
A good slouchy beanie is a staple in any cozy cold weather wardrobe. And I don’t know about you, but I am so ready for a little cold weather!

The snow can hold off for a while as far as I’m concerned, but bring on the crisp fall air and the fireplaces and apple cider and changing leaves. Fall in Michigan is short-lived but absolutely stunning!

To complete the set, I made matching cowl. Click here to view the pattern for the Cabin Fever Cowl!
About the Yarn
For this pattern set, I used a yarn that I acquired during our family vacation to the Great Smoky Mountains this summer. I have always wanted to visit an A.C. Moore store, but I live several hours from the nearest one… so when our road trip took us right through Cincinnati, we made a quick stop – literally, I basically ran to the yarn aisle and went straight for Stitch Studio By Nicole’s Earthtone, grabbed a bunch of them, and hurried up to checkout. (When you have a travel-weary toddler waiting for you in the van, you don’t get to take your time!)
I’ve seen several of you using Earthtone for my patterns throughout the years, and always wanted to get my hands on some. I absolutely love it. It’s soft and the colors are rich and beautiful and the tweediness adds so much character. A good tweed gives acrylic projects a much more natural look, and it’s also very forgiving. I can hardly even tell where my seam is from the outside!
(Edited 10/20/20 to add: This yarn is now discontinued. There are so many beautiful aran weight yarns available in stores, though, so no worries… just use your favorite one!)
VIDEO TUTORIAL
I’ve put together a step-by-step video tutorial for you visual learners! The instructions for the pattern are written right on the screen, so you can follow along visually while also developing your pattern-reading skills. It’s a feature I’ve gotten lots of compliments for on my videos, so it’s definitely worth the extra effort it takes to include it!
ABOUT THOSE CUTE LEATHER TAGS
Those adorable tags on my sample hats aren’t actually leather at all – they’re cork! I had mine printed by All This Wood (affiliate link). They always do a great job for me. If you purchase tags of your own through this link, you won’t pay any extra, but I’ll get a small percentage of the sale. My affiliate links are just one of the ways I am able to keep releasing free patterns, so I am always incredibly appreciative of anyone who uses them!

Prefer a PDF?
This pattern can be completed using the 100% free version right here on this page. However, many people prefer the convenience of a printable, ad-free PDF.
All-Access Passholders get the ad-free version of this and all of my other blog patterns. It’s a pretty sweet deal, if I do say so myself! Learn more about it here or continuing scrolling for the free version.
CABIN FEVER SLOUCH
Difficulty: Easy
Finished Size: 9″ tall x 9.75″ wide, when laid flat
Hook: H (5.0mm)
Yarn: Approx. 200 yards of #4 aran weight. You will need about 125 yards of COLOR A and 75 yards of COLOR B. Yarn used in sample photos is Stitch Studio By Nicole’s Earthtones, previously found at A.C. Moore stores (now discontinued).
Gauge: First 5 rounds = 4″ across
You’ll also need: Yarn needle, fur pom (optional)
Terms and Abbreviations:
MC (magic circle – view tutorial here)
ST/STS (stitch/stitches)
SL ST (slip stitch)
CH (chain)
HDC (half double crochet)
3rd LOOP (work stitch into 3rd loop only – see “Special Stitch”)
Special Stitch:
3rd Loop Only
Half double crochet stitches have a 3rd loop that we utilize in this pattern. When working in turned rows, as in this pattern, the 3rd loop can be found just below the front loop on the side of the work that is facing you. (When you work the band of the hat, it will be behind the back loop.) When instructed to work in “3rd loop only”, insert your hook into this special loop. This creates a delicate braided look on the opposite side of the pattern.
Notes:
(1) This pattern is written in American Standard Terms.
(2) CH1s at the beginning of rows do not count as a stitch in the final stitch count.
(3) When instructed to “join”, always join with a slip stitch to the first stitch of the round.
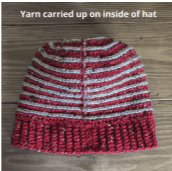
(4) Instead of fastening off at each color change, you will be carrying your yarn up the seam on the inside of the hat. Instructions for how to do this are written into the pattern.
INSTRUCTIONS
To begin: With COLOR A, make a magic circle, CH1.
Round 1: 10 HDC in MC, join. (10)
Round 2: Attach COLOR B (do not fasten off COLOR A); CH1, turn. In 3rd loops, 2 HDC in each ST around. Join, making sure working tail from COLOR A is in front of the join stitch. (20)
Round 3: Switch to COLOR A; CH1, turn. In 3rd loops throughout, 2 HDC in first ST, HDC in next ST, (2 HDC in next ST, HDC in next ST) around. Join, making sure working tail from COLOR B is behind the join stitch. (30)
From this point on, every time you join, be sure that the yarn is always carried up on the same side of the fabric.
Round 4: Switch to COLOR B; CH1, turn. In 3rd loops throughout, 2 HDC in first ST, HDC in each of the next 2 STS, (2 HDC in next ST, HDC in each of the next 2 STS) around. Join. (40)
Round 5: Switch to COLOR A; CH1, turn. In 3rd loops throughout, 2 HDC in first ST, HDC in each of the next 3 STS, (2 HDC in next ST, HDC in each of the next 3 STS) around. Join. (50)
Round 6: Switch to COLOR B; CH1, turn. In 3rd loops throughout, 2 HDC in first ST, HDC in each of the next 4 STS, (2 HDC in next ST, HDC in each of the next 4 STS) around. Join. (60)
Round 7: Switch to COLOR A; CH1, turn. In 3rd loops throughout, 2 HDC in first ST, HDC in each of the next 5 STS, (2 HDC in next ST, HDC in each of the next 5 STS) around. Join. (70)
Round 8: Switch to COLOR B; CH1, turn. In 3rd loops throughout, 2 HDC in first ST, HDC in each of the next 6 STS, (2 HDC in next ST, HDC in each of the next 6 STS) around. Join. (80)
Round 9: Switch to COLOR A; CH1, turn. In 3rd loops, HDC in each ST around. Join. (80)
Round 10: Switch to COLOR B; CH1, turn. In 3rd loops, HDC in each ST around. Join. (80)
Round 11: Switch to COLOR A; CH1, turn. In 3rd loops, HDC in each ST around. Join. (80)
Rounds 12-23: Repeat Rounds 10-11.
– – – – – –
Next we’re going to make the band of the hat, and we will be working in vertical rows, attaching it to Round 23 (the final round of the hat) with SL STS as we go.
– – – – – –
Row 1: CH9. SC in 2nd chain from hook and in each of the remaining 7 chains. SL ST into the 3rd loop (now found behind the top loops since we didn’t turn our work) of the first HDC from Round 23, the stitch on which your CH9 was built. SL ST into the 3rd loop of the next HDC from Round 23. (8, plus the two slip stitches along Round 23)
The section we just created, built on the CH9, will hereafter be referred to as the “ribbing.”
Row 2: CH1, turn. Skipping over the 2 SL STS you put in Round 23, SC in BLO of each of the first 7 STS of the ribbing. SC in both loops of the last ST. (8)
Row 3: CH1, turn. SC in 1st ST. SC in BLO of each of the remaining 7 STS of the ribbing. SL ST in 3rd loop of each of the next 2 STS of Round 23. (8, plus the 2 SL STS along Round 23)
Row 4: CH1, turn. Skipping over the 2 SL STS you put in Round 23, SC in BLO of each of the first 7 STS of the ribbing. SC in both loops of the last ST. (8)
Rows 5-80: Repeat Rows 3-4 all the way along Round 23.
Fasten off and use your tail to sew together the gap between the first and last rows of the ribbing, then weave in your ends.
– – – – – – – – – –
Done! If you’re sharing on social media, be sure to hashtag #cabinfeverslouch and tag me @yarnandchai.design. Hope you enjoyed it!

