

Can I just say… I AM SO HAPPY that cooler weather has arrived!
Being a Michigan girl, we always hear about “seasonal affective disorder” — in other words, living in a state where the sun is hidden by clouds for 5-6 months out of the year can seriously alter your mood in a bad way. But me? At least for the first few months of the fall/winter journey, I come alive.
You can keep your 95 degree days, summer. I’m a sweater-and-fuzzy-socks kind of girl.
So is my model, who is rocking the Harvest Cardigan with jeans and boots.

So if you’re like me, and have already traded your summer clothes for cozier ones, you’re definitely going to want to make this cardigan for yourself.
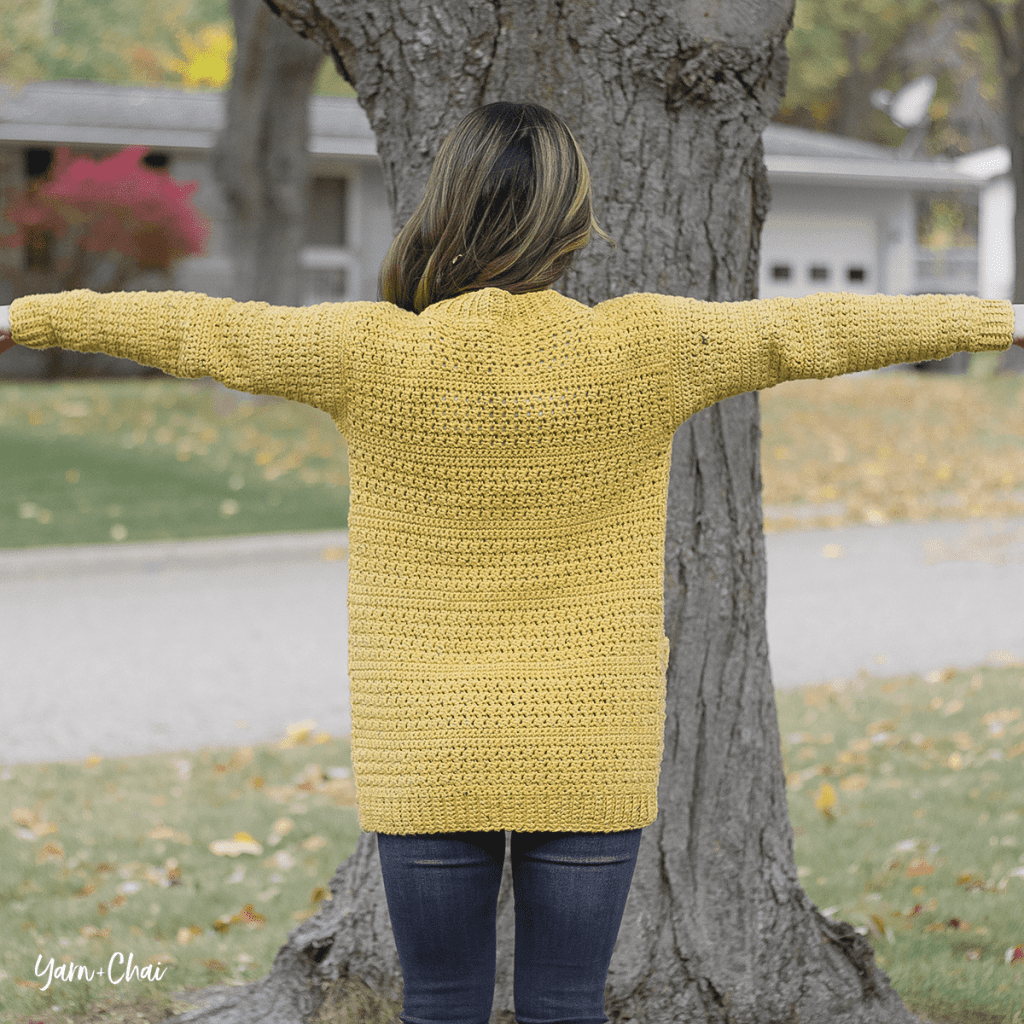
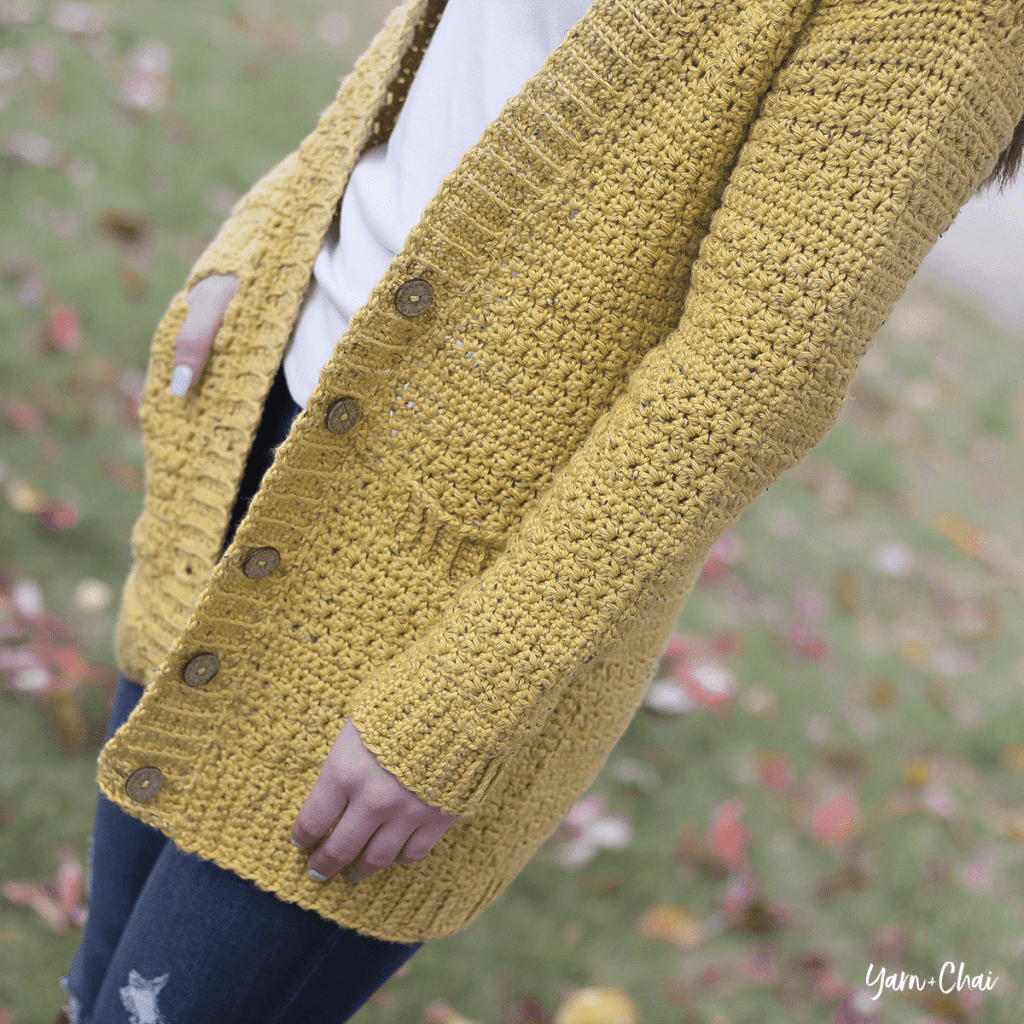
If you’ve never crocheted invisible pockets (pockets that don’t have a visible seam on the outside of the garment), I’ll teach you how! I even added some cute ribbing to the top of them. Subtle yet stylish.
About the Yarn
For this pattern I used Tweed Indeed, a new yarn from Yarn Bee, in “Golden Tweed.” As soon as I started working with it, I knew that Tweed Indeed would become one of my favorite yarns.
A mix of Acetate (46%), Cotton (46%), Viscose (6%), and Polyester (2%), this yarn feels incredible against the skin. It ran through my hands and my hook just like a quality 100% cotton, but the resulting fabric is especially soft and squishy, and the fibers fill the space between stitches better than any cotton I’ve used. And the tweed! I’ve never been able to find a tweed cotton that I liked until now. I sincerely hope that they expand the line because I can imagine this yarn in so many rich colors. (And don’t let that acetate scare you off! Acetate is a man-made fiber derived from cellulose obtained from wood pulp – a renewable resource that decomposes over time. It’s soft and silky, environmentally friendly, and has no relation to acetone.)
If you want to use the same yarn I did, you’re probably going to want to order it online. Hobby Lobby stores don’t tend to carry yarns in large quantities, but their warehouse does understand the importance of matching dye lots, so you don’t have to worry about getting a mixed bag!
Possible Substitutes
If you want to use a different yarn, here are a few options I thought of (but always do a gauge check!):
- Superwash 220 | Cascade Yarns
- Basic Stitch (Anti-Pilling or Premium) | Lion Brand
- Feels Like Butta | Lion Brand
- Jeans | Lion Brand
- ZZ Twist | Lion Brand
- I Love This Cotton | Yarn Bee
- Rustic Romantic | Yarn Bee
- Red Heart Soft | Red Heart
- Chic Sheep by Marly Bird | Red Heart
- Premier Everyday Anti-Pilling Worsted | Yarnspirations
– – – – – – – – – – – – – – –
Prefer a PDF?
This pattern can be completed using the 100% free version right here on this page. However, many people prefer the convenience of a printable, ad-free PDF.
All-Access Passholders get the ad-free version of this and all of my other blog patterns. It’s a pretty sweet deal, if I do say so myself! Learn more about it here or continuing scrolling for the free version.
– – – – – – – – – – – – – – –
Harvest Cardigan
View on Ravelry
Difficulty: Intermediate
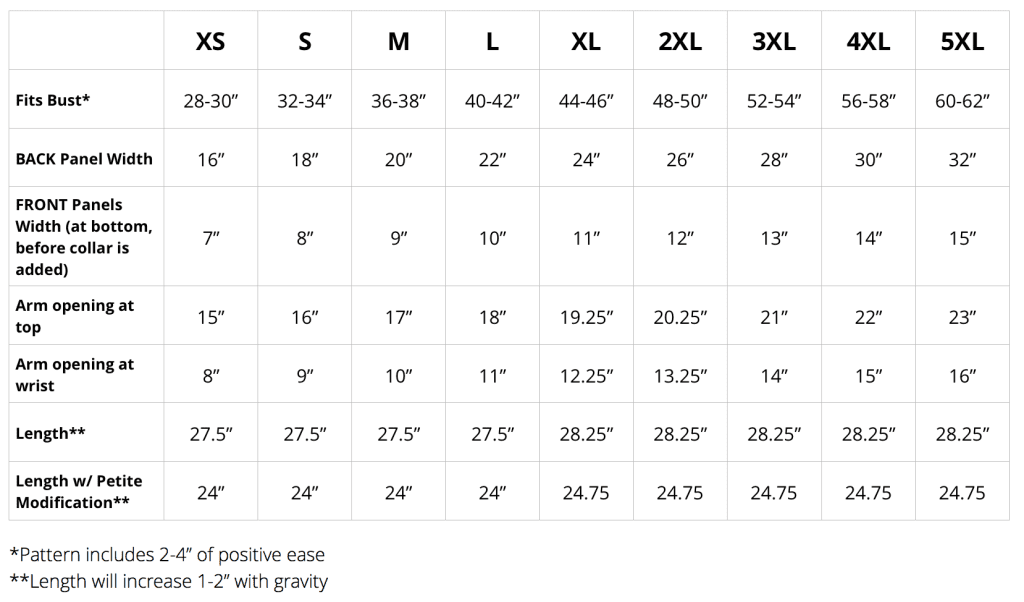
Finished Size: Pattern is written for sizes XS – 5XL, with an optional petite modification for length (see chart for specific measurements). It has a slender classic fit, with 2-4″ positive ease. To achieve the intended fit, choose the size that matches your actual bust measurement in the first row of the chart. If you are between sizes, or desire a more oversized fit, you can size up.
Yarn: You’ll need a soft #4 worsted weight yarn. I used Yarn Bee’s Tweed Indeed in the color “Golden Tweed.” Tweed Indeed is a blend of acetate, cotton, viscose and polyester. For a cotton yarn, it has an especially cozy vibe, but this sweater can easily be created with an acrylic or a wool, too. Please refer to the chart to determine how much you’ll need:

Hook: 5.5mm (I), or whichever hook you need to get an accurate gauge check.
Gauge: 15 SC x 20 rows = 4”
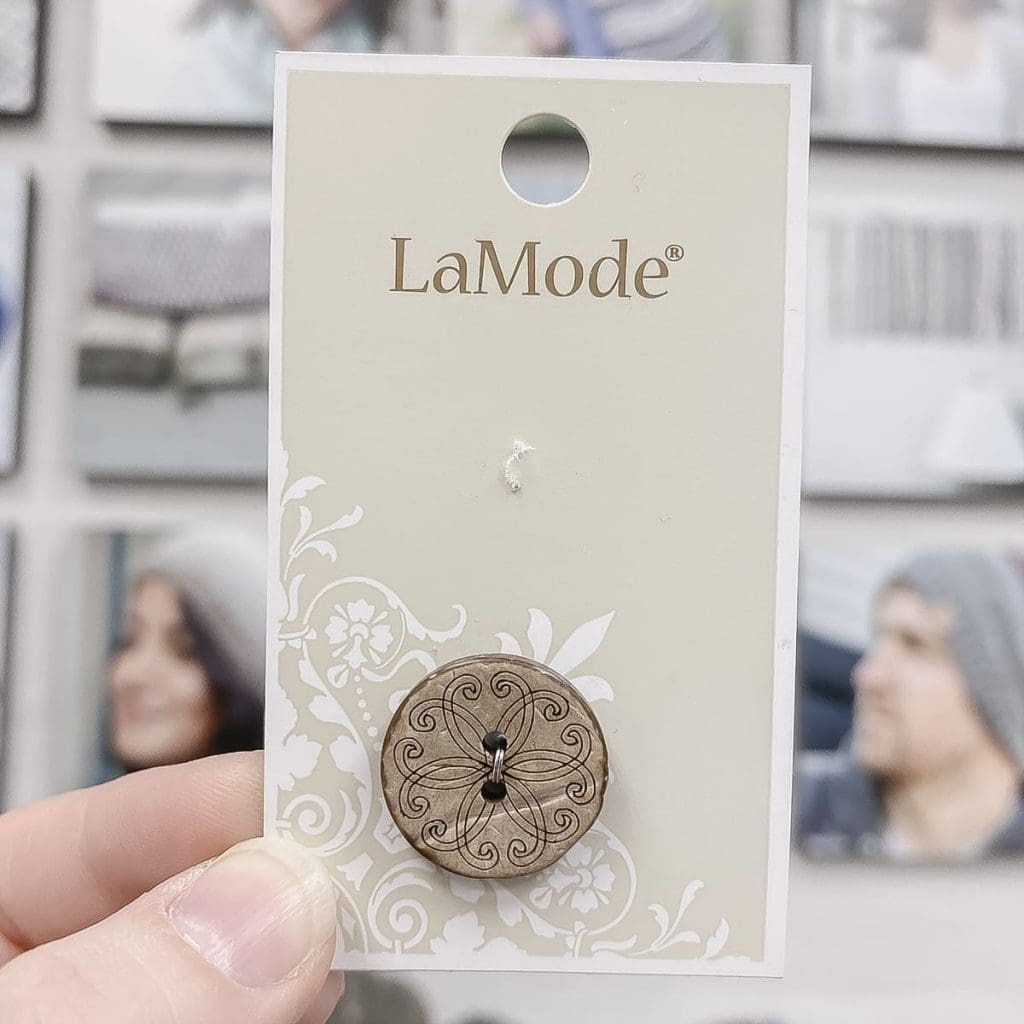
You’ll Also Need: 3/4″ (19mm) buttons. I recommend 5-7 buttons for regular sizes, and 5 for petite sizes. For my sample, I used LaMode #02706 (from Joann Fabrics).
Terms and Abbreviations:
ST/STS (stitch/stitches)
SL ST (slip stitch)
SK (skip)
CH (chain)
SC (single crochet)
HDC (half double crochet)
SC+HDC (SC and HDC in the same ST)
BLO (back loop only)
SC2TOG (single crochet 2 together, or SC Decrease)
Notes:
(1) This pattern is written in American Standard Terms.
(2) Pattern is written for sizes XS-5XL, with counts for sizes S-5XL written in parentheses. Example: XS (S, M, L, XL, 2XL, 3XL, 4XL, 5XL). If only one number is given, it applies to all sizes.
(3) CH1 at the beginning of rows does not count as a stitch.
Important Information About Sizing:
As I’ve come to learn, designing garment patterns for a large and varied audience is a tricky business. It’s one thing when we can go into a store and try on a top, and instantly know if it falls where we want it to in terms of length; it’s totally another thing to make that top ourselves, only basing its finished silhouette on the images the designer provides. Standard sizing is based on averages, but within those guidelines, there is so much variation; the same cardigan will look very different on a 5’10 woman than it will on a 5’0 woman, even if they are both, for instance, size mediums.
So to help a bit with this, I’ve written this pattern based on the standard measurements provided by the Craft Yarn Council, but I’ve also included recommendations within the pattern for a petite modification, mainly because my model is very petite at just 4’9. In the pattern photos, she is wearing size XS, with a petite modification. The petite modification removes 3.25″ from the overall length. (Of course, this is all assuming you’ve done an accurate gauge check.)

– – – – – – – – – – – – – – –
Instructions
– – – – – – – – – – – –
BACK PANEL
– – – – – – – – – – – –
To Begin: CH9.
Ribbing Row 1: SC in 2nd CH from hook and in each remaining CH.
Stitch count: 8
Ribbing Rows 2-60 (68, 74, 82, 90, 98, 104, 112, 120): CH1, turn. SC in first ST, SC in BLO of each of the next 6 STS, SC in final ST.
Stitch count: 8
We’re now going to begin working down the long edge of the ribbing. Our row count will restart at 1.
Row 1: CH1, do not turn. SC down the long edge of the ribbing, putting 1SC in each row end.
Stitch count: 60 (68, 74, 82, 90, 98, 104, 112, 120)
Rows 2-8: CH1, turn. HDC in first ST. (SK next ST, SC+HDC in next ST) across until 1 ST remains. SC in final ST.
Stitch count: 60 (68, 74, 82, 90, 98, 104, 112, 120)
Rows 9-12: CH1, turn. SC in each ST across.
Stitch count: 60 (68, 74, 82, 90, 98, 104, 112, 120)
Rows 13-20: CH1, turn. HDC in first ST. (SK next ST, SC+HDC in next ST) across until 1 ST remains. SC in final ST.
Stitch count: 60 (68, 74, 82, 90, 98, 104, 112, 120)
Rows 21-92: Repeat Rows 9-20, in order, 6 more times. (For PETITE MODIFICATION, repeat only 5 more times, then proceed to next instruction.)
Row 93: CH1, turn. SC in each ST across.
Stitch count: 60 (68, 74, 82, 90, 98, 104, 112, 120)
Sizes XS, S, M, L ONLY: Fasten off and weave in ends, then proceed to “POCKETS”.
Rows 94-96 (Sizes XL-5XL ONLY): Repeat Row 93. Fasten off and weave in all ends.
– – – – – – – – – – – –
POCKETS (Make 2)
– – – – – – – – – – – –
To begin: CH19 (19, 19, 21, 21, 21, 23, 23, 23).
Row 1: SC in 2nd CH from hook and in each ST across.
Stitch count: 18 (18, 18, 20, 20, 20, 22, 22, 22)
Rows 2-22: CH1, turn. SC in each ST across.
Stitch count: 18 (18, 18, 20, 20, 20, 22, 22, 22)
Fasten off and weave in ends. Have pockets ready for Front Panels.
– – – – – – – – – – – –
FRONT PANEL – RIGHT SIDE
– – – – – – – – – – – –
To Begin: CH9.
Ribbing Row 1: SC in 2nd CH from hook and in each remaining CH.
Stitch count: 8
Ribbing Rows 2-26 (30, 34, 38, 42, 46, 50, 52, 56): CH1, turn. SC in first ST, SC in BLO of each of the next 6 STS, SC in final ST.
Stitch count: 8
We’re now going to begin working down the long edge of the ribbing. Our row count will restart at 1.
Row 1: CH1, do not turn. SC down the long edge of the ribbing, putting 1SC in each row end.
Stitch count: 26 (30, 34, 38, 42, 46, 50, 52, 56)
Rows 2-8: CH1, turn. HDC in first ST. (SK next ST, SC+HDC in next ST) across until 1 ST remains. SC in final ST.
Stitch count: 26 (30, 34, 38, 42, 46, 50, 52, 56)
Rows 9-12: CH1, turn. SC in each ST across.
Stitch count: 26 (30, 34, 38, 42, 46, 50, 52, 56)
Rows 13-20: CH1, turn. HDC in first ST. (SK next ST, SC+HDC in next ST) across until 1 ST remains. SC in final ST.
Stitch count: 26 (30, 34, 38, 42, 46, 50, 52, 56)
Row 21: CH1, turn. SC in each ST across.
Stitch count: 26 (30, 34, 38, 42, 46, 50, 52, 56)
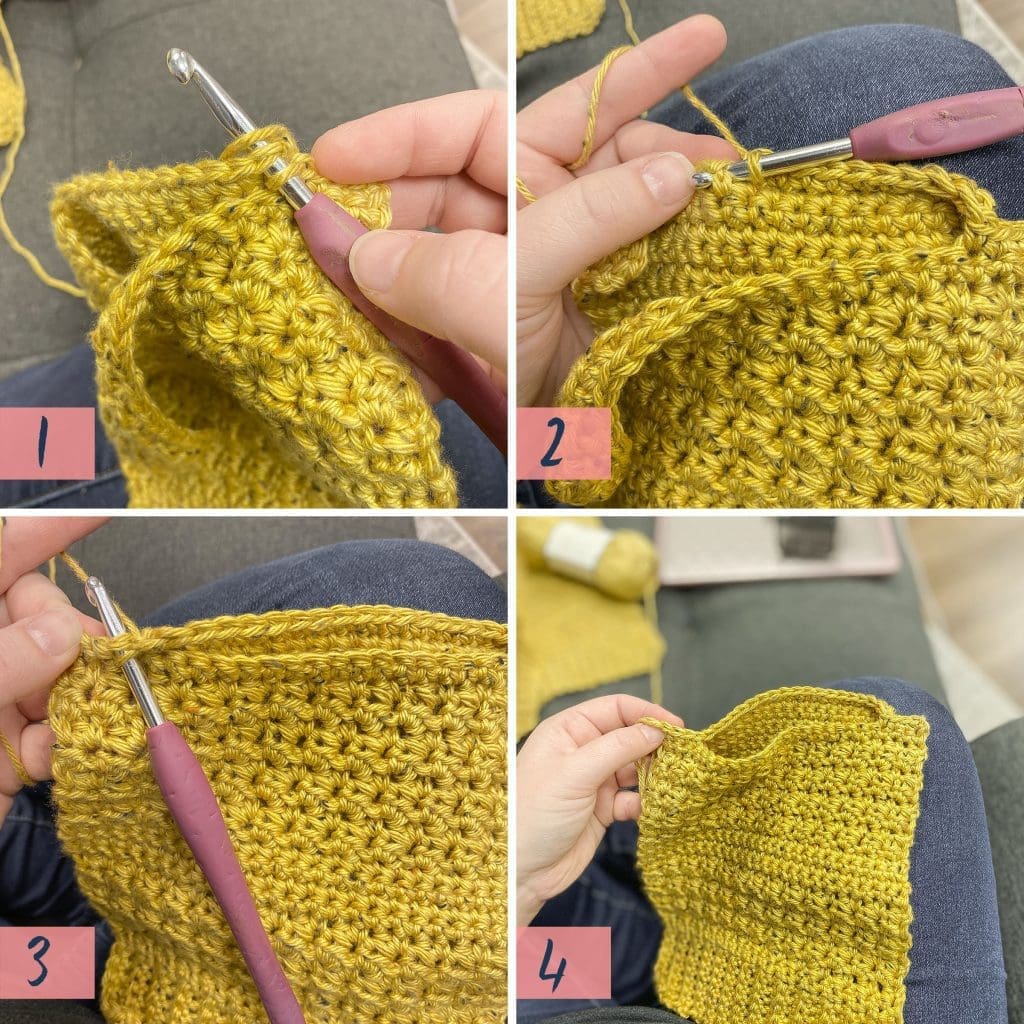
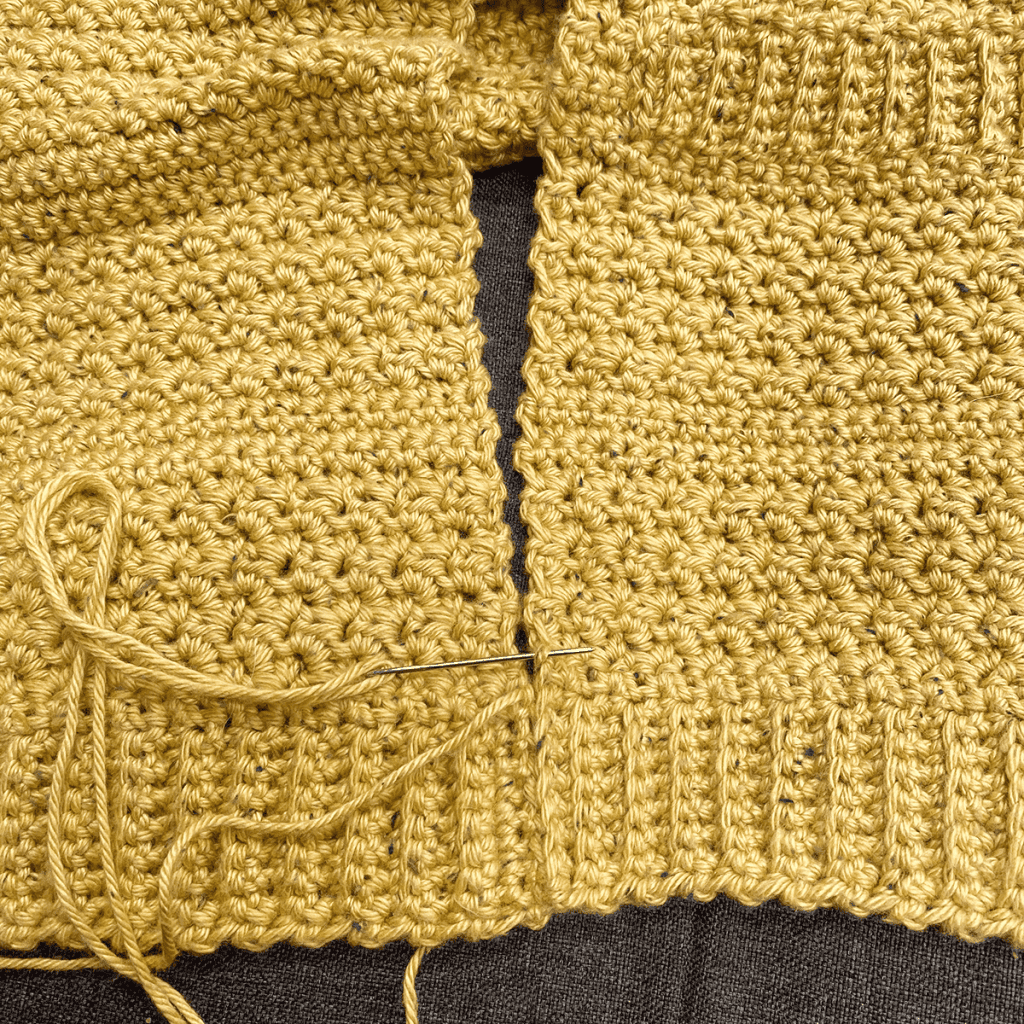
Row 22: Have finished pocket ready. CH1, turn. SC in each of the first 4 (8, 12, 14, 18, 22, 24, 26, 30) STS. Hold pocket behind panel and line up the top right corner with your next available stitch (photo 1). Continue SCing across, inserting hook into top loops of pocket instead of top loops of panel (photo 2). When you have SC’d into each ST across the top of the pocket, SC in each of the remaining 4 STS of the panel (photo 3). Photo 4 shows completed row.
Stitch count: 26 (30, 34, 38, 42, 46, 50, 52, 56)
Rows 23-24: CH1, turn. SC in each ST across.
Stitch count: 26 (30, 34, 38, 42, 46, 50, 52, 56)
Rows 25-32: CH1, turn. HDC in first ST. (SK next ST, SC+HDC in next ST) across until 1 ST remains. SC in final ST.
Stitch count: 26 (30, 34, 38, 42, 46, 50, 52, 56)
Rows 33-36: CH1, turn. SC in each ST across.
Stitch count: 26 (30, 34, 38, 42, 46, 50, 52, 56)
Rows 37-48: Repeat Rows 25-36, in order, 1 more time. (For PETITE MODIFICATION, DO NOT do Rows 37-48; proceed immediately to Row 49 instructions.)
Row 49 (Decrease Row): CH1, turn. HDC in first ST. (SK next ST, SC+HDC in next ST) across until 3 STS remain. SK next ST, SC in each of the final 2 STS.
Stitch count: 25 (29, 33, 37, 41, 45, 49, 51, 55)
Row 50: CH1, turn. HDC in each of the first 2 STS. (SK next ST, SC+HDC in next ST) across until 1 ST remains. SC in final ST.
Stitch count: 25 (29, 33, 37, 41, 45, 49, 51, 55)
Row 51: CH1, turn. HDC in first ST. (SK next ST, SC+HDC in next ST) across until 2 STS remain. SC in each of the final 2 STS.
Stitch count: 25 (29, 33, 37, 41, 45, 49, 51, 55)
Row 52: CH1, turn. HDC in each of the first 2 STS. (SK next ST, SC+HDC in next ST) across until 1 ST remains. SC in final ST.
Stitch count: 25 (29, 33, 37, 41, 45, 49, 51, 55)
Row 53 (Decrease Row): CH1, turn. HDC in first ST. (SK next ST, SC+HDC in next ST) across until 2 STS remain. SK next ST, SC in final ST.
Stitch count: 24 (28, 32, 36, 40, 44, 48, 50, 54)
Rows 54-56: CH1, turn. HDC in first ST. (SK next ST, SC+HDC in next ST) across until 1 ST remains. SC in final ST.
Stitch count: 24 (28, 32, 36, 40, 44, 48, 50, 54)
Row 57 (Decrease Row): CH1, turn. SC across until 2 STS remain; SC2TOG final 2 STS.
Stitch count: 23 (27, 31, 35, 39, 43, 47, 49, 53)
Rows 58-60: CH1, turn. SC in each ST across.
Stitch count: 23 (27, 31, 35, 39, 43, 47, 49, 53)
Row 61 (Decrease Row): CH1, turn. HDC in first ST. (SK next ST, SC+HDC in next ST) across until 2 STS remain. SK next ST, SC in final ST.
Stitch count: 22 (26, 30, 34, 38, 42, 46, 48, 52)
Rows 62-64: CH1, turn. HDC in first ST. (SK next ST, SC+HDC in next ST) across until 1 ST remains. SC in final ST.
Stitch count: 22 (26, 30, 34, 38, 42, 46, 48, 52)
Row 65 (Decrease Row): CH1, turn. HDC in first ST. (SK next ST, SC+HDC in next ST) across until 3 STS remain. SK next ST, SC in each of the final 2 STS.
Stitch count: 21 (25, 29, 33, 37, 41, 45, 47, 51)
Row 66: CH1, turn. HDC in each of the first 2 STS. (SK next ST, SC+HDC in next ST) across until 1 ST remains. SC in final ST.
Stitch count: 21 (25, 29, 33, 37, 41, 45, 47, 51)
Row 67: CH1, turn. HDC in first ST. (SK next ST, SC+HDC in next ST) across until 2 STS remain. SC in each of the final 2 STS.
Stitch count: 21 (25, 29, 33, 37, 41, 45, 47, 51)
Row 68: CH1, turn. HDC in each of the first 2 STS. (SK next ST, SC+HDC in next ST) across until 1 ST remains. SC in final ST.
Stitch count: 21 (25, 29, 33, 37, 41, 45, 47, 51)
Row 69 (Decrease Row): CH1, turn. SC across until 2 STS remain; SC2TOG final 2 STS.
Stitch count: 20 (24, 28, 32, 36, 40, 44, 46, 50)
Rows 70-72: CH1, turn. SC in each ST across.
Stitch count: 20 (24, 28, 32, 36, 40, 44, 46, 50)
Row 73 (Decrease Row): CH1, turn. HDC in first ST. (SK next ST, SC+HDC in next ST) across until 3 STS remain. SK next ST, SC in each of the final 2 STS.
Stitch count: 19 (23, 27, 31, 35, 39, 43, 45, 49)
Row 74: CH1, turn. HDC in each of the first 2 STS. (SK next ST, SC+HDC in next ST) across until 1 ST remains. SC in final ST.
Stitch count: 19 (23, 27, 31, 35, 39, 43, 45, 49)
Row 75: CH1, turn. HDC in first ST. (SK next ST, SC+HDC in next ST) across until 2 STS remain. SC in each of the final 2 STS.
Stitch count: 19 (23, 27, 31, 35, 39, 43, 45, 49)
Row 76: CH1, turn. HDC in each of the first 2 STS. (SK next ST, SC+HDC in next ST) across until 1 ST remains. SC in final ST.
Stitch count: 19 (23, 27, 31, 35, 39, 43, 45, 49)
Row 77 (Decrease Row): CH1, turn. HDC in first ST. (SK next ST, SC+HDC in next ST) across until 2 STS remain. SK next ST, SC in final ST.
Stitch count: 18 (22, 26, 30, 34, 38, 42, 44, 48)
Rows 78-80: CH1, turn. HDC in first ST. (SK next ST, SC+HDC in next ST) across until 1 ST remains. SC in final ST.
Stitch count: 18 (22, 26, 30, 34, 38, 42, 44, 48)
Row 81 (Decrease Row): CH1, turn. SC across until 2 STS remain; SC2TOG final 2 STS.
Stitch count: 17 (21, 25, 29, 33, 37, 41, 43, 47)
Rows 82-84: CH1, turn. SC in each ST across.
Stitch count: 17 (21, 25, 29, 33, 37, 41, 43, 47)
Row 85 (Decrease Row): CH1, turn. HDC in first ST. (SK next ST, SC+HDC in next ST) across until 2 STS remain. SK next ST, SC in final ST.
Stitch count: 16 (20, 24, 28, 32, 36, 40, 42, 46)
Rows 86-88: CH1, turn. HDC in first ST. (SK next ST, SC+HDC in next ST) across until 1 ST remains. SC in final ST.
Stitch count: 16 (20, 24, 28, 32, 36, 40, 42, 46)
Row 89 (Decrease Row): CH1, turn. HDC in first ST. (SK next ST, SC+HDC in next ST) across until 3 STS remain. SK next ST, SC in each of the final 2 STS.
Stitch count: 15 (19, 23, 27, 31, 35, 39, 41, 45)
Row 90: CH1, turn. HDC in each of the first 2 STS. (SK next ST, SC+HDC in next ST) across until 1 ST remains. SC in final ST.
Stitch count: 15 (19, 23, 27, 31, 35, 39, 41, 45)
Row 91: CH1, turn. HDC in first ST. (SK next ST, SC+HDC in next ST) across until 2 STS remain. SC in each of the final 2 STS.
Stitch count: 15 (19, 23, 27, 31, 35, 39, 41, 45)
Row 92: CH1, turn. HDC in each of the first 2 STS. (SK next ST, SC+HDC in next ST) across until 1 ST remains. SC in final ST.
Stitch count: 15 (19, 23, 27, 31, 35, 39, 41, 45)
Row 93: CH1, turn. SC in each ST across.
Stitch count: 15 (19, 23, 27, 31, 35, 39, 41, 45)
Sizes XS, S, M, L ONLY: Fasten off and weave in ends.
Rows 94-96 (Sizes XL-5XL ONLY): Repeat Row 93. Fasten off and weave in all ends.
– – – – – – – – – – – –
FRONT PANEL – LEFT SIDE
– – – – – – – – – – – –
To Begin: Follow instructions for FRONT PANEL – RIGHT SIDE through Row 21, then proceed with the following instructions.
Row 22: Have finished pocket ready. CH1, turn. SC in each of the first 4 STS. Hold pocket behind panel and line up the top right corner with your next available stitch. Continue SCing across, inserting hook into top loops of pocket instead of top loops of panel. When you have SC’d into each ST across the top of the pocket, SC in each of the remaining 4 (8, 12, 14, 18, 22, 24, 26, 30) STS of the panel.
Stitch count: 26 (30, 34, 38, 42, 46, 50, 52, 56)
Rows 23-24: CH1, turn. SC in each ST across.
Stitch count: 26 (30, 34, 38, 42, 46, 50, 52, 56)
Rows 25-32: CH1, turn. HDC in first ST. (SK next ST, SC+HDC in next ST) across until 1 ST remains. SC in final ST.
Stitch count: 26 (30, 34, 38, 42, 46, 50, 52, 56)
Rows 33-36: CH1, turn. SC in each ST across.
Stitch count: 26 (30, 34, 38, 42, 46, 50, 52, 56)
Rows 37-48: Repeat Rows 25-36, in order, 1 more time. (For PETITE MODIFICATION, DO NOT do Rows 37-48; proceed immediately to Row 49 instructions.)
Row 49 (Decrease Row): CH1, turn. SK first ST, SC in next ST, HDC in next ST. (SK next ST, SC+HDC in next ST) across until 1 ST remains. SC in final ST.
Stitch count: 25 (29, 33, 37, 41, 45, 49, 51, 55)
Row 50: CH1, turn. HDC in first ST. (SK next ST, SC+HDC in next ST) across until 2 STS remain. SC in each of the remaining 2 STS.
Stitch count: 25 (29, 33, 37, 41, 45, 49, 51, 55)
Row 51: CH1, turn. SC in first ST, HDC in next ST. (SK next ST, SC+HDC in next ST) across until 1 ST remains. SC in final ST.
Stitch count: 25 (29, 33, 37, 41, 45, 49, 51, 55)
Row 52: CH1, turn. HDC in first ST. (SK next ST, SC+HDC in next ST) across until 2 STS remain. SC in each of the remaining 2 STS.
Stitch count: 25 (29, 33, 37, 41, 45, 49, 51, 55)
Row 53 (Decrease Row): CH1, turn. SK first ST, HDC in next ST. (SK next ST, SC+HDC in next ST) across until 1 ST remains. SC in final ST.
Stitch count: 24 (28, 32, 36, 40, 44, 48, 50, 54)
Rows 54-56: CH1, turn. HDC in first ST. (SK next ST, SC+HDC in next ST) across until 1 ST remains. SC in final ST.
Stitch count: 24 (28, 32, 36, 40, 44, 48, 50, 54)
Row 57 (Decrease Row): CH1, turn. SC2TOG. SC in each remaining ST.
Stitch count: 23 (27, 31, 35, 39, 43, 47, 49, 53)
Rows 58-60: CH1, turn. SC in each ST across.
Stitch count: 23 (27, 31, 35, 39, 43, 47, 49, 53)
Row 61 (Decrease Row): CH1, turn. SK first ST, HDC in next ST. (SK next ST, SC+HDC in next ST) across until 1 ST remains. SC in final ST.
Stitch count: 22 (26, 30, 34, 38, 42, 46, 48, 52)
Rows 62-64: CH1, turn. HDC in first ST. (SK next ST, SC+HDC in next ST) across until 1 ST remains. SC in final ST.
Stitch count: 22 (26, 30, 34, 38, 42, 46, 48, 52)
Row 65 (Decrease Row): CH1, turn. SK first ST, SC in next ST, HDC in next ST. (SK next ST, SC+HDC in next ST) across until 1 ST remains. SC in final ST.
Stitch count: 21 (25, 29, 33, 37, 41, 45, 47, 51)
Row 66: CH1, turn. HDC in first ST. (SK next ST, SC+HDC in next ST) across until 2 STS remain. SC in each of the remaining 2 STS.
Stitch count: 21 (25, 29, 33, 37, 41, 45, 47, 51)
Row 67: CH1, turn. SC in first ST, HDC in next ST. (SK next ST, SC+HDC in next ST) across until 1 ST remains. SC in final ST.
Stitch count: 21 (25, 29, 33, 37, 41, 45, 47, 51)
Row 68: CH1, turn. HDC in first ST. (SK next ST, SC+HDC in next ST) across until 2 STS remain. SC in each of the remaining 2 STS.
Stitch count: 21 (25, 29, 33, 37, 41, 45, 47, 51)
Row 69 (Decrease Row): CH1, turn. SC2TOG. SC in each remaining ST.
Stitch count: 20 (24, 28, 32, 36, 40, 44, 46, 50)
Rows 70-72: CH1, turn. SC in each ST across.
Stitch count: 20 (24, 28, 32, 36, 40, 44, 46, 50)
Row 73 (Decrease Row): CH1, turn. SK first ST, SC in next ST, HDC in next ST. (SK next ST, SC+HDC in next ST) across until 1 ST remains. SC in final ST.
Stitch count: 19 (23, 27, 31, 35, 39, 43, 45, 49)
Row 74: CH1, turn. HDC in first ST. (SK next ST, SC+HDC in next ST) across until 2 STS remain. SC in each of the remaining 2 STS.
Stitch count: 19 (23, 27, 31, 35, 39, 43, 45, 49)
Row 75: CH1, turn. SC in first ST, HDC in next ST. (SK next ST, SC+HDC in next ST) across until 1 ST remains. SC in final ST.
Stitch count: 19 (23, 27, 31, 35, 39, 43, 45, 49)
Row 76: CH1, turn. HDC in first ST. (SK next ST, SC+HDC in next ST) across until 2 STS remain. SC in each of the remaining 2 STS.
Stitch count: 19 (23, 27, 31, 35, 39, 43, 45, 49)
Row 77 (Decrease Row): CH1, turn. SK first ST, HDC in next ST. (SK next ST, SC+HDC in next ST) across until 1 ST remains. SC in final ST.
Stitch count: 18 (22, 26, 30, 34, 38, 42, 44, 48)
Rows 78-80: CH1, turn. HDC in first ST. (SK next ST, SC+HDC in next ST) across until 1 ST remains. SC in final ST.
Stitch count: 18 (22, 26, 30, 34, 38, 42, 44, 48)
Row 81 (Decrease Row): CH1, turn. SC2TOG. SC in each remaining ST.
Stitch count: 17 (21, 25, 29, 33, 37, 41, 43, 47)
Rows 82-84: CH1, turn. SC in each ST across.
Stitch count: 17 (21, 25, 29, 33, 37, 41, 43, 47)
Row 85 (Decrease Row): CH1, turn. SK first ST, HDC in next ST. (SK next ST, SC+HDC in next ST) across until 1 ST remains. SC in final ST.
Stitch count: 16 (20, 24, 28, 32, 36, 40, 42, 46)
Rows 86-88: CH1, turn. HDC in first ST. (SK next ST, SC+HDC in next ST) across until 1 ST remains. SC in final ST.
Stitch count: 16 (20, 24, 28, 32, 36, 40, 42, 46)
Row 89 (Decrease Row): CH1, turn. SK first ST, SC in next ST, HDC in next ST. (SK next ST, SC+HDC in next ST) across until 1 ST remains. SC in final ST.
Stitch count: 15 (19, 23, 27, 31, 35, 39, 41, 45)
Row 90: CH1, turn. HDC in first ST. (SK next ST, SC+HDC in next ST) across until 2 STS remain. SC in each of the remaining 2 STS.
Stitch count: 15 (19, 23, 27, 31, 35, 39, 41, 45)
Row 91: CH1, turn. SC in first ST, HDC in next ST. (SK next ST, SC+HDC in next ST) across until 1 ST remains. SC in final ST.
Stitch count: 15 (19, 23, 27, 31, 35, 39, 41, 45)
Row 92: CH1, turn. HDC in first ST. (SK next ST, SC+HDC in next ST) across until 2 STS remain. SC in each of the remaining 2 STS.
Stitch count: 15 (19, 23, 27, 31, 35, 39, 41, 45)
Row 93: CH1, turn. SC in each ST across.
Stitch count: 15 (19, 23, 27, 31, 35, 39, 41, 45)
Sizes XS, S, M, L ONLY: Fasten off and weave in ends.
Rows 94-96 (Sizes XL-5XL ONLY): Repeat Row 93. Fasten off and weave in all ends.
– – – – – – – – – – – –
POCKETS – RIBBING AND SECURING
– – – – – – – – – – – –
(Complete these instructions for both pockets.)
RIBBING
For help with this technique, please see my tutorial video.
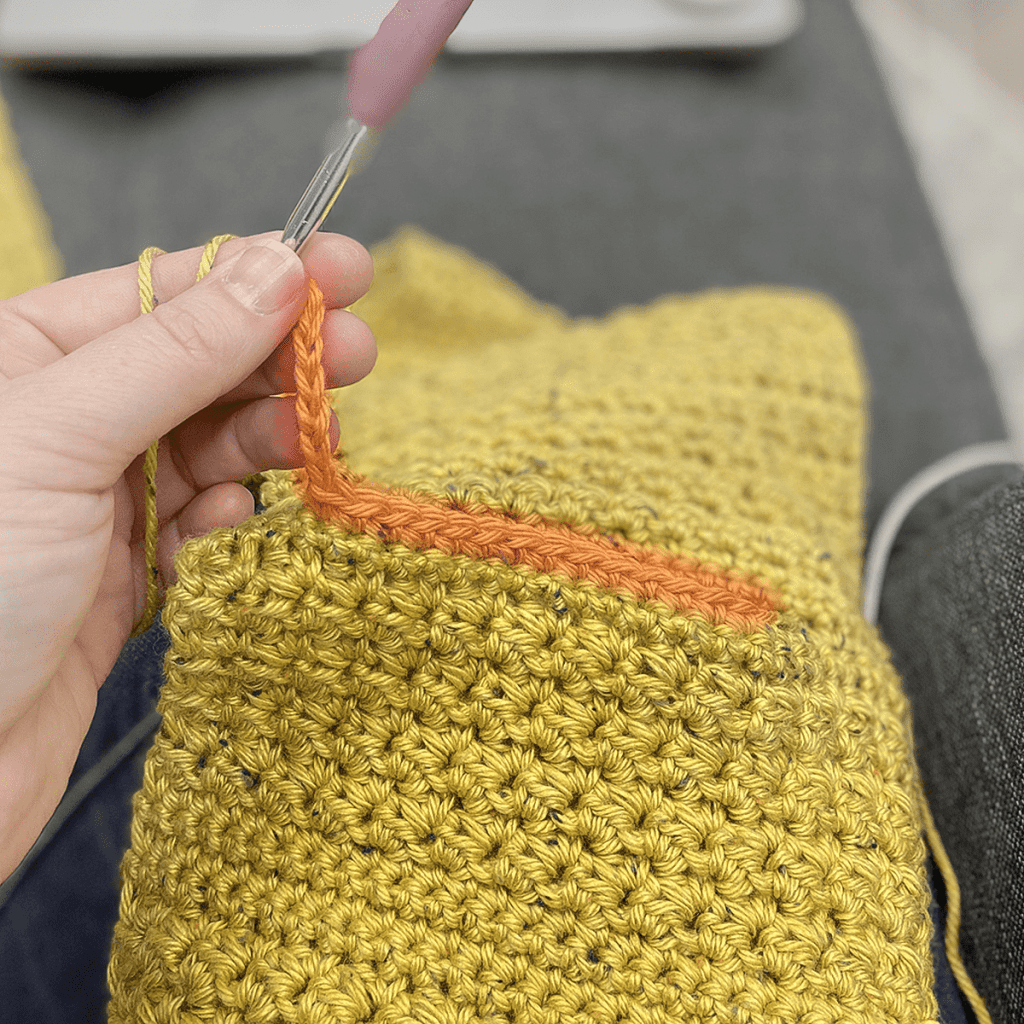
To begin: Join yarn to rightmost unworked stitch on the front edge of the pocket; CH1.
Base Row: SC in each unworked ST across.
Stitch count: 18 (18, 18, 20, 20, 20, 22, 22, 22)
Ribbing, Row 1: CH7, turn. SC in 2nd chain from hook and in each of the remaining 5 chains. SL ST into the first SC from Base Row, the stitch on which your CH7 was built. SL ST into the next SC from Base Row. (6, plus the two slip stitches along Base Row)
Row 2: CH1, turn. Skipping over the 2 SL STS you put in Base Row, SC in BLO of each of the first 5 STS of the ribbing. SC in both loops of the last ST. (6)
Row 3: CH1, turn. SC in 1st ST. SC in BLO of each of the remaining 5 STS of the ribbing. SL ST in each of the next 2 STS of Base Row. (6, plus the 2 SL STS along Base Row)
Row 4: CH1, turn. Skipping over the 2 SL STS you put in Base Row, SC in BLO of each of the first 5 STS of the ribbing. SC in both loops of the last ST. (6)
Rows 5-18 (18, 18, 20, 20, 20, 22, 22, 22): Repeat Rows 3-4 all the way across Base Row.
Fasten off, leaving a long finishing tail to secure pocket.
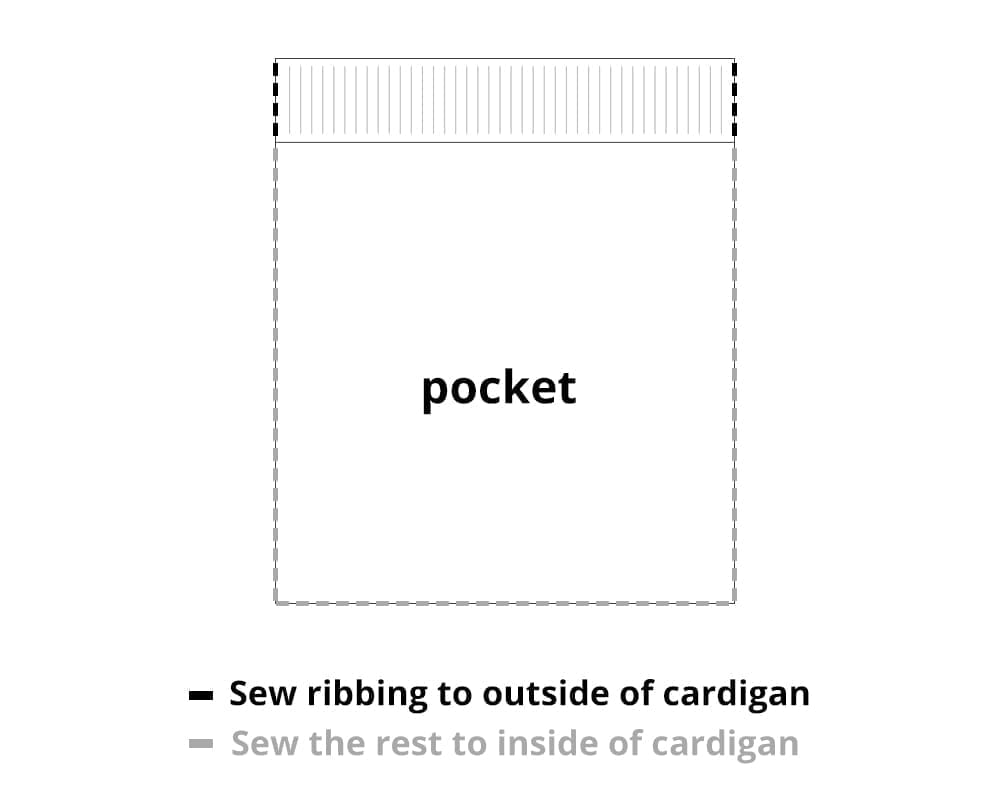
SECURING POCKETS
Use long finishing tail to secure pocket to cardigan. Begin by sewing down the side of the ribbing, then transition to the inner pocket and sew it to the inside of the front panel along side, bottom, and 2nd side. (To avoid unseemly stitching on the front of your cardigan, don’t push your yarn needle all the way through to the front when sewing; instead, grab a thread or two from the inside of the cardigan for each stitch.) Finish by transitioning back to the front of the cardigan to sew the second ribbing edge down. Fasten off and weave in ends.
– – – – – – – – – – – –
SLEEVES (make 2)
– – – – – – – – – – – –
To begin: CH9.
Ribbing Row 1: SC in 2nd CH from hook and in each remaining CH.
Stitch count: 8
Ribbing Rows 2-30 (34, 38, 42, 46, 50, 52, 56, 60): CH1, turn. SC in first ST, SC in BLO of each of the next 6 STS, SC in final ST.
Stitch count: 8
We’re now going to begin working down the long edge of the ribbing. Our row count will restart at 1.
Row 1: CH1, do not turn. SC down the long edge of the ribbing, putting 1SC in each row end. JOIN with a SL ST to the top of the first SC.
Stitch count: 30 (34, 38, 42, 46, 50, 52, 56, 60)
Rows 2-4: CH1, turn. (SK first ST, SC+HDC in next ST) around. JOIN.
Stitch count: 30 (34, 38, 42, 46, 50, 52, 56, 60)
Row 5: CH1, turn. SC in first ST, SC+HDC in next ST. (SK next ST, SC+HDC in next ST) around. JOIN.
Stitch count: 31 (35, 39, 43, 47, 51, 53, 57, 61)
Row 6: CH1, turn. SC in first ST, SC+HDC in next ST. (SK next ST, SC+HDC in next ST) around until 1 ST remains. SC in final ST. JOIN.
Stitch count: 32 (36, 40, 44, 48, 52, 54, 58, 62)
Rows 7-8: CH1, turn. SC in first ST. (SK next ST, SC+HDC in next ST) around until 1 ST remains. SC in final ST. JOIN.
Stitch count: 32 (36, 40, 44, 48, 52, 54, 58, 62)
Rows 9-10: CH1, turn. SC in each ST around. JOIN.
Stitch count: 32 (36, 40, 44, 48, 52, 54, 58, 62)
Row 11: CH1, turn. 2SC in first ST, SC in each remaining ST around. JOIN.
Stitch count: 33 (37, 41, 45, 49, 53, 55, 59, 63)
Row 12: CH1, turn. 2SC in first ST, SC in each remaining ST around. JOIN.
Stitch count: 34 (38, 42, 46, 50, 54, 56, 60, 64)
Rows 13-16: CH1, turn. (SK next ST, SC+HDC in next ST) around. JOIN.
Stitch count: 34 (38, 42, 46, 50, 54, 56, 60, 64)
Row 17: CH1, turn. SC in first ST, SC+HDC in next ST. (SK next ST, SC+HDC in next ST) around. JOIN.
Stitch count: 35 (39, 43, 47, 51, 55, 57, 61, 65)
Row 18: CH1, turn. SC in first ST, SC+HDC in next ST. (SK next ST, SC+HDC in next ST) around until 1 ST remains. SC in final ST. JOIN.
Stitch count: 36 (40, 44, 48, 52, 56, 58, 62, 66)
Rows 19-20: CH1, turn. SC in first ST. (SK next ST, SC+HDC in next ST) around until 1 ST remains. SC in final ST. JOIN.
Stitch count: 36 (40, 44, 48, 52, 56, 58, 62, 66)
Rows 21-22: CH1, turn. SC in each St around. JOIN.
Stitch count: 36 (40, 44, 48, 52, 56, 58, 62, 66)
Row 23: CH1, turn. 2SC in first ST, SC in each remaining ST around. JOIN.
Stitch count: 37 (41, 45, 49, 53, 57, 59, 63, 67)
Row 24: CH1, turn. 2SC in first ST, SC in each remaining ST around. JOIN.
Stitch count: 38 (42, 46, 50, 54, 58, 60, 64, 68)
Rows 25-28: CH1, turn. (SK next ST, SC+HDC in next ST) around. JOIN.
Stitch count: 38 (42, 46, 50, 54, 58, 60, 64, 68)
Row 29: CH1, turn. SC in first ST, SC+HDC in next ST. (SK next ST, SC+HDC in next ST) around. JOIN.
Stitch count: 39 (43, 47, 51, 55, 59, 61, 65, 69)
Row 30: CH1, turn. SC in first ST, SC+HDC in next ST. (SK next ST, SC+HDC in next ST) around until 1 ST remains. SC in final ST. JOIN.
Stitch count: 40 (44, 48, 52, 56, 60, 62, 66, 70)
Rows 31-32: CH1, turn. SC in first ST. (SK next ST, SC+HDC in next ST) around until 1 ST remains. SC in final ST. JOIN.
Stitch count: 40 (44, 48, 52, 56, 60, 62, 66, 70)
Rows 33-34: CH1, turn. SC in each St around. JOIN.
Stitch count: 40 (44, 48, 52, 56, 60, 62, 66, 70)
Row 35: CH1, turn. 2SC in first ST, SC in each remaining ST around. JOIN.
Stitch count: 41 (45, 49, 53, 57, 61, 63, 67, 71)
Row 36: CH1, turn. 2SC in first ST, SC in each remaining ST around. JOIN.
Stitch count: 42 (46, 50, 54, 58, 62, 64, 68, 72)
Rows 37-40: CH1, turn. (SK next ST, SC+HDC in next ST) around. JOIN.
Stitch count: 42 (46, 50, 54, 58, 62, 64, 68, 72)
Row 41: CH1, turn. SC in first ST, SC+HDC in next ST. (SK next ST, SC+HDC in next ST) around. JOIN.
Stitch count: 43 (47, 51, 55, 59, 63, 65, 69, 73)
Row 42: CH1, turn. SC in first ST, SC+HDC in next ST. (SK next ST, SC+HDC in next ST) around until 1 ST remains. SC in final ST. JOIN.
Stitch count: 44 (48, 52, 56, 60, 64, 66, 70, 74)
Rows 43-44: CH1, turn. SC in first ST. (SK next ST, SC+HDC in next ST) around until 1 ST remains. SC in final ST. JOIN.
Stitch count: 44 (48, 52, 56, 60, 64, 66, 70, 74)
Rows 45-46: CH1, turn. SC in each St around. JOIN.
Stitch count: 44 (48, 52, 56, 60, 64, 66, 70, 74)
Row 47: CH1, turn. 2SC in first ST, SC in each remaining ST around. JOIN.
Stitch count: 45 (49, 53, 57, 61, 65, 67, 71, 75)
Row 48: CH1, turn. 2SC in first ST, SC in each remaining ST around. JOIN.
Stitch count: 46 (50, 54, 58, 62, 66, 68, 72, 76)
Rows 49-52: CH1, turn. (SK next ST, SC+HDC in next ST) around. JOIN.
Stitch count: 46 (50, 54, 58, 62, 66, 68, 72, 76)
Row 53: CH1, turn. SC in first ST, SC+HDC in next ST. (SK next ST, SC+HDC in next ST) around. JOIN.
Stitch count: 47 (51, 55, 59, 63, 67, 69, 73, 77)
Row 54: CH1, turn. SC in first ST, SC+HDC in next ST. (SK next ST, SC+HDC in next ST) around until 1 ST remains. SC in final ST. JOIN.
Stitch count: 48 (52, 56, 60, 64, 68, 70, 74, 78)
Rows 55-56: CH1, turn. SC in first ST. (SK next ST, SC+HDC in next ST) around until 1 ST remains. SC in final ST. JOIN.
Stitch count: 48 (52, 56, 60, 64, 68, 70, 74, 78)
Rows 57-60: CH1, turn. 2SC in first ST, SC around until you have 1 ST remaining; 2SC in final ST.
Stitch count: 56 (60, 64, 68, 72, 76, 78, 82, 86)
Fasten off, leaving a long tail for seaming sleeve to shoulder. Use starting tail to sew first and last rows of ribbing together, then weave in.
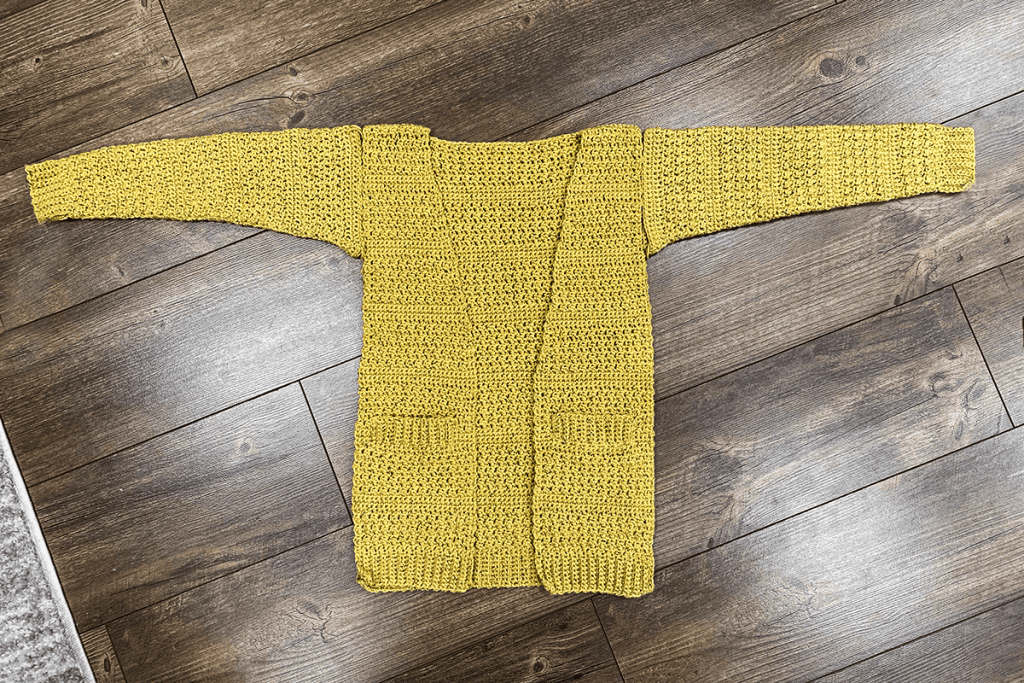
Here’s what we have so far:
– – – – – – – – – – – –
SEAMING THE PIECES TOGETHER
– – – – – – – – – – – –
Shoulders
First, we’ll use a Slip Stitch to seam the shoulders. Slip Stitches give the shoulder area a strong seam to counteract the weight of the sweater pulling down on them. With wrong sides facing each other, line up first front panel with back panel and attach yarn at top corner; CH1 and slip stitch into the two loops in the middle of the 4 you have to choose from. Continue to SL ST this way across the width of the shoulder; fasten off and weave in ends. Repeat for the other side.
Sides + Sleeves
For this part, I recommend using the Mattress Stitch; and if you do, you’ll want to seam everything with your cardigan turned right-side-out. (You can find tutorials on Google for this seaming stitch) If you prefer a different seaming stitch, turn your cardigan whichever way is recommended by that stitch.
Seeming arms can feel a little tricky, so here’s the order I do things in to make sure everything is lining up the way it needs to.
Step 1: Cut a long length of yarn and use the mattress stitch to seam up the first side, being sure to keep the rows lined up correctly. Stop when you get about an inch or two below the armpit (use a sleeve for reference). Remove your yarn needle, but don’t weave in ends.
Step 2: Line your sleeve up against the side of the cardigan and use the finishing tail from the sleeve to carefully seam the front layer of fabric to the front panel. You’re working in the loops of the sleeve and the row ends of the cardigan, so you’ll need to improvise a bit. Just make sure that the top of the sleeve meets up with the shoulder seam and the fabric doesn’t pull or bunch. Remove yarn needle.
Step 3: Thread yarn needle with what’s left of the yarn from the side seam and continue up, then seam the back layer of sleeve fabric to the back panel.
Fasten off and weave in ends, then repeat for the other sleeve on the other side.
– – – – – – – – – – – –
ADDING THE COLLAR + BUTTONHOLES
– – – – – – – – – – – –
Lay cardigan flat and rejoin your yarn at the bottom corner of the right panel as shown. CH1 and SC evenly up the panel, across the back, and down the other panel to form a Base Row for the ribbing (just like we did for the pockets). Remove your hook, but don’t let your stitches unravel.
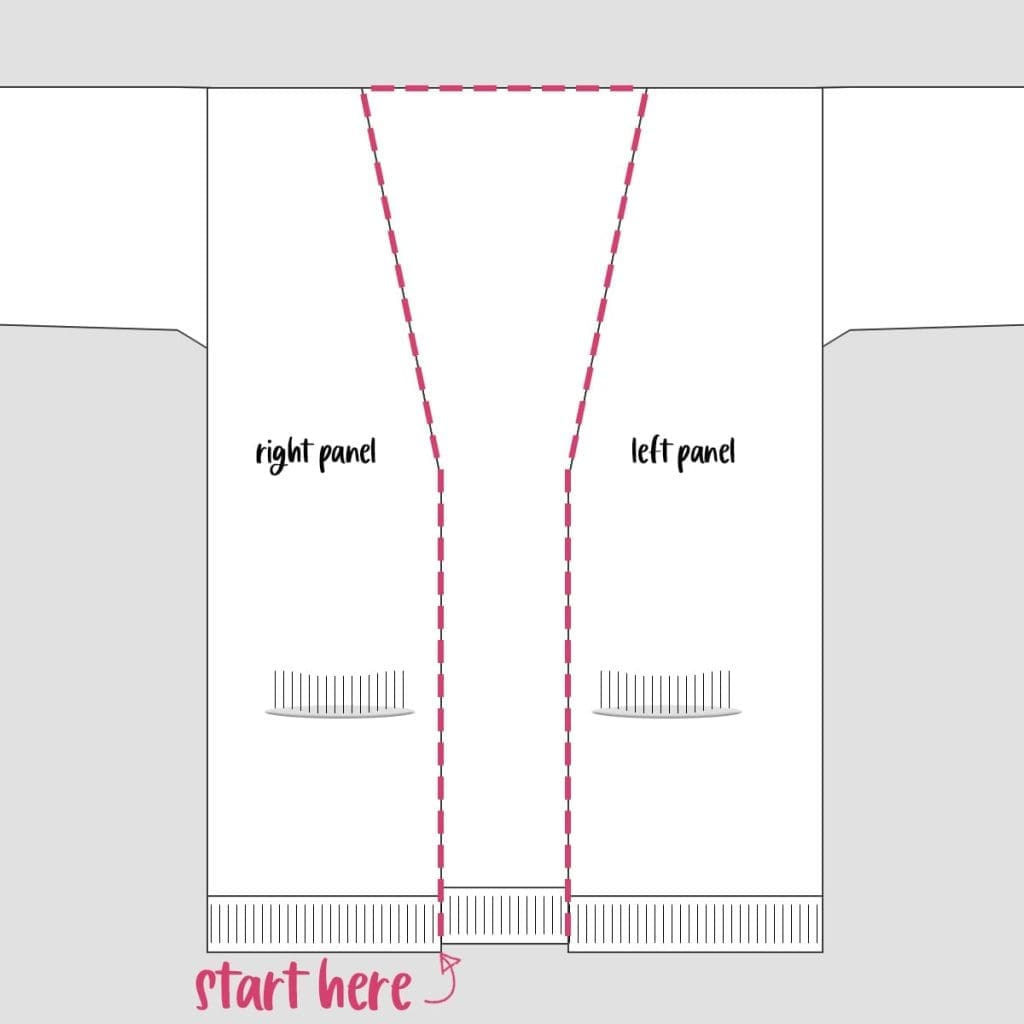
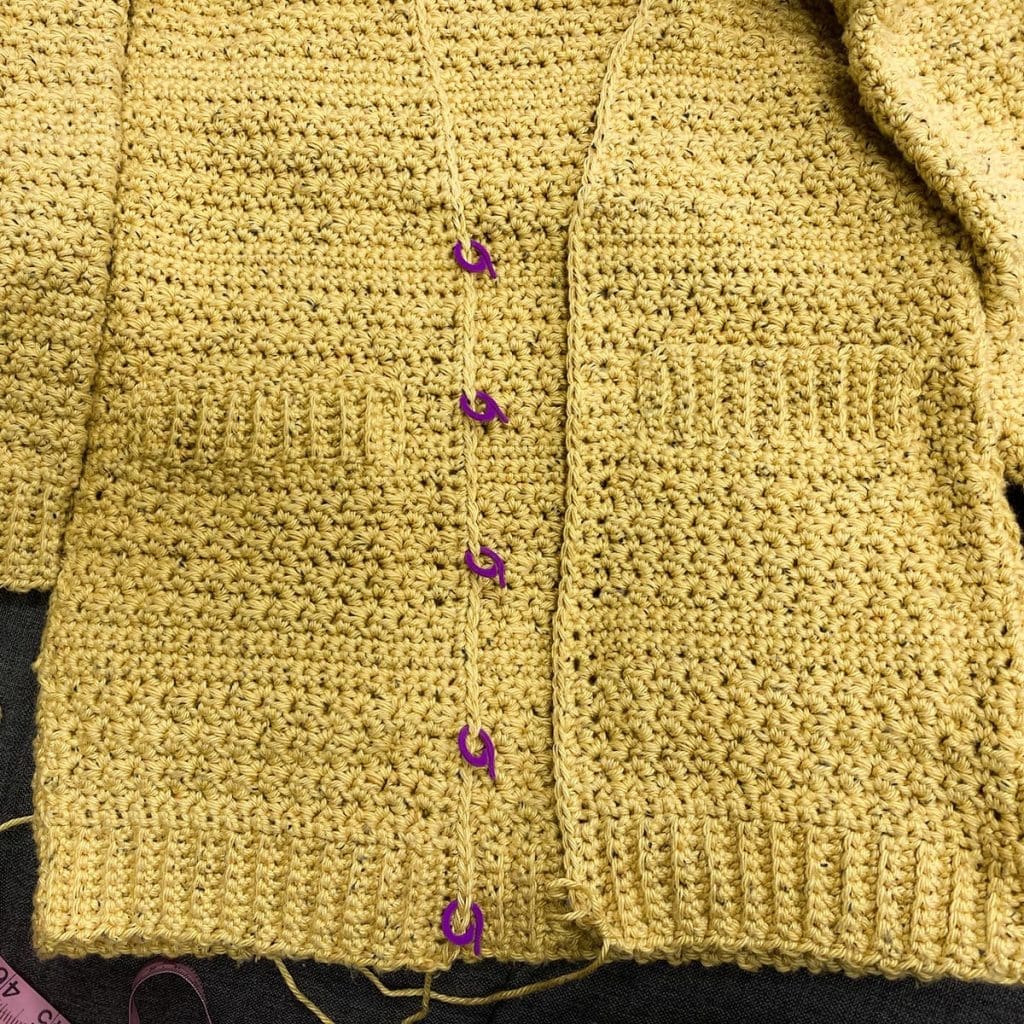
Button Placement
Decide where you want your buttonholes to go by arranging your buttons on the cardigan edge on the right side. (The buttons themselves will later be sewn onto the left side, but right now we’re just figuring out placement for the holes.) When you’re happy with the arrangement, use stitch markers to mark the stitches in the Base Row where you want each hole to be.
For my sample (which, remember, is a petite XS), I used 5 buttons. I put the highest button right where the edge begins to taper, and the lowest one in the middle of the ribbing; I then evenly spaced the 3 remaining in between those two.
Crocheting the Ribbed Collar
Reinsert your hook where you left off and follow these instructions to add ribbing for the collar:
Ribbing, Row 1: CH7, turn. SC in 2nd chain from hook and in each of the remaining 5 chains. SL ST into the first SC from Base Row, the stitch on which your CH7 was built. SL ST into the next SC from Base Row. (6, plus the two slip stitches along Base Row)
Row 2: CH1, turn. Skipping over the 2 SL STS you put in Base Row, SC in BLO of each of the first 5 STS of the ribbing. SC in both loops of the last ST. (6)
Row 3: CH1, turn. SC in 1st ST. SC in BLO of each of the remaining 5 STS of the ribbing. SL ST in each of the next 2 STS of Base Row. (6, plus the 2 SL STS along Base Row)
Row 4: CH1, turn. Skipping over the 2 SL STS you put in Base Row, SC in BLO of each of the first 5 STS of the ribbing. SC in both loops of the last ST. (6)
Rows 5 – the end: Repeat Rows 3-4 all the way across Base Row, but use the following instructions whenever you come to a buttonhole row (marked by your stitch markers):
Buttonhole Rows: Complete row as normal except replace the middle two stitches with a CH1 space. On the row immediately following, complete as normal except put the 2 middle stitches into the CH1 space.
Fasten off and weave in ends. Sew buttons to the left side panel so that they line up with their corresponding holes.
Step back and take a look at your beautiful work… you’re DONE!
Don’t forget to share your finished project!
Share it on FB, in our FB group, in other groups, on Instagram… wherever you want to show if off! Be sure to tag me @yarnandchai.design so I can see it, too!
