This pattern is dedicated to my mom and the example she set as a successful business-owning, work-at-home-mama!
I should start off by saying that I’m not an expert cross-stitcher. But I do have a neat connection to the world of cross-stitching, because when I was teeny tiny, my mom had a cross-stitching business through a company called Creative Circle. (Creative Circle doesn’t exist anymore, but if you remember it, I’d love to know in the comments!) So it probably goes without saying that she was pretty awesome at it.
Then there’s me. I’ve attempted a couple cross-stitch projects in my lifetime, but I couldn’t tell you all the techniques and tips that a more complicated project would involve. I knew just enough to pull off this project, so I’m passing on my very basic knowledge to you in case you’ve never done it, either!

For this project, we’ll first crochet the bag itself, and then we’ll add the cross-stitched lamb at the end. The bag uses a crochet stitch called Crossed Single Crochet (CSC), not to be confused with cross-stitching… they are unrelated. (Not confusing at all, right!?) But the CSC stitch really is a great stitch for our purposes. If you’re already familiar with it, feel free to scroll down to the pattern; otherwise, I’ve got some tips for you!

– – – – – – – – – – – – – – –
The Crossed Single Crochet Stitch: Tips + Tricks
With its almost perfectly square stitches, the Crossed Single Crochet (CSC) stitch makes for an ideal surface for cross-stitching. Here are the steps:
CROSSED SINGLE CROCHET STITCH:
Insert your hook, yarn under,
draw yarn through stitch (2 loops on hook), yarn over,
draw through both loops.
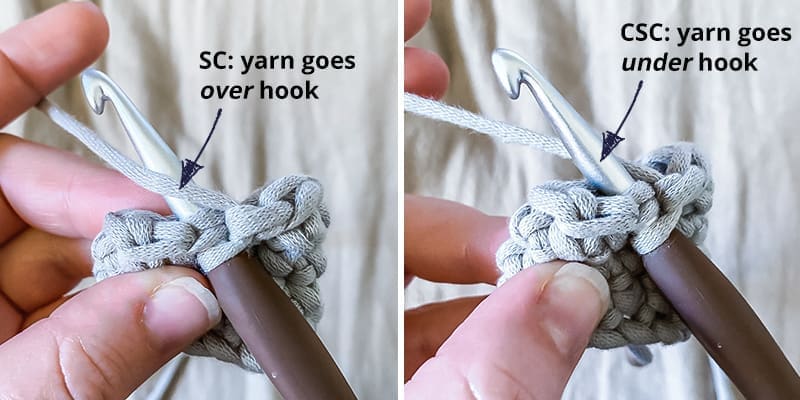
It’s created almost the same way as a standard Single Crochet (SC), but with one tiny difference (bolded in the instructions above): you’ll grab your yarn under your hook instead of over it. Here’s the difference between an SC and a CSC at that step:
Sidenote: You might be looking at this and thinking “um… I’ve always grabbed my yarn under the hook for a regular single crochet! Have I been doing it wrong all this time!?” Short answer – Yes! But you aren’t alone. I’ve even seen patterns online that call for single crochet stitches, but the designer is clearly doing crossed single crochets stitches. Chances are, you’re a self-taught crocheter and no one ever corrected you. It usually won’t make much difference in a pattern, but it’s always good to learn and improve.
Even if you know the steps for CSC, it takes some practice — and some helpful tips — to get those stitches to line up almost vertically. Here’s what I’ve learned:
- Keep your tension loose. If you are already a loose crocheter, this will come naturally; but for me, a tight crocheter, I really had to concentrate to keep a relaxed tension.
- Be a “lifter”. You may have heard the terms rider, yanker and lifter in reference to something called the golden loop. (And if not, I got ya covered.) The golden loop is the loop that is on your hook after you’ve pulled your yarn through the stitch in the first part of a crochet stitch. We all fall into three categories as far as how tall we pull that loop before moving on to the next step in the stitch; a yanker barely pulls the loop up at all, a lifter pulls it up quite tall, and a rider falls somewhere in the middle. Your CSC stitches are more likely to line up vertically if you become a lifter. (Again, this does not come naturally for me. I really had to focus!)
- Don’t pull your yarn directly from the skein. Unless you’re working from a center-pull skein and the yarn is flowing out freely, you’re going to want to pull out a few yards of it at a time and then complete the stitches. Any friction on the yarn is going to mess with your tension and make your stitches less consistent.
- Work your bag right-side out. When I make hats, bags, or any 3D round shape, I tend to hold my bag inside out while crocheting. It’s just the way I have always done it, and it doesn’t feel as natural to work on it right side out. But I can look at my finished bag and tell you exactly where I started holding it right side out, because it’s the point in the bag where my stitches really started to line up well vertically. I couldn’t tell you why this is the case, but it definitely made a big difference.
So that’s the Crossed Single Crochet!
– – – – – – – – – – – – – – –
Prefer a PDF?
This pattern can be completed using the 100% free version right here on this page. However, many people prefer the convenience of a printable, ad-free PDF.
All-Access Passholders get the ad-free version of this and all of my other blog patterns. It’s a pretty sweet deal, if I do say so myself! Learn more about it here or continuing scrolling for the free version.
– – – – – – – – – – – – – – –
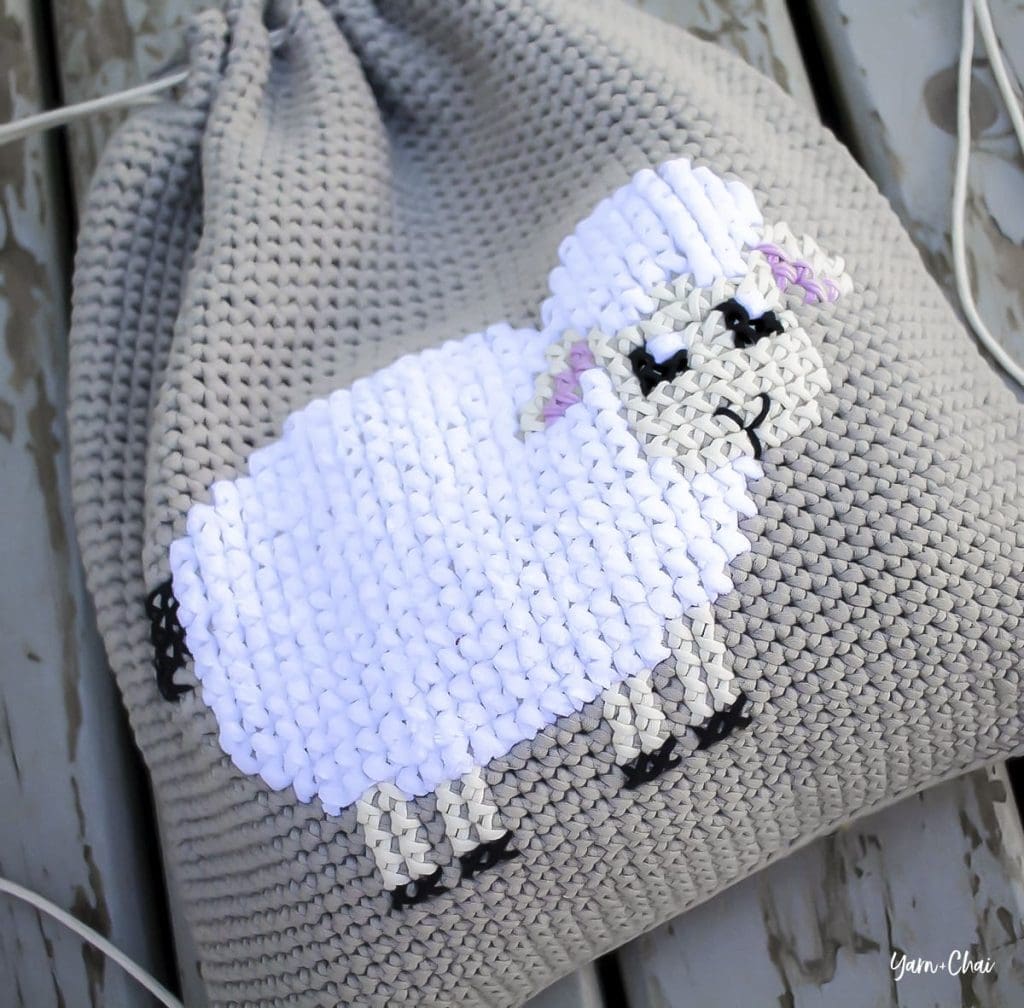
Cross-stitched Lamb Cinched Backpack
View on Ravelry
Difficulty: Easy
Finished Size: 14.25″ wide x 15.75″ tall
Hook: I (5.5mm)
Gauge: 13.5 CSC x 15 rows = 4″ square
Yarn: For the bag, you’ll need 450 yards of Bernat Maker Home Dec or other #5 weight yarn. For the cross-stitched lamb, you’ll need about 30 yards of Baby Bee Adore-A-Ball or other #4 or #5 fluffy white yarn, as well as less than 10 yards each of black, cream, and pink yarns in #4 or #5 weights.
You’ll also need: A large-eyed yarn needle and 3 yards of 3mm macrame cord, or other chosen material for drawstring backpack strap.
Terms and Abbreviations:
ST/STS (stitch/stitches)
SK (skip)
CH (chain)
SL ST (slip stitch)
BLO (back loop only)
CSC (crossed single crochet – see Special Stitches)
Special Stitches:
Crossed Single Crochet (CSC): Insert your hook, yarn under*, draw yarn through stitch (2 loops on hook), yarn over, draw through both loops. (*This is the only difference between a crossed single crochet and a standard single crochet, for which you would yarn over after inserting your hook.)
Notes:
(1) This pattern is written in American Standard Terms.
(2) Pattern is worked in a seamless spiral. Do not join, chain or turn unless instructed. Use a stitch marker to keep track of the first stitch of your rounds.
(3) Pattern can be created with standard Single Crochet stitches, but you’ll want to join and turn each round rather than working in a spiral so that your stitches line up vertically.
– – – – – – – – – – – – – – –
The Pattern
– – – – – – – – – – – – – – –
MAKING THE BAG
– – – – – – – – – – – – – – –
To Begin: CH49.
Round 1: Working into the back bumps, CSC in 2nd CH from hook and in each remaining CH. Working in BLO down the opposite side of the chain, CSC across. (You have now worked in both sides of each chain.) Do not join. (96)
Rounds 2-56: CSC in each ST around. (96)
Now we need to “reset” our starting point for the next round so that our drawstring holes go in the correct place. So no matter where on the bag you completed the last stitch of the previous round, continue to CSC until you reach the nearest edge. (I had to crochet 3 additional stitches to get to the edge; you may require more or less.) Consider the last stitch you make to be the final stitch of the previous round, and get ready to mark the first stitch of the next round with your stitch marker.
Round 57 (drawstring holes): CSC in next ST. CH2, SK 2 STS. (CSC in each of the next 2 STS, CH2, SK 2 STS) around until 1 ST remains. CSC in final ST. (24 drawstring holes)
Round 58: CSC in each ST around, putting 2CSC in each CH2 space. (96)
Round 59: CSC in each of the first 94 STS. SL ST in each of the remaining 2 STS. (96)
Fasten off and weave in all ends.
– – – – – – – – – – – – – – –
CROSS-STITCHING ON YOUR BAG
– – – – – – – – – – – – – – –
Use a yarn needle and basic cross-stitching technique to add the lamb to your bag. Never cross-stitched before? No problem! At least for this purpose, it’s easy. Here is the diagram:

The graph on the diagram represents the first 34 rounds of the bag, and is 48 units wide to represent the front side of the bag. The dark brown units represent the bag itself, and you will not cross-stitch into them.
Let’s start with the tail. Lay your bag flat and count up to the 25th round, 8th stitch from the left (marked on the graph by a pink border). This is your starting point.
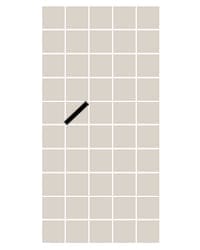
Thread your yarn needle with a couple yards of the black yarn, and coming out from the inside of the bag, make a diagonal line from the top right corner of the stitch to the bottom left corner of the same stitch.
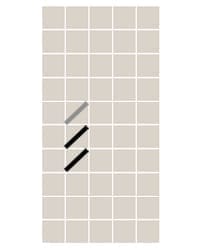
Before crossing the stitch, look back at the diagram: there are 3 black stitches in this column. To keep things looking as streamlined as possible, we’re going to make that first diagonal line for all three of the stitches.
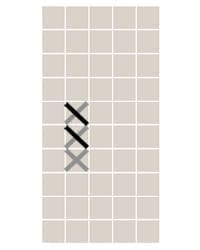
Now, starting with the last stitch you made and moving back up toward your starting stitch, cross each stitch with a diagonal line starting at the bottom right corner and ending in the top left corner. You now have 3 completed stitches!
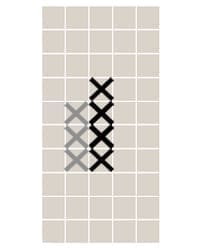
Move to the next column and follow the same process.
Follow the process for the third column as well.
Your lamb’s tail should be done! Fasten off the yarn and secure as desired. I tied a bunch of knots because I don’t care what the inside looks like, but if you do, you’ll want to weave in your ends or line your bag with fabric.
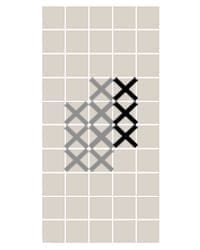
Move on to another section of color; I did the white next, but it’s really up to you how you want to tackle it. (Just save the thin lines on the lamb’s face for Don’t worry if you run out of yarn before you finish a color; just fasten off and start with a new strand wherever you left off.
When you’ve finished every section, it’s time to add the three lines that make up the mouth/nose area. Simply use your yarn needle and black yarn to “draw” the lines over the face stitches. Simple!
– – – – – – – – – – – – – – –
DRAWSTRING
– – – – – – – – – – – – – – –
Cut two 1.5 yard lengths of macrame cord. Lay bag flat and locate the furthermost hole to the right; starting from the outside, thread the first length of cord through the hole and then, working leftward, proceed to weave it in and out of each hole around the entire bag (photo 1). You should end up with the cord exiting the bag through the hole next to your starting hole.
Make sure the two cord ends are equal in length when bag is uncinched, then take the end that is coming out of the first hole you used and thread it into the bag along the edge, starting at about 5 rounds from the bottom, and out through the bottom corner (photo 2). Line the unused cord end up with it, and tie together in a knot. Don’t cut off the excess yet.


Do the same thing with the other 1.5 yard length of cord, starting in the leftmost hole and working rightward, continuing around the entire bag. (Both cords will be entering and exiting the same drawstring holes, in opposite directions.) Follow the rest of the steps to secure the second cord.
Cinch the backpack and wear it to test the length, then readjust knot placement as needed. Trim off excess cord.
Done!
– – – – – – – – – – – – – – –
Don’t forget to share your finished project!
Share it on FB, in our FB group, in other groups, on Instagram… wherever you want to spread creativity! Be sure to tag me @yarnandchai.design so I can see it, too!