

Today I am excited to be joining The Blog Hop Crochet Along! Nine other bloggers and I are teaming up to release a new afghan square pattern every day for a month. Crochet along with us and you will have a gorgeous new afghan just in time for the holiday season!
Here’s how it is going to work:
- Every day (M-F) a new square pattern will be posted on one of our ten blogs.
- You can join in the fun by crocheting each day’s square on that day whenever you have time.
- Share your progress and post photos of your squares in our facebook group.
- By the end of the Crochet Along you will have twenty 12″ squares all ready to be pieced together into a beautiful afghan just in time for the holiday season.
- Finally, we will be hosting some fabulous giveaways! You could win Lion Brand yarn to make your own afghan, $100 CASH money, OR our COMPLETED AFGHAN! That’s right, we are going to be piecing all of our squares together and shipping an afghan out to one very lucky winner.

Hopeful Honey – Persia Lou – Little Monkeys Crochet
Fiber Flux – Loopsan One Dog Woof – Maybe Matilda
Dream a Little Bigger – Whistle & Ivy – Gleeful Things
—
—
Today I am sharing the 12″ Wildflower Granny Square [No. 1]. This is a modified version of my much smaller Wildflower Granny Square. You can find links to all the other participating patterns at the end of this post. The links will be updated daily!
– – – – – – – – – – – – – – – – – – – – – – – – – – – – – – – – – –
12″ WILDFLOWER GRANNY SQUARE [NO. 1]
Finished Size: About 12″ square
Abbreviations Used:
- Ch – Chain
- Sl St – Slip Stitch
- SC – Single Crochet
- HDC – Half Double Crochet
- DC – Double Crochet
- TR- Treble (or Triple) Crochet
- FLO – Front Loops Only
- BLO- Back Loops Only
- BPDC – Back Post Double Crochet
Yarn: Medium worsted (I used Wool-Ease from Lion Brand)
Hook: Size H (5.00mm)
Notes:
(1) Pattern is written in American standard terms.
(2) The square is built around the flower (so the flower will not need to be attached at the end).
(3) Beginning chains do NOT count as the first stitch in the final row count. When joining, you’ll slip stitch to the top of the first stitch (not the chain).
(4) I’ve included [New Color] in the pattern whenever I chose to change colors. I think it looks cleaner to attach a new color before joining at the end of a row, but you do what’s familiar to you. The Lion Brand Wool-Ease colors I used in the photo above, in order of introduction, are Seaspray, Natural Heather, and Eggplant.
– – – – – – – – – – – – – – – – – – – – – – – – – – – – – – – – – –
THE FLOWER:
Begin with a Magic Circle.
Round 1: Ch1. 12 HDC in Magic Circle. Join to the top of the first HDC with a Sl St. (12)
Round 2: Ch1; 2 HDC in same. 2 HDC in next and in each St around. [New Color] Join to the top of the first HDC with a Sl St. (24)
Round 3 (work this round in BLO): Ch2; 2 DC in same, DC in next. (2 DC in next, DC in next) around. Join to the top of the first DC with a Sl St. (36)
Round 4: Ch2; 2 DC in same, DC in each of the next 2 Sts. (2 DC in next, DC in each of the next 2 Sts) around. Join to the top of the first DC with a Sl St. (48)
The next round is worked in 2 parts: the petals, and then the base behind it. Just follow the instructions and you’ll be fine. 🙂
Round 5, Part 1 (work this round in FLO): Ch3; DC in same St, 2 TR in next, 2 TR in next, DC in next, Ch3 and Sl St to same St as DC. You’ve completed one petal. (Sl St to the next St. Ch3, DC in same, 2 TR in next, 2 TR in next, DC in next, Ch3 and Sl St to same St as DC.) around. Sl St to first St of the round.
It helps, at this point, to fasten off and weave in all ends; then, proceed with the next instructions.
THE SQUARE:
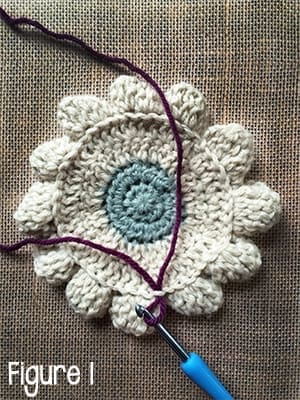
Turn flower over. Attach [New Color] yarn via one of the loops on the back side of the finished flower, as in Figure 1, below. (Remember in Round 5, Part 1 when we worked in FLO? The loop we didn’t use is the loop we’re using now.)
Round 5, Part 2: Ch2; 2 DC in same, DC in each of the next 3 Sts. (2 DC in next, DC in each of the next 3 Sts) around. (see figures 2 and 3). Join to the top of the first DC with a Sl St. (60)

Round 6: Ch2. In same St: 2 DC, Ch2, 2 DC (first corner). DC in each of the next 2 Sts. HDC in each of the next 3 Sts. SC in each of the next 4 Sts. HDC in each of the next 3 Sts. DC in each of the next 2 Sts. (In next St: 2 DC, Ch2, 2 DC. DC in each of the next 2 Sts. HDC in each of the next 3 Sts. SC in each of the next 4 Sts. HDC in each of the next 3 Sts. DC in each of the next 2 Sts.) Repeat ( ) 2 more times. Join to the top of the first DC with a Sl St.
Round 7: Ch2. DC in same St and in each St around, putting (2 DC + CH2 + 2 DC) in each CH2 corner space from previous round. [New Color] Join to the top of the first DC with a Sl St. (When you complete this round, there should be 22 DCs on each side.)
Round 8: Ch2. DC in same St and in each St around, putting (2 DC + CH2 + 2 DC) in each CH2 corner space from previous round. [New Color] Join to the top of the first DC with a Sl St. (When you complete this round, there should be 26 DCs on each side.)
Round 9: Ch2. DC in same St and in each St around, putting (2 DC + CH2 + 2 DC) in each CH2 corner space from previous round. Join to the top of the first DC with a Sl St. (When you complete this round, there should be 30 DCs on each side.)
Round 10 (note the change to BPDC): Ch2. BPDC in same St and in each St around, but when you come to corner spaces, simply CH2; then begin with your BPDCs across the next side. [New Color] Join to the top of the first BPDC with a Sl St.(When you complete this round, there should be 30 BPDCs on each side.)
Round 11: Ch2. DC in same St and in each St around, putting (2 DC + CH2 + 2 DC) in each CH2 corner space from previous round. [New Color] Join to the top of the first DC with a Sl St. (When you complete this round, there should be 34 DCs on each side.)
Round 12: Ch2. DC in same St and in each St around, putting (2 DC + CH2 + 2 DC) in each CH2 corner space from previous round. Join to the top of the first DC with a Sl St. (When you complete this round, there should be 38 DCs on each side.)
Fasten off and weave in ends.
