

Spring is here, and before we know it, summer will arrive with its holidays, pool parties and barbecues.
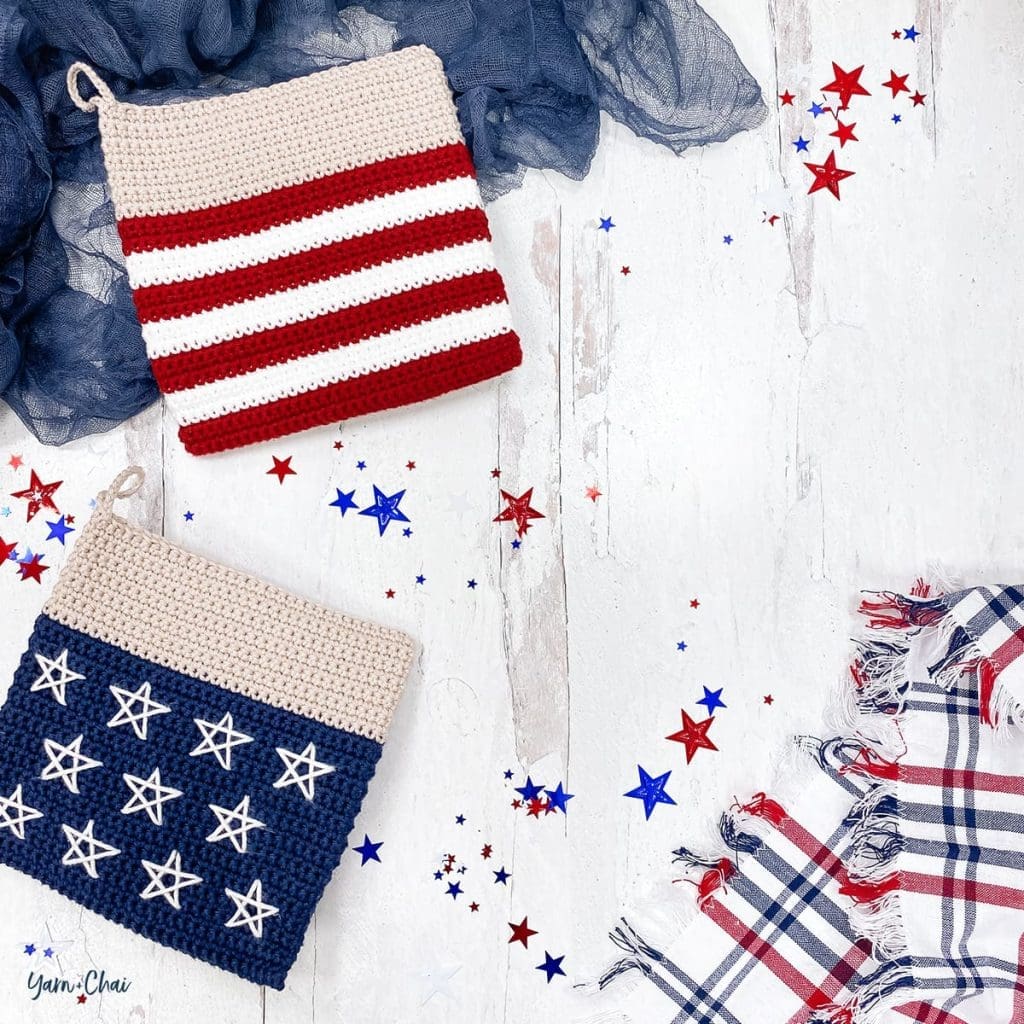
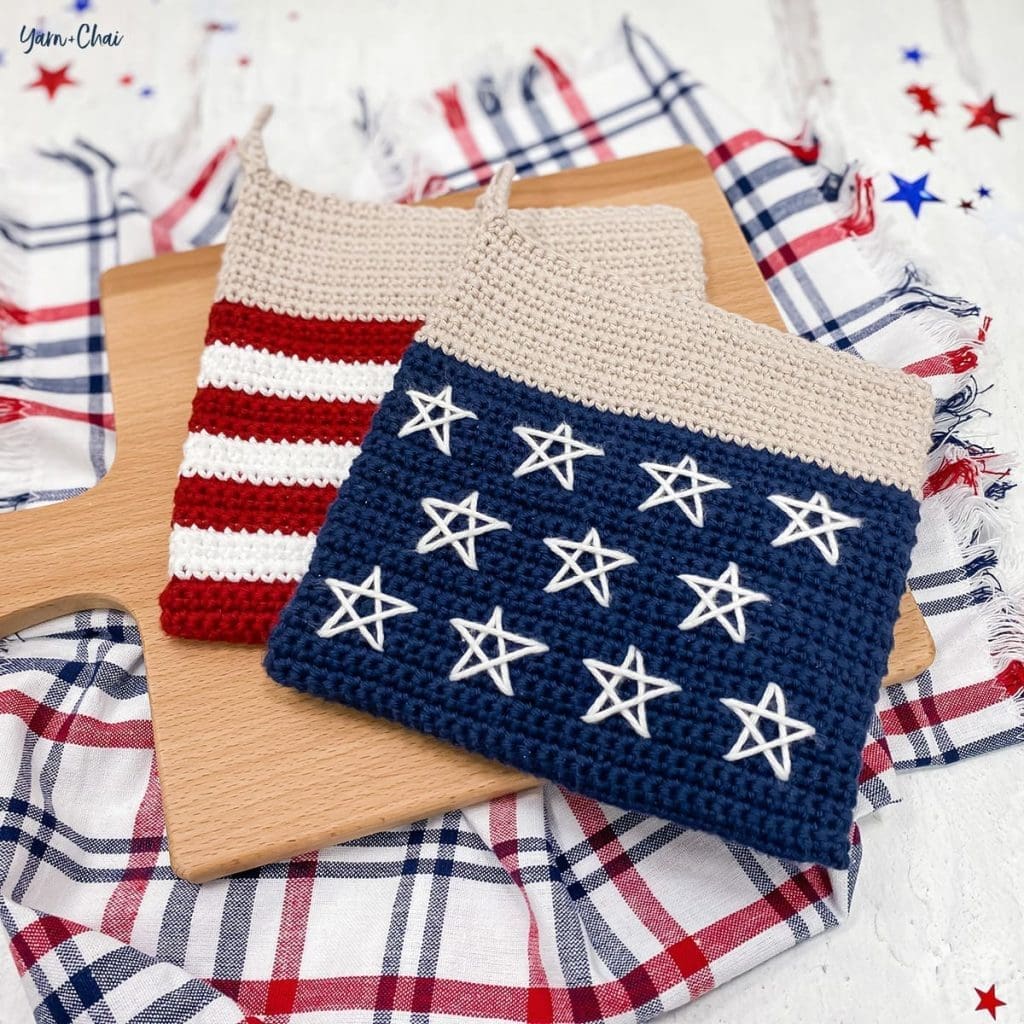
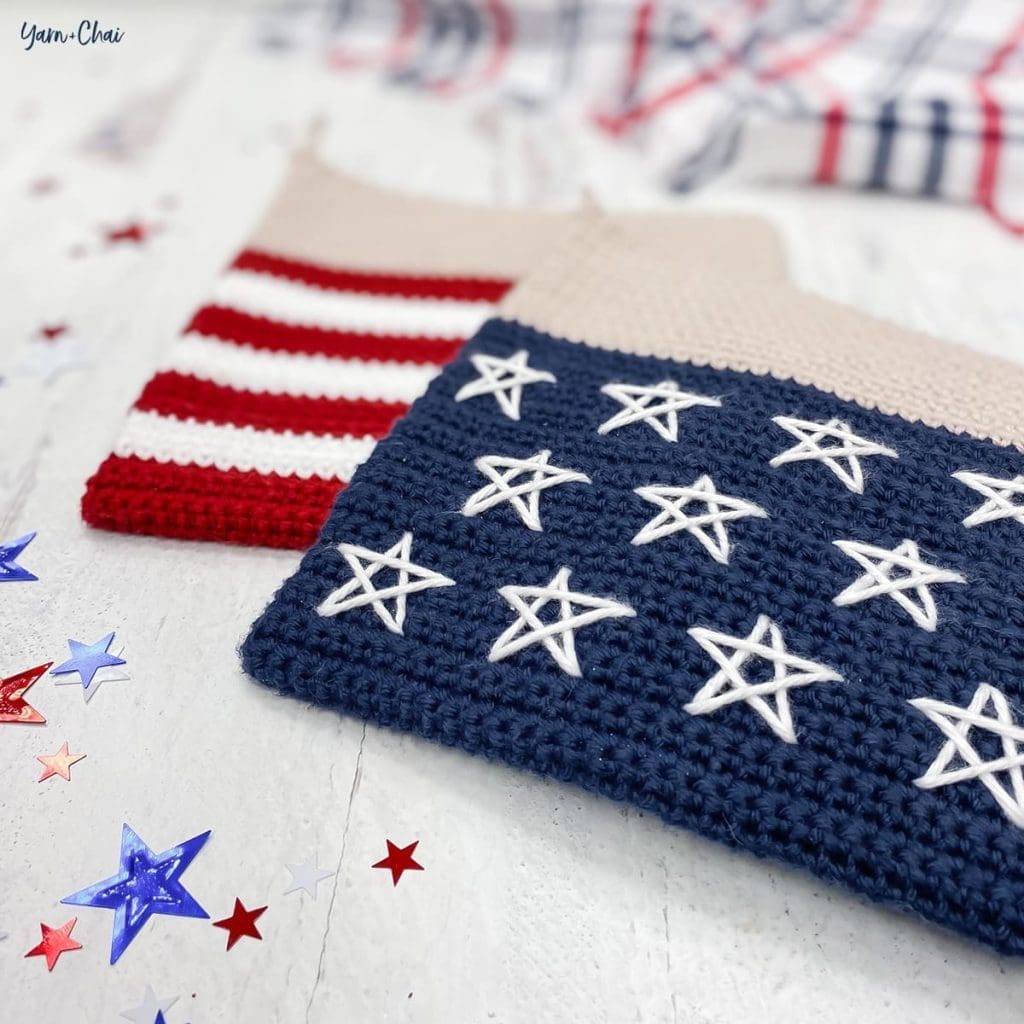
These double-thick red, white and blue potholders are the perfect project to get you in the patriotic spirit!
It’s important to use a 100% cotton yarn for items that will come into contact with intense heat, such as a potholder. For the red, white and blue colors, I used my go-to: Hobby Lobby’s I Love This Cotton. For the tan color at the top of the potholders, I turned to one of their newer yarns, Yarn Bee Pima Suprema, which is also a #4 weight and 100% cotton. I love the color “Bone”; It’s a beautiful light tan and exactly what I was looking for. Pima Suprema is a bit softer than I Love This Cotton, but we’re using such a small hook that it wasn’t an issue. Of course, there are tan colors within the I Love This Cotton line… use the one that calls to you!
Prefer a PDF?
This pattern can be completed using the 100% free version right here on this page. However, many people prefer the convenience of a printable, ad-free PDF.
All-Access Passholders get the ad-free version of this and all of my other blog patterns. It’s a pretty sweet deal, if I do say so myself! Learn more about it here or continuing scrolling for the free version.
– – – – – – – – – – – – – –
View on Ravelry
Stars & Stripes Potholder Set
Difficulty: Easy
Crochet Language: American Standard
Finished Size: 7.5″ x 7.5″
Yarn: #4 worsted weight, 100% cotton yarn in 4 colors, in the amounts below:
- COLOR A (red): 65 yards. I used I Love This Cotton in “Burnt Sienna”.
- COLOR B (white): 65 yards. I used I Love This Cotton in “White”.
- COLOR C (tan): 105 yards. I used Yarn Bee Pima Suprema in “Bone”.
- COLOR D (blue): 105 yards. I used I Love This Cotton in ‘Dark Denim”.
Hook: 3.5mm (E)
Gauge: 18SC x 23 rows = 4″ square
You’ll also need: Yarn needle
Terms and Abbreviations:
ST/STS (stitch/stitches)
SL ST (slip stitch)
CH (chain)
SC (single crochet)
Notes:
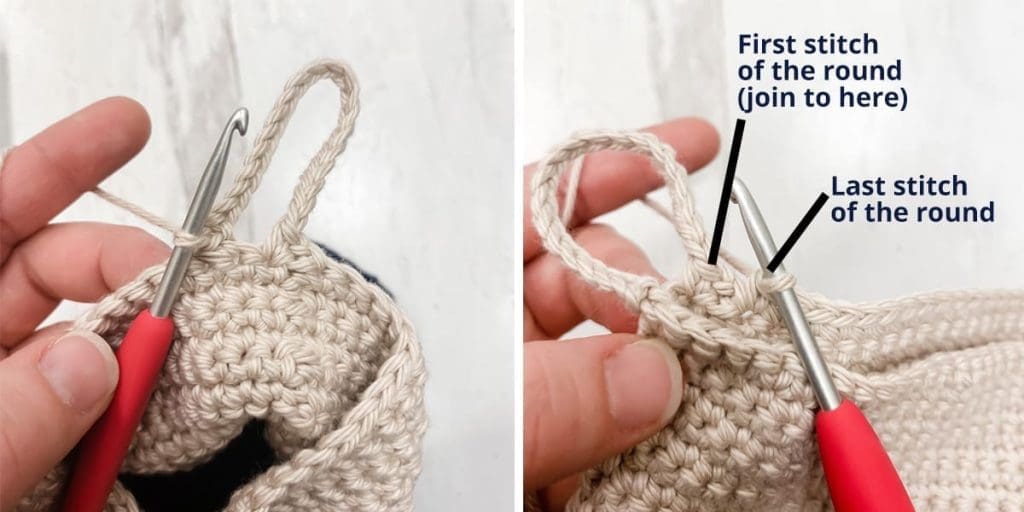
(1) Pattern is worked in joined, turned rounds. When instructed to “join”, always join with a SL ST to the top of the first SC of the round.
(2) For the striped potholder, you can carry your colors up the inside of the potholder so that there are fewer ends to weave in.
– – – – – – – – – – – – – – –
STRIPES POTHOLDER

To begin: With COLOR A, CH34.
Round 1: SC in 2nd CH from hook and in each remaining CH. Working around to the opposite side of the starting chain, SC in each CH across. You have now worked in both sides of each chain. Join. (68)
Rounds 2-4: CH1, turn. SC in each ST around. Join. (68)
Switch to COLOR B.
Rounds 5-8: CH1, turn. SC in each ST around. Join. (68)
Switch to COLOR A.
Rounds 9-12: CH1, turn. SC in each ST around. Join. (68)
Switch to COLOR B.
Rounds 13-16: CH1, turn. SC in each ST around. Join. (68)
Switch to COLOR A.
Rounds 17-20: CH1, turn. SC in each ST around. Join. (68)
Switch to COLOR B.
Rounds 21-24: CH1, turn. SC in each ST around. Join. (68)
Switch to COLOR A.
(You can fasten off COLOR B.)
Rounds 25-28: CH1, turn. SC in each ST around. Join. (68)
Switch to COLOR C.
(You can fasten off COLOR A.)
Rounds 29-40: CH1, turn. SC in each ST around. Join. (68)
Round 41: CH1, turn. SC in first ST, CH20, SC into next ST to form a loop (first image). SC in each remaining ST around (second image). Join. (68 + CH20)
Fasten off, leaving a long tail for closing the top of the potholder. Weave in all other ends.
SEAMING
Holding the potholder and making sure the top stitches are lined up so that the seam on the side is straight up-and-down, use the finishing tail and a yarn needle to sew the potholder closed. Secure with a knot, then run tail down into the potholder using the yarn needle; pull the knot so that it disappears into the inside of the potholder. Trim end so that it also disappears into the inside of the potholder.
STARS POTHOLDER
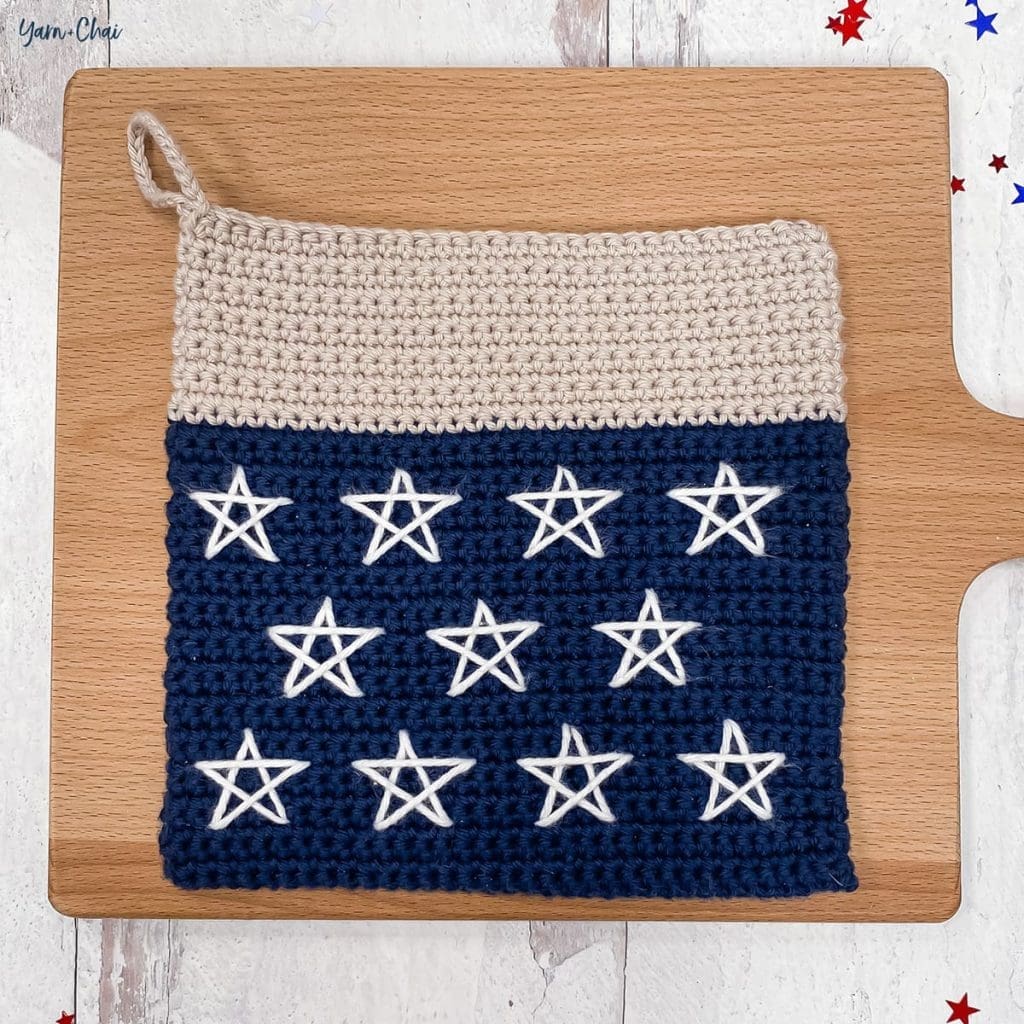
To begin: With COLOR D, CH34.
Round 1: SC in 2nd CH from hook and in each remaining CH. Working around to the opposite side of the starting chain, SC in each CH across. You have now worked in both sides of each chain. Join. (68)
Rounds 2-28: CH1, turn. SC in each ST around. Join. (68)
Switch to COLOR C.
(You can fasten off COLOR D.)
Rounds 29-40: CH1, turn. SC in each ST around. Join. (68)
Round 41: CH1, turn. SC in first ST, CH20, SL ST into next ST to form a loop. SC in each remaining ST around. Join. (68 + CH20)
Fasten off, leaving a long tail for closing the top of the potholder. Weave in all other ends.
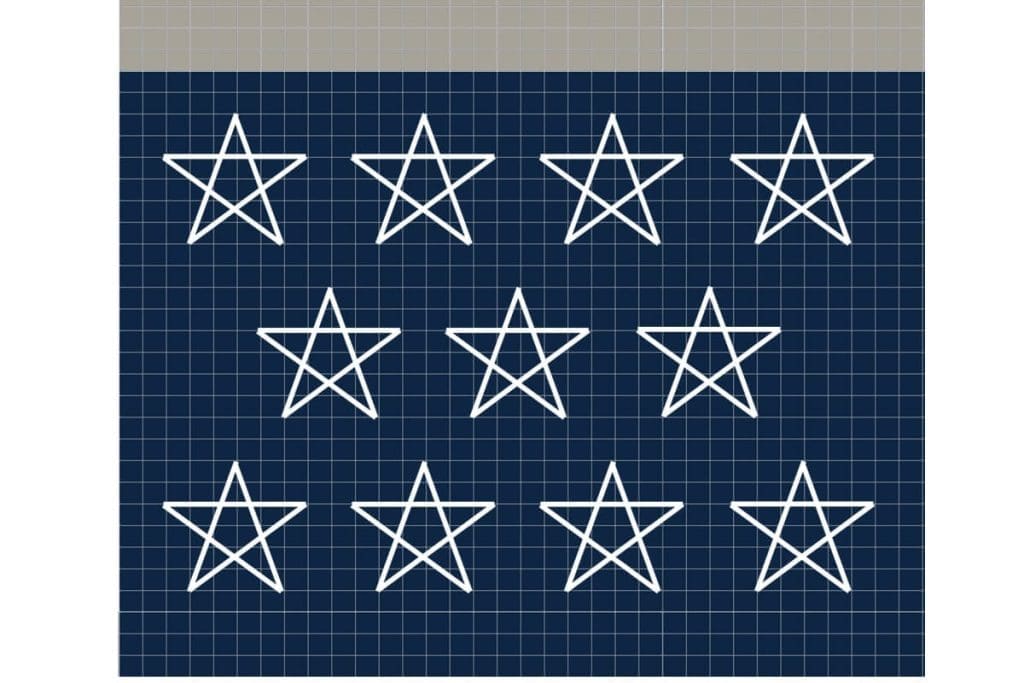
EMBROIDERING THE STARS
Using COLOR B (white), a yarn needle, and the chart below, embroider your stars onto both sides of the potholder by cutting a long length of yarn (however long you are comfortable with; you can just start with a new length of yarn when you run out) and following the pattern on the chart.
A few tips:
- Each star is 6 rows tall and 6 stitches wide. There are 8 stitches between the top points of stars that are next to each other, and two empty rows between each row of stars.
- If you look closely on my sample potholder (the finished one, not this chart), you’ll see that my first star (the top left) starts one stitch to the left from what the chart shows; I shifted everything over one stitch when creating this chart for you because it evens out the spacing around the outer edges of the blue section. I just didn’t want to rip out all of my stars, so I called it good enough. Follow the chart, and don’t be confused if you notice this slight difference in my photos. 🙂
- Try to be consistent when pulling each strand through; too tight, and your flat potholder will start to warp, but too loose, and they’ll start to look sloppy.
- Don’t forget to secure the start and end of each strand of white yarn! You can weave in the ends or tie knots and leave them loose inside the potholder, as long as they’re secure.
SEAMING
Holding the potholder and making sure the top stitches are lined up so that the seam on the side is straight up-and-down, use the finishing tail and a yarn needle to sew the potholder closed. Secure with a knot, then run tail down into the potholder using the yarn needle; pull the knot so that it disappears into the inside of the potholder. Trim end so that it also disappears into the inside of the potholder.
That’s it!
I hope you enjoyed this tutorial. If you’re sharing your project on social media, be sure to tag me @yarnandchai.design!

