

This pattern is part of the Yarn + Chai Spring 2023 Crochet-Along.
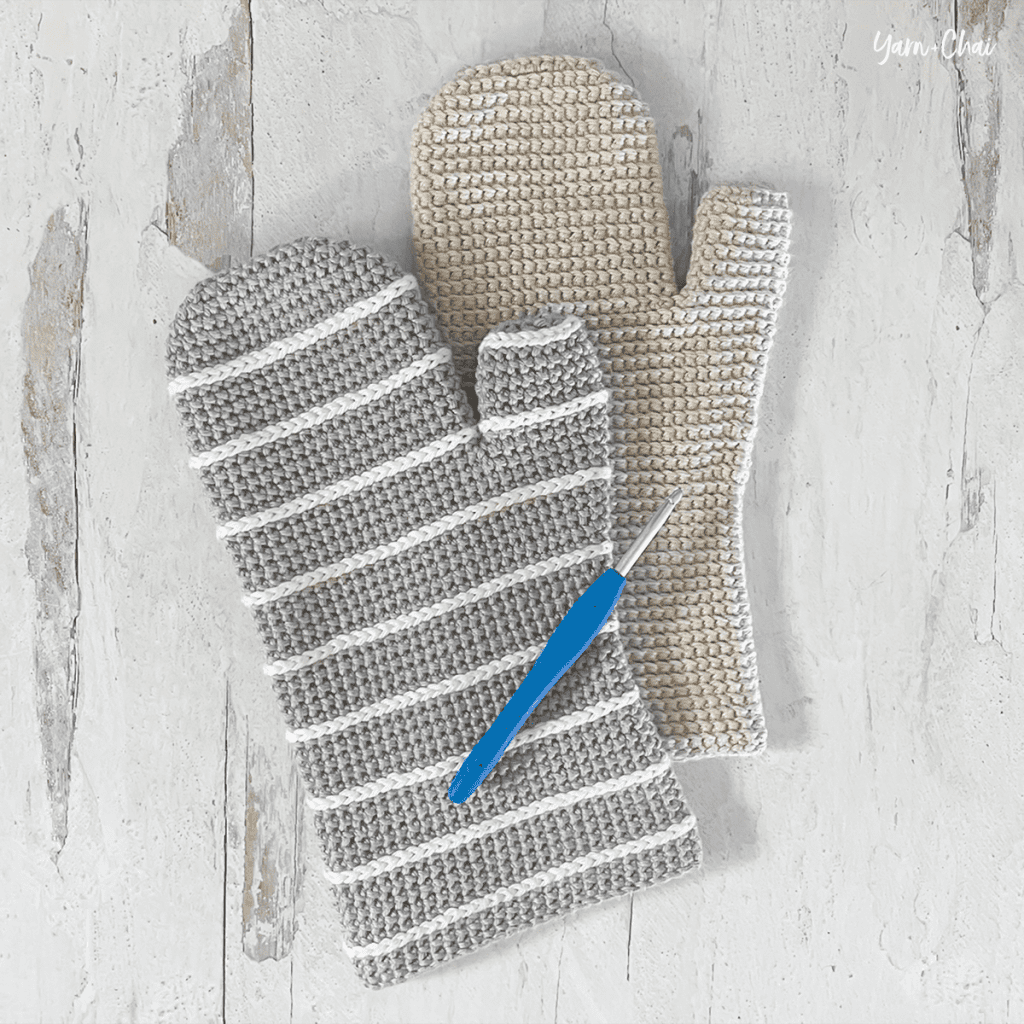
I’ve designed several potholders over the years, but never an oven mitt until now. I knew I wanted it to be a double layer of thickness just like my potholders, and with a little brainstorming, I was able to make it happen. I love the result!
The Striped Oven Mitt uses the same techniques as the matching Striped Potholder; but for this project, we’ll also utilize increases and decreases to get the perfect oven mitt shape.
The Striped Oven Mitt is part of a matching set of three cute + modern kitchen accessories, which are all available as part of my Spring 2023 Crochet-Along. I strongly recommend completing each individual project in order (potholder, oven mitt, towel holder), as the techniques involved do build on each other somewhat.
Here is where you’ll be able to find the links for each project:
- Striped Potholder: Click here
- Striped Oven Mitt: You are here!
- Striped Towel Holder: Available Wednesday, May 3 2023
About the Yarn
Hobby Lobby’s I Love This Cotton has definitely become my go-to cotton. It’s affordable and soft, and there are lots of colors available! But there are several other cottons to choose from when crocheting kitchen items. Here are a few other options you could use:
- K + C Essential Cotton (available at Joann Fabrics)
- Lily Sugar ‘n Cream
- Lion Brand 24/7 Cotton
- Yarn Bee Fundamental Cotton (available at Hobby Lobby)
Whatever you pick, make sure it’s a 100% cotton yarn. Other fibers like wool and acrylic will melt if they get too hot… and what a mess that would be!
Prefer a PDF?
This pattern can be completed using the 100% free version right here on this page. However, many people prefer the convenience of a printable, ad-free PDF.
All-Access Passholders get the ad-free version of this and all of my other blog patterns. It’s a pretty sweet deal, if I do say so myself! Learn more about it here or continuing scrolling for the free version.
– – – – – – – – – – – – – –
Striped Oven Mitt
Difficulty: Easyish
Crochet Language: American Standard
Finished Size: 5.5″ x 10.75″ (inner lining is 5″ x 10.5″)
Yarn: I used Hobby Lobby’s I Love This Cotton, but you can use your favorite #4 weight kitchen cotton. You’ll need approximately 125 yards of BASE COLOR A for the inner lining (I used “Parchment”), 160 yards of BASE COLOR B for the outer mitt color (I used “Dove”), and 30 yards of STRIPE COLOR (I used “White”). If you wish to make both the inner lining and the outer mitt the same color, simply combine the yarn amounts for BASE COLORS A and B for a total of 285 yards.
Hook: H (5.5mm), or whichever hook size is needed to achieve gauge.
Gauge: 20 CSC x 19 rows = 4″ square
You’ll Also Need: 10″ length of leather or suede craft cord (also called craft lace) for optional hanging loop.
Terms and Abbreviations:
ST/STS (stitch/stitches)
SL ST (slip stitch)
CH (chain)
CSC (crossed single crochet: Insert hook into stitch. Yarn UNDER, pull through; 2 loops on hook. Yarn over, pull through both loops.
CSC INC (CSC increase: 2 CSC in the same ST)
CSC DEC (CSC 2 stitches together: Insert hook into FLO of stitch, then immediately insert hook into FLO of the next ST. Yarn UNDER, pull through front loop of each ST; 2 loops on hook. Yarn over, pull through both loops.)
FLO (front loop only)
JOIN (Join with a SL ST to the top loops of the first ST of the round)
Notes:
(1) Pattern is worked in joined, unturned rounds. CSC stitches worked into FLO stack nice and straight on top of each other, which allows the seam to stay straight and clean. If you have trouble recognizing your first and last stitches, a stitch marker can be very helpful.
(2) CH1s at the beginning of rounds do not count as stitches in final stitch counts.
(3) Unless otherwise noted, the first stitch of each round is always worked into the same ST as the CH1.
(4) The slip stitched stripes (worked in white in my sample) are labeled in the pattern as “STRIPE #1”, “STRIPE #2”, etc. They are not a part of the main round count because when we work these stripes after a round of CSC, the top loops of those CSCs remain exposed so that when we move on to the next round of CSC, we are still working into the loops from the previous round of CSC. (This will probably make more sense once you’ve gotten started!)
(5) The pattern is worked in two parts: the inner lining, and the outer mitt. They are joined together at the end with a single round of stitches.
(6) Instructional photos are located below their respective written instructions.
– – – – – – – – – – – – – – –
PART 1: INNER LINING
– – – – – – – – – – – – – – –
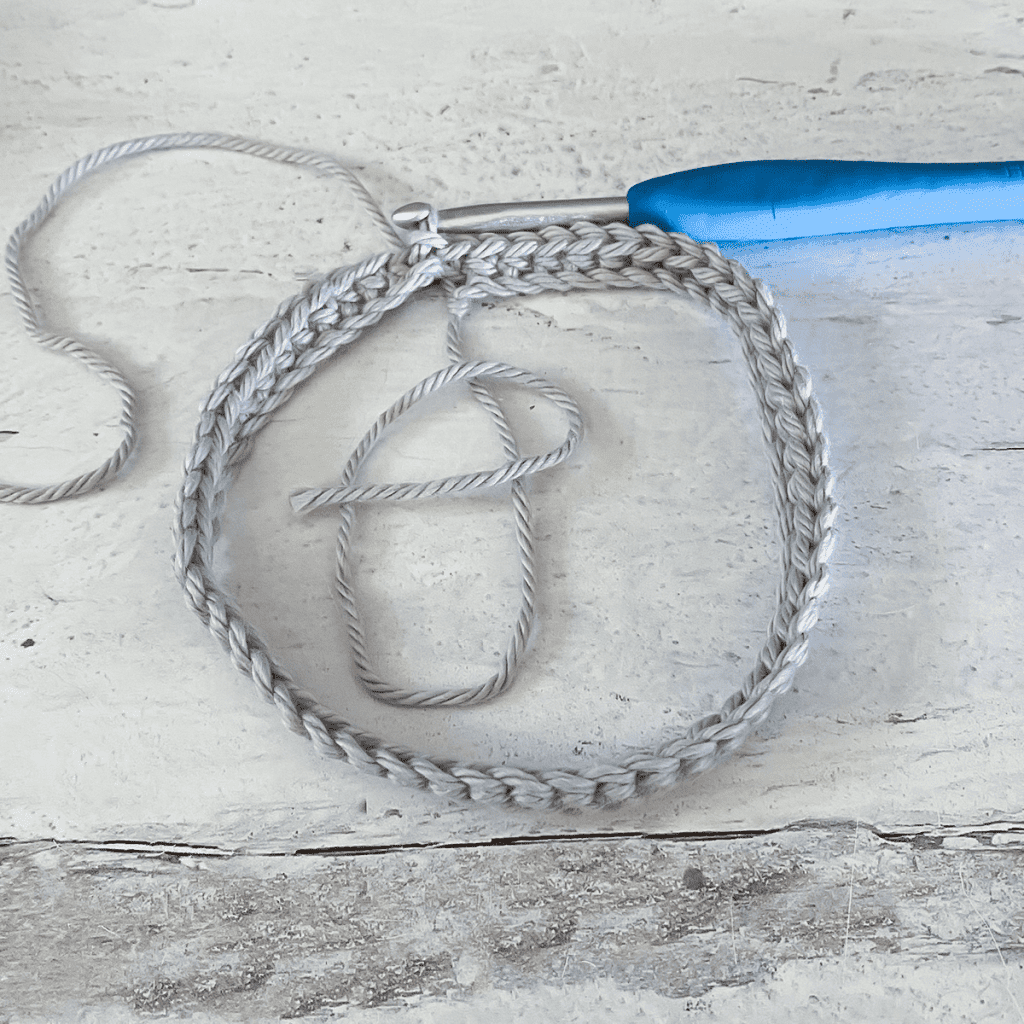
To begin: With BASE COLOR A, CH51.
Round 1: CSC in 2nd CH from hook and in each remaining CH to end. Join to form a loop, being careful not to twist the round. (50)
Rounds 2-19: CH1 (do not turn). CSC in FLO of each ST around. Join. (50)
Round 20: CH1 (do not turn). CSC in FLO of each of the first 24 STS, CSC INC in FLO of each of the next 2 STS, CSC in FLO of each of the remaining 24 STS. Join. (52)
Rounds 21-22: CH1 (do not turn). CSC in FLO of each ST around. Join. (52)
Round 23: CH1 (do not turn). CSC in FLO of each of the first 25 STS, CSC INC in FLO of each of the next 2 STS, CSC in FLO of each of the remaining 25 STS. Join. (54)
Rounds 24-25: CH1 (do not turn). CSC in FLO of each ST around. Join. (54)
Round 26: CH1 (do not turn). CSC in FLO of each of the first 26 STS, CSC INC in FLO of each of the next 2 STS, CSC in FLO of each of the remaining 26 STS. Join. (56)
Rounds 27-28: CH1 (do not turn). CSC in FLO of each ST around. Join. (56)
Round 29: CH1 (do not turn). CSC in FLO of each of the first 27 STS, CSC INC in FLO of each of the next 2 STS, CSC in FLO of each of the remaining 27 STS. Join. (58)
Rounds 30-31: CH1 (do not turn). CSC in FLO of each ST around. Join. (58)
Round 32: CH1 (do not turn). CSC in FLO of each of the first 28 STS, CSC INC in FLO of each of the next 2 STS, CSC in FLO of each of the remaining 28 STS. Join. (60)
Round 33 (forming the thumb hole): CH 1 (do not turn). CSC in FLO of each of the first 21 STS, SKIP OVER the next 18 STS, CSC in FLO of each of the remaining 21 STS. Join. (42, with 18 unworked STS)
Rounds 34-45: CH1 (do not turn). CSC in FLO of each ST around. Join. (42)
Round 46: CH1 (do not turn). CSC DEC in FLO, CSC in FLO of each of the next 17 STS, CSC DEC in FLO 2 times, CSC in FLO of each of the next 17 STS, CSC DEC in FLO. (38)
Round 47: CH1 (do not turn). CSC DEC in FLO, CSC in FLO of each of the next 15 STS, CSC DEC in FLO 2 times, CSC in FLO of each of the next 15 STS, CSC DEC in FLO. (34)
Round 48: CH1 (do not turn). CSC DEC in FLO 2 times, CSC in FLO of each of the next 9 STS, CSC DEC in FLO 4 times, CSC in FLO of each of the next 9 STS, CSC DEC in FLO 2 times. (26)
Round 49: CH1 (do not turn). CSC DEC in FLO 2 times, CSC in FLO of each of the next 5 STS, CSC DEC in FLO 4 times, CSC in FLO of each of the next 5 STS, CSC DEC in FLO 2 times. (18)
Fasten off, leaving a 12″ tail for later seaming.
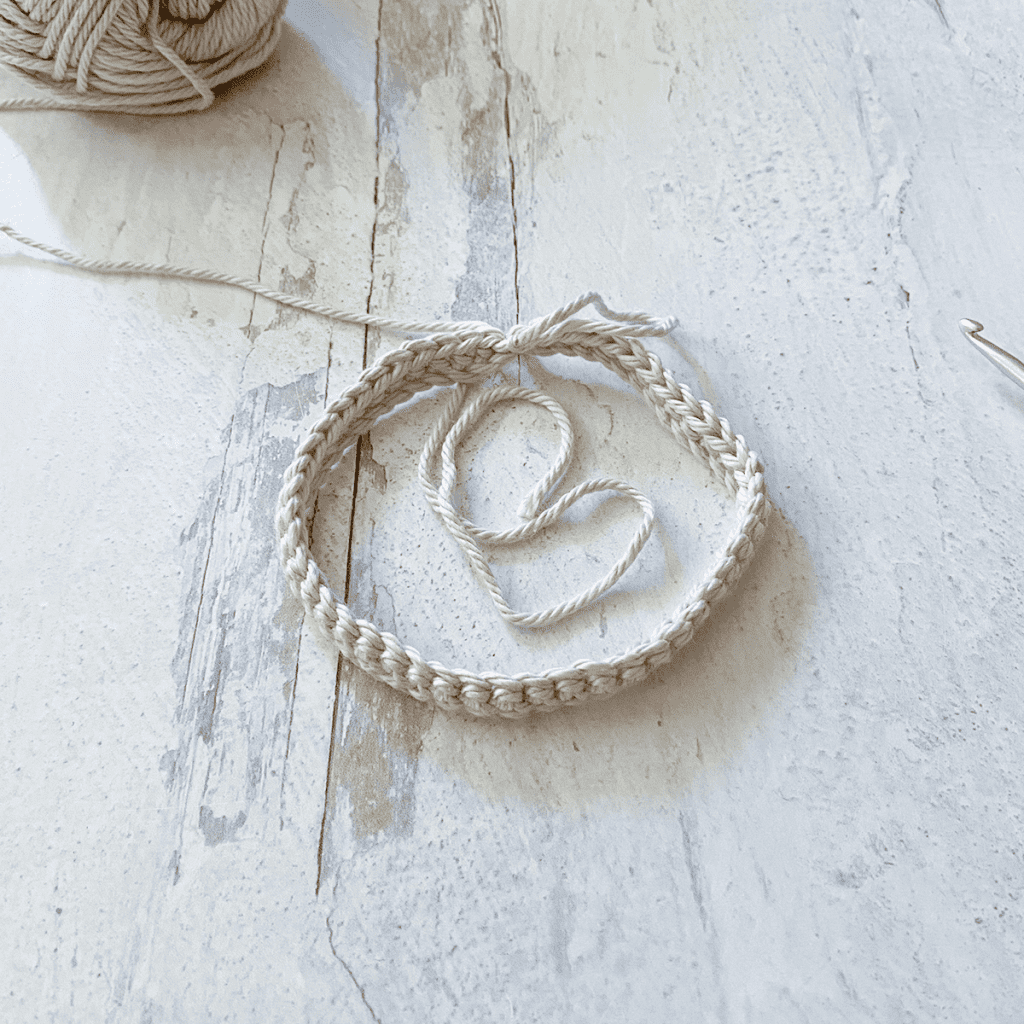
THUMB
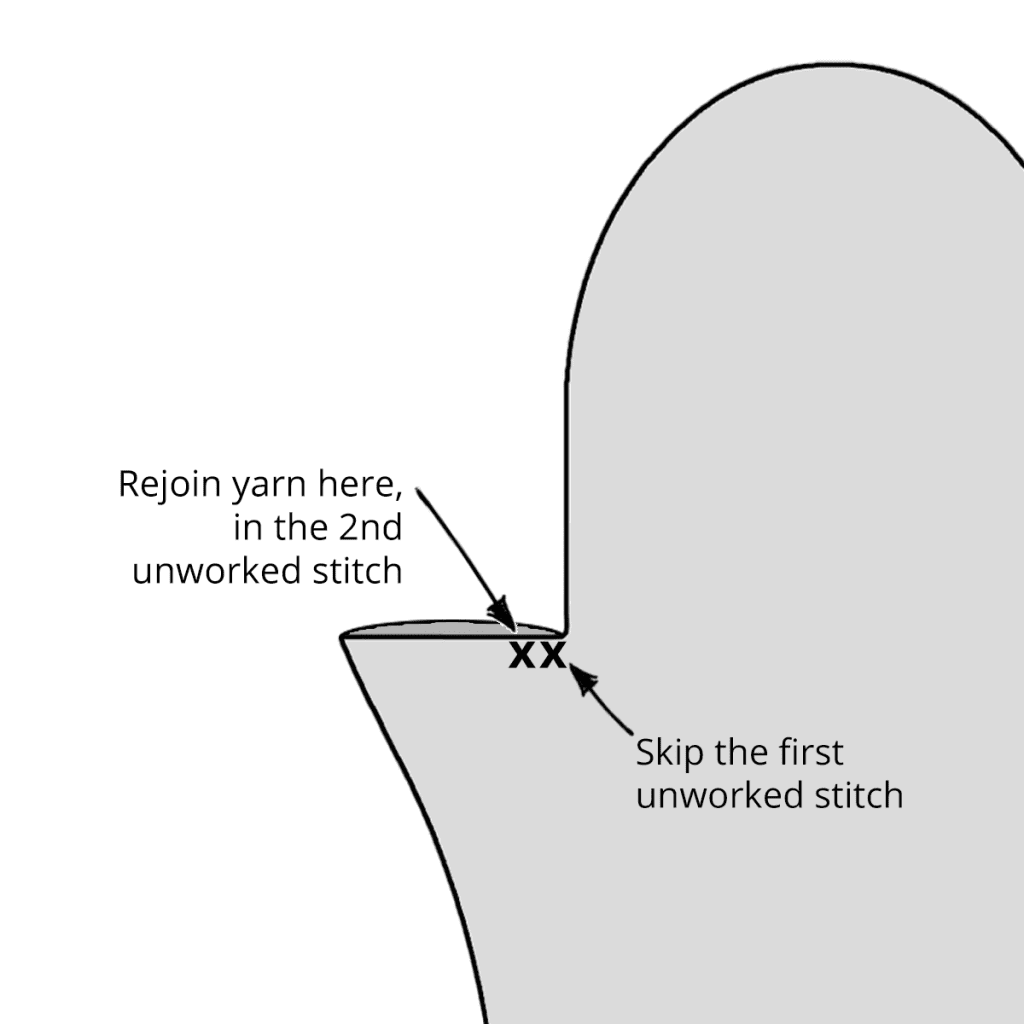
Lay mitt flat with seam along the right edge and thumb hole on the left. Leaving one stitch empty, rejoin your yarn in the 2nd unworked stitch along the thumb hole.
Thumb, Round 1: CH1. CSC in FLO of each of the first 16 STS. (1 stitch will remain unworked at the end.) Join. (16)
Rounds 2-7: CH1 (do not turn). CSC in FLO of each ST around. Join. (16)
Round 8: CSC DEC in FLO around (8 times). Join. (8)
Fasten off, leaving a tail for later seaming.
FINISHING
Turn mitt inside out and lay flat.
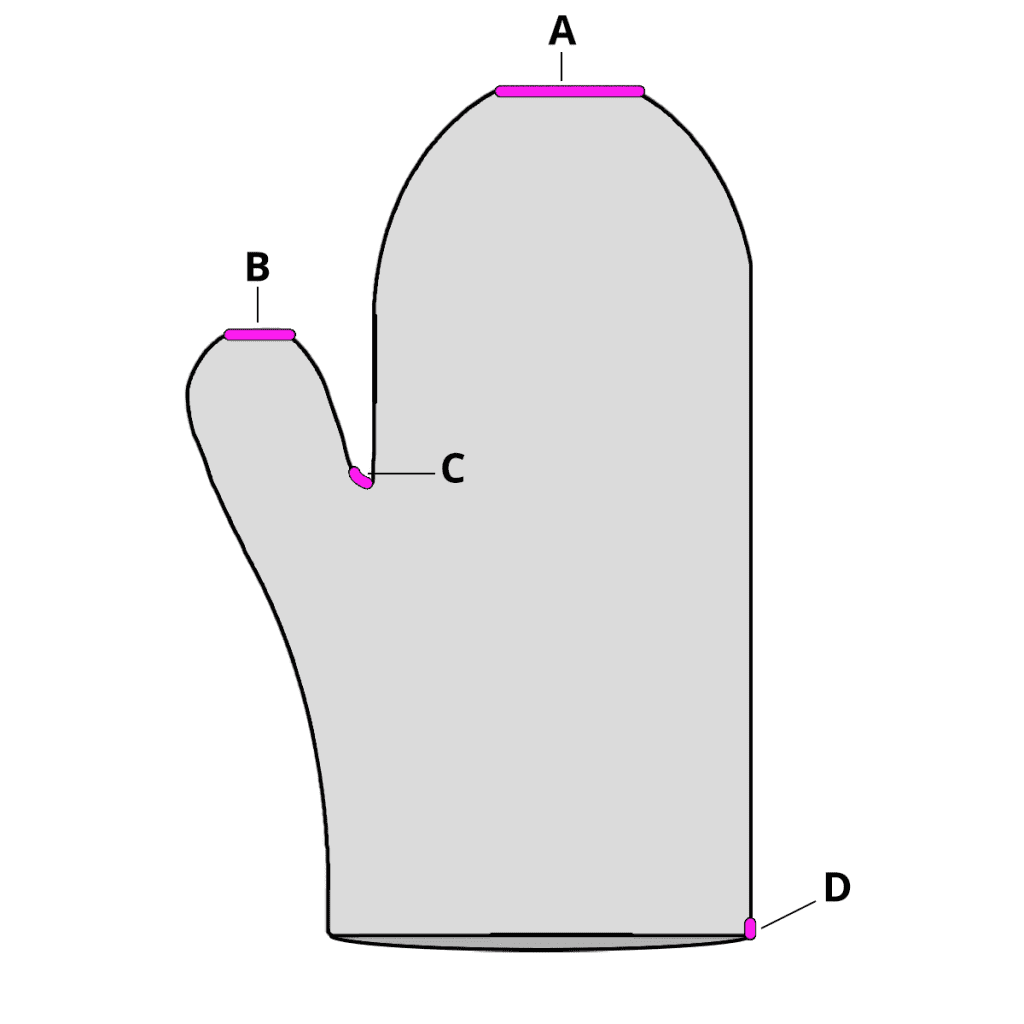
Use first finishing tail to whip stitch top of mitt closed (A). Use 2nd (thumb) finishing tail to whip stitch top of thumb closed (B). Use thumb starting tail to stitch together the small hole between the thumb and the rest of the mitt (C). Use starting tail to stitch up the small gap between the first and last STS of the Round 1 (D).
Weave in all ends. Set aside and move on to Part 2: Outer Mitt.
– – – – – – – – – – – – – – –
PART 2: OUTER MITT
– – – – – – – – – – – – – – –
To begin: With BASE COLOR B, CH55.
Round 1: CSC in 2nd CH from hook and in each remaining CH to end. Join to the first CSC to form a loop, being careful not to twist the round. (54)
Rounds 2-3: CH1 (do not turn). CSC in FLO of each ST around. Join. (54)
Pull up a large loop so that your work doesn’t unravel, then remove your hook.
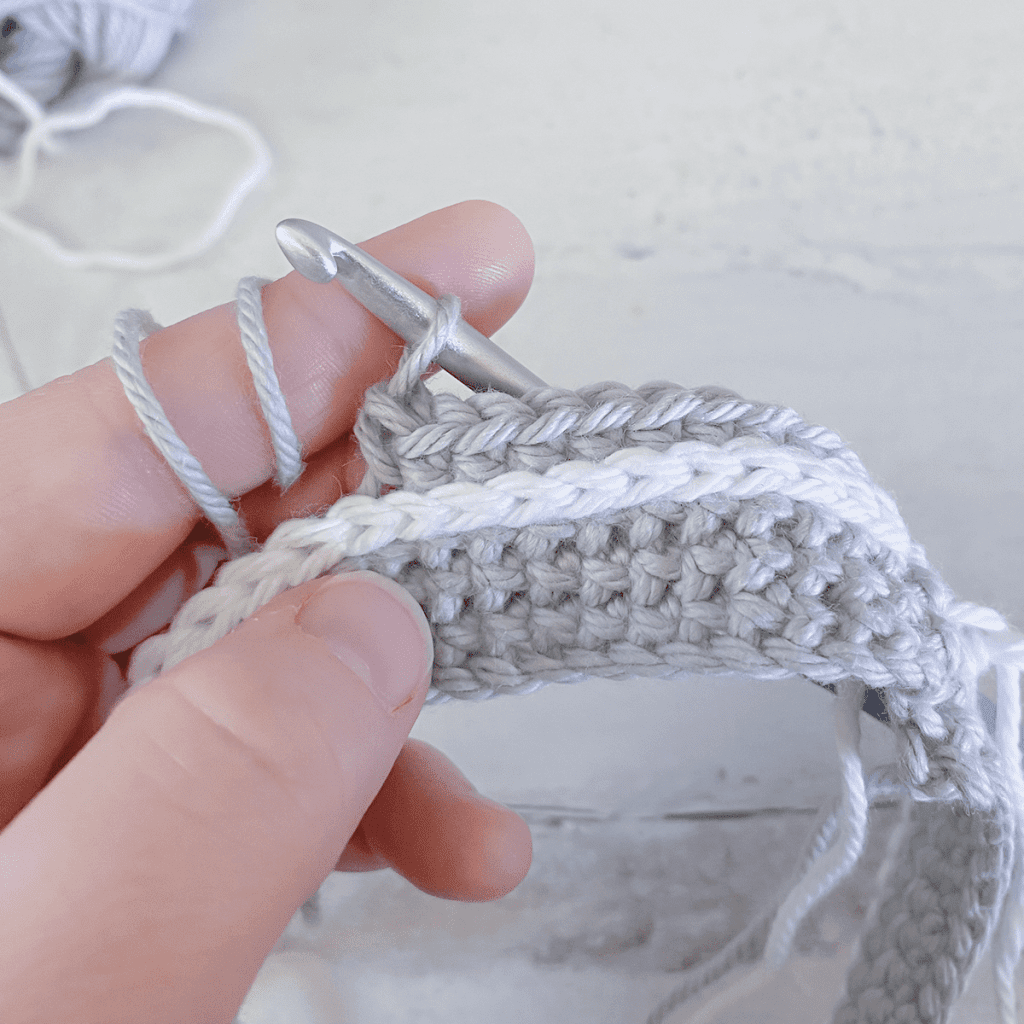
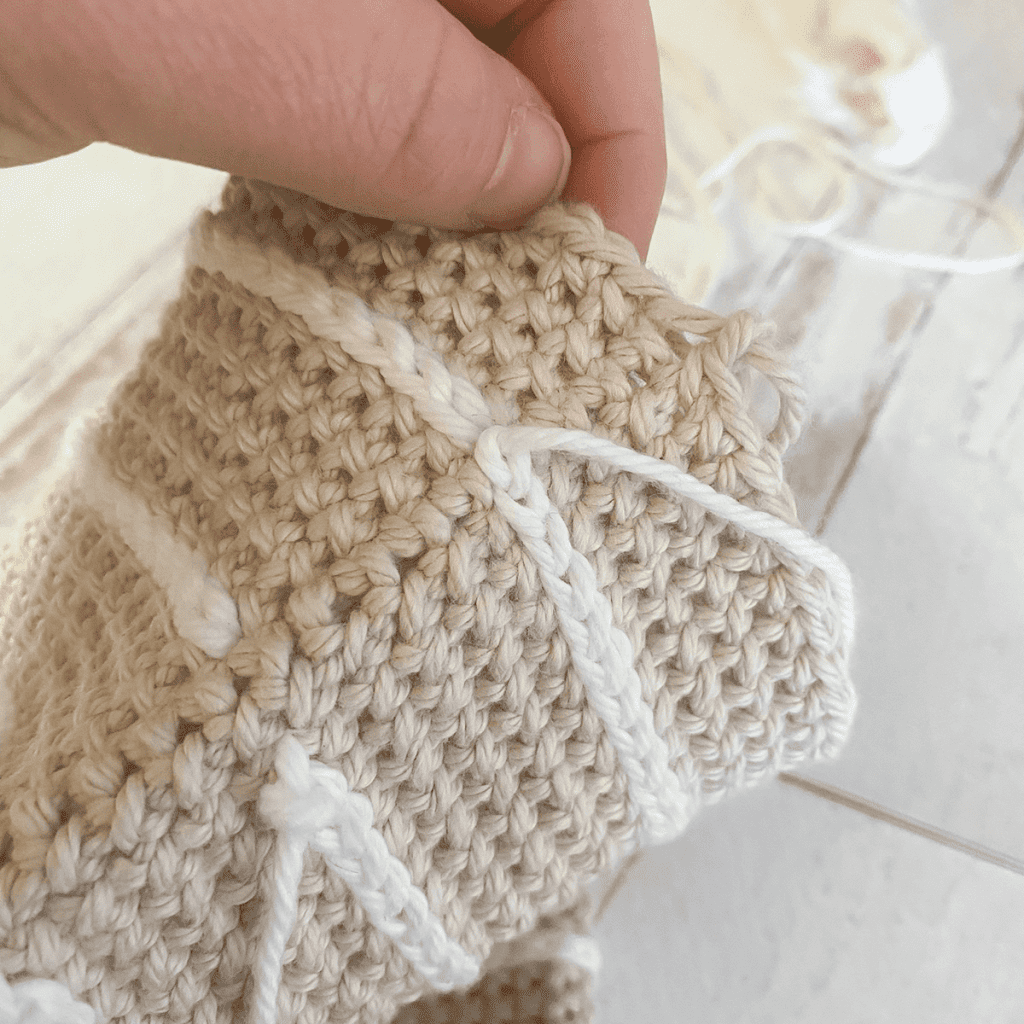
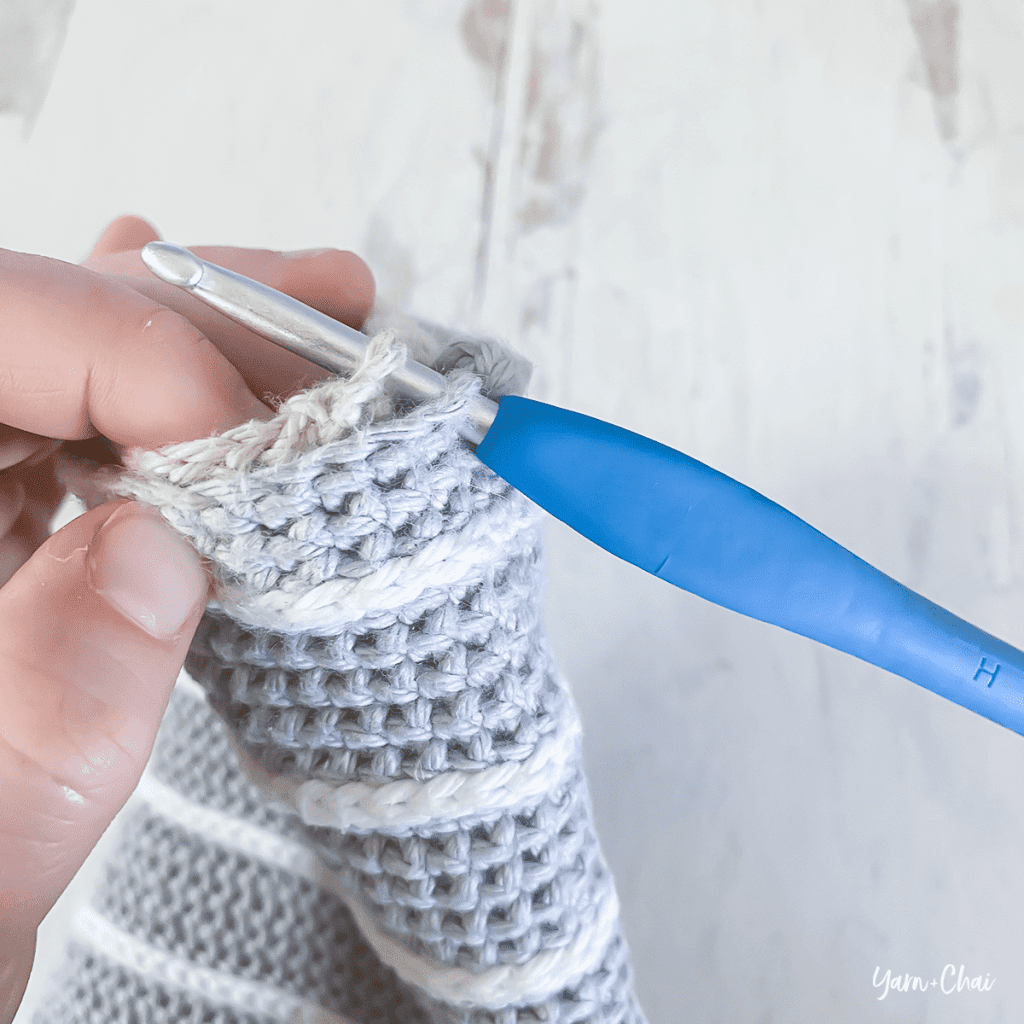
STRIPE #1: Pull STRIPE COLOR through top loops of first ST of the round. Do not chain; instead, immediately insert hook into next stitch (1st image) and work a SL ST (2nd image). Continue to SL ST in each ST around (3rd image). Fasten off without joining (4th image). (53)
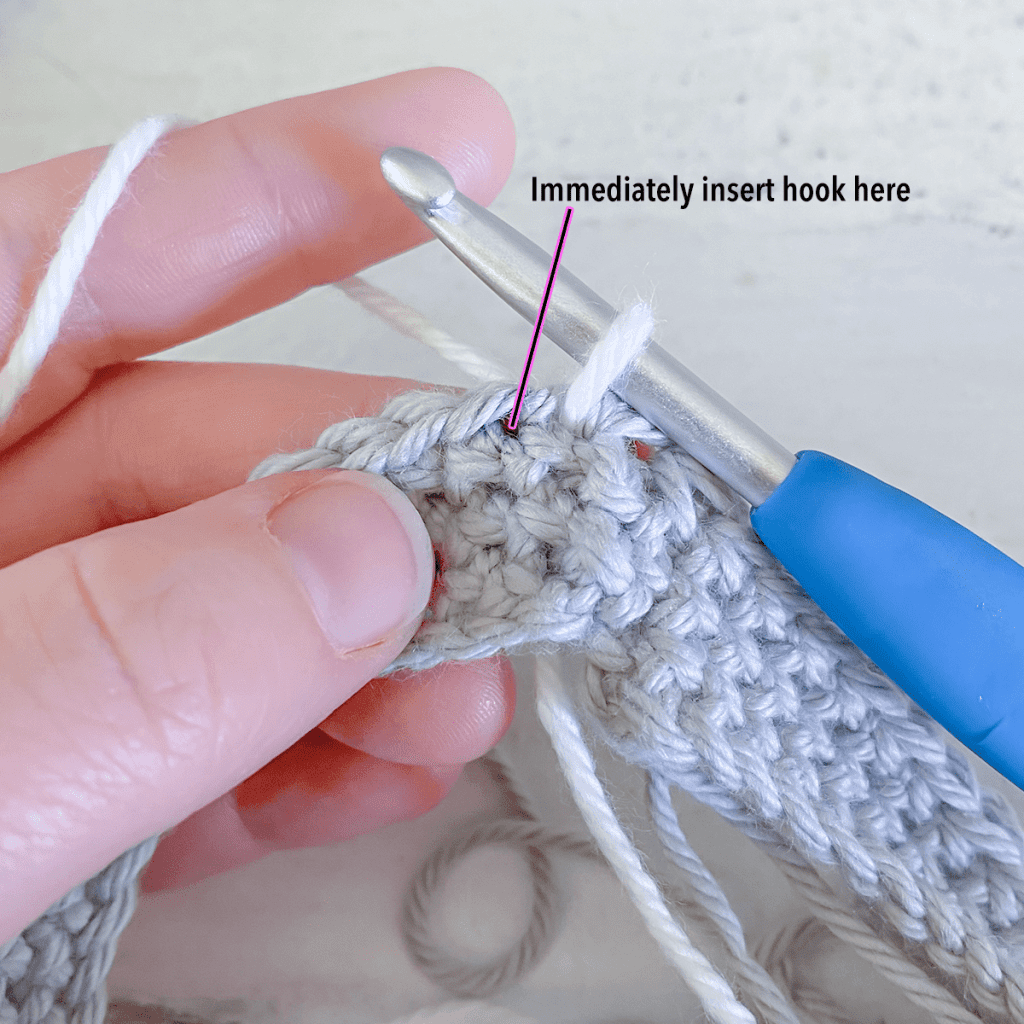
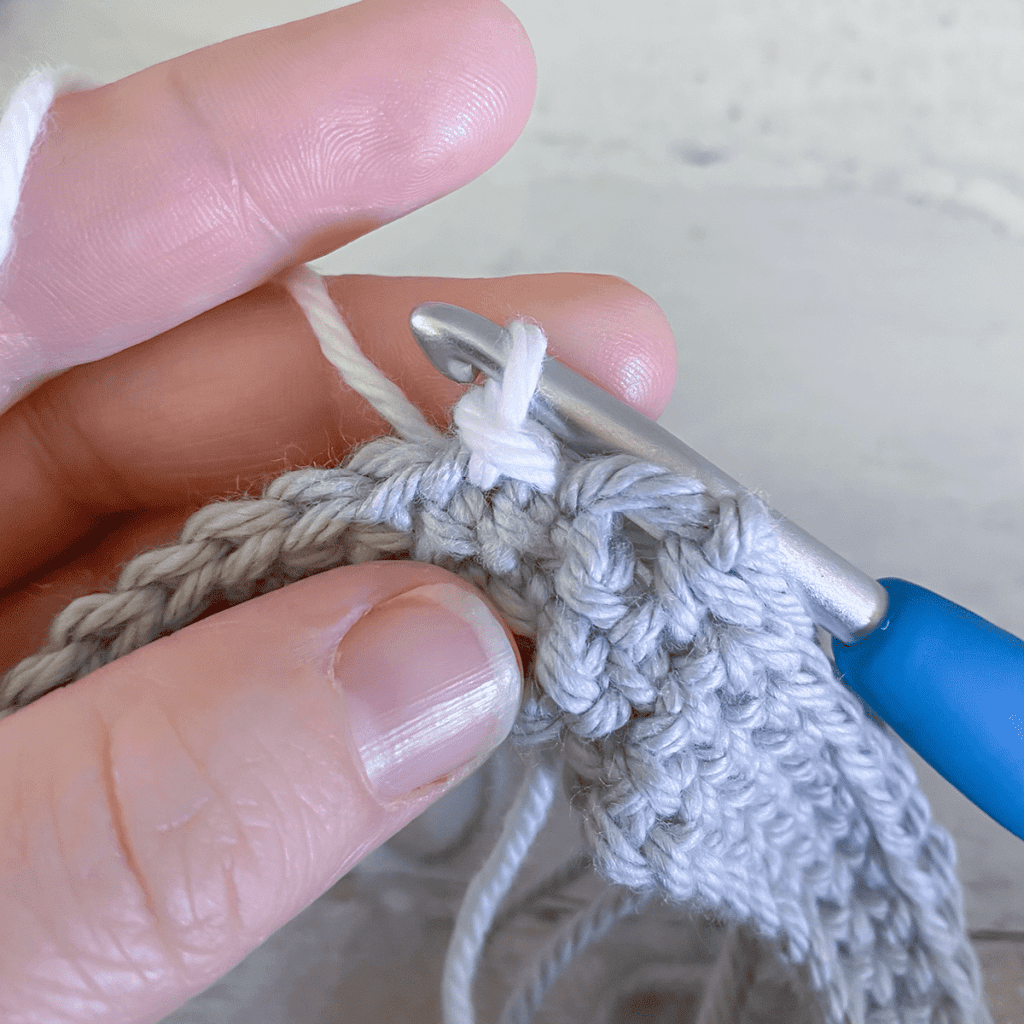
Notice how the top loops from the previous BASE COLOR round are still visible (1st image); that’s where you’ll work the next round as we continue on (2nd image).

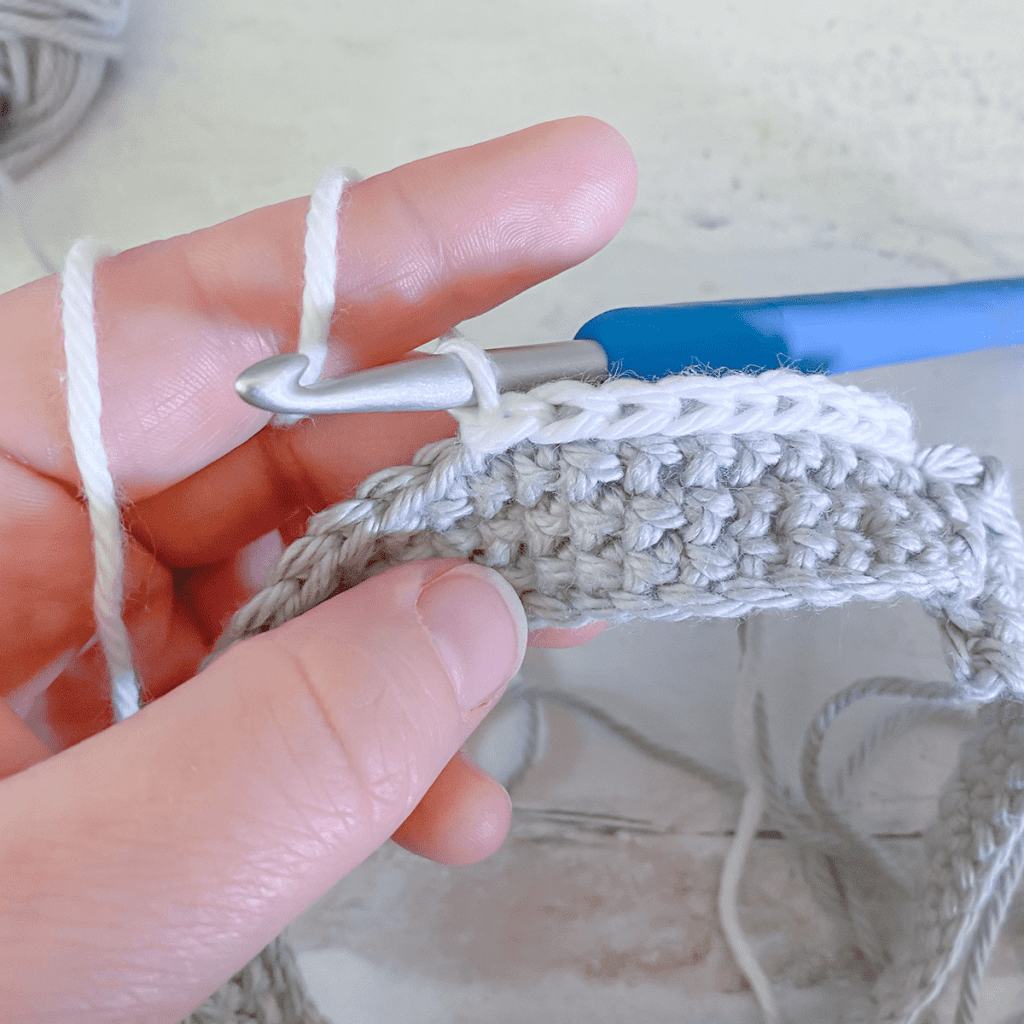
Rounds 4-8: With BASE COLOR B, CH1 (do not turn). CSC in FLO of each ST around. Join. (54)
STRIPE #2: Follow instructions from STRIPE #1. (53)
Rounds 9-13: With BASE COLOR B, CH1 (do not turn). CSC in FLO of each ST around. Join. (54)
STRIPE #3: Follow instructions from STRIPE #1. (53)
Rounds 14-18: With BASE COLOR B, CH1 (do not turn). CSC in FLO of each ST around. Join. (54)
STRIPE #4: Follow instructions from STRIPE #1. (53)
Round 19: With BASE COLOR B, CH1 (do not turn). CSC in FLO of each of the first 26 STS, CSC INC in FLO x2, CSC in FLO of each of the remaining 26 STS. Join. (56)
Rounds 20-21: CH1 (do not turn). CSC in FLO of each ST around. Join. (56)
Round 22: CH1 (do not turn). CSC in FLO of each of the first 27 STS, CSC INC in FLO x2, CSC in FLO of each of the remaining 27 STS. Join. (58)
Round 23: CH1 (do not turn). CSC in FLO of each ST around. Join. (58)
STRIPE #5: Follow instructions from STRIPE #1. (57)
Round 24: With BASE COLOR B, CH1 (do not turn). CSC in FLO of each ST around. Join. (58)
Round 25: CH1 (do not turn). CSC in FLO of each of the first 28 STS, CSC INC in FLO x2, CSC in FLO of each of the remaining 28 STS. Join. (60)
Rounds 26-27: CH1 (do not turn). CSC in FLO of each ST around. Join. (60)
Round 28: CH1 (do not turn). CSC in FLO of each of the first 29 STS, CSC INC in FLO x2, CSC in FLO of each of the remaining 29 STS. Join. (62)
STRIPE #6: Follow instructions from STRIPE #1. (61)
Rounds 29-30: With BASE COLOR B, CH1 (do not turn). CSC in FLO of each ST around. Join. (62)
Round 31: CH1 (do not turn). CSC in FLO of each of the first 30 STS, CSC INC in FLO x2, CSC in FLO of each of the remaining 30 STS. Join. (64)
Round 32 (forming the thumb hole): CH1 (do not turn). CSC in FLO of each of the first 22 STS, SKIP the next 20 STS, CSC in FLO of each of the remaining 22 STS. Join. (44)
Round 33: CH1 (do not turn). CSC in FLO of each ST around. Join. (44)
STRIPE #7: Follow instructions from STRIPE #1. (43)
Rounds 34-38: With BASE COLOR B, CH1 (do not turn). CSC in FLO of each ST around. Join. (44)
STRIPE #8: Follow instructions from STRIPE #1. (43)
Rounds 39-43: With BASE COLOR B, CH1 (do not turn). CSC in FLO of each ST around. Join. (44)
STRIPE #9: Follow instructions from STRIPE #1. (43)
Rounds 44-45: With BASE COLOR B, CH1 (do not turn). CSC in FLO of each ST around. Join. (44)
Round 46: CH1 (do not turn). CSC DEC in FLO, CSC in FLO of each of the next 18 STS, CSC DEC in FLO x2, CSC in FLO of each of the next 18 STS, CSC DEC in FLO. Join. (40)
Round 47: CH1 (do not turn). CSC DEC in FLO, CSC in FLO of each of the next 16 STS, CSC DEC in FLO x2, CSC in FLO of each of the next 16 STS, CSC DEC in FLO. Join. (36)
Round 48: CH1 (do not turn). CSC DEC x2 in FLO, CSC in FLO of each of the next 10 STS, CSC DEC in FLO x4, CSC in FLO of each of the next 10 STS, CSC DEC in FLO x2. Join. (28)
Round 49: CH1 (do not turn). CSC DEC in FLO x2, CSC in FLO of each of the next 6 STS, CSC DEC in FLO x4, CSC in FLO of each of the next 6 STS, CSC DEC in FLO x2. Join. (20)
Fasten off, leaving a 12″ tail for later seaming.
THUMB
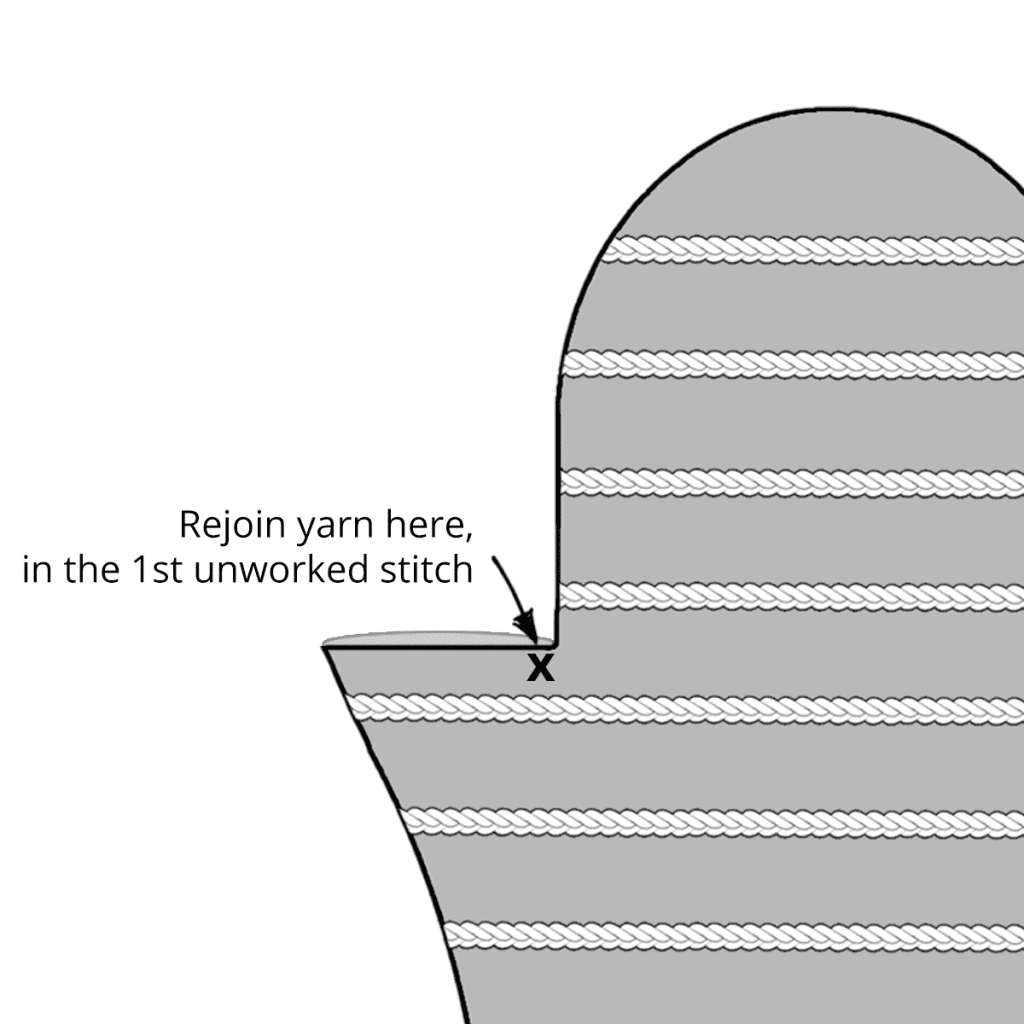
Lay mitt flat with seam along the right edge and thumb hole on the left. Rejoin your yarn in the 1st unworked stitch along the thumb hole.
Thumb, Round 1: CH1. CSC in FLO of each ST around. Join. (20)
Round 2: CH1 (do not turn). CSC in FLO of each ST around. Join. (20)
THUMB STRIPE #1: Follow instructions from STRIPE #1. (19)
Rounds 3-7: CH1 (do not turn). CSC in FLO of each ST around. Join. (20)
THUMB STRIPE #2: Follow instructions from STRIPE #1. (19)
Round 8: CSC DEC in FLO around (10 times). Join. (10)
Fasten off, leaving a tail for later seaming.
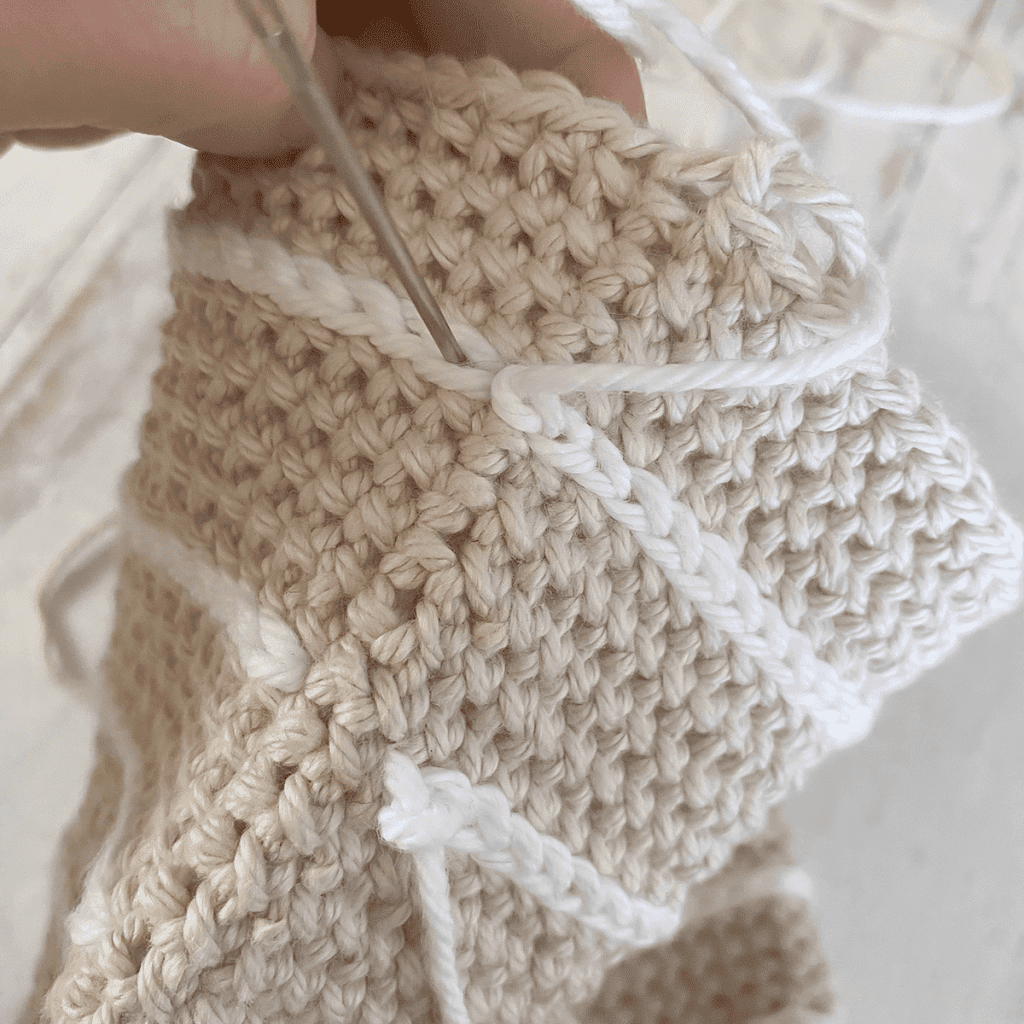
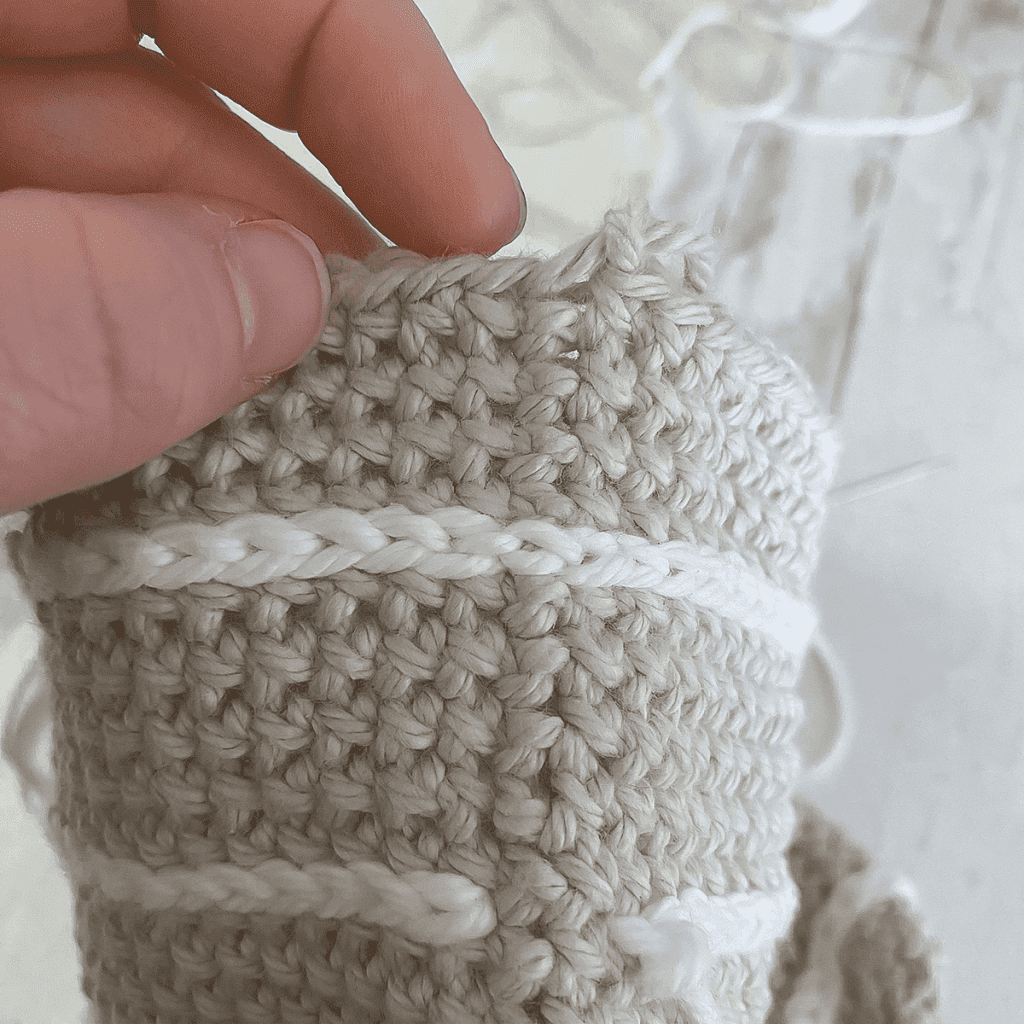
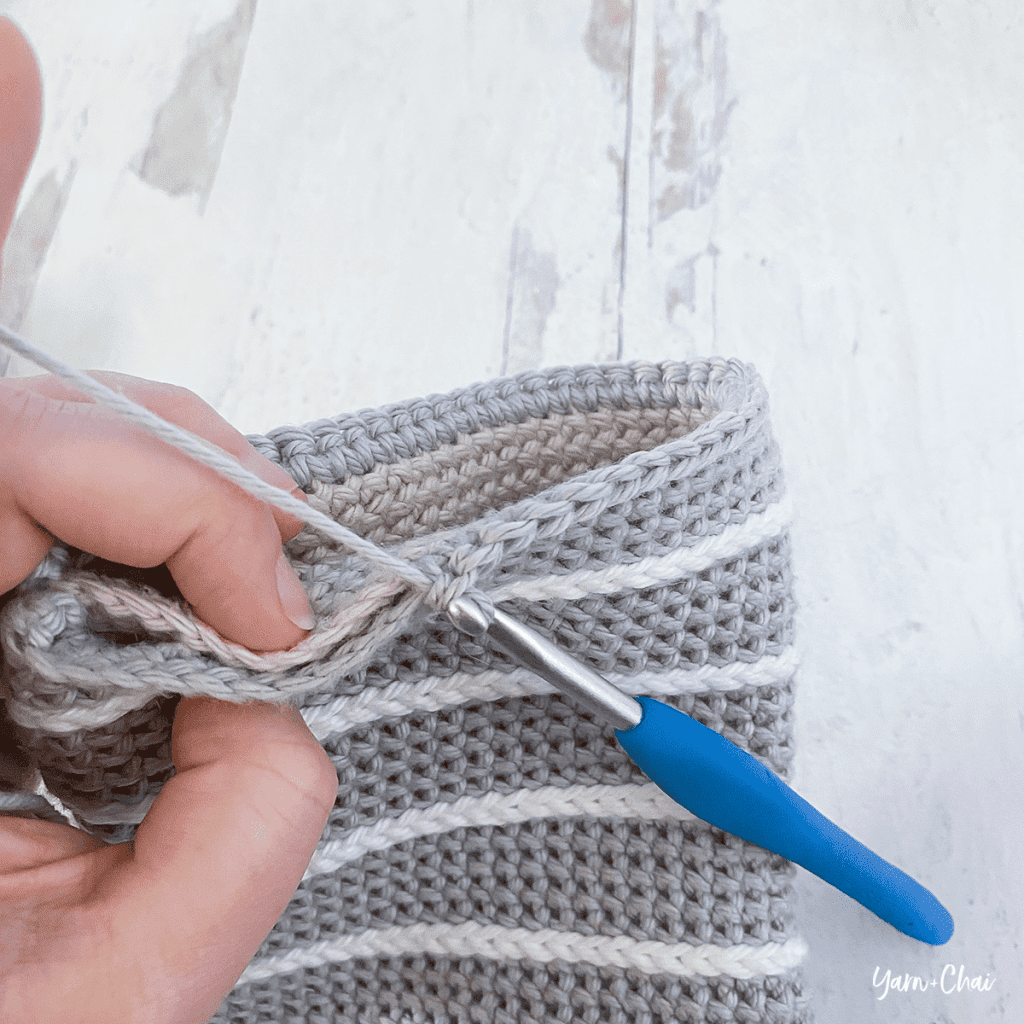
FINISHING THE STRIPES
To finish the stripes and create an almost seamless look, we’ll use our yarn needle to manually create two more “stitches” to close the gap between the first and last slip stitch of each stripe. Here’s how to do it:
(NOTE, the photos below are from the matching Striped Potholder pattern, but the technique is the same.)
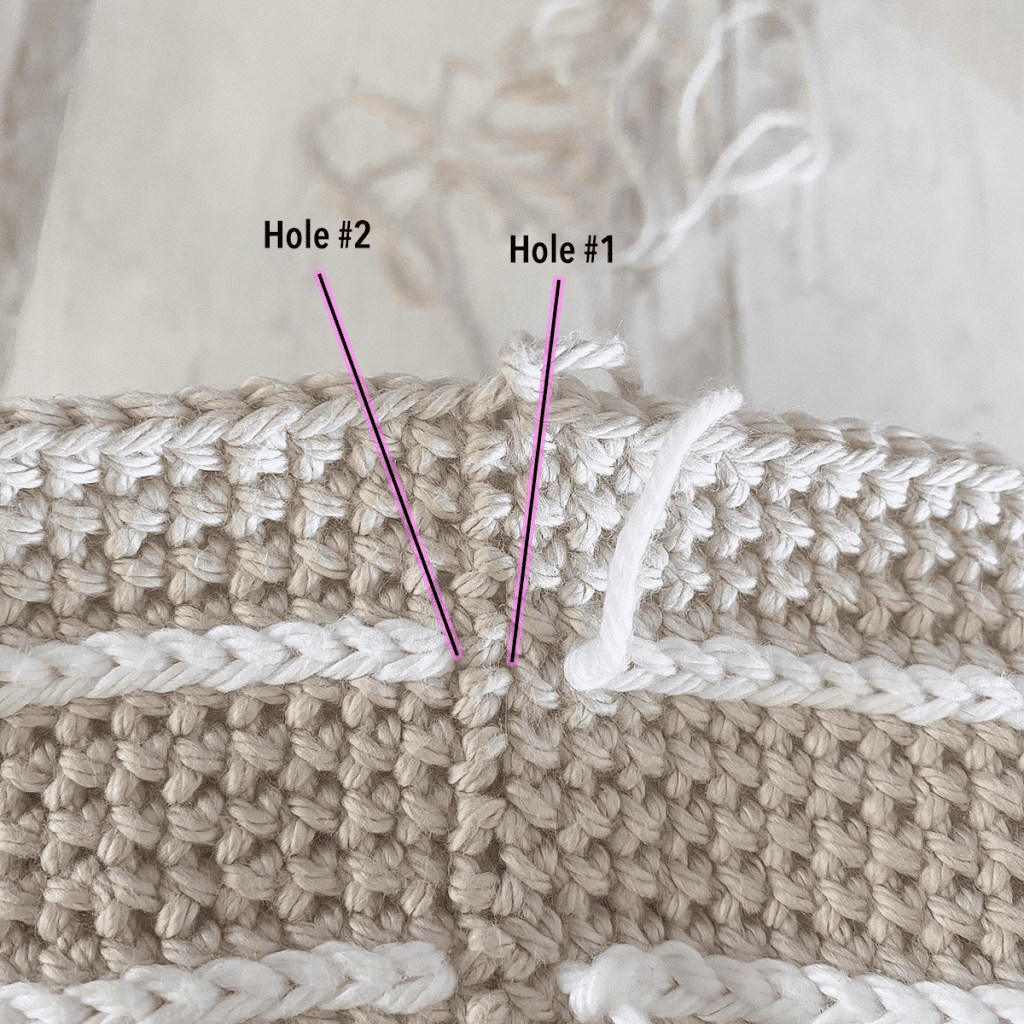
1. With seam area visible, notice two locations (holes) as marked on the image. Hole #1 is halfway between the first and last slip stitches of the STRIPE round; Hole #2 is where the top loops of the first slip stitch come together (the bottom of the sideways “V”). Keep these locations in mind.
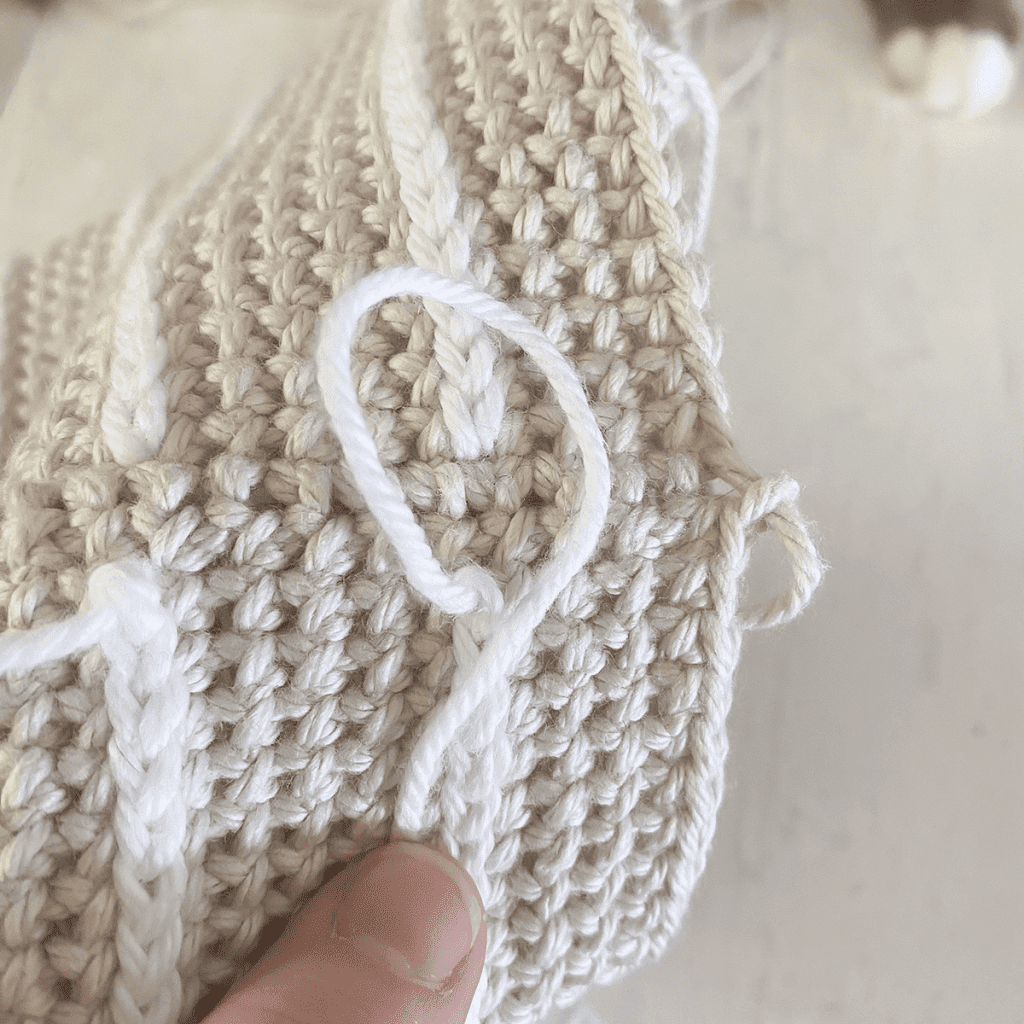
2. Thread finishing tail through yarn needle, and make a loop. Hold it in place with your thumb.
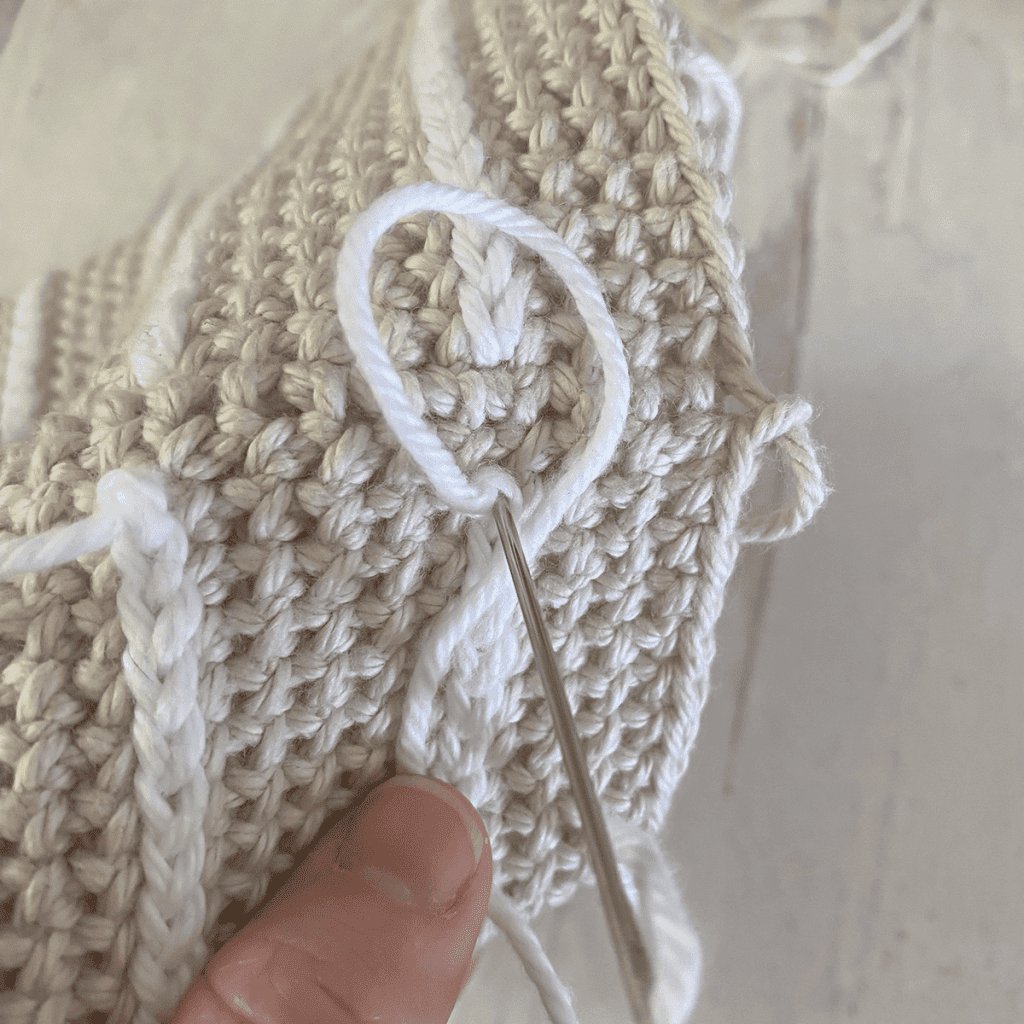
3. Insert yarn needle down between the two loops of the last SL ST (same place the tail is coming from) …
4. … and up through Hole #1, making sure it travels up through the loop you created.
5. Pull it through; you’ll see our first manually-created stitch form.
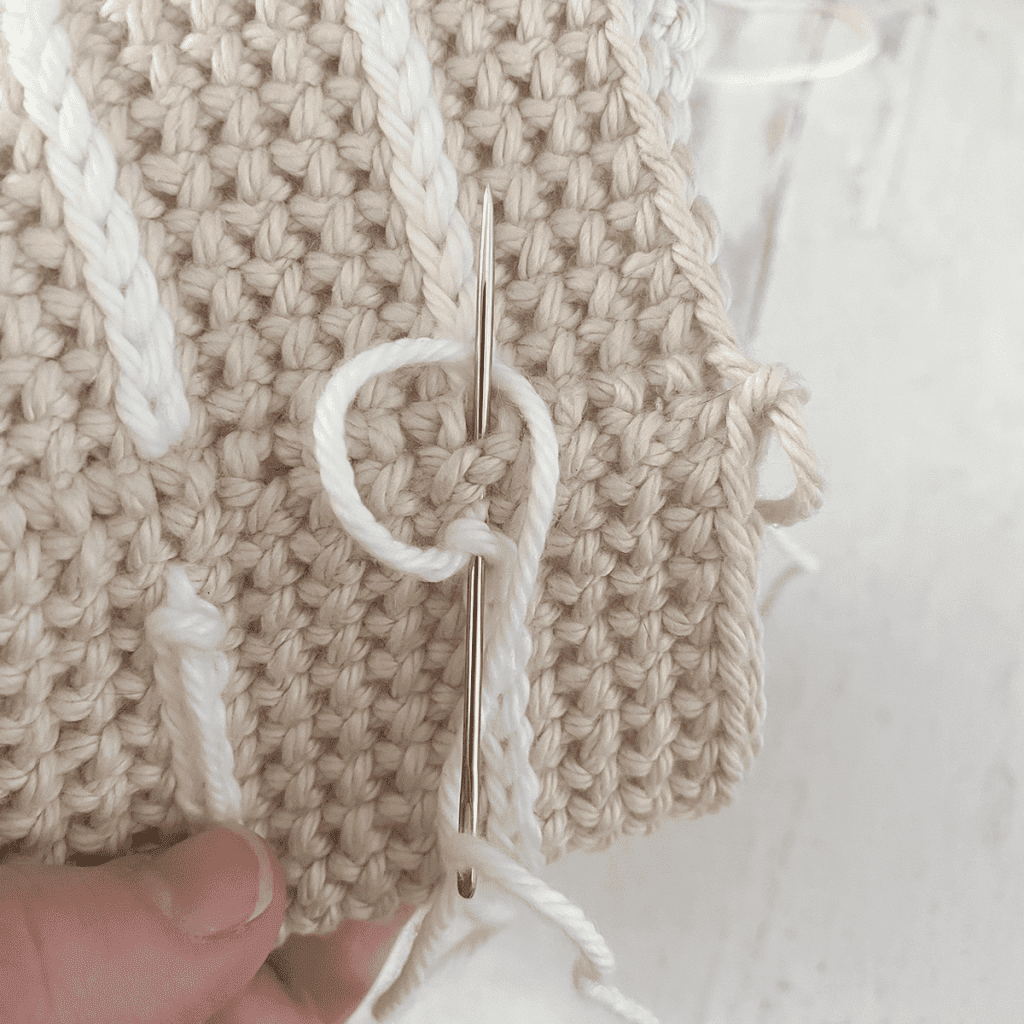
6. Repeat the process: Make a loop, insert needle down into the same place the tail is emerging from, and up through Hole #2 this time. Pull through. Image shows what it should look like once you’ve finished both stitches.
7. We need the finishing tail on the inside of our project, so insert yarn needle into the first slip stitch of the round …
8. … and pull it tight.
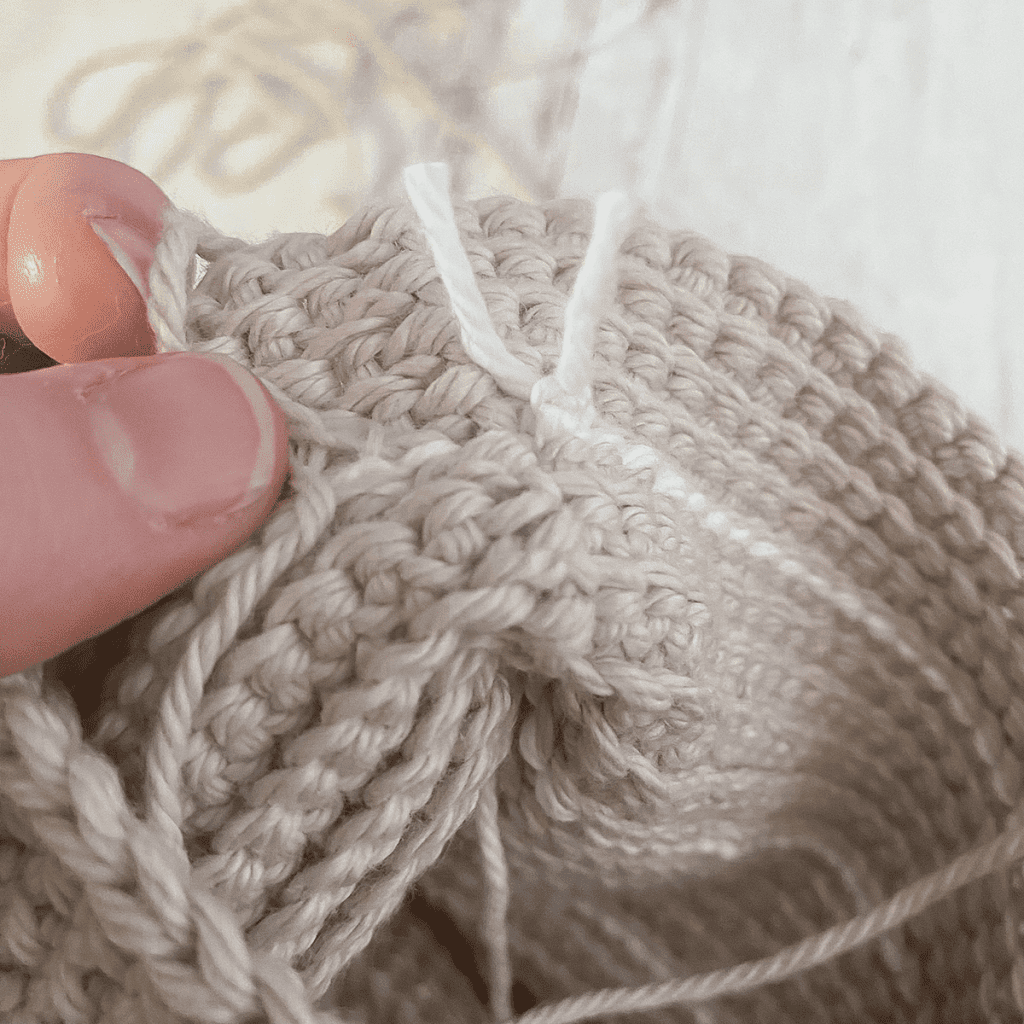
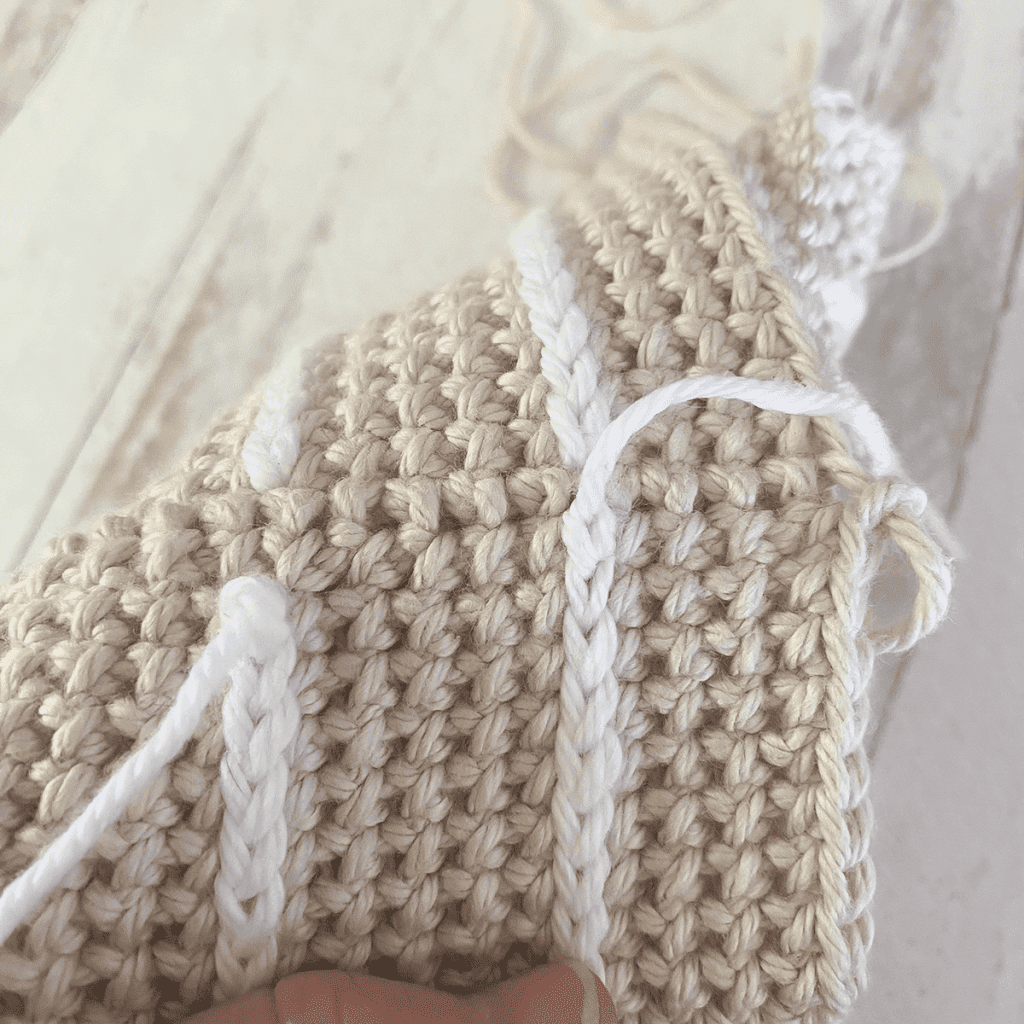
9. Turn inside out and tie 3 or 4 knots with the yarn tails, then trim the excess yarn. (This will be hidden inside the project, but if you would rather weave in your ends, go ahead.)
Complete this process for all stripes (including thumb).
FINISHING
Use the same process you used on the inner layer to seam mitt openings.
Use first finishing tail to whip stitch top of mitt closed (A). Use 2nd (thumb) finishing tail to whip stitch top of thumb closed (B). Use thumb starting tail to stitch together the small hole between the thumb and the rest of the mitt (C). Use starting tail to stitch up the small gap between the first and last STS of the Round 1 (D).
Weave in any remaining project ends.
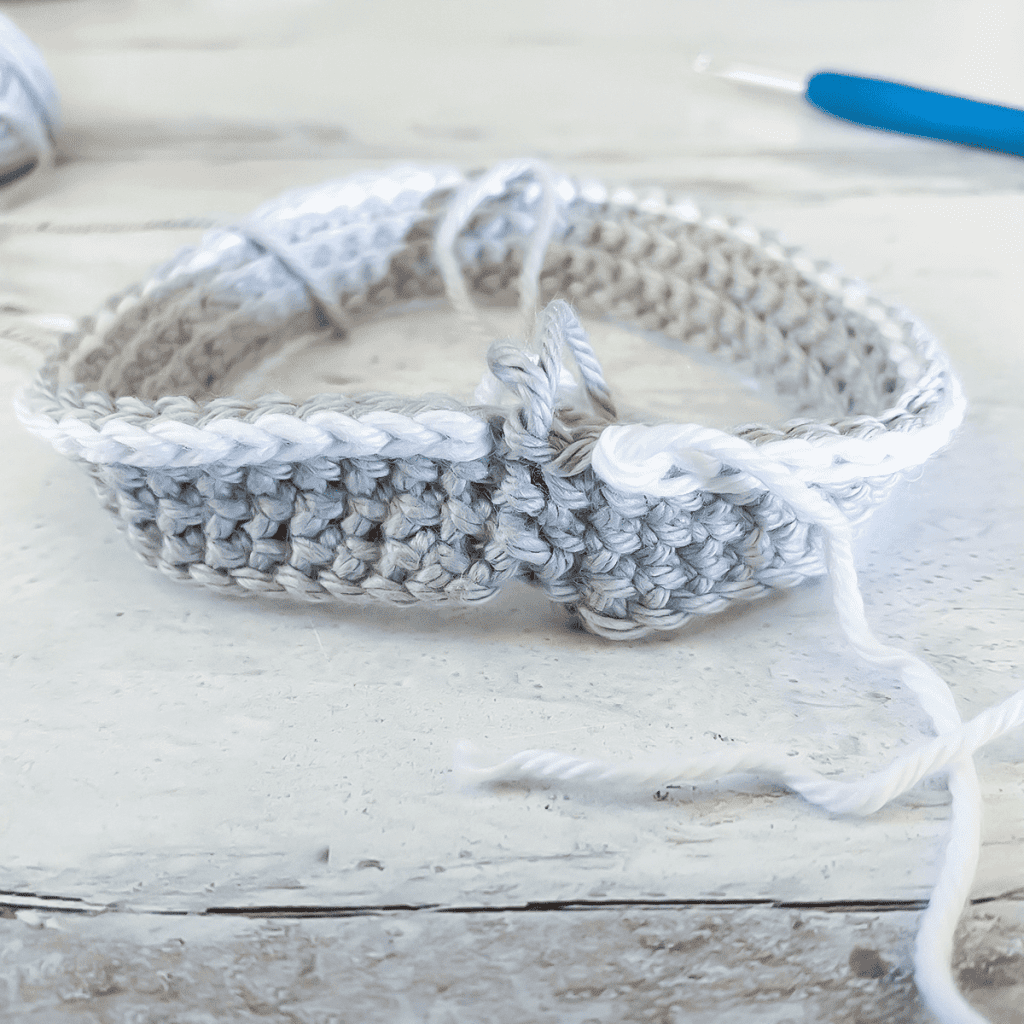
JOINING THE TWO PIECES TOGETHER
Turn the INNER LAYER inside out, and insert it into the outer layer. (I found that the easiest way to do this is to wear the inner layer and then put on the outer later over it.) At the seam, insert hook through both layers and join BASE COLOR B; CH1.
We now have two rounds of stitches, with two different stitch counts (54 and 50), to seam together with a final round of CSC. We’ll do this by inserting our hook through one stitch of the outer layer and the corresponding stitch of the inner layer and completing a CSC, joining the layers together.
But what about those extra 4 stitches in the outer layer?
Simple! 4 times (two at each fold), we will complete the usual CSC through both layers, but then we’ll insert our hook into the next stitch of the outer layer and back to the previous (already worked) stitch of the inner layer. That will seam 2 outer layer stitches to a single inner layer stitch, and will take care of those 4 extra stitches in the outer layer.
Here’s a visual, with the pink dots representing the stitches of the outer layer and the gray dots, the inner layer:
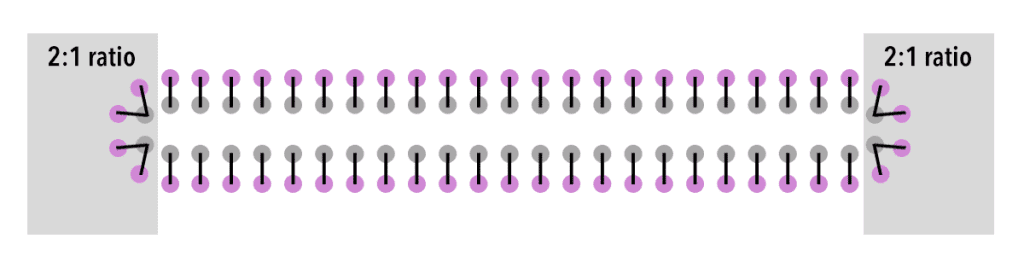
The only tricky-ish part is the joins in each layer. Since the inner layer is turned inside out, the joins won’t line up together. The best way to deal with them is to ignore them altogether; so when you come to a join, don’t treat it as a stitch. Just skip over it.
Hint: Don’t get overwhelmed. This section is not about being exact, it’s about seaming the layers together in a way that looks and lays nice. Adjust as necessary for that outcome.
After you’ve seamed both layers together, fasten off and weave in your ends.
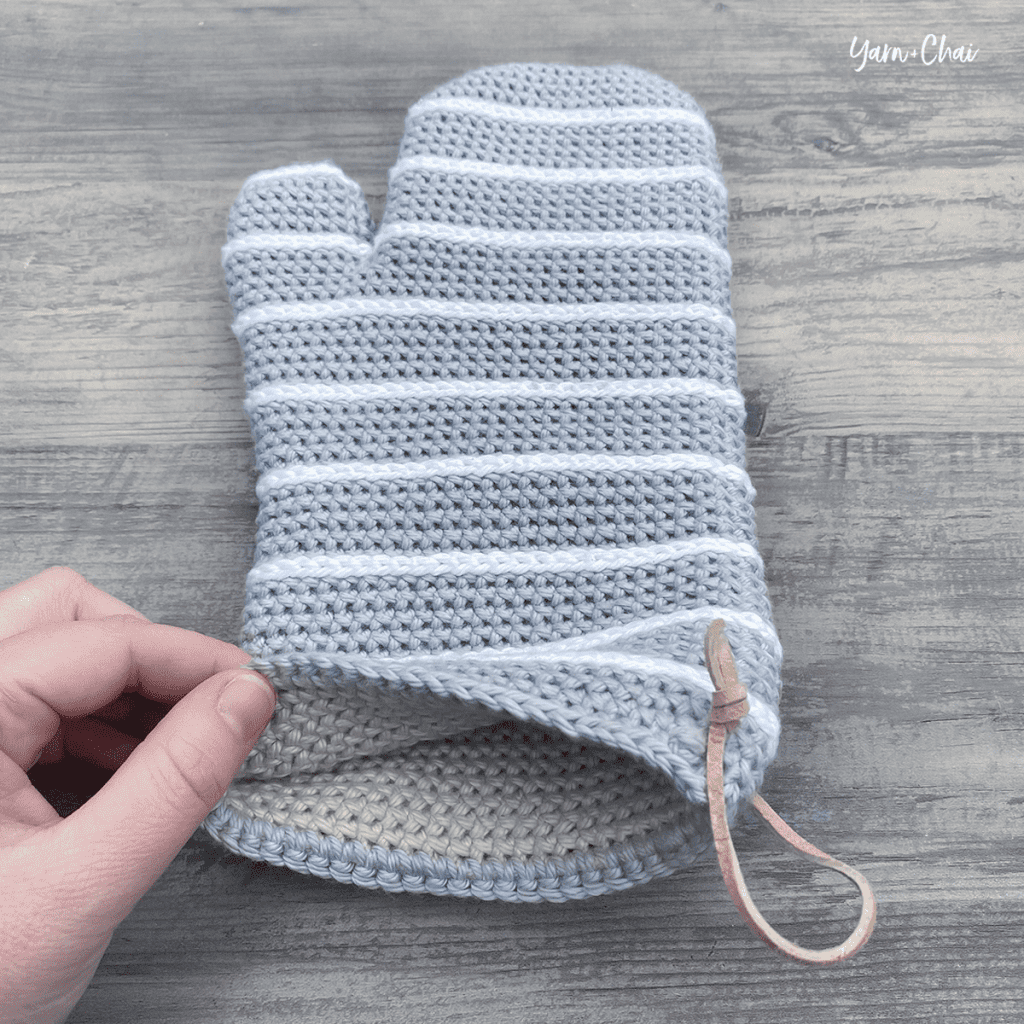
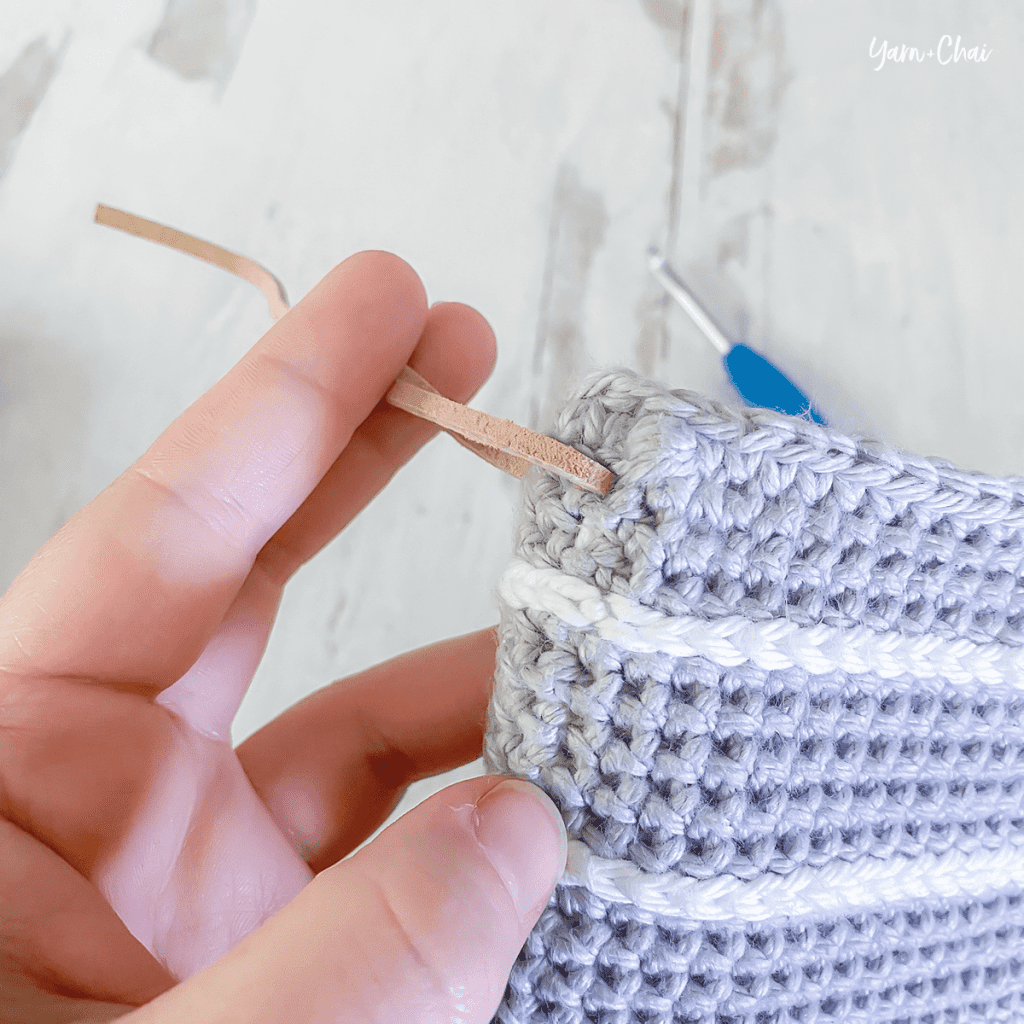
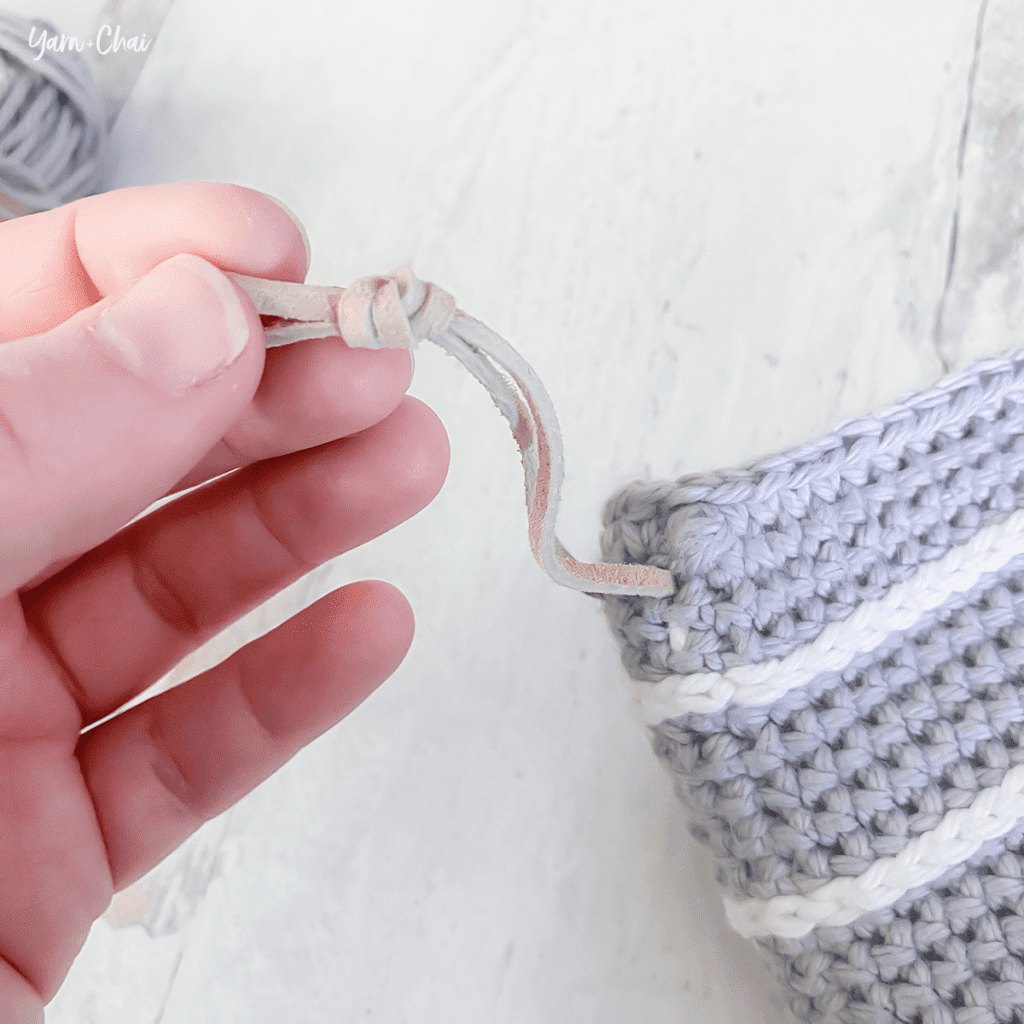
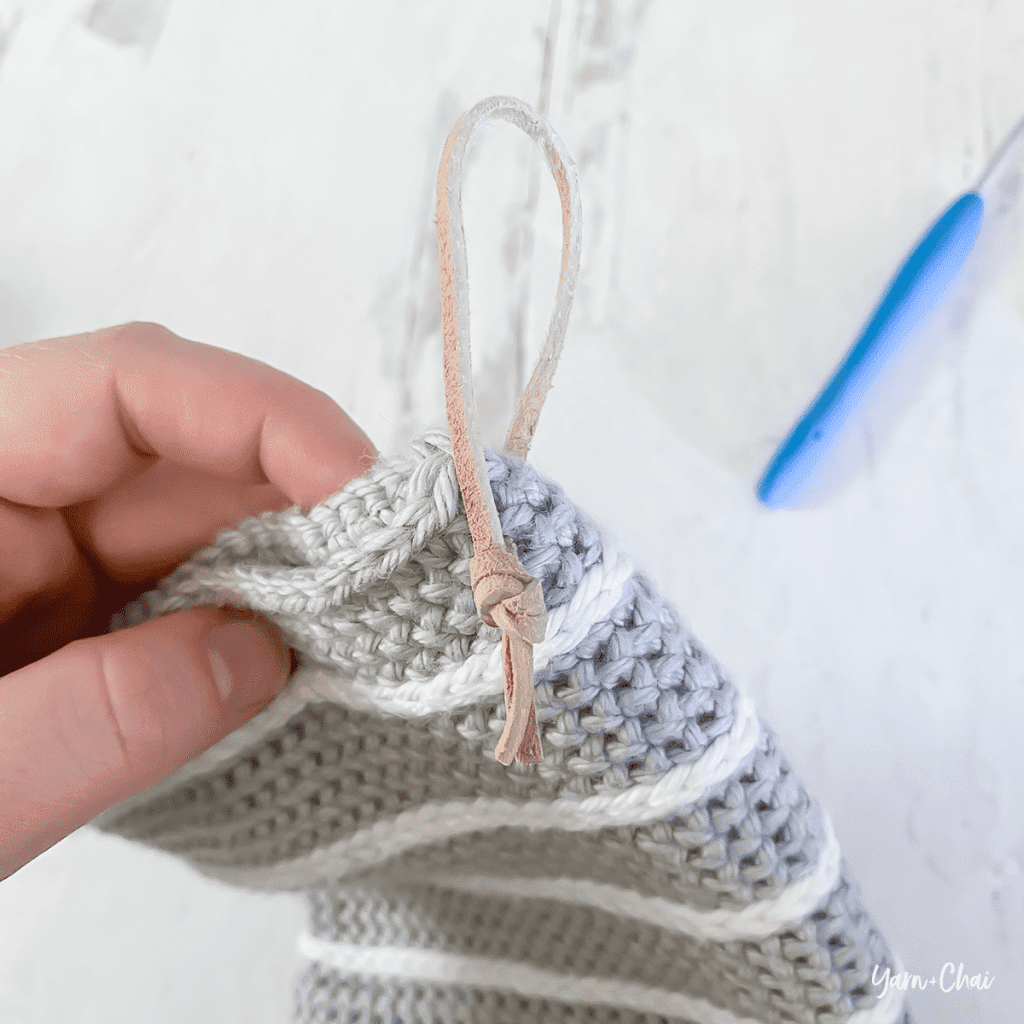
ADDING A HANGING LOOP (OPTIONAL)
Cut a 10″ length of leather or suede cord (mine was 1/8″ thick) and use a yarn needle to run it through the potholder near the corner. Tie a knot at the top and trim as necessary.
That’s it!
I hope you enjoyed this tutorial. If you’re sharing your project on social media, be sure to tag me @yarnandchai.design!
