Category: All Posts

  • Pansy Flower Crochet Pattern

    Pansy Flower Crochet Pattern

    When I released the pattern for this tropical flower, I didn’t know what to call it and mentioned that I definitely wasn’t a “flower expert.” A sweet lady on Ravelry commented that it reminded her of a pansy. So I googled “pansy”, and I could definitely see why my Tropical Flower reminded her of one!

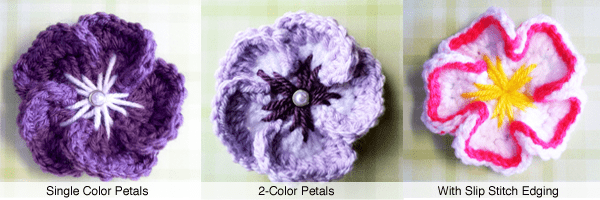
    But, there were some significant differences. The pansies I saw had 5 petals like my Tropical Flower, but they weren’t evenly sized and spaced, as mine was. In fact, the pansy flower has a very unique-looking grouping of petals. The three top petals overlap a bit, with one being a little larger than the other two. Then, there are two larger petals in a contrasting color underneath. All of the flowers I looked at had eye-popping, vibrant color schemes. Blues, Pinks, Purples, Yellows… there definitely isn’t just one way to color a pansy!

    pansy-doneOne of the most fun challenges about making a new pattern is taking an everyday object, like a flower, and trying to mimic its look, its shape, with a pile of yarn and a unique combination of stitches. I decided the pansy would be my next project. I’m so excited for how it turned out!

    For this pattern, you’ll need to decide what colors you want your pansy to be. I will add “[color change]” throughout the pattern to show you where you WOULD change if you decided to change at that point. But how many times you change colors will be up to you. The more color changes you do, the more yarn tails you’ll be working around, so I like to weave in my tails as I go.

    I’ve also modified my format a bit, because it’s easy to get lost in these instructions, especially if you’re a newbie. Small steps within rounds will be on different lines to keep things clear.

    Read Online Brochure for parabody Free Weight Smith System Fitness Equipment proviron cycle yatoo paudex fitness & santé sa (paudex) | contact

    One thing to keep in mind. It says the size in the pattern, but still the #1 piece of feedback I get about this flower is that it’s “too big for what I was going to use it for.” If you use a G hook and worsted weight yarn, as I did, it’s going to come to about 3.5″. Plan ahead, and if that’s too big for you, use a DK or fine weight yarn and a smaller hook. 😉

    PANSY FLOWER

    Notes: I used a G hook (4.0mm) and worsted weight yarn for this flower, which came to about 3.5″ at its widest. You can use whatever hook and yarn you want to achieve your desired size.

    – – – – – – – – – – – – – – – – – – – – – –

    Create a Magic Circle.

    Round 1: 6 SC in magic circle; [color change]. Join. (6)

    Round 2: (2 SC in next, 1 SC in next) around; [color change]. Join. (9)

    Round 3, Petal 1:
    Ch 2. 3 DC in same St.
    3 DC in next.
    3 DC in next. Ch 2. Sl St to same SC. (You’ve covered 3 SCs from Rd 2 at this point.)

    Round 3, Petal 2:
    Sl St to next SC. In same St, Ch 2 + 2 DC.
    3 DC in next.
    2 DC in next. Ch 2. Sl St to same SC.

    Round 3, Petal 3: 
    Repeat instructions for Petal 2. [color change]

    Round 4, Petal 1:
    Sl St to base of Ch 2 from previous round.
    SC in Ch 2 space.
    4 DC in next St.
    1 DC in each of the next 3 St.
    Ch 1. 1 SC in next. Ch 1.
    1 DC in each of the next 3 St.
    4 DC in next St. Ch 1.
    SC in Ch 2 space.
    Sl St to base of Ch 2.

    Round 4, Petal 2:
    Sl St to base of next Ch 2.
    SC in Ch 2 space.
    2 DC in next St.
    1 DC in each of the next 5 St.
    2 DC in next St. Ch 1.
    SC in Ch 2 space.
    Sl St to base of Ch 2.

    Round 4, Petal 3: Repeat instructions for Petal 2.

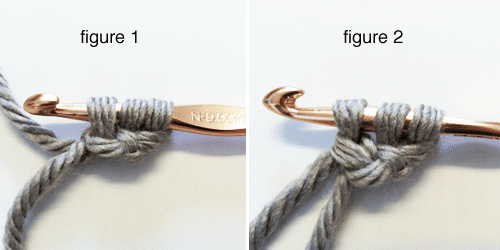
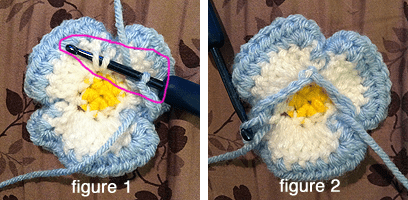
    Ch 5. Turn flower over and stretch the chain across the back of the petal you just completed. We are now working on the backside of the flower. Sl St in first available BACK STRANDS of next petal, as shown in figure 1 below. (We do this so the color doesn’t show on the front of the flower, in case you’re using a different color.)
    pansy-figures1and2

    Ch 5. Stretch chain across the back of the next petal and Sl St the same way, as shown in figure 2 above. [color change]

    Ch 2; turn. We will now be working in rows.

    Row 1 (all worked along the Ch 5):
    5 DC in Ch 5 space. Ch 2; Sl St to Ch 5. (Base of first back petal.)
    Ch 1; Sl St to next Ch 5. 5 DC in Ch 5 space. Ch 2; Sl St to Ch 5. (Base of second back petal.) Ch 1; turn.

    Row 2, Back Petal 1:
    SC in Ch 2 space.
    4 TC in next St.
    1 TC in each of the next 3 St.
    4 TC in next St. Ch 1.
    SC in Ch 2 space. Slip Stitch to base of Ch 2.

    Repeat for next petal. Ch 1; turn.

    Row 3: SC evenly around both petals. Sl St to base of Ch 2 on last petal and fasten off. Weave in all ends.
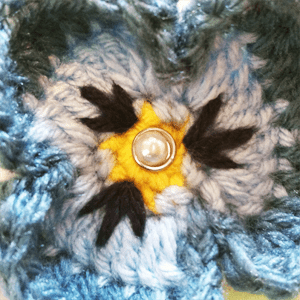
    pansy-detailingDetailing: Cut a piece of yarn about two feet long. With yarn needle, sew inner petal detailing by bringing yarn up through the SC (from the very first round) at the center of one of the top petals; bring yarn down through petal, up through the same SC, down through petal, up through the same SC, and down through the petal, 3 times total at three different placed in the petal. (You can eyeball it based on the photo I’ve provided. This is nature; it doesn’t have to be perfect to be beautiful.) You can fold the back petal back and hold it with your fingers to keep it out of the way while you sew the detailing. When you finish with the first petal, bring your yarn needle through a couple of back strands to get you to the base SC for the next petal, and repeat. Repeat for third petal as well. Fasten off and weave in ends.

    Finishing: You can be done here, or finish off your flower with a small embellishment like the ones in my photos. I love to use small brads that I find in my craft store’s scrapbooking section. You just slip the two metal prongs through the center of your flower and bend them back on the other side. They are a beautiful finishing touch!

  • Buttoned Infinity Scarf

    Buttoned Infinity Scarf

    As much as I enjoy the quickness of crocheting a big, chunky scarf with a giant hook, I have to admit I’m a sucker for the look of a worsted weight scarf. It’s more time-consuming, yes, but it provides a sleek, intricate-looking accessory that can’t be matched by bulky yarn and an N hook. One way to make crocheting these scarves a breeze is to learn the art of the Chainless Foundation Stitch. So be sure you know how to do that before starting on this double-wrapping, extra long Buttoned Infinity Scarf. (Finished product measures approximately 6″ wide and 80″ long, unbuttoned… long enough to wrap a third time for a cozy warm cowl, too!) Have fun!

    BUTTONED INFINITY SCARF

    Hooks: I (5.5mm) and H (5.00mm)
    Yarn: Worsted Weight (I used 2 skeins, approx. 340 yards, of Vanna’s Choice Solids in Dusty Purple)
    Buttons: 3 (7/8 inch)
    Difficulty: Easy
    Note: Ch 2 DOES count as starting DC.

    – – – – – – – – – – – – – – –

    With I hook,

    Row 1: FHDC 240. (You’ll find instructions for the Chainless Foundation  Half Double Crochet stitch at the bottom of this post.) Ch 2; turn. Switch to H hook.

    Row 2: DC in next St and in each St across. Ch 2; turn.

    Row 3: HDC in next 2 st. Ch 1; skip 1 st. HDC in next St and in each St across. Ch 2; turn.

    Row 4: DC in next St and in each St across. When you reach the button hole from previous row, place DC in Ch space instead of St. Finish row. Ch 2; turn.

    Row 5: HDC in next St and in each St across. Ch 2; turn.

    Row 6: DC in next St and in each St across. Ch 2; turn.

    Row 7: HDC in next 2 st. Ch 1; skip 1 st. HDC in next St and in each St across. Ch 2; turn.

    Row 8: DC in next St and in each St across. When you reach the button hole from previous row, place DC in Ch space instead of St. Finish row. Ch 2; turn.

    Row 9: HDC in next St and in each St across. Ch 2; turn.

    Row 10: DC in next St and in each St across. Ch 2; turn.

    Row 11: HDC in next 2 st. Ch 1; skip 1 st. HDC in next St and in each St across. Ch 2; turn.

    Row 12: DC in next St and in each St across. When you reach the button hole from previous row, place DC in Ch space instead of St. Finish row. Ch 2; turn.

    Row 13: HDC in next St and in each St across.

    Edging (optional): Ch 1. SC around entire scarf, placing an additional SC into each corner. Join. Fasten off and weave in tails.

    Buttons: Using yarn or thread and a needle, working on end of scarf opposite of where button holes are, sew buttons onto the HDC rows that correspond with where the button holes were placed. Be sure to sew them in a straight row, as in photo.

    buttonedinfinityscarf-buttons

  • 5 Petal Tropical Flower Crochet Pattern

    5 Petal Tropical Flower Crochet Pattern

    I love flowers with a little dimension. This is a pattern I came up with about a year ago and use all the time. I love the overlapping petals, and the versatility of this simple little flower. It’s perfect for spring / summer and can add a vibrant pop of colors to your project!

    I named it “Tropical Flower” because, to me, it looks like something you might find on a beautiful island. I’m no flower expert, so if you think this looks like a certain type of flower, let me know in the comments and maybe I’ll change the name! Until then… it lives on in my tropical imagination. 🙂

    Prefer a PDF?

    This pattern can be completed using the 100% free version right here on this page. However, many people prefer the convenience of a printable, ad-free PDF.

    All-Access Passholders get the ad-free version of this and all of my other blog patterns. It’s a pretty sweet deal, if I do say so myself! Learn more about it here or continuing scrolling for the free version.

    5 PETAL TROPICAL FLOWER

    Notes: I used a G hook and worsted weight yarn for this flower.

    – – – – – – – –

    Create a Magic Circle.

    Round 1: 5 SC in magic circle; join (5)

    Round 2: Ch 1; 2 SC in each SC; join (10)

    Round 3: *Slip Stitch into next SC; Ch 2. In same stitch, complete 5DC; Ch 2. Slip stitch into next SC.* Do this a total of 5 times, for 5 petals.

    Change colors here if you are doing a 2-colored petal.

    Round 4: *Slip stitch into base of Ch of next petal. SC in Ch space. 3 DC in next stitch (the first DC from the previous round); 2 DC in next; 2 HDC in next; 2 DC in next; 3 DC in next, Ch 1; SC into Ch space; Slip Stitch into base of Ch.* Do this a total of 5 times, for 5 petals.

    Fasten off; weave in ends.

    Center Detailing: Cut a contrasting piece of yarn about 3 feet long. Using yarn needle, sew detailing by bringing yarn up through the center, and back down through a place of your choice on the first petal. Bring yarn back up through the middle; back down through another place on the petal. Do this three times for each petal. (I like to make the center detail of each petal reach a little higher than the two on either side of it.) Fasten off and weave in ends. Finish with a button or other embellishment.

    Here are a few variations of the Tropical Flower:

    tropicalflower-variations

  • Tutorial: Chainless Foundation (No More Chains!)

    Tutorial: Chainless Foundation (No More Chains!)

    Raise your hand if you hate sewing into chains.

    Yeah, that’s what I thought. Is there anyone who doesn’t completely dread that first row of a scarf, and having to sew into all of those pesky, tight little knots?

    What I’m about to show you will change your life. (At least your crochet life.) With the Chainless Foundation Stitch, you NO LONGER have to chain a million and then go back and sew into them one by one. Trust me, when you master this simple concept, you’ll be whipping out scarves and cowls like nobody’s business. (And you’ll wonder why this wasn’t, like, the first thing you ever learned.)

    Once you’ve got the technique down, check out these fun, FREE scarf patterns to practice on!

    For this tutorial, we’ll use the Double Crochet (DC), although this can be modified for single, half, etc (we’ll cover that toward the end).

    Double Crochet Chainless Foundation Stitch

    – – – – – – – – – – – – – – – – – – – – –
    First DC:
    Chain 3. Yarn over and insert hook into third chain from hook.
    (Okay, okay, I know I said no more sewing into chains. This is the only one, I promise.)

    Draw up a loop (you will have 3 loops on your hook, as in Figure 1 below); then yarn over and pull through only the first loop. (<—This is the magic step that makes it work!) You will still have 3 loops on your hook. (It should look like Figure 2, below.)

    figures1and2

    For the lefties:

    Now, complete the DC as normal (yarn over, draw through first two loops; yarn over again and draw through remaining two loops).

    – – – – – – – – – – – – – – – – – – – – – 
    Next DC (repeat the following steps for as many DCs as you need):
    Yarn over and insert hook into the loops of the last DC. It’s a little hard to see at first but you’ll get the hang of it once you get going. Here’s a photo to help you… I’ve highlighted the loops you need to insert hook into:

    topviewsideview

    For the lefties:

    Draw up a loop (3 loops on hook now), then yarn over and pull through only the first loop. (<—-Look, it’s the magic step again!)

    Yarn over, draw through the first two loops. Yarn over again and draw through remaining two loops.

    – – – – – – – – – – – – – – – – – – – – – 
    To connect for crochet in the round:

    Bring your ends together as in the photo, being careful not to twist the row. (This is so much easier to do now, isn’t it?)

    Insert hook into top of first DC, draw through, and slip stitch through the loop on your hook. Ch 3 and begin next row of normal DCs (or whatever stitch you are going to do next). When you’re done with the scarf (or whatever), you can use the starting tail to sew that gap together.

    CrochetInTheRound

    How awesome is that?!? If it seems labor-intensive now, just practice. Seriously, it won’t take long before you are knocking out that first row in record time. And notice how NICE that bottom edge is – no more little bumps! Just a beautiful row of loops!

    And in case you’re wondering… YES. You can do this with other stitches, such as the Half Double Crochet and the Single Crochet:

    Half Double Crochet Chainless Foundation Stitch

    First HDC:

    • Chain 2. Yarn over and insert hook into second chain from hook.
    • Draw up a loop (you will have 3 loops on your hook), then draw through only the first loop on hook. You will still have 3 loops on your hook.
    • Complete HDC as normal (yarn over and draw through all 3 loops).

    Next HDC (repeat the following steps for as many HDCs as you need):

    • Yarn over and insert hook into the loops of the last HDC.
    • Draw up a loop and pull through first loop on hook.
    • Yarn over, and draw through all three loops on hook.

    Single Crochet Chainless Foundation Stitch

     First SC:

    • Ch 2. Insert hook into second chain from hook.
    • Draw up a loop (you will have 2 loops on your hook), then draw through only the first loop on hook. You will still have 2 loops on your hook.
    • Complete SC as normal (draw through both loops).

    Next SC (repeat the following steps for as many SCs as you need):

    • Insert hook into the loops of the last SC.
    • Draw up a loop and pull through first loop on hook.
    • Draw through both loops on hook.

    Enjoy!

  • 5 Petal Curled Edge Flower

    5 Petal Curled Edge Flower

    This is a simple photo tutorial for a cute little flower that you can use for an adorable embellishment. Its petals curl up and inward, giving it a little dimension.

    For this photo tutorial, I’m using Caron Simply Soft. I’ve upped the contrast of the photos so that you can see the details better.

    5 Petal Curled Edge Flower

    Start with a Magic Circle; SC 10 in the circle. Join with Slip Stitch into first SC and pull center tight to close the gap.
    5petalflower-step1

    ROUND 1: *Slip Stitch into next SC. In same stitch, ch2, 3DC, 1HDC, ch1. Slip stitch into next SC* around.5petalflower-step2

    You will end up with 5 small petals.
    You will end up with 5 small petals.

    ROUND 2: *Slip Stitch to first SC of magic circle. SC into Ch space of first petal. 2HDC each of the next 4 stitches. Ch1. Slip Stitch to next SC of magic circle.* Do this 5 times total. Fasten off; weave ends into back of flower. Finish with embellishment, if desired. For my flower’s center, I used a small embellishment brad that I found at my local craft store. You can also find them on Amazon. Just slip it through, bend the bendy things back (yep, I think that’s the technical name) and you have yourself a cute little flower!
    5petalflower-step4b

  • Triple Loop Skinny Scarf

    Triple Loop Skinny Scarf

    This pattern was originally published on my previous blog, Little Monkeys Crochet. 

    Let me just say: before you attempt this pattern, make sure you’re familiar with the Chainless Foundation Stitch. This is a looooooooooong scarf and I KNOW you don’t want to sew into that many chains. So if you haven’t yet, go learn the secret of chainless foundation!

    – – – – – – – – – – – – – – – – – – – – – –
    If you love the yarn I used
     (Hometown USA by Lion Brand) but don’t know where to find it, you can buy it at Craftsy.com! They often have it on sale. (Disclosure:  I am a part of the Craftsy Affiliate Program, and at no additional cost to you, I will earn a small commission if you decide to make a purchase.  Please know that I would never recommend you something that I do not use myself.)  🙂

    Now that we’ve got that out of the way, let’s get started on this super easy, super adorable skinny scarf…

    TRIPLE LOOP SKINNY SCARF

    Hook: N  (9.00mm)
    Yarn: Bulky or Super Bulky (I used Lion Brand’s “Hometown USA” in Grand Rapids Green)
    Difficulty: Easy
    Gauge: Unimportant (just crochet til it’s the length you want. There’s quite a bit of leeway with a scarf anyway.)

    SCARF INSTRUCTIONS:

    Round 1: Beginning with your DC Chainless Foundation Stitch (FDC), FDC until you reach about 7 feet (84″), or until scarf is the length you want it when wrapped around your neck 3 times. Connect with Slip Stitch at top of first DC, being careful to not twist it in the process.

    Rounds 2-3: Ch2 (counts as first DC). DC in each stitch around. Connect with Slip Stitch at top of first DC.

    Fasten off; weave in ends.

    WRAP PIECE INSTRUCTIONS:

    Row 1: Beginning with your DC Chainless Foundation Stitch (FDC), FDC 19.

    Rows 2-3: Ch2 (Counts as first DC), turn. DC in next stitch and each stitch across (19).

    Edging: Ch 1; turn. SC around the entire piece, adding an extra SC at each corner. Connect to first SC with Slip Stitch.

    Fasten off; weave in ends.

    Sew 1.5″ button onto one end of Wrap Piece. (Exact button size is not important as long as it is small enough to fit through the holes of the DC stitches and large enough to not slip back through and come undone.)

    tripleloopscarf-wrapperpiece

    I gifted the green scarf shown above before I had a chance to take many photos, so I whipped up another Wrapper Piece to show you what it will look like. This one is done in the same yarn, but in Dallas Grey.

    To Wear: Wrap Skinny Scarf around your neck 3 times, then take Wrap Piece and wrap it around all three layers; secure by slipping button through one of the DCs on its opposite end.

    Enjoy!

  • Rugby Infinity Scarf

    Rugby Infinity Scarf

    © Photography by Kindred Photo & Design

    I have been toying with the idea of doing a horizontally-striped crochet scarf for a while now. What has kept me from it is the idea of weaving in ALL those ends… one of my least favorite tasks! But when I fell in love with a rugby-style knit scarf at the store a while back, I knew I needed to try it, just to see if it really would be as much of a pain as I envisioned.

    I’m so glad I did!

    I had my then-16 year old sis Jenny (above) in mind when I picked out the yarn for my first rugby scarf. I chose Hobby Lobby’s “I Love This Yarn” (my favorite yarn!) in a light grey and white. She’s not one for boring accessories, so I took a chance and switched the plain white yarn for White Sparkle (same brand). It’s basically white yarn with one strand of shiny silver running through it.

    This was the first time I’ve used a sparkle yarn, as I think it can become gaudy looking very quick. But I was pretty confident that this style of scarf and amount of “sparkle” would work perfectly to produce a classy, unique accessory.

    Once I had my yarn, I got to work. I started with a chainless foundation of 22 double crochet stitches, but you could also just start with a regular chain. The basic idea is that each segment of color is 7 rows of 22 DC. I ended up with 14 segments total (7 grey, 7 white sparkle), and a great length for a double-wrap infinity scarf. I whip-stitched the ends together; then I got comfy on the couch with my yarn needle and scissors and spent a while weaving in those 28 ends. Not my idea of fun, but it was WORTH IT for the finished product!

    rugbyscarf-finishedgreywhite

    The photos don’t really show the sparkle on the white segments, but trust me, it’s there. I LOVE how it turned out. In fact I was so in love with it that I seriously debated keeping it for myself, and probably would have if Christmas wasn’t just right around the corner and I hadn’t been so behind on Christmas presents already!

    The next time I went to Hobby Lobby I took a better look at all of the sparkle yarns. My niece Maribel is sporty and loves bright colors, so I decided to make one for her, too. Her favorite color is teal so I grabbed some Peacock Sparkle and plain white, and made another one!

    rugbyscarf-tealwhite

    Prefer a PDF?

    This pattern can be completed using the 100% free version right here on this page. However, many people prefer the convenience of a printable, ad-free PDF.

    All-Access Passholders get the ad-free version of this and all of my other blog patterns. It’s a pretty sweet deal, if I do say so myself! Learn more about it here or continuing scrolling for the free version.

    Infinity Rugby Scarf

    Hook: H (5.00mm)
    Yarn: Worsted Weight (I used Hobby Lobby’s “I Love This Yarn”)
    Difficulty: Easy
    Gauge: Unimportant (just crochet til it’s the length you want. There’s quite a bit of leeway with a scarf anyway.)

    Note: Ch 2 does NOT count as starting DC.

    The Pattern

    To begin: With Color A, Ch 24. DC in third chain from hook. DC across. (22 DC)
    (You can also do a chainless foundation stitch for the first row of 22 DC. If you don’t know how to do this, check out this tutorial. It might change your life.)

    Rows 2-7: Ch 2; turn. DC across. (22 DC)

    Switch to Color B. Cut yarn from Color A, leaving about a 6″ tail.

    Rows 8-14: Ch 2; turn. DC across. (22 DC)

    Switch to color A. Cut yarn from Color B, leaving about a 6″ tail.

    Repeat this process section by section, 22 DC per row, 7 rows per section, until you have 14 total sections (98 rows), or until the scarf is the length you want it. Cut the last tail of yarn, leaving about 12″ tail. Use tail to Whip Stitch one end of the scarf to the other. Fasten off.

    Weave in all those ends, and you’re done. Enjoy your new Rugby Infinity Scarf!