Category: Blankets + Afghans

  • Wildflower Granny Square

    Wildflower Granny Square

    Up until a few weeks ago, I’d never made a granny square. It’s a category of crochet that I hadn’t gotten around to trying yet. But, as I’m getting a little tired of making striped blankets, I just felt like it was time to change things up a bit and try something new.

    After taking a look at different free patterns offered, I came to realize that there is really nothing complicated about a granny square. Like all crochet patterns, it’s simply a matter of math and angles, which is how my brain likes to work. So, for my very first granny square, I decided to just go ahead and design my own!

    I’ll be joining these together once I’ve made enough (join method TBD), and I’ll release the pattern for a full blanket soon. But for now, here’s a simple pattern for a modern granny square that will brighten any room.

    – – – – – – – – – – –
    UPDATE: It’s finished! Click here to see the Wildflower Afghan.
    – – – – – – – – – – –


    WILDFLOWER GRANNY SQUARE

    Finished Size: About 5.5″ square
    Stitches Used: Ch, Sl St, SC, HDC, DC
    Yarn: Medium worsted (I used Bernat Satin)
    Hook: Size H (5.00mm)
    Notes: (1)Pattern is written in American standard terms. (2)The square is built around the flower (so the flower will not need to be attached at the end). (3)Beginning chains DO count as the first stitch in the final row count, HOWEVER, when joining, you’ll slip stitch to the top of the first TRUE stitch (not the chain).

    FLOWER:

    With the color you want your center to be, begin with a Magic Circle (or Adjustable Ring).

    Round 1: Ch1 (counts as HDC). 11 HDC in magic circle. Attach a new color for petals, and join with a Sl St to top of 1st true HDC (not the chain). Fasten off first color. (12 HDC)

    Round 2 (work in BLO): Ch2 (counts as DC). DC in same st. 2 DC in each stitch around (24 DC)

    Round 3 (work in FLO): Ch2. DC in same. DC in next; Ch2 and Sl St to same st as last DC; this is your first petal. (Sl St to next st. Ch 2. DC in same. DC in next. Ch2 and Sl St to same st as last DC) around, for a total of 12 petals. Fasten off and weave in all ends.

    SQUARE:
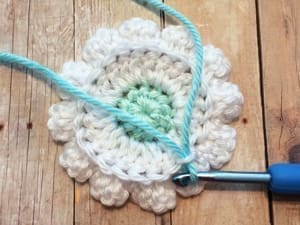
    Wildflower Granny Square Crochet Pattern | Little Monkeys CrochetAttach yarn via one of the loops on the back side of the finished flower. (Remember in Round 3 when we worked in FLO? The loop we didn’t use is the loop we’re using now.) 
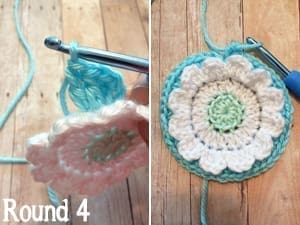


    Wildflower Granny Square Crochet Pattern | Little Monkeys CrochetRound 4: Ch3 (counts as DC). DC in same St. 2 DC in each remaining St around. Join to top of first true DC. (48 DC)


    Wildflower Granny Square Crochet Pattern | Little Monkeys Crochet

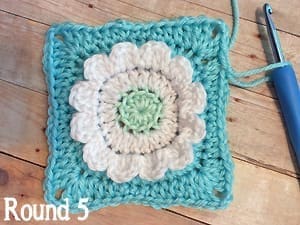
    Round 5: Ch3 (counts as DC). (In next St, 2DC + Ch2 + 2DC. DC in next St. HDC in each of the next 3 Sts. SC in each of the next 3 Sts. HDC in each of the next 3 Sts. DC in next St) around, with your final DC being the Ch3 from the beginning of the round. Join to top of 1st true DC.


    Wildflower Granny Square Crochet Pattern | Little Monkeys Crochet

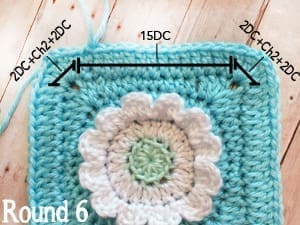
    Round 6: Ch3. DC in each St around; (2DC+Ch2+2DC) in each corner. Join with a Sl St to top of 1st true DC.

    Each side should consist of 15 DC, not including the DCs that make up the corners.


    Wildflower Granny Square Crochet Pattern | Little Monkeys Crochet

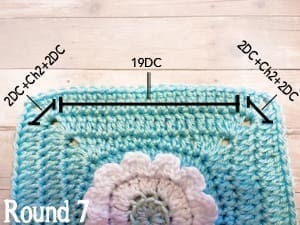
    Round 7: Ch3. DC in each St around; (2DC+Ch2+2DC) in each corner. Join with a Sl St to top of 1st true DC. Fasten off; weave in ends. DONE!

    Each side should consist of 19 DC, not including the DCs that make up the corners.

  • Midwife Blanket

    Midwife Blanket

    Please note: There is a version of this blanket floating around that has red stripes with added heart-shaped sections. I’m getting a lot of questions about where that pattern is (I’ve even seen pattern roundups that show that blanket but link directly here). It’s not my blanket, and I do not have the pattern variation for you here. Sorry!

    A Little Background

    This pattern has quite a story behind it – more so than I realized when I first published it!

    Back in 2014 (when I was blogging under the name “Little Monkeys Crochet”) I was watching one of my favorite tv shows, Call the Midwife, and spotted the most beautiful single-colored baby blanket.

    blanketphoto-1

    After an online search yielded no results, I immediately set out to figure out the pattern on my own. It gave me a run for my money but I finally finished it, published it on my blog, and the crochet world went a little crazy for it!

    Quite some time later, I started to get an occasional comment here and there from someone who was so excited to discover my pattern because their mom (or grandma or aunt) had crocheted them this blanket decades ago and now they had a pattern for it! It wasn’t too much longer before the origins of this show prop were discovered: an old, out-of-print Patons & Baldwins Limited (UK) Booklet from years ago!

    It was a fun discovery, but also a bit of a sad one, as I realized (perhaps later than I should have) that I had deconstructed someone else’s pattern, rewritten it, and published it on my own blog. I’m not sure why I didn’t realize this sooner – perhaps it was partly because I was a new blogger and hadn’t really thought through the legal or ethical issues of doing so, or perhaps it was because I saw the blanket on a TV show, in a pretend world, and it didn’t even cross my mind that there would be an actual real-life pattern out there for it. It’s probably a little of both.

    This story does have a happy ending, though! Once it was clear where the pattern had originated, I sat down to write to the publisher who owned the rights. I explained the entire situation and timeline, apologized profusely, and offered to remove the pattern from my blog. Much to my surprise and delight, they responded with the utmost kindness and gave me permission to leave it be, enabling thousands of people to continue using it!

    And so, this pattern remains on my blog with the permission of Yarnspirations, who now owns Patons. That’s a happy ending, I’d say!

    THE MIDWIFE BLANKET

    Hook: G (4.25mm)
    Yarn: Light (DK). I used approximately 1,000 yards of Bernat Softee Baby Yarn in Antique White.
    Difficulty: Easy
    Crochet Language: American Standard Terms (I would have written it in UK, in honor of the fact that the show is from there, but I don’t know how…) 🙂
    Finished Size: Approx. 30″ x 35″ (You can easily increase or decrease the size by adding to your starting Ch; just make sure you start with a multiple of 16, plus 6)

    Notes:
    (1) Because of the design, which is created by the use of skipped stitches, you’ll be crocheting into those stitches often. It’s up to you whether you crochet into the Ch, or the space created by it. I chose to crochet into the Ch itself because I felt it would give my rows a steadier look. Just note going into it that each of those skipped stitches still counts as a stitch for the row that follows it. So if it tells you to “DC in next 6 sts”, and there are only 4 DCs from the previous row followed by a space that was created by chains, you’ll need to put the last 2 DC into those chains (or the chain space, if you prefer).

    – – – – – – – – – – – – – – – – – – – – – – – –

    To Begin: Ch 118.

    Row 1: DC in 6th Ch from hook. (Ch 1, Sk 1 St, DC in next St) across. Ch 4; turn.

    Row 2: Sk first 2 Sts, DC in next 15 Sts, including Ch 1s from previous row. (Ch 1; Sk 1 St. DC in next 15 Sts) 6 more times. Ch 1, Sk 1 St, DC in next St (which is part of the Ch 4 from previous row). Ch 4; turn.

    Row 3: Sk first 2 Sts, DC in next 6 Sts, Ch 3, Sk 3 Sts, DC in next 6 Sts. (Ch 1; Sk 1 St. DC in next 6 Sts. Ch 3, Sk 3 Sts. DC in next 6 Sts) 6 more times. Ch 1; DC in next St  (which is part of the Ch 4 from previous row). Ch 4; turn.

    Row 4: Sk first 2 Sts, DC in next 4 Sts, Ch 3, Sk 3 Sts, SLIP STITCH into next St, Ch 3, Sk 3 Sts, DC in next 4 Sts. (Ch 1; Sk 1 St. DC in next 4 Sts, Ch 3, Sk 3 Sts, SLIP STITCH into next St, Ch 3, Sk 3 Sts, DC in next 4 Sts) 6 more times. Ch 1; DC in next St  (which is part of the Ch 4 from previous row). Ch 4; turn.

    Row 5: Sk first 2 Sts, DC in next 6 Sts (don’t forget to include the Chs from the previous row in your count!), Ch 3, Sk 3 Sts, DC in next 6 Sts. (Ch 1; Sk 1 St. DC in next 6 Sts. Ch 3, Sk 3 Sts. DC in next 6 Sts) 6 more times. Ch 1; DC in next St  (which is part of the Ch 4 from previous row). Ch 4; turn.

    Row 6: Sk first 2 Sts, DC in next 15 Sts. (Ch 1; Sk 1 St. DC in next 15 Sts) 6 more times. Ch 1; DC in next St  (which is part of the Ch 4 from previous row). Ch 4; turn.

    Row 7: Sk first 2 Sts. DC in next. (Ch 1, Sk 1 St, DC in next St) across. Ch 4; turn.

    You’ve completed one row of rectangles. To continue your blanket, repeat rows 2-7 10 more times for a stroller blanket, or as many anavar for sale as you want to achieve desired length. At the end of your final row, do not Ch 4, but continue to “Edging”.

    Edging You will be working along the little boxes that line the perimeter of your blanket, using two of them together to create a scalloped edge.  Ch 1. SC + DC into first space. DC into the stitch that divides the two spaces. DC + SC into second space. This completes 1 scallop. (Sk next dividing st. SC + DC into next space. DC into the stitch that divides the two spaces. DC + SC into second space.) Repeat () all the way around the blanket (I added an extra DC when working in the corners).

    Depending on how many rows of rectangles you chose to do, you may end up with a leftover box at the end, like I did. I simply improvised and made a 3-box scallop at the end. There’s probably a better way to figure that out, but I’m not above a little improvisation to get a job done. 😉 Fasten off; weave in ends.

  • Sweet Ocean Breeze Baby Blanket

    Sweet Ocean Breeze Baby Blanket

    Bummer of an update:
    Bernat has discontinued both Sandstone and Lagoon. However, they still have a gorgeous line of colors in the Bernat Satin collection that you can choose from!

    11/13/15: Occasionally, the time comes to update a pattern.

    It’s not lost on me that although many of you have successfully completed this blanket without issue, there is also a significant number of you who are convinced that the pattern doesn’t work. Clearly something is getting lost in translation, and although I’m not exactly sure what it is, I am not above trying to make my patterns better and better. I am, after all, only human… and there will always be room for growth.

    It has dawned on me recently that I’ve released some other patterns using this same stitch, just worded a bit differently, and there hasn’t been any confusion on those patterns. So, I’m re-writing this pattern in the exact same language that was used for those patterns. (If you’re wondering: the only significant changes, other than re-wording, are a CH1 at the beginning of rows (instead of the original CH2), and I also left out the part about putting the last stitches in the CH2 space. It was more confusing than I meant for it to be, and it’s not necessary to make the pattern work.)

    If you were in the middle of making this blanket, and didn’t have a problem with the previous version, click here to view it in its original wording.

    I’ve also gone ahead and deleted many of the comments for the pattern because they were getting pretty confusing, some of them were wrong, and frankly, they just won’t apply to this new version and I don’t want to confuse new visitors even more. Nothing wrong with starting fresh. 🙂

    Prefer a PDF?

    This pattern can be completed using the 100% free version right here on this page. However, many people prefer the convenience of a printable, ad-free PDF.

    All-Access Passholders get the ad-free version of this and all of my other blog patterns. It’s a pretty sweet deal, if I do say so myself! Learn more about it here or continuing scrolling for the free version.

    SWEET OCEAN BREEZE BABY BLANKET

    Hook: I (5.50mm)
    Yarn: Bernat Satin in Sandstone (250 yards, or 2 skeins), Lagoon (140 yards, or 1 skein), and Snow (280 yards, or 2 skeins).
    Difficulty: Easy
    Finished Size: Approx. 34″x26″ (You can easily increase or decrease the size by adding to your starting Ch; just make sure you start with an odd number of Ch)

    Notes:
    (1) This pattern is written in American Standard terms.
    (2) When working in rows, I usually do my starting chain and first row in a hook one size bigger than the pattern asks for. I tend to chain tightly, which pulls at the finished project if I don’t use a larger hook to start. You can do the same if you wish. It is not noted in the pattern.
    (3) “SC+DC” just means to put both a single crochet stitch and a double crochet stitch in the same place.

    – – – – – – – – – – – – – – – – – – – – – – – –

    To begin: CH103.

    Row 1:  SC+DC in 3rd CH from hook. (Sk next ST, SC+DC in next ST) across. (102)

    Row 2: CH1, turn. Skip 1st ST, SC+DC in next ST. (Sk next ST, SC+DC in next ST) across. (102)

    Rows 3-76: Repeat Row 2.

    – – – – – –

    Here’s how I ordered my colors for the blanket in the example, using Bernat Satin yarn:

    • Sandstone x4 rows
    • Snow x4
    • Lagoon x4
    • Snow x4
    • Sandstone x8
    • Snow x4
    • Lagoon x4
    • Snow x4

    Repeat all of the above, in order, one more time.

    Finish with a final section of Sandstone x4.