Author: rebecca

  • Diamond Dust Cowl

    I named this pattern the Diamond Dust Cowl because I love how the white yarn looks like a light dusting of snowflakes at the start of a snowfall, when the sun is shining down and making everything extra bright. I chose dark wooden toggles to attach to the cowl, and I love the contrast of the rich brown against the white. Of course, the cowl can be worked up in any color you choose.

    Prefer a PDF?

    This pattern can be completed using the 100% free version right here on this page. However, many people prefer the convenience of a printable, ad-free PDF.

    All-Access Passholders get the ad-free version of this and all of my other blog patterns. It’s a pretty sweet deal, if I do say so myself! Learn more about it here or continuing scrolling for the free version.

    DIAMOND DUST COWL

    Hook: P (11.50mm)
    Yarn: Super Bulky (I used 3 skeins of Lion Brand’s “Hometown USA” in New York White)
    Buttons: 4 large. I used 1.75″ wooden toggles.
    Difficulty: Easy
    Gauge: Not crucial, but a row of 5 SC+DC combos = about 7″
    Finished Size: Approximately 29″ around, 14″ tall

    Notes:
    (1) This pattern is written in American Standard Terms.
    (2) This pattern is worked in rows, then sewn together at the end. The buttons or toggles are optional, and you may choose to use them as functioning buttons, but I decided to sew the cowl together and add the toggles to be decorative. (In other words, in my finished cowl, the sewing is holding it together, not the toggles; although, it appears as though the toggles are functional.) If you choose to not sew your cowl together and instead rely on functioning buttons or toggles, be sure to use large enough buttons that they will not slip through the large spaces created by using such a bulky yarn and large hook.
    (3) To help you get a nice straight edge, you’ll place your last SC+DC combo of each row into the Ch2 space from the previous row.

    THE PATTERN

    To begin: Ch 47.

    Row 1: In 3rd Ch from hook, 1SC + 1DC. (Skip next St; 1 SC + 1 DC in next St) across.

    Row 2: Ch2; turn. (Skip next St; 1 SC + 1 DC in next St) across. (Hint: To get a nice straight edge, place your last SC+DC combo of the row into the Ch2 space from the previous row. Follow this hint for all future rows as well.)

    Row 3-20 (or until scarf is about 14″ tall): Ch2; turn. (Skip next St; 1 SC + 1 DC in next St) across.

    Fasten off, leaving a long finishing tail. Weave in your starting tail only, then choose one of the following options for finishing.

    Finishing Option 1: Decorative Buttons or Toggles
    Fold your cowl so that the ends meet. Overlap one edge about 1″ over the other edge, then use your long finishing tail to sew them together, going up and down through both edges of the cowl with small stitches. Fasten off and weave in. Attach 4 large buttons or toggles in even increments down the seam so that it appears as though the cowl has been “buttoned up.”

    Finishing Option 2: Functional Buttons or Toggles
    Weave in your finishing tail (you won’t need it for this option). Sew 4 large buttons or toggles evenly down one side. To wear, slip the buttons or toggles through the stitches of the other end of the cowl.

  • Chunky Ribbed Infinity Scarf

    Chunky Ribbed Infinity Scarf

    The Chunky Ribbed Infinity Scarf is great practice for your Half Double Crochet stitch, but working in the back loops only (BLO) gives it a more interesting surface and adds visual depth.

    Prefer a PDF?

    This pattern can be completed using the 100% free version right here on this page. However, many people prefer the convenience of a printable, ad-free PDF.

    All-Access Passholders get the ad-free version of this and all of my other blog patterns. It’s a pretty sweet deal, if I do say so myself! Learn more about it here or continuing scrolling for the free version.

    CHUNKY RIBBED INFINITY SCARF

    Hook: P (11.50mm)
    Yarn: Super Bulky (I used 3 skeins of Lion Brand’s “Hometown USA”)
    Difficulty: Easy
    Gauge: Not crucial, but a row of 8 HDC = about 5″
    Finished Size: Approximately 52″ around, 8″ wide

    Notes:
    (1) This pattern is worked in American Standard Terms.
    (2) This pattern is a great candidate for the Chainless Foundation method, if you’re comfortable with it. If you haven’t learned it, there is a helpful tutorial here.

    – – – – – – – – – – – – – – – – – – – – – – – –

    THE PATTERN

    To begin: Ch 83.

    Round 1: HDC in 2nd chain from hook. HDC across. Bring ends together, being careful not to twist the chain. Join with a slip stitch to the top of the first HDC.
    (You can also do a chainless foundation stitch (FHDC) for the first row of 82 HDC. If you don’t know how to do this, check out this tutorial. It will change your life. Be sure to join the FHDC, and don’t twist it in the meantime.)

    Round 2: Ch1, turn. In BLO (Back Loops Only), HDC around. Join with a slip stitch to the top of the first HDC.

    Rounds 3-10 (or until scarf is about 8″ wide): Ch1, turn. In BLO, HDC around. Join with a slip stitch to the top of the first HDC.

    Fasten off and weave in ends.

  • Grit Stitch Infinity Scarf

    Grit Stitch Infinity Scarf

    Prefer a PDF?

    This pattern can be completed using the 100% free version right here on this page. However, many people prefer the convenience of a printable, ad-free PDF.

    All-Access Passholders get the ad-free version of this and all of my other blog patterns. It’s a pretty sweet deal, if I do say so myself! Learn more about it here or continuing scrolling for the free version.

    GRIT STITCH INFINITY SCARF

    Hook: P (11.50mm)
    Yarn: Super Bulky (I used 3 skeins of Lion Brand’s “Hometown USA”)
    Difficulty: Easy
    Gauge: Not crucial, but a row of 4 (sc,dc, sk next st) combos = about 6″
    Finished Size: Approximately 58″ around, 7.5″ wide

    Notes:
    (1) This pattern is worked in American Standard Terms.
    (2) This pattern is worked in a seamless round. Do not join or chain except when instructed. Use a stitch marker to keep track of the beginning of your rounds.

    – – – – – – – – – – – – – – – – – – – – – – – –

    THE PATTERN

    To begin: Ch 81.

    Row 1: SC in 2nd chain from hook and in each St across. Bring ends together, being careful not to twist the chain, and join with a slip stitch to the top of the first SC.

    Round 2 (We will now work in seamless rounds): Do not chain. Skip the first St. (SC+DC in next St, Sk next St) around.

    Rounds 3-9 (or until scarf is about 7.5″ wide): (SC+DC in next St, Sk next St) around. (Wondering if your placement is correct? Your SC+DC combos should be completed in loops from each SC from previous row, with each DC from previous row being left empty.)

    Slip Stitch into the next 3 stitches to smooth out the row, then fasten off and weave in ends.

  • Simply Single Crochet Infinity Scarf

    The Simple Single Crochet Infinity Scarf is the ultimate beginner scarf, because it uses one of the first stitches you (most likely) learned. It works up fast because of the super bulky yarn, and the finished texture is awesome.


    THE PATTERN

    To begin: Ch 91.

    Row 1: SC in 2nd chain from hook. SC across. Bring ends together, being careful not to twist the first row. Join with a slip stitch to the first SC of the row. Do not chain.
    (You can also do a chainless foundation stitch (FSC) for the first row of 90 SC. If you don’t know how to do this, check out this tutorial. It will change your life. Be sure to join the FSC, and don’t twist it in the meantime.)

    Round 2 (We will now work in rounds): SC in first St of previous row, and SC around.

    Rounds 3-13 (or until scarf is about 7″ wide): SC around.

    Slip Stitch into the next 3 stitches to smooth out the row, then fasten off and weave in ends.

  • Printable Chalkboard Tags: Crocheter’s Edition!

    Printable Chalkboard Tags: Crocheter’s Edition!

    I’ve got some new printable gift tags for you today! At first glance, you might be thinking, “didn’t she already release these?” But look a little closer, and you’ll discover something fun…

    These ones are just for CROCHETERS! 

    How fun is that!?

    I asked on my Facebook page what people would like to see on crochet-specific gift tags, and you guys came up with some great stuff. I compiled it all as best I could into 8 adorable, witty new chalkboard tags. I really think you guys are going to love these fun sayings:

    • stitched up with love
    • from my hook and my heart
    • hot off the hook
    • hooked with love
    • a little yarn, a lot of love
    • I hooked this just for you
    • I loop you with all my yarn
    • this took me forever to make

    Click the graphic below to download the finished product!

    Handmade Chalkboard Christmas Gift Tags for Crocheters | Free Printable from Little Monkeys Crochet

    Please be sure to share the love with all of your hooking friends by Sharing or Pinning!

  • Wildflower Granny Square No. 2

    Wildflower Granny Square No. 2

    Today I am excited to be joining The Blog Hop Crochet Along! Nine other bloggers and I are teaming up to release a new afghan square pattern every day for a month. Crochet along with us and you will have a gorgeous new afghan just in time for the holiday season!

    Here’s how it is going to work:

    • Every day (M-F) a new square pattern will be posted on one of our ten blogs.
    • You can join in the fun by crocheting each day’s square on that day whenever you have time.
    • Share your progress and post photos of your squares in our facebook group.
    • By the end of the Crochet Along you will have twenty 12″ squares all ready to be pieced together into a beautiful afghan just in time for the holiday season.
    • Finally, we will be hosting some fabulous giveaways! You could win Lion Brand yarn to make your own afghan, $100 CASH money, OR our COMPLETED AFGHAN! That’s right, we are going to be piecing all of our squares together and shipping an afghan out to one very lucky winner.


    Hopeful Honey – Persia Lou – Little Monkeys Crochet
    Fiber Flux – Loopsan One Dog Woof – Maybe Matilda
    Dream a Little Bigger – Whistle & Ivy  – Gleeful Things


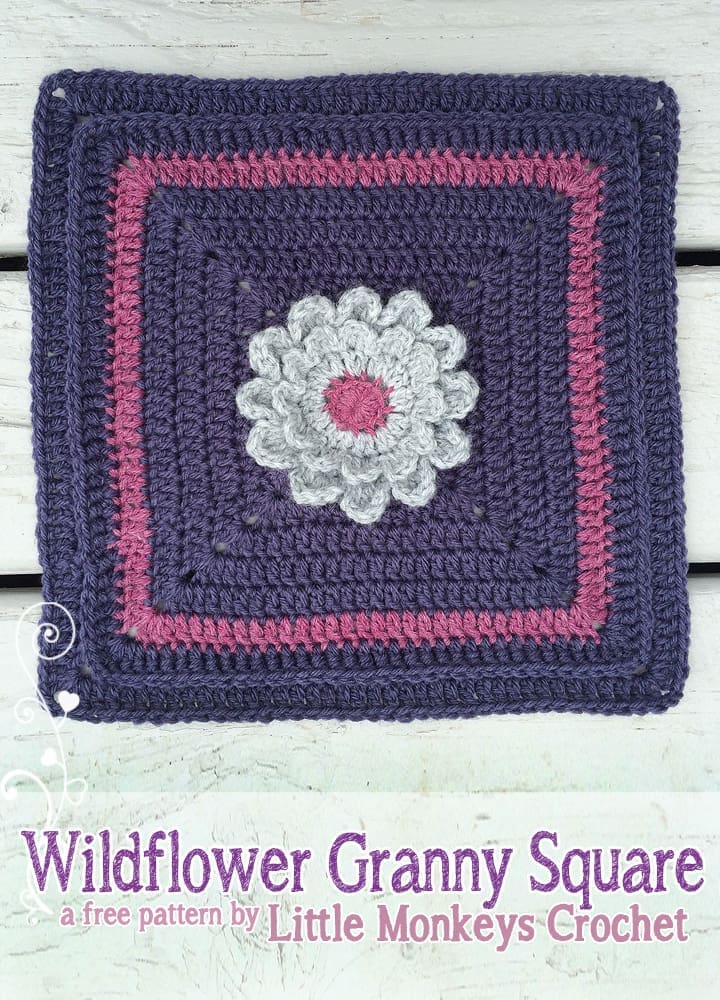
    Today I am sharing the 12″ Wildflower Granny Square [No. 2]. This, like my last Square-A-Day contribution, is a modified version of my much smaller Wildflower Granny Square. You can find links to all the other participating patterns at the end of this post. The links will be updated daily!

    – – – – – – – – – – – – – – – – – – – – – – – – – – – – – – – – – –

    12" Wildflower Granny Square from Square-A-Day CrochetAlong | Free Crochet Pattern by Little Monkeys Crochet


    12″ WILDFLOWER GRANNY SQUARE [NO. 2]

    Finished Size: About 12″ square
    Abbreviations Used: 

    • Ch – Chain
    • Sl St – Slip Stitch
    • SC – Single Crochet
    • HDC – Half Double Crochet
    • DC – Double Crochet
    • TR- Treble (or Triple) Crochet
    • FLO – Front Loops Only
    • BLO- Back Loops Only
    • BPDC – Back Post Double Crochet

    Yarn: Medium worsted (I used Wool-Ease from Lion Brand)
    Hook: Size H (5.00mm)
    Notes:
    (1) Pattern is written in American standard terms.
    (2) The square is built around the flower (so the flower will not need to be attached at the end).
    (3) Beginning chains do NOT count as the first stitch in the final row count. When joining, you’ll slip stitch to the top of the first stitch (not the chain).
    (4) I’ve included [New Color] in the pattern whenever I chose to change colors. I think it looks cleaner to attach a new color before joining at the end of a row, but you do what’s familiar to you. The Lion Brand Wool-Ease colors I used in the photo above, in order of introduction, are Dark Rose Heather, Grey Heather, and Violet.
    (5) Don’t overlook the switch to Back Post Double Crochet (BPDC) for round 11! Lots of people missed that part of my first Blog Hop contribution square, but I think it adds so much to the finished product. 🙂

    – – – – – – – – – – – – – – – – – – – – – – – – – – – – – – – – – –

    THE FLOWER:

    Begin with a Magic Circle.

    Round 1: Ch1. 12 HDC in Magic Circle. [New Color] Join to the top of the first HDC with a Sl St. (12)

    Round 2 (work this round in BLO): Ch2; 2 HDC in same. 2 HDC in next and in each St around. Join to the top of the first HDC with a Sl St. Take a moment to weave in the tails from the first color, and the starting tail of the current color. It will help to get them out of the way. (24)

    The next round is worked in 2 parts: the petals, and then the base behind it. Just follow the instructions and you’ll be fine. 🙂

    Round 3, part 1 (work this round in FLO): Ch2. DC in same. DC in next; Ch2 and Sl St to same St. This is your first petal. (Sl St to next st. Ch 2. DC in same. DC in next. Ch2 and Sl St to same St) around, for a total of 12 petals.

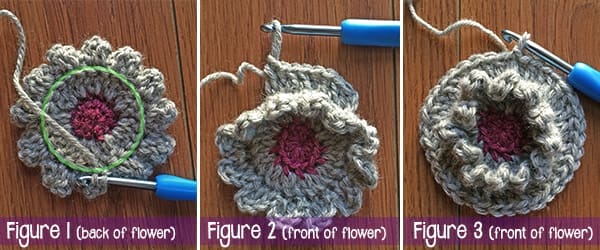
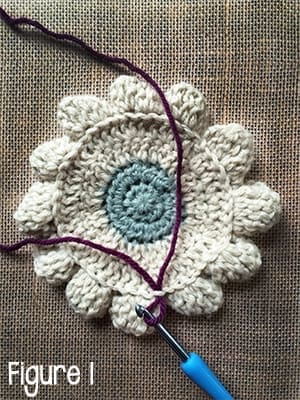
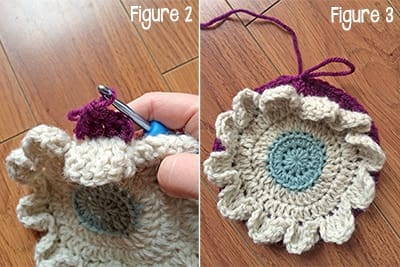
    Round 3, part 2: Turn flower over. You will see a circle that is made up of the back loops that we didn’t use in Round 3.1 (I’ve highlighted this circle in green in the photo below). These are the loops we will use now. Ch1; Sl St into the nearest loop [See Figure 1]. Ch2; 2 DC in same, DC in next. (2 DC in next, DC in next) around [Figure 2]. Join to the top of the first DC with a Sl St [Figure 3]. (36)

    12" Wildflower Granny Square from Square-A-Day CrochetAlong | Free Crochet Pattern by Little Monkeys Crochet

    Round 4, part 1 (work this round in FLO):  Ch2. DC in same St. 2 TR in next. DC in next. Ch2 and Sl St to same St. This is your first petal. (Sl St to next St. Ch2. DC in same. 2 TR in next. DC in next. Ch2 and Sl St to same St) around, for a total of 12 petals.

    THE SQUARE:

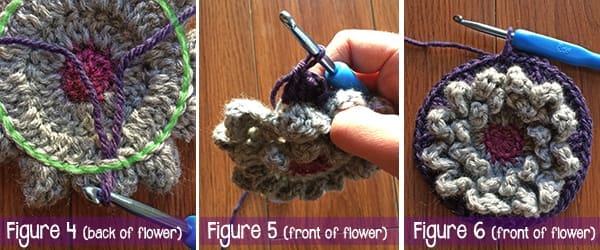
    Fasten off and weave in the tail. Turn flower over to view a new circle of back loops, just like the ones from Round 3. Attach [New Color] yarn via one of the loops [Figure 4].

    12" Wildflower Granny Square from Square-A-Day CrochetAlong | Free Crochet Pattern by Little Monkeys Crochet

    Round 4, part 2:  Ch2. 2DC in same St, DC in each of the next 2 Sts. (2DC in next, DC in each of the next 2 Sts) around. Join to the top of the first DC with a Sl St. (48)

    Round 5:  Ch2. In same St: 2 DC, Ch2, 2 DC (first corner). DC in next St. HDC in each of the next 3 Sts. SC in each of the next 3 Sts. HDC in each of the next 3 Sts. DC in next St. (In next St: 2 DC, Ch2, 2 DC. DC in next St. HDC in each of the next 3 Sts. SC in each of the next 3 Sts. HDC in each of the next 3 Sts. DC in next St.) Repeat ( ) 2 more times. Join to the top of the first DC with a Sl St.

    12" Wildflower Granny Square from Square-A-Day CrochetAlong | Free Crochet Pattern by Little Monkeys Crochet

    Round 6:  Ch2. DC in same St and in each St around, putting (2 DC + CH2 + 2 DC) in each CH2 corner space from previous round. Join to the top of the first DC with a Sl St. (When you complete this round, there should be 19 DCs on each side.)

    Round 7:  Ch2. DC in same St and in each St around, putting (2 DC + CH2 + 2 DC) in each CH2 corner space from previous round. Join to the top of the first DC with a Sl St. (When you complete this round, there should be 23 DCs on each side.)

    Round 8:  Ch2. DC in same St and in each St around, putting (2 DC + CH2 + 2 DC) in each CH2 corner space from previous round. [New Color] Join to the top of the first DC with a Sl St. (When you complete this round, there should be 27 DCs on each side.)

    Round 9:  Ch2. DC in same St and in each St around, putting (2 DC + CH2 + 2 DC) in each CH2 corner space from previous round. [New Color] Join to the top of the first DC with a Sl St. (When you complete this round, there should be 31 DCs on each side.)

    Round 10:  Ch2. DC in same St and in each St around, putting (2 DC + CH2 + 2 DC) in each CH2 corner space from previous round. Join to the top of the first DC with a Sl St. (When you complete this round, there should be 35 DCs on each side.)

    Round 11 (note the change to BPDC): Ch2. BPDC in same St and in each St around, but when you come to corner spaces, simply CH2; then begin with your BPDCs across the next side. Join to the top of the first BPDC with a Sl St.(When you complete this round, there should be 35 BPDCs on each side.)

    Round 12:  Ch2. DC in same St and in each St around, putting (2 DC + CH2 + 2 DC) in each CH2 corner space from previous round. Join to the top of the first DC with a Sl St. (When you complete this round, there should be 39 DCs on each side.)

    Fasten off and weave in ends.

  • Wildflower Granny Square No. 1

    Wildflower Granny Square No. 1

    Today I am excited to be joining The Blog Hop Crochet Along! Nine other bloggers and I are teaming up to release a new afghan square pattern every day for a month. Crochet along with us and you will have a gorgeous new afghan just in time for the holiday season!

    Here’s how it is going to work:

    • Every day (M-F) a new square pattern will be posted on one of our ten blogs.
    • You can join in the fun by crocheting each day’s square on that day whenever you have time.
    • Share your progress and post photos of your squares in our facebook group.
    • By the end of the Crochet Along you will have twenty 12″ squares all ready to be pieced together into a beautiful afghan just in time for the holiday season.
    • Finally, we will be hosting some fabulous giveaways! You could win Lion Brand yarn to make your own afghan, $100 CASH money, OR our COMPLETED AFGHAN! That’s right, we are going to be piecing all of our squares together and shipping an afghan out to one very lucky winner.


    Hopeful Honey – Persia Lou – Little Monkeys Crochet
    Fiber Flux – Loopsan One Dog Woof – Maybe Matilda
    Dream a Little Bigger – Whistle & Ivy  – Gleeful Things


    Today I am sharing the 12″ Wildflower Granny Square [No. 1]. This is a modified version of my much smaller Wildflower Granny Square. You can find links to all the other participating patterns at the end of this post. The links will be updated daily!

    – – – – – – – – – – – – – – – – – – – – – – – – – – – – – – – – – –

    12" Wildflower Granny Square from Square-A-Day CrochetAlong | Free Crochet Pattern by Little Monkeys Crochet

    12″ WILDFLOWER GRANNY SQUARE [NO. 1]

    Finished Size: About 12″ square
    Abbreviations Used: 

    • Ch – Chain
    • Sl St – Slip Stitch
    • SC – Single Crochet
    • HDC – Half Double Crochet
    • DC – Double Crochet
    • TR- Treble (or Triple) Crochet
    • FLO – Front Loops Only
    • BLO- Back Loops Only
    • BPDC – Back Post Double Crochet

    Yarn: Medium worsted (I used Wool-Ease from Lion Brand)
    Hook: Size H (5.00mm)
    Notes:
    (1) Pattern is written in American standard terms.
    (2) The square is built around the flower (so the flower will not need to be attached at the end).
    (3) Beginning chains do NOT count as the first stitch in the final row count. When joining, you’ll slip stitch to the top of the first stitch (not the chain).
    (4) I’ve included [New Color] in the pattern whenever I chose to change colors. I think it looks cleaner to attach a new color before joining at the end of a row, but you do what’s familiar to you. The Lion Brand Wool-Ease colors I used in the photo above, in order of introduction, are Seaspray, Natural Heather, and Eggplant.

    – – – – – – – – – – – – – – – – – – – – – – – – – – – – – – – – – –

    THE FLOWER:

    Begin with a Magic Circle.

    Round 1: Ch1. 12 HDC in Magic Circle. Join to the top of the first HDC with a Sl St. (12)

    Round 2: Ch1; 2 HDC in same. 2 HDC in next and in each St around. [New Color] Join to the top of the first HDC with a Sl St. (24)

    Round 3 (work this round in BLO): Ch2; 2 DC in same, DC in next. (2 DC in next, DC in next) around. Join to the top of the first DC with a Sl St. (36)

    Round 4: Ch2; 2 DC in same, DC in each of the next 2 Sts. (2 DC in next, DC in each of the next 2 Sts) around. Join to the top of the first DC with a Sl St. (48)

    The next round is worked in 2 parts: the petals, and then the base behind it. Just follow the instructions and you’ll be fine. 🙂

    Round 5, Part 1 (work this round in FLO): Ch3; DC in same St, 2 TR in next, 2 TR in next, DC in next, Ch3 and Sl St to same St as DC. You’ve completed one petal. (Sl St to the next St. Ch3, DC in same, 2 TR in next, 2 TR in next, DC in next, Ch3 and Sl St to same St as DC.) around. Sl St to first St of the round.

    It helps, at this point, to fasten off and weave in all ends; then, proceed with the next instructions.

    THE SQUARE:

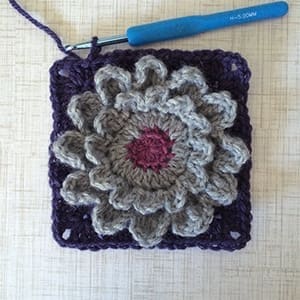
    Turn flower over. Attach [New Color] yarn via one of the loops on the back side of the finished flower, as in Figure 1, below. (Remember in Round 5, Part 1 when we worked in FLO? The loop we didn’t use is the loop we’re using now.)

    12" Wildflower Granny Square from Square-A-Day CrochetAlong | Free Crochet Pattern by Little Monkeys Crochet


    Round 5, Part 2: Ch2; 2 DC in same, DC in each of the next 3 Sts. (2 DC in next, DC in each of the next 3 Sts) around. (see figures 2 and 3). Join to the top of the first DC with a Sl St. (60)

    12" Wildflower Granny Square from Square-A-Day CrochetAlong | Free Crochet Pattern by Little Monkeys Crochet

    Round 6: Ch2. In same St: 2 DC, Ch2, 2 DC (first corner). DC in each of the next 2 Sts. HDC in each of the next 3 Sts. SC in each of the next 4 Sts. HDC in each of the next 3 Sts. DC in each of the next 2 Sts. (In next St: 2 DC, Ch2, 2 DC. DC in each of the next 2 Sts. HDC in each of the next 3 Sts. SC in each of the next 4 Sts. HDC in each of the next 3 Sts. DC in each of the next 2 Sts.) Repeat ( ) 2 more times. Join to the top of the first DC with a Sl St.

    Round 7: Ch2. DC in same St and in each St around, putting (2 DC + CH2 + 2 DC) in each CH2 corner space from previous round. [New Color] Join to the top of the first DC with a Sl St. (When you complete this round, there should be 22 DCs on each side.)

    Round 8: Ch2. DC in same St and in each St around, putting (2 DC + CH2 + 2 DC) in each CH2 corner space from previous round. [New Color] Join to the top of the first DC with a Sl St. (When you complete this round, there should be 26 DCs on each side.)

    Round 9: Ch2. DC in same St and in each St around, putting (2 DC + CH2 + 2 DC) in each CH2 corner space from previous round. Join to the top of the first DC with a Sl St. (When you complete this round, there should be 30 DCs on each side.)

    Round 10 (note the change to BPDC): Ch2. BPDC in same St and in each St around, but when you come to corner spaces, simply CH2; then begin with your BPDCs across the next side. [New Color] Join to the top of the first BPDC with a Sl St.(When you complete this round, there should be 30 BPDCs on each side.)

    Round 11: Ch2. DC in same St and in each St around, putting (2 DC + CH2 + 2 DC) in each CH2 corner space from previous round. [New Color] Join to the top of the first DC with a Sl St. (When you complete this round, there should be 34 DCs on each side.)

    Round 12: Ch2. DC in same St and in each St around, putting (2 DC + CH2 + 2 DC) in each CH2 corner space from previous round. Join to the top of the first DC with a Sl St. (When you complete this round, there should be 38 DCs on each side.)

    Fasten off and weave in ends.

  • Free Printable: Handmade Chalkboard Gift Tags

    Free Printable: Handmade Chalkboard Gift Tags

    I have a fun freebie for you today – printable chalkboard gift tags!

    I love gift tags.  Last year, I bought the cheapest brown packing paper I could find to wrap all of my presents in and a couple of half-priced rolls of skinny decorative ribbon, and printed off my own tags. And I’m not one to brag, but let me tell you, my wrapped gifts were adorable.

    And since you’re here, I’m guessing you know the value of something handmade. Is there any more satisfying feeling at Christmastime than when you’re wrapping up something you put your time, creativity, and heart into for someone you love? Why not finish it off with a cute “Handmade with Love” gift tag?

    Just click the image below to view the PDF.

    Handmade Chalkboard Christmas Gift Tags | Free Printable from Little Monkeys Crochet

    These tags aren’t just for crocheters, so be sure to share the love with all of your crafty friends by Sharing or Pinning!

    Handmade Chalkboard Christmas Gift Tags | Free Printable from Little Monkeys Crochet

  • Olivia’s Preemie Hat

    Olivia’s Preemie Hat

    This is my first year participating in the 12 Days of Christmas NICU Hat Challenge, and I am so honored to be a part of such an awesome and inspiring project! The challenge for the designers was to come up with a preemie hat pattern that relied on texture or color change for originality. (NICU babies, and hospital babies in general, are not allowed to have any kind of embellishment on their hats due to the potential for choking).

    (By the way, if you want to join this awesome challenge starting November 20, 2014, either follow me on Facebook or sign up for my email list (under the main menu). When the challenge begins, you’ll know about it!)

    As I started thinking about how to make my hat, I did quite a bit of reading on NICU hats. I learned that NICU wards go through hats like crazy. In an environment where even the mildest germs can make a tiny newborn take a turn for the worse, any hat that falls off a baby’s head and onto the floor cannot be put back on. So one little baby can go through multiple hats in a day. Doesn’t that put it in perspective for you? It does for me! NICU wards need these donations.

    Another thing to keep in mind as you get ready to make preemie hats is that your yarn needs to be super soft. This isn’t the time to use Super Saver yarn. I made my hats with Bernat Satin, which is comparable in weight and feel to Caron Simply Soft. (Actually, the coral hat in the photos is Simply Soft.) I prefer Bernat Satin, but they both worked well for this project.

    I found a chart online that showed the different hat sizes needed for the various weights of premature babies. I was only going to choose one to make a pattern for, but it went so quick that I decided to go ahead and make up all 4 sizes. So, below you’ll find patterns for 1-2 lbs, 2-3.5 lbs, 3.5-5 lbs, and 5-6 lbs.

    12 Days of Christmas NICU Hat Challenge: Olivia's Preemie Crochet Hat Pattern | Little Monkeys Crochet

    12 Days of Christmas NICU Hat Challenge: Olivia's Preemie Crochet Hat Pattern | Little Monkeys CrochetI named my pattern after my niece, Olivia, who spent a few days in the NICU herself due to water on her lungs, low oxygen levels, anemia, and a few other issues. (That’s her in the photo, modeling a big-girl version of this pattern.) I remember visiting the day after she was born and seeing the exhaustion and fear in my sister’s eyes. Olivia wasn’t in a life-threatening situation, but even that (relatively) short stay in NICU was enough to completely overwhelm that new mommy, who had a husband in the middle of nursing school finals and a toddler son who needed her at home. It made me realize that every single family in the NICU has a story; from the babies who only stay a few days, to the tiniest newborns who fight for their lives for months or more, each new mommy and daddy goes through an emotional struggle that I know cannot even be imagined by those of us who have not experienced it.

    I hope that every single hat that is made during this challenge will be a small blessing to the family whose little one wears it. (Even if it’s only for 5 minutes before it falls on the floor!)

    – – – – – – – – – – – – – – – – – – – – – – – – –

    Quick note: One of my wonderful readers mentioned that her local hospital does not use homemade hats on the smallest babies. It’s probably a good idea to contact the hospital you’re going to donate to, and find out if they have any special policies as well!

    – – – – – – – – – – – – – – – – – – – – – – – – –

    OLIVIA’S PREEMIE HAT

    Skill Level: Easy
    Finished Sizes: Listed on individual patterns
    Gauge: The first 3 rounds of the sizes worked with an H hook should measure 2.5” across. The first 3 rounds of the sizes worked with an I hook should measure 2.75” across.
    Stitches Used: Magic Circle, SC, HDC, DC, Sl St
    Yarn: <1oz (per hat) of your favorite soft worsted weight yarn. (I used Bernat Satin and Caron Simply Soft.)
    Hooks: Sizes H (5.0mm) or I (5.50mm) depending on which size you are making.
    Notions: Yarn needle and stitch marker

    Notes:
    Pattern is written in American standard terms.
    Pattern is worked in a seamless round. Use a stitch marker to mark the beginning of each row.

    – – – – – – –

    SIZE 1-2 LBS

    (4” width when laid flat)

    Hook Size: H (5.0mm)

    Begin with a Magic Circle.
    Row 1: Ch1. 10 HDC in Magic Circle. (10)
    Row 2: 2 HDC in each St around. (20)
    Row 3: (2 HDC in next St, HDC in next) around. (30)
    Row 4: Sk 1st St. (SC+DC) in next. Place your stitch marker in the SC to mark beginning of the row. (Sk next St; SC+DC in next) around, 13 times. Leave the last St empty.
    Row 5: (SC+DC in next St, Sk next St) around.
    Rows 6-8: Repeat Row 5.
    Rows 9-11: SC around.

    Slip stitch into the first stitch of the previous row, fasten off and weave in ends.

    – – – – – – –

    SIZE 2-3.5 LBS

    (4.5” width when laid flat)

    Hook Size: I (5.5mm)

    **Follow instructions for Size 1-2 lbs pattern, using an I hook instead of an H hook.**

    – – – – – – –


    SIZE 3.5-5 LBS

    (5” width when laid flat)

    Hook Size: H (5.0mm)

    Begin with a Magic Circle.
    Row 1: Ch1. 10 HDC in Magic Circle. (10)
    Row 2: 2 HDC in each St around. (20)
    Row 3: (2 HDC in next St, HDC in next) around. (30)
    Row 4: (2 HDC in next St, HDC in next 5 Sts) around. (35)
    Row 5: Sk 1st St. (SC+DC in next St, Sk next St) around.
    Row 6: (SC+DC in next St, Sk next St) around.
    Rows 7-9: Repeat Row 6.
    Rows 10-12: SC around.


    Slip stitch into the first stitch of the previous row, fasten off and weave in ends.

    – – – – – – –

    SIZE 5-6 LBS

    (5.5” width when laid flat)

    Hook Size: I (5.5mm)

    Begin with a Magic Circle.
    Row 1: Ch1. 10 HDC in Magic Circle. (10)
    Row 2: 2 HDC in each St around. (20)
    Row 3: (2 HDC in next St, HDC in next) around. (30)
    Row 4: (2 HDC in next St, HDC in next 2 Sts) around. (40)
    Row 5: Sk 1st St. (SC+DC) in next. Place your stitch marker in the SC to mark beginning of the row. (Sk next St; SC+DC in next) around, 19 times. Leave the last St empty.
    Row 6: (SC+DC in next St; Sk next St) around.
    Rows 7-9: Repeat Row 6.
    Rows 10-13: SC around. 

    Slip stitch into the first stitch of the previous row, fasten off and weave in ends.

  • Polar Bear Hat (6-12m)

    Polar Bear Hat (6-12m)

    Brrrrr!

    I can already feel the weather changing here in Michigan. Soon we’ll be bundling ourselves up like eskimos to go outside. What better way to finish off your cold-weather ensemble than a cute polar bear hat?

    Get the Full Pattern

    This pattern can be completed using the 100% free version right here on this page. However, many people prefer the convenience of a printable, ad-free PDF.

    All-Access Passholders get the ad-free version of this and all of my other blog patterns. It’s a pretty sweet deal, if I do say so myself! Learn more about it here or continuing scrolling for the free version.

    POLAR BEAR HAT (SIZE 6-12 MONTHS)

    Finished Size: Approximately 8.25″ wide x 5.75″ tall
    Stitches Used: Ch, Sl St, SC, HDC, SC2TOG, HDC2TOG
    Yarn: Medium, worsted weight yarn, 1 skein of white (such as RED HEART With Love), and bulky fur-like yarn, 1 skein of white (such as RED HEART Buttercup)
    Hooks: Size I (5.50mm) for base, and size H (5.00mm) for features
    Notes: Pattern is written in American standard terms.
    Gauge: With 5.5mm (US I-9) hook, 4 rounds = 3.5 in (9 cm). CHECK YOUR GAUGE. Use any size hook to obtain the gauge.

    The Ch1 at the beginning of rounds DOES NOT count as a stitch.

    – – – – – – – – – – – – – – – – – – – –

    BASE (WORKED IN CONTINUOUS ROUNDS; USE STITCH MARKER TO MARK BEGINNING OF ROUNDS)

    With I HOOK, begin with a Magic Circle (MC).

    Round 1: Ch 1; 10 HDC in MC. (10)
    Round 2: (2 HDC in next St) around. (20)
    Round 3: (2 HDC in next St, HDC in next St) around. (30)
    Round 4: (2 HDC in next St, HDC in next 2 Sts) around. (40)
    Round 5: (2 HDC in next St, HDC in next 3 Sts) around. (50)
    Rounds 6-15: HDC around. (50)

    DO NOT fasten off; continue to “Earflaps” instructions.

    EARFLAPS (WORKED IN ROWS)

    With I HOOK,

    Row 1: Sl St to next St. Ch 1, SC in same St and in next 8 Sts; Ch 1, turn. (9)
    Row 2: SC across; Ch 1, turn. (9)
    Row 3: SC across; Ch 1, turn. (9)
    Row 4: SC2TOG, SC in next 5 Sts, SC2TOG; Ch 1, turn. (7)
    Row 5: SC across; Ch 1, turn. (7)
    Row 6: SC2TOG, SC in next 3 Sts, SC2TOG; Ch 1, turn. (5)
    Row 7: HDC2TOG, DC, HDC2TOG (3)

    Fasten off and weave in ends.

    To complete 2nd earflap, beginning at the base of the first earflap (the opposite side from which you started), and continuing on across the front of the hat, count over 19 Sts. Attach yarn. Ch 1, SC in same St and in next 8 Sts; Ch 1, turn. Repeat Rows 2-7 above.

    DO NOT fasten off; continue on to “Edging” instructions.

    EDGING (WORKED IN JOINED ROUNDS)

    With I HOOK,

    Round 1: Ch 1. SC in same St and in each St around, working evenly along sides of earflaps, and including an extra SC at the tip of each earflap. Join with a Sl St into the first SC. Fasten off; weave in ends.
    Round 2: Switch to FUR YARN. Attach yarn to a St at the back of the hat; Ch1. SC in same St and in each St around, adding an extra SC at the tip of each earflap. Join with a Sl St into the first SC. Fasten off; weave in ends.

    EARS (MAKE 2; WORKED IN CONTINUOUS ROUNDS)

    With H HOOK, begin with a Magic Circle (MC).

    Round 1: Ch 1; 6 HDC in MC. (6)
    Round 2: (2 HDC in next St) around. (12)
    Round 3: (2 HDC in next St, HDC in next St) around. (18)
    Round 4: (2 HDC in next St, HDC in next 2 Sts) around. (24)
    Round 5: HDC around. (24)
    Round 6: HDC2TOG around. (12)

    Fasten off, leaving a long tail for attaching to hat.

    SNOUT

    With H HOOK, begin with a Magic Circle (MC).

    Round 1: Ch 1; 8 SC in MC. (8)
    Round 2: (2 SC in next St) around. (16)
    Round 3: (2 SC in next St, SC in next St) around. (24)
    Rounds 4-5: SC around. (24)

    Fasten off, leaving a long tail for attaching to hat.

    FINAL ASSEMBLY

    Nose: Cut a rounded triangle nose from black felt. (Templates available with full pattern purchase.) Sew to snout using black thread (or attach with washable fabric glue), placing the bottom point of the nose on the center of the snout.

    Snout: Using long tail, begin to sew the snout to the hat, placing the bottom of the snout just above the fur edging. (Tip: Use a pin to hold the top of the snout centered in place so your snout doesn’t end up off-centered.) Stuff it with a small amount of polyester fiberfill before closing it up completely.

    Ears: Flatten hat. Using long tail, sew ears to either side of hat. The top of the ears should attach at Round 5. (The photos below are only to help you understand how to fold the ears. The size shown below is not 6-12m, so do not depend on it for feature placement.)

    Polar Bear Hat Crochet Pattern | Little Monkeys Crochet

    Eyes: Using thread and a sewing needle, attach two ½ inch buttons just above the snout, using the photo as a guide.

    Tassels (optional): For each tassel, use 6 pieces of white yarn and 3 pieces of fur yarn.