Category: Crochet Patterns

  • Herringbone Round Basket Set

    Herringbone Round Basket Set

    I love crocheted baskets. I love making them, I love displaying them, and I love using them. Ever since I came up with my plastic canvas method for stability, I just can’t get enough of these easy projects!

    I wanted my next basket pattern to be chic, simple and modern looking. So I returned to one of my favorite stitches – the herringbone half double crochet worked in the round. Such pretty texture!

    (My tribe has been begging for a square basket pattern, too, and that’s right here.)

    About Those Cute Leather Tags

    Those adorable tags on my baskets aren’t actually leather at all – they’re cork! I had mine printed by All This Wood (affiliate link). They always do a great job for me. If you purchase tags of your own through this link, you won’t pay any extra, but I’ll get a small percentage of the sale. My affiliate links are just one of the ways I am able to keep releasing free patterns, so I am always incredibly appreciative of anyone who uses them!

    Video Help

    While this is a very simple pattern, I know that many of you are visual learners. I don’t have a video tutorial specifically for this pattern, but I have three tutorials that you can use together to basically make the entire basket! Here they are:

    • Crocheting the smooth-circle base
      Timestamp 3:40 – 19:05 covers 12 rounds of the Smooth Circle Increase. (It’s a different basket pattern that uses the same technique.)
    • Crocheting the rest of the basket
      Timestamp 4:31 – 27:35 covers crocheting the rest of the basket. (It’s the same basket, just the square version. So while the video will begin by telling you to HHDC around the perimeter of the square, you’ll just HHDC around the circle, continuing seamlessly as you already were.)
    • And finally, Inserting plastic canvas into a round basket.

    Prefer a PDF?

    This pattern can be completed using the 100% free version right here on this page. However, many people prefer the convenience of a printable, ad-free PDF.

    All-Access Passholders get the ad-free version of this and all of my other blog patterns. It’s a pretty sweet deal, if I do say so myself! Learn more about it here or continuing scrolling for the free version.

    Herringbone Round Basket Set

    Difficulty: Easy

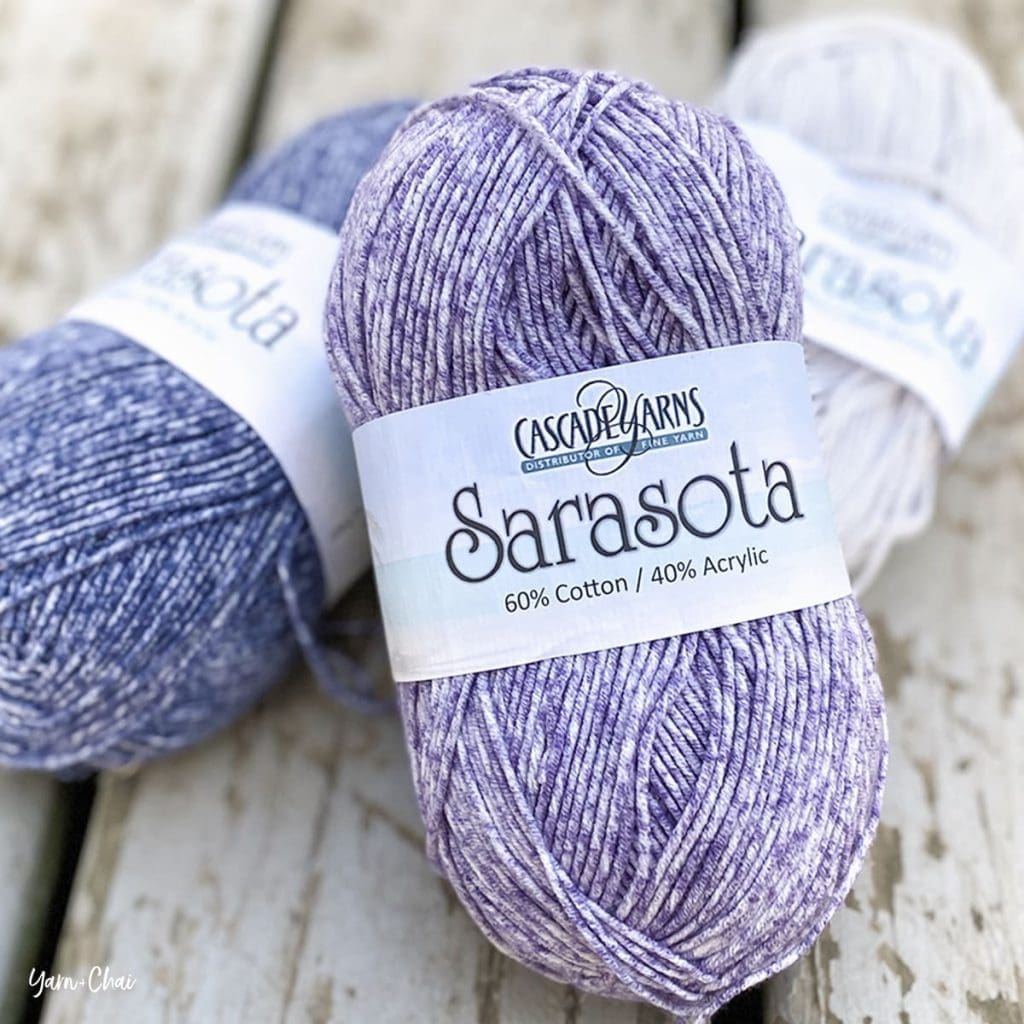
    Yarn: I used Bernat Maker Home Dec (a #5 bulky weight cotton/nylon blend) in “Clay”. Yarn amounts are listed with individual pattern sizes.

    Hooks: H (5.0mm) and G (4.25mm)

    Gauge: Your first 5 rounds should measure 2.5″ across.

    You’ll also need: Yarn needle, stitch marker, heavy duty plastic canvas

    Terms and Abbreviations:
    MC (magic circle – view tutorial here)
    ST/STS
     (stitch/stitches)
    SL ST (slip stitch)
    SK (skip)
    CH (chain)
    SC (single crochet)
    HDC (half double crochet)
    HHDC (herringbone half double crochet; see Special Stitches, below)
    3rd Loop
     (see Special Stitches, below)

    Special Stitches:

    HHDC: Yarn over, insert hook into stitch. Yarn over, pull loop through stitch AND through first loop on hook (this is similar to a slip stitch motion). Two loops remain on hook. Yarn over and pull through both loops.

    3rd Loop: Half double crochet stitches have a 3rd loop that we utilize in this pattern. For this pattern the 3rd loop can be found just below the front loop on the side of the work that is facing away from you. When instructed to work in “3rd loop only”, reach over the two top loops and insert your hook into this special loop. This creates a delicate braided look on the right side of the pattern. Also called Camel Stitch or RibHDC.

    Notes:
    (1) This pattern is written in American Standard Terms.
    (2) IMPORTANT: Most of this pattern is worked seamlessly, but a small portion is worked in joined rounds. Pay attention, and only join, chain and/or turn when specifically instructed. Use a stitch marker to mark the beginning of your rounds when working seamlessly.
    (3) The finished size of each basket is listed on its individual pattern.
    (4) This basket uses the Smooth-Circle Base method of increasing, which is different than a standard circle increase pattern. Please see the video tutorial listed under “Video Help” up in the blog post for a thorough walk-through of this method.

    – – – – – – – – – – – – – – –

    SMALLER BASKET

    Yards Used: 120
    Finished Size: 5.5″ wide x 2.75″ tall

    To Begin: With larger hook and bulky yarn, make a magic circle; CH1 (does not count as a stitch).

    Round 1: 6SC in MC. (6)

    Round 2: 2SC in each ST around. (12)

    Round 3: (2SC in next ST, SC in next ST) around. (18)

    Round 4: (SC in next ST, 2SC in next ST, SC in next ST) around. (24)

    Round 5: (2SC in next ST, SC in each of the next 3 STS) around. (30)

    Round 6: (SC in each of the next 2 STS, 2SC in next ST, SC in each of the next 2 STS) around. (36)

    Round 7: (2SC in next ST, SC in each of the next 5 STS) around. (42)

    Round 8: (SC in each of the next 3 STS, 2SC in next ST, SC in each of the next 3 STS) around. (48)

    Round 9: (2SC in next ST, SC in each of the next 7 STS) around. (54)

    Rounds 10-15: HHDC in each ST around. (54)

    Round 16: HHDC in each of the first 52 STS. SC in each of the remaining 2 STS. Join with a  SL ST to the top of the first ST of the round. (54)

    Round 17: CH1. HDC in each ST around. Join with a SL ST to the top of the first HDC. (54)

    Switch to smaller hook.

    Round 18: CH1. SC in 3rd loop of each ST around. Do not join. (54)

    Rounds 19-27: SC in each ST around. (54)

    SL ST into the next ST to smooth down the round. Fasten off and weave in ends, then proceed to “Adding Plastic Canvas.”

    – – – – – – – – – – – – – – –

    LARGER BASKET

    Yards Used: 190
    Finished Size: 
    7″ wide x 3.25″ tall

    To Begin: With larger hook and bulky yarn, make a magic circle; CH1 (does not count as a stitch).

    Round 1: 6SC in MC. (6)

    Round 2: 2SC in each ST around. (12)

    Round 3: (2SC in next ST, SC in next ST) around. (18)

    Round 4: (SC in next ST, 2SC in next ST, SC in next ST) around. (24)

    Round 5: (2SC in next ST, SC in each of the next 3 STS) around. (30)

    Round 6: (SC in each of the next 2 STS, 2SC in next ST, SC in each of the next 2 STS) around. (36)

    Round 7: (2SC in next ST, SC in each of the next 5 STS) around. (42)

    Round 8: (SC in each of the next 3 STS, 2SC in next ST, SC in each of the next 3 STS) around. (48)

    Round 9: (2SC in next ST, SC in each of the next 7 STS) around. (54)

    Round 10: (SC in each of the next 4 STS, 2SC in next ST, SC in each of the next 4 STS) around. (60)

    Round 11: (2SC in next ST, SC in each of the next 9 STS) around. (66)

    Round 12: (SC in each of the next 5 STS, 2SC in next ST, SC in each of the next 5 STS) around. (72)

    Rounds 13-20: HHDC in each ST around. (72)

    Round 21: HHDC in each of the first 70 STS. SC in each of the remaining 2 STS. Join with a  SL ST to the top of the first ST of the round. (72)

    Round 22: CH1. HDC in each ST around. Join with a SL ST to the top of the first HDC. (72)

    Switch to smaller hook.

    Round 23: CH1. SC in 3rd loop of each ST around. Do not join. (72)

    Rounds 24-34: SC in each ST around. (72)

    SL ST into the next ST to smooth down the round. Fasten off and weave in ends, then proceed to “Adding Plastic Canvas.”

    – – – – – – – – – – – – – – –

    Adding Plastic Canvas

    Cut across your plastic canvas to make strips that are the same height as the inner layer of the basket. Set your basket so that it is completely unfolded. Roll up a strip of canvas and insert it into the bottom of the basket, allowing it to expand up against the walls of the basket. Continue adding as many layers as you want to make it as stiff as you want. Fold the inside layer down over the canvas. Work the fabric until it all lays neat and flat.

    If you want, you can sew the inner edge of the fabric to the bottom of the basket to keep everything in place. (Avoid doing this if you want your basket to be machine washable.)

    You’re done!

    I hope you enjoyed this tutorial. If you’re sharing your baskets on social media, be sure to use hashtag #herringbonebasket and tag me @yarnandchai.design!

  • Marsali Sweater (XS-5X)

    Marsali Sweater (XS-5X)

    Ever since I designed my very first garment pattern last winter, I’ve been itching to get started on a new wearable. I love how Marsali turned out; she’s soft, simple, and feminine, and she’ll accompany you through at least 3 seasons:

    • 🍂 In fall, pair her with jeans or leggings and tall boots
    • ❄️ In winter, put a long-sleeved white tee underneath for extra coziness
    • 🌷 In spring, layer her over a simple tank top

    About the Yarn

    I worked up the sample in Lion Brand Coboo (affiliate link), which is a #3 weight blend: 51% cotton, and 49% rayon from bamboo. When I was newer to crochet I avoided cotton because my first experience with it was the kitchen cottons that are sold at almost all craft stores, and I couldn’t fathom how anyone would make garments with it. I had no idea the huge range of cotton that was actually available in the yarn world… I’m so glad I do now!

    Coboo was awesome to work with. It can be a little splitty, but that doesn’t bother me (and it actually helps the drape of the finished pattern). And it’s so soft! I am really picky about what yarn touches my skin, and I would love to wrap myself in a big soft blanket of Coboo.

    Note: If you’re someone who has trouble with “splitty” yarns, I recommend switching up your hook. My Clover Amour works well with this yarn, and although I had to be a little more conscious of grabbing all of the strands, I didn’t find Coboo unmanageable in the least. And the finished fabric is worth it. Look at that drape!

    About to do some yarn shopping? Click here to use my affiliate link for Lion Brand Coboo. (When you purchase from my affiliate links at no extra cost to you, I get a little commission… which helps me to continue putting out free patterns!)

    – – – – – – – – – – – – – – –

    Prefer a PDF?

    This pattern can be completed using the 100% free version right here on this page. However, many people prefer the convenience of a printable, ad-free PDF.

    All-Access Passholders get the ad-free version of this and all of my other blog patterns. It’s a pretty sweet deal, if I do say so myself! Learn more about it here or continuing scrolling for the free version.

    – – – – – – – – – – – – – – –

    Marsali Summer Top

    View on Ravelry

    Difficulty: Easy

    Finished Size: Pattern is written for sizes XS – 5XL (see chart for specific measurements). Top has an oversized fit, with 10-12″ positive ease.

    Yarn: I used Coboo from Lion Brand (affiliate link), a super soft #3 DK weight cotton/rayon blend, in the color “Silver”. The table below will tell you how much yarn you will need for your size. Please note that the number of skeins required assumes an accurate gauge check and is specific to Lion Brand Coboo; if you use a different yarn, you’ll need to go by yardage when deciding how much to purchase.

    Hook(s): 4.5mm, or whichever hook you need to get an accurate gauge check. For the sleeves, you will also need a hook that is .5mm larger (I used a 5.0mm).

    Gauge: 17 STS x 16 rows = 4″ square (done in the SC+HDC stitch).

    ::: How to Check Your Gauge For the Marsali Top :::

    With 4.5mm hook and chosen yarn, follow this pattern:

    To begin: CH23.
    Row 1: HDC in 2nd CH from hook. (SK next CH, SC+HDC in next CH) 10 times. SC in final CH. (22)
    Rows 2-20: CH1, turn. HDC in first ST. (SK next ST, SC+HDC in next ST) 10 times. SC in final ST. (22)

    Fasten off.

    Lay your gauge fabric on a flat surface and measure the width of 17 stitches, as well as the height of 16 rows. If each come to 4″, you are good to go. If less than 4″, use a larger hook and try again; if more than 4″, use a smaller hook.


    If you can get one measurement correct but not the other, go with the hook size that gets you the correct number of stitches; you can easily adjust the height of the pattern by adding or removing rows.

    Terms and Abbreviations:
    ST/STS
     (stitch/stitches)
    SL ST (slip stitch)
    SK (skip)
    CH (chain)
    SC (single crochet)
    HDC (half double crochet)
    SC+HDC (do a full SC and full HDC in the same stitch)
    BLO (back loop only)

    Notes:
    (1) This pattern is written in American Standard Terms.
    (2) Measurements can be easily adjusted. For width, simply keep an even-numbered stitch count in your rows, and for height, add or subtract an even number of rows of the SC+HDC stitch in the body of the pattern. Just be sure that whatever you do for the front panel, you do for the back panel as well.
    (3) Pattern is written for sizes XS-5XL, with counts for sizes S-5XL written in parentheses. Example: XS (S, M, L, XL, 2XL, 3XL, 4XL, 5XL). If only one number is given, it applies to all sizes.
    (4) “Right” side of fabric is the side where the braid at the top and bottom of the pattern is visible.
    (5) Pattern is worked from the bottom up.

    – – – – – – – – – – – – – – –

    Instructions

    – – – – – – – – – – – – – – – – – –
    PANELS (MAKE 2)
    – – – – – – – – – – – – – – – – – –
    The front and back panels, which are identical, consist of 3 parts: the bottom ribbing, the body, and the top ribbing. These 3 parts are worked as one piece, so don’t fasten off until instructed.

    – – –
    Part 1: Bottom Ribbing
    The bottom of Marsali is a classic ribbed edge.

    To Begin: With 4.5mm hook, CH9.

    Row 1: SC in 2nd CH from hook and in each remaining CH. (8)

    Rows 2-86 (94, 102, 110, 120, 128, 136, 144, 154): CH1, turn. SC in first ST. SC in BLO of each of the next 6 STS. SC in final ST. (8)

    – – –
    Part 2: Body

    Body, Row 1: CH1, do not turn. Working down the long edge of the ribbing, HDC in each row end (each peak and each valley). (86 [94, 102, 110, 120, 128, 136, 144, 154])

    Row 2: CH1, turn. SC in first ST. SC in 3rd loop of each of the next 84 (92, 100, 108, 118, 126, 134, 142, 152) STS. SC in final ST. (86 [94, 102, 110, 120, 128, 136, 144, 154])

    Rows 3-74 (74, 74, 78, 78, 78, 82, 82, 82): CH1, turn. HDC in first ST. (SK next ST, SC+HDC in next ST) across, until 1 ST remains. SC in final ST. (86 [94, 102, 110, 120, 128, 136, 144, 154])

    Row 75 (75, 75, 79, 79, 79, 83, 83, 83): CH1, turn. HDC in each ST across. (86 [94, 102, 110, 120, 128, 136, 144, 154])

    Row 76 (76, 76, 80, 80, 80, 84, 84, 84): CH1, turn. SC in first ST. SC in 3rd loop of each of the next 84 (92, 100, 108, 118, 126, 134, 142, 152) STS. SC in final ST. (86 [94, 102, 110, 120, 128, 136, 144, 154])

    – – –
    Part 3: Top Ribbing
    In this section, we will be creating the top ribbing by making vertical ribs and attaching them with slip stitches to the last row of the body as we go. If you feel you need a little more in-depth help with this part, here’s a tutorial video that is specifically about this technique.

    Top Ribbing, Row 1: CH9, turn. SC in 2nd chain from hook and in each of the remaining 7 chains. SL ST into the first SC from final row of Part 2, the stitch on which your CH9 was built. SL ST into the next SC from the final row of Part 2. (8, plus the two slip stitches along the final row of Part 2)

    The section we just created, built on the CH9, will hereafter be referred to as the “ribbing.”

    Row 2: CH1, turn. Skipping over the 2 SL STS you put in the final row of Part 2, SC in first ST of the ribbing. SC in BLO of each of the next 6 STS. SC in both loops of the last ST. (8)

    Row 3: CH1, turn. SC in 1st ST. SC in BLO of each of the next 6 STS. SC in both loops of the last ST. SL ST in each of the next 2 unworked STS along the final row of Part 2. (8, plus the 2 SL STS along the final row of Part 2)

    Row 4: CH1, turn. Skipping over the 2 SL STS you put in the final row of Part 2, SC in first ST of the ribbing. SC in BLO of each of the next 6 STS. SC in both loops of the last ST. (8)

    Rows 5-86 (94, 102, 110, 120, 128, 136, 144, 154): Repeat Rows 3-4 all the way across the final row of Part 2. (8)

    Fasten off and weave in all ends. Block both panels if desired.


    – – – – – – – – – – – – – – –
    SEAMING THE SIDES
    – – – – – – – – – – – – – – –

    Lay panels on top of each other on a flat surface, wrong sides together, right sides facing out. Using the recommendations for your size in the chart below, measure the suggested number of inches down both sides and mark with a stitch marker. Put your stitch marker through both panels and be sure to mark the same row on both sides, and both panels.

    Starting at the bottom, just above where the ribbing ends and working upward, seam edges of one side using the Mattress Stitch (being careful to keep the rows lined up as you go). Seam until you reach your stitch marker, then fasten off and weave in ends on the inside of the top. Do the same for the other side.

    (A note on seaming: Because we are seaming the sides of the work, there are no top loops to work into. We just have to do our best; and the more you do, the more you’ll become familiar with the pattern of the yarn along the edges, helping you to stay consistent. Just keep those rows lined up. You’ll be ok! If you need a little help on Mattress Stitch technique, here’s a tutorial video from fellow designer Edie Eckman.) 

    – – – – – – – – – – – – – – –
    ADDING RIBBING TO THE ARM HOLES
    – – – – – – – – – – – – – – –

    Important: Follow all arm hole instructions with a hook that is .5mm larger than you used for the body. As you SC around the first arm hole, if your fabric starts to pucker, try going another .5mm larger still.

    Decide which side is going to be the front panel and which will be the back panel (right now they are identical). Mark the front panel with a stitch marker for easy reference.

    RIGHT SIDE ARM HOLE
    Remove the stitch marker on the right arm hole (as if you were wearing it) and join your yarn at that spot on the front panel. SC up the front edge of the arm hole, putting one SC in each row end. (Tip: the little “squares” in the fabric are each comprised of two rows each.)

    When you get to the ribbing at the top, lay the ribbing from the front panel over the ribbing from the back panel…

    …and SC through both panels along the edge of the ribbing.

    Continue to SC down the back edge of the arm hole until you reach the seam. Count your SCs; if you have an odd number, add or subtract one to make it even. Then, follow this pattern to add ribbing all around the armhole:

    Row 1: CH9, turn. SC in 2nd chain from hook and in each of the remaining 7 chains. SL ST into the first SC from arm hole edging, the stitch on which your CH9 was built. SL ST into the next SC from the edging. (8, plus the two slip stitches along the arm hole edging)

    The section we just created, built on the CH9, will hereafter be referred to as the “ribbing.”

    Row 2: CH1, turn. Skipping over the 2 SL STS you put in the edging row, SC in first ST of the ribbing. SC in BLO of each of the next 6 STS. SC in both loops of the last ST. (8)

    Row 3: CH1, turn. SC in 1st ST. SC in BLO of each of the next 6 STS. SC in both loops of the last ST. SL ST in each of the next 2 unworked STS along the edging. (8, plus the 2 SL STS along the arm hole edging)

    Row 4: CH1, turn. Skipping over the 2 SL STS you put in the edging, SC in first ST of the ribbing. SC in BLO of each of the next 6 STS. SC in both loops of the last ST. (8)

    Rows 5-?: Repeat Rows 3-4 all the way around the arm hole. (8)

    Here is an in-progress illustration of adding the ribbing:

    Fasten off, leaving a 12″ tail for seaming.

    Overlap ribbed edges as shown (front panel over back panel) and use finishing tail to sew them in place as marked.

    Weave in ends.

    LEFT SIDE ARM HOLE
    Remove the stitch marker on the left arm hole (as if you were wearing it) and join your yarn at that spot on the back panel. SC up the back edge of the arm hole, putting one SC in each row end. (Tip: the little “squares” in the fabric are each comprised of two rows each.)

    When you get to the ribbing at the top, lay the ribbing from the front panel over the ribbing from the back panel…

    … and SC through both panels along the edge of the ribbing.

    Continue to SC down the front edge of the arm hole until you reach the seam. Then, follow the same ribbing pattern you did for the right arm hole to add ribbing all the way around the left arm hole.

    Next, overlap ribbed edges as shown (front panel over back panel) and use finishing tail to sew them in place as marked.

    Weave in ends.

    – – – – – – – – – – – – – – –
    SECURING THE SHOULDERS
    – – – – – – – – – – – – – – –

    You’ll need to add a little bit of seaming at the shoulders so that your beautiful top stays put!

    Lay garment flat, front side up. Using the size chart in the illustration below, measure the instructed number of inches in from each edge (NOT counting the sleeves) and place a stitch marker on the front panel in those two locations at the top of your garment.

    Beginning on either side, and holding the front panel ribbing over the back panel ribbing (lined up with the braid on the back panel, but not covering it), use yarn and a yarn needle to sew the pieces together from the edge of the garment to the stitch marker, then across the ribbing on one side (as shown by the red lines in the photo). Make sure that your final stitch goes all the way over the edge of the top layer of fabric to hold it down; this will ensure that it won’t stick up when stretched over your shoulders.

    Fasten off and weave in ends on inside of garment. Repeat for the other shoulder.

    Don’t forget to share your finished project!

    Share it on FB, in our FB group, in other groups, on Instagram… wherever you want to show if off! Be sure to tag me @yarnandchai.design so I can see it, too!

  • Cinch Bag Series

    Welcome to the home page for a small collection of simple + beautiful designs I’m calling the Cinch Bag Series!

    About the Cinch Bag Series

    All bags in the Cinch Bag Series begin with the exact same pattern (and it’s all single crochet!), and use variations in color and surface detailing to produce unique designs with tons of personality. Whether you whip up a couple for yourself or for gifts, these easy-level patterns will make any newbie crocheter feel like a seasoned pro.

    Here are the three bags:

    – – – – – – – – – – – – – – – –

    GIVEAWAY with LOVECRAFTS.COM!

    great place to find the yarn for any of the patterns in the Cinch Bag Series is LoveCrafts.com! LoveCrafts is a global Makers community offering all kinds of yarn and supplies for crocheters, knitters, and more. I’ve bought yarn from them several times, and they always deliver quick service and quality!

    LoveCrafts offered to provide the necessary yarn for the Mudcloth Bag as part of a fun giveaway. So be sure to enter below! The winner will receive two skeins of Sarasota and a 50yd roll of 3mm macrame cord for the Mudcloth Bag pattern, as well as some extra yarn-lovers’ goodies. The giveaway runs through the end of Saturday, July 4, and the winner will be announced soon after. (See Terms and Conditions for details.) Best of luck!

    a Rafflecopter giveaway
  • Cinch Bag Series: The Zig Zag Bag

    Cinch Bag Series: The Zig Zag Bag

    This bright and colorful backpack is my 2nd design in a small series of artistic backpacks that are super simple to create! The Zig Zag Bag features five colors of yarn in a loose striping pattern, with some simple zigzags added at the end to give it a little extra oomph.

    And can I brag about my middle child for a moment? This kid is always ready and willing to help me with blog stuff when I need it, even if it means modeling a “kinda girly bag” (his words). He’s always been interested in how I run my business, and I won’t be a bit surprised if he becomes an entrepreneur himself one day!

    About the Cinch Bag Series

    All designs in the Cinch Bag Series are made with the same pattern (all single crochet!), and use variations in color and surface detailing to produce unique designs with tons of personality. These easy-level patterns will make any newbie crocheter feel like a seasoned pro.

    Here are each of the bags currently included in the collection:

    About the Yarn

    All of the samples I created for my Cinch Bag Series use Sarasota, a yarn by Cascade Yarns. Sarasota is a blend of cotton and acrylic in a #3 light weight. It’s soft enough to crochet with comfort, but sturdy enough to make a great bag. It comes in solids and heathers, and I’ve used both throughout the series.

    With its large range of color options, it’s safe to say that Sarasota is my new favorite cotton blend for bags. (And you know how I love making bags!)

    Want to try Sarasota for yourself? I’ve found it at LoveCrafts, WEBS, and The Yarn Lady!

    – – – – – – – – – – – – – – –

    GIVEAWAY WITH LOVECRAFTS.COM!

    great place to find the yarn for any of the patterns in the Cinch Bag Series is LoveCrafts.com! LoveCrafts is a global Makers community offering all kinds of yarn and supplies for crocheters, knitters, and more. I’ve bought yarn from them several times, and they always deliver quick service and quality!

    LoveCrafts offered to provide the necessary yarn for the Mudcloth Bag as part of a fun giveaway. So be sure to enter below! The winner will receive two skeins of Sarasota and a 50yd roll of 3mm macrame cord for the Mudcloth Bag pattern, as well as some extra yarn-lovers’ goodies. The giveaway runs through the end of Saturday, July 4, and the winner will be announced soon after. (See Terms and Conditions for details.) Best of luck!

    a Rafflecopter giveaway

    – – – – – – – – – – – – – – – –

    Prefer a PDF?

    This pattern can be completed using the 100% free version right here on this page. However, many people prefer the convenience of a printable, ad-free PDF.

    All-Access Passholders get the ad-free version of this and all of my other blog patterns. It’s a pretty sweet deal, if I do say so myself! Learn more about it here or continuing scrolling for the free version.

    – – – – – – – – – – – – – – –

    Zig Zag Bag

    View on Ravelry

    Difficulty: Easy

    Finished Size: 11″ wide x 14.75″ tall when laid flat (before assembly)

    Yarn: Approx. 525 yards of #3 (light) cotton or cotton/acrylic blend. I used Sarasota, a cotton/acrylic blend from Cascade Yarn, in 5 colors:

    • COLOR A (“Black”): 60 yards
    • COLOR B (“Lunar Rock”): 140 yards
    • COLOR C (“Deep Violet”): 120 yards
    • COLOR D (“Turquoise”): 120 yards
    • COLOR E (“White”): 85 yards

    Hook: E (3.5mm)

    Gauge: 21 SC x 24 rows = 4″ square

    You’ll also need: Yarn needle, ruler, and 3 yards of 3mm macrame cord (or other chosen material for drawstring backpack strap)

    Terms and Abbreviations:
    ST/STS
     (stitch/stitches)
    SK (skip)
    CH (chain)
    SC (single crochet)
    FLO (front loop only)

    Notes:
    (1) This pattern is written in American Standard Terms.
    (2) You may choose to fasten off after each color change or carry your yarn up through the inside of the bag. I did a mixture of both, depending on how soon I would be using the same color again.
    (3) Your seam WILL be on a slant. This is due to the fact that we are joining but not turning our rounds; the slight offset of a crochet stitch’s top loops in relation to its base cause this slant to happen naturally. The only way to avoid the slant is to turn each round, but it results in a busier-looking fabric that doesn’t showcase the detailing of the bag nearly as well.

    – – – – – – – – – – – – – – –

    Instructions

    – – – – – – – – – – – – – – –
    PATTERN FOR BAG
    – – – – – – – – – – – – – – –

    To Begin: With COLOR A, CH57.

    Round 1: Working into the back bumps, SC in 2nd CH from hook and in each remaining CH. Working in FLO down the opposite side of the chain, SC across. (You have now worked in both sides of each chain.) Join. (112)

    Rounds 2-82: CH1, SC in same ST and in each ST around. Join. (112) Use the following color pattern:

    Rounds 2-8 (8 rounds total, including Round 1): COLOR A
    Rounds 9-12 (4 rounds): COLOR B
    Rounds 13-16 (4 rounds): COLOR C
    Rounds 17-18 (2 rounds): COLOR D
    Rounds 19-20 (2 rounds): COLOR E
    Rounds 21-22 (2 rounds): COLOR D
    Rounds 23-26 (4 rounds): COLOR C
    Rounds 27-34 (8 rounds): COLOR B
    Rounds 35-36 (2 rounds): COLOR E
    Rounds 37-40 (4 rounds): COLOR D
    Rounds 41-42 (2 rounds): COLOR E
    Rounds 43-46 (4 rounds): COLOR B
    Rounds 47-50 (4 rounds): COLOR C
    Rounds 51-52 (2 rounds): COLOR D
    Rounds 53-54 (2 rounds): COLOR E
    Rounds 55-56 (2 rounds): COLOR D
    Rounds 57-60 (4 rounds): COLOR C
    Rounds 61-64 (4 rounds): COLOR B
    Rounds 65-66 (2 rounds): COLOR E
    Rounds 67-70 (4 rounds): COLOR D
    Rounds 71-72 (2 rounds): COLOR E
    Rounds 73-76 (4 rounds): COLOR B
    Rounds 77-80 (4 rounds): COLOR C
    Rounds 81-82 (2 rounds): COLOR D

    After Round 82 is complete, fasten off and weave in ends.

    Lay bag flat, seam side facing down. Locate the rightmost top stitch (leftmost for lefties) and attach COLOR E in that stitch; proceed to Round 83.

    Round 83 (drawstring holes): CH1. SC in same ST and in next ST. CH3, SK 3 STS. (SC in each of the next 4 STS, CH3, SK 3 STS) around until only 2 STS remain. SC in each of the remaining 2 STS. Join. (16 drawstring holes)

    Round 84: CH1. SC in same ST and in each ST around, putting 3SC in each CH3 space. Join. (112)

    Rounds 85-86: Switch to COLOR D. CH1, SC in same ST and in each ST around. Join. (112)

    Fasten off and weave in all ends.

    – – – – – – – – – – – – – – –
    SURFACE DETAILING
    – – – – – – – – – – – – – – –

    Using a yarn needle and COLOR A, add the surface detailing to the bag using the charts below. For this bag, the detailing is added to each section of COLOR B.

    Hint: Click the image to make it larger on your screen. (I provided one color version and one black-and-white version; use whichever you find most helpful.)

    Click image to enlarge

    Here area few tips for adding the detailing:

    1. Do each section separately. Cut your yarn first (each section will take a couple of yards), then start in the inside of the bag so that your starting tail can be woven in on the inside.
    2. Start each section right at the seam.
    3. Try adding all of the lines that go in the SAME direction before coming back around to add the remaining lines. (So instead of sewing like this: /\/\/\/\/\/\/\/\/\ , sew all of the / / / / / / / / and then come back and do the \ \ \ \ \ \ \ \ .) This will help your lines to look more consistent.
    4. If you run out of yarn before finishing a section, that’s ok! Just finish off with an additional strand.
    5. Don’t be alarmed that your surface stitches slant just a bit. This is due to the nature of crochet stitches worked in unturned rounds.
    Our bag so far

    Please note that the images that follow are of a different bag from the Cinch Bag Collection, but all use the same techniques for shaping and adding drawstrings and tabs.


    – – – – – – – – – – – – – – –
    SHAPING THE BOTTOM
    – – – – – – – – – – – – – – –

    We’re going to use a simple trick to give our bag a little roominess at the bottom.

    (If you need help visualizing this, I use the technique in my video tutorial for the Malia Shoulder Bag at timestamp 28:50.)

    With the bag inside out, turn it upside down and position the bottom so that one end lays out in a triangular shape, with the seam going up the center. Use a ruler and measure a 3″ line across the corner of the base (mark the line with tape if it helps). Sew a seam across the line (through both layers) with COLOR A. Repeat on the opposite side.

    Make sure all yarn is woven in, then turn bag right-side out. Here’s what it should look like on the bottom:

    – – – – – – – – – – – – – – –
    PATTERN FOR DRAWSTRING TABS
    – – – – – – – – – – – – – – –

    Next, we’ll make some little tabs to secure the ends of our drawstrings to the backpack. Use the following pattern to make two tabs:

    To begin: With COLOR A, CH7.

    Row 1: SC in 2nd CH from hook and in each remaining CH. (6)

    Rows 2-6: CH1, turn. SC in each ST across. (6)

    Fasten off leaving a 12″ finishing tail for sewing. Weave in starting tail.

    Now, let’s attach them.

    Step 1: Turn your bag so that the seam is facing UP. Locate the triangle on the bottom-left corner of the bag, formed when you shaped the bottom. Then, locate the edge of the triangle that is on the seamed side of the bag (pink arrow). This is the side to which we’ll attach our first tab.

    Step 2: Using a yarn needle and the finishing tail, fold the tab over and sew it centered along the edge of the triangle. Work your yarn needle through a couple of stitches on the triangle edge as well as both top and bottom edges of the tab, so that you are sewing the tab closed while also attaching it to the bag.

    Step 3: When finished, weave the tail into the inside of the bag.

    Attach the second tab to the triangle at the bottom-right corner of the bag, again using the edge of the triangle that is on the seamed side of the bag.

    – – – – – – – – – – – – – – –
    ADDING DRAWSTRING
    – – – – – – – – – – – – – – –

    Cut two 1.5 yard lengths of macrame cord. Lay bag flat and locate the furthermost hole to the right; starting from the outside, thread the first length of cord through the hole and then, working leftward, proceed to weave it in and out of each hole around the entire bag. You should end up with the cord exiting the bag through the hole next to your starting hole. 

    Do the same thing with the other 1.5 yard length of cord, starting in the leftmost hole and working rightward, continuing around the entire bag. (Both cords will be entering and exiting the same drawstring holes, in opposite directions.)

    Take each pair of drawstring ends and thread them through their corresponding tabs at the bottom of the bag. Tie ends together in a knot beneath each tab. Don’t cut off the excess yet.

    Cinch the backpack and wear it to test the length of your drawstrings, then readjust knot placement as needed. Trim off excess cord.

    Done!

    – – – – – – – – – – – – – – –

    Don’t forget to share your finished project!

    Share it on FB, in our FB group, in other groups, on Instagram… wherever you want to spread joy! Be sure to and tag me @yarnandchai.design so I can see it, too!

  • Cinch Bag Series: The Fading Stripes Bag

    Cinch Bag Series: The Fading Stripes Bag

    This backpack, based on my Linen Stitch Baby Blanket color pattern, is my 3rd design in a small series of artistic backpacks that are super simple to create! The Fading Stripes Bag features three colors, using a striping pattern that creatively transitions from one color to the next.

    About the Cinch Bag Series

    All designs in the Cinch Bag Series are made with the same pattern (all single crochet!), and use variations in color and surface detailing to produce unique designs with tons of personality. These easy-level patterns will make any newbie crocheter feel like a seasoned pro.

    Here are each of the bags currently included in the collection:

    About the Yarn

    All of the samples I created for my Cinch Bag Series use Sarasota, a yarn by Cascade Yarsn. Sarasota is a blend of cotton and acrylic in a #3 light weight. It’s soft enough to crochet with comfort, but sturdy enough to make a great bag. It comes in solids and heathers, and I’ve used both throughout the series.

    With its large range of color options, it’s safe to say that Sarasota is my new favorite cotton blend for bags. (And you know how I love making bags!)

    GIVEAWAY WITH LOVECRAFTS.COM!

    great place to find the yarn for any of the patterns in the Cinch Bag Series is LoveCrafts.com! LoveCrafts is a global Makers community offering all kinds of yarn and supplies for crocheters, knitters, and more. I’ve bought yarn from them several times, and they always deliver quick service and quality!

    LoveCrafts offered to provide the necessary yarn for the Mudcloth Bag as part of a fun giveaway. So be sure to enter below! The winner will receive two skeins of Sarasota and a 50yd roll of 3mm macrame cord for the Mudcloth Bag pattern, as well as some extra yarn-lovers’ goodies. The giveaway runs through the end of Saturday, July 4, and the winner will be announced soon after. (See Terms and Conditions for details.) Best of luck!

    a Rafflecopter giveaway

    – – – – – – – – – – – – – – –

    Prefer a PDF?

    This pattern can be completed using the 100% free version right here on this page. However, many people prefer the convenience of a printable, ad-free PDF.

    All-Access Passholders get the ad-free version of this and all of my other blog patterns. It’s a pretty sweet deal, if I do say so myself! Learn more about it here or continuing scrolling for the free version.

    – – – – – – – – – – – – – – –

    Fading Stripes Bag

    View on Ravelry

    Difficulty: Easy

    Finished Size: 11″ wide x 14.75″ tall when laid flat (before assembly)

    Yarn: Approx. 510 yards of #3 (light) cotton or cotton/acrylic blend. I used Sarasota, a cotton/acrylic blend from Cascade Yarn, in 3 colors:

    • COLOR A (“Navy”): 195 yards
    • COLOR B (“White”): 170 yards
    • COLOR C (“Deep Violet”): 145 yards

    Hook: E (3.5mm)

    Gauge: 21 SC x 24 rows = 4″ square

    You’ll also need: Yarn needle, ruler, and 3 yards of 3mm macrame cord (or other chosen material for drawstring backpack strap)

    Terms and Abbreviations:
    ST/STS
     (stitch/stitches)
    SK (skip)
    CH (chain)
    SC (single crochet)
    FLO (front loop only)

    Notes:
    (1) This pattern is written in American Standard Terms.
    (2) You may choose to fasten off after each color change or carry your yarn up through the inside of the bag. For this bag, I carried each color up until I was finished with it.
    (3) Your seam WILL be on a slant. This is due to the fact that we are joining but not turning our rounds; the slight offset of a crochet stitch’s top loops in relation to its base cause this slant to happen naturally. The only way to avoid the slant is to turn each round, but it results in a busier-looking fabric that doesn’t showcase the detailing of the bag nearly as well.

    – – – – – – – – – – – – – – –

    Instructions

    – – – – – – – – – – – – – – –
    PATTERN FOR BAG
    – – – – – – – – – – – – – – –

    To Begin: With COLOR A, CH57.

    Round 1: Working into the back bumps, SC in 2nd CH from hook and in each remaining CH. Working in FLO down the opposite side of the chain, SC across. (You have now worked in both sides of each chain.) Join. (112)

    Rounds 2-82: CH1, SC in same ST and in each ST around. Join. (112) Use the following color pattern:

    Rounds 2-22 (22 rounds total, including Round 1): COLOR A
    Round 23 (1 round): COLOR B
    Rounds 24-27 (4 rounds): COLOR A
    Rounds 28-29 (2 rounds): COLOR B
    Rounds 30-32 (3 rounds): COLOR A
    Rounds 33-35 (3 rounds): COLOR B
    Rounds 36-37 (2 rounds): COLOR A
    Rounds 38-41 (4 rounds): COLOR B
    Round 42 (1 round): COLOR A
    Rounds 43-47 (5 rounds): COLOR B
    Round 48 (1 round): COLOR C
    Rounds 49-52 (4 rounds): COLOR B
    Rounds 53-54 (2 rounds): COLOR C
    Rounds 55-57 (3 rounds): COLOR B
    Rounds 58-60 (3 rounds): COLOR C
    Rounds 61-62 (2 rounds): COLOR B
    Rounds 63-66 (4 rounds): COLOR C
    Round 67 (1 round): COLOR B
    Rounds 68-82 (15 rounds): COLOR C

    After Round 82 is complete, fasten off and weave in ends.

    Lay bag flat, seam side facing down. Locate the rightmost top stitch (leftmost for lefties) and attach COLOR C in that stitch; proceed to Round 83.

    Round 83 (drawstring holes): CH1. SC in same ST and in next ST. CH3, SK 3 STS. (SC in each of the next 4 STS, CH3, SK 3 STS) around until only 2 STS remain. SC in each of the remaining 2 STS. Join. (16 drawstring holes)

    Round 84: CH1. SC in same ST and in each ST around, putting 3SC in each CH3 space. Join. (112)

    Rounds 85-86: CH1, SC in same ST and in each ST around. Join. (112)

    Fasten off and weave in all ends.

    Our bag so far

    – – – – – – – – – – – – – – –
    SHAPING THE BOTTOM
    – – – – – – – – – – – – – – –

    We’re going to use a simple trick to give our bag a little roominess at the bottom.

    (If you need help visualizing this, I use the technique in my video tutorial for the Malia Shoulder Bag at timestamp 28:50.)

    With the bag inside out, turn it upside down and position the bottom so that one end lays out in a triangular shape, with the seam going up the center. Use a ruler and measure a 3″ line across the corner of the base (mark the line with tape if it helps). Sew a seam across the line (through both layers) with COLOR A. Repeat on the opposite side.

    Make sure all yarn is woven in, then turn bag right-side out. Here’s what it should look like on the bottom:

    – – – – – – – – – – – – – – –
    PATTERN FOR DRAWSTRING TABS
    – – – – – – – – – – – – – – –

    Next, we’ll make some little tabs to secure the ends of our drawstrings to the backpack. Use the following pattern to make two tabs:

    To begin: With COLOR A, CH7.

    Row 1: SC in 2nd CH from hook and in each remaining CH. (6)

    Rows 2-6: CH1, turn. SC in each ST across. (6)

    Fasten off leaving a 12″ finishing tail for sewing. Weave in starting tail.

    Now, let’s attach them.

    Step 1: Turn your bag so that the seam is facing UP. Locate the triangle on the bottom-left corner of the bag, formed when you shaped the bottom. Then, locate the edge of the triangle that is on the seamed side of the bag (pink arrow). This is the side to which we’ll attach our tab.

    Step 2: Using a yarn needle and the finishing tail, fold the tab over and sew it centered along the edge of the triangle. Work your yarn needle through a couple of stitches on the triangle edge as well as both top and bottom edges of the tab, so that you are sewing the tab closed while also attaching it to the bag.

    Step 3: When finished, weave the tail into the inside of the bag.

    Attach the second tab to the triangle at the bottom-right corner of the bag, again using the edge of the triangle that is on the seamed side of the bag.

    – – – – – – – – – – – – – – –
    ADDING DRAWSTRING
    – – – – – – – – – – – – – – –

    Cut two 1.5 yard lengths of macrame cord. Lay bag flat and locate the furthermost hole to the right; starting from the outside, thread the first length of cord through the hole and then, working leftward, proceed to weave it in and out of each hole around the entire bag. You should end up with the cord exiting the bag through the hole next to your starting hole. 

    Do the same thing with the other 1.5 yard length of cord, starting in the leftmost hole and working rightward, continuing around the entire bag. (Both cords will be entering and exiting the same drawstring holes, in opposite directions.)

    Take each pair of drawstring ends and thread them through their corresponding tabs at the bottom of the bag. Tie ends together in a knot beneath each tab. Don’t cut off the excess yet.

    Cinch the backpack and wear it to test the length of your drawstrings, then readjust knot placement as needed. Trim off excess cord.

    Done!

    – – – – – – – – – – – – – – –

    Don’t forget to share your finished project!

    Share it on FB, in our FB group, in other groups, on Instagram… wherever you want to spread joy! Be sure to hashtag #yarnstashchallenge and tag me @yarnandchai.design so I can see it, too!

  • Cinch Bag Series: The Mudcloth Bag

    Cinch Bag Series: The Mudcloth Bag

    The very first bag in my Cinch Bag Series is my absolute favorite. The inspiration for it came from traditional African mudcloth, a beautiful handmade cotton fabric that has been a part of Malian culture since the 12th century. And while my hook-and-yarn version isn’t exactly comparable to the fascinating way that genuine mudcloth is made (using fermented mud and plant dyes), I am still in love with this bag!

    (While I was photographing the samples, my middle and youngest boys came outside to play and I convinced them to model for me. They were great sports!)

    About the Cinch Bag Series

    All designs in the Cinch Bag Series are made with the same pattern (all single crochet!), and use variations in color and surface detailing to produce unique designs with tons of personality. These easy-level patterns will make any newbie crocheter feel like a seasoned pro.

    Here are each of the bags currently included in the collection:

    About the Yarn

    All of the samples I created for my Cinch Bag Series use Sarasota, a yarn by Cascade Yarns. Sarasota is a blend of cotton and acrylic in a #3 light weight. It’s soft enough to crochet with comfort, but sturdy enough to make a great bag. It comes in solids and heathers, and I’ve used both throughout the series.

    With its large range of color options, it’s safe to say that Sarasota is my new favorite cotton blend for bags. (And you know how I love making bags!)

    – – – – – – – – – – – – – – –

    Giveaway: WIN the yarn + cord for this project!

    A great place to find the yarn for any of the patterns in the Cinch Bag Series is LoveCrafts.com! LoveCrafts is a global Makers community offering all kinds of yarn and supplies for crocheters, knitters, and more. I’ve bought yarn from them several times, and they always deliver quick service and quality!

    LoveCrafts offered to provide the necessary yarn for the Mudcloth Bag as part of a fun giveaway. So be sure to enter below! The winner will receive two skeins of Sarasota and a 50yd roll of 3mm macrame cord for the Mudcloth Bag pattern, as well as some extra yarn-lovers’ goodies. The giveaway runs through the end of Saturday, July 4, and the winner will be announced soon after. (See Terms and Conditions for details.) Best of luck!

    a Rafflecopter giveaway

    – – – – – – – – – – – – – – –

    Prefer a PDF?

    This pattern can be completed using the 100% free version right here on this page. However, many people prefer the convenience of a printable, ad-free PDF.

    All-Access Passholders get the ad-free version of this and all of my other blog patterns. It’s a pretty sweet deal, if I do say so myself! Learn more about it here or continuing scrolling for the free version.

    – – – – – – – – – – – – – – –

    Mudcloth Bag

    View on Ravelry

    Difficulty: Easy

    Finished Size: 11″ wide x 14.75″ tall when laid flat (before assembly)

    Yarn: Approx. 550 yards of #3 (light) cotton or cotton/acrylic blend. I used Sarasota, a cotton/acrylic blend from Cascade Yarn, in 2 colors:

    • COLOR A (“Navy Solid”): 300 yards
    • COLOR B (“White”): 250 yards

    Hook: E (3.5mm)

    Gauge: 21 SC x 24 rows = 4″ square

    You’ll also need: Yarn needle, ruler, and 3 yards of 3mm macrame cord (or other chosen material for drawstring backpack strap)

    Terms and Abbreviations:
    ST/STS
     (stitch/stitches)
    SK (skip)
    CH (chain)
    SC (single crochet)
    FLO (front loop only)

    Notes:
    (1) This pattern is written in American Standard Terms.
    (2) You may choose to fasten off after each color change or carry your yarn up through the inside of the bag. For this bag, I chose to carry both colors.
    (3) Your seam WILL be on a slant. This is due to the fact that we are joining but not turning our rounds; the slight offset of a crochet stitch’s top loops in relation to its base cause this slant to happen naturally. The only way to avoid the slant is to turn each round, but it results in a busier-looking fabric that doesn’t showcase the detailing of the bag nearly as well.

    – – – – – – – – – – – – – – –

    Instructions

    – – – – – – – – – – – – – – –
    PATTERN FOR BAG
    – – – – – – – – – – – – – – –

    To Begin: With COLOR A, CH57.

    Round 1: Working into the back bumps, SC in 2nd CH from hook and in each remaining CH. Working in FLO down the opposite side of the chain, SC across. (You have now worked in both sides of each chain.) Join. (112)

    Rounds 2-82: CH1, SC in same ST and in each ST around. Join. (112) Use the following color pattern:

    Rounds 2-8 (8 rounds total, including Round 1): COLOR A
    Rounds 9-13 (5 rounds): COLOR B
    Rounds 14-17 (4 rounds): COLOR A
    Rounds 18-19 (2 rounds): COLOR B
    Round 20 (1 round): COLOR A
    Rounds 21-25 (5 rounds): COLOR B
    Rounds 26-30 (5 rounds): COLOR A
    Rounds 31-32 (2 rounds): COLOR B
    Rounds 33-37 (5 rounds): COLOR A
    Rounds 38-39 (2 rounds): COLOR B
    Rounds 40-44 (5 rounds): COLOR A
    Rounds 45-52 (8 rounds): COLOR B
    Round 53 (1 round): COLOR A
    Rounds 54-55 (2 rounds): COLOR B
    Rounds 56-60 (5 rounds): COLOR A
    Rounds 61-64 (4 rounds): COLOR B
    Rounds 65-66 (2 rounds): COLOR A
    Round 67 (1 round): COLOR B
    Rounds 68-72 (5 rounds): COLOR A
    Rounds 73-77 (5 rounds): COLOR B
    Round 78 (1 round): COLOR A
    Round 79 (1 round): COLOR B
    Rounds 80-82 (3 rounds): COLOR A

    After Round 82 is complete, fasten off and weave in ends.

    Lay bag flat, seam side facing down. Locate the rightmost top stitch (leftmost for lefties) and attach COLOR A in that stitch; proceed to Round 83.

    Round 83 (drawstring holes): CH1. SC in same ST and in next ST. CH3, SK 3 STS. (SC in each of the next 4 STS, CH3, SK 3 STS) around until only 2 STS remain. SC in each of the remaining 2 STS. Join. (16 drawstring holes)

    Round 84: CH1. SC in same ST and in each ST around, putting 3SC in each CH3 space. Join. (112)

    Rounds 85-86: CH1, SC in same ST and in each ST around. Join. (112)

    Fasten off and weave in all ends.

    – – – – – – – – – – – – – – –
    SURFACE DETAILING
    – – – – – – – – – – – – – – –

    Using a yarn needle, add the surface detailing to the bag using the chart below. COLOR A is represented by black, and COLOR B is represented by white.

    Here area few tips for adding the detailing:

    1. Do each section separately. Cut your yarn first (each section will take a couple of yards), then start in the inside of the bag so that your starting tail can be woven in on the inside.
    2. Start each section right at the seam.
    3. Try adding all of the lines that go in the SAME direction before coming back around to add the remaining lines. (For example: instead of sewing like this: /\/\/\/\/\/\/\/\/\ , sew all of the / / / / / / / / and then come back and do the \ \ \ \ \ \ \ \ .) This will help your lines to look more consistent.
    4. If you run out of yarn before finishing a section, that’s ok! Just finish off with an additional strand.
    5. Don’t be alarmed that your surface stitches slant just a bit. This is due to the nature of crochet stitches worked in unturned rounds.
    Our bag so far

    Please note that the images that follow are of a different bag from the Cinch Bag Collection, but all use the same techniques for shaping and adding drawstrings and tabs.


    – – – – – – – – – – – – – – –
    SHAPING THE BOTTOM
    – – – – – – – – – – – – – – –

    We’re going to use a simple trick to give our bag a little roominess at the bottom.

    (If you need help visualizing this, I use the technique in my video tutorial for the Malia Shoulder Bag at timestamp 28:50.)

    With the bag inside out, turn it upside down and position the bottom so that one end lays out in a triangular shape, with the seam going up the center. Use a ruler and measure a 3″ line across the corner of the base (mark the line with tape if it helps). Sew a seam across the line (through both layers) with COLOR A. Repeat on the opposite side.

    Make sure all yarn is woven in, then turn bag right-side out. Here’s what it should look like on the bottom:

    – – – – – – – – – – – – – – –
    PATTERN FOR DRAWSTRING TABS
    – – – – – – – – – – – – – – –

    Next, we’ll make some little tabs to secure the ends of our drawstrings to the backpack. Use the following pattern to make two tabs:

    To begin: With COLOR A, CH7.

    Row 1: SC in 2nd CH from hook and in each remaining CH. (6)

    Rows 2-6: CH1, turn. SC in each ST across. (6)

    Fasten off leaving a 12″ finishing tail for sewing. Weave in starting tail.

    Now, let’s attach them.

    Step 1: Turn your bag so that the seam is facing UP. Locate the triangle on the bottom-left corner of the bag, formed when you shaped the bottom. Then, locate the edge of the triangle that is on the seamed side of the bag (pink arrow). This is the side to which we’ll attach our first tab.

    Step 2: Using a yarn needle and the finishing tail, fold the tab over and sew it centered along the edge of the triangle. Work your yarn needle through a couple of stitches on the triangle edge as well as both top and bottom edges of the tab, so that you are sewing the tab closed while also attaching it to the bag.

    Step 3: When finished, weave the tail into the inside of the bag.

    Attach the second tab to the triangle at the bottom-right corner of the bag, again using the edge of the triangle that is on the seamed side of the bag.

    – – – – – – – – – – – – – – –
    ADDING DRAWSTRING
    – – – – – – – – – – – – – – –

    Cut two 1.5 yard lengths of macrame cord. Lay bag flat and locate the furthermost hole to the right; starting from the outside, thread the first length of cord through the hole and then, working leftward, proceed to weave it in and out of each hole around the entire bag. You should end up with the cord exiting the bag through the hole next to your starting hole. 

    Do the same thing with the other 1.5 yard length of cord, starting in the leftmost hole and working rightward, continuing around the entire bag. (Both cords will be entering and exiting the same drawstring holes, in opposite directions.)

    Take each pair of drawstring ends and thread them through their corresponding tabs at the bottom of the bag. Tie ends together in a knot beneath each tab. Don’t cut off the excess yet.

    Cinch the backpack and wear it to test the length of your drawstrings, then readjust knot placement as needed. Trim off excess cord.

    Done!

    – – – – – – – – – – – – – – –

    Don’t forget to share your finished project!

    Share it on FB, in our FB group, in other groups, on Instagram… wherever you want to spread joy! Be sure to tag me @yarnandchai.design so I can see it, too!

  • Yarn-Wrapped Bottles

    Yarn-Wrapped Bottles

    – – – – – – – – – – – – – – – –

    This project is part of the Yarn Stash Challenge.
    For more great ideas, or to join the fun, visit the Yarn Stash Challenge blog post!

    – – – – – – – – – – – – – – – –

    Wrapping yarn around bottles is definitely not a new idea, but it is an easy one! What a great way to add some pretty decor to your home using yarn from your stash.

    This is also a great project for the kiddos! You could help them come up with some pretty embellishments to add to their jars, like buttons or little crocheted flowers.

    The Process

    Grab any bottle or other container you think will work. I used three of those little Starbucks Frappuccino bottles, but you could also use a beer or wine bottle, a can, or a jar. Be sure to clean it out first so it doesn’t start smelling!

    Attach the yarn to the top of the bottle with some sort of glue. I used a glue stick because it’s what I had, but if I’d have been able to find my super glue, I would’ve used that instead. You just need something that will bond quickly to help the yarn stay in place.

    Then, begin wrapping the bottle with the yarn. I tried to stick to a nice single layer of yarn, except on the lip of the bottle where the surface is uneven; for that part, I wound it thickly. The important thing is that the bottle isn’t showing through the yarn.

    When you get to the other end, snip off the yarn and glue it in place.

    I used some small budding branches from my tree out front to beautify the bottles even more.

    Simple as that!

    – – – – – – – – – – – – – – –

    Don’t forget to share your finished project!

    Share it on FB, in our FB group, in other groups, on Instagram… wherever you want to spread joy! Be sure to hashtag #yarnstashchallenge and tag me @yarnandchai.design so I can see it, too!

  • Classic Easter Basket

    Classic Easter Basket

    So at the time I’m writing up this pattern, many of us are at the beginning of a long “social distancing” quarantine. A week ago, I wouldn’t have even known what that sentence meant, but now life is changing daily. What a strange time we are living in!

    Before we know it, Easter will be upon us! So here’s a fun pattern to get you ready, and if you already have a good cotton stash, you might not even have to make a craft store run.

    I’m sorry there’s no video for this one; now that I have all three boys home with me all day every day during the quarantine, there’s not much quiet time available for filming. (Let’s be honest, they’re boys; there’s, like, no quiet time whatsoever.) Luckily, many of the techniques will be familiar to anyone who has already made Yarn + Chai baskets!

    About the Yarn

    I used two different yarns to make this basket. The bulk of the basket is made with Bernat Softee Baby Cotton, double stranded throughout. The baby hues of this yarn offer lots of options for the perfect Easter color scheme! The white stripes around the basket were made with a small amount of Yarn Bee Soft & Sleek, which I already had in my stash, but any #4 aran weight yarn should work fine. I also used the Soft & Sleek to cover a strip of plastic canvas to serve as the handle.

    Download Total Fitness – Home & Gym Workout Mod APK 8.0.7 for Android. winstrol dosing health & fitness courses – brindisi in brindisi – kijiji: ebay classifieds

    I didn’t need more than one skein of any color to complete the project, so in order to double-strand the yarn, I brought both ends of the skein together and wound them into an already-double-stranded ball. That way, I could crochet from one ball instead of two skeins at a time. It took some prep work, but was well worth it!

    Leaving out the yellow color was a last-minute decision, so that’s why it’s still in the photo.

    Prefer a PDF?

    This pattern can be completed using the 100% free version right here on this page. However, many people prefer the convenience of a printable, ad-free PDF.

    All-Access Passholders get the ad-free version of this and all of my other blog patterns. It’s a pretty sweet deal, if I do say so myself! Learn more about it here or continuing scrolling for the free version.

    EASTER BASKET

    View on Ravelry

    Difficulty: Easy

    Finished Size: 8″ wide x 3.75″ tall (excludes handle)

    Yarn: I used Bernat Softee Baby Cotton, a #3 weight cotton/acrylic blend, in these colors / amounts:

    • COLOR A (“Jade Frost”): 225 yards
    • COLOR B (“Dusk Sky”): 100 yards
    • COLOR C (“Petal”): 225 yards

    I also used a small amount of #4 aran weight stash yarn for the white surface-stitched lines around the basket, and about 30 yards of the same yarn to wrap around the basket handle.

    Hooks: H (5.0mm) and G/7 (4.25-4.50mm)

    Gauge: Your first 6 rounds should measure 2.75″ across.

    You’ll also need: Heavy duty plastic canvas

    Terms and Abbreviations:
    MC (magic circle – view tutorial here)
    ST/STS
     (stitch/stitches)
    SL ST (slip stitch)
    CH (chain)
    HDC (half double crochet)
    3rd Loop (see Special Stitches)
    CSC (crossed single crochet; see Special Stitches)

    Special Stitches:

    Crossed Single Crochet (CSC): Insert your hook, yarn under*, draw yarn through stitch (2 loops on hook), yarn over, draw through both loops. (*This is the only difference between a crossed single crochet and a standard single crochet, for which you would yarn over after inserting your hook.)

    3rd Loop: The 3rd loop can be found just below the front loop on the side of the work that is facing you. When instructed to work in “3rd loop only”, insert your hook into this loop from the bottom.

    Notes:
    (1) This pattern is written in American Standard Terms.
    (2) Much of the pattern is worked double-stranded.
    (3) When instructed to “join”, join with a SL ST to the top of the first ST of the round.
    (4) The pattern uses the Crossed Single Crochet stitch, but could also be made with standard SC.

    – – – – – – – – – – – – – – –

    PATTERN

    To Begin: With larger hook and COLOR A double stranded, make a magic circle; CH1 (does not count as a stitch).

    Round 1: 6CSC in MC. Join. (6)

    Round 2: CH1, turn. 2CSC in each ST around. Join. (12)

    Round 3: CH1, turn. (2CSC in next ST, CSC in next ST) around. Join. (18)

    Round 4: CH1, turn. (2CSC in next ST, CSC in each of the next 2 STS) around. Join. (24)

    Round 5: CH1, turn. (2CSC in next ST, CSC in each of the next 3 STS) around. Join. (30)

    Round 6: CH1, turn. (2CSC in next ST, CSC in each of the next 4 STS) around. Join. (36)

    Round 7: CH1, turn. (2CSC in next ST, CSC in each of the next 5 STS) around. Join. (42)

    Round 8: CH1, turn. (2CSC in next ST, CSC in each of the next 6 STS) around. Join. (48)

    Round 9: CH1, turn. (2CSC in next ST, CSC in each of the next 7 STS) around. Join. (54)

    Round 10: CH1, turn. (2CSC in next ST, CSC in each of the next 8 STS) around. Join. (60)

    Round 11: CH1, turn. (2CSC in next ST, CSC in each of the next 9 STS) around. Join. (66)

    Round 12: CH1, turn. (2CSC in next ST, CSC in each of the next 10 STS) around. Join. (72)

    Round 13: CH1, turn. (2CSC in next ST, CSC in each of the next 11 STS) around. Join. (78)

    Round 14: CH1, turn. (2CSC in next ST, CSC in each of the next 12 STS) around. Join. (84)

    Round 15: CH1, turn. (2CSC in next ST, CSC in each of the next 13 STS) around. Join. (90)

    Round 16: CH1, turn. (2CSC in next ST, CSC in each of the next 14 STS) around. Join. (96)

    Rounds 17-20: CH1, turn. CSC in each ST around. Join. (96)

    Attach COLOR B double stranded. Fasten off COLOR A.

    Rounds 21-24: CH1, turn. CSC in each ST around. Join. (96)

    Attach COLOR C double stranded. Fasten off COLOR B.

    Rounds 25-28: CH1, turn. CSC in each ST around. Join. (96)

    Attach COLOR A double stranded. Fasten off COLOR C.

    Round 29: CH1, turn. CSC in each ST around. Join. (96)

    Round 30: CH1, turn. HDC in each ST around. Join. (96)

    Switch to smaller hook.

    Round 31: CH1, turn. CSC in 3rd loop only of each St around. Join. (96)

    Round 32: CH1, turn. CSC in each ST around. Join. (96)

    Attach COLOR B double stranded. Fasten off COLOR A.

    Rounds 33-46 (or until last round reaches bottom of basket when folded down inside): CH1, turn. CSC in each ST around. Join. (96)

    Fasten off; weave in all ends.

    – – – – – – – – – – – – – – –

    Adding White Lines with Surface Crochet (Optional)

    With larger hook and white #4 aran weight yarn (single-stranded), and beginning at the seam, use the surface crochet technique to slip stitch 4 white lines around the basket, along the lines where two colors meet. Fasten off and weave in ends. B. Hooked Crochet has a great video on how to do this technique if you have never done it before.

    Once you’ve done this, here’s what your basket should look like when unfolded:

    – – – – – – – – – – – – – – –

    Adding Plastic Canvas

    Cut across your plastic canvas to make strips that are the same height as the inner layer of the basket. Set your basket so that it is completely unfolded. Roll up a strip of canvas and insert it into the bottom of the basket, allowing it to expand up against the walls of the basket. Continue adding as many layers as you want to make it as stiff as you want. Fold the inside layer down over the canvas. Work the fabric until it all lays neat and flat.

    – – – – – – – – – – – – – – –

    Adding a Handle

    Cut two more long strips of plastic canvas, this time only about 6 squares wide. Hold the strips together (layered one on top of the other) and use your white aran weight yarn to cover them using either a simple wrap-around, or a woven look (as I did). For my strap, I attached 6 very long strands of yarn to the top row of squares so that I had 12 long strands to work with (we’re talking a few yards long). I divided them in half and very carefully layered them over the canvas and each other, over and over down the canvas, similar to a braiding motion. I was careful to smooth out the yarn each time so it laid nice and flat and covered the most ground. When I got to the ends, I superglued everything in place and cut off the excess. Once I was done I superglued the handles to the inside of the basket.

    – – – – – – – – – – – – – – –

    You’re done!

    I hope you enjoyed this pattern. If you’re sharing your easter basket on social media, be sure to use hashtag #classiceasterbasket and tag me @yarnandchai.design!

  • That Time I Crocheted a Christmas Stocking for ESPN

    That Time I Crocheted a Christmas Stocking for ESPN

    If you happened to be watching ESPN on Christmas Day, you might have seen something pretty cool… something that will forever be referred to in our home as “that time mommy crocheted a Christmas stocking for ESPN.” Whaaaaat!?

    Yeah, it’s officially the most random, and possibly the coolest, thing I’ve been asked to do since becoming a blogger. You can see the stocking in the teaser commercial below, which aired on ABC and ESPN in the afternoon on Christmas Day 2019 ahead of the basketball game between the Bucks and the 76ers. For a brief moment at 0:20 you can see my red hand-crocheted NBA Countdown stocking hanging from the mantle along with some green (store-bought) stockings, and you can see a closeup of the stocking at 1:03.

    So here’s how it all happened!

    The First Email

    On the morning of December 5, I checked my email and saw what I at first assumed was just another junk message. (You wouldn’t believe some of the ridiculous emails I’ve gotten since becoming a blogger.) THANKFULLY I read it a little closer after scanning it over, and realized — oh my goodness — I think this is actually legit! It was from a production agency and they were looking for someone to crochet a few green stockings with different names on them. (I’m guessing they found me by searching for crocheted stockings online, and came across the Malia stocking.)

    They needed the stockings as background props for a commercial for the show “NBA Countdown”, and they needed them ASAP. I screenshot the emails and texted them to my husband, who freaked out. (He’s the sports person in the family.) We decided it was definitely legitimate, so I replied to the email and accepted the assignment.

    Change of Plans

    Over the next couple of days, I emailed back and forth with the head of the production company as we figured out the logistics. The big question for me was, how am I going to add the names? After lots of brainstorming, we decided that using the cross-stitching method would be best. So the next day, I headed to Hobby Lobby for yarn. But right after I got home, there was an apology email in my inbox from the producer, saying that the “higher ups” had changed the plan, and now they wanted one stocking, simple and red (not green), and they wanted the NBA Countdown logo on it. Here’s the rough mockup he sent me:

    YIKES!

    I looked at the complexity of the logo and knew there was no yarn technique I could use that would recreate the detailing to make it recognizable… at least not in the timeframe I had. So, after a bit of panicking, I realized there was really only one way to add the NBA Countdown logo to the stocking.

    Vinyl!

    Back to the Store

    The only problem was, I didn’t own a Cricut. I’d been daydreaming about having one, but never had a good reason to spend the money on it. Now I did! So I went straight to JoAnn Fabrics and got a brand new Cricut Explore Air 2 (that’s an affiliate link). I had no idea how to use it, but I was going to learn… and quick.

    No Time to Waste

    Over the next couple of days, I watched tons of Cricut tutorial videos while I crocheted the stocking. For the stocking, I knew that the fabric needed to be as flat as possible so that the soft vinyl wouldn’t get too distorted when it was adhered to the yarn. I had just started another pattern with a new-to-me stitch that I was in love with — the linked double crochet — and decided that would be the way to go. It would produce a nice tight fabric in case they wanted to put anything in the stocking, it wasn’t too textured, and it would be much quicker than single crocheting the whole thing. And at this point, time was running out… once the “higher ups” finalized the design, I only had 4 days to make it and overnight it to Philadelphia for the shoot!

    Nothing gets your adrenaline going quite like knowing a national television commercial is waiting on a prop from you.

    The Eleventh Hour

    Once I finished crocheting the stocking, my nerves really set in. Even though I had practiced adding vinyl to some cotton potholders, I knew that I only had one shot at adding it to the stocking. If I messed up, I would be pulling an all-nighter to remake the stocking and try again, because it was due at FedEx the next day. No pressure.

    I cut the vinyl, turned on the heat press, said a prayer, held my breath, and went for it.

    It worked! The next morning I packaged it up and dropped it off at FedEx to be overnighted to where the commercial would be shot in Philly, and that was that.

    Christmas Day

    I had no idea what the commercial was about, who would be in it, or when it would air. All I knew was that it had something to do with the basketball game on Christmas Day, and my stocking would be hanging on a mantle. Of course, we kept ESPN on all day on Christmas. A little before 3pm, right in the middle of opening gifts with extended family at my parents’ house, the commercial aired! There was Joel Embiid (a name I didn’t know before all this happened, because a again, not a sports person), and there behind him on the mantle was a row of store-bought stockings… and one red handmade stocking with the NBA Countdown logo on it.

    It was brief but so fun to see, and so surreal! It made me realize just how much thought is put into commercials and everything in them. And I’m so glad I got to be a tiny part of it!

    Many, many years ago, my grandpa was on a game show on television, and I remember how cool I thought that was. Now I get to tell my own grandkids someday about the time Grandma crocheted a stocking and it was on national television on Christmas Day!

    What a randomly unexpected and crazy fun little adventure that was. You never know what the blogging life is going to bring… but I sure do love my job!

    And that Cricut Explore Air 2? I’m making great use of it! Just in the week before Christmas, I made…

    • Fun shirts for my boys
    • A personalized apron for my middle son, who has discovered a love of cooking
    • Several bags and shirts for extended family members for Christmas

    I am having so much fun with it! Stay tuned for some gorgeous Yarn + Chai and yarn-related merchandise in the coming year! And if you’ve been thinking about getting your own Cricut, I highly recommend it.

    – – – – – –

    If you’re wondering… no, I didn’t write out the pattern for the stocking. There just wasn’t enough time! But I do have a stocking pattern here that you might love 🙂

  • Eva Cardigan

    Eva Cardigan

    It’s hard to believe I’m ready to release my first garment pattern, because this has been a looooong process!

    I can’t even tell you how many times over the last year that I’ve started designing a garment and ended up scrapping the whole thing. I can create hats and scarves in my sleep, but garment design is a whole new beast!

    Part of the reason it was such a process is because I was determined to design it the right way — with size inclusivity. This cardigan pattern includes 9 sizes, from XS through 5XL, because we all deserve to wear our beautiful creations! But… it meant lots of learning and lots of calculations. Now that I’ve done it, I can say that I definitely did learn a lot and my next design should be much easier on my brain. (FYI, my model is 5’1 and is wearing XS, her usual clothing size.)

    ABOUT THE YARN

    The beautiful heathered yarn in my sample is Yarn Bee Soft & Sleek DK (order it through my affiliate link here). I strongly recommend it, BUT, please read on for my important notes about it.

    It’s just as soft as it is pretty, and I absolutely loved working with it. The skeins are generous at 478 yards, and while I can’t say I’ve really tested it out, it is a low-pill yarn. I used Mink (color A), Cloud Control (color B), and Pink Lemonade (color C) in my sample cardigan.

    The only strange thing about this particular yarn is that while it’s classified as a #3 weight, it feels a whole lot more like a #1. That’s quite a difference, right!? I did some investigating online, and most of the reviews I found agreed. I also compared its yards-to-grams ratio with other #1, #2 and #3 yarns, and it most definitely fit in the #1 category. I have no explanation for this, but you’ll need to keep it in mind if you decide to use a substitute; you’ll want to start with a #1, or thin #2, yarn. And it should go without saying, but please do a gauge check.

    Update: I asked in my Facebook group what substitute yarns people were using successfully with this pattern, and here’s a list! Please note that crocheters have been able to meet the pattern gauge with each of these yarns, but they may have used a slightly smaller or larger hook size to do so. It’s all part of the gauging process!

    • Loops & Threads Woolike (Michael’s)
    • Cotton Kings (Hobbii)
    • Dotted Line (Lion Brand)
    • It’s A Wrap Rainbow (Red Heart)
    • Yarn Bee Glint of Glam (Hobby Lobby)
    • Amazing Lace (Lion Brand)
    • Yarn Bee Pigment (Hobby Lobby)

    VIDEO TUTORIAL

    I’ve put together a step-by-step video tutorial for you visual learners! This video is meant to help you as you work from the written pattern and goes over each technique that you’ll need to complete your cardigan, from the linen stitch to seaming.

    Prefer a PDF?

    This pattern can be completed using the 100% free version right here on this page. However, many people prefer the convenience of a printable, ad-free PDF.

    All-Access Passholders get the ad-free version of this and all of my other blog patterns. It’s a pretty sweet deal, if I do say so myself! Learn more about it here or continuing scrolling for the free version.

    – – – – – – – – – – – – – – – – – – – – – – – – – – – – – – – – – – – – – –

    Eva Cardigan

    Language
    American Standard

    Difficulty
    Easy

    Finished Sizes
    Pattern is written for sizes XS – 5XL (see chart for specific measurements). Cardigan has a loose fit, with 6-8″ positive ease.

    Hook
    G (4.5mm) or whichever hook is needed to meet gauge. You may also want to have a smaller hook handy (see Note #2). My favorite hooks are Clover Amour (affiliate link).

    Yarn
    I used Yarn Bee Soft & Sleek DK (affiliate link), a soft, heathered yarn from Hobby Lobby that is categorized as a #3 weight, but please note that it feels more like a fingering weight (#1!). Most of the online reviews I’ve read agree with this assessment, and its yardage-to-grams ratio would suggest that it is a fingering weight. It was a great yarn to work with, but if you don’t have access to it, I strongly suggest working up a gauge swatch in a fingering or light sport yarn as #3 weights will be too thick.

    The table below will tell you how much yarn you will need for your size. Please note that the number of skeins required is specific to Yarn Bee Soft & Sleek DK, and if you use a different yarn, you’ll need to go by yardage when deciding how much to purchase.

    Gauge
    25 STS x 27 rows = 4″ square (worked in the linen stitch). To get an accurate gauge, which is especially important in a garment pattern, you should work up a swatch that is larger than 4″ and measure within it, away from the edges. (Tip: Work up one of the pockets as your gauge swatch. That way, you’ll already have one pocket ready to go!)

    You’ll also need
    Yarn needle

    Terms and Abbreviations
    ST/STS (stitch/stitches)
    SL ST (slip stitch)
    SK (skip)
    CH (chain)
    SC (single crochet)
    SC2TOG (single crochet 2 together; see Special Stitch)
    BLO (back loop only)

    Special Stitch

    SC2TOG (single crochet 2 together): In this pattern, SC2TOGs will be worked over two CH1 spaces. Complete them as follows: Insert hook in next CH1 space, yarn over and pull up loop (2 loops on hook); insert hook in next CH1 space, yarn over and pull up loop (3 loops on hook); yarn over and draw through all 3 loops on hook. This will decrease your stitch count by 2 (1 SC and 1 CH1 space).

    Notes

    1. A video tutorial is available up in the post, or by clicking here.
    2. When I work the linen stitch (the stitch used throughout this pattern), my fabric tends to pull in a bit after the first couple of rows. To avoid this, I use a smaller (3.5mm) hook for the initial chain and the first row, before switching to my regular hook. This is not noted in the pattern, but you might find it helpful if your first couple of rows are coming out wider. If you choose to stick with the regular hook, be sure to keep a tight tension in those first couple of rows.
    3. Each row will have an equal number of stitches and CH1 spaces. The sum of these is reflected in the stitch counts. For example, a stitch count of 78 means that row has 39 stitches + 39 CH1 spaces.
    4. Pattern is written for sizes Xs-5XL, with counts for sizes S-5XL written in parentheses. Example: XS (S, M, L, XL, 2XL, 3XL, 4XL, 5XL) It might help to highlight the correct counts for your size before you begin.
    5. To avoid redundancy, pattern has been written out as “regular rows” and “decrease rows”, with applicable stitch counts included for each row.  Use the following instructions for each:

    Regular Row: CH2 (counts as first CH1 space), turn. SC in first CH1 space. (CH1, SC in next CH1 space) across.
    Decrease Row: CH2 (counts as first CH1 space), turn. SC2TOG over first 2 CH1 spaces. (CH1, SC in next CH1 space) across.

    – – – – – – – – – –

    Back Panel (make 1)

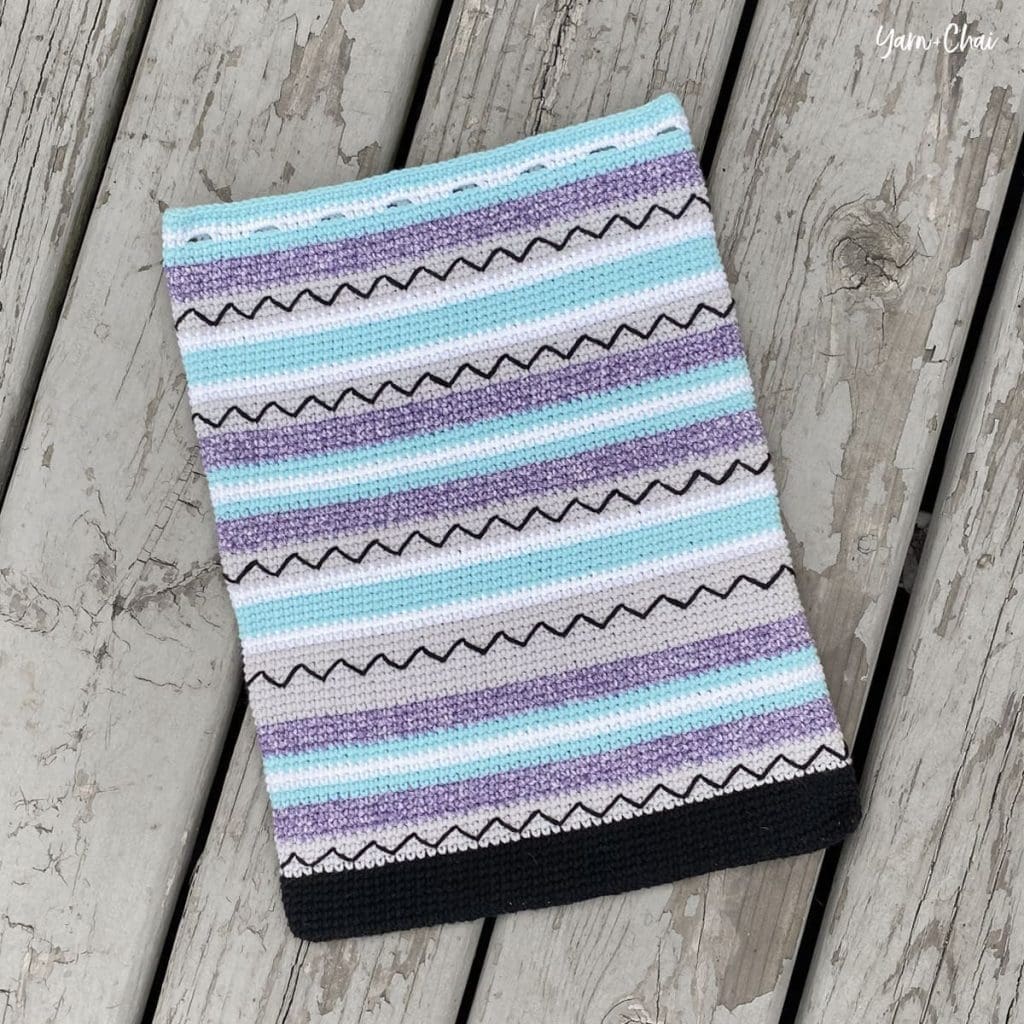
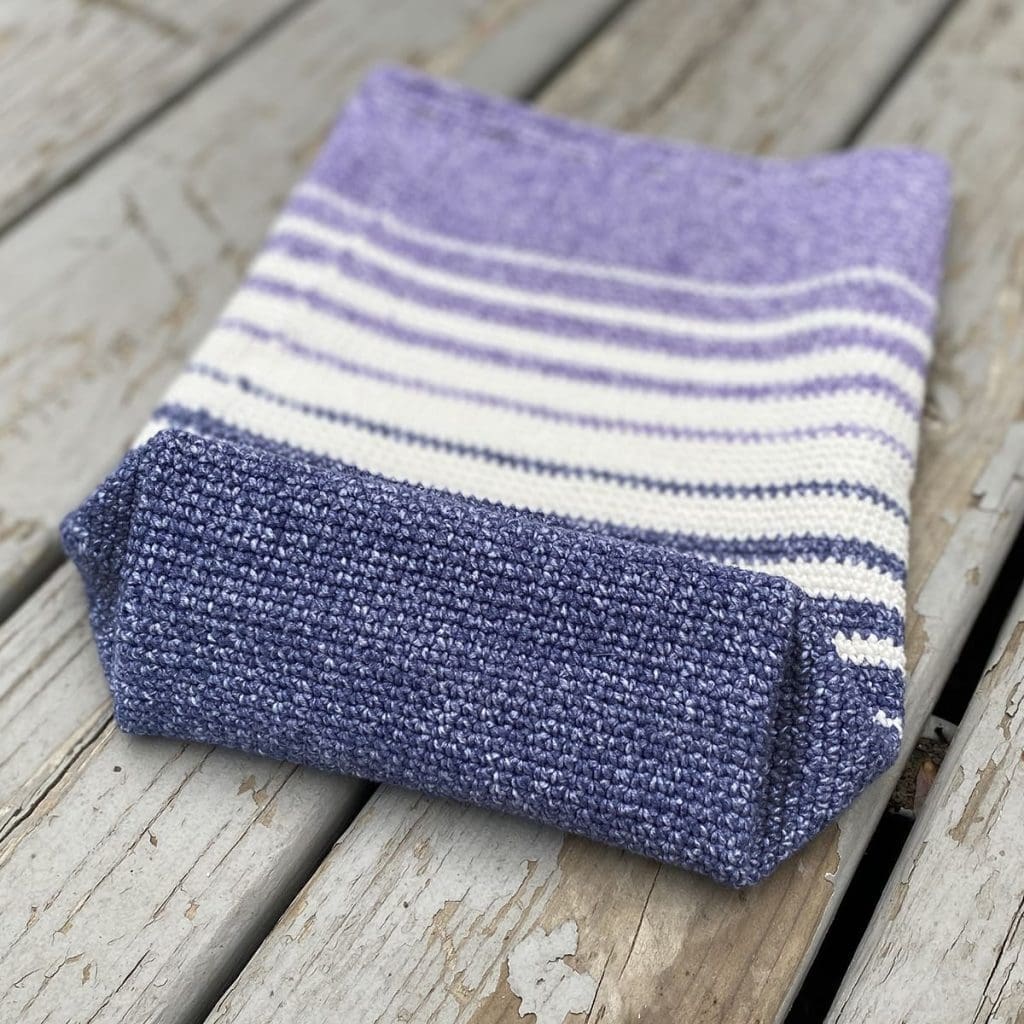
    For this panel, you’ll crochet 7 color blocks of 28 (sizes XS-L) or 29 (sizes XL-5XL) rows per block. There are no increases or decreases. 

    To begin: With COLOR A, CH116 (128,140,152,164,178,190,202,214).

    Row 1: SC in 4th CH from hook (counts as first CH1 space and first SC). (CH1, SK1, SC in next) across.
    Stitch count (will remain the same for each row): 114 (126,138,150,162,176,188,200,212)

    Rows 2-28 (XS-L) OR 2-29 (XL-5XL): Regular row.

    Switch to COLOR B.

    Rows 29-56 (XS-L) OR 30-58 (XL-5XL): Regular row.

    Switch to COLOR C.

    Rows 57-84 (XS-L) OR 59-87 (XL-5XL): Regular row. 

    Switch to COLOR A.

    Rows 85-112 (XS-L) OR 88-116 (XL-5XL): Regular row.

    Switch to COLOR B.

    Rows 113-140 (XS-L) OR 117-145 (XL-5XL): Regular row. 

    Switch to COLOR C.

    Rows 141-168 (XS-L) OR 146-174 (XL-5XL): Regular row. 

    Switch to COLOR A.

    Rows 169-196 (XS-L) OR 175-203 (XL-5XL): Regular row. 

    Fasten off and weave in all ends.

    – – – – – – – – – –

    Front Panels (make 2)

    For these panels, you’ll crochet 7 color blocks of 28 (sizes XS-L) or 29 (sizes XL-5XL) rows per block. There are no increases or decreases. 

    To begin: With COLOR A, CH44 (50,56,62,68,74,80,88,94).

    Row 1: SC in 4th CH from hook (counts as first CH1 space and first SC). (CH1, SK1, SC in next) across.
    Stitch count (will remain the same for each row): 42 (48,54,60,66,72,78,86,92)

    Rows 2-28 (XS-L) OR 2-29 (XL-5XL): Regular row.

    Switch to COLOR B.

    Rows 29-56 (XS-L) OR 30-58 (XL-5XL): Regular row.

    Switch to COLOR C.

    Rows 57-84 (XS-L) OR 59-87 (XL-5XL): Regular row.

    Switch to COLOR A.

    Rows 85-112 (XS-L) OR 88-116 (XL-5XL): Regular row.

    Switch to COLOR B.

    Rows 113-140 (XS-L) OR 117-145 (XL-5XL): Regular row.

    Switch to COLOR C.

    Rows 141-168 (XS-L) OR 146-174 (XL-5XL): Regular row.

    Switch to COLOR A.

    Rows 169-196 (XS-L) OR 175-203 (XL-5XL): Regular row.

    Fasten off and weave in all ends.

    – – – – – – – – – –

    Sleeves (make 2)

    For the sleeves, you’ll begin with COLOR B and crochet 3 color blocks of 28 rows per block, with decrease rows scattered throughout, before adding ribbing at the end. As a reminder, a decrease row is: CH2 (counts as first CH1 space), turn. SC2TOG over first 2 CH1 spaces. (CH1, SC in next CH1 space) across.

    IMPORTANT: When you finish a color, fasten it off with a tail long enough to be used for seaming the edges of that color block together.

    To begin: With COLOR B, CH80 (86,92,98,104,110,116,122,128).

    Row 1: SC in 4th CH from hook (counts as first CH1 space and first SC). (CH1, SK1, SC in next) across. (78 [84, 90, 96, 102, 108, 114, 120, 126] )

    Rows 2-11: Regular row. (78 [84, 90, 96, 102, 108, 114, 120, 126] )

    Row 12: Decrease row. (76 [82, 88, 94, 100, 106, 112, 118, 124] )

    Row 13: Decrease row. (74 [80, 86, 92, 98, 104, 110, 116, 122] )

    Rows 14-24: Regular row. (74 [80, 86, 92, 98, 104, 110, 116, 122] )

    Row 25: Decrease row.  (72 [78, 84, 90, 96, 102, 108, 114, 120] )

    Row 26: Decrease row. (70 [76, 82, 88, 94, 100, 106, 112, 118] )

    Rows 27-37 (switch to COLOR C on Row 29): Regular row. (70 [76, 82, 88, 94, 100, 106, 112, 118] )

    Row 38: Decrease row. (68 [74, 80, 86, 92, 98, 104, 110, 116] )

    Row 39: Decrease row. (66 [72, 78, 84, 90, 96, 102, 108, 114] )

    Rows 40-50: Regular row. (66 [72, 78, 84, 90, 96, 102, 108, 114] )

    Row 51: Decrease row. (64 [70, 76, 82, 88, 94, 100, 106, 112] )

    Row 52: Decrease row. (62 [68, 74, 80, 86, 92, 98, 104, 110] )

    Rows 53-63 (switch to COLOR A on Row 57): Regular row. (62 [68, 74, 80, 86, 92, 98, 104, 110] )

    Row 64: Decrease row. (60 [66, 72, 78, 84, 90, 96, 102, 108] )

    Row 65: Decrease row. (58 [64, 70, 76, 82, 88, 94, 100, 106] )

    Rows 66-76: Regular row. (58 [64, 70, 76, 82, 88, 94, 100, 106] )

    Row 77: Decrease row. (56 [62, 68, 74, 80, 86, 92, 98, 104] )

    Row 78: Decrease row. (54 [60, 66, 72, 78, 84, 90, 96, 102] )

    Rows 79-85 (switch to COLOR B on Row 85): Regular row. (54 [60, 66, 72, 78, 84, 90, 96, 102] )

    Row 86: CH1, turn. SC in first SC, SK first CH1 space, SC in next SC, SC in next CH1 space, SK next SC, SC in next CH1 space. (SC in next SC, SK next CH1 space, SC in next SC, SC in next CH1 space, SK next SC, SC in next CH1 space) across. (36 [40, 44, 48, 52, 56, 60, 64, 68] )

    Keep hook inserted for next step.

    Next, we will be creating the ribbing by making vertical ribs and attaching them with slip stitches to the last row of the sleeve as we go. We’ll be referring to “Row 86”; that’s the last row of the sleeve we completed, and that’s what the ribbing will be attaching to. I cover this in the video tutorial for this pattern, but if you feel you need a little more in-depth help with this part, here’s another tutorial video that is specifically about this technique.

    CH17.

    Row 1: Turn. SC in 2nd chain from hook and in each of the remaining 15 chains. SL ST into the first SC from Row 86, the stitch on which your CH17 was built. SL ST into the next ST from Row 86. (16, plus the two slip stitches along Row 86)

    The section we just created, built on the CH17, will hereafter be referred to as the “ribbing.”

    Row 2: CH1, turn. Skipping over the 2 SL STS you put in Row 86, SC in BLO of each of the first 15 STS of the ribbing. SC in both loops of the last ST. (16)

    Row 3: CH1, turn. SC in 1st ST. SC in BLO of each of the remaining 15 STS of the ribbing. SL ST in each of the next 2 SCs  along row 86. (16, plus the 2 SL STS along Row 86)

    Row 4: CH1, turn. Skipping over the 2 SL STS you put in Row 86, SC in BLO of each of the first 15 STS of the ribbing. SC in both loops of the last ST. (16)

    Rows 5-the end: Repeat Rows 3-4 all the way across Row 86. Fasten off, leaving a long tail for seaming this color section.

    Fold sleeve in half lengthwise and use long finishing tails to seam each color block together. Weave in all ends and keep sleeve inside out.

    – – – – – – – – – –

    Pockets (make 2)

    For the pockets, you’ll simply crochet two rectangles with Color A. Easy!

    To begin: With COLOR A, CH36 (36, 36, 36, 40, 40, 40, 40, 40).

    Row 1: SC in 4th CH from hook (counts as first CH1 space and first SC). (CH1, SK1, SC in next) across.
    Stitch count (will remain the same for each row): 34 (34, 34, 34, 38, 38, 38, 38, 38)

    Rows 2-32 (XS-L) OR 2-36 (XL-5XL): Regular row. 

    Fasten off, leaving a long tail for sewing pocket to cardigan later. Weave in starting tail.

    – – – – – – – – – –

    Seaming

    It’s time to seam it all together! Here are a few tips before you begin:

    • Use the mattress stitch to seam your work (demonstrated in the tutorial video).
    • Be sure to seam everything inside out. There are no “wrong sides” on your flat panels, but once you begin seaming, stay consistent and make sure all of your seams are facing out (including the arm seams that you already did). When you’re done seaming, you can flip everything right-side out.
    • When seaming the arms to the cardigan, you can use a 1:1 ratio; meaning, each single stitch along the arm hole will be seamed up with a single row along the side of the cardigan.

    Seam up your cardigan in this order, using the diagram below as a visual:

    1. With COLOR A, seam the tops of the front panels to the top of the back panel as shown.
    2. With COLOR B, seam the arms (make sure they’re inside out!) to body of cardigan.
    3. Seam down the sides of the cardigan using whichever color you are joining. You’ll have more ends to weave in, but it looks better than seaming it with all one color.
    4. Sew the pockets to the front panels, just above the last color block.

    – – – – – – – – – –

    Collar

    Our final step is to add the collar with COLOR A. We’re going to lay the foundation by starting at the bottom corner of the front panel (indicated on the diagram below) and working a “regular row” up the side, across the middle of the back panel, and down the opposite side. Since there are no stitches to work into along the edges of the front panels, you’ll be treating each row as one stitch. This is demonstrated in the tutorial video.

    To begin: Attach COLOR A; CH2 (counts as first CH1 space). (CH1, SK1, SC in next) across, working up the side, across the back and down the other side. Be sure to end with an SC.

    Rows 2-12: Regular rows.

    Fasten off and weave in ends.

    – – – – – – – – – –

    Done! If you’re sharing on social media, be sure to hashtag #evacardigan and tag me @yarnandchai.design. I can’t wait to see your finished cardigan!