The Mosaic stitch pattern (that’s what I call it, but it’s really just a combination of single crochets and spike stitches) has been so fun to design with. It started with the Mosaic Baskets and soon became a Floor Pouf and a Bucket Bag, too. It’s one of those patterns that produces a fabric that looks good in so many different forms.
My latest addition to the Mosaic collection is the Mosaic Potholder (or trivet, or hotpad, depending on what you call it). I used all cotton (because heat melts acrylic), and stuck with my formula of light background + dark, thinner mosaic to produce this beautiful kitchen helper that, at least in my opinion, looks like it could hang out on the shelves at Target next to all the other farmhouse-chic decor.
I’m way too time-starved to make more than one of anything these days, but I can just imagine how beautiful a set of two or three of these, in different complimentary colors, would look in my kitchen. And what a great gift idea for a new bride or a new homeowner!
Speaking of being time-starved, this pattern probably deserves a video tutorial, but it’s just not going to happen at this point. If this is your first experience with a Mosaic pattern, you might want to consider grabbing some scrap yarn and completing a small Mosaic Basket using this video tutorial. It’s a quick project and it will teach you everything you need to know and clear up any confusion that you may have, especially if you’re a visual learner like me.
Also, off topic, but does anyone else have a kitty who assumes everything you make is for him? If I leave anything out, there is a 120% chance I will walk back in the room and he will be snuggled up with it.
Prefer a PDF?
This pattern can be completed using the 100% free version right here on this page. However, many people prefer the convenience of a printable, ad-free PDF.
All-Access Passholders get the ad-free version of this and all of my other blog patterns. It’s a pretty sweet deal, if I do say so myself! Learn more about it here or continuing scrolling for the free version.
Yarn: For COLOR A, approx. 150 yards of #4 worsted weight cotton (I used I Love This Cotton in “Ivory”). For COLOR B, approx. 150 yards of #10 cotton thread (I used Artiste in “Deep Ocean”).
Gauge: 19SC = 4″ in length. Stitch height does not matter for this pattern.
You’ll also need: Yarn needle
Terms and Abbreviations:
ST/STS (stitch/stitches) SL ST (slip stitch) SK (skip) CH (chain) SC (single crochet) Spike Stitch (see Special Stitches, below)
Special Stitches:
SC Spike Stitch: Instead of inserting your hook into the top loops of the stitch, insert them into its base, then complete an SC. This will wrap your SCs over the top of the SCs from the previous round.
SL ST Spike Stitch: Follow instructions for SC Spike Stitch, but instead of completing an SC, complete a SL ST.
Notes: (1) This pattern is written in American Standard Terms.
(2) CHs do not count as a stitch.
(3) There is no stitch multiple for this pattern. If you want to make it larger or smaller, add or subtract chains at the beginning and repeat rounds as many times as necessary for the height you want.
(4) Because we utilize the SC Spike Stitch for entire rounds throughout the pattern, we will be referring to those rounds as an extension of the SC rounds they are being worked into. For example, if Round 1 is a round of SC, then the very next round which places spike stitches on top of those SCs will be referred to as Round 1B. This just makes for easier counting.
INSTRUCTIONS
To Begin: With COLOR A, CH35.
Round 1: SC in 2nd CH from hook and in each remaining CH. Working down the opposite side of the chain, SC across. (You have now worked in both sides of each chain.) Do not join. Pull the loop on your hook up a couple inches so it doesn’t unravel, then remove your hook. (68)
Round 1B: Insert hook into top loops of the first ST of Round 1; attach COLOR B and CH1, then SC SPIKE ST in same ST. SC SPIKE STITCH into next ST and each ST around. Pull the loop on your hook up a couple inches so it doesn’t unravel, then remove your hook. (68)
Round 2: Reinsert hook into loop from COLOR A. SC in each ST around (you’re working in the top loops of the SC SPIKE STS from the previous round). Remove hook. (68)
Round 2B: Reinsert hook into loop from COLOR B. SC SPIKE ST in each ST around. Remove hook. (68)
Take a quick moment to weave in your starting tails, because it will be much harder to do so the further into the pattern you get. Then…
Repeat Rounds 2 and 2B until potholder measures about 7.5″ tall.
Lay your potholder flat and notice that your starting ST for the last round has moved slightly away from the edge of the potholder (see first image below). This is normal and has to do with the anatomy of a stitch and the fact that we aren’t turning our rounds, but that’s a lesson for another day. For now, to get us back to the edge where we need to be to complete the final round of the potholder, follow these instructions:
Reinsert hook into loop from COLOR A. Count how many stitches are between your hook and the folded edge of the potholder (I had 6; it’s ok if your number is slightly different). SC in all but the last 2 STS, then SL ST in each of the last 2 STS. Remove hook.
Reinsert hook into loop from COLOR B. Follow the instructions from Step 1, but with SPIKE STS. Remove hook and fasten off COLOR B; weave in its end.
Final Round: Reinsert hook into loop from COLOR A. CH1; SC into same ST. Continue to SC along top of the potholder, stopping when you get to the fold on the opposite side; CH20, then SL ST back into the same ST (at the base of the CH20) to form a loop. SC in each ST along the other side of the potholder to complete the round. Join with a SL ST to the top of the first SC. (68 + CH20)
Finishing: Fasten off COLOR A, leaving a long tail for seaming. Use the tail and a yarn needle to seam potholder closed. Tie a knot at the end; then run your yarn needle into the nearest opening and underneath about half a dozen stitches (going between the two layers of fabric). Pull yarn through, then reinsert yarn needle back into the exit point and repeat. Do this a few times, then cut yarn and pull fabric to make the tip of the yarn disappear completely into the potholder.
– – – – – – – – – – – –
Done! If you’re sharing on social media, be sure to tag me @yarnandchai.design. Hope you enjoyed it!
Potholder, trivet, hotpad… whatever you call them, they are a staple in any home. Why not use your yarn skills to add some handmade flair to your kitchen?
My favorite feature of these potholders is the double layer of thickness, achieved by working them in the round. It’s a simple way to protect your hands and furniture, and it gives the potholders a thick, professional-looking finish. And while these aren’t technically seamless (we join our rounds, chain up and turn), the seam is nicely hidden on the edge of the potholder where no one would be the wiser of it.
The simple ribbing design gives it a sleek, modern look, and it’s sure to be a beautiful addition to your kitchen.
Prefer a PDF?
This pattern can be completed using the 100% free version right here on this page. However, many people prefer the convenience of a printable, ad-free PDF.
All-Access Passholders get the ad-free version of this and all of my other blog patterns. It’s a pretty sweet deal, if I do say so myself! Learn more about it here or continuing scrolling for the free version.
Yarn: Approx. 160 yards of cotton in a medium (#4) weight. For my samples, I used I Love This Cotton in Rosy.
Gauge: 19SC = 4″ in length. Stitch height does not matter for this pattern.
You’ll also need: Yarn needle
Terms and Abbreviations:
ST/STS (stitch/stitches) SL ST (slip stitch) SK (skip) CH (chain) SC (single crochet) HDC (half double crochet) 3rd LOOP (work stitch into 3rd loop only – see “Special Stitch”)
Special Stitch:
3rd Loop Only – Half double crochet stitches have a 3rd loop that we utilize in this pattern. When working in turned rounds, as in this pattern, the 3rd loop can be found just below the front loop on the side of the work that is facing you. When instructed to work in “3rd loop only”, insert your hook into this special loop. This creates a delicate braided look on the opposite side of the pattern.
Notes:
(1) This pattern is written in American Standard Terms.
(2) CHs at the beginning of rounds do not count as a stitch.
(3) Pattern can easily be adapted for different yarn thicknesses, hook sizes, or desired final measurements, by adding or subtracting any number of chains from the beginning.
(4) Placing a stitch marker or bobby pin in the first stitch of each round is recommended.
INSTRUCTIONS
To Begin: CH37.
Round 1: SC in 2nd CH from hook and in each remaining CH. Working down the opposite side of the chain, SC across. You have now worked in both sides of each chain. Join with a SL ST to the top of the first ST. (72)
Round 2: CH1, turn. HDC in each ST around. Join with a SL ST to the top of the first ST. (72)
Round 3: CH1, turn. SC in 3rd loop of each ST around. Join with a SL ST to the top of the first ST. (72)
Round 4: CH1, turn. HDC in each ST around. Join with a SL ST to the top of the first ST. (72)
– – – – – – – – – – – –
Repeat Rounds 3-4, in order, until potholder reaches about 7.5″ in height; be sure to end on a repeat of Round 4 for best results.
– – – – – – – – – – – –
Final Round: CH1, turn. SC in 3rd loop of each ST across first side of potholder until you get to the fold. CH20; SL ST back into the base ST to form a loop. SC in 3rd loop of each remaining St around. Join with a SL ST to the top of the first ST. (72 + CH20)
To finish: Fasten off, leaving a long tail for seaming. Weave in starting tail. Use the finishing tail and a yarn needle to sew potholder closed. Tie a knot at the end; then run your yarn needle into the nearest opening and underneath about half a dozen stitches or rows (going between the two layers of fabric). Pull yarn through, then reinsert yarn needle back into the exit point and repeat. Do this a few times, then cut yarn and pull fabric to make the tip of the yarn disappear completely into the potholder.
– – – – – – – – – – – –
Done! If you’re sharing on social media, be sure to tag me @yarnandchai.design. Hope you enjoyed it!
Ah, Malia. You are so versatile. You’ve been everything from clothing accessories to holiday decor to purses. I can’t get enough of you.
So, old friend… welcome to my kitchen!
With a double layer of thickness and a seam that hides inconspicuously on the folded edge, this potholder design is such a beautiful addition to your home.
If you’re like me and you’re always looking for ways to add more of your crochet obsession to your decor, potholders (or trivets or hotpads, depending on where you’re from) are a quick and easy way to do it. They also make great gifts!
Prefer a PDF?
This pattern can be completed using the 100% free version right here on this page. However, many people prefer the convenience of a printable, ad-free PDF.
All-Access Passholders get the ad-free version of this and all of my other blog patterns. It’s a pretty sweet deal, if I do say so myself! Learn more about it here or continuing scrolling for the free version.
Yarn: Approx. 170 yards of cotton in a medium (#4) weight. For my samples, I used I Love This Cotton in Dove.
Gauge: 19SC = 4″ in length. Stitch height does not matter for this pattern.
You’ll also need: Yarn needle
Terms and Abbreviations:
ST/STS (stitch/stitches) SL ST (slip stitch) SK (skip) CH (chain) SC (single crochet) HDC (half double crochet) BNS (bean stitch – see “Special Stitches”) 3rd LOOP (work stitch into 3rd loop only – see “Special Stitches”)
Special Stitches:
Bean Stitch (BNS) Insert hook into stitch, yarn over and pull through (2 loops on hook). Yarn over, insert hook into same stitch, yarn over and pull through (4 loops on hook). Yarn over, insert hook into same stitch, yarn over and pull through (6 loops on hook). Yarn over and pull through all 6 loops.
3rd Loop Only Half double crochet stitches have a 3rd loop that we utilize in this pattern. When working in turned rounds, as in this pattern, the 3rd loop can be found just below the front loop on the side of the work that is facing you. When instructed to work in “3rd loop only”, insert your hook into this special loop. This creates a delicate braided look on the opposite side of the pattern.
Notes:
(1) This pattern is written in American Standard Terms.
(2) CHs at the beginning of rounds do not count as a stitch.
(3) Pattern can easily be adapted for different yarn thicknesses, hook sizes, or desired final measurements, by adding or subtracting any number of chains from the beginning.
(4) Placing a stitch marker or bobby pin in the first stitch of each round is strongly recommended.
(5) Weaving in your ends as you go will be much easier than leaving them all for the end.
INSTRUCTIONS
To Begin: CH37.
Round 1: SC in 2nd CH from hook and in each remaining CH. Working down the opposite side of the chain (away from your starting tail), SC across. You have now worked in both sides of each chain. Join with a SL ST to the top of the first ST. (72)
Round 2: CH1, turn. SK first ST, BNS in next ST, CH1. (SK next ST, BNS in next ST, CH1) around. Join with a SL ST to the top of the first ST. (72)
Round 3: CH1, turn. HDC in each ST around. Join with a SL ST to the top of the first ST. (72)
Round 4: CH1, turn. SC in 3rd loops of each ST around. Join with a SL ST to the top of the first ST. (72)
Round 5: CH1, turn. SC in each ST around. Join with a SL ST to the top of the first ST. (72)
Round 6: CH1, turn. BNS in first ST, CH1, SK next ST. (BNS in next ST, CH1, SK next ST) around. Join with a SL ST to the top of the first ST. (72)
Round 7: CH1, turn. HDC in each ST around. Join with a SL ST to the top of the first ST. (72)
Round 8: CH1, turn. SC in 3rd loops of each ST around. Join with a SL ST to the top of the first ST. (72)
Round 9: CH1, turn. SC in each ST around. Join with a SL ST to the top of the first ST. (72)
– – – – – – – – – – – –
Repeat Rounds 2-9, in order, until potholder reaches about 7.5″ in height. It does not matter which repeat round you end on.
– – – – – – – – – – – –
Final Round: CH1, turn. SC across first side of potholder until you get to the fold. CH20; SL ST back into the same ST to form a loop. SC in each remaining St around. (72 + CH20)
To finish: Fasten off, leaving a long tail for seaming. Use the tail and a yarn needle to seam potholder closed. Tie a knot at the end; then run your yarn needle into the nearest opening and underneath about half a dozen stitches (going between the two layers of fabric). Pull yarn through, then reinsert yarn needle back into the exit point and repeat. Do this a few times, then cut yarn and pull fabric to make the tip of the yarn disappear completely into the potholder.
– – – – – – – – – – – –
Done! If you’re sharing on social media, be sure to tag me @yarnandchai.design. Hope you enjoyed it!
Herringbone Half Double Crochet worked in the round provides one of my favorite crocheted textures. I used it in the Carlyle Slouch + Cowl set and the Herringbone Baby Hat, and it’s making an appearance again in this doubly-thick, modern potholder.
The color-blocking gives you endless possibilities for a more colorful potholder, but this pattern would look just as chic in a solid color, especially if presented in a set of two or three potholders of complimentary shades.
Prefer a PDF?
This pattern can be completed using the 100% free version right here on this page. However, many people prefer the convenience of a printable, ad-free PDF.
All-Access Passholders get the ad-free version of this and all of my other blog patterns. It’s a pretty sweet deal, if I do say so myself! Learn more about it here or continuing scrolling for the free version.
Hook: E (3.50 mm) or whichever hook is needed to obtain correct gauge
Yarn: Approx. 160 yards (80 yards per color) of cotton in a medium (#4) weight. For my sample, I used I Love This Cotton in Dark Denim + Pale Denim.
Gauge: 15 rows of 18 HHDC = 4″ square
You’ll also need: Yarn needle
Terms and Abbreviations:
ST/STS (stitch/stitches) SL ST (slip stitch) CH (chain) SC (single crochet) HHDC (herringbone half double crochet; see “Special Stitch”, below)
Special Stitch:
Herringbone Half Double Crochet (HHDC): Yarn over, insert hook into stitch. Yarn over, pull loop through stitch AND through first loop on hook (this is similar to a slip stitch motion). Two loops remain on hook. Yarn over and pull through both loops.
(If you need additional help, Moogly has an excellent video tutorial here.)
Notes: (1) This pattern is written in American Standard Terms.
(2) CHs do not count as a stitch.
(3) There is no stitch multiple for this pattern. If you want to make it larger or smaller, add or subtract chains at the beginning and repeat rounds as many times as necessary for the height you want. (If doing two colors, switch when potholder is half the height you want it to be.)
INSTRUCTIONS
To Begin: With COLOR A, CH37.
Round 1: SC in 2nd CH from hook. HHDC in each remaining CH. Working down the opposite side of the chain, HHDC across. (You have now worked in both sides of each chain.) Do not join. (72)
Rounds 2-15: HHDC in each ST around. Do not join. (72)
Round 16: You may notice that your starting point has shifted over a bit and is no longer right on the fold. This is normal and has to do with the anatomy of a stitch and the fact that we aren’t turning our rounds, but that’s a lesson for another day. For now, since we want to put our color change on the fold (where the jagged change won’t be as noticeable), HHDC in next few stitches (until you are back on the folded edge), then switch to COLOR B. HHDC in each remaining ST around. Do not join. (72)
Rounds 17-29: HHDC in each ST around. Do not join. (72)
Round 30: HHDC in each ST until you get to the first folded edge. Then, continue to HHDC around until you get to the next fold. CH20; SL ST back into the same ST to form a loop. HHDC in each remaining ST around. (72 + CH20)
To finish: Determine how many stitches are left between where your hook is now, and the folded edge. (There should be about 6 or 7, but don’t worry if yours is more or less.) SC in all but one of those STS, then SL ST in the final ST. (So your SL ST should be right on the folded part.)
Fasten off, leaving a long tail for seaming. Weave in your other tails, then use the finishing tail and a yarn needle to sew potholder closed. Tie a knot at the end; then run your yarn needle into the nearest opening and underneath about half a dozen stitches (going between the two layers of fabric). Pull yarn through, then reinsert yarn needle back into the exit point and repeat. Do this a few times, then cut yarn and pull fabric to make the tip of the yarn disappear completely into the potholder.
– – – – – – – – – – – –
Done! If you’re sharing on social media, be sure to tag me @yarnandchai.design. Hope you enjoyed it!
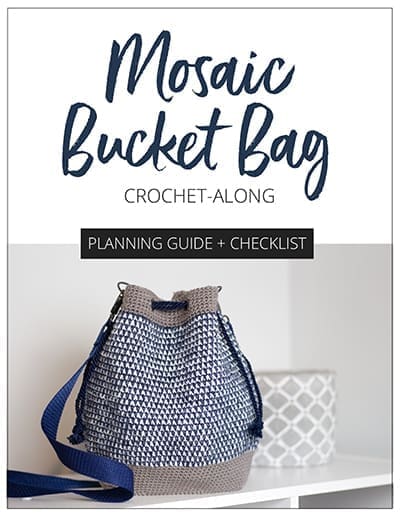
Click here to get your FREE Mosaic Bucket Bag PDF Planning Guide!
– – – – – – – – – – – – – –
First Things First… What’s A CAL?
***PLEASE NOTE: THIS CAL HAS FINISHED. YOU CAN STILL FIND THE PATTERN BELOW!***
A CAL (Crochet-Along) is an online event where a pattern is released in segments over the course of a number of weeks, and a community of crocheters works on it together. The Mosaic Bucket Bag CAL will begin on March 27 and last for 3 weeks. For this CAL, I’ll be keeping everything on this page; I’ll just update the page each time a new part of the pattern is released. The schedule is as follows:
Pre-Launch: Supply List (published) Week 1: Base (published) Week 2: Mosaic Section (published) Week 3: Top, Drawstring, + Strap (published)
What’s the first thing you should do?
If you haven’t already, you should download your FREE Mosaic Bucket Bag PDF Planning Guide! This 8-page guide will walk you through the complete supply list, explain how the colors are chosen and how they work together, and give you lots of inspiration to fuel your creativity. It even includes a handy checklist so you know exactly what supplies you need and when!
(FYI, this is optional, and you’ll still be able to follow along with the crochet-along without the Planning Guide… but, I worked really hard on it and I am so excited about it, and I think you’re going to love it!)
– – – – – – – – – – – – – –
Click here to view your FREE Mosaic Bucket Bag PDF Planning Guide!
– – – – – – – – – – – – – –
Mosaic Bucket Bag on Ravelry
Ravelry lover? Click here to add the Mosaic Bucket Bag to your Ravelry favorites!
Join my Crochet-Along Facebook Group
Life is better together, right? That’s the heart behind a crochet-along, too! If you’re on Facebook and want to join our private group to ask questions, post progress pics, or just meet new friends while you work through the CAL, request your invite by clicking here.
Prefer a PDF?
This pattern can be completed using the 100% free version right here on this page. However, many people prefer the convenience of a printable, ad-free PDF.
All-Access Passholders get the ad-free version of this and all of my other blog patterns. It’s a pretty sweet deal, if I do say so myself! Learn more about it here or continuing scrolling for the free version.
Need a little extra help?
If you’re a visual learner, my tutorial videos are for you! You’ll find the step-by-step tutorials right here when they are published (according to the CAL schedule). Currently available: Video Planning Guide, Part 1: Base, Part 2: Mosaic, and Part 3: Top + Straps.
– – – – – – – – – – – – – – –
MOSAIC BUCKET BAG
DIFFICULTY: Easy
FINISHED SIZES: Please note that measurements are approximate and may vary slightly depending on thickness of yarn used for COLOR C.
Laid flat: Classic size: 12.5” (w) x 13” (h) Mini size: 9.5” (w) x 8.5” (h)
Standing up with flat base, uncinched: Classic size: 10” (w) x 5” (d) x 10” (h) Mini size: 7.5” (w) x 4” (d) x 7” (h)
HOOK: F/G (4.0 mm) or whichever hook is needed to obtain correct gauge
YARN: Bag is comprised of 3 different yarns. For a full explanation of how each yarn is used, please download your FREE PDF Planning Guide or watch the Video Planning Guide.
COLOR A: #4 worsted weight (preferably cotton) in any color. Classic size: 150 yds / Mini size: 100 yds
COLOR B: #4 worsted weight (same type yarn as COLOR A) in a light color. Classic size: 140 yds / Mini size: 70 yds
COLOR C: Can be any weight, any fiber, as long as it is thinner than COLOR B.Use darker colors for more contrast. Classic size: 150 yds / Mini size: 80 yds
GAUGE: With COLOR A, 16SC x 20 rows = 4” square
ADDITIONAL SUPPLIES:
(8) 6mm or 8mm Eyelets. You can find packages of eyelets at craft stores, and they are usually available in colors like silver, gunmetal, and gold. Either size (6mm or 8mm) will work.
Eyelet Setting Tool. Sometimes this comes with your eyelets, but may need to be purchased separately. Just be sure to get the right size (6mm or 8mm)! You’ll also need a hammer.
(2) 1” D-Rings. Get the same color as the eyelets you chose.
(2) Swivel Lobster Clasps. Again, make sure these match your eyelets and D-Rings.
Craft Cord, 2mm or 4mm. This is for the drawstring. You’ll need two lengths of 34” each for the Classic size, and for the Mini size, two lengths of 30” each.
Shoulder Strap. Nylon or cotton ribbon (sold by the yard) is an economical choice, but feel free to get creative! You’ll also need a needle and thread for sewing it. Choose measurements based on the wearer; for adults, you’ll need about 42”, and for kids, about 30”. Other options include sewing your own from another fabric, or ordering one online.
TERMS AND ABBREVIATIONS:
ST/STS (stitch/stitches) SL ST (slip stitch) SK (skip) CH (chain) SC (single crochet) Spike Stitch (see Special Stitches, below)
SPECIAL STITCHES:
SC Spike Stitch: Instead of inserting your hook into the top loops of the stitch, insert them into its base, then complete an SC. This will wrap your SCs over the top of the SCs from the previous round.
SL ST Spike Stitch: Follow instructions for SC Spike Stitch, but instead of completing an SC, complete a SL ST.
NOTES: (1) This pattern is written in American Standard Terms. (2) CH1s at the beginning of rounds do not count as a stitch in the final stitch count. (3) When instructed to “join”, join with a slip stitch to the first stitch of the round. (4) Because we utilize the SC Spike Stitch for entire rounds throughout the pattern, we will be referring to those rounds as an extension of the SC rounds they are being worked into. For example, if Round 32 is a round of SC, then the very next round which places spike stitches on top of those SCs will be referred to as Round 32B. This just makes for easier counting.
Round 1: 3SC in 2nd CH from hook, SC in each of the next 12 CH, 3SC in final CH (working around the tail to the other side). Working down the other side of the chain, SC in each of the next 12 CH. Join. (30)
Round 2: CH1, turn. SC in each of the first 12 STS. 2SC in each of the next 3 STS. SC in each of the next 12 STS. 2SC in each of the next 3 STS. Join. (36)
Round 3: CH1, turn. 2SC in first ST, SC in next ST. (2SC in next ST, SC in next ST) 2 times. SC in each of the next 12 STS. (2SC in next ST, SC in next ST) 3 times. SC in each of the next 12 STS. Join. (42)
Round 4: CH1, turn. SC in each of the first 12 STS. (2SC in next ST, SC in each of the next 2 STS) 3 times. SC in each of the next 12 STS. (2SC in next ST, SC in each of the next 2 STS) 3 times. Join. (48)
Round 5: CH1, turn. 2SC in first ST, SC in each of the next 3 STS. (2SC in next ST, SC in each of the next 3 STS) 2 times. SC in each of the next 12 STS. (2SC in next ST, SC in each of the next 3 STS) 3 times. SC in each of the next 12 STS. Join. (54)
Round 6: CH1, turn. SC in each of the first 12 STS. (2SC in next ST, SC in each of the next 4 STS) 3 times. SC in each of the next 12 STS. (2SC in next ST, SC in each of the next 4 STS) 3 times. Join. (60)
Round 7: CH1, turn. 2SC in first ST, SC in each of the next 5 STS. (2SC in next ST, SC in each of the next 5 STS) 2 times. SC in each of the next 12 STS. (2SC in next ST, SC in each of the next 5 STS) 3 times. SC in each of the next 12 STS. Join. (66)
Round 8: CH1, turn. SC in each of the first 12 STS. (2SC in next ST, SC in each of the next 6 STS) 3 times. SC in each of the next 12 STS. (2SC in next ST, SC in each of the next 6 STS) 3 times. Join. (72)
Round 9: CH1, turn. 2SC in first ST, SC in each of the next 7 STS. (2SC in next ST, SC in each of the next 7 STS) 2 times. SC in each of the next 12 STS. (2SC in next ST, SC in each of the next 7 STS) 3 times. SC in each of the next 12 STS. Join. (78)
Round 10: CH1, turn. SC in each of the first 12 STS. (2SC in next ST, SC in each of the next 8 STS) 3 times. SC in each of the next 12 STS. (2SC in next ST, SC in each of the next 8 STS) 3 times. Join. (84)
Round 11: CH1, turn. 2SC in first ST, SC in each of the next 9 STS. (2SC in next ST, SC in each of thenext 9 STS) 2 times. SC in each of the next 12 STS. (2SC in next ST, SC in each of the next 9 STS) 3 times. SC in each of the next 12 STS. Join. (90)
Round 12: CH1, turn. SC in each of the first 12 STS. (2SC in next ST, SC in each of the next 10 STS) 3 times. SC in each of the next 12 STS. (2SC in next ST, SC in each of the next 10 STS) 3 times. DO NOT join. (96)
We are now switching to a seamless spiral. Do not join, turn or chain until instructed, and mark the first stitch of each round with a stitch marker so you don’t lose your place.
Round 13: Continuing in the same direction, SC in first ST (the ST you would have joined in, if we had joined the previous round) and in each ST around. Do not join. (96)
Switch to COLOR B. For the best transition, use the jogless method (demonstrated in the tutorial video for Part 2).
Round 23: SL ST in first ST of the round. (If you used the jogless color change method, you will have already done this.) SC in each remaining ST around. Pull the loop on your hook up a couple inches so it doesn’t unravel, then remove your hook. (96)
Round 23B: Insert hook into top loops of next ST; attach COLOR C and CH1; SC in same ST. SC SPIKE STITCH into next ST and each remaining ST. Pull the loop on your hook up a couple inches so it doesn’t unravel, then remove your hook. (96)
Round 24: Reinsert hook into loop from COLOR B. SC in each ST around (you’re working in the top loops of the SC Spike Stitches from the previous round). Remove hook. (96)
Round 24B: Reinsert hook into loop from COLOR C. SC Spike Stitch in each ST around. Remove hook. (96)
Rounds 25-47B: Repeat Rounds 24-24B. (96)
Round 48: Reinsert hook into loop from COLOR B. SC in each of the first 95 STS. SL ST in the final ST. Remove hook. (96)
Round 48B: Reinsert hook into loop from COLOR C. SC Spike Stitch in each of the first 95 STS. SL ST in the remaining ST. Remove hook. (96)
Fasten off both COLOR B and COLOR C (but don’t weave in ends yet).
Turn bag right side out (if not already so). Fold it lengthwise along the bottom seam, and lay it flat so that the side with the joins and color changes is face up. Locate the stitch that sits atop the right-hand crease. Counting that stitch as #1, count over 8 stitches. Attach COLOR A into that 8th stitch; CH1.
Round 49: SC in same ST as CH1, and in each ST around. Join. (96)
Rounds 50-52: CH1, turn. SC in each ST around. Join. (96)
Round 53: CH1, turn. SC in each of the first 11 STS. CH1, SK next ST. (SC in each of the next 11 STS; CH1, SK next ST) 7 times. Join. (96)
Round 54: CH1, turn. SC in first CH1 space. Continue to SC in each ST around, putting 1SC in each CH1 space. Join. (96)
Round 55: CH1, turn. SC in each of the first 39 STS. SC each of the next 6 STS over a D-Ring. SC in each of the next 42 STS. SC each of the next 6 STS over a D-Ring. SC in each of the remaining 3 STS. Join. (96)
Round 56: CH1, turn. SC in each of the first 3 STS. SC SPIKE STITCH in each of the 6 STS inside the D-Ring. SC in each of the next 42 STS. SC SPIKE STITCH in each of the 6 STS inside the D-Ring. SC in each of the remaining 39 STS. Join. (96)
Fasten off and weave in all ends.
Proceed to ADDING EYELETS, located after instructions for Mini Size bag.
Round 1: 3SC in 2nd CH from hook, SC in each of the next 12 CH, 3SC in final CH (working around the tail to the other side). Working down the other side of the chain, SC in each of the next 12 CH. Join. (30)
Round 2: CH1, turn. SC in each of the first 12 STS. 2SC in each of the next 3 STS. SC in each of the next 12 STS. 2SC in each of the next 3 STS. Join. (36)
Round 3: CH1, turn. 2SC in first ST, SC in next ST. (2SC in next ST, SC in next ST) 2 times. SC in each of the next 12 STS. (2SC in next ST, SC in next ST) 3 times. SC in each of the next 12 STS. Join. (42)
Round 4: CH1, turn. SC in each of the first 12 STS. (2SC in next ST, SC in each of the next 2 STS) 3 times. SC in each of the next 12 STS. (2SC in next ST, SC in each of the next 2 STS) 3 times. Join. (48)
Round 5: CH1, turn. 2SC in first ST, SC in each of the next 3 STS. (2SC in next ST, SC in each of the next 3 STS) 2 times. SC in each of the next 12 STS. (2SC in next ST, SC in each of the next 3 STS) 3 times. SC in each of the next 12 STS. Join. (54)
Round 6: CH1, turn. SC in each of the first 12 STS. (2SC in next ST, SC in each of the next 4 STS) 3 times. SC in each of the next 12 STS. (2SC in next ST, SC in each of the next 4 STS) 3 times. Join. (60)
Round 7: CH1, turn. 2SC in first ST, SC in each of the next 5 STS. (2SC in next ST, SC in each of the next 5 STS) 2 times. SC in each of the next 12 STS. (2SC in next ST, SC in each of the next 5 STS) 3 times. SC in each of the next 12 STS. Join. (66)
Round 8: CH1, turn. SC in each of the first 12 STS. (2SC in next ST, SC in each of the next 6 STS) 3 times. SC in each of the next 12 STS. (2SC in next ST, SC in each of the next 6 STS) 3 times. DO NOT join. (72)
We are now switching to a seamless spiral. Do not join, turn or chain until instructed, and mark the first stitch of each round with a stitch marker so you don’t lose your place.
Round 9: Continuing in the same direction, SC in first ST (the ST you would have joined in, if we had joined the previous round) and in each ST around. Do not join. (72)
Switch to COLOR B. For the best transition, use the jogless method (demonstrated in the tutorial video for Part 2).
Round 16: SL ST in first ST of the round. (If you used the jogless color change method, you will have already done this.) SC in each remaining ST around. Pull the loop on your hook up a couple inches so it doesn’t unravel, then remove your hook. (72)
Round 16B: Insert hook into top loops of next ST; attach COLOR C and CH1; SC in same ST. SC SPIKE STITCH into next ST and each remaining ST. Pull the loop on your hook up a couple inches so it doesn’t unravel, then remove your hook. (72)
Round 17: Reinsert hook into loop from COLOR B. SC in each ST around (you’re working in the top loops of the SC Spike Stitches from the previous round). Remove hook. (72)
Round 17B: Reinsert hook into loop from COLOR C. SC Spike Stitch in each ST around. Remove hook. (72)
Rounds 18-30B: Repeat Rounds 17-17B. (72)
Round 31: Reinsert hook into loop from COLOR B. SC in each of the first 71 STS. SL ST in remaining ST. Remove hook. (72)
Round 31B: Reinsert hook into loop from COLOR C. SC Spike Stitch in each of the first 71 STS. SL ST in remaining ST. Remove hook. (72)
Fasten off both COLOR B and COLOR C (but don’t weave in ends yet).
Turn bag right side out (if not already so). Fold it lengthwise along the bottom seam, and lay it flat so that the side with the joins and color changes is face up. Locate the stitch that sits atop the right-hand crease. Counting that stitch as #1, count over 6 stitches. Attach COLOR A into that 6th stitch; CH1.
Round 32: SC in same ST as CH1, and in each ST around. Join. (72)
Round 33: CH1, turn. SC in each ST around. Join. (72)
Round 34: CH1, turn. SC in each of the first 8 STS. CH1, SK next ST. (SC in each of the next 8 STS; CH1, SK next ST) 7 times. Join. (72)
Round 35: CH1, turn. SC in first CH1 space. Continue to SC in each ST around, putting 1SC in each CH1 space. Join. (72)
Round 36: CH1, turn. SC in each of the first 28 STS. SC each of the next 6 STS over a D-Ring. SC in each of the next 30 STS. SC each of the next 6 STS over a D-Ring. SC in each of the remaining 2 STS. Join. (72)
Round 37: CH1, turn. SC in each of the first 2 STS. SC SPIKE STITCH in each of the 6 STS inside the D-Ring. SC in each of the next 30 STS. SC SPIKE STITCH in each of the 6 STS inside the D-Ring. SC in each of the remaining 28 STS. Join. (72)
Fasten off and weave in all ends.
Proceed to ADDING EYELETS.
– – – – – – – – – – – –
ADDING EYELETS
With eyelets, eyelet setting tool and hammer ready, turn your bag inside out. Follow the instructions on your eyelet kit (or watch my video demonstration!) to add eyelets to each of the eight holes at the top of the bag.
– – – – – – – – – – – –
ADDING DRAWSTRING
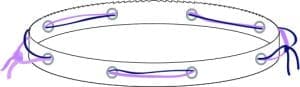
Option 1: Double Side Drawstrings
Lay bag flat (right side out). Starting on outside of bag, insert first length of craft cord (represented in purple) into the first eyelet on the left. Moving right (counter-clockwise), weave cord in and out through all 8 eyelets around the bag; the last one should exit the bag so that both ends of cord are outside the bag. Make sure bag is uncinched, then bring cord ends together and tie a tight knot close to the bag. Complete with second length of craft cord (represented in navy), but start on the eyelet on the right side of the bag and move left (clockwise).
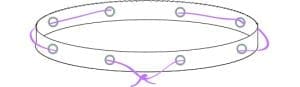
Option 2: Single Centered Drawstring
Lay bag flat (right side out), seam side down. Starting on front of bag, locate center and insert craft cord in first eyelet to the left. Working left (in a clockwise direction), weave cord in and out through all 8 eyelets around the bag; the last one should exit the bag so that both ends of cord are outside the bag and can meet in the center. Make sure bag is uncinched, then bring cord ends together and tie a tight knot close to the bag.
– – – – – – – – – – – –
ADDING A STRAP
The following are very bare-bones instructions for making your own strap, but these instructions are meant specifically for someone like me who is nota seamstress and just needs something basic. Other options include purchasing straps online, or sewing your own from fabric. There are plenty of tutorials on YouTube for this if you are handy with a sewing machine!
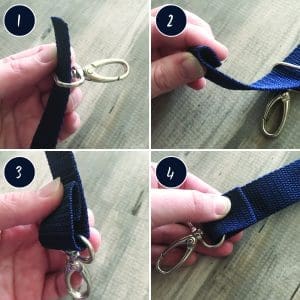
For the rest of us, here’s what I did:
1. Thread strap through lobster clasp.
2. Fold the tip of the strap over about 1/2”.
3. Hold the fold from Step 2 in place and make another fold about 1” down, resting the hardware in that fold.
4. Use the texture of the material as a guide to sew a straight line across the strap, just below the first fold (as indicated in the photo), going through all three layers.
– – – – – – – – – – – –
DONE! If you’re sharing your bag on social media,be sure to use hashtag #mosaicbucketbagcal and tag me @yarnandchai.design!
Last Fall I created a pillow pattern for Hobby Lobby, and the whole time I was working on the pattern, I knew it needed to be made into a wearable pattern as well. I’ve been having a lot of fun lately with using the most basic stitches in new and interesting ways, and I love the stitch pattern on the Autumn Boho Pillow.
These patterns definitely fall into the “looks-more-complicated-than-it-really-is” category. The reality is, the design on them is achieved purely through creative use of a single crochet stitch. So if you can single crochet, and you’re good at following directions, you can tackle this pattern with no hesitation.
VIDEO TUTORIAL
If you need a little extra help with the pattern, here is a video tutorial, and the free pattern is below!
Prefer a PDF?
This pattern can be completed using the 100% free version right here on this page. However, many people prefer the convenience of a printable, ad-free PDF.
All-Access Passholders get the ad-free version of this and all of my other blog patterns. It’s a pretty sweet deal, if I do say so myself! Learn more about it here or continuing scrolling for the free version.
Hook: K (6.50 mm) or whichever hook is needed to obtain correct gauge
Yarn: You’ll need two yarns for this project.
COLOR A: about 375 yards of a #4 aran weight. Yarn used in sample photos is Yarn Bee’s Rustic Romantic in “Window Ivy.” A medium to dark color is best.
COLOR B: about 150 yards of a #3 DK or #4 worsted weight. Yarn used in sample photos is Yarn Bee’s Must Be Merino in “White”. A light, smooth yarn is best.
Gauge: With COLOR A, 16 rows of 13SC = 4″ square
You’ll also need: Yarn needle, 3 buttons (1″ – 1-1/8″)
SC SPIKE STITCH – Instead of inserting your hook into the top loops of a stitch, insert it into the bottom of the stitch where the “V” meets. See photo (click to enlarge):
Notes: (1) This pattern is written in American Standard Terms.
(2) CHs at the beginning of rows do not count as a stitch in the final stitch count.
(3) There is no stitch multiple for this pattern. If you want to make it longer, add more chains at the beginning. If you want to make it wider, complete the repeated section more times than instructed.
(4) Buttons are decorative, but not functional (they are sewn through both layers of the scarf, joining it together permanently).
INSTRUCTIONS
To Begin: With COLOR A, CH205.
Row 1: SC in 2nd CH from hook and in each remaining CH. (204)
Row 2: CH1, turn. SC in each ST across. Pull up a large loop so yarn doesn’t unravel, then remove hook. (204)
Row 3: Without turning your work, insert hook into the first stitch of Row 2, and attach COLOR B. CH1. SC in each ST across. Pull up a loop and remove hook. (204)
Row 4A: Reinsert hook into loop from COLOR A, making sure to insert from behind previous color’s loop and working yarn. CH1, turn. SC in each ST across. Pull up a loop and remove hook. (204)
Row 4B: Turn work and reinsert hook into loop from COLOR B. CH1, turn. SC SPIKE STITCH in each ST across. Pull up a loop and remove hook. (204)
Row 5: Reinsert hook into loop from COLOR A, making sure to insert from behind previous color’s loop and working yarn. CH1, turn. SC in each ST across. (204)
Row 6: CH1, turn. SC in each ST across. (204)
Row 7: CH1, turn. SC in each ST across. Pull up a loop and remove hook. (204)
Row 8: Turn work and reinsert hook into loop from COLOR B. CH3, turn. SC in each ST across. Pull up a loop and remove hook. (204)
Row 9A: Reinsert hook into loop from COLOR A, making sure to insert from behind previous color’s loop and working yarn. CH1, turn. SC in each ST across. Pull up a loop and remove hook. (204)
Row 9B: Turn work and reinsert hook into loop from COLOR B. CH1, turn. SC SPIKE STITCH in each ST across. Pull up a loop and remove hook. (204)
Row 10: Reinsert hook into loop from COLOR A, making sure to insert from behind previous color’s loop and working yarn. CH1, turn. SC in each ST across. (204)
Row 11: CH1, turn. SC in each ST across. (204)
Rows 12-31: Repeat Rows 7-11, in order, 4 more times. (204)
Row 32: CH1, turn. SC in each ST across. (204)
Fasten off and weave in all ends.
Buttons Lay scarf wrong side up and bring ends together, overlapping by about an inch. Place your buttons evenly along the edge and sew them through both layers to hold the scarf together.
Done! If you’re sharing on social media, be sure to hashtag #anyainfinityscarf and tag me @yarnandchai.design. Hope you enjoyed it!
Last Fall I created a pillow pattern for Hobby Lobby, and the whole time I was working on the pattern, I knew it needed to be made into a wearable pattern as well. I’ve been having a lot of fun lately with using the most basic stitches in new and interesting ways, and I love the stitch pattern on the Autumn Boho Pillow.
These patterns definitely fall into the “looks-more-complicated-than-it-really-is” category. The reality is, the design on them is achieved purely through creative use of a single crochet stitch. So if you can single crochet, and you’re good at following directions, you can tackle this pattern with no hesitation.
VIDEO TUTORIAL
If you need a little extra help with the pattern, here is a video tutorial, and the free pattern is below!
Prefer a PDF?
This pattern can be completed using the 100% free version right here on this page. However, many people prefer the convenience of a printable, ad-free PDF.
All-Access Passholders get the ad-free version of this and all of my other blog patterns. It’s a pretty sweet deal, if I do say so myself! Learn more about it here or continuing scrolling for the free version.
Hook: K (6.50 mm) or whichever hook is needed to obtain correct gauge
Yarn: You’ll need two yarns for this project.
COLOR A: about 290 yards of a #4 aran weight. Yarn used in sample photos is Yarn Bee’s Rustic Romantic in “Red Roads.” A medium to dark color is best. If you want to include fringe, add another 25 yards to the total.
COLOR B: about 135 yards of a #3 DK or #4 worsted weight. Yarn used in sample photos is Yarn Bee’s Must Be Merino in “White”. A light, smooth yarn is best.
Gauge: With COLOR A, 16 rows of 13SC = 4″ square
You’ll also need: Yarn needle, 3 buttons (1″ – 1-1/8″)
SC SPIKE STITCH – Instead of inserting your hook into the top loops of a stitch, insert it into the bottom of the stitch where the “V” meets. See photo (click to enlarge):
Notes: (1) This pattern is written in American Standard Terms.
(2) CHs at the beginning of rows do not count as a stitch in the final stitch count.
(3) There is no stitch multiple for this pattern. If you want to make it longer, add more chains at the beginning. If you want to make it wider, complete the repeated section more times than instructed.
(4) Buttons are decorative, but not functional (they are sewn through both layers of the cowl, joining it together permanently).
INSTRUCTIONS
To Begin: With COLOR A, CH129.
Row 1: SC in 2nd CH from hook and in each remaining CH. (128)
Row 2: CH1, turn. SC in each ST across. Pull up a large loop so yarn doesn’t unravel, then remove hook. (128)
Row 3: Without turning your work, insert hook into the first stitch of Row 2, and attach COLOR B. CH1. SC in each ST across. Pull up a loop and remove hook. (128)
Row 4A: Reinsert hook into loop from COLOR A, making sure to insert from behind previous color’s loop and working yarn. CH1, turn. SC in each ST across. Pull up a loop and remove hook. (128)
Row 4B: Turn work and reinsert hook into loop from COLOR B. CH1, turn. SC SPIKE STITCH in each ST across. Pull up a loop and remove hook. (128)
Row 5: Reinsert hook into loop from COLOR A, making sure to insert from behind previous color’s loop and working yarn. CH1, turn. SC in each ST across. (128)
Row 6: CH1, turn. SC in each ST across. (128)
Row 7: CH1, turn. SC in each ST across. Pull up a loop and remove hook. (128)
Row 8: Turn work and reinsert hook into loop from COLOR B. CH3, turn. SC in each ST across. Pull up a loop and remove hook. (128)
Row 9A: Reinsert hook into loop from COLOR A, making sure to insert from behind previous color’s loop and working yarn. CH1, turn. SC in each ST across. Pull up a loop and remove hook. (128)
Row 9B: Turn work and reinsert hook into loop from COLOR B. CH1, turn. SC SPIKE STITCH in each ST across. Pull up a loop and remove hook. (128)
Row 10: Reinsert hook into loop from COLOR A, making sure to insert from behind previous color’s loop and working yarn. CH1, turn. SC in each ST across. (128)
Row 11: CH1, turn. SC in each ST across. (128)
Rows 12-41: Repeat Rows 7-11, in order, 6 more times. (128)
Row 42: CH1, turn. SC in each ST across. (128)
Fasten off and weave in all ends.
Fringe (optional) Cut about 100 9″ long strands of yarn. (I wrap mine around a 9″ cutting board.) With the right side of the cowl facing up, start at one bottom corner and attach them in groups of 3 strands every 4 stitches along the entire bottom edge of the cowl. (If you don’t know how to attach fringe, see video tutorial for guidance.)
Buttons Lay cowl wrong side up and bring ends together to form a triangle, as shown, making sure the edges line up together. Place your buttons evenly along the edge and sew them through both layers to hold the cowl together. You can also place a small stitch through both layers where the red “x” is to hold the underside of the cowl in place (optional).
Done! If you’re sharing on social media, be sure to hashtag #anyacowl and tag me @yarnandchai.design. Hope you enjoyed it!
Every year, I make my boys a hat for Christmas. They’ve always been various character hats like TMNT, Lion Guard, etc., but at ages 6 and 8, we’ve transitioned out of the Disney Jr phase and into a more mature (ha!) one. Pikachu and Link have replaced Mickey Mouse and Kion, and the boys reach for their simple Walmart slouchies way more often than their Lion Guard hats. (How did they get so old?)
And then there’s little Henry, who doesn’t keep a hat on long enough to make a character hat worth the time or energy. Toddlers, right!?
And then there’s the husband, who has been asking me for a hat for I’m-embarrassed-to-say-how-long. Sorry, babe.
So this year, I went in a different direction and designed a pattern that would work for all of them. It has just the right amount of slouch, and uses a very guy-friendly yarn called Jeans (from Lion Brand). This yarn is soft, heathery, and just looks really good.
Then, I did a little searching online to find some patches for the boys’ hats. The older two are super into the Zelda video game, and I was so pumped to find these Hylian Shield patches online. (Listen to me, throwing around that video game lingo like I actually know what I’m talking about. I don’t.)
I then searched for something Mario-related for little Henry, and found this adorable mushroom patch that I knew he would recognize.
I left my husband’s hat patch-free, but of course, all four of them got Mom’s Yarn + Chai tag sewn on. Gotta represent! (I get my tags from All This Wood on Etsy.)
And for those of you that like to know name origins — I ended up naming this hat the Hyland Slouch because for a while, when my boys would refer to that Hylian Shield, I thought they were saying hy-land instead of hy-lee-an and it just stuck.
Of course, despite its name, this hat isn’t just for the guys. It would make a great girls’ hat, too! (But let’s be honest, girls get a lot more dedicated patterns than guys, right?)
Prefer a PDF?
This pattern can be completed using the 100% free version right here on this page. However, many people prefer the convenience of a printable, ad-free PDF.
All-Access Passholders get the ad-free version of this and all of my other blog patterns. It’s a pretty sweet deal, if I do say so myself! Learn more about it here or continuing scrolling for the free version.
Finished Sizes (h x w): 8″ x 8″ (toddler), 9″ x 9″ (child), 10″ x 9.5″ (teen/adult small), 10.5″ x 10″ (adult large). Width is measured at the bottom of the ribbing when the hat is laid flat, but the widest part of the hat (near the middle) will be about .5-1″ more.
Hook: J (6.0 mm) or whichever hook is needed to obtain correct gauge
Yarn: Lion Brand Jeans Yarn or similar #4 worsted weight yarn. Approximate amounts as follows: 170 yards (toddler), 210 yards (child), 240 yards (teen/adult small), 280 yards (adult large).
Gauge: 5 increase rounds of 10 HDC = 4.25″ across.
Pattern For Gauge:
Round 1: 10HDC in magic circle; join (10)
Round 2: 2HDC in each ST around; join (20)
Round 3: (2HDC in next, HDC in next) around; join (30)
Round 4: (2HDC in next, HDC in next 2) around; join (40)
Round 5: (2HDC in next, HDC in next 3) around; join (50)
Terms and Abbreviations:
Magic Circle (view my tutorial here) ST/STS (stitch/stitches) SL ST (slip stitch) SK (skip) CH (chain) SC (single crochet) YUSC (yarn under single crochet – see Special Stitches) YUHDC (yarn under half double crochet – see Special Stitches)
Special Stitches:
Yarn Under Single Crochet (YUSC) – this is the same as a regular SC, but with one simple variation. In a regular SC, you insert your hook, yarn over, draw yarn through (2 loops on hook), yarn over, draw through both loops. With a Yarn Under Single Crochet, you will insert your hook, yarn over, draw yarn through the stitch (2 loops on hook), yarn under, draw through both loops.
Yarn Under Half Double Crochet (YUHDC) – this is the same as a regular HDC, but with one simple variation. In a regular HDC, you yarn over, insert your hook, yarn over, draw yarn through (3 loops on hook), yarn over, draw through both loops. With a Yarn Under Half Double Crochet, you will yarn over, insert your hook, yarn over, draw yarn through the stitch (3 loops on hook), yarn under, draw through all three loops.
A Note About Changing Colors: To keep the written pattern simple, I have written it without including color changes (since it would be different for every size). The hat can be made all one color, with 2 or 3 colors (as in my samples), or really with any number of color changes you wish. To change colors, keep the following tips in mind:
To decide where to put your color changes, first decide how many colors you want, then take the finished height of the size you are making and divide it by the number of colors you want to use. So for instance, if I want to make a children’s hat (9″ tall) with 3 colors, I’ll divide 9 by 3 (9/3=3). I know that each color block will be about 3″, so I’ll keep a ruler handy as I work the pattern and I’ll change colors every 3″.
I feel that the cleanest color change happens between two rounds of YUSC (as opposed to YUHDC), so I always placed my color changes at that part of the pattern, wherever it fell closest to the measurements I was going for.
Additional Notes: (1) This pattern is written in American Standard Terms.
(2) Pattern is worked top-down, in a spiral. Do not join or chain unless instructed.
(3) Pattern is written for toddler size with additional sizes in brackets [child, teen/adult small, adult large]. So, for example, if it says “12 [13, 14, 15]”, the first number is for the toddler size, and the numbers in brackets are child, teen/adult small, and adult large instructions, respectively. If there is only one number, it applies regardless of which size you are making. If you are working from printed instructions, it helps to circle or highlight the numbers you are following before you begin.
INSTRUCTIONS
Note: The first few rounds will produce a VERY wavy circle. As you work further down the hat, the waves will smooth out. This is how we get that cinched look at the top.
Round 2: 2YUSC in each ST around. (24 [26, 28, 30])
Round 3: 3YUSC in each ST around. (72 [78, 84, 90])
Rounds 4-5: YUSC in each ST around. (72 [78, 84, 90])
Rounds 6-8: YUHDC in each ST around. (72 [78, 84, 90])
Rounds 9-13: YUSC in each ST around. (72 [78, 84, 90])
Rounds 14 – ?: Repeat Rounds 6-13, in order (3 rounds YUHDC, 5 rounds YUSC), until hat measures 6.5 [7.5, 8.5, 9]” tall, then continue to “Base Round” (the beginning of the ribbing section). It does not matter which repeat round you end on.
Base Round: YUSC in each ST around. Join with a SL ST to the first ST of the round. (72 [78, 84, 90])
– – – – – –
Next we’re going to make the band of the hat, and we will be working in vertical rows, attaching it to the Base Round with SL STS as we go. If you need a little extra help, click here for a video tutorial on how to add ribbing at the end of a project.
– – – – – –
CH7.
Row 1: SC in 2nd chain from hook and in each of the remaining 6 chains. SL ST into the first SC from Base Round, the stitch on which your CH7 was built. SL ST into the next SC from Base Round. (6, plus the two slip stitches along Base Round)
The section we just created, built on the CH7, will hereafter be referred to as the “ribbing.”
Row 2: CH1, turn. Skipping over the 2 SL STS you put in Base Round, SC in BLO of each of the first 5 STS of the ribbing. SC in both loops of the last ST. (6)
Row 3: CH1, turn. SC in 1st ST. SC in BLO of each of the remaining 5 STS of the ribbing. SL ST in each of the next 2 STS of Base Round. (6, plus the 2 SL STS along Base Round)
Row 4: CH1, turn. Skipping over the 2 SL STS you put in Base Round, SC in BLO of each of the first 5 STS of the ribbing. SC in both loops of the last ST. (6)
Rows 5-72 [78, 84, 90]: Repeat Rows 3-4 all the way along Base Round.
Fasten off and use your tail to sew together the gap between the first and last rows of the ribbing, then weave in your ends.
Done! If you’re sharing your finished hat on social media, be sure to hashtag #hylandmenshat and tag me @yarnandchai.design. Stay warm out there!
A few years ago, my sister saw a photo of another designer’s floor pouf and exclaimed “I want one!” She probably doesn’t even remember this, but I do. At the time, I was a much slower crocheter and the size of that project seemed daunting. But lucky for her, I’m much faster (and, more importantly, more confident) than I was then. And, I drew her name in the family Christmas exchange this year! 🙂
Ready to make your own?
The Supplies
Yarn
You’ll need two different yarns to achieve the mosaic effect of this pattern. First, you’ll need a chunky #5 yarn that will be the base color of your pouf. Just like with my Mosaic Baskets, I used Bernat Maker Home Dec (but with a bigger hook — yay!). I think it’s the perfect yarn for this project, but really any #5 yarn will work.
Second, you’ll need a different colored yarn for the mosaic pattern on the sides of the pouf. You can get so creative here! Whether you choose a solid, variegated, or self-striping yarn, the effect will be awesome. The only rule is that it needs to be thinner than your base yarn so that you can still see the base yarn through the mosaic stitching. I recommend a #3 weight yarn.
Stuffing
We also have to stuff this thing, which is quite large. There are several things you can do — if you like to sew, you can sew an insert and fill it with polyester stuffing (you’ll need a lot to help it hold its shape). You can also use old pillows or an old blanket, but you’ll probably have to work a little harder to get it nice and round.
Or, do what I did, and use a couple rolls of foam! I found this at my craft store by the pillow inserts and knew it would be perfect. I bought two rolls of the 1″ thick foam and had my handyman dad help me slice them in half so that I would have twice as much to work with. I then carefully combined it all into one big roll.
Perfect!
Large wood circle
This part is optional, but I think it’s a great addition. If you want your pouf cover to be removable (for washing), you can purchase a large wooden circle from a craft or hardware store. I found a 15″ circle in the woodworking section of Joann Fabrics, but yours doesn’t have to be 15″ — just make sure it covers a good amount of the bottom of the pouf. (If it’s too small, you’ll have to crochet further toward the middle and the cover will get harder to remove.) I’ll explain in the directions how to adjust the pattern for whatever size you get.
Of course, if you don’t want to add the wooden piece and don’t need it to be washable, just follow the pattern to the end to completely close up the stuffing in crocheted fabric.
For the Visual Learners
This pattern does not have a video tutorial. However, it is basically just a very large version of my Mosaic Basket! If you want to quickly practice the techniques in this pattern before committing to it on such a large scale, I highly recommend that you watch the video tutorial below and maybe even follow along to make the small sized basket. Any confusing parts are bound to become more clear when seen in action!
Prefer a PDF?
This pattern can be completed using the 100% free version right here on this page. However, many people prefer the convenience of a printable, ad-free PDF.
All-Access Passholders get the ad-free version of this and all of my other blog patterns. It’s a pretty sweet deal, if I do say so myself! Learn more about it here or continuing scrolling for the free version.
Yarn: I used about 930 yards of Bernat Maker Home Dec (a #5 bulky weight cotton/nylon blend) in “Clay”, and about 400 yards of Yarn Bee Urban Chic (a #3 light acrylic/alpaca blend) in “Juneberry Breeze”.
Hook: K (6.5mm)
Gauge: First 7 rounds of pattern = 4.25″ across
You’ll also need: Yarn needle, stitch marker, stuffing
Terms and Abbreviations: MC (magic circle – view tutorial here)
ST/STS (stitch/stitches) SL ST (slip stitch) SK (skip) CH (chain) SC (single crochet) Spike Stitch (see Special Stitches, below) SC2TOG (single crochet two together)
Special Stitches:
SC Spike Stitch: Instead of inserting your hook into the top loops of the stitch, insert them into its base, then complete an SC. This will wrap your SCs over the top of the SCs from the previous round.
SL ST Spike Stitch: Follow instructions for SC Spike Stitch, but instead of completing an SC, complete a SL ST.
Notes: (1) This pattern is written in American Standard Terms.
(2) This pattern is worked in a seamless round. Use a stitch marker or bobby pin to mark the first stitch of each round.
(3) When working increase rounds in single crochet (as we do for this pattern), the small bumps created by the increases tend to make the circle look more like a hexagon the more rounds you complete. That’s why for this large base of 32 rounds, I chose to use the Smooth Circle Base method, which is a way of staggering the placement of your increase stitches to keep it all circular. If you need help with this method beyond the written instructions, you can use my video tutorial for the Mosaic Basket in which I go into great detail about how it is done. If you prefer to not use the method, a standard 32-round increase will work fine and the hexagon will work back into a smooth circle eventually after you get past the increasing part of the pattern.
(4) Because we utilize the SC Spike Stitch for entire rounds throughout the pattern, we will be referring to those rounds as an extension of the SC rounds they are being worked into. For example, if Round 32 is a round of SC, then the very next round which places spike stitches on top of those SCs will be referred to as Round 32B. This just makes for easier counting.
– – – – – – – – – – – – – – –
Part 1: Increasing
Note: What follows is the Smooth Circle Base method of increasing. Please refer to Note #3 for an explanation.
To Begin: Make a magic circle; CH1 (does not count as a stitch).
Round 1: 6SC in MC. (6)
Round 2: 2SC in each ST around. (12)
Round 3: (2SC in next ST, SC in next ST) around. (18)
Round 4: (SC in next ST, 2SC in next ST, SC in next ST) around. (24)
Round 5: (2SC in next ST, SC in each of the next 3 STS) around. (30)
Round 6: (SC in each of the next 2 STS, 2SC in next ST, SC in each of the next 2 STS) around. (36)
Round 7: (2SC in next ST, SC in each of the next 5 STS) around. (42)
Round 8: (SC in each of the next 3 STS, 2SC in next ST, SC in each of the next 3 STS) around. (48)
Round 9: (2SC in next ST, SC in each of the next 7 STS) around. (54)
Round 10: (SC in each of the next 4 STS, 2SC in next ST, SC in each of the next 4 STS) around. (60)
Round 11: (2SC in next ST, SC in each of the next 9 STS) around. (66)
Round 12: (SC in each of the next 5 STS, 2SC in next ST, SC in each of the next 5 STS) around. (72)
Round 13: (2SC in next ST, SC in each of the next 11 STS) around. (78)
Round 14: (SC in each of the next 6 STS, 2SC in next ST, SC in each of the next 6 STS) around. (84)
Round 15: (2SC in next ST, SC in each of the next 13 STS) around. (90)
Round 16: (SC in each of the next 7 STS, 2SC in next ST, SC in each of the next 7 STS) around. (96)
Round 17: (2SC in next ST, SC in each of the next 15 STS) around. (102)
Round 18: (SC in each of the next 8 STS, 2SC in next ST, SC in each of the next 8 STS) around. (108)
Round 19: (2SC in next ST, SC in each of the next 17 STS) around. (114)
Round 20: (SC in each of the next 9 STS, 2SC in next ST, SC in each of the next 9 STS) around. (120)
Round 21: (2SC in next ST, SC in each of the next 19 STS) around. (126)
Round 22: (SC in each of the next 10 STS, 2SC in next ST, SC in each of the next 10 STS) around. (132)
Round 23: (2SC in next ST, SC in each of the next 21 STS) around. (138)
Round 24: (SC in each of the next 11 STS, 2SC in next ST, SC in each of the next 11 STS) around. (144)
Round 25: (2SC in next ST, SC in each of the next 23 STS) around. (150)
Round 26: (SC in each of the next 12 STS, 2SC in next ST, SC in each of the next 12 STS) around. (156)
Round 27: (2SC in next ST, SC in each of the next 25 STS) around. (162)
Round 28: (SC in each of the next 13 STS, 2SC in next ST, SC in each of the next 13 STS) around. (168)
Round 29: (2SC in next ST, SC in each of the next 27 STS) around. (174)
Round 30: (SC in each of the next 14 STS, 2SC in next ST, SC in each of the next 14 STS) around. (180)
Round 31: (2SC in next ST, SC in each of the next 29 STS) around. (186)
Round 32: (SC in each of the next 15 STS, 2SC in next ST, SC in each of the next 15 STS) around. (192)
– – – – – – – – – – – – – – –
Part 2: Body of Pouf
Rounds 33-36: SC in each ST around. (192)
Round 37: SC in each ST around. Pull up a loop on your hook a couple inches tall so it doesn’t unravel, then remove your hook. (192)
Round 37B: Insert hook into top loops of next ST; attach thinner yarn and CH1; SC in same ST. SC Spike Stitch into next ST and each remaining ST. Pull the loop on your hook up a couple inches so it doesn’t unravel, then remove your hook. (192)
Round 38: Reinsert hook into loop from bulky yarn. SC in each ST around (you’re working in the top loops of the SC Spike Stitches from the previous round). Remove hook. (192)
Round 38B: Reinsert hook into loop from thinner yarn. SC Spike Stitch in each ST around. Remove hook. (192)
Rounds 39-67B: Repeat Rounds 38-38B. (192)
If you’re using rolled foam as your stuffing, you should insert it now to see how high the fabric will reach up the side. Be sure to work the fabric a bit and stretch it up — you don’t want to pull it crazy tight, but the more snug the fabric fits over the stuffing, the better the whole thing will look in the end. If you’re confident that the fabric will stretch up to the top of the insert, that’s great. If not, you can add more rounds before moving on. If you think you need to take some rounds away to make sure it all stays tight and snug, do that.
Round 68: Reinsert hook into loop from bulky yarn. SC in each of the next 189 STS (3 STS remain). SL ST in each of the remaining 3 STS. Remove hook. (192)
Round 68B: Reinsert hook into loop from thinner yarn. SC Spike Stitch in each of the next 189 STS (3 STS remain). SL ST Spike Stitch in each of the remaining 3 STS. Remove hook. (192)
Round 69: Reinsert hook into loop from bulky yarn; fasten off thinner yarn. SC in each ST around. (192)
Take a moment to weave in all ends before proceeding to “Decreasing”.
– – – – – – – – – – – – – – –
Part 3: Decreasing
Important note: Below you will find the complete pattern for decreasing back down to the handful of stitches you started with. If you don’t plan to use a wooden insert at the bottom, follow these instructions to the end. If you do plan to use an insert, simply follow the instructions until your crocheted fabric will cover the wooden insert by about 2-3 inches, then proceed to “Finishing with a wooden insert”, below.
Round 70: (SC in each of the next 15 STS, SC2TOG, SC in each of the next 15 STS) around. (186)
Round 71: (SC2TOG, SC in each of the next 29 STS) around. (180)
Round 72: (SC in each of the next 14 STS, SC2TOG, SC in each of the next 14 STS) around. (174)
Round 73: (SC2TOG, SC in each of the next 27 STS) around. (168)
Round 74: (SC in each of the next 13 STS, SC2TOG, SC in each of the next 13 STS) around. (162)
Round 75: (SC2TOaG, SC in each of the next 25 STS) around. (156)
Round 76: (SC in each of the next 12 STS, SC2TOG, SC in each of the next 12 STS) around. (150)
Round 77: (SC2TOG, SC in each of the next 23 STS) around. (144)
Round 78: (SC in each of the next 11 STS, SC2TOG, SC in each of the next 11 STS) around. (138)
Round 79: (SC2TOG, SC in each of the next 21 STS) around. (132)
Round 80: (SC in each of the next 10 STS, SC2TOG, SC in each of the next 10 STS) around. (126)
Round 81: (SC2TOG, SC in each of the next 19 STS) around. (120)
Round 82: (SC in each of the next 9 STS, SC2TOG, SC in each of the next 9 STS) around. (114)
Round 83: (SC2TOG, SC in each of the next 17 STS) around. (108)
Round 84: (SC in each of the next 8 STS, SC2TOG, SC in each of the next 8 STS) around. (102)
Round 85: (SC2TOG, SC in each of the next 15 STS) around. (96)
Round 86: (SC in each of the next 7 STS, SC2TOG, SC in each of the next 7 STS) around. (90)
Round 87: (SC2TOG, SC in each of the next 13 STS) around. (84)
Round 88: (SC in each of the next 6 STS, SC2TOG, SC in each of the next 6 STS) around. (78)
Round 89: (SC2TOG, SC in each of the next 11 STS) around. (72)
Round 90: (SC in each of the next 5 STS, SC2TOG, SC in each of the next 5 STS) around. (66)
Round 91: (SC2TOG, SC in each of the next 9 STS) around. (60)
Round 92: (SC in each of the next 4 STS, SC2TOG, SC in each of the next 4 STS) around. (54)
Round 93: (SC2TOG, SC in each of the next 7 STS) around. (48)
Round 94: (SC in each of the next 3 STS, SC2TOG, SC in each of the next 3 STS) around. (42)
Round 95: (SC2TOG, SC in each of the next 5 STS) around. (36)
Round 96: (SC in each of the next 2 STS, SC2TOG, SC in each of the next 2 STS) around. (30)
Round 97: (SC2TOG, SC in each of the next 3 STS) around. (24)
Round 98: (SC in next ST, SC2TOG, SC in next ST) around. (18)
Round 99: (SC2TOG, SC in next ST) around. (12)
To Finish: Fasten off, leaving a long tail. Thread it through your yarn needle and weave it in and out of the 12 stitches from the previous round, then pull it tight and weave in.
– – – – – – – – – – – – – – –
Finishing with a Wooden Insert
After you’ve completed a sufficient number of decrease rounds, fasten off and weave in the end. Cut a long length of Bernat Maker Home Dec (or your chosen chunky yarn) and thread it through a yarn needle. Weave it in and out of each stitch of the last completed round. Insert your wooden circle, then take each end of the threaded yarn and pull tight (but don’t break it!) and tie a small bow.
You’re done!
I hope you enjoyed this tutorial. If you’re sharing your pouf on social media, be sure to use hashtag #mosaicfloorpouf and tag me @yarnandchai.design!
When the weather starts to get cold here in Michigan, one of my favorite accessories to help beat the chill is an earwarmer. I love that I can still wear my hair piled up all messy on the top of my head — or, if it’s a good hair day, down and wavy — because a cozy earwarmer will look great either way.
This earwarmer is easy and quick. Don’t let the #3 DK weight yarn fool you; it will work up fast, and still feel light on your head. The seam is conveniently hidden underneath the button, and although I am totally ok with a necessary seam, I always get excited when I find a good hiding place for it!
Visual Learner?
You can follow along with me with this tutorial video, regardless of what size you are making! I put the pattern instructions right on screen so you can relax and go at your own pace. Be sure to subscribe, too!
Prefer a PDF?
This pattern can be completed using the 100% free version right here on this page. However, many people prefer the convenience of a printable, ad-free PDF.
All-Access Passholders get the ad-free version of this and all of my other blog patterns. It’s a pretty sweet deal, if I do say so myself! Learn more about it here or continuing scrolling for the free version.
Finished Sizes: 17″ x 3.5″ (toddler), 18″ x 4″ (child), 20″ x 4.5″ (teen), 21″ x 4.5″ (adult)
Hook: H (5.0 mm) or whichever hook is needed to obtain correct gauge
Yarn: Yarn Bee Sweet Delight, a #3 weight yarn, in the following amounts: 80 yds (toddler), 95 yds (child), 115 yds (teen), 120 yds (adult). Colors used in samples are Toy Elephant and Toy Elephant Marled.
Gauge: 17 HDC x 12 rows = 4″ square
You’ll also need: 7/8″ button, and a yarn needle that can fit through it
Terms and Abbreviations: ST/STS (stitch/stitches) SL ST (slip stitch) SK (skip) CH (chain) SC (single crochet) HDC (half double crochet) SC+HDC (complete a full single crochet and a full half double crochet in the same stitch) 3rd LOOP (work stitch into 3rd loop only – see “Special Stitch”)
Special Stitch:
3rd Loop Only Half double crochet stitches have a 3rd loop that we utilize in this pattern. When working in turned rounds, as in this pattern, the 3rd loop can be found just below the front loop on the side of the work that is facing you. When instructed to work in “3rd loop only”, insert your hook into this special loop. This creates a delicate braided look on the opposite side of the pattern.
Notes: (1) This pattern is written in American Standard Terms.
(2) CH1s at the beginning of rounds do not count as a stitch in the final stitch count.
(3) To resize earwarmer, your starting chain can be any odd number.
(4) Pattern is written for toddler size with additional sizes in brackets [child, teen, adult]. So, for example, if it says “CH71 [75, 85, 89]”, the first number is for the toddler size, and the numbers in brackets are child, teen, and adult instructions, respectively. If you are working from printed instructions, it helps to circle or highlight the numbers you are following before you begin.
(5) Knowing where to place your first stitch can be tricky when working in joined rounds. Usually, it doesn’t matter as long as you’re consistent, but for this pattern, it does matter… especially from Round 4 on! So, here is an image to help you identify where to put your first stitch. Because Round 4 instructs you to skip the first stitch, you will put your SC+HDC combo in the stitch marked as the 2nd stitch (which is also easy to find thanks to the spaces created by the SC+HDC combos from Round 3).
INSTRUCTIONS
To begin: CH71 [75, 85, 89].
Round 1: HDC in 2nd CH from hook and in each remaining CH. Bring ends together, without twisting, and join to the top of the first ST with a SL ST. (70 [74, 84, 88])
Round 2: CH1, turn. SC in 3rd loop of each ST around. Join to the top of the first ST with a SL ST. (70 [74, 84, 88])
Rounds 3-14 [3-16, 3-18, 3-18]: CH1, turn. SK first ST, SC+HDC in next ST. (SK next ST, SC+HDC in next ST) around. Join to the top of the first ST with a SL ST. (70 [74, 84, 88])
Round 15 [17, 19, 19]: CH1, turn. HDC in each ST around. Join to the top of the first ST with a SL ST. (70 [74, 84, 88])
Round 16 [18, 20, 20]: CH1, turn. SC in 3rd loop of each ST around. Join to the top of the first ST with a SL ST. (70 [74, 84, 88])
Fasten off, leaving a long tail for cinching. Use yarn needle and starting tail to sew the small gap between the first and last stitches of Round 1 closed, then weave in that tail only.
Cinching
1. Thread the long finishing tail through your yarn needle and gently set it aside. Gather the seamed section of the headband, and fold in half so that the fold is facing you.
2. Holding on to the fold with one hand, use your other hand to pinch the upper half in half again. The top edge of the earwarmer should be facing down. Grasp the fold together with the first fold, then repeat with the bottom section. When you’re finished, you should be pinching three folds together, with both the top and bottom edges of the earwarmer facing down.
3. Run your yarn needle through all three sections of gathered material. The closer you get to the surface, the better your cinch will look; so I run mine right under just a couple strands of each fold.
4. Wrap the yarn around the underside of the cinch, then through the sections again. Do this a few times to secure the cinch, then thread the needle up through the 1st hole of the button and back down through the 2nd hole, position it on the cinch, and wrap yarn around to the underside to tie off. (If your button has four holes, complete the first two, wrap yarn around the bottom, then come back and complete the last two before tying off.) Weave in the tail.
Done! If you’re sharing on social media, be sure to hashtag #hopeearwarmer and tag me @yarnandchai.design. Stay warm out there!