Category: Miscellaneous

  • Striped Towel Holder

    Striped Towel Holder

    This pattern is part of the Yarn + Chai Spring 2023 Crochet-Along.
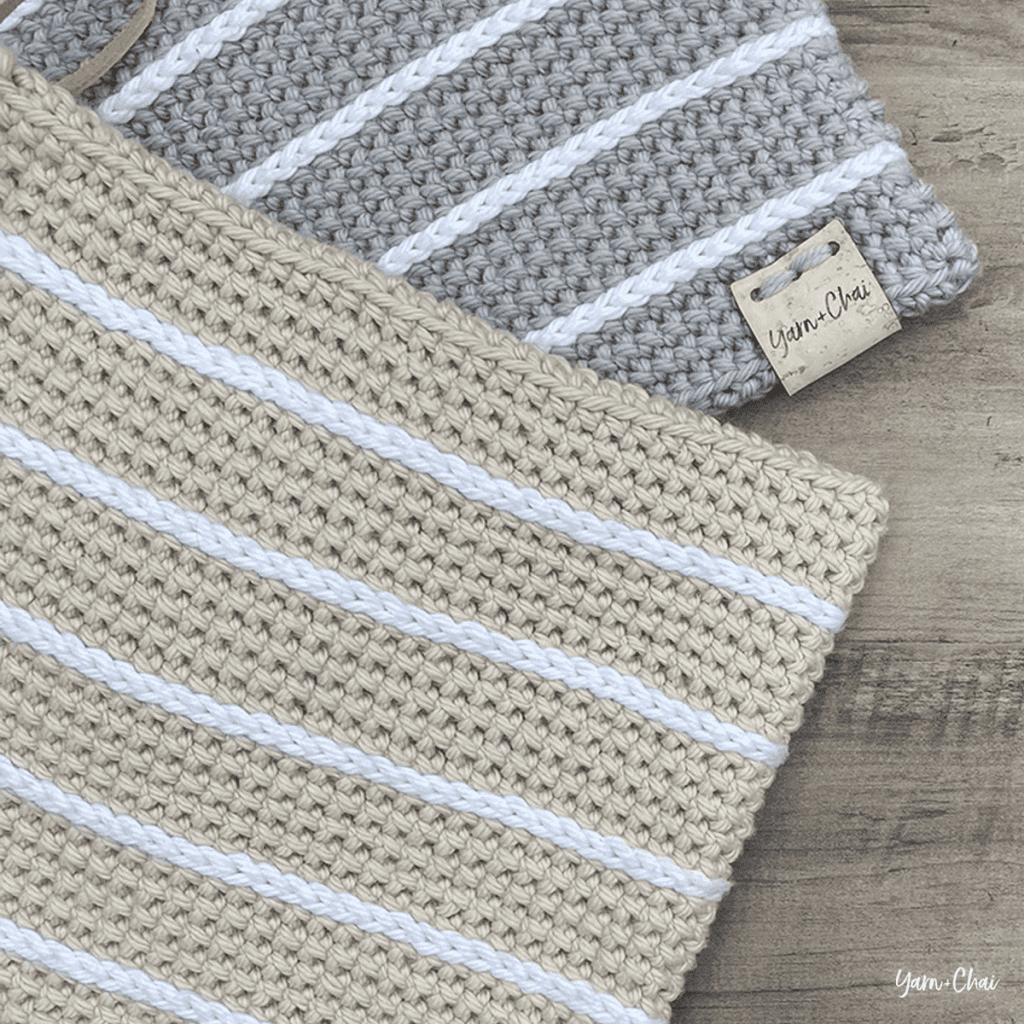
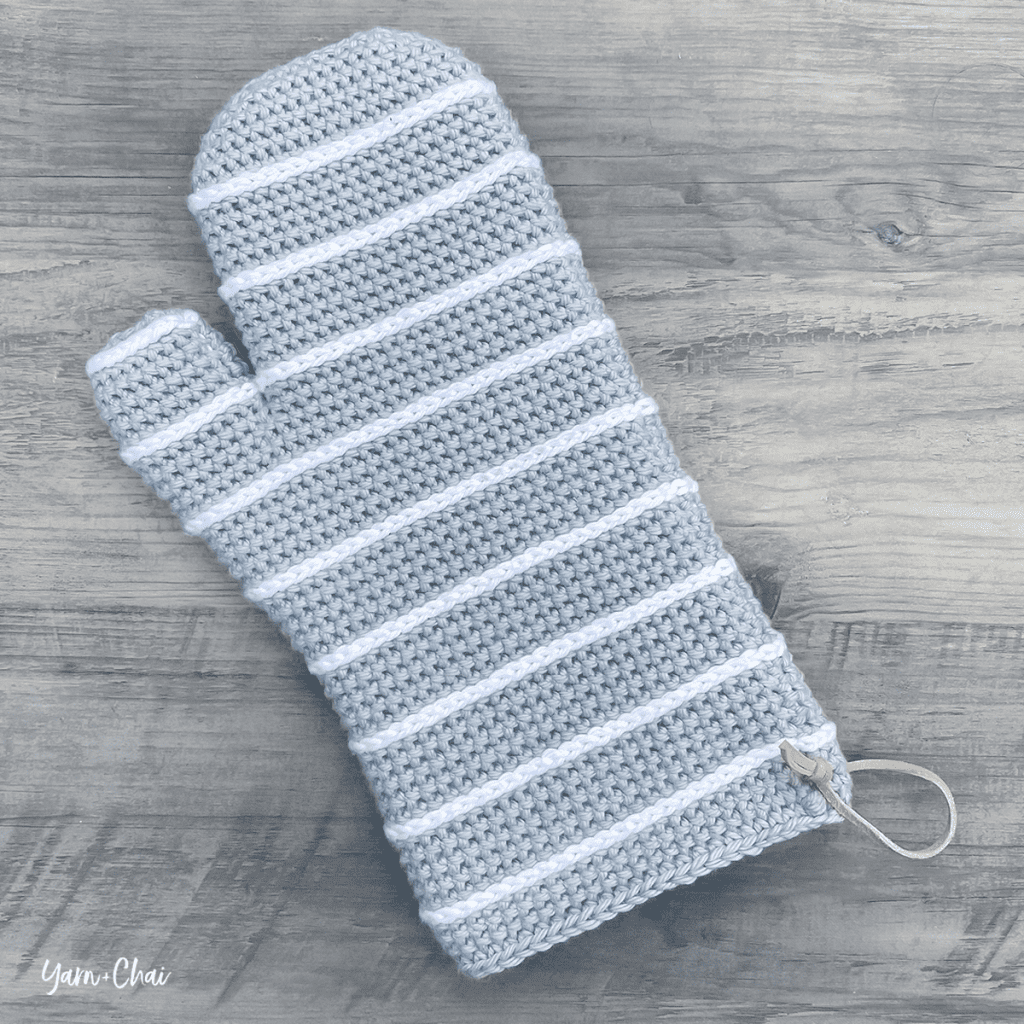
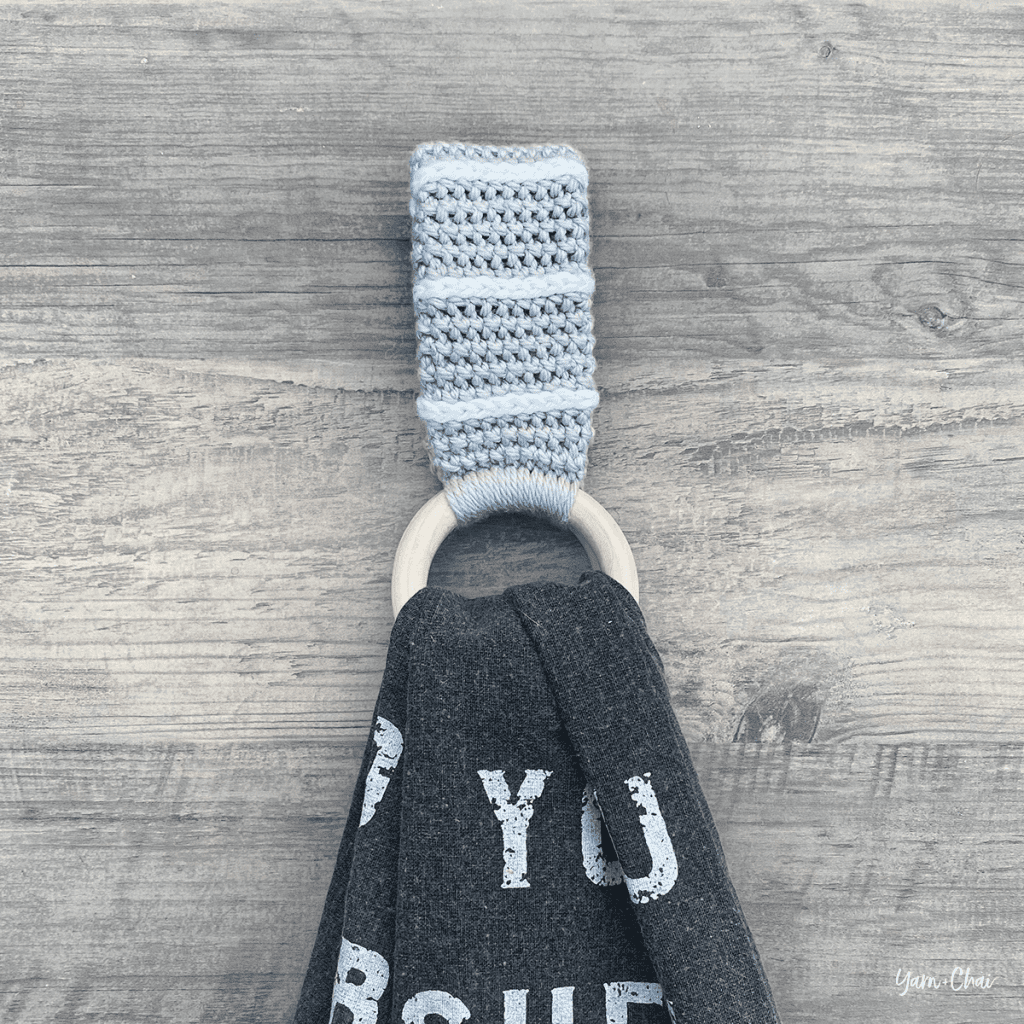
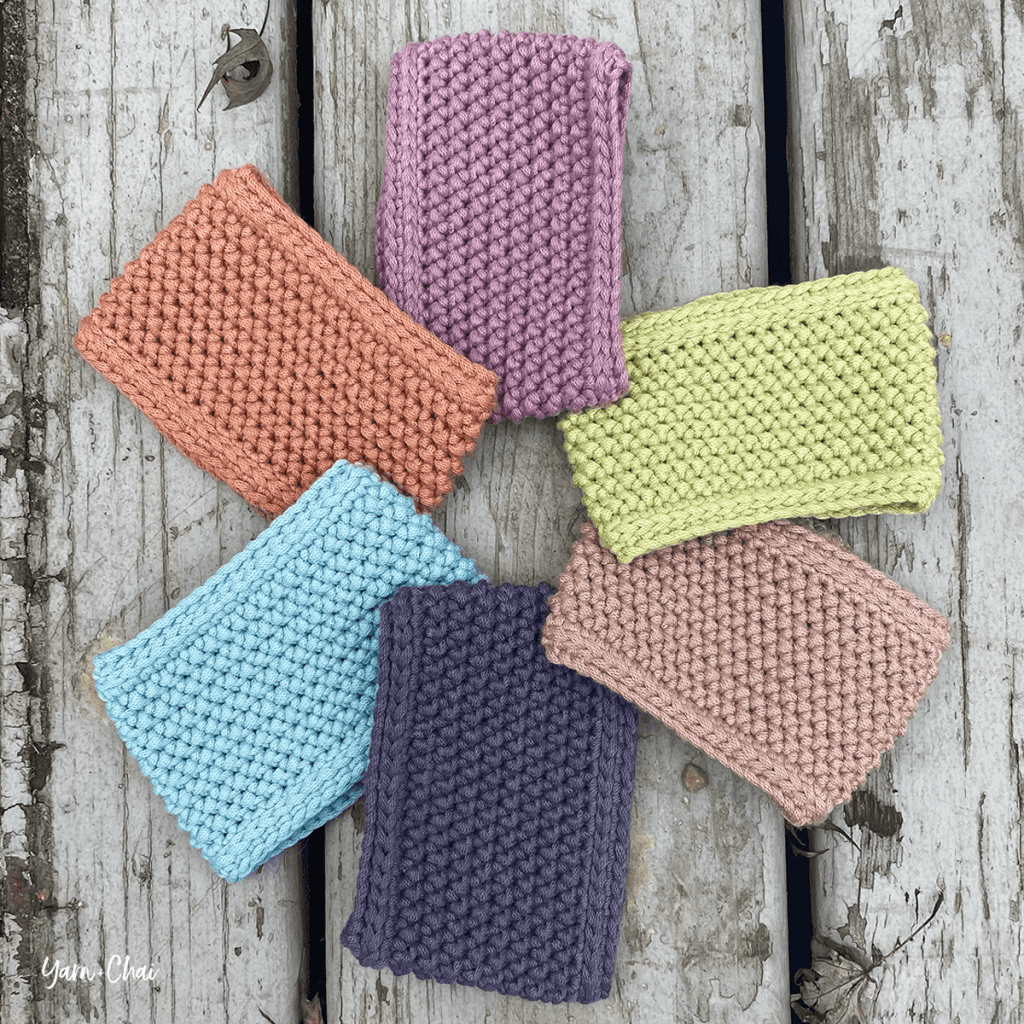
    The final pattern in our kitchen-themed CAL is this cute and functional towel holder!
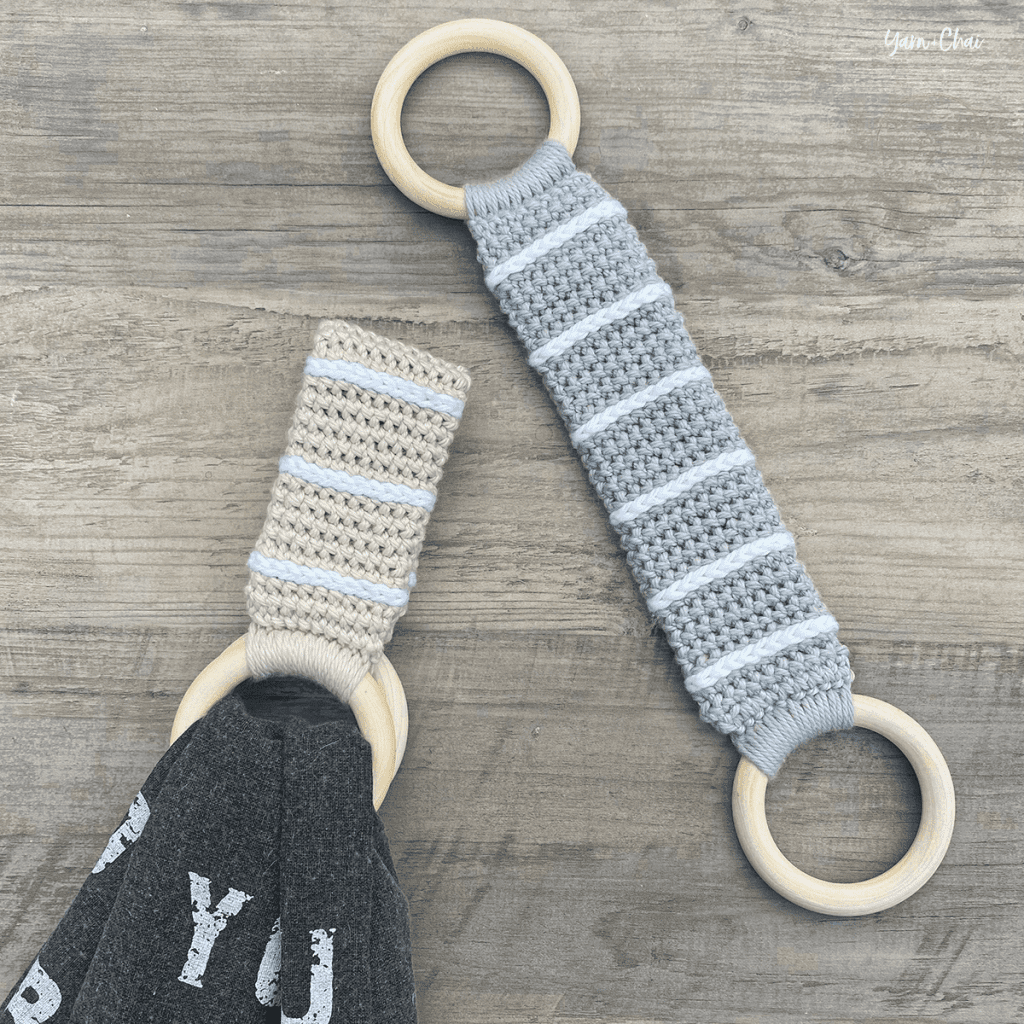
    I went with the wooden ring style of towel holder because I love how it allows you to change out the towel whenever you need to without wearing out the crocheted part from over-washing.

    The Striped Towel Holder is part of a matching set of three cute + modern kitchen accessories, which are all available as part of my Spring 2023 Crochet-Along. I strongly recommend completing each individual project in order (potholder, oven mitt, towel holder), as the techniques involved do build on each other somewhat.
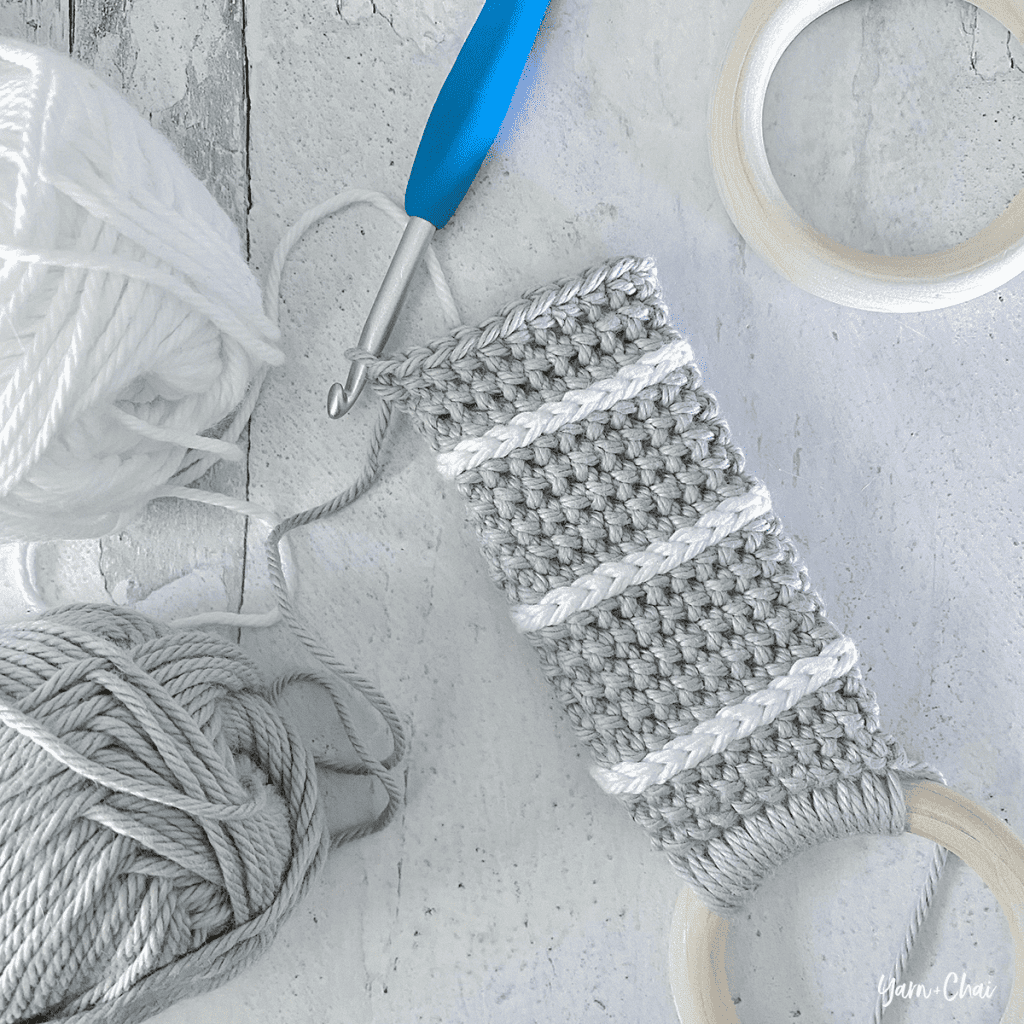
    Here is where you’ll be able to find the links for each project:

    About the Yarn

    Hobby Lobby’s I Love This Cotton has definitely become my go-to cotton. It’s affordable and soft, and there are lots of colors available! But there are several other cottons to choose from when crocheting kitchen items. Here are a few other options you could use:

    • K + C Essential Cotton (available at Joann Fabrics)
    • Lily Sugar ‘n Cream
    • Lion Brand 24/7 Cotton
    • Yarn Bee Fundamental Cotton (available at Hobby Lobby)

    Whatever you pick, make sure it’s a 100% cotton yarn if you’ll be making the coordinating potholder and oven mitt. Other fibers like wool and acrylic will melt if they get too hot… and what a mess that would be!

    Prefer a PDF?

    This pattern can be completed using the 100% free version right here on this page. However, many people prefer the convenience of a printable, ad-free PDF to holders of an All Access Pass.

    – – – – – – – – – – – – – –

    Striped Towel Holder

    Difficulty: Easyish

    Crochet Language: American Standard

    Finished Size: 8.5″ long x 1.75″ wide (laid flat), not including wooden rings. When in use, towel will hang about 5.5″ from top.

    Yarn: I used Hobby Lobby’s I Love This Cotton, but you can use your favorite #4 weight kitchen cotton. You’ll need approximately 50 yards of BASE COLOR (I used “Parchment” and “Dove” in my samples), and 10 yards of STRIPE COLOR (I used “White”).

    Hook: H (5.5mm), or whichever hook size is needed to achieve gauge.

    Gauge: 20 CSC x 19 rows = 4″ square

    You’ll Also Need: 2 wooden macrame craft rings, large enough to run a towel through. I used 2.75″ wide rings (with an approx. 2″ wide opening).

    Terms and Abbreviations:
    ST/STS (stitch/stitches)
    SL ST (slip stitch)
    CH (chain)

    SC (single crochet)
    CSC (crossed single crochet: Insert hook into stitch. Yarn UNDER, pull through; 2 loops on hook. Yarn over, pull through both loops.
    FLO (front loop only)
    JOIN (Join with a SL ST to the top loops of the first ST of the round)

    Notes:
    (1) Pattern is worked in joined, unturned rounds. CSC stitches worked into FLO stack nice and straight on top of each other, which allows the seam to stay straight and clean.
    (2) CH1s at the beginning of rounds do not count as stitches in final stitch counts.
    (3) Unless otherwise noted, the first stitch of each round is always worked into the same ST as the CH1.
    (4) The slip stitched stripes (worked in white in my sample) are labeled in the pattern as “STRIPE #1”, “STRIPE #2”, etc. They are not a part of the main round count because when we work these stripes after a round of CSC, the top loops of those CSCs remain exposed so that when we move on to the next round of CSC, we are still working into the loops from the previous round of CSC. (This will probably make more sense once you’ve gotten started!)
    (5) Instructional photos are located below their respective written instructions.

    – – – – – – – – – – – – – – –

    PATTERN

    – – – – – – – – – – – – – – –

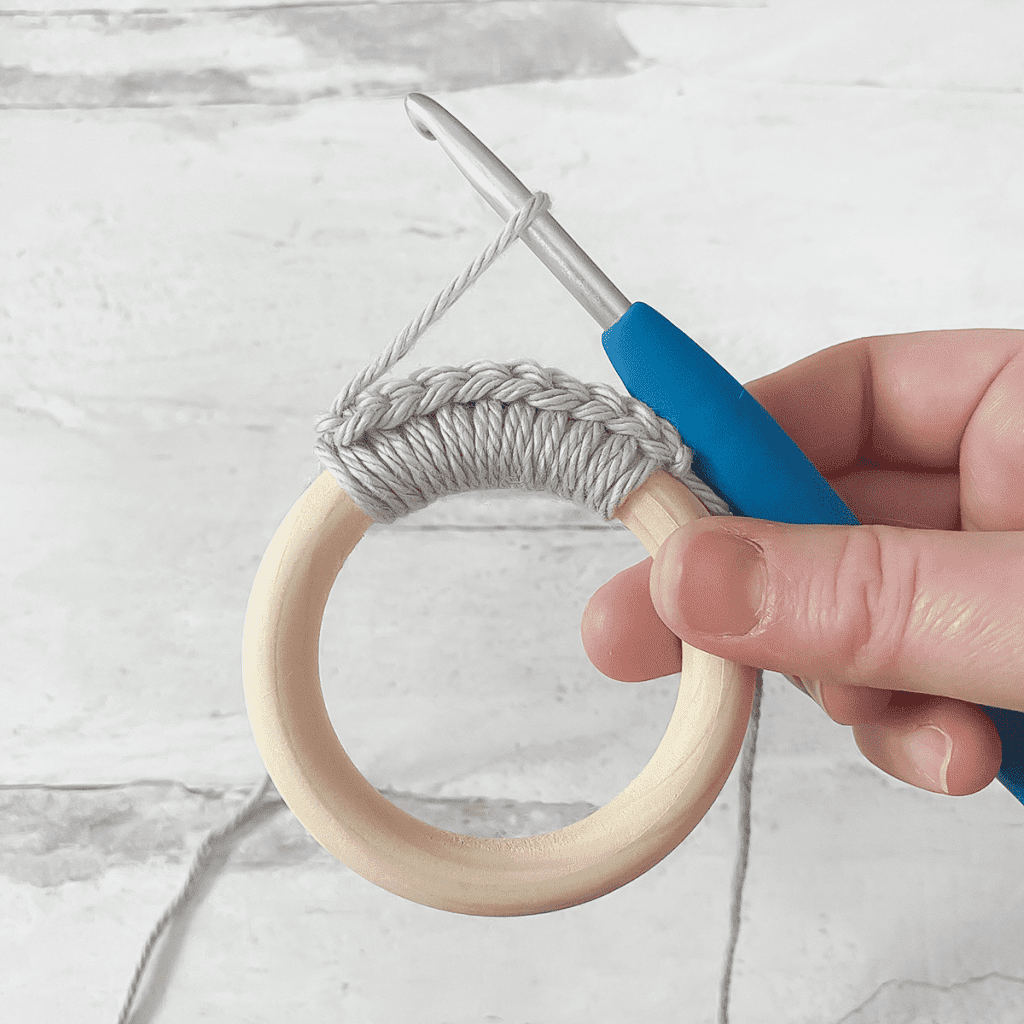
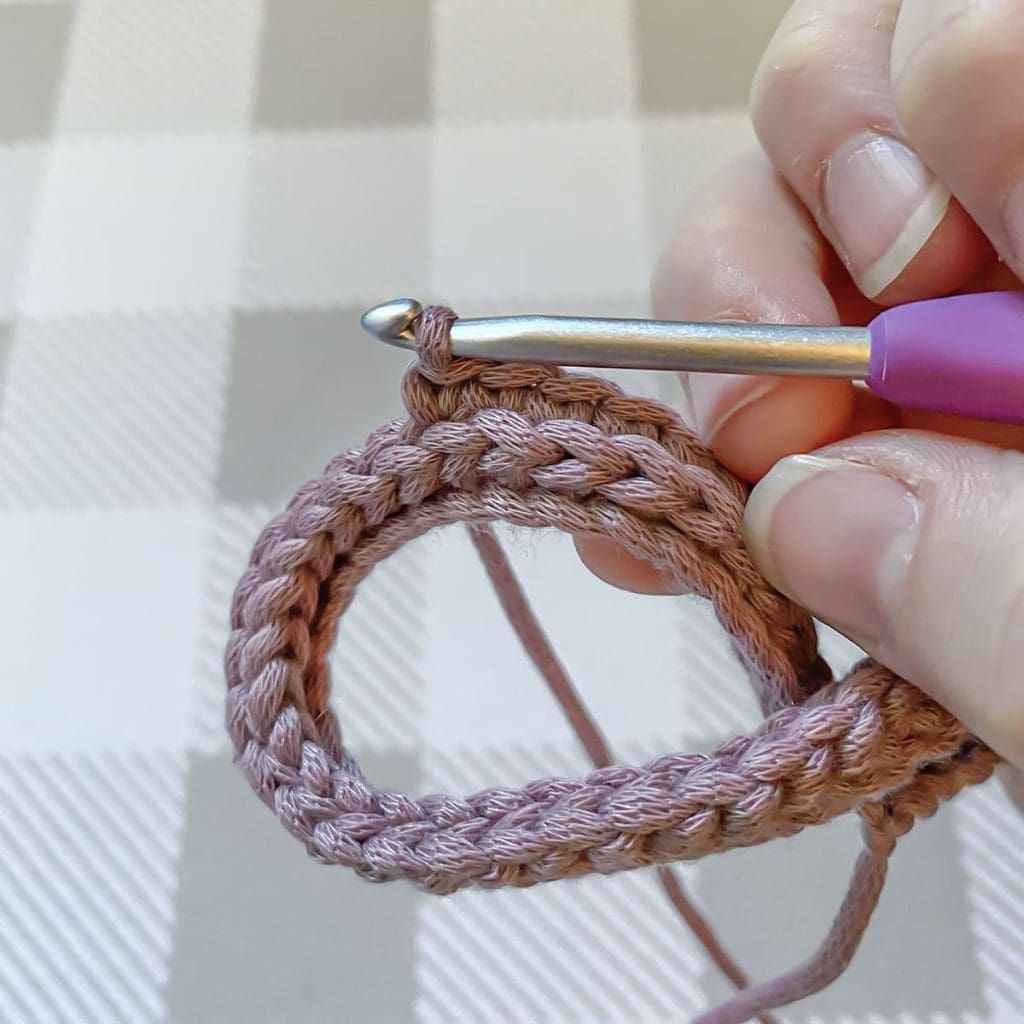
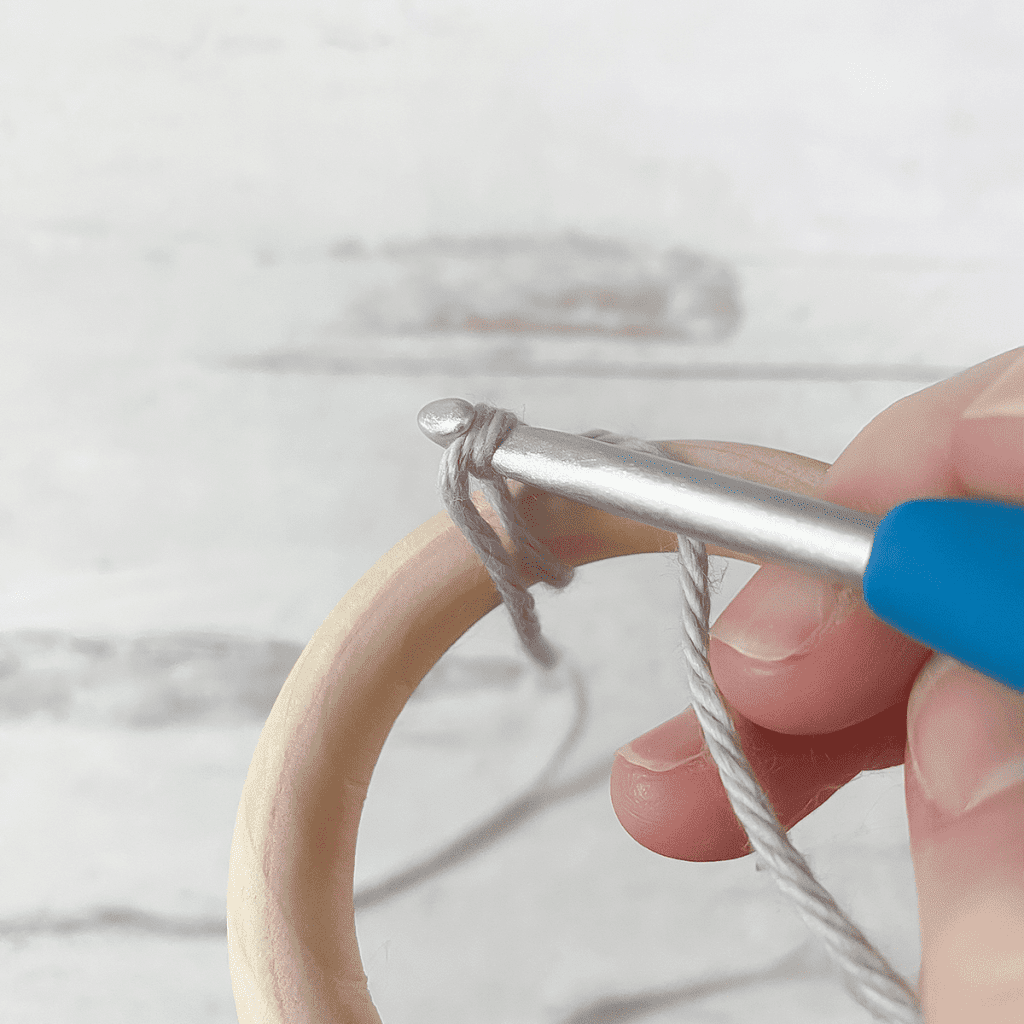
    To begin: With BASE COLOR, make a slipknot (1st image). Drape working yarn over top of ring (2nd image).
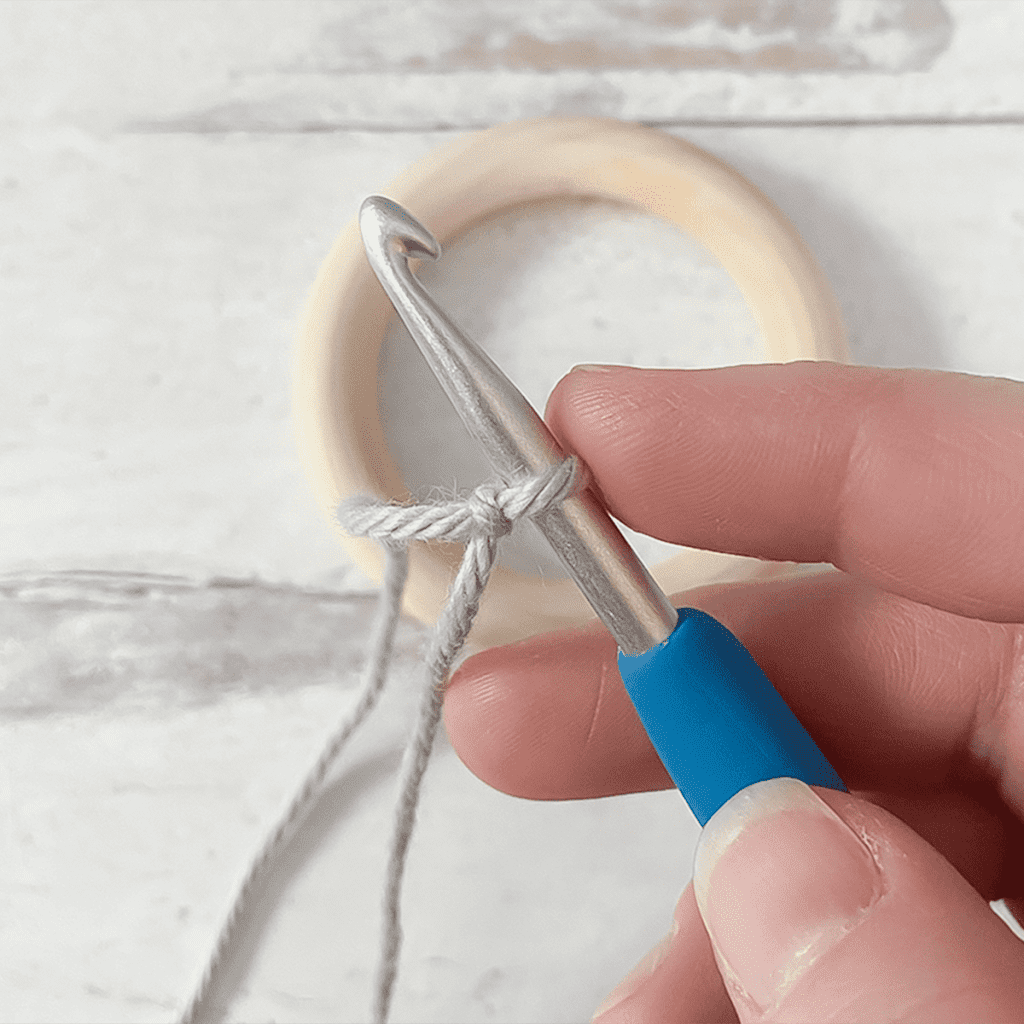
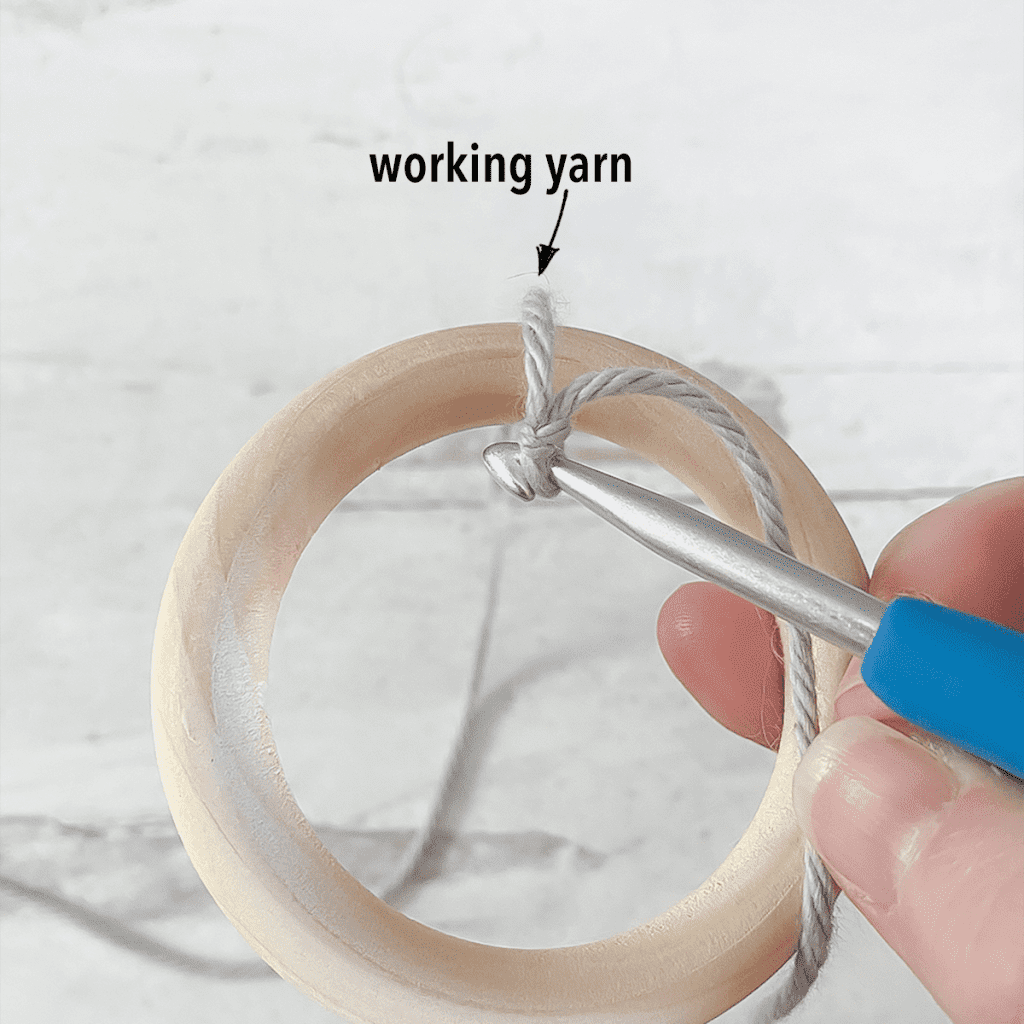
    Base Row: Reach hook through ring opening, yarn over, pull hook back through opening; two loops on hook (1st image — one loop will be loose). Yarn over and pull through both loops — this is your first SC (2nd image). Repeat 9 times for a total of 10 SC (3rd image).
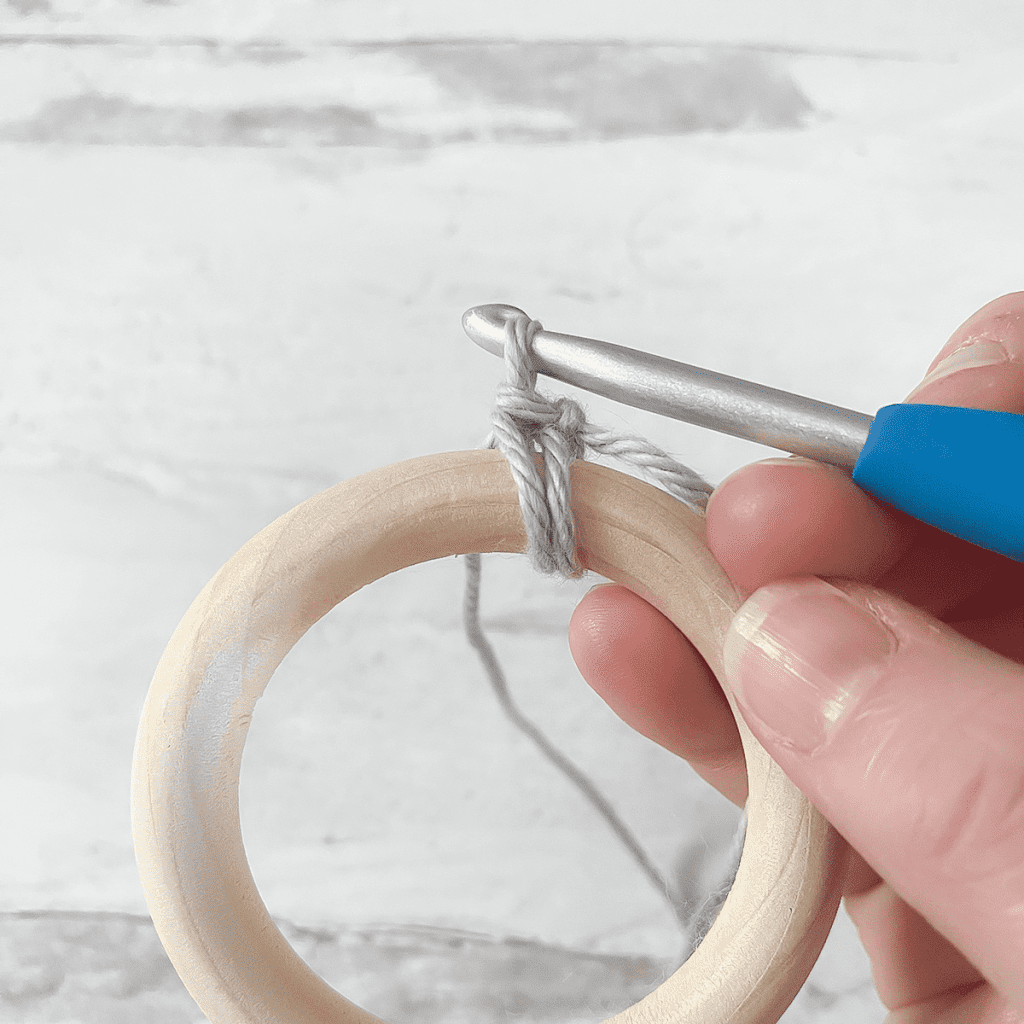
    Tip: If any of the strands around the ring are crossed with each other, you can use a yarn needle to uncross them for a nice clean look.

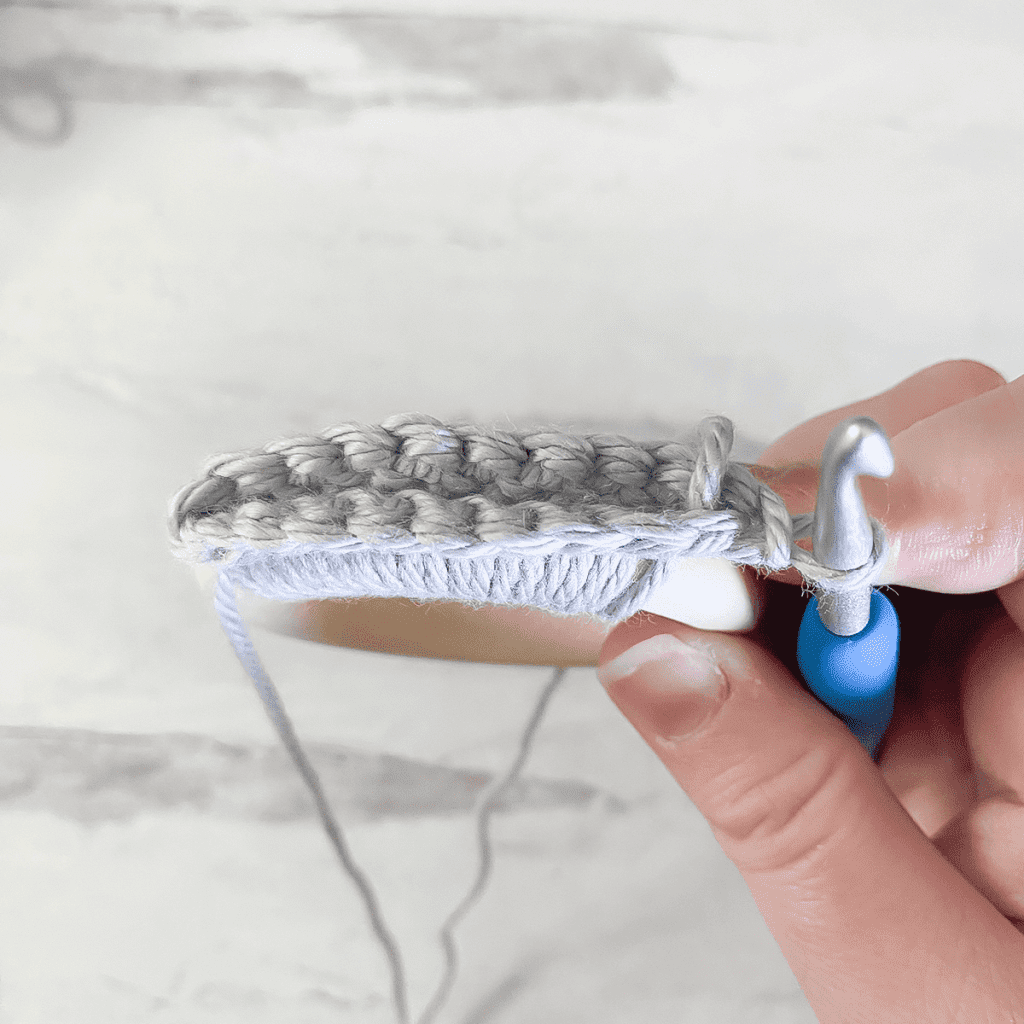
    Round 1: CH1, turn. CSC in FLO of each ST across (1st image). Turn again, and notice the 10 back loops left exposed (2nd image). CSC in each one. Join (3rd image, top view). (20)

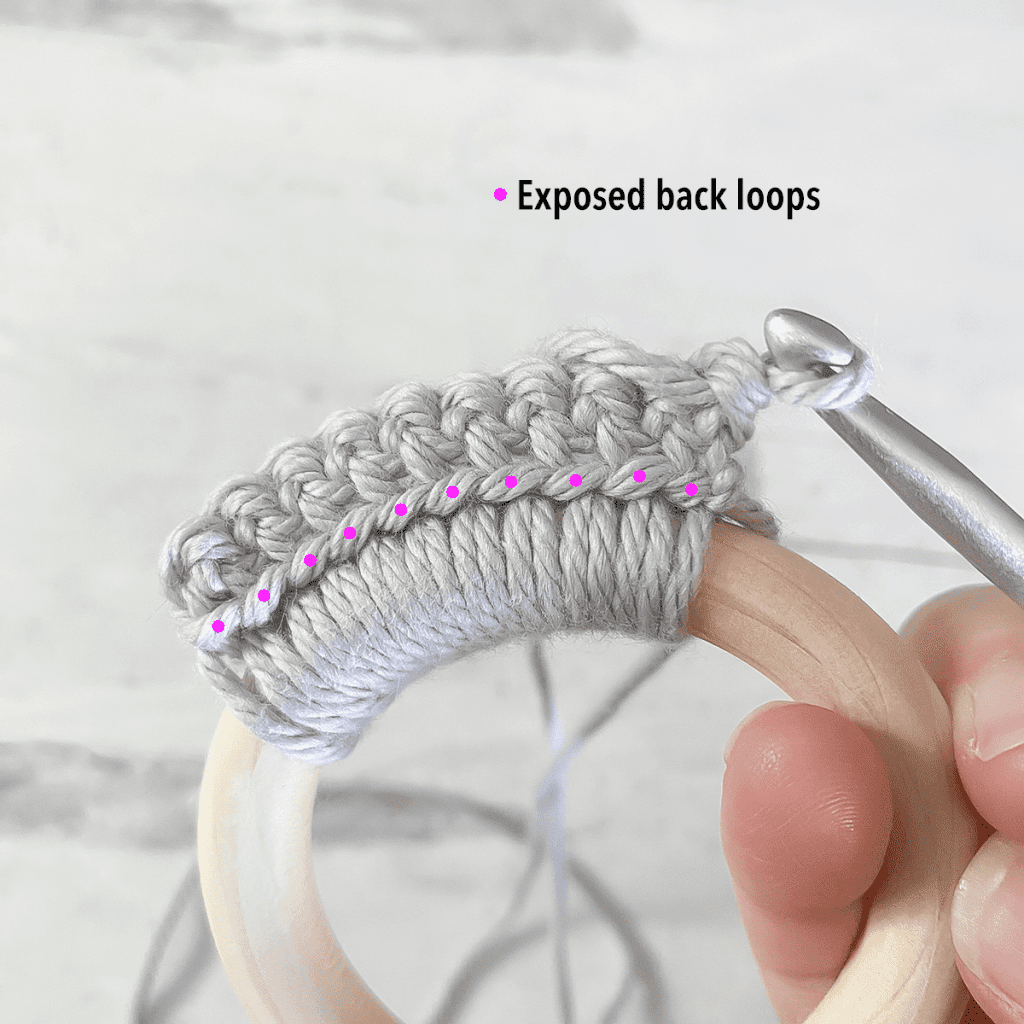
    Rounds 2-3: CH1 (do not turn). CSC in FLO of each ST around. Join. (20)

    Pull up a large loop so that your work doesn’t unravel, then remove your hook.

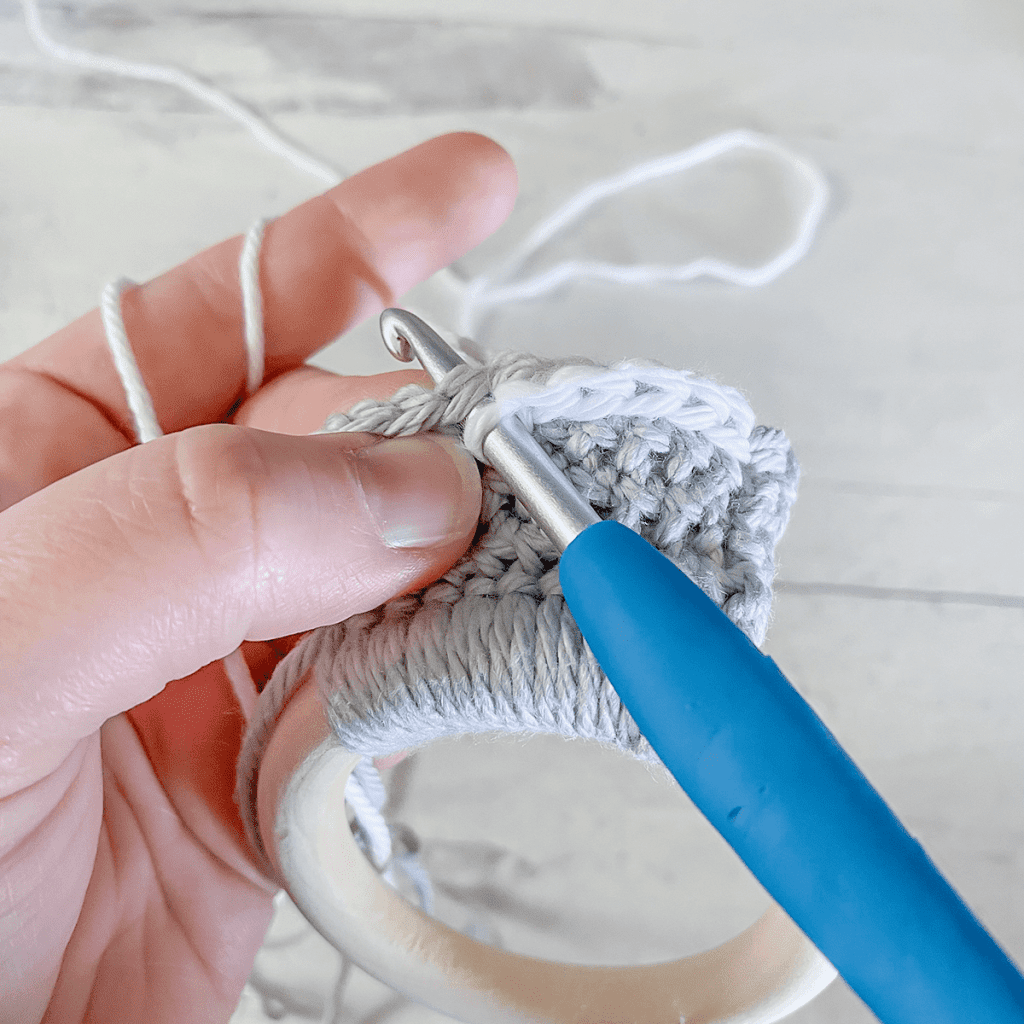
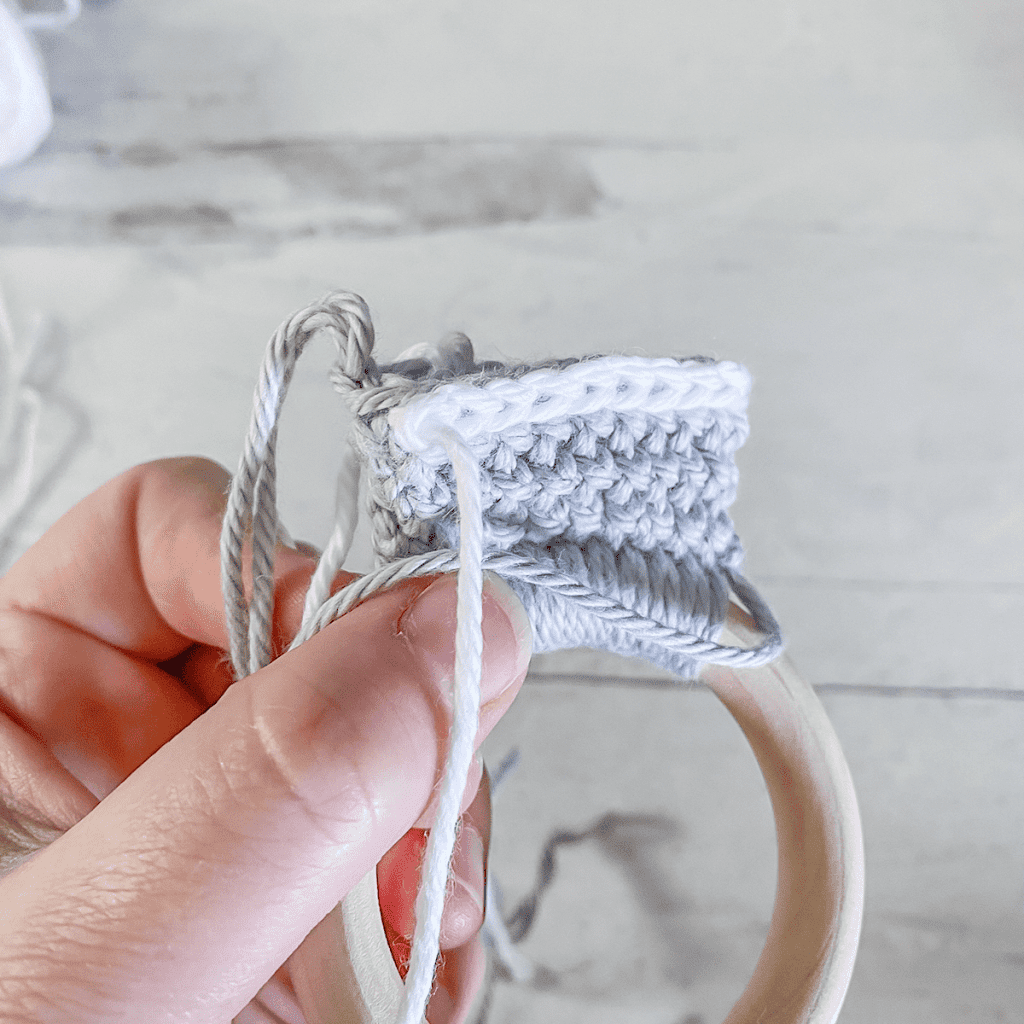
    STRIPE #1: Pull STRIPE COLOR through top loops of first ST of the round. Do not chain; instead, immediately insert hook into next stitch (1st image) and work a SL ST (2nd image). Continue to SL ST in each ST around (3rd image). Fasten off without joining (4th image). (19)

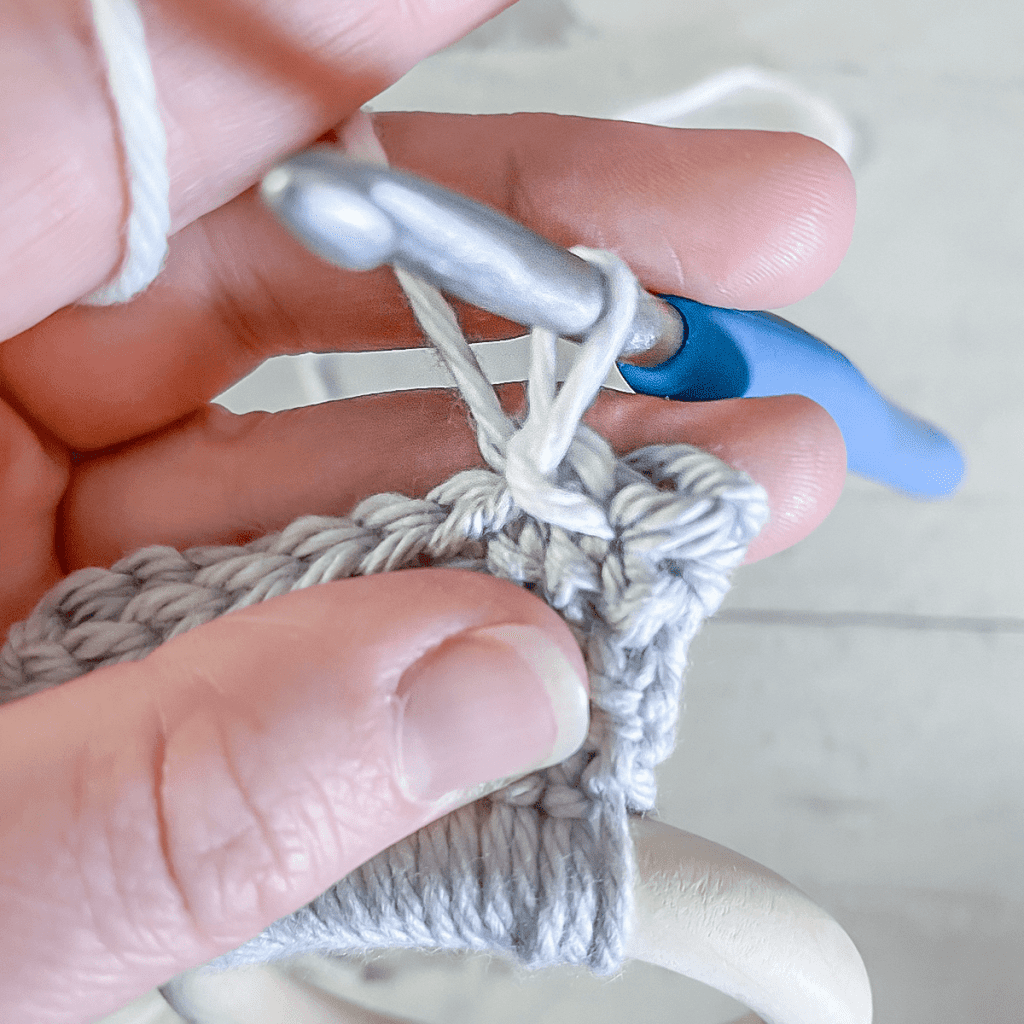
    Notice how the top loops from the previous BASE COLOR round are still visible (image); that’s where you’ll work the next round as we continue on.
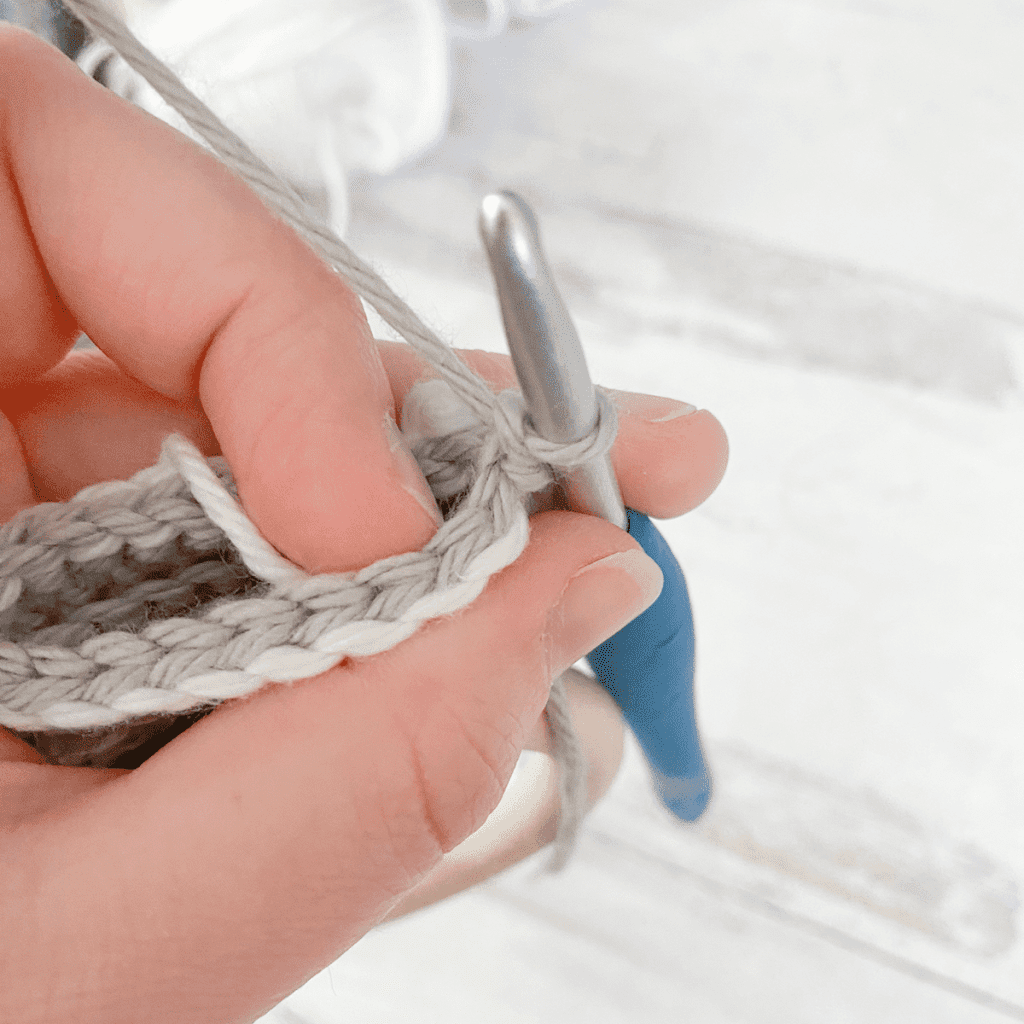
    Round 4: Reinsert hook into loop from BASE COLOR. CH1 (do not turn). CSC in FLO of each ST around. Join. (20)

    At this point, we’re going to PAUSE to take care of our STRIPE ends before they get buried too far inside the project and out of reach. We’ll use our yarn needle to manually create two more stitches to close the gap between the first and last slip stitches, giving us an almost seamless finish for the stripes. Here’s how to do it:
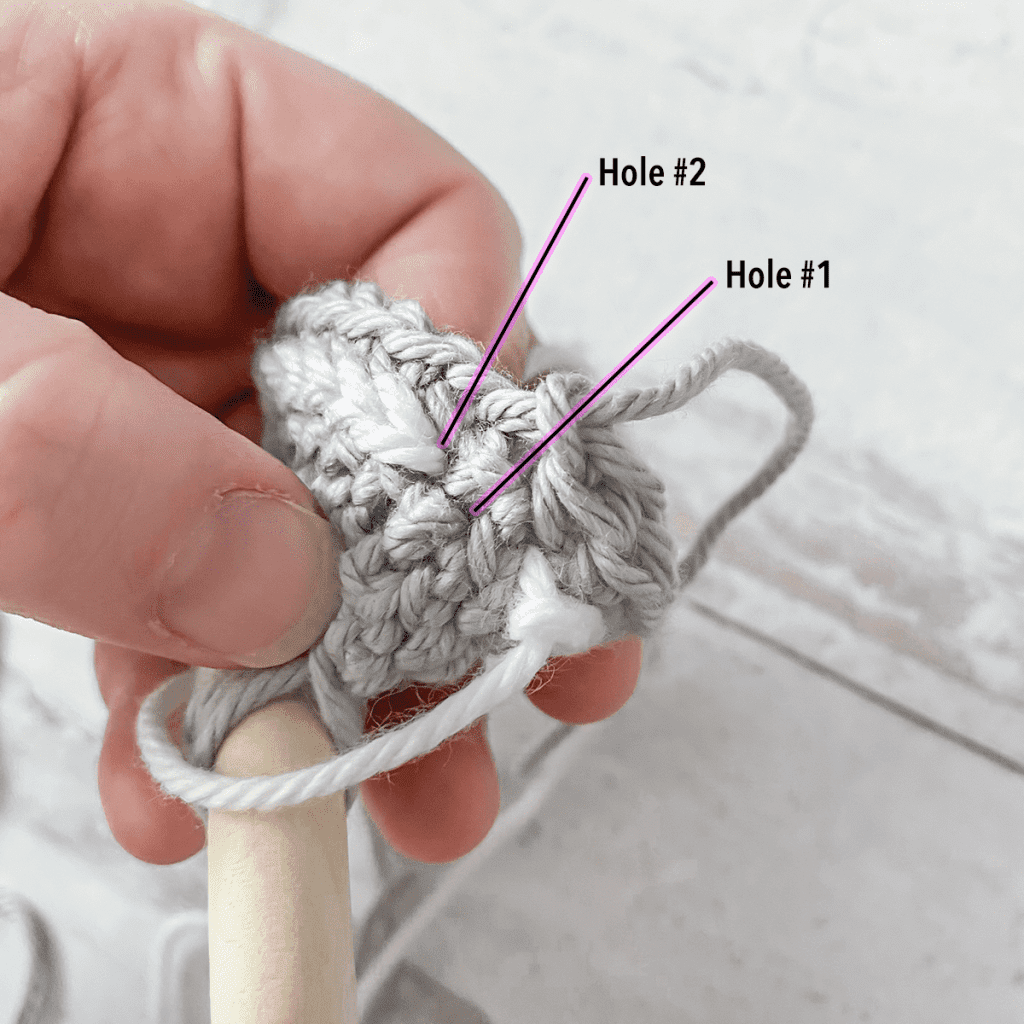
    1. With seam area visible, notice two locations (holes) as marked on the image. Hole #1 is halfway between the first and last slip stitches of the STRIPE round; Hole #2 is where the top loops of the first slip stitch come together (the bottom of the sideways “V”). Keep these locations in mind.
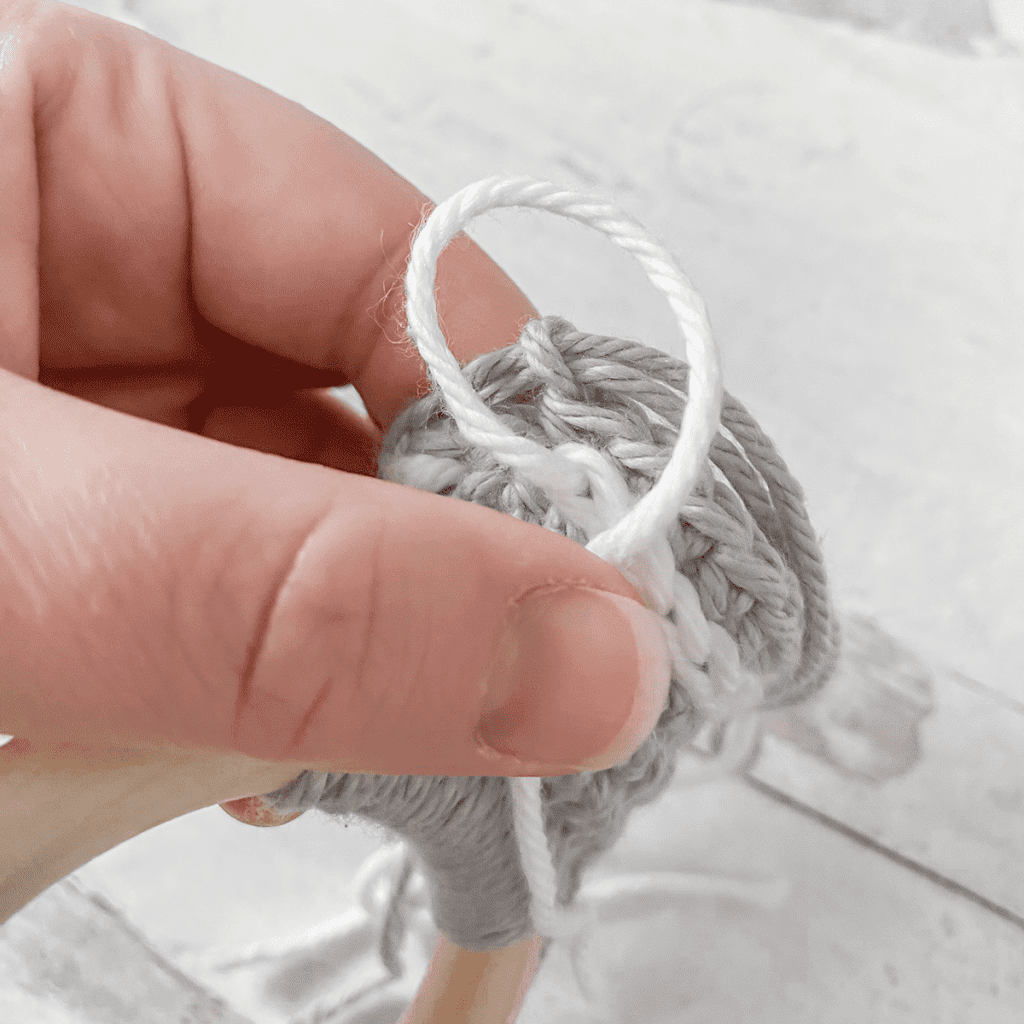
    2. Thread finishing tail through yarn needle, and make a loop. Hold it in place with your thumb.
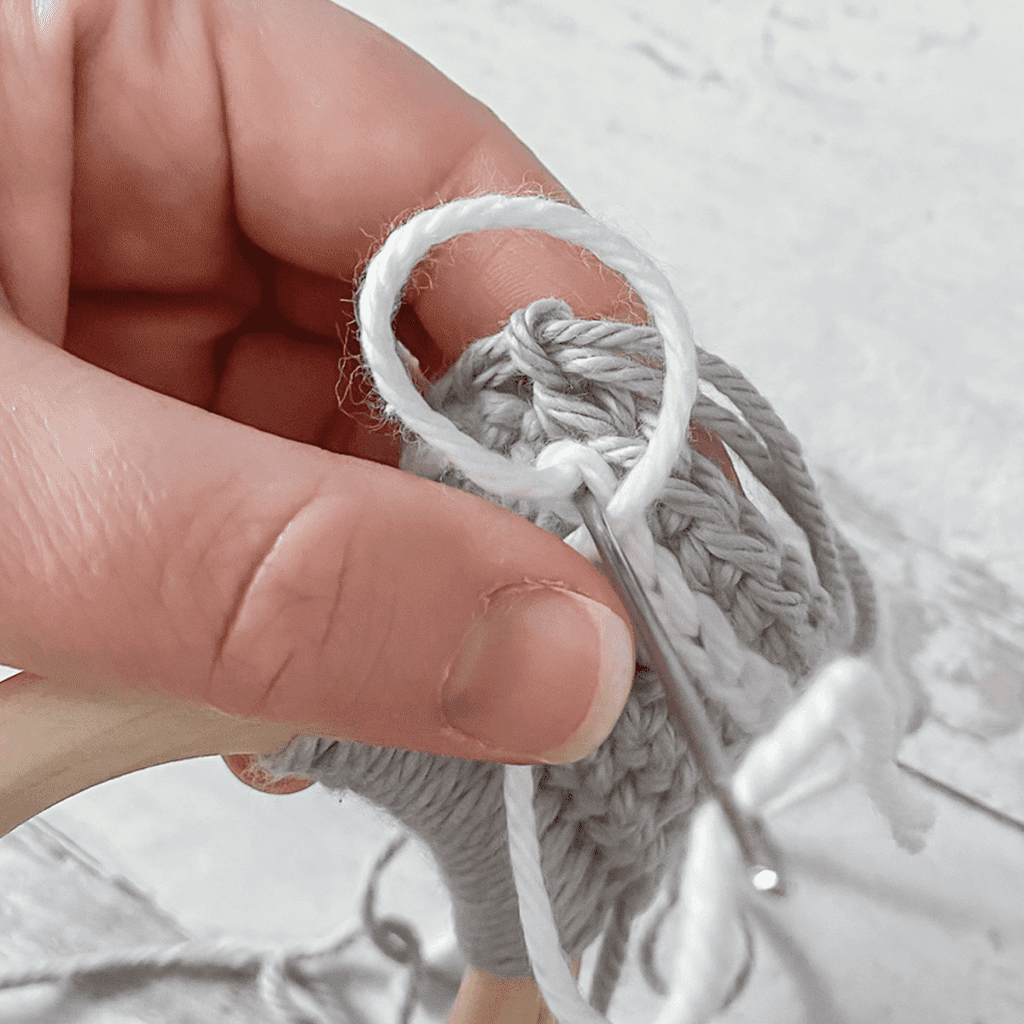
    3. Insert yarn needle down between the two loops of the last SL ST (same place the tail is coming from) …
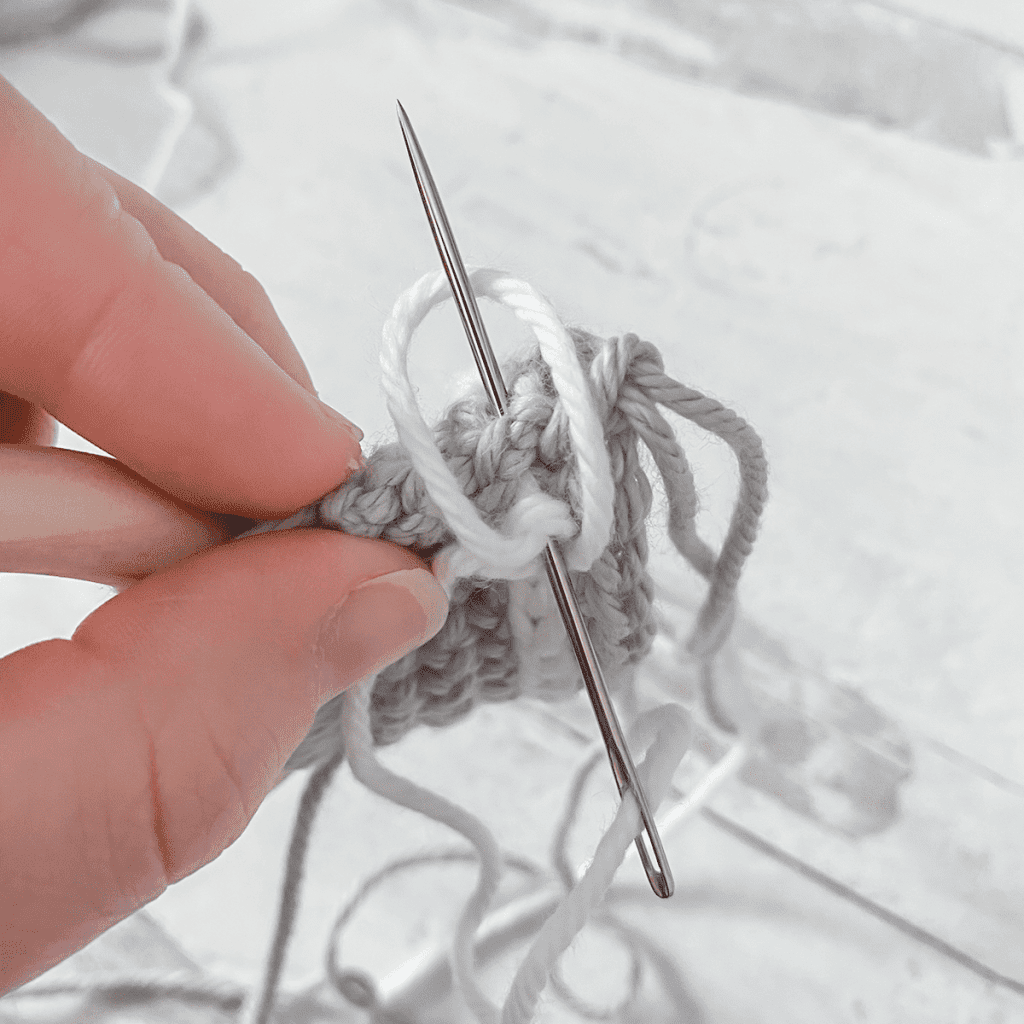
    4. … and up through Hole #1, making sure it travels up through the loop you created.
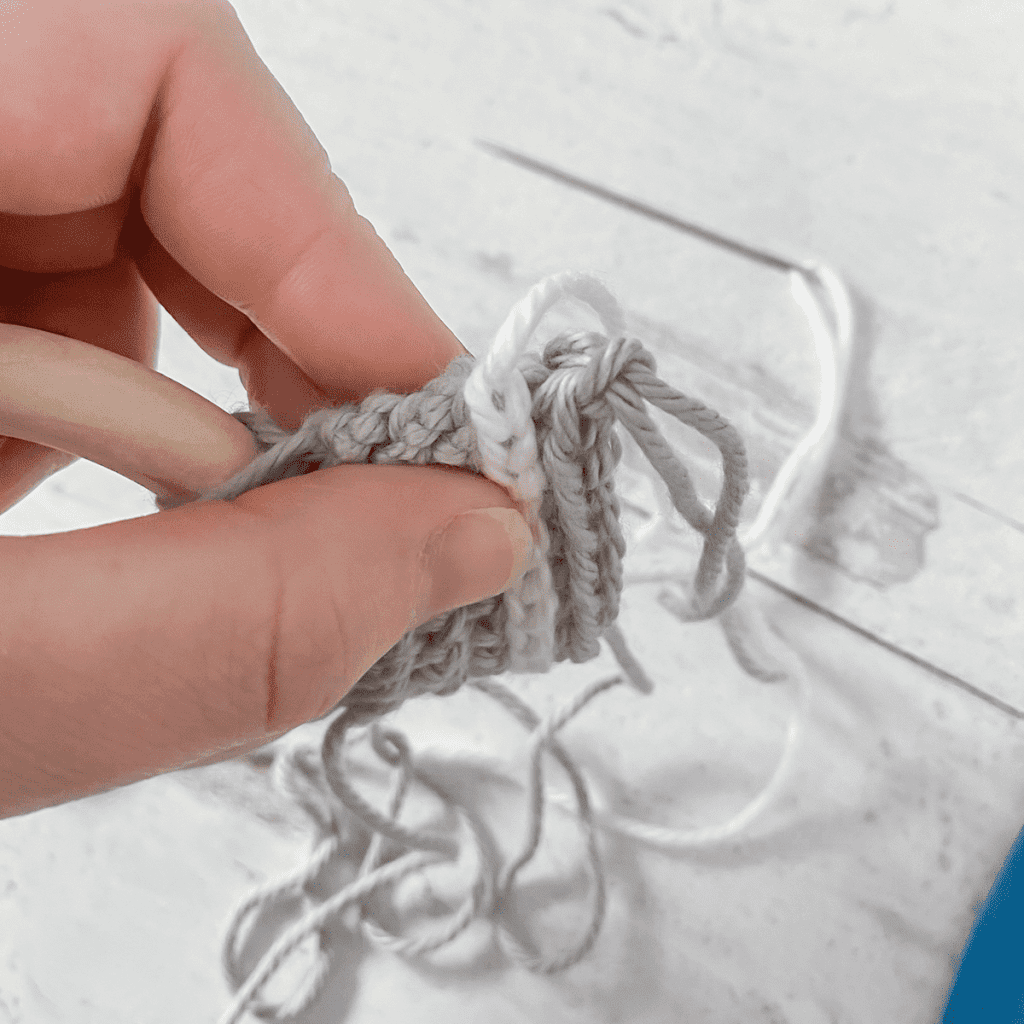
    5. Pull it through; you’ll see our first manually-created stitch form.
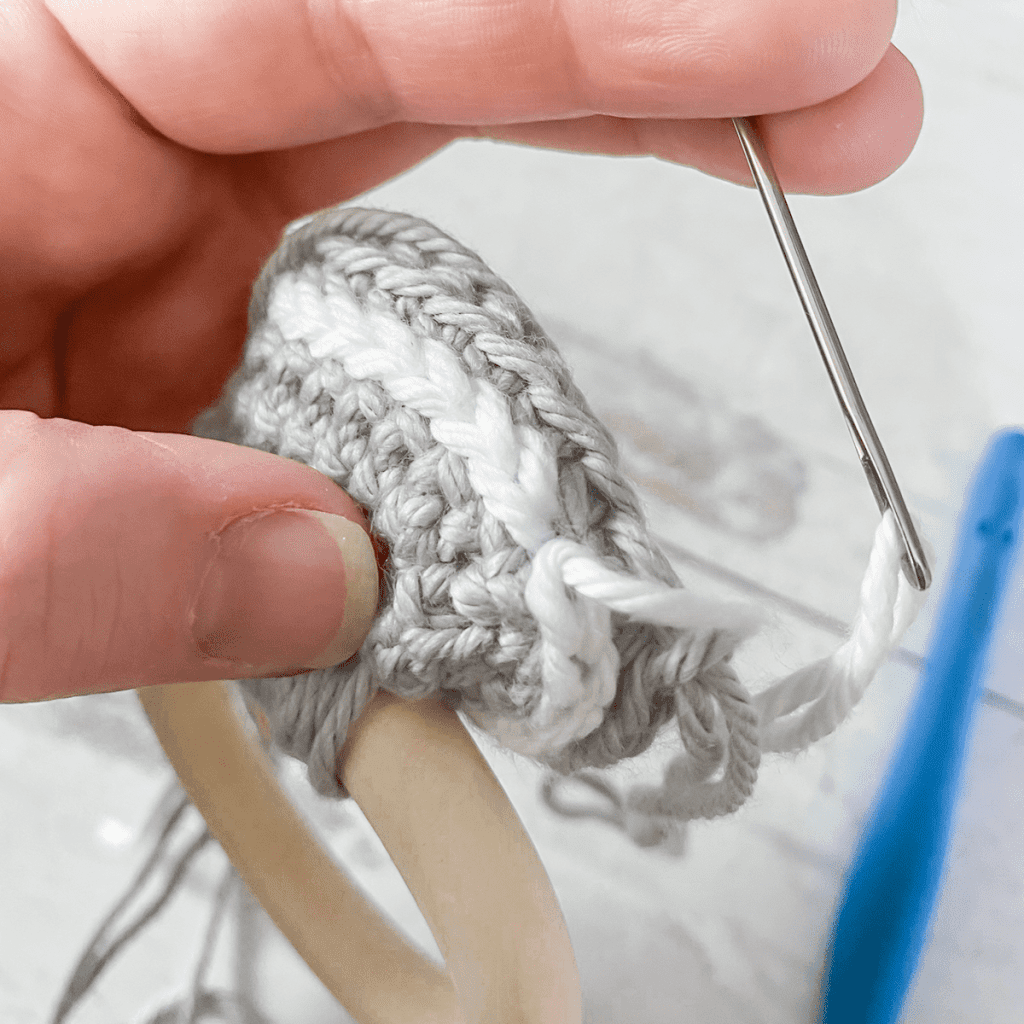
    6. Repeat the process: Make a loop, insert needle down into the same place the tail is emerging from, and up through Hole #2 this time. Pull through. Image shows what it should look like once you’ve finished both stitches.
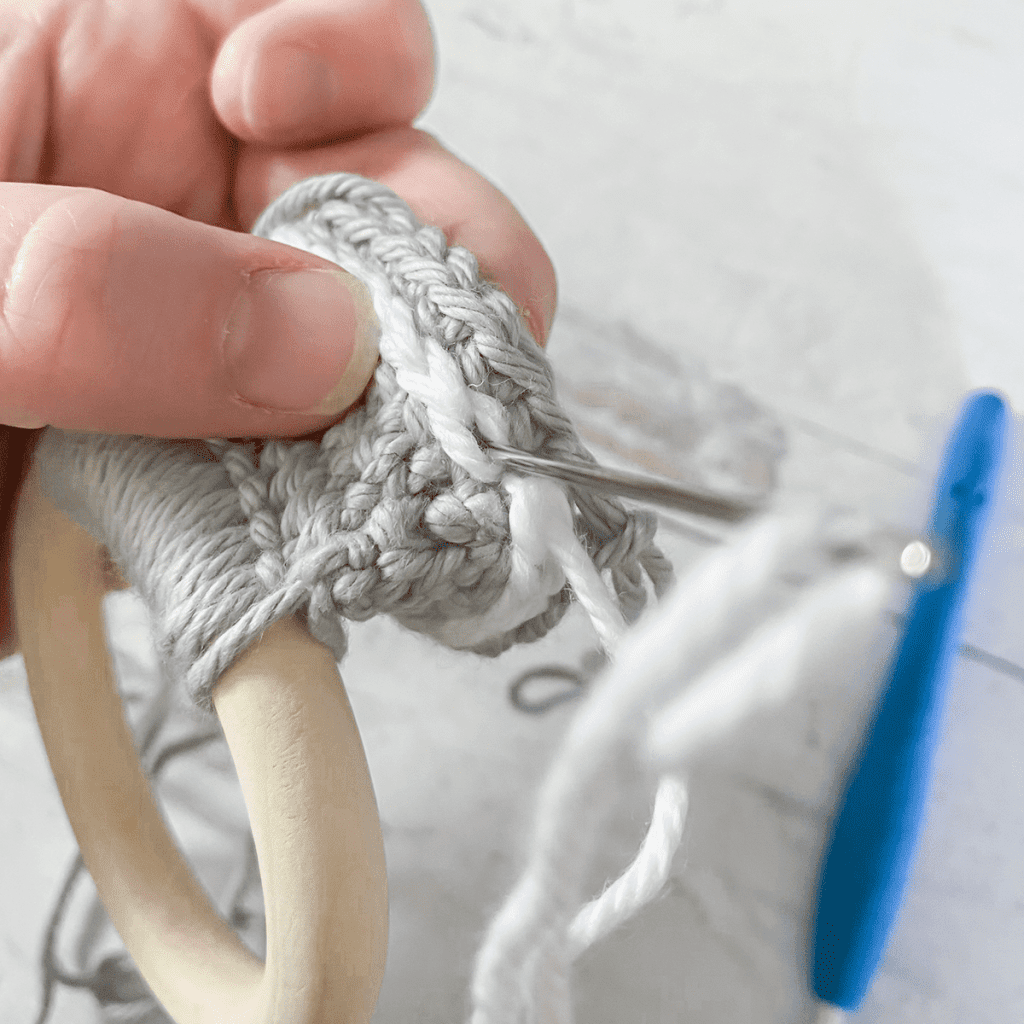
    7. We need the finishing tail on the inside of our project, so insert yarn needle into the first slip stitch of the round …
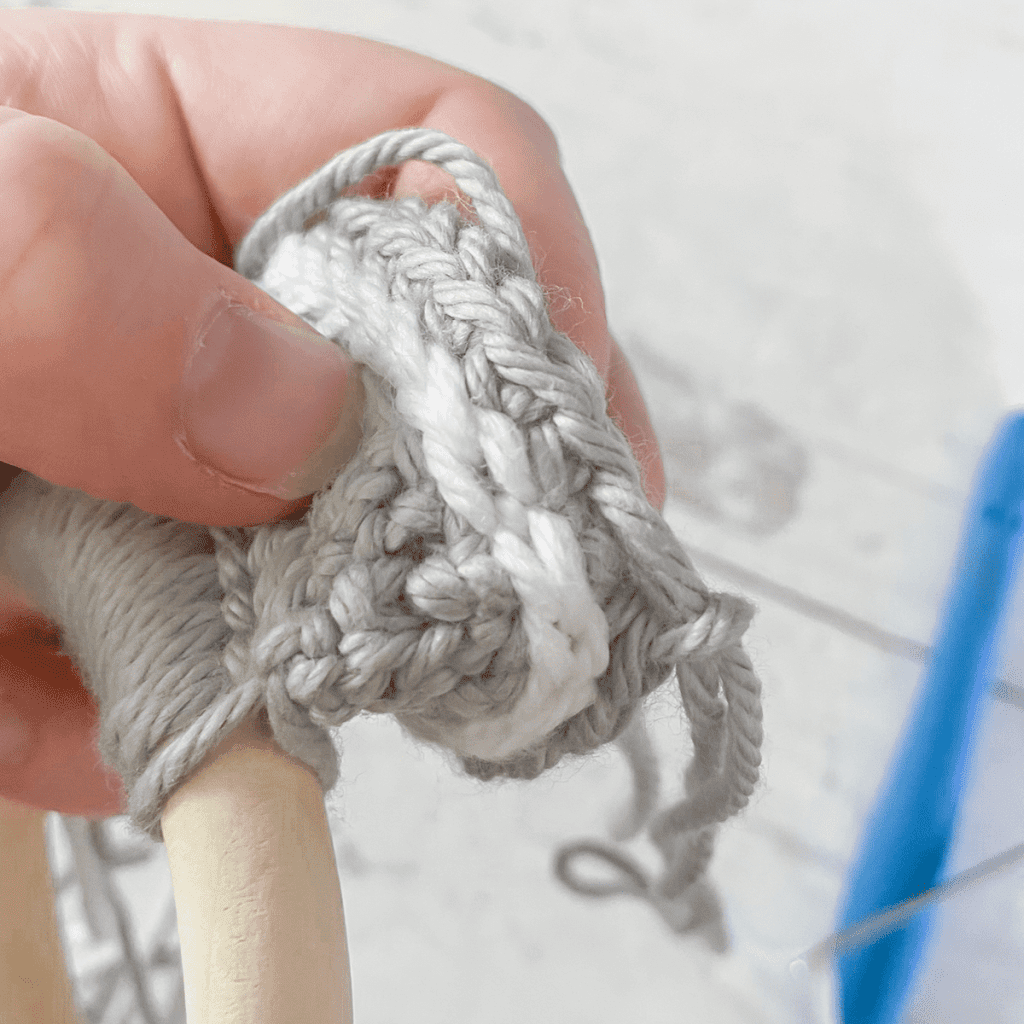
    8. … and pull it tight.
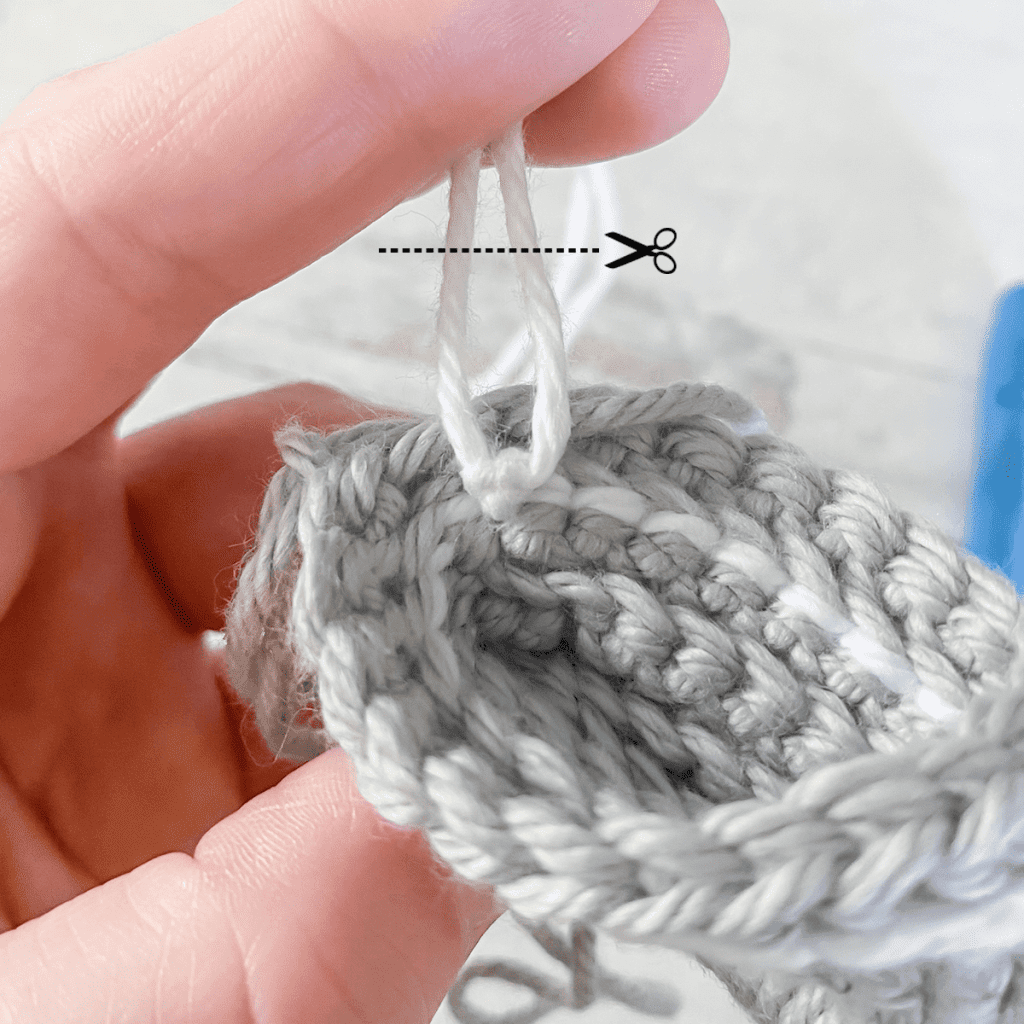
    9. Tie 3 or 4 knots with the yarn tails, then trim the excess yarn. (This will be hidden inside the project, but if you would rather weave in your ends, go ahead.)

    Continuing on with our pattern…

    Rounds 5-8: CH1 (do not turn). CSC in FLO of each ST around. Join. (20)

    STRIPE #2: Follow instructions from STRIPE #1. (19)

    Round 9: Return to BASE COLOR, CH1 (do not turn). CSC in FLO of each ST around. Join. (20)

    Take care of STRIPE #2 ends the same way you did for STRIPE #1.

    Rounds 10-13: CH1 (do not turn). CSC in FLO of each ST around. Join. (20)

    STRIPE #3: Follow instructions from STRIPE #1. (19)

    Round 14: Return to BASE COLOR, CH1 (do not turn). CSC in FLO of each ST around. Join. (20)

    Take care of STRIPE #3 ends.

    Rounds 15-18: CH1 (do not turn). CSC in FLO of each ST around. Join. (20)

    STRIPE #4: Follow instructions from STRIPE #1. (19)

    Round 19: Return to BASE COLOR, CH1 (do not turn). CSC in FLO of each ST around. Join. (20)

    Take care of STRIPE #4 ends.

    Rounds 20-23: CH1 (do not turn). CSC in FLO of each ST around. Join. (20)

    STRIPE #5: Follow instructions from STRIPE #1. (19)

    Round 24: Return to BASE COLOR, CH1 (do not turn). CSC in FLO of each ST around. Join. (20)

    Take care of STRIPE #5 ends.

    Rounds 25-28: CH1 (do not turn). CSC in FLO of each ST around. Join. (20)

    STRIPE #6: Follow instructions from STRIPE #1. (19)

    Round 29: Return to BASE COLOR, CH1 (do not turn). CSC in FLO of each ST around. Join. (20)

    Take care of STRIPE #6 ends.

    Rounds 30-31: CH1 (do not turn). CSC in FLO of each ST around. Join. (20)

    Fasten off and weave in any ends.


    SEAMING + ADDING SECOND RING
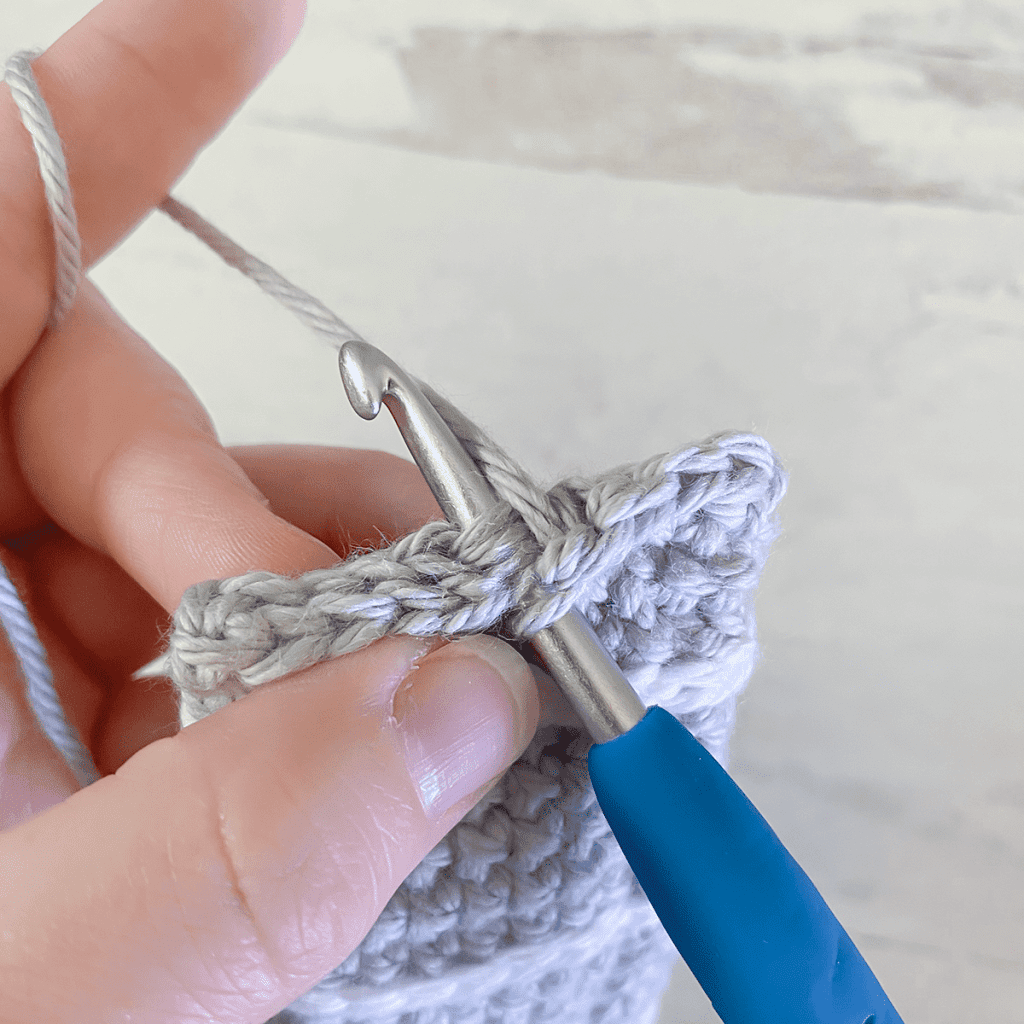
    Lay work flat, make sure seam is straight, and align the top stitches; rejoin BASE COLOR at rightmost stitch, going through all 4 loops (2 loops from the front stitch, and two loops from the corresponding back stitch).

    CH1, CSC in same ST and in each ST across. Fasten off, leaving a long finishing tail (about a yard) for attaching second ring. Weave in starting tail.
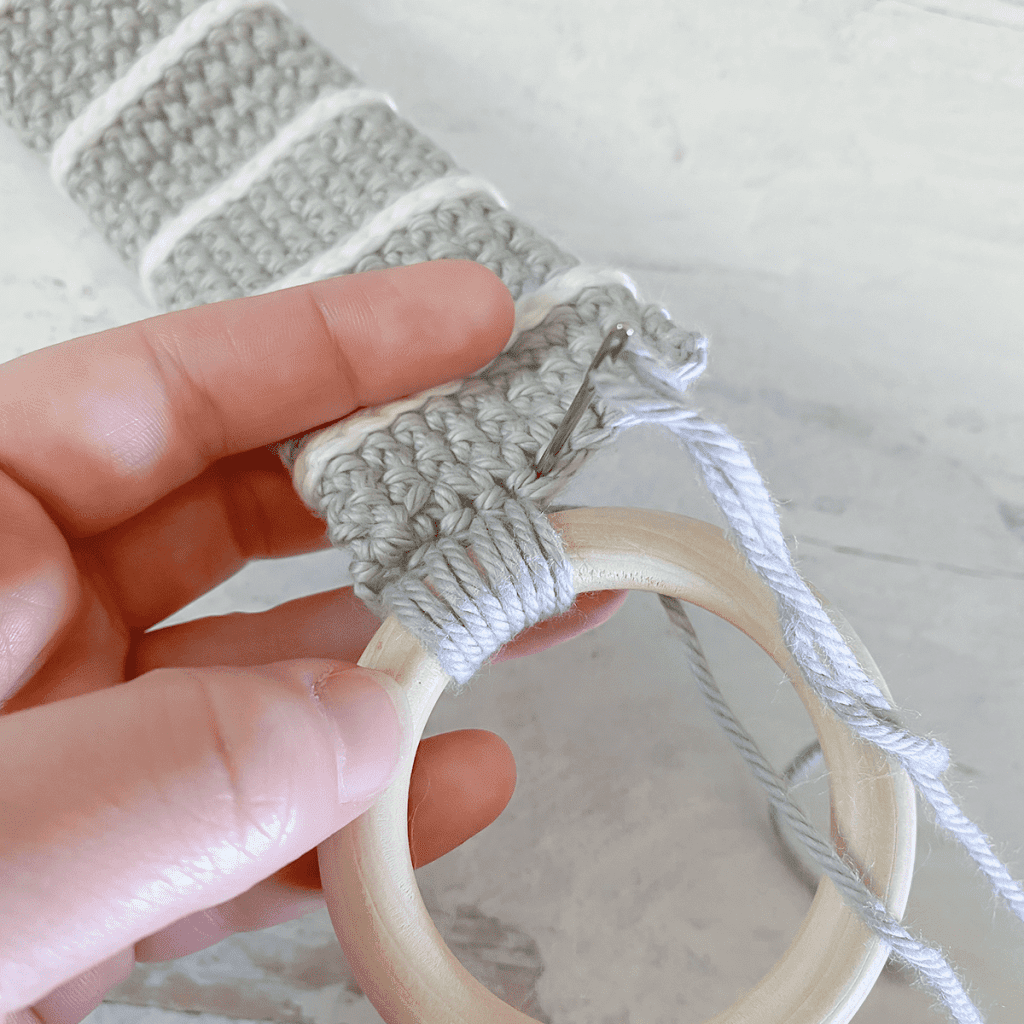
    Thread finishing tail through yarn needle. Hold ring up to edge of project and begin to attach it by inserting yarn needle up through ring and down through first stitch; repeat, working through the same stitch a second time. Continue process with each stitch across the seam, being sure to work into each stitch twice. You should finish with about 20 loops around the ring.

    Fasten off and weave in finishing tail.

    That’s it!

    I hope you enjoyed this tutorial. If you’re sharing your project on social media, be sure to tag me @yarnandchai.design!

  • Coffee Cup Cozy

    Coffee Cup Cozy

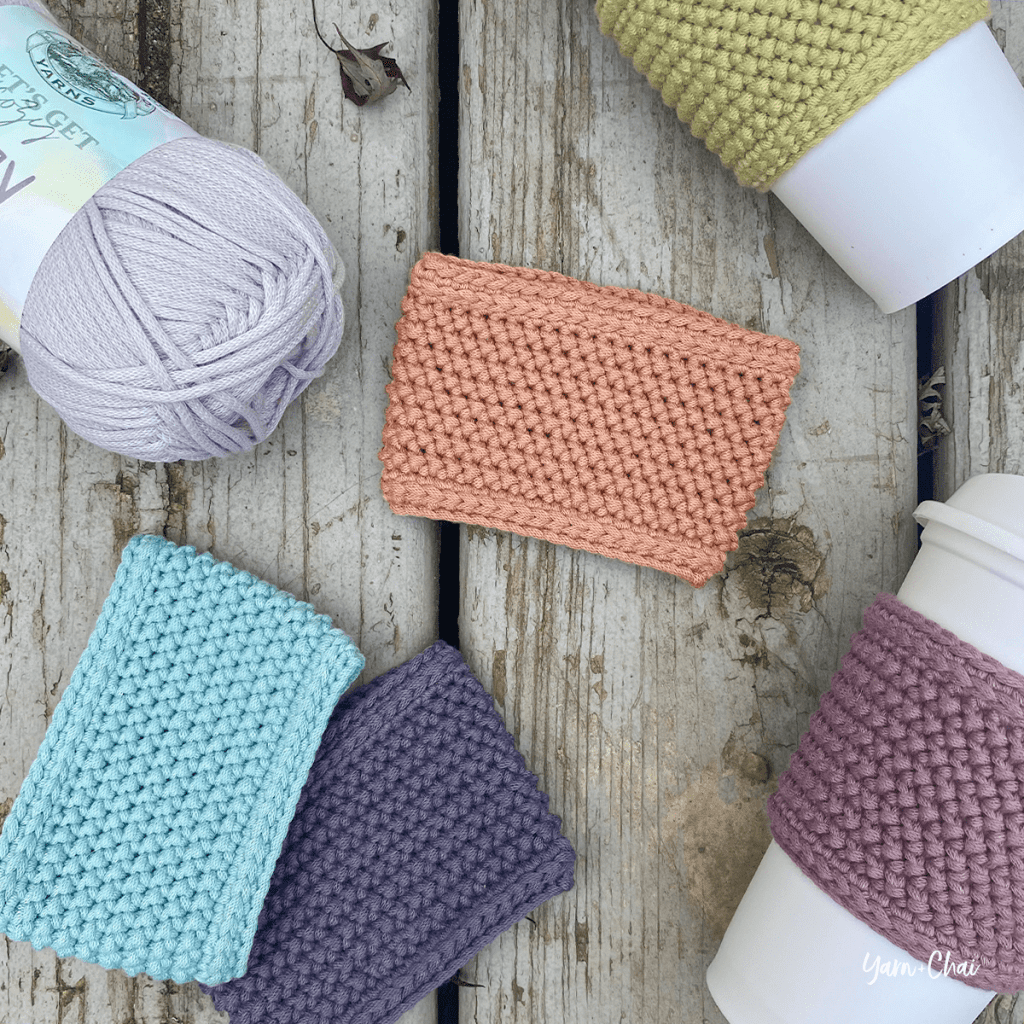
    Cup cozies (also known as to-go hot drink sleeves) are a quick and easy gift for friends, family, teachers, and coworkers. They also make a great addition to craft fair inventory, because they’re fast to make and don’t take much yarn! So here’s a simple, modern pattern to help you create your own.

    FITNESS FACTORY – Home modafinil recreational dose health & fitness courses – throughout italy – classifieds lecce

    About the Yarn

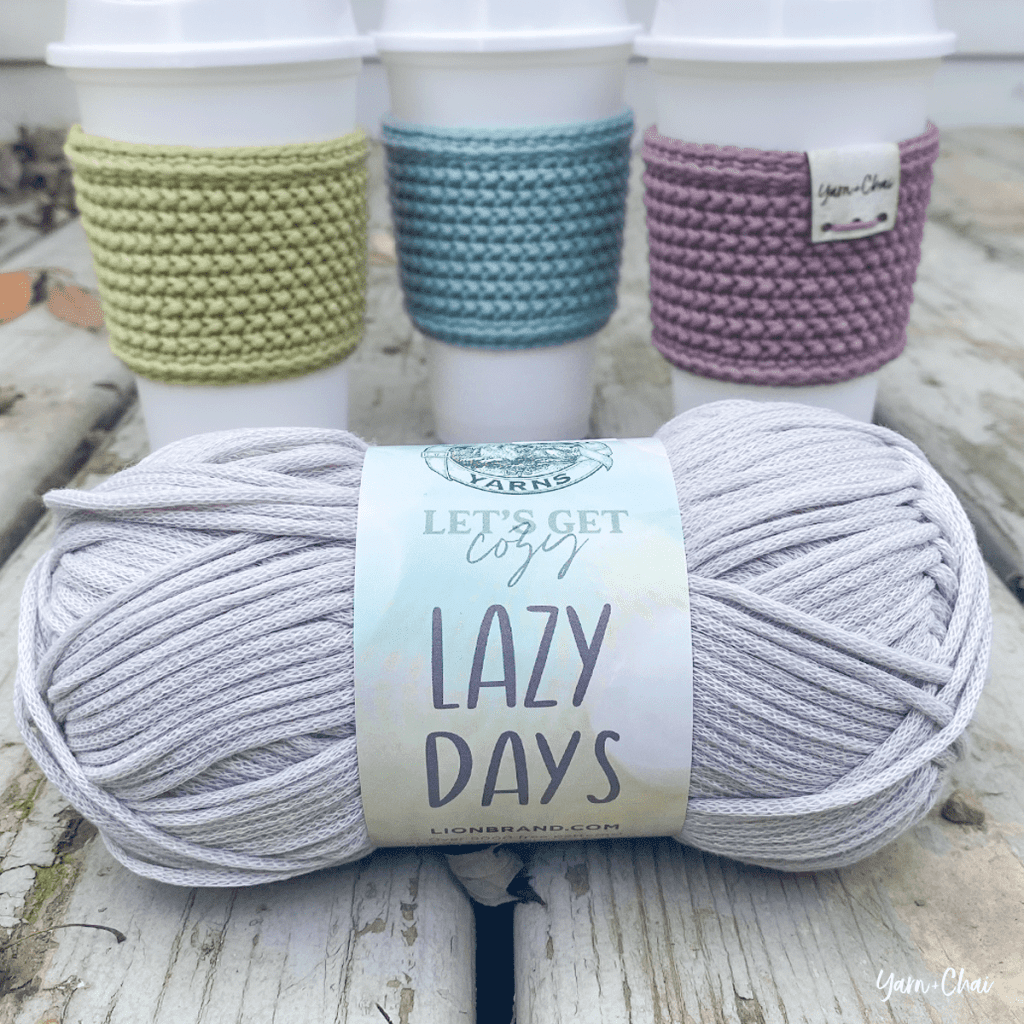
    For my samples, I used Lion Brand’s Lazy Days yarn that I had left over from my Mosaic Pumpkin samples. Lazy Days is a #4 weight, chainette-style acrylic yarn with gorgeous colors and about zero possibility of splitting… I love it. It has some stretch to it as well, so it’s a great option for these cozies.

    You can use any #4 weight yarn you want, though, as long as you can meet gauge. You’ll want your cozies to come out the right size, or they’ll be too tight or too loose on the to-go cups.

    Speaking of the cups, I found the reusable plastic ones in my sample photos at JoAnn Fabrics… the 2-packs were on sale for a couple bucks! Pair your hand-crocheted cozy with one for a cute gift, or read on for another adorable way to package and present it.

    Level Up Your Cozies

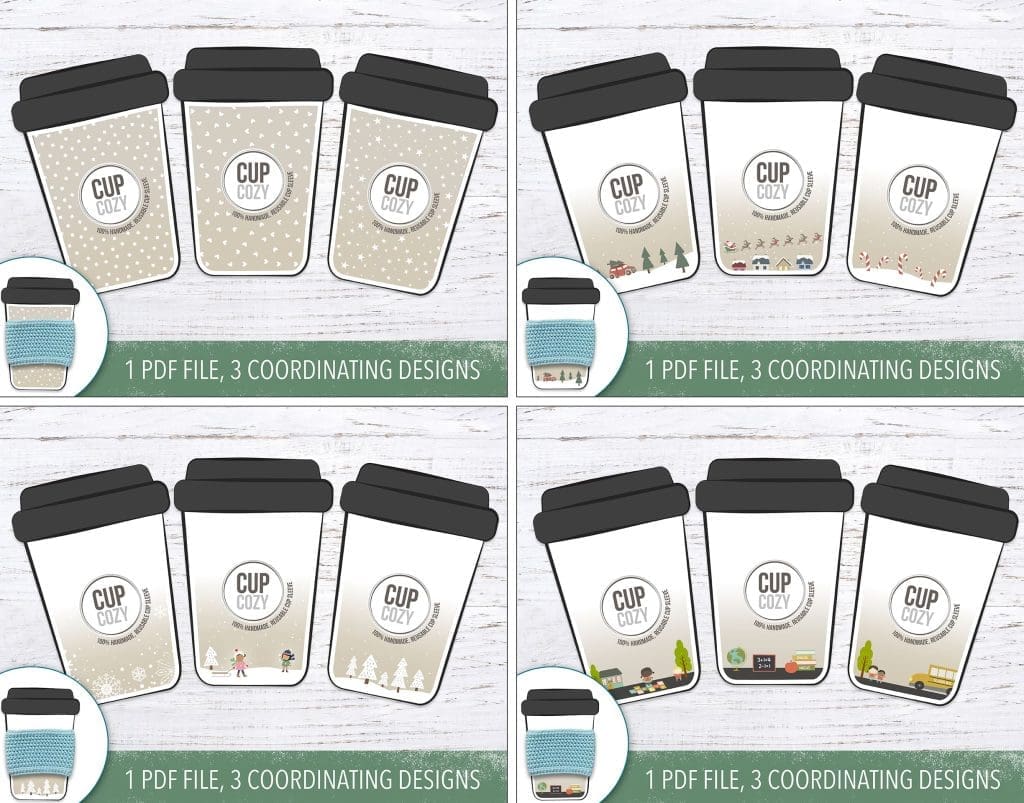
    Presentation is everything, so I created some cute inserts for these cozies (or any other cozy patterns you love)! You can find the downloadable + printable files for these in my Etsy shop. Just download, print, and cut, and whether you’re giving cozies as gifts or stocking inventory for your craft fair, they’ll look cute and professional wrapped around these inserts.

    Prefer a PDF?

    This pattern can be completed using the 100% free version right here on this page. However, many people prefer the convenience of a printable, ad-free PDF.

    All-Access Passholders get the ad-free version of this and all of my other blog patterns. It’s a pretty sweet deal, if I do say so myself! Learn more about it here or continuing scrolling for the free version.

    – – – – – – – – – – – – – –

    Coffee Cup Cozy

    View on Ravelry

    Difficulty: Easy

    Crochet Language: American Standard

    Finished Size: 4.5″ wide x 3″ tall (fits standard plastic reusable travel cups like these from JoAnn Fabrics)

    Yarn: About 40 yards of Lion Brand Lazy Days, a #4 medium weight chainette-style polyester yarn. Any #4 weight yarn can be substituted if you can meet gauge.

    Hook: 4.0mm (G) hook

    Gauge: 18 HHDC x 18 rows = 4″. See Note #2.

    Terms and Abbreviations:
    ST/STS (stitch/stitches)
    SL ST (slip stitch)
    CH (chain)

    SC (single crochet)
    HHDC (herringbone half double crochet: Yarn over, insert hook into stitch. Yarn over, pull loop through stitch AND through first loop on hook — this is similar to a slip stitch motion. Two loops remain on hook. Yarn over and pull through both loops.)
    JOIN (unless otherwise specified, join with a slip stitch to the top of the first stitch of the round.)

    Notes:
    (1) Pattern is worked in joined, unturned rounds. Your seam will be at a slight diagonal.
    (2) Note about gauge: It’s probably easier to just start the pattern and check it against a real to-go coffee cup, than to do a separate gauge swatch. Do the first few rounds of the pattern, then slip it onto the cup; if it settles snug about 1/4-1/3 of the way up the cup, you should be good.

    – – – – – – – – – – – – – – –

    INSTRUCTIONS

    To begin: CH41.

    Round 1: SC in 2nd CH from hook and in each remaining CH. Join, being careful to not get it twisted.
    Stitch count: 40

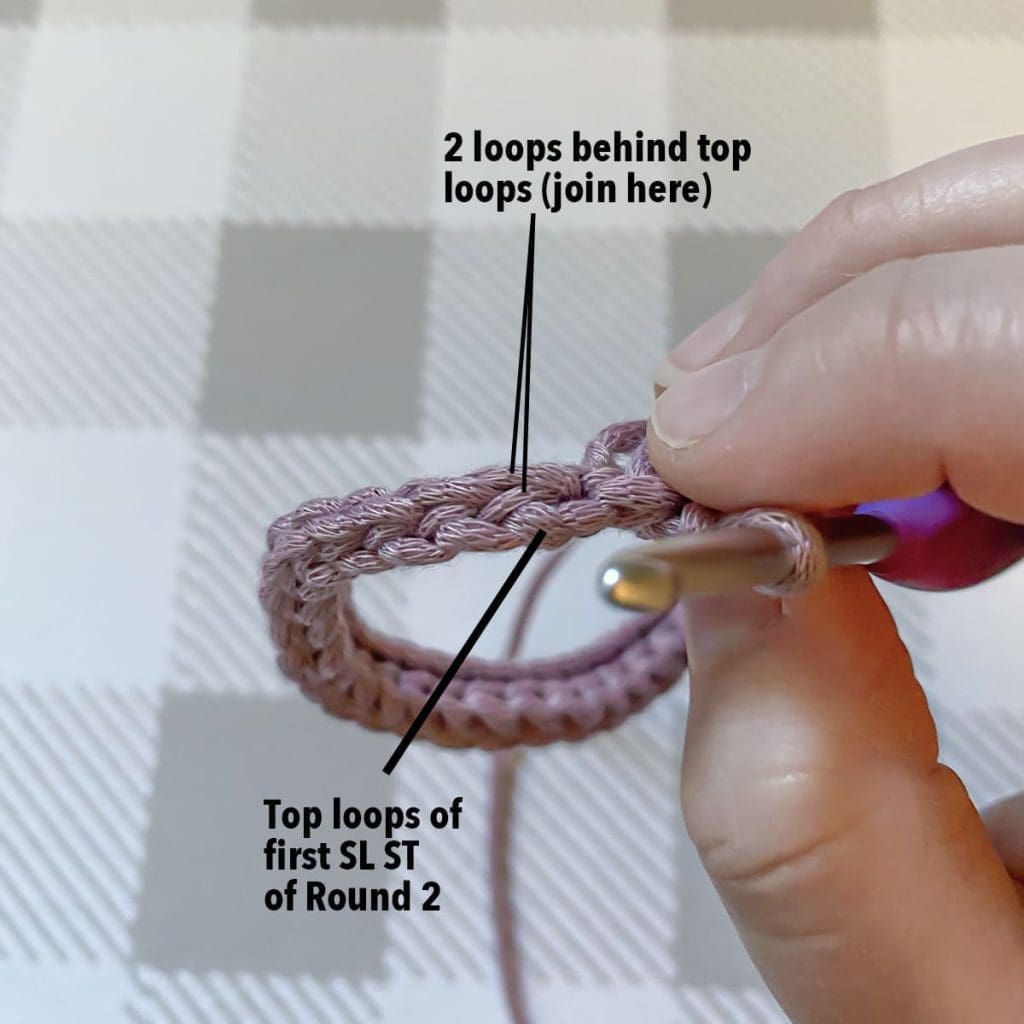
    Round 2: Without chaining, SL ST in each ST around. Join with a SL ST to the two loops behind the top loops of the first ST of the round (see image).
    Stitch count: 40

    Round 2

    Round 3: CH1. Staying in the loops behind the previous slip stitch round, SC in each ST around (see image). Join.
    Stitch count: 40

    Round 3

    Rounds 4-5: CH1. HHDC in each ST around. Join.
    Stitch count: 40

    Round 6: CH1. 2HHDC in first ST, HHDC in each of the next 38 STS, 2HHDC in last ST. Join.
    Stitch count: 42

    Rounds 7-8: CH1. HHDC in each ST around. Join.
    Stitch count: 42

    Round 9: CH1. 2HHDC in first ST, HHDC in each of the next 40 STS, 2HHDC in last ST. Join.
    Stitch count: 44

    Rounds 10-11: CH1. HHDC in each ST around. Join.
    Stitch count: 44

    Round 12: CH1. SC in each ST around. Join.
    Stitch count: 44

    Round 13: Without chaining, SL ST in each ST around. Join with a SL ST to the two loops behind the top loops of the first ST of the round.
    Stitch count: 44

    Round 14: CH1. Staying in the loops behind the previous slip stitch round, SC in each ST around. Do not join; fasten off and create an “invisible finish” using the images below.
    Stitch count: 44

    (Step 1) With yarn needle, bring finishing tail through top loops of first ST of the final round, from back to front. (Step 2) Bring tail through back loop only of the last ST of the final round. (Step 3) Pull gently until tail forms a new set of “top loops”, then weave in end.

    To finish: Use yarn needle to sew together the small opening between the first and last stitches of Round 1, then weave in starting tail.

    That’s it!

    I hope you enjoyed this tutorial. If you’re sharing your project on social media, be sure to tag me @yarnandchai.design!

  • Baskets!

    Baskets!

    You want to know what a fun, easy, quick project is in the dead heat of summer?

    Baskets!

    I’ve never published basket patterns before now, and I’ll tell you why. It’s because I did not like making them. I’d made one back in the day (which still graces my dining room), but I didn’t enjoy the process because my hands just ached all the way through. Using crazy thick yarn with an unnaturally tiny hook is a recipe for wrist issues, and so the idea of ever making a basket again was not really an option for me.

    Until I decided there had to be a better way!

    And once I figured out how to make beautiful baskets without killing my hands, I went a little crazy and ended up designing 4 patterns. I think you’ll love this method — not only does it save you the pain, but it produces professional-grade baskets that are significantly sturdier than any crocheted baskets I’ve seen, and it all comes down to the addition of one thing – plastic canvas! (Seems obvious now, right?)

    As usual, my patterns are 100% free on the blog; but if you prefer the ad-free PDF versions, you can grab the All Access Pass, which includes all four of these patterns and every single other pattern in my library!

    So, scroll down, click the basket that strikes your fancy, and get ready to make a piece of beautiful decor that will last for years to come.

    Nautical Basket

    Mosaic Basket (with full video tutorial!)

    Mini Nesting Baskets

    Hook & Needle Basket

  • Hook & Needle Basket

    Hook & Needle Basket

    I’ve been on a basket kick lately, and while I was working on the pattern for the Mini Nesting Baskets, I decided that a new place for my favorite crochet hooks would be a great way to utilize the techniques I was exploring – mainly, the use of plastic canvas to make a strong, sturdy basket! So I whipped up this cute little basket for my desk and now I’m wondering why I didn’t make my own hook holder a long time ago.

    Of course, there could be many applications for this little guy. Pens and pencils, candy, buttons… it could hold just about any little objects you can think of.

    Prefer a PDF?

    This pattern can be completed using the 100% free version right here on this page. However, many people prefer the convenience of a printable, ad-free PDF.

    All-Access Passholders get the ad-free version of this and all of my other blog patterns. It’s a pretty sweet deal, if I do say so myself! Learn more about it here or continuing scrolling for the free version.

    HOOK & NEEDLE BASKET

    View on Ravelry

    Difficulty: Easy

    Finished Size: 3.75″ tall x 3.75″ wide

    Yarn: I used about 110 yards of Bernat Maker Home Dec, a #5 bulky weight cotton/nylon blend, in “Clay.”

    Hooks: H (5.0mm) and G (4.25mm)

    Gauge: Your first 5 rounds should measure 2.5″ across.

    You’ll also need: Yarn needle, stitch marker, plastic canvas

    Terms and Abbreviations:
    MC (magic circle – view tutorial here)
    ST/STS
     (stitch/stitches)
    SL ST (slip stitch)
    SK (skip)
    CH (chain)
    SC (single crochet)
    HDC (half double crochet)
    MBS (mini bean stitch – see Special Stitches, below)
    3rd Loop (see Special Stitches, below)

    Special Stitches:

    Mini Bean Stitch (MBS): Insert hook into stitch, yarn over, pull through (2 loops on hook), yarn over, insert hook into same stitch, yarn over, pull through (4 loops on hook), yarn over, pull through all 4 loops, chain 1 to close stitch. (Please note that this CH1 does count as a stitch in the final stitch counts of each round; so each MBS you complete will count for 2 stitches.)

    3rd Loop: Half double crochet stitches have a 3rd loop that we utilize in this pattern. For this pattern the 3rd loop can be found just below the front loop on the side of the work that is facing you. When instructed to work in “3rd loop only”, insert your hook into this special loop. This creates a delicate braided look on the opposite side of the pattern. Also called Camel Stitch or RibHDC.

    Notes:
    (1) This pattern is written in American Standard Terms.
    (2) IMPORTANT: Part of this pattern is worked in joined rounds, and part of it is worked seamlessly. Pay attention, and only join, chain and/or turn when specifically instructed. Use a stitch marker to mark the beginning of your rounds when working seamlessly.

    – – – – – – – – – – – – – – –

    INSTRUCTIONS

    To Begin: With larger hook, make a magic circle; CH1 (does not count as a stitch).

    Round 1: 6SC in MC; join with a SL ST to the top of the first SC. (6)

    Round 2: CH1. 2SC in each ST around; join with a SL ST to the top of the first SC. (12)

    Round 3: CH1. (2SC in next ST, SC in next ST) around; join with a SL ST to the top of the first SC. (18)

    Round 4: CH1. (2SC in next ST, SC in each of the next 2 STS) around; join with a SL ST to the top of the first SC. (24)

    Round 5: CH1. (2SC in next ST, SC in each of the next 3 STS) around; join with a SL ST to the top of the first SC. (30)

    Round 6: CH1. (2SC in next ST, SC in each of the next 4 STS) around; join with a SL ST to the top of the first SC. (36)

    Round 7: CH1. (2SC in next ST, SC in each of the next 5 STS) around. DO NOT JOIN. (42)

    Rounds 8-19: (MBS in next ST, SK next ST) around. (42, or 21 beans)

    Round 20: (MBS in next ST, SK next ST) around. SL ST to the top of the first ST of the round to join. (42, or 21 beans)

    Round 21: CH1. HDC in each ST around. Join with a SL ST to the top of the first ST of the round. (42)

    Round 22: CH1, TURN. SC in 3rd loops of each ST around. DO NOT JOIN. (42)

    Switch to smaller hook.

    Rounds 23-39: SC in each ST around. DO NOT JOIN. (42)

    QUICK CHECK: Remove your hook and fold the top half of the basket down into the center to create a double-layered side. The round of 3rd loops we did earlier (which looks like a braid around the edge) should be at the top of the basket, and down inside, the last round of single crochets should be touching the floor of the basket but not crowding it. You may need to add or remove a round or two of single crochets to achieve this.

    To finish: Unfold your basket, reinsert your hook into the last stitch, and SL ST to the first ST of the final round. Fasten off and weave in ends.

    – – – – – – – – – – – – – – –

    Adding Plastic Canvas

    Cut across your plastic canvas to make strips that are the same height as the inner layer of the basket. Set your basket so that it is completely unfolded. Roll up a strip of canvas and insert it into the bottom of the basket, allowing it to expand up against the walls of the basket. Continue adding as many layers as you want to make it as stiff as you want. Fold the inside layer down over the canvas. Work the fabric until it all lays neat and flat.

    Here’s a quick tutorial video that explains what plastic canvas is, where to buy it, and how to use it in Yarn + Chai basket patterns:

  • Malia Christmas Stocking

    Malia Christmas Stocking

    Every year around this time, when we dig out the boxes full of Christmas decorations, I say to myself “this year we are all going to have matching stockings!”

    I think in the younger years of a family, Christmas stockings tend to be random and mismatched because each new addition to the family comes on a different year. I brought my stocking with me when I moved from my family’s house into the one I shared with my new husband, and I think we bought him one that year. When Sam was born, we bought one for him, and two years later, one for Isaiah, too. Of course, none of them matched!

    There’s nothing wrong with that, and each one holds special memories. But. The older I get, the more I love the idea of looking at the mantle and seeing 5 coordinating stockings. What can I say? Life is chaos, and a little order makes my anxious heart happy. (Can you tell I’m a mom of all boys!?)

    If I’m being honest, this year probably won’t be the year we achieve my dream of matching stockings, because it’s already December 5th (what!?) and I’ve only made one. But I am SO going be ready for next year thanks to this new pattern – the Malia Christmas Stocking!

    VIDEO TUTORIAL

    If you’ve been following along with the Malia pattern collection, this pattern won’t give you much trouble, if any. But if you need a little extra help with any of the stitches in the pattern, I created a video tutorial for previous Malia patterns in which I crocheted up a swatch of the stitch pattern. You might find it useful to scan through the tutorial if you find yourself stuck at any point!

    `

    Prefer a PDF?

    This pattern can be completed using the 100% free version right here on this page. However, many people prefer the convenience of a printable, ad-free PDF.

    All-Access Passholders get the ad-free version of this and all of my other blog patterns. It’s a pretty sweet deal, if I do say so myself! Learn more about it here or continuing scrolling for the free version.

    MALIA CHRISTMAS STOCKING

    Difficulty: Easyish

    Finished Sizes: 16.5″ tall (folded) or 20.5″ tall (unfolded) x 9″ wide

    Hook: I (5.0 mm) or whichever hook is needed to obtain correct gauge

    Yarn: 275 yards of COLOR A (yarn used in sample photos is Yarn Bee’s Rustic Romantic in “Red Roads”) and 95 yards of COLOR B (yarn used in sample photos is Bernat Baby Blanket Tiny in “Snow Cap”). Both yarns are #4 medium weight.

    Gauge: To ensure the best results, the gauge check is a swatch taken straight from the pattern. Upon completion, you should have a 4” square. If yours is larger, consider using a smaller hook or a thinner #4 yarn. If yours is smaller, consider using a larger hook. Please note that I have a tight tension, so it is entirely possible that you will need a smaller hook.

    Pattern for Gauge:
    CH17.
    Row 1: SC in 2nd CH from hook and in each remaining CH. (16)
    Row 2: CH1, turn. SC in first ST. (SK next ST, LBS in next ST) 7 times. SC in final ST. (16)
    Row 3: CH1, turn. HDC in each ST across. (16)
    Row 4: CH1, turn. SC in first ST. SC in 3rd loop of each of the next 14 STS. SC in final ST. (16)
    Row 5: CH1, turn. SC in each ST across. (16)
    Row 6: CH1, turn. SC in first ST. (LBS in next ST, SK next ST) 7 times. SC in final ST. (16)
    Row 7: CH1, turn. HDC in each ST across. (16)
    Row 8: CH1, turn. SC in first ST. SC in 3rd loop of each of the next 14 STS. SC in final ST. (16)
    Row 9: CH1, turn. SC in each ST across. (16)
    Rows 10-16: Repeat Rows 2-8. (16)

    You’ll also need: Yarn needle, 3 decorative buttons, needle & thread, 11″ long coordinating ribbon (I used 1.5″ thick burlap)

    Terms and Abbreviations:
    ST/STS
     (stitch/stitches)
    SL ST (slip stitch)
    SK (skip)
    CH (chain)
    SC (single crochet)
    HDC (half double crochet)
    LBS (large bean stitch – see “Special Stitches”)
    BLO (back loop only)
    SC2TOG (single crochet two together)
    HDC2TOG (half double crochet two together)
    3rd LOOP (work stitch into 3rd loop only – see “Special Stitches”)

    Special Stitches:

    Large Bean Stitch (LBS)
    Insert hook into stitch, yarn over and pull through (2 loops on hook). Yarn over, insert hook into same stitch, yarn over and pull through (4 loops on hook). Yarn over, insert hook into same stitch, yarn over and pull through (6 loops on hook). Yarn over, insert hook into same stitch, yarn over and pull through (8 loops on hook). Yarn over and pull through all 8 loops. Chain 1 to close the stitch. (Because this stitch creates two sets of loops – one when creating the bean, and one when closing the stitch – each completed Large Bean Stitch will count for two stitches in the row or round’s final stitch count.)

    3rd Loop Only
    Half double crochet stitches have a 3rd loop that we utilize in this pattern. When working in turned rows, as in this pattern, the 3rd loop can be found just below the front loop on the side of the work that is facing you. When instructed to work in “3rd loop only”, insert your hook into this special loop. This creates a delicate braided look on the opposite side of the pattern.

    Notes:
    (1) This pattern is written in American Standard Terms.
    (2) CH1s at the beginning of rows do not count as a stitch in the final stitch count.
    (3) A video tutorial for a swatch of the stitch pattern is available up in the post, or by clicking here.

    INSTRUCTIONS – SIDE 1

    To begin: CH39.

    Row 1: SC in 2nd CH from hook and in each remaining CH. (38)

    Row 2: CH1, turn. SC in first ST. (SK next ST, LBS in next ST) 18 times. 2SC in final ST. (39)

    Row 3: CH1, turn. HDC in each ST across. (39)

    Row 4: CH1, turn. SC in 3rd loop of each of the first 38 STS. 2SC in 3rd loop of final ST. (40)

    Row 5: CH1, turn. SC in each ST across. (40)

    Row 6: CH1, turn. SC in first ST. (LBS in next ST, SK next ST) 19 times. 2SC in final ST. (41)

    Row 7: CH1, turn. HDC in each ST across. (41)

    Row 8: Ch1, turn. SC in 3rd loop of each of the first 40 STS. 2SC in 3rd loop of final ST. (42)

    Row 9: CH1, turn. SC in each ST across. (42)

    Row 10: CH1, turn. SC in first ST. (SK next ST, LBS in next ST) 20 times. 2SC in final ST. (43)

    Row 11: CH1, turn. HDC in each ST across. (43)

    Row 12: Ch1, turn. SC in 3rd loop of each of the first 42 STS. 2SC in 3rd loop of final ST. (44)

    Row 13: CH1, turn. SC in each ST across. (44)

    Row 14: CH1, turn. SC in first ST. (LBS in next ST, SK next ST) 21 times. 2SC in final ST. (45)

    Row 15: CH1, turn. HDC in each ST across. (45)

    Row 16: Ch1, turn. SC in 3rd loop of each of the first 44 STS. 2SC in 3rd loop of final ST. (46)

    Row 17: Ch1, turn. SC in each ST across. (46)

    Row 18: Ch1, turn. SC in first ST. (SK next ST, LBS in next ST) 22 times. 2SC in final ST. (47)

    Row 19: Ch1, turn. HDC in each ST across. (47)

    Row 20: Ch1, turn.  SC in 3rd loop of each of the first 46 STS. 2SC in 3rd loop of final ST. (48)

    Row 21: Ch1, turn.  SC in each ST across. (48)

    Row 22: Ch1, turn. SC in first ST. (LBS in next ST, SK next ST) 23 times. 2SC in final ST. (49)

    Row 23: Ch1, turn. HDC in each ST across. (49)

    Row 24: Ch1, turn. SC in 3rd loop of each of the first 48 STS. 2SC in 3rd loop of final ST. (50)

    Row 25: Ch1, turn. SC in each of the first 22 STS. SC2TOG. Leave the rest unworked. (23)

    Row 26: Ch1, turn. SC2TOG. (SK next ST, LBS in next ST) 10 times. SC in final ST. (22)

    Row 27: Ch1, turn. HDC in each ST across. (22)

    Row 28: Ch1, turn. In 3rd loops of first 2 STS, SC2TOG. SC in 3rd loops of each remaining ST across. (21)

    Row 29: Ch1, turn. SC in each of the first 19 STS. SC2TOG. (20)

    Row 30: Ch1, turn. SC2TOG. (LBS in next ST, SK next ST) 8 times. SC2TOG. (18)

    Row 31: Ch1, turn. HDC2TOG. HDC in each of the next 14 STS. HDC2TOG. (16)

    Row 32: Ch1, turn. In 3rd loops of first 2 STS, SC2TOG. SC in 3rd loops of each of the next 12 STS. In 3rd loops of final 2 STS, SC2TOG. (14)

    Row 33: Ch1, turn. SC2TOG. SC in next ST. HDC in each of the next 2 STS. DC in each of the next 4 STS. HDC in each of the next 2 STS. SC in next ST. SC2TOG. (12)

    Edging: CH1; SC evenly around the entire piece, putting one SC in each ST or row end as applicable, and using the image below to place 2SC or 3SC where indicated (this will help keep your stocking from curling). Fasten off and weave in ends.

    INSTRUCTIONS – SIDE 2

    To begin: CH39.

    Row 1: SC in 2nd CH from hook and in each remaining CH. (38)

    Row 2: CH1, turn. 2SC in first ST. (SK next ST, LBS in next ST) 18 times. SC in final ST. (39)

    Row 3: CH1, turn. HDC in each ST across. (39)

    Row 4: CH1, turn. 2SC in 3rd loop of first ST. SC in 3rd loop of each of the remaining 38 STS. (40)

    Row 5: CH1, turn. SC in each ST across. (40)

    Row 6: CH1, turn. 2SC in first ST. (LBS in next ST, SK next ST) 19 times. SC in final ST. (41)

    Row 7: CH1, turn. HDC in each ST across. (41)

    Row 8: Ch1, turn. 2SC in 3rd loop of first ST. SC in 3rd loop of each of the remaining 40 STS. (42)

    Row 9: CH1, turn. SC in each ST across. (42)

    Row 10: CH1, turn. 2SC in first ST. (SK next ST, LBS in next ST) 20 times. SC in final ST. (43)

    Row 11: CH1, turn. HDC in each ST across. (43)

    Row 12: Ch1, turn. 2SC in 3rd loop of first ST. SC in 3rd loop of each of the remaining 42 STS. (44)

    Row 13: CH1, turn. SC in each ST across. (44)

    Row 14: CH1, turn. 2SC in first ST. (LBS in next ST, SK next ST) 21 times. SC in final ST. (45)

    Row 15: CH1, turn. HDC in each ST across. (45)

    Row 16: Ch1, turn. 2SC in 3rd loop of first ST. SC in 3rd loop of each of the remaining 44 STS. (46)

    Row 17: Ch1, turn. SC in each ST across. (46)

    Row 18: Ch1, turn. 2SC in first ST. (SK next ST, LBS in next ST) 22 times. SC in final ST. (47)

    Row 19: Ch1, turn. HDC in each ST across. (47)

    Row 20: Ch1, turn. 2SC in 3rd loop of first ST. SC in 3rd loop of each of the remaining 46 STS. (48)

    Row 21: Ch1, turn.  SC in each ST across. (48)

    Row 22: Ch1, turn. 2SC in first ST. (LBS in next ST, SK next ST) 23 times. SC in final ST. (49)

    Row 23: Ch1, turn. HDC in each ST across. (49)

    Row 24: Ch1, turn. 2SC in 3rd loop of first ST. SC in 3rd loop of each of the remaining 48 STS. (50)

    Fasten off.

    Row 25: Turn the work like you normally would to start a new row. Skip the first 26 STS, and reattach yarn in the next (27th) ST, then CH1. Beginning in same ST, SC2TOG. SC in each of the remaining 22 STS. (23)

    Row 26: Ch1, turn. SC in first ST. (SK next ST, LBS in next ST) 10 times. SC2TOG. (22)

    Row 27: Ch1, turn. HDC in each ST across. (22)

    Row 28: Ch1, turn. SC in 3rd loops of the first 20 STS. In 3rd loops of final 2 STS, SC2TOG. (21)

    Row 29: Ch1, turn. SC2TOG. SC in each of the remaining 19 STS. (20)

    Row 30: Ch1, turn. SC2TOG. (LBS in next ST, SK next ST) 8 times. SC2TOG. (18)

    Row 31: Ch1, turn. HDC2TOG. HDC in each of the next 14 STS. HDC2TOG. (16)

    Row 32: Ch1, turn. In 3rd loops of first 2 STS, SC2TOG. SC in 3rd loops of each of the next 12 STS. In 3rd loops of final 2 STS, SC2TOG. (14)

    Row 33: Ch1, turn. SC2TOG. SC in next ST. HDC in each of the next 2 STS. DC in each of the next 4 STS. HDC in each of the next 2 STS. SC in next ST. SC2TOG. (12)

    Edging: CH1; SC evenly around the entire piece, putting one SC in each ST or row end as applicable, and using the image below to place 2SC or 3SC where indicated (this will help keep your stocking from curling). Fasten off and weave in ends.

    SEAMING

    Put stocking sides together, right sides facing out, and attach yarn in the top left corner through both layers; CH1. SL ST evenly around the left, bottom, and right edges of the stocking, going through all 4 loops (both layers) of each stitch, putting one SL ST in each ST or row end as applicable, and 2 SL STS wherever needed to keep stocking from curling. (You can use Side 1’s placement as a guide.) I find it difficult to SL ST twice in one stitch, so for the 2nd SL ST, I skip over the loop closest to me and work it through the remaining 3 loops. Once you reach the top right corner, CH1 and SC evenly (1 SC in each row end) around the top of the stocking, one layer at a time (don’t crochet it closed, or Santa won’t be able to fill it!), going all the way around the top until you come back to where you started; SL ST to the top of the first SC. (You should have 48 SC.)

    TOP RIBBING SECTION
    If you need some extra guidance, a video tutorial for how to add ribbing to crochet projects can be found here.)

    Attach new color (if you are switching); fasten off previous color.

    Base Round: CH1, SC in same ST and in each ST around. Join with a SL ST to the top of the first SC. (48)

    Row 1: CH33. SC in 2nd chain from hook and in each of the remaining 31 chains. SL ST into the first SC from the Base Round, the stitch on which your CH33 was built. SL ST into the next SC from the Base Round. (32, plus the two slip stitches along the Base Round)

    The section we just created, built on the CH33, will hereafter be referred to as the “ribbing.”

    Row 2: CH1, turn. Skipping over the 2 SL STS you put in the Base Round, SC in BLO of each of the first 31 STS of the ribbing. SC in both loops of the last ST. (32)

    Row 3: CH1, turn. SC in 1st ST. SC in BLO of each of the remaining 31 STS of the ribbing. SL ST in each of the next 2 STS of the Base Round. (32, plus the two slip stitches along the Base Round)

    Row 4: CH1, turn. Skipping over the 2 SL STS you put in the Base Round, SC in BLO of each of the first 31 STS of the ribbing. SC in both loops of the last ST. (32)

    Rows 5-48: Repeat Rows 3-4 all the way around the Base Round.

    Row 49: CH1, do not turn. SC along the top of the ribbing, putting 1SC in each row end (48). Fasten off, leaving a long tail, and use it to sew the first and last ribbing rows together. Weave in all ends.

    BUTTONS

    Fold ribbing down over itself until it extends about an inch lower than its bottom edge. Place buttons where indicated and sew them on, working through the front double layers of ribbing to help hold everything in the correct place.

    RIBBON

    Tuck ribbon ends into the stocking on the left side, about an inch below the top edge, and sew them to the inside, 1 against each side of the stocking. (I should note here that I am not a seamstress by any stretch of the imagination, and those of you who are may be cringing at what I did to attach the ribbon… so, if you have any kind words of wisdom, please feel free to put them in the comments below!)

    Done! If you’re sharing on social media, be sure to hashtag #maliachristmasstocking and tag me @yarnandchai.design. Hope you enjoyed it!

  • Mini Beach Bag Gift Card Holder

    Mini Beach Bag Gift Card Holder

    Thank you Lion Brand Yarn for providing the yarn for this pattern!

    I’m a textbook procrastinator, so with just 4 days left of preschool for the middle monkey, of course I was scrambling this weekend to figure out what to give his teachers. I was also working on a really fun beach bag pattern (to be released soonish), and a couple nights ago the idea for this gift card holder dawned on me as I was working on the other pattern. What says “Summer’s here!” more than a beach bag filled with a beach ball, flip flops and sunglasses?

    So I whipped up this little mini bag and then put together an adorable printable to go with it. (Patterns rarely come together this quickly for me, so I was pretty proud of myself!) I used Lion Brand’s 24/7 Cotton yarn, because its bright colors are so summery.

    I included the phrase “School’s out, summer’s here… thanks for all you’ve done this year!” on the printable. But don’t worry; if you love the gift card holder but don’t have any teachers to buy for this year, you can also download the free printable without the phrase on it!

    Prefer a PDF?

    This pattern can be completed using the 100% free version right here on this page. However, many people prefer the convenience of a printable, ad-free PDF.

    All-Access Passholders get the ad-free version of this and all of my other blog patterns. It’s a pretty sweet deal, if I do say so myself! Learn more about it here or continuing scrolling for the free version.

    MINI BEACH BAG GIFT CARD HOLDER

    Difficulty: Easy

    Finished Size: 3″ wide at bottom, 4″ wide at top, and 2.5″ tall (not including straps)

    Hook:  E (3.5mm)

    Yarn: Less than 40 yards of #4 medium weight yarn. I used Lion Brand’s 24/7 Cotton in “Aqua” (COLOR A, about 11 yards); “White” (COLOR B, about 13 yards); and “Silver” (COLOR C, about 11 yards).

    Gauge: 10 rows of 10 SC = 2″ square. Starting chain should wrap snuggly around a gift card.

    You’ll also need: Yarn needle, tape, and this downloadable insert for teachers or this generic downloadable insert printed on card stock. Starfish charm optional (I found mine at Hobby Lobby)

    Abbreviations Used:
    ST/STS
     (stitch/stitches)
    SL ST (slip stitch)
    SK (skip)
    CH (chain)
    SC (single crochet)

    Notes:
    (1) This pattern is written in American Standard Terms.
    (2) CH1 at the beginning of round does not count as a stitch.

    – – – – – – – – – – – – – – – – – – – – – – – –

    THE PATTERN

    To begin: With COLOR A, leaving a 12″ tail, CH33. Join to first CH with a SL ST, being careful to not twist the chain. (Briana K has an awesome video tutorial here for how to do this perfect every time.) (33)

    Rounds 1-2: CH1. SC in same ST and in each ST around. Join with a SL ST to the top of the first SC. (33)

    Switch to COLOR B; fasten off COLOR A.

    Round 3: CH1. SC in same ST and in each ST around. Join with a SL ST to the top of the first SC. (33)

    Switch to COLOR C (do not fasten off COLOR B).

    Round 4: CH1. SC in same ST and in each ST around. Join with a SL ST to the top of the first SC. (33)

    Switch to COLOR B (do not fasten off COLOR C).

    Round 5: CH1. SC in same ST and in each ST around. Join with a SL ST to the top of the first SC. (33)

    Switch to COLOR C (do not fasten off COLOR B).

    Round 6: CH1. 2SC in same ST. SC in each of the next 16 STS. 2SC in next ST. SC in each of the next 15 STS. Join with a SL ST to the top of the first SC. (35)

    Switch to COLOR B (do not fasten off COLOR C).

    Round 7: CH1. SC in same ST and in each ST around. Join with a SL ST to the top of the first SC. (35)

    Switch to COLOR C (do not fasten off COLOR B).

    Round 8: CH1. 2SC in same ST. SC in each of the next 17 STS. 2SC in next ST. SC in each of the next 16 STS. Join with a SL ST to the top of the first SC. (37)

    Switch to COLOR B (do not fasten off COLOR C).

    Round 9: CH1. SC in same ST and in each ST around. Join with a SL ST to the top of the first SC. (37)

    Switch to COLOR C (do not fasten off COLOR B).

    Round 10: CH1. 2SC in same ST. SC in each of the next 18 STS. 2SC in next ST. SC in each of the next 17 STS. Join with a SL ST to the top of the first SC. (39)

    Switch to COLOR B; fasten off COLOR C.

    Round 11: CH1. SC in same ST and in each ST around. Join with a SL ST to the top of the first SC. (39)

    Switch to COLOR A; fasten off COLOR B.

    Round 12: CH1. 2SC in same ST. SC in each of the next 19 STS. 2SC in next ST. SC in each of the next 18 STS. Join with a SL ST to the top of the first SC. (41)

    Round 13: CH1. SC in same ST and in each ST around. Join with a SL ST to the top of the first SC. (41)

    Fasten off and weave in all ends except your starting tail. Turn your bag inside out and lay it flat so that the starting tail is at one end, then use it to sew the bottom together, stitch by stitch. Turn bag right side out.


    Straps

    1. Cut 6 strands of white yarn, each 10″ long. Take 3 of them and tie them together with a knot toward one end (pictured). Do the same with the other 3 strands.

    2. Take one set of strands and tape the knotted end down to something sturdy, then braid the three strands until the braided section measures 5″. Tie another knot to secure the braid. Repeat with the other set of strands.

    3. Lay your bag flat and locate the spaces between the final two rounds (the tiny spaces created by the stitches). Count 7 stitches from the top left edge of the bag and use a crochet hook to draw a knot from one of your braids through that space from the inside of the bag to the outside. Count 7 stitches from the top right edge and do the same with the other end of the same braid. Tie an additional knot over each of the original knots to make them big enough that they won’t slip back through the holes. Trim the excess yarn from each end.

    4. Turn bag over and repeat step 3 with the remaining braid.

    Free Printable

    Don’t forget the adorable printable for your mini beach bag! I’ve created two versions: one specifically for teachers with the saying “School’s out, summer’s here… thanks for all you’ve done this year!” and one blank version in case you want to write your own message or use this for someone other than a teacher.

    Download the Mini Beach Bag Gift Card Holder Insert – for Teachers
    Download the Mini Beach Bag Gift Card Holder Insert – Generic

    Cut out your insert, add your gift card, stuff it in your beach bag, and you’re done! I just know that the recipient will get a kick out of this adorable and reusable gift card holder.

  • Bubble Gum Accent Rug

    Thank you to Lion Brand Yarn for providing the yarn for this sample!

    I have a fun new home decor pattern for you today! I experimented with Lion Brand’s cheerfully-colored Kitchen Cotton line to come up with this bright accent rug. I’m a big fan of color-blocking (colors striped in big chunks at a time), so I used that method when choosing this project’s color scheme. Smaller stripes of an off-white separate each of the color blocks to really make them pop. This accent rug would be perfect in a bathroom or a nursery.

    Bubble Gum Accent Rug Crochet Pattern made with Kitchen Cotton yarn from Lion Brand | Free crochet pattern by Little Monkeys Crochet

    I double-stranded (held two strands together) my yarn for this pattern in order to get a nice sturdy rug. If you’re newer to crochet, this might sound intimidating, but you’ll get the hang of it quick! You may also find that it’s a little harder on your hands, because the hook has to work a little harder, but you can always set it aside for a day and come back to it with fresh fingers.

    You can find this fun, sturdy yarn at lionbrand.com, or on Craftsy. At the time this blog post was published, Kitchen Cotton was on sale on Craftsy.com for just $2.03 a skein (regular $3.69). That’s a steal!

    Bubble Gum Accent Rug Crochet Pattern made with Kitchen Cotton yarn from Lion Brand | Free crochet pattern by Little Monkeys Crochet

    Prefer a PDF?

    This pattern can be completed using the 100% free version right here on this page. However, many people prefer the convenience of a printable, ad-free PDF.

    All-Access Passholders get the ad-free version of this and all of my other blog patterns. It’s a pretty sweet deal, if I do say so myself! Learn more about it here or continuing scrolling for the free version.

    BUBBLE GUM ACCENT RUG

    add-to-ravelry-favorites

    Level: Easy

    Size: 20″ (height) x 30″ (width)

    Hook: H (5.00mm)

    Yarn: About 1,100 yards of Kitchen Cotton yarn from Lion Brand. (Kitchen Cotton is a #4 medium weight yarn.) I used the following colors and amounts:

    Grape (about 280 yards, or less than 3 skeins)
    Bubblegum (about 280 yards, or less than 3 skeins)
    Tropic Breeze (about 280 yards, or less than 3 skeins)
    Vanilla (about 260 yards, or less than 3 skeins)

    You’ll also need: Yarn needle for weaving in ends

    Gauge: 6 rows of 10 SC = 3″ square (getting this exact is not super important unless you’re wanting your rug to turn out the exact same size as mine)

    Abbreviations Used:
       ST/STS (stitch/stitches)
    SL ST (slip stitch)
    SK (skip)
    CH (chain)
    SC (single crochet)
    HDC (half double crochet)
       SC+HDC (this just means to put a single crochet and a half double crochet in the same stitch)

    Notes:
    (1) This pattern is worked in American Standard Terms.
    (2) CH1 at the beginning of rows does not count as a stitch.
    (3) You will be double-stranding the entire pattern. (That means holding two strands of yarn together. This will give the rug stiffness.)
    (4) You can easily change the size of this rug; just make sure to begin with any odd number of chains (to make it taller or shorter), and add or subtract rows as needed for a different width.
    (5) The pattern below is written out according to my color changes, but the stitch pattern is actually just Rows 1-8, with  a continuous repeat of Rows 5-8. This is good information to have if you want to make a solid-colored rug, or if you want your color changes to be different than mine.

    Here are the colors I used, and how they’ll be referenced in the pattern:
        COLOR A: Grape (purple)
    COLOR B: Vanilla (ivory)
    COLOR C: Bubblegum (pink)
    COLOR D: Tropic Breeze (aqua)


    PATTERN

    Remember, you’re holding two strands together throughout!

    To begin: With COLOR A, CH 61.

    Row 1: SC in 2nd CH from hook and in each CH across. (60)
    Row 2: CH1, turn. SK 1st ST, SC+HDC in next ST. (SK next ST, SC+HDC in next ST) across. (60)
    Row 3: CH1, turn. SK 1st ST, SC+HDC in next ST. (SK next ST, SC+HDC in next ST) across. (60)
    Row 4: CH1, turn. SC in each ST across. (60)
    Row 5: CH1, turn. SC in each ST across. (60)
    Row 6: CH1, turn. SK 1st ST, SC+HDC in next ST. (SK next ST, SC+HDC in next ST) across. (60)
    Row 7: 
    CH1, turn. SK 1st ST, SC+HDC in next ST. (SK next ST, SC+HDC in next ST) across. (60)
    Row 8: 
    CH1, turn. SC in each ST across. (60)
    Row 9: 
    CH1, turn. SC in each ST across. (60)
    Row 10: 
    CH1, turn. SK 1st ST, SC+HDC in next ST. (SK next ST, SC+HDC in next ST) across. (60)
    Row 11: 
    CH1, turn. SK 1st ST, SC+HDC in next ST. (SK next ST, SC+HDC in next ST) across. (60)
    Row 12: 
    CH1, turn. SC in each ST across. (60)

    Change to COLOR B.

    Row 13: CH1, turn. SC in each ST across. (60)
    Row 14: 
    CH1, turn. SK 1st ST, SC+HDC in next ST. (SK next ST, SC+HDC in next ST) across. (60)
    Row 15: 
    CH1, turn. SK 1st ST, SC+HDC in next ST. (SK next ST, SC+HDC in next ST) across. (60)
    Row 16: 
    CH1, turn. SC in each ST across. (60)

    Change to COLOR C.

    Row 17: CH1, turn. SC in each ST across. (60)
    Rows 18-28: Repeat Rows 2-12. (60)

    Change to COLOR B.

    Rows 29-32: Repeat Rows 13-16. (60)

    Change to COLOR D.

    Row 33: CH1, turn. SC in each ST across. (60)
    Rows 34-44: Repeat Rows 2-12. (60)

    Change to COLOR B.

    Rows 45-48: Repeat Rows 13-16. (60)

    Change to COLOR A.

    Row 49: CH1, turn. SC in each ST across. (60)
    Rows 50-60: Repeat Rows 2-12. (60)

    Change to COLOR B.

    Rows 61-64: Repeat Rows 13-16. (60)

    Change to COLOR C.

    Row 65: CH1, turn. SC in each ST across. (60)
    Rows 66-76: Repeat Rows 2-12. (60)

    Change to COLOR B.

    Rows 77-80: Repeat Rows 13-16. (60)

    Change to COLOR D.

    Row 81: CH1, turn. SC in each ST across. (60)
    Rows 82-92: Repeat Rows 2-12. (60)

    Fasten off and weave in all ends.

  • Huntley Gift Bag Crochet Pattern

    Thank you to Lion Brand Yarn for supplying the yarn for this sample!

    It’s not lost on me that this probably seems a little late in the game to be releasing a Teacher Thank-You Gift idea, considering it seems most of the country has already been on summer break for a couple of weeks. But here in Michigan, we have this silly little state law that prohibits public schools from starting before Labor Day; and with a late start date comes a late end date. (I don’t mind it, really… it’s especially nice when all the Ohio kids go back to school in August and we Michiganders get all the rides at Cedar Point to ourselves. But I digress.)

    So, since I’m a procrastinator, I’m just now figuring out what to give my son’s awesome Readiness Kindergarten teacher. Luckily for you, this pattern could be used for a number of things (and I’m hoping that Mrs. Huntley will find other uses for it as well)!

    For Mrs. Huntley, I stuffed it with glue sticks and glue bottles (which were a constant need in the classroom throughout the year), and I also plan to add some candy and a small gift card for coffee. Hopefully she’ll love it… we sure love her!

    Huntley Gift Bag / Basket Crochet Pattern | Free teacher gift bag / basket crochet pattern by Little Monkeys Crochet

    About the Yarn

    Color Block Placemat Crochet Pattern with Lion Brand 24/7 Cotton Yarn | Crochet Placemat Pattern by Little Monkeys Crochet

    24/7 Cotton is a #4 medium weight yarn, although I’d definitely put it on the lighter side of the #4 family. It’s 100% mercerized cotton, which means it’s been treated with a process that brings out its brightness and sheen and helps it withstand multiple washings without losing that sheen. It comes in 186-yard skeins in a range of 24 gorgeous colors, from striking brights to natural-looking neutrals. It produces a stiffish (that’s probably not a real word) fabric, has a great balance of sheen and stitch definition, and doesn’t split at all during use. I’ve been seriously impressed with Lion Brand’s recently released yarns, and 24/7 Cotton is really no exception.

    Prefer a PDF?

    This pattern can be completed using the 100% free version right here on this page. However, many people prefer the convenience of a printable, ad-free PDF.

    All-Access Passholders get the ad-free version of this and all of my other blog patterns. It’s a pretty sweet deal, if I do say so myself! Learn more about it here or continuing scrolling for the free version.

    HUNTLEY GIFT BAG

    add-to-ravelry-favorites

    Level: Easy

    Size: 9″ long x 3″ wide x 6″ tall

    Hook: H (5.00mm)

    Yarn: About 295 yards total of a #4 medium weight 100% mercerized cotton yarn. I used 24/7 Cotton (by Lion Brand) in color blocks of Lilac, Café Au Lait, and Ecru. You will be holding two strands together, so you can either buy two skeins of each color (if you’re using my color changes), or you can buy 1 skein of each and roll half of each skein into its own center-pull ball.

    You’ll also need: Yarn needle

    Gauge: 12 rows of 10SC = 3″ square

    Abbreviations Used:
       ST (stitch)
    SL ST (slip stitch)
    SK (skip)
    CH (chain)
    SC (single crochet)
    HDC (half double crochet)
       SC+HDC (this just means to put a single crochet and a half double crochet in the same stitch)

    Notes:
    (1) This pattern is written in American Standard Terms.
    (2) Starting CHs do not count as stitches.
    (3) You are holding two strands together throughout the pattern.
    (4) Made at the correct gauge, this bag is stiff enough to stand on its own, but still has quite a bit of give. For a stiffer bag, use a smaller hook size or consider triple-stranding your yarn.

    – – – – – – – – – – – – – – – –

    To begin:
    With first color double-stranded, CH 26.

    Round 1: 3SC in 2nd CH from hook. SC in each of the next 23 CHs. 3SC in last CH, working around the tail to the other side. SC in each of the next 23 CHs. Join with a SL ST to 1st SC. (52)

    Round 2: CH1 (does not count as a stitch, here or throughout). 2SC in same ST, 2SC in each of the next 2 STS. SC in each of the next 23 STS. 2SC in each of the next 3 STS. SC in each of the next 23 STS. Join with a SL ST to 1st SC. (58)

    Round 3: CH1. 2SC in same ST. SC in next ST. (2SC in next, SC in next) two times. SC in each of the next 23 STS. (2SC in next, SC in next) three times. SC in each of the next 23 STS. Join with a SL ST to 1st SC. (64)

    Round 4: CH1. SC in each of first 2 STS. 2 SC in next ST. (SC in each of next 2 STS, 2SC in next) two times. SC in each of the next 23 STS. (SC in each of next 2 STS, 2SC in next) three times. SC in each of the next 23 STS. Join with a SL ST to 1st SC. (70)

    Round 5: CH1. SC+HDC in same ST, SK next ST. (SC+HDC in next ST, SK next ST) around. Join with a SL ST to the first SC. (70)

    Rounds 6-13: CH1, turn. SC+HDC in same ST, SK next ST. (SC+HDC in next ST, SK next ST) around. Join with a SL ST to the first SC. (70)

    Note: You should be back on the right side of your work at this point. If you find that you are on the wrong side, it’s not a big deal, you probably just miscounted a row, but you’ll need to turn on the next round to get yourself back to the right side.

    Change colors if desired.

    Rounds 14-20: CH1. SC in first ST and in each ST around. Join with a SL ST to the first SC. (70)

    Change colors if desired.

    Rounds 21-23: CH1. SC in first ST and in each ST around. Join with a SL ST to the first SC. (70)

    Round 24: CH1. SC in first ST and in next 19 STS. CH14. SK 11 STS. SC in next 24 STS. CH14. SK 11 STS. SC in next 4 STS. Join with a SL ST to the first SC. (48 SC + two CH14s)

    Visual of Round 24, creating the bag handles with the CH14:

    Huntley Gift Bag Crochet Pattern  |  Free teacher gift bag crochet pattern by Little Monkeys Crochet

    Round 25: CH1. SC in first ST and in each ST around, putting 1SC in each CH from the two CH14s of the previous round. Join with a SL ST to the first SC. (76)

    Rounds 26-27: CH1. SC in first ST and in each ST around. Join with a SL ST to the first SC. (76)

    Fasten off and weave in all ends.

  • Wildflower Dish Scrubby

    Wildflower Dish Scrubby

    Thank you to Red Heart for providing the yarn for this sample! 

    Not long ago, a really fun box of yarn from Red Heart landed on my doorstep. Included inside were two skeins of “Scrubby“, a yarn I’d seen online, but never in person. I couldn’t wait to get started playing with it! I came up with this cute little dish scrubby pattern in the shape of the wildflower that’s been so popular on the blog.

    About the Yarn

    Red Heart Scrubby is a #4 worsted weight, extremely textured polyester yarn. Thanks to that texture, it gets the gunk off your dishes with ease, and the polyester dries quicker than cotton. If you aren’t a fan of cotton crocheted dishcloths, this might be the perfect alternative!

    Wildflower Dish Scrubby Crochet Pattern with Red Heart Scrubby Yarn | Free Crochet Scrubby Pattern by Little Monkeys Crochet

    Because of the texture, Scrubby isn’t as easy to crochet with as a typical worsted weight yarn. I was a little intimidated at first, but once I got going with it, I was fine. It takes a little concentration (and a lot of bright light!), but as long as you understand the different parts of a stitch and what to look for, you’ll get the hang of crocheting with Scrubby!

    If you need a little extra help, check out this awesome help video from Marly Bird:

    Prefer a PDF?

    This pattern can be completed using the 100% free version right here on this page. However, many people prefer the convenience of a printable, ad-free PDF.

    All-Access Passholders get the ad-free version of this and all of my other blog patterns. It’s a pretty sweet deal, if I do say so myself! Learn more about it here or continuing scrolling for the free version.

    WILDFLOWER SCRUBBY

    add-to-ravelry-favorites

    Hook: I (5.50mm)
    Yarn: Red Heart Scrubby in two colors (< one ball of each). I used Grape (Color “A”) and Jelly (Color “B”).
    Difficulty: Easyish (the yarn is a bit tricky at first!)
    Gauge: Unimportant
    Finished Size: Sample is 5.5″ wide

    Notes:


    • This pattern is written in American Standard Terms.
    • Rounds will alternate between increase rounds and petals. Increase rounds will be called “round 1, 2, 3” etc, and petal rounds will be referred to as “1st round of petals, 2nd round of petals,” etc. Because ch petal round shares its space with the increase round below it, they are not counted as part of the pattern’s total rounds.
    • CH1 on the increase rounds does not count as a stitch.
    • Be mindful that the pattern alternates in calling for FLO (Front Loops Only) and BLO (Back Loops Only).
    • This pattern is based off of my Neverending Wildflower. If you haven’t done this pattern before, it might be a good idea to try the pattern below with regular yarn before attempting it with Scrubby. If you need a little extra help, give this pattern a try (it has photo tutorials).

    THE PATTERN

    With Color A, begin with a Magic Circle; CH1.

    Round 1: 12 DC in MC. Join with a SL ST to first DC. (12)

    Switch to Color B.

    1st Round of Petals (FLO): CH2. DC in same ST. In next ST, DC, CH2, SL ST. (SL ST to next St, CH2, DC in same ST. In next ST, DC, CH2, SL ST) around. SL ST to base of 1st CH2. (6 petals)

    Switch to Color A.

    Round 2 (BLO – You’re now going to work around Round 1 again, this time working in the loop that you ignored during the first round of petals): SL ST to 1st back loop of Round 1. CH1. 2DC in same ST. 2 DC in each ST around. Join with a SL ST to first DC. (24)

    2nd Round of Petals (FLO): CH2. DC in same ST. In next ST, DC, CH2, SL ST. (SL ST to next St, CH2, DC in same ST. In next ST, DC, CH2, SL ST) around. SL ST to base of 1st CH2. (12 petals)

    Switch to Color B.

    Round 3 (BLO): SL ST to 1st back loop of Round 2. CH1. 2DC in same ST, DC in next ST. (2DC in next ST, DC in next ST) around. Join with a SL ST to first DC. (36)

    3rd Round of Petals (FLO): CH2. DC in same ST. 2DC in next ST. In next ST, DC, CH2, SL ST. (SL ST to next ST, CH2, DC in same ST. 2DC in next ST. In next ST, DC, CH2, SL ST) around. SL ST to base of 1st CH2. (12 petals)

    Fasten off and weave in all ends.

  • Color Block Placemat

    Color Block Placemat

    Thank you to Lion Brand Yarn for supplying the yarn for this sample!

    Before we talk about this fabulous yarn, can we talk about this fabulous table!? My dad made it for me! Isn’t it gorgeous? I’ve wanted a farmhouse-style dining table for years and I can’t believe it’s mine! And the fact that my dad made it makes it infinitely more special than anything I could’ve found in a store. (He’s in the process of making some benches for it, but until then, try to look past the totally-not-matching-chairs from my previous table.)

    Color Block Placemat Crochet Pattern with Lion Brand 24/7 Cotton Yarn | Crochet Placemat Pattern by Little Monkeys Crochet

    I decided to make some placemats for it; you know, for when guests come over and we pretend that we’re classier than we really are. I’ve been wanting to try Lion Brand Yarn’s 24/7 Cotton, and I had a hunch that placemats might be just the right project. Have you seen the color choices for this yarn? Beautiful!

    Color Block Placemat Crochet Pattern with Lion Brand 24/7 Cotton Yarn | Crochet Placemat Pattern by Little Monkeys Crochet

    About the Yarn

    24/7 Cotton is a #4 medium weight yarn, although I’d definitely put it on the lighter side of the #4 family. It’s 100% mercerized cotton, which means it’s been treated with a process that brings out its brightness and sheen and helps it withstand multiple washings without losing that sheen. It comes in 186-yard skeins in a range of 24 gorgeous colors, from striking brights to natural-looking neutrals. It produces a stiffish (that’s probably not a real word) fabric, has a great balance of sheen and stitch definition, and doesn’t split at all during use. I’ve been seriously impressed with Lion Brand’s recently released yarns, and 24/7 Cotton is really no exception.

    Color Block Placemat Crochet Pattern with Lion Brand 24/7 Cotton Yarn | Crochet Placemat Pattern by Little Monkeys Crochet

    Prefer a PDF?

    This pattern can be completed using the 100% free version right here on this page. However, many people prefer the convenience of a printable, ad-free PDF.

    All-Access Passholders get the ad-free version of this and all of my other blog patterns. It’s a pretty sweet deal, if I do say so myself! Learn more about it here or continuing scrolling for the free version.

    COLOR BLOCK PLACEMAT

    add-to-ravelry-favorites

    Level: Easy

    Size: 13″x18″ (standard placemat size)

    Hook: G (4.25mm)

    Yarn: About 75-80 yards per color block of #4 medium weight 100% mercerized cotton yarn. I used 24/7 Cotton (by Lion Brand) in color blocks of Lilac, White, Café Au Lait, and Ecru. (Helpful tip: 1 skein of each color will produce 2 placemats, but 2 skeins of each color will produce 5 placemats.)

    You’ll also need: Yarn needle

    Gauge: 10 rows of 10 SC = a 2.25″ square

    Abbreviations Used:
       ST (stitch)
    SL ST (slip stitch)
    SK (skip)
    CH (chain)
    SC (single crochet)
    HDC (half double crochet)
       SC+HDC (this just means to put a single crochet and a half double crochet in the same stitch)

    Notes:
    (1) This pattern is written in American Standard Terms.
    (2) Starting CHs do not count as stitches.

    – – – – – – – – – – – – – – – –

    To begin:
    With first color, CH 55.

    Row 1: SC in 2nd CH from hook and in each remaining CH. (54)

    Rows 2-17: CH1, turn. HDC in 1st ST. (SK next ST, SC+HDC in next ST) across until 1 ST remains. SC in remaining ST. (54)

    Row 18: CH1, turn. SC in first ST and in each ST across. (54)

    Helpful tip: The SCs in Rows 18 & 19 help us to create a nice straight line where color blocks come together. If we didn’t add it, the color changes would have a more jagged edge.

    Switch to a new color; fasten off previous color.

    Row 19: CH1, turn. SC in first ST and in each ST across. (54)

    Rows 20-35: CH1, turn. HDC in 1st ST. (SK next ST, SC+HDC in next ST) across until 1 ST remains. SC in remaining ST. (54)

    Row 36: CH1, turn. SC in first ST and in each ST across. (54)

    For the two remaining color blocks: Switch to a new color and fasten off the previous color, then repeat Rows 19-36. (You will end with 4 color blocks totaling 72 rows.)

    Fasten off and weave in all ends.

    Color Block Placemat Crochet Pattern with Lion Brand 24/7 Cotton Yarn  |  Crochet Placemat Pattern by Little Monkeys Crochet