I think cowls are the greatest thing. They basically style themselves, and they don’t fall off. That’s a win for me!
The Cabin Fever Cowl is the match to the Cabin Fever Slouch. It’s chunky, oversized, and stylish. And it’s easy! There’s nothing groundbreaking about the design of this set; it’s just a simple stitch paired with a beautiful yarn in rich fall colors. And it’s beautiful.
I loved it so much, I made a second one!
About the Yarn
For this pattern set, I used a yarn that I acquired during our family vacation to the Great Smoky Mountains this summer. I have always wanted to visit an A.C. Moore store, but I live several hours from the nearest one… so when our road trip took us right through Cincinnati, we made a quick stop – literally, I basically ran to the yarn aisle and went straight for Stitch Studio By Nicole’s Earthtone, grabbed a bunch of them, and hurried up to checkout. (When you have a travel-weary toddler waiting for you in the van, you don’t get to take your time!)
I’ve seen several of you using Earthtone for my patterns throughout the years, and always wanted to get my hands on some. I absolutely love it. It’s soft and the colors are rich and beautiful and the tweediness adds so much character. A good tweed gives acrylic projects a much more natural look, and it’s also very forgiving. I can hardly even tell where my seam is from the outside!
VIDEO TUTORIAL
I’ve put together a step-by-step video tutorial for you visual learners! The instructions for the pattern are written right on the screen, so you can follow along visually while also developing your pattern-reading skills. It’s a feature I’ve gotten lots of compliments for on my videos, so it’s definitely worth the extra effort it takes to include it!
Prefer a PDF?
This pattern can be completed using the 100% free version right here on this page. However, many people prefer the convenience of a printable, ad-free PDF.
All-Access Passholders get the ad-free version of this and all of my other blog patterns. It’s a pretty sweet deal, if I do say so myself! Learn more about it here or continuing scrolling for the free version.
CABIN FEVER COWL
Difficulty: Easy
Finished Size: 35″ around x 14″ tall
Hook: H (5.0mm)
Yarn: Approx. 550 yards of #4 aran weight. You will need about 410 yards of COLOR A and 140 yards of COLOR B. Yarn used in sample photos is Stitch Studio By Nicole’s Earthtone, found at A.C. Moore stores. (Don’t live near an A.C. Moore? Other similar yarns include Vanna’s Choice by Lion Brand or Rustic Romantic by Hobby Lobby.)
Gauge: Done in 3rd loops, 15 HDC x 13 rows = 4″ square.
You’ll also need: Yarn needle
Terms and Abbreviations: ST/STS (stitch/stitches) SL ST (slip stitch) CH (chain) HDC (half double crochet) FHDC (foundation half double crochet – see “Special Stitches”) 3rd LOOP (work stitch into 3rd loop only – see “Special Stitches”)
Special Stitches:
Foundation Half Double Crochet (FHDC) This is the recommended way of beginning the pattern and is better shown than explained, so check out the video tutorial if you aren’t familiar with the technique. There is also an optional classic chain start noted in the pattern, if you would like to do that instead.
3rd Loop Only Half double crochet stitches have a 3rd loop that we utilize in this pattern. When working in turned rounds, as in this pattern, the 3rd loop can be found just below the front loop on the side of the work that is facing you. When instructed to work in “3rd loop only”, insert your hook into this special loop. This creates a delicate braided look on the opposite side of the pattern.
Notes: (1) This pattern is written in American Standard Terms.
(2) CH1s at the beginning of rows do not count as a stitch in the final stitch count.
(3) When instructed to “join”, always join with a slip stitch to the first stitch of the round.
(4) Instead of fastening off at each color change, you will be carrying your yarn up the seam on the inside of the cowl. Instructions for how to do this are written into the pattern.
INSTRUCTIONS
Round 1: With COLOR A, FHDC 130. (Alternate start: CH131, HDC in 2nd CH from hook and in each remaining CH.) Join, being careful to not twist the round. There will be a gap where the bottom edge of your first and last stitches do not touch; we’ll fix that later. (130)
Round 23: Attach COLOR B (do not fasten off COLOR A). CH1, turn. HDC in 3rd loops around. Join, making sure working tail from COLOR A is in front of the join stitch. (130)
Round 24: Switch to COLOR A(do not fasten off COLOR B). CH1, turn. HDC in 3rd loops around. Join, making sure working tail from COLOR B is behind the join stitch. (130)
From this point on, every time you join, be sure that the yarn is always carried up on the same side of the fabric.
Rounds 25-44: Repeat Rounds 23-24. (Note that when you repeat Round 23, you are no longer attaching COLOR B as it is already attached; you are just switching back to it.)
Fasten off. Use your starting tail to stitch the gap at the beginning closed, then weave in all ends.
– – – – – – – – – –
Done! If you’re sharing on social media, be sure to hashtag #cabinfevercowl and tag me @yarnandchai.design. Hope you enjoyed it!
A good slouchy beanie is a staple in any cozy cold weather wardrobe. And I don’t know about you, but I am so ready for a little cold weather!
The snow can hold off for a while as far as I’m concerned, but bring on the crisp fall air and the fireplaces and apple cider and changing leaves. Fall in Michigan is short-lived but absolutely stunning!
To complete the set, I made matching cowl. Click here to view the pattern for the Cabin Fever Cowl!
About the Yarn
For this pattern set, I used a yarn that I acquired during our family vacation to the Great Smoky Mountains this summer. I have always wanted to visit an A.C. Moore store, but I live several hours from the nearest one… so when our road trip took us right through Cincinnati, we made a quick stop – literally, I basically ran to the yarn aisle and went straight for Stitch Studio By Nicole’s Earthtone, grabbed a bunch of them, and hurried up to checkout. (When you have a travel-weary toddler waiting for you in the van, you don’t get to take your time!)
I’ve seen several of you using Earthtone for my patterns throughout the years, and always wanted to get my hands on some. I absolutely love it. It’s soft and the colors are rich and beautiful and the tweediness adds so much character. A good tweed gives acrylic projects a much more natural look, and it’s also very forgiving. I can hardly even tell where my seam is from the outside!
(Edited 10/20/20 to add: This yarn is now discontinued. There are so many beautiful aran weight yarns available in stores, though, so no worries… just use your favorite one!)
VIDEO TUTORIAL
I’ve put together a step-by-step video tutorial for you visual learners! The instructions for the pattern are written right on the screen, so you can follow along visually while also developing your pattern-reading skills. It’s a feature I’ve gotten lots of compliments for on my videos, so it’s definitely worth the extra effort it takes to include it!
ABOUT THOSE CUTE LEATHER TAGS
Those adorable tags on my sample hats aren’t actually leather at all – they’re cork! I had mine printed by All This Wood (affiliate link). They always do a great job for me. If you purchase tags of your own through this link, you won’t pay any extra, but I’ll get a small percentage of the sale. My affiliate links are just one of the ways I am able to keep releasing free patterns, so I am always incredibly appreciative of anyone who uses them!
Prefer a PDF?
This pattern can be completed using the 100% free version right here on this page. However, many people prefer the convenience of a printable, ad-free PDF.
All-Access Passholders get the ad-free version of this and all of my other blog patterns. It’s a pretty sweet deal, if I do say so myself! Learn more about it here or continuing scrolling for the free version.
CABIN FEVER SLOUCH
Difficulty: Easy
Finished Size: 9″ tall x 9.75″ wide, when laid flat
Hook: H (5.0mm)
Yarn: Approx. 200 yards of #4 aran weight. You will need about 125 yards of COLOR A and 75 yards of COLOR B. Yarn used in sample photos is Stitch Studio By Nicole’s Earthtones, previously found at A.C. Moore stores (now discontinued).
Gauge: First 5 rounds = 4″ across
You’ll also need: Yarn needle, fur pom (optional)
Terms and Abbreviations: MC (magic circle – view tutorial here) ST/STS (stitch/stitches) SL ST (slip stitch) CH (chain) HDC (half double crochet) 3rd LOOP (work stitch into 3rd loop only – see “Special Stitch”)
Special Stitch:
3rd Loop Only Half double crochet stitches have a 3rd loop that we utilize in this pattern. When working in turned rows, as in this pattern, the 3rd loop can be found just below the front loop on the side of the work that is facing you. (When you work the band of the hat, it will be behind the back loop.) When instructed to work in “3rd loop only”, insert your hook into this special loop. This creates a delicate braided look on the opposite side of the pattern.
Notes: (1) This pattern is written in American Standard Terms. (2) CH1s at the beginning of rows do not count as a stitch in the final stitch count. (3) When instructed to “join”, always join with a slip stitch to the first stitch of the round. (4) Instead of fastening off at each color change, you will be carrying your yarn up the seam on the inside of the hat. Instructions for how to do this are written into the pattern.
INSTRUCTIONS
To begin: With COLOR A, make a magic circle, CH1.
Round 1: 10 HDC in MC, join. (10)
Round 2: Attach COLOR B (do not fasten off COLOR A); CH1, turn. In 3rd loops, 2 HDC in each ST around. Join, making sure working tail from COLOR A is in front of the join stitch. (20)
Round 3: Switch to COLOR A; CH1, turn. In 3rd loops throughout, 2 HDC in first ST, HDC in next ST, (2 HDC in next ST, HDC in next ST) around. Join, making sure working tail from COLOR B is behind the join stitch. (30)
From this point on, every time you join, be sure that the yarn is always carried up on the same side of the fabric.
Round 4: Switch to COLOR B; CH1, turn. In 3rd loops throughout, 2 HDC in first ST, HDC in each of the next 2 STS, (2 HDC in next ST, HDC in each of the next 2 STS) around. Join. (40)
Round 5: Switch to COLOR A; CH1, turn. In 3rd loops throughout, 2 HDC in first ST, HDC in each of the next 3 STS, (2 HDC in next ST, HDC in each of the next 3 STS) around. Join. (50)
Round 6: Switch to COLOR B; CH1, turn. In 3rd loops throughout, 2 HDC in first ST, HDC in each of the next 4 STS, (2 HDC in next ST, HDC in each of the next 4 STS) around. Join. (60)
Round 7: Switch to COLOR A; CH1, turn. In 3rd loops throughout, 2 HDC in first ST, HDC in each of the next 5 STS, (2 HDC in next ST, HDC in each of the next 5 STS) around. Join. (70)
Round 8: Switch to COLOR B; CH1, turn. In 3rd loops throughout, 2 HDC in first ST, HDC in each of the next 6 STS, (2 HDC in next ST, HDC in each of the next 6 STS) around. Join. (80)
Round 9: Switch to COLOR A; CH1, turn. In 3rd loops, HDC in each ST around. Join. (80)
Round 10: Switch to COLOR B; CH1, turn. In 3rd loops, HDC in each ST around. Join. (80)
Round 11: Switch to COLOR A; CH1, turn. In 3rd loops, HDC in each ST around. Join. (80)
Rounds 12-23: Repeat Rounds 10-11.
– – – – – –
Next we’re going to make the band of the hat, and we will be working in vertical rows, attaching it to Round 23 (the final round of the hat) with SL STS as we go.
– – – – – –
Row 1: CH9. SC in 2nd chain from hook and in each of the remaining 7 chains. SL ST into the 3rd loop (now found behind the top loops since we didn’t turn our work) of the first HDC from Round 23, the stitch on which your CH9 was built. SL ST into the 3rd loop of the next HDC from Round 23. (8, plus the two slip stitches along Round 23)
The section we just created, built on the CH9, will hereafter be referred to as the “ribbing.”
Row 2: CH1, turn. Skipping over the 2 SL STS you put in Round 23, SC in BLO of each of the first 7 STS of the ribbing. SC in both loops of the last ST. (8)
Row 3: CH1, turn. SC in 1st ST. SC in BLO of each of the remaining 7 STS of the ribbing. SL ST in 3rd loop of each of the next 2 STS of Round 23. (8, plus the 2 SL STS along Round 23)
Row 4: CH1, turn. Skipping over the 2 SL STS you put in Round 23, SC in BLO of each of the first 7 STS of the ribbing. SC in both loops of the last ST. (8)
Rows 5-80: Repeat Rows 3-4 all the way along Round 23.
Fasten off and use your tail to sew together the gap between the first and last rows of the ribbing, then weave in your ends.
– – – – – – – – – –
Done! If you’re sharing on social media, be sure to hashtag #cabinfeverslouch and tag me @yarnandchai.design. Hope you enjoyed it!
The linen (or moss, or seed, or granite) stitch has become a popular choice for baby blankets, and it’s easy to see why. A little quicker than a purely single crocheted blanket (which I also love; see here), the linen stitch still provides a solid and modern-looking fabric, safe for those little baby fingers.
The linen stitch is very basic, so it’s left up to the crocheter to decide how to spruce it up with color. I actually got the inspiration for this blanket from one of my son’s newborn socks! (What can I say? You never know when inspiration will strike.)
ABOUT THE YARN
This was my first experience with Lion Brand’s Feels Like Butta (affiliate link) yarn. It’s just as soft as they say it is; a little dense, but great for a stroller or carseat blanket for a cooler-weather baby. It doesn’t split at all, and the colors are fresh and bright.
VIDEO TUTORIAL
I’ve put together a step-by-step video tutorial for you visual learners! The instructions for the pattern are written right on the screen, so you can follow along visually while also developing your pattern-reading skills. It’s a feature I’ve gotten lots of compliments for on my videos, so it’s definitely worth the extra effort it takes to include it!
Prefer a PDF?
This pattern can be completed using the 100% free version right here on this page. However, many people prefer the convenience of a printable, ad-free PDF.
All-Access Passholders get the ad-free version of this and all of my other blog patterns. It’s a pretty sweet deal, if I do say so myself! Learn more about it here or continuing scrolling for the free version.
LINEN STITCH BABY BLANKET
Difficulty: Easy
Finished Size: Approx. 30” wide x 36” long (stroller blanket size)
Hook: J (6.0mm) and F (4.0mm). My favorite hooks are Clover Amour.
Yarn: Approx. 1100 yards of #4 aran weight yarn in 3 colors. Yarn used in sample is Lion Brand Feels Like Butta in Pale Grey (COLOR A, about 390 yards), White (COLOR B, about 320 yards), and Lilac (COLOR C, about 390 yards).
Gauge: With larger hook, the following pattern = 4″ square:
To begin: CH19. Row 1: SC in 3rd CH from hook. (CH1, SK next ST, SC in next ST) across. Rows 2-18: CH2 (counts as first CH1 space), turn. SK first ST, SC in CH1 space. (CH1, SK next ST, SC in next CH1 space) across.
You’ll also need: Yarn needle
Terms and Abbreviations: ST/STS (stitch/stitches) SL ST (slip stitch) SK (skip) CH (chain) SC (single crochet) BLO (back loop only)
Notes: (1) This pattern is written in American Standard Terms.
(2) A video tutorial is available up in the post, or by clicking here.
(3) When doing your gauge check: If you have to move up or down in hook size to match gauge, be sure to move up or down the same number of millimeters for your smaller hook as well.
(4) Fasten off at each color change.
(5) Because of all of the CH1s in the linen stitch, you’re going to want to try to keep a loose tension in the body of the blanket. CHs do not have the stretch that other stitches do. Adjust your hook size if it seems the body of the blanket is getting wider or thinner than the ribbed section.
– – – – – – – – – –
INSTRUCTIONS
TOP RIBBING
With smaller hook and COLOR A, CH11.
Row 1: SC in 2nd CH from hook and in each remaining CH. (10)
Rows 2-144 (or until ribbing measures about 29-30″ long): CH1, turn. SC in first ST. SC in BLO of each of the next 8 STS. SC in final ST. (10)
– – – – – – – – – –
BODY (Row count restarts back to 1)
Switch to larger hook. Pay attention in your first few rows, and if they seem like they are getting wider than the strip of ribbing, downsize your hook; if they are pulling the ribbing inward, choose a larger hook.
Body, Row 1: CH2 (counts as first CH1 space), do not turn. We are now working down the long edge of the ribbing. Look at the edge of the ribbing as a series of tiny peaks and valleys. Skip over the first peak and SC in the valley right after it. (CH1, SK next peak, SC in next valley) across, putting your final SC in the corner of the ribbing at the other end. (72 CH1 spaces + 72 SC)
Rows 2-154: CH2 (counts as first CH1 space), turn. SK first ST, SC in CH1 space. (CH1, SK next ST, SC in next CH1 space) across. (72 CH1 spaces + 72 SC). Use the following color pattern:
Rows 2-32 (32 rows): COLOR A Rows 33-34 (2 rows): COLOR B Rows 35-42 (8 rows): COLOR A Rows 43-46 (4 rows): COLOR B Rows 47-52 (6 rows): COLOR A Rows 53-58 (6 rows): COLOR B Rows 59-62 (4 rows): COLOR A Rows 63-70 (8 rows): COLOR B Rows 71-72 (2 rows): COLOR A Rows 73-82 (10 rows): COLOR B Rows 83-84 (2 rows): COLOR C Rows 85-92 (8 rows): COLOR B Rows 93-96 (4 rows): COLOR C Rows 97-102 (6 rows): COLOR B Rows 103-108 (6 rows): COLOR C Rows 109-112 (4 rows): COLOR B Rows 113-120 (8 rows): COLOR C Rows 121-122 (2 rows): COLOR B Rows 123-154 (32 rows): COLOR C
– – – – – – – – – – – – – –
BOTTOM RIBBING
In this section, we will be creating the bottom ribbing by making vertical ribs and attaching them with slip stitches to the last row of the body as we go. We’ll be referring to “Row 154”; that’s the last row of the body of the blanket we completed, and that’s what the ribbing will be attaching to. I cover this in the video tutorial for this blanket, but if you feel you need a little more in-depth help with this part, here’s another tutorial video that is specifically about this technique.
– – –
Switch to smaller hook; CH11.
Row 1: Turn. SC in 2nd chain from hook and in each of the remaining 9 chains. SL ST into the first SC from Row 154, the stitch on which your CH11 was built. SL ST into the 1st CH1 space from Row 154. (10, plus the two slip stitches along Row 154)
The section we just created, built on the CH11, will hereafter be referred to as the “ribbing.”
Row 2: CH1, turn. Skipping over the 2 SL STS you put in Row 154, SC in BLO of each of the first 9 STS of the ribbing. SC in both loops of the last ST. (10)
Row 3: CH1, turn. SC in 1st ST. SC in BLO of each of the remaining 9 STS of the ribbing. SL ST in next SC and next CH1 space along row 154. (10, plus the 2 SL STS along Row 154)
Row 4: CH1, turn. Skipping over the 2 SL STS you put in Row 154, SC in BLO of each of the first 9 STS of the ribbing. SC in both loops of the last ST. (10)
Rows 5-144: Repeat Rows 3-4 all the way across Row 154.
Fasten off and weave in ends.
– – – – – – – – – –
Done! If you’re sharing on social media, be sure to hashtag #linenstitchbabyblanket and tag me @yarnandchai.design
I’ve been getting so many requests for a square version of my baskets and I’ve promised to publish a pattern… today I’m finally delivering on that promise!
You can read through my design process, or scroll down for the free pattern.
Figuring Out the Base
I knew that I wanted these baskets to be built in one piece (no seaming). I initially started with a square base made in the round, like you would build a granny square, but I just wasn’t happy with the way the base puckered. Baskets need a tighter-than-usual hook and yarn combo that simply isn’t compatible with a nice flat worked-in-the-round square. So next, I tried a square worked in rows. Much better! Because of the tightness, the square didn’t lay flat at first, but by the time I finished the basket you never would’ve known.
Stabilizing the Sides
I also experimented with the plastic canvas to figure out the best way to utilize it. (If you aren’t familiar with my plastic canvas method for round baskets, check it out!) Round baskets naturally have a balanced design that provides structure to the edges, but square baskets lack that because of their long edges and inner corners. I started by putting folds in the canvas to accommodate the corners, but ended up cutting at the folds and stacking separate pieces against the individual sides of the basket. It seemed to make the corners a little more defined.
Adding Handles
I grabbed some leather from the craft store and cut it into small strips for the handles. I initially tried to attach them to the basket with rivets, but it wasn’t going very smoothly, and even when I did a decent job of hammering them, they still popped out of the yarn. So, I went with Plan B and sewed them on. I used a tiny hole punch to punch 4 holes in each end and used leftover yarn to sew them on with an “X”, going right through the plastic canvas on the inside of the basket. Of course, handles on your basket are totally optional. It does add a lot of character, though!
So after lots of trial and error, I think I’ve come up with a pretty cute square basket!
About Those Cute Leather Tags
Those adorable tags on my baskets aren’t actually leather at all – they’re cork! I had mine printed by All This Wood (affiliate link). They always do a great job for me. If you purchase tags of your own through this link, you won’t pay any extra, but I’ll get a small percentage of the sale. My affiliate links are just one of the ways I am able to keep releasing free patterns, so I am always incredibly appreciative of anyone who uses them!
Video Tutorial
I’ve put together a video tutorial to assist you throughout this pattern. The video tutorial is specifically designed to help you create any size of basket you want! Instructions for inserting the plastic canvas can be found at 27:35.
Prefer a PDF?
This pattern can be completed using the 100% free version right here on this page. However, many people prefer the convenience of a printable, ad-free PDF.
All-Access Passholders get the ad-free version of this and all of my other blog patterns. It’s a pretty sweet deal, if I do say so myself! Learn more about it here or continuing scrolling for the free version.
Herringbone Square Basket Set
Difficulty: Easy
Yarn: I used Bernat Maker Home Dec (a #5 bulky weight cotton/nylon blend) in “Clay”. Yarn amounts are listed with individual pattern sizes.
Hooks: H (5.0mm) and G (4.25mm)
Gauge: With larger hook, 14 SC x 14 rows =4″ square
You’ll also need: Yarn needle, stitch marker, heavy duty plastic canvas
Terms and Abbreviations: ST/STS (stitch/stitches) SL ST (slip stitch) SK (skip) CH (chain) SC (single crochet) HDC (half double crochet) HHDC (herringbone half double crochet; see Special Stitches, below)
3rd Loop (see Special Stitches, below)
Special Stitches:
HHDC: Yarn over, insert hook into stitch. Yarn over, pull loop through stitch AND through first loop on hook (this is similar to a slip stitch motion). Two loops remain on hook. Yarn over and pull through both loops.
3rd Loop: Half double crochet stitches have a 3rd loop that we utilize in this pattern. For this pattern the 3rd loop can be found just below the back loop on the side of the work that is facing away from you. When instructed to work in “3rd loop only”, reach over the two top loops and insert your hook into this special loop. This creates a delicate braided look on the right side of the pattern. Also called Camel Stitch or RibHDC.
Notes: (1) This pattern is written in American Standard Terms.
(2) IMPORTANT: Part of this pattern is worked in rows, part is worked in seamless rounds, and a small portion is worked in joined rounds. Pay attention, and only join, chain and/or turn when specifically instructed. Use a stitch marker to mark the beginning of your rounds when working seamlessly.
(3) When instructed to “join”, you should always join with a SL ST to the top of the first ST of that round.
(4) The finished size of each basket is listed on its individual pattern.
(5) Heavy duty plastic canvas is inexpensive and can be purchased in individual sheets at many craft stores.
(6) To resize the basket, simply chain the length you want one side to be, then crochet the same number of rows as you have stitches in each row.
Row 1: SC in 2nd CH from hook and in each remaining chain. (16)
Rows 2-16: CH1, turn. SC across. (16)
Next we’ll switch to rounds and build up the sides of the basket.
Round 1: CH1, turn. HHDC in each ST across (16 STS). Turn corner and HHDC in each row, as you would if you were adding an edging (16 STS). Turn corner and HHDC in each ST from the starting chain (16 STS). Turn corner and HHDC in each row (16 STS). Do not join. (64)
Rounds 2-6: HHDC in each ST around. (64)
Round 7: HHDC in each of the first 62 STS. SC in each of the 2 remaining STS. Join. (64)
Round 8: CH1. HDC in each ST around. Join. (64)
Switch to smaller hook.
Round 9: SC in 3rd loop of each ST around. Do not join. (64)
Rounds 10-18 (or until edge touches bottom of basket when folded down): SC in each ST around. (64)
SL ST into the next ST to smooth down the round. Fasten off and weave in ends, then proceed to “Adding Plastic Canvas.”
Row 1: SC in 2nd CH from hook and in each remaining chain. (22)
Rows 2-22: CH1, turn. SC across. (22)
Next we’ll switch to rounds and build up the sides of the basket.
Round 1: CH1, turn. HHDC in each ST across (22 STS). Turn corner and HHDC in each row, as you would if you were adding an edging (22 STS). Turn corner and HHDC in each ST from the starting chain (22 STS). Turn corner and HHDC in each row (22 STS). Do not join. (88)
Rounds 2-8: HHDC in each ST around. (88)
Round 9: HHDC in each of the first 86 STS. SC in each of the 2 remaining STS. Join. (88)
Round 10: CH1. HDC in each ST around. Join. (88)
Switch to smaller hook.
Round 11: CH1. SC in 3rd loop of each ST around. Do not join. (88)
Rounds 12-21 (or until edge touches bottom of basket when folded down): SC in each ST around. (88)
SL ST into the next ST to smooth down the round. Fasten off and weave in ends, then proceed to “Adding Plastic Canvas.”
– – – – – – – – – – – – – – –
Adding Plastic Canvas
Cut across your plastic canvas to make strips that are the same height as the inner layer of the basket, and as long as two sides of it. (Cut at least 4; add more for more stability.) Set your basket so that it is completely unfolded. Fold strips of canvas in half and insert along each edge, then fold the inside layer down over the canvas. Work the fabric until it all lays neat and flat.
If you want, you can sew the inner edge of the fabric to the bottom of the basket to keep everything in place. (Don’t do this if you want your basket to be machine washable.)
A visual demonstration of this process can be found in the tutorial video at the 27:35 mark.
– – – – – – – – – – – – – – –
Adding Handles (Optional)
Cut two equal-sized strips of leather (whatever size you want). Punch 4 holes in each end in a square shape, then use a small yarn needle to sew them to the sides of your basket, working though both layers of crocheted fabric and the plastic canvas in between.
You’re done!
I hope you enjoyed this tutorial. If you’re sharing your baskets on social media, be sure to use hashtag #herringbonebasket and tag me @yarnandchai.design!
One of the most common Malia-related requests I get is for a blanket pattern. I always said I’d publish one, but it’s taken me a long time. (Sorry!)
Truthfully, I’ve been incredibly overwhelmed with life (business and otherwise) for a while. So about a year ago, I decided to <*gasp*> ask for some help. I commissioned a talented crocheter from our Facebook group to create a Malia Baby Blanket with the pattern I had in my head. It was a little scary for me, considering this was the first time I’d asked someone to invest time making pattern of mine that I hadn’t actually made and tested myself yet. But as you can see, it went well… and Erica did a phenomenal job with it!
I mean look at all those beautiful LBS stitches.
It’s taken me entirely too long to get this pattern published (again, life = overwhelming), but here it is!
ABOUT THE YARN
I sent Erica some Paintbox Simply DK for this sample. I’d never used Paintbox yarn before, and I have to say, the color choices are pretty amazing. I feel like some of the larger yarn companies are trending toward putting out more new lines of yarn with fewer colors to choose from in each one, and I love Paintbox’s philosophy of keeping it simple, because that enables them to be able to offer a wide variety of color choices. This particular yarn (Simply DK) is an acrylic, and while it’s soft, I wasn’t sure if it was soft enough to be a baby blanket. But with a wash, the blanket definitely softened up.
VIDEO TUTORIAL
If you need a little extra help with the stitches in the Malia stitch pattern, here is a video tutorial! (Please note that this tutorial does not follow the Malia Baby Blanket pattern; I simply show you how to do the Malia stitch pattern by crocheting up a swatch of it.)
Prefer a PDF?
This pattern can be completed using the 100% free version right here on this page. However, many people prefer the convenience of a printable, ad-free PDF.
All-Access Passholders get the ad-free version of this and all of my other blog patterns. It’s a pretty sweet deal, if I do say so myself! Learn more about it here or continuing scrolling for the free version.
MALIA BABY BLANKET
Difficulty: Easyish
Finished Size: Approx. 30” wide x 37.5” long (stroller blanket size). Each color block is approx. 7.5” tall.
Hook: 4.5mm (US-7) hook
Yarn: Approx. 1,950 yards of #3 DK weight in 5 colors. You’ll need about 390 yards per color. Yarn used in sample photos is Paintbox Simply DK in Paper White (COLOR A), Stormy Grey (B), Marine Blue (C), Bubblegum Pink (D), and Neon Pink (E).
Gauge: 18 HDC x 14 rows = 4″ square
You’ll also need: Yarn needle
Terms and Abbreviations: ST/STS (stitch/stitches) SL ST (slip stitch) SK (skip) CH (chain) SC (single crochet) HDC (half double crochet) LBS (large bean stitch – see “Special Stitches”) BLO (back loop only) 3rd LOOP (work stitch into 3rd loop only – see “Special Stitches”)
Special Stitches:
Large Bean Stitch (LBS) Insert hook into stitch, yarn over and pull through (2 loops on hook). Yarn over, insert hook into same stitch, yarn over and pull through (4 loops on hook). Yarn over, insert hook into same stitch, yarn over and pull through (6 loops on hook). Yarn over, insert hook into same stitch, yarn over and pull through (8 loops on hook). Yarn over and pull through all 8 loops. Chain 1 to close the stitch. (Because this stitch creates two sets of loops – one when creating the bean, and one when closing the stitch – each completed Large Bean Stitch will count for two stitches in the row or round’s final stitch count.)
3rd Loop Only Half double crochet stitches have a 3rd loop that we utilize in this pattern. When working in turned rows, as in this pattern, the 3rd loop can be found just below the front loop on the side of the work that is facing you. When instructed to work in “3rd loop only”, insert your hook into this special loop. This creates a delicate braided look on the opposite side of the pattern.
Notes: (1) This pattern is written in American Standard Terms.
(2) CH1s at the beginning of rows do not count as a stitch in the final stitch count.
(3) A video tutorial for the stitch pattern is available up in the post, or by clicking here.
(4) You may prefer to use one hook size larger than your gauge hook to complete the ribbing at the beginning and end of the pattern. Some people tend to crochet ribbing a little tighter, which can result in some minor pulling inward at each end of the blanket.
INSTRUCTIONS
TOP RIBBING
With COLOR A, CH11.
Row 1: SC in 2nd CH from hook and in each remaining CH. (10)
Rows 2-144 (or until ribbing measures about 30″ long; be sure to complete an even number of rows): CH1, turn. SC in first ST. SC in BLO of each of the next 8 STS. SC in final ST. (10)
– – – – – – – – – –
BODY (Row count restarts back to 1)
Body, Row 1: CH1, do not turn. SC in each row end along the long edge of the ribbing. (144, or however many ribbing rows you completed)
Row 2: CH1, turn. SC in first ST. (SK next ST, LBS in next ST) 71 times. SC in final ST. (144)
Row 3: CH1, turn. HDC in each ST across. (144)
Row 4: CH1, turn. SC in first ST. SC in 3rd loop of each of the next 142 STS. SC in final ST. (144)
Row 5: CH1, turn. SC in each ST across. (144)
Row 6: CH1, turn. SC in first ST. (LBS in next ST, SK next ST) 71 times. SC in final ST. (144)
Row 7: CH1, turn. HDC in each ST across. (144)
Row 8: CH1, turn. SC in first ST. SC in 3rd loop of each of the next 142 STS. SC in final ST. (144)
Row 9: CH1, turn. SC in each ST across. (144)
Row 10: CH1, turn. SC in first ST. (SK next ST, LBS in next ST) 71 times. SC in final ST. (144)
Row 11: CH1, turn. HDC in each ST across. (144)
Row 12: CH1, turn. SC in 3rd loop of each ST across. (144)
Rows 13-28: Repeat Rows 5-12, in order, twice. (144)
– – – – – – – – – –
Switch to COLOR B; fasten off COLOR A.
Rows 29-60: Repeat Rows 5-12, in order, 4 times. (144)
Rows 61-64: Repeat Rows 5-8. (144)
– – – – – – – – – –
Switch to COLOR C; fasten off COLOR B.
Rows 65-68: Repeat Rows 9-12. (144)
Rows 69-100: Repeat Rows 5-12, in order, 4 times. (144)
– – – – – – – – – –
Switch to COLOR D; fasten off COLOR C.
Rows 101-132: Repeat Rows 5-12, in order, 4 times. (144)
Rows 133-136: Repeat Rows 5-8. (144)
– – – – – – – – – –
Switch to COLOR E; fasten off COLOR D.
Rows 137-140: Repeat Rows 9-12. (144)
Rows 141-164: Repeat Rows 5-12, in order, 3 times. (144)
– – – – – – – – – – – – – –
BOTTOM RIBBING
In this section, we will be creating the bottom ribbing by making vertical ribs and attaching them with slip stitches to the last row of the body as we go. We’ll be referring to “Row 164” quite a bit; that’s the last row of the body of the blanket we completed, and that’s what the ribbing will be attaching to. If you need a little help with this part, here’s a tutorial video.
CH11.
Row 1: Turn. SC in 2nd chain from hook and in each of the remaining 9 chains. SL ST into the first SC from Row 164, the stitch on which your CH11 was built. SL ST into the next SC from Row 164. (10, plus the two slip stitches along Row 164)
The section we just created, built on the CH11, will hereafter be referred to as the “ribbing.”
Row 2: CH1, turn. Skipping over the 2 SL STS you put in Row 164, SC in BLO of each of the first 9 STS of the ribbing. SC in both loops of the last ST. (10)
Row 3: CH1, turn. SC in 1st ST. SC in BLO of each of the remaining 9 STS of the ribbing. SL ST in each of the next 2 STS of Row 164. (10, plus the 2 SL STS along Row 164)
Row 4: CH1, turn. Skipping over the 2 SL STS you put in Row 164, SC in BLO of each of the first 9 STS of the ribbing. SC in both loops of the last ST. (10)
Rows 5-144: Repeat Rows 3-4 all the way across Row 164.
Fasten off and weave in ends.
– – – – – – – – – –
Done! If you’re sharing on social media, be sure to hashtag #maliababyblanket and tag me @yarnandchai.design
The Mosaic stitch pattern (that’s what I call it, but it’s really just a combination of single crochets and spike stitches) has been so fun to design with. It started with the Mosaic Baskets and soon became a Floor Pouf and a Bucket Bag, too. It’s one of those patterns that produces a fabric that looks good in so many different forms.
My latest addition to the Mosaic collection is the Mosaic Potholder (or trivet, or hotpad, depending on what you call it). I used all cotton (because heat melts acrylic), and stuck with my formula of light background + dark, thinner mosaic to produce this beautiful kitchen helper that, at least in my opinion, looks like it could hang out on the shelves at Target next to all the other farmhouse-chic decor.
I’m way too time-starved to make more than one of anything these days, but I can just imagine how beautiful a set of two or three of these, in different complimentary colors, would look in my kitchen. And what a great gift idea for a new bride or a new homeowner!
Speaking of being time-starved, this pattern probably deserves a video tutorial, but it’s just not going to happen at this point. If this is your first experience with a Mosaic pattern, you might want to consider grabbing some scrap yarn and completing a small Mosaic Basket using this video tutorial. It’s a quick project and it will teach you everything you need to know and clear up any confusion that you may have, especially if you’re a visual learner like me.
Also, off topic, but does anyone else have a kitty who assumes everything you make is for him? If I leave anything out, there is a 120% chance I will walk back in the room and he will be snuggled up with it.
Prefer a PDF?
This pattern can be completed using the 100% free version right here on this page. However, many people prefer the convenience of a printable, ad-free PDF.
All-Access Passholders get the ad-free version of this and all of my other blog patterns. It’s a pretty sweet deal, if I do say so myself! Learn more about it here or continuing scrolling for the free version.
Yarn: For COLOR A, approx. 150 yards of #4 worsted weight cotton (I used I Love This Cotton in “Ivory”). For COLOR B, approx. 150 yards of #10 cotton thread (I used Artiste in “Deep Ocean”).
Gauge: 19SC = 4″ in length. Stitch height does not matter for this pattern.
You’ll also need: Yarn needle
Terms and Abbreviations:
ST/STS (stitch/stitches) SL ST (slip stitch) SK (skip) CH (chain) SC (single crochet) Spike Stitch (see Special Stitches, below)
Special Stitches:
SC Spike Stitch: Instead of inserting your hook into the top loops of the stitch, insert them into its base, then complete an SC. This will wrap your SCs over the top of the SCs from the previous round.
SL ST Spike Stitch: Follow instructions for SC Spike Stitch, but instead of completing an SC, complete a SL ST.
Notes: (1) This pattern is written in American Standard Terms.
(2) CHs do not count as a stitch.
(3) There is no stitch multiple for this pattern. If you want to make it larger or smaller, add or subtract chains at the beginning and repeat rounds as many times as necessary for the height you want.
(4) Because we utilize the SC Spike Stitch for entire rounds throughout the pattern, we will be referring to those rounds as an extension of the SC rounds they are being worked into. For example, if Round 1 is a round of SC, then the very next round which places spike stitches on top of those SCs will be referred to as Round 1B. This just makes for easier counting.
INSTRUCTIONS
To Begin: With COLOR A, CH35.
Round 1: SC in 2nd CH from hook and in each remaining CH. Working down the opposite side of the chain, SC across. (You have now worked in both sides of each chain.) Do not join. Pull the loop on your hook up a couple inches so it doesn’t unravel, then remove your hook. (68)
Round 1B: Insert hook into top loops of the first ST of Round 1; attach COLOR B and CH1, then SC SPIKE ST in same ST. SC SPIKE STITCH into next ST and each ST around. Pull the loop on your hook up a couple inches so it doesn’t unravel, then remove your hook. (68)
Round 2: Reinsert hook into loop from COLOR A. SC in each ST around (you’re working in the top loops of the SC SPIKE STS from the previous round). Remove hook. (68)
Round 2B: Reinsert hook into loop from COLOR B. SC SPIKE ST in each ST around. Remove hook. (68)
Take a quick moment to weave in your starting tails, because it will be much harder to do so the further into the pattern you get. Then…
Repeat Rounds 2 and 2B until potholder measures about 7.5″ tall.
Lay your potholder flat and notice that your starting ST for the last round has moved slightly away from the edge of the potholder (see first image below). This is normal and has to do with the anatomy of a stitch and the fact that we aren’t turning our rounds, but that’s a lesson for another day. For now, to get us back to the edge where we need to be to complete the final round of the potholder, follow these instructions:
Reinsert hook into loop from COLOR A. Count how many stitches are between your hook and the folded edge of the potholder (I had 6; it’s ok if your number is slightly different). SC in all but the last 2 STS, then SL ST in each of the last 2 STS. Remove hook.
Reinsert hook into loop from COLOR B. Follow the instructions from Step 1, but with SPIKE STS. Remove hook and fasten off COLOR B; weave in its end.
Final Round: Reinsert hook into loop from COLOR A. CH1; SC into same ST. Continue to SC along top of the potholder, stopping when you get to the fold on the opposite side; CH20, then SL ST back into the same ST (at the base of the CH20) to form a loop. SC in each ST along the other side of the potholder to complete the round. Join with a SL ST to the top of the first SC. (68 + CH20)
Finishing: Fasten off COLOR A, leaving a long tail for seaming. Use the tail and a yarn needle to seam potholder closed. Tie a knot at the end; then run your yarn needle into the nearest opening and underneath about half a dozen stitches (going between the two layers of fabric). Pull yarn through, then reinsert yarn needle back into the exit point and repeat. Do this a few times, then cut yarn and pull fabric to make the tip of the yarn disappear completely into the potholder.
– – – – – – – – – – – –
Done! If you’re sharing on social media, be sure to tag me @yarnandchai.design. Hope you enjoyed it!
Potholder, trivet, hotpad… whatever you call them, they are a staple in any home. Why not use your yarn skills to add some handmade flair to your kitchen?
My favorite feature of these potholders is the double layer of thickness, achieved by working them in the round. It’s a simple way to protect your hands and furniture, and it gives the potholders a thick, professional-looking finish. And while these aren’t technically seamless (we join our rounds, chain up and turn), the seam is nicely hidden on the edge of the potholder where no one would be the wiser of it.
The simple ribbing design gives it a sleek, modern look, and it’s sure to be a beautiful addition to your kitchen.
Prefer a PDF?
This pattern can be completed using the 100% free version right here on this page. However, many people prefer the convenience of a printable, ad-free PDF.
All-Access Passholders get the ad-free version of this and all of my other blog patterns. It’s a pretty sweet deal, if I do say so myself! Learn more about it here or continuing scrolling for the free version.
Yarn: Approx. 160 yards of cotton in a medium (#4) weight. For my samples, I used I Love This Cotton in Rosy.
Gauge: 19SC = 4″ in length. Stitch height does not matter for this pattern.
You’ll also need: Yarn needle
Terms and Abbreviations:
ST/STS (stitch/stitches) SL ST (slip stitch) SK (skip) CH (chain) SC (single crochet) HDC (half double crochet) 3rd LOOP (work stitch into 3rd loop only – see “Special Stitch”)
Special Stitch:
3rd Loop Only – Half double crochet stitches have a 3rd loop that we utilize in this pattern. When working in turned rounds, as in this pattern, the 3rd loop can be found just below the front loop on the side of the work that is facing you. When instructed to work in “3rd loop only”, insert your hook into this special loop. This creates a delicate braided look on the opposite side of the pattern.
Notes:
(1) This pattern is written in American Standard Terms.
(2) CHs at the beginning of rounds do not count as a stitch.
(3) Pattern can easily be adapted for different yarn thicknesses, hook sizes, or desired final measurements, by adding or subtracting any number of chains from the beginning.
(4) Placing a stitch marker or bobby pin in the first stitch of each round is recommended.
INSTRUCTIONS
To Begin: CH37.
Round 1: SC in 2nd CH from hook and in each remaining CH. Working down the opposite side of the chain, SC across. You have now worked in both sides of each chain. Join with a SL ST to the top of the first ST. (72)
Round 2: CH1, turn. HDC in each ST around. Join with a SL ST to the top of the first ST. (72)
Round 3: CH1, turn. SC in 3rd loop of each ST around. Join with a SL ST to the top of the first ST. (72)
Round 4: CH1, turn. HDC in each ST around. Join with a SL ST to the top of the first ST. (72)
– – – – – – – – – – – –
Repeat Rounds 3-4, in order, until potholder reaches about 7.5″ in height; be sure to end on a repeat of Round 4 for best results.
– – – – – – – – – – – –
Final Round: CH1, turn. SC in 3rd loop of each ST across first side of potholder until you get to the fold. CH20; SL ST back into the base ST to form a loop. SC in 3rd loop of each remaining St around. Join with a SL ST to the top of the first ST. (72 + CH20)
To finish: Fasten off, leaving a long tail for seaming. Weave in starting tail. Use the finishing tail and a yarn needle to sew potholder closed. Tie a knot at the end; then run your yarn needle into the nearest opening and underneath about half a dozen stitches or rows (going between the two layers of fabric). Pull yarn through, then reinsert yarn needle back into the exit point and repeat. Do this a few times, then cut yarn and pull fabric to make the tip of the yarn disappear completely into the potholder.
– – – – – – – – – – – –
Done! If you’re sharing on social media, be sure to tag me @yarnandchai.design. Hope you enjoyed it!
Ah, Malia. You are so versatile. You’ve been everything from clothing accessories to holiday decor to purses. I can’t get enough of you.
So, old friend… welcome to my kitchen!
With a double layer of thickness and a seam that hides inconspicuously on the folded edge, this potholder design is such a beautiful addition to your home.
If you’re like me and you’re always looking for ways to add more of your crochet obsession to your decor, potholders (or trivets or hotpads, depending on where you’re from) are a quick and easy way to do it. They also make great gifts!
Prefer a PDF?
This pattern can be completed using the 100% free version right here on this page. However, many people prefer the convenience of a printable, ad-free PDF.
All-Access Passholders get the ad-free version of this and all of my other blog patterns. It’s a pretty sweet deal, if I do say so myself! Learn more about it here or continuing scrolling for the free version.
Yarn: Approx. 170 yards of cotton in a medium (#4) weight. For my samples, I used I Love This Cotton in Dove.
Gauge: 19SC = 4″ in length. Stitch height does not matter for this pattern.
You’ll also need: Yarn needle
Terms and Abbreviations:
ST/STS (stitch/stitches) SL ST (slip stitch) SK (skip) CH (chain) SC (single crochet) HDC (half double crochet) BNS (bean stitch – see “Special Stitches”) 3rd LOOP (work stitch into 3rd loop only – see “Special Stitches”)
Special Stitches:
Bean Stitch (BNS) Insert hook into stitch, yarn over and pull through (2 loops on hook). Yarn over, insert hook into same stitch, yarn over and pull through (4 loops on hook). Yarn over, insert hook into same stitch, yarn over and pull through (6 loops on hook). Yarn over and pull through all 6 loops.
3rd Loop Only Half double crochet stitches have a 3rd loop that we utilize in this pattern. When working in turned rounds, as in this pattern, the 3rd loop can be found just below the front loop on the side of the work that is facing you. When instructed to work in “3rd loop only”, insert your hook into this special loop. This creates a delicate braided look on the opposite side of the pattern.
Notes:
(1) This pattern is written in American Standard Terms.
(2) CHs at the beginning of rounds do not count as a stitch.
(3) Pattern can easily be adapted for different yarn thicknesses, hook sizes, or desired final measurements, by adding or subtracting any number of chains from the beginning.
(4) Placing a stitch marker or bobby pin in the first stitch of each round is strongly recommended.
(5) Weaving in your ends as you go will be much easier than leaving them all for the end.
INSTRUCTIONS
To Begin: CH37.
Round 1: SC in 2nd CH from hook and in each remaining CH. Working down the opposite side of the chain (away from your starting tail), SC across. You have now worked in both sides of each chain. Join with a SL ST to the top of the first ST. (72)
Round 2: CH1, turn. SK first ST, BNS in next ST, CH1. (SK next ST, BNS in next ST, CH1) around. Join with a SL ST to the top of the first ST. (72)
Round 3: CH1, turn. HDC in each ST around. Join with a SL ST to the top of the first ST. (72)
Round 4: CH1, turn. SC in 3rd loops of each ST around. Join with a SL ST to the top of the first ST. (72)
Round 5: CH1, turn. SC in each ST around. Join with a SL ST to the top of the first ST. (72)
Round 6: CH1, turn. BNS in first ST, CH1, SK next ST. (BNS in next ST, CH1, SK next ST) around. Join with a SL ST to the top of the first ST. (72)
Round 7: CH1, turn. HDC in each ST around. Join with a SL ST to the top of the first ST. (72)
Round 8: CH1, turn. SC in 3rd loops of each ST around. Join with a SL ST to the top of the first ST. (72)
Round 9: CH1, turn. SC in each ST around. Join with a SL ST to the top of the first ST. (72)
– – – – – – – – – – – –
Repeat Rounds 2-9, in order, until potholder reaches about 7.5″ in height. It does not matter which repeat round you end on.
– – – – – – – – – – – –
Final Round: CH1, turn. SC across first side of potholder until you get to the fold. CH20; SL ST back into the same ST to form a loop. SC in each remaining St around. (72 + CH20)
To finish: Fasten off, leaving a long tail for seaming. Use the tail and a yarn needle to seam potholder closed. Tie a knot at the end; then run your yarn needle into the nearest opening and underneath about half a dozen stitches (going between the two layers of fabric). Pull yarn through, then reinsert yarn needle back into the exit point and repeat. Do this a few times, then cut yarn and pull fabric to make the tip of the yarn disappear completely into the potholder.
– – – – – – – – – – – –
Done! If you’re sharing on social media, be sure to tag me @yarnandchai.design. Hope you enjoyed it!
Herringbone Half Double Crochet worked in the round provides one of my favorite crocheted textures. I used it in the Carlyle Slouch + Cowl set and the Herringbone Baby Hat, and it’s making an appearance again in this doubly-thick, modern potholder.
The color-blocking gives you endless possibilities for a more colorful potholder, but this pattern would look just as chic in a solid color, especially if presented in a set of two or three potholders of complimentary shades.
Prefer a PDF?
This pattern can be completed using the 100% free version right here on this page. However, many people prefer the convenience of a printable, ad-free PDF.
All-Access Passholders get the ad-free version of this and all of my other blog patterns. It’s a pretty sweet deal, if I do say so myself! Learn more about it here or continuing scrolling for the free version.
Hook: E (3.50 mm) or whichever hook is needed to obtain correct gauge
Yarn: Approx. 160 yards (80 yards per color) of cotton in a medium (#4) weight. For my sample, I used I Love This Cotton in Dark Denim + Pale Denim.
Gauge: 15 rows of 18 HHDC = 4″ square
You’ll also need: Yarn needle
Terms and Abbreviations:
ST/STS (stitch/stitches) SL ST (slip stitch) CH (chain) SC (single crochet) HHDC (herringbone half double crochet; see “Special Stitch”, below)
Special Stitch:
Herringbone Half Double Crochet (HHDC): Yarn over, insert hook into stitch. Yarn over, pull loop through stitch AND through first loop on hook (this is similar to a slip stitch motion). Two loops remain on hook. Yarn over and pull through both loops.
(If you need additional help, Moogly has an excellent video tutorial here.)
Notes: (1) This pattern is written in American Standard Terms.
(2) CHs do not count as a stitch.
(3) There is no stitch multiple for this pattern. If you want to make it larger or smaller, add or subtract chains at the beginning and repeat rounds as many times as necessary for the height you want. (If doing two colors, switch when potholder is half the height you want it to be.)
INSTRUCTIONS
To Begin: With COLOR A, CH37.
Round 1: SC in 2nd CH from hook. HHDC in each remaining CH. Working down the opposite side of the chain, HHDC across. (You have now worked in both sides of each chain.) Do not join. (72)
Rounds 2-15: HHDC in each ST around. Do not join. (72)
Round 16: You may notice that your starting point has shifted over a bit and is no longer right on the fold. This is normal and has to do with the anatomy of a stitch and the fact that we aren’t turning our rounds, but that’s a lesson for another day. For now, since we want to put our color change on the fold (where the jagged change won’t be as noticeable), HHDC in next few stitches (until you are back on the folded edge), then switch to COLOR B. HHDC in each remaining ST around. Do not join. (72)
Rounds 17-29: HHDC in each ST around. Do not join. (72)
Round 30: HHDC in each ST until you get to the first folded edge. Then, continue to HHDC around until you get to the next fold. CH20; SL ST back into the same ST to form a loop. HHDC in each remaining ST around. (72 + CH20)
To finish: Determine how many stitches are left between where your hook is now, and the folded edge. (There should be about 6 or 7, but don’t worry if yours is more or less.) SC in all but one of those STS, then SL ST in the final ST. (So your SL ST should be right on the folded part.)
Fasten off, leaving a long tail for seaming. Weave in your other tails, then use the finishing tail and a yarn needle to sew potholder closed. Tie a knot at the end; then run your yarn needle into the nearest opening and underneath about half a dozen stitches (going between the two layers of fabric). Pull yarn through, then reinsert yarn needle back into the exit point and repeat. Do this a few times, then cut yarn and pull fabric to make the tip of the yarn disappear completely into the potholder.
– – – – – – – – – – – –
Done! If you’re sharing on social media, be sure to tag me @yarnandchai.design. Hope you enjoyed it!
Click here to get your FREE Mosaic Bucket Bag PDF Planning Guide!
– – – – – – – – – – – – – –
First Things First… What’s A CAL?
***PLEASE NOTE: THIS CAL HAS FINISHED. YOU CAN STILL FIND THE PATTERN BELOW!***
A CAL (Crochet-Along) is an online event where a pattern is released in segments over the course of a number of weeks, and a community of crocheters works on it together. The Mosaic Bucket Bag CAL will begin on March 27 and last for 3 weeks. For this CAL, I’ll be keeping everything on this page; I’ll just update the page each time a new part of the pattern is released. The schedule is as follows:
Pre-Launch: Supply List (published) Week 1: Base (published) Week 2: Mosaic Section (published) Week 3: Top, Drawstring, + Strap (published)
What’s the first thing you should do?
If you haven’t already, you should download your FREE Mosaic Bucket Bag PDF Planning Guide! This 8-page guide will walk you through the complete supply list, explain how the colors are chosen and how they work together, and give you lots of inspiration to fuel your creativity. It even includes a handy checklist so you know exactly what supplies you need and when!
(FYI, this is optional, and you’ll still be able to follow along with the crochet-along without the Planning Guide… but, I worked really hard on it and I am so excited about it, and I think you’re going to love it!)
– – – – – – – – – – – – – –
Click here to view your FREE Mosaic Bucket Bag PDF Planning Guide!
– – – – – – – – – – – – – –
Mosaic Bucket Bag on Ravelry
Ravelry lover? Click here to add the Mosaic Bucket Bag to your Ravelry favorites!
Join my Crochet-Along Facebook Group
Life is better together, right? That’s the heart behind a crochet-along, too! If you’re on Facebook and want to join our private group to ask questions, post progress pics, or just meet new friends while you work through the CAL, request your invite by clicking here.
Prefer a PDF?
This pattern can be completed using the 100% free version right here on this page. However, many people prefer the convenience of a printable, ad-free PDF.
All-Access Passholders get the ad-free version of this and all of my other blog patterns. It’s a pretty sweet deal, if I do say so myself! Learn more about it here or continuing scrolling for the free version.
Need a little extra help?
If you’re a visual learner, my tutorial videos are for you! You’ll find the step-by-step tutorials right here when they are published (according to the CAL schedule). Currently available: Video Planning Guide, Part 1: Base, Part 2: Mosaic, and Part 3: Top + Straps.
– – – – – – – – – – – – – – –
MOSAIC BUCKET BAG
DIFFICULTY: Easy
FINISHED SIZES: Please note that measurements are approximate and may vary slightly depending on thickness of yarn used for COLOR C.
Laid flat: Classic size: 12.5” (w) x 13” (h) Mini size: 9.5” (w) x 8.5” (h)
Standing up with flat base, uncinched: Classic size: 10” (w) x 5” (d) x 10” (h) Mini size: 7.5” (w) x 4” (d) x 7” (h)
HOOK: F/G (4.0 mm) or whichever hook is needed to obtain correct gauge
YARN: Bag is comprised of 3 different yarns. For a full explanation of how each yarn is used, please download your FREE PDF Planning Guide or watch the Video Planning Guide.
COLOR A: #4 worsted weight (preferably cotton) in any color. Classic size: 150 yds / Mini size: 100 yds
COLOR B: #4 worsted weight (same type yarn as COLOR A) in a light color. Classic size: 140 yds / Mini size: 70 yds
COLOR C: Can be any weight, any fiber, as long as it is thinner than COLOR B.Use darker colors for more contrast. Classic size: 150 yds / Mini size: 80 yds
GAUGE: With COLOR A, 16SC x 20 rows = 4” square
ADDITIONAL SUPPLIES:
(8) 6mm or 8mm Eyelets. You can find packages of eyelets at craft stores, and they are usually available in colors like silver, gunmetal, and gold. Either size (6mm or 8mm) will work.
Eyelet Setting Tool. Sometimes this comes with your eyelets, but may need to be purchased separately. Just be sure to get the right size (6mm or 8mm)! You’ll also need a hammer.
(2) 1” D-Rings. Get the same color as the eyelets you chose.
(2) Swivel Lobster Clasps. Again, make sure these match your eyelets and D-Rings.
Craft Cord, 2mm or 4mm. This is for the drawstring. You’ll need two lengths of 34” each for the Classic size, and for the Mini size, two lengths of 30” each.
Shoulder Strap. Nylon or cotton ribbon (sold by the yard) is an economical choice, but feel free to get creative! You’ll also need a needle and thread for sewing it. Choose measurements based on the wearer; for adults, you’ll need about 42”, and for kids, about 30”. Other options include sewing your own from another fabric, or ordering one online.
TERMS AND ABBREVIATIONS:
ST/STS (stitch/stitches) SL ST (slip stitch) SK (skip) CH (chain) SC (single crochet) Spike Stitch (see Special Stitches, below)
SPECIAL STITCHES:
SC Spike Stitch: Instead of inserting your hook into the top loops of the stitch, insert them into its base, then complete an SC. This will wrap your SCs over the top of the SCs from the previous round.
SL ST Spike Stitch: Follow instructions for SC Spike Stitch, but instead of completing an SC, complete a SL ST.
NOTES: (1) This pattern is written in American Standard Terms. (2) CH1s at the beginning of rounds do not count as a stitch in the final stitch count. (3) When instructed to “join”, join with a slip stitch to the first stitch of the round. (4) Because we utilize the SC Spike Stitch for entire rounds throughout the pattern, we will be referring to those rounds as an extension of the SC rounds they are being worked into. For example, if Round 32 is a round of SC, then the very next round which places spike stitches on top of those SCs will be referred to as Round 32B. This just makes for easier counting.
Round 1: 3SC in 2nd CH from hook, SC in each of the next 12 CH, 3SC in final CH (working around the tail to the other side). Working down the other side of the chain, SC in each of the next 12 CH. Join. (30)
Round 2: CH1, turn. SC in each of the first 12 STS. 2SC in each of the next 3 STS. SC in each of the next 12 STS. 2SC in each of the next 3 STS. Join. (36)
Round 3: CH1, turn. 2SC in first ST, SC in next ST. (2SC in next ST, SC in next ST) 2 times. SC in each of the next 12 STS. (2SC in next ST, SC in next ST) 3 times. SC in each of the next 12 STS. Join. (42)
Round 4: CH1, turn. SC in each of the first 12 STS. (2SC in next ST, SC in each of the next 2 STS) 3 times. SC in each of the next 12 STS. (2SC in next ST, SC in each of the next 2 STS) 3 times. Join. (48)
Round 5: CH1, turn. 2SC in first ST, SC in each of the next 3 STS. (2SC in next ST, SC in each of the next 3 STS) 2 times. SC in each of the next 12 STS. (2SC in next ST, SC in each of the next 3 STS) 3 times. SC in each of the next 12 STS. Join. (54)
Round 6: CH1, turn. SC in each of the first 12 STS. (2SC in next ST, SC in each of the next 4 STS) 3 times. SC in each of the next 12 STS. (2SC in next ST, SC in each of the next 4 STS) 3 times. Join. (60)
Round 7: CH1, turn. 2SC in first ST, SC in each of the next 5 STS. (2SC in next ST, SC in each of the next 5 STS) 2 times. SC in each of the next 12 STS. (2SC in next ST, SC in each of the next 5 STS) 3 times. SC in each of the next 12 STS. Join. (66)
Round 8: CH1, turn. SC in each of the first 12 STS. (2SC in next ST, SC in each of the next 6 STS) 3 times. SC in each of the next 12 STS. (2SC in next ST, SC in each of the next 6 STS) 3 times. Join. (72)
Round 9: CH1, turn. 2SC in first ST, SC in each of the next 7 STS. (2SC in next ST, SC in each of the next 7 STS) 2 times. SC in each of the next 12 STS. (2SC in next ST, SC in each of the next 7 STS) 3 times. SC in each of the next 12 STS. Join. (78)
Round 10: CH1, turn. SC in each of the first 12 STS. (2SC in next ST, SC in each of the next 8 STS) 3 times. SC in each of the next 12 STS. (2SC in next ST, SC in each of the next 8 STS) 3 times. Join. (84)
Round 11: CH1, turn. 2SC in first ST, SC in each of the next 9 STS. (2SC in next ST, SC in each of thenext 9 STS) 2 times. SC in each of the next 12 STS. (2SC in next ST, SC in each of the next 9 STS) 3 times. SC in each of the next 12 STS. Join. (90)
Round 12: CH1, turn. SC in each of the first 12 STS. (2SC in next ST, SC in each of the next 10 STS) 3 times. SC in each of the next 12 STS. (2SC in next ST, SC in each of the next 10 STS) 3 times. DO NOT join. (96)
We are now switching to a seamless spiral. Do not join, turn or chain until instructed, and mark the first stitch of each round with a stitch marker so you don’t lose your place.
Round 13: Continuing in the same direction, SC in first ST (the ST you would have joined in, if we had joined the previous round) and in each ST around. Do not join. (96)
Switch to COLOR B. For the best transition, use the jogless method (demonstrated in the tutorial video for Part 2).
Round 23: SL ST in first ST of the round. (If you used the jogless color change method, you will have already done this.) SC in each remaining ST around. Pull the loop on your hook up a couple inches so it doesn’t unravel, then remove your hook. (96)
Round 23B: Insert hook into top loops of next ST; attach COLOR C and CH1; SC in same ST. SC SPIKE STITCH into next ST and each remaining ST. Pull the loop on your hook up a couple inches so it doesn’t unravel, then remove your hook. (96)
Round 24: Reinsert hook into loop from COLOR B. SC in each ST around (you’re working in the top loops of the SC Spike Stitches from the previous round). Remove hook. (96)
Round 24B: Reinsert hook into loop from COLOR C. SC Spike Stitch in each ST around. Remove hook. (96)
Rounds 25-47B: Repeat Rounds 24-24B. (96)
Round 48: Reinsert hook into loop from COLOR B. SC in each of the first 95 STS. SL ST in the final ST. Remove hook. (96)
Round 48B: Reinsert hook into loop from COLOR C. SC Spike Stitch in each of the first 95 STS. SL ST in the remaining ST. Remove hook. (96)
Fasten off both COLOR B and COLOR C (but don’t weave in ends yet).
Turn bag right side out (if not already so). Fold it lengthwise along the bottom seam, and lay it flat so that the side with the joins and color changes is face up. Locate the stitch that sits atop the right-hand crease. Counting that stitch as #1, count over 8 stitches. Attach COLOR A into that 8th stitch; CH1.
Round 49: SC in same ST as CH1, and in each ST around. Join. (96)
Rounds 50-52: CH1, turn. SC in each ST around. Join. (96)
Round 53: CH1, turn. SC in each of the first 11 STS. CH1, SK next ST. (SC in each of the next 11 STS; CH1, SK next ST) 7 times. Join. (96)
Round 54: CH1, turn. SC in first CH1 space. Continue to SC in each ST around, putting 1SC in each CH1 space. Join. (96)
Round 55: CH1, turn. SC in each of the first 39 STS. SC each of the next 6 STS over a D-Ring. SC in each of the next 42 STS. SC each of the next 6 STS over a D-Ring. SC in each of the remaining 3 STS. Join. (96)
Round 56: CH1, turn. SC in each of the first 3 STS. SC SPIKE STITCH in each of the 6 STS inside the D-Ring. SC in each of the next 42 STS. SC SPIKE STITCH in each of the 6 STS inside the D-Ring. SC in each of the remaining 39 STS. Join. (96)
Fasten off and weave in all ends.
Proceed to ADDING EYELETS, located after instructions for Mini Size bag.
Round 1: 3SC in 2nd CH from hook, SC in each of the next 12 CH, 3SC in final CH (working around the tail to the other side). Working down the other side of the chain, SC in each of the next 12 CH. Join. (30)
Round 2: CH1, turn. SC in each of the first 12 STS. 2SC in each of the next 3 STS. SC in each of the next 12 STS. 2SC in each of the next 3 STS. Join. (36)
Round 3: CH1, turn. 2SC in first ST, SC in next ST. (2SC in next ST, SC in next ST) 2 times. SC in each of the next 12 STS. (2SC in next ST, SC in next ST) 3 times. SC in each of the next 12 STS. Join. (42)
Round 4: CH1, turn. SC in each of the first 12 STS. (2SC in next ST, SC in each of the next 2 STS) 3 times. SC in each of the next 12 STS. (2SC in next ST, SC in each of the next 2 STS) 3 times. Join. (48)
Round 5: CH1, turn. 2SC in first ST, SC in each of the next 3 STS. (2SC in next ST, SC in each of the next 3 STS) 2 times. SC in each of the next 12 STS. (2SC in next ST, SC in each of the next 3 STS) 3 times. SC in each of the next 12 STS. Join. (54)
Round 6: CH1, turn. SC in each of the first 12 STS. (2SC in next ST, SC in each of the next 4 STS) 3 times. SC in each of the next 12 STS. (2SC in next ST, SC in each of the next 4 STS) 3 times. Join. (60)
Round 7: CH1, turn. 2SC in first ST, SC in each of the next 5 STS. (2SC in next ST, SC in each of the next 5 STS) 2 times. SC in each of the next 12 STS. (2SC in next ST, SC in each of the next 5 STS) 3 times. SC in each of the next 12 STS. Join. (66)
Round 8: CH1, turn. SC in each of the first 12 STS. (2SC in next ST, SC in each of the next 6 STS) 3 times. SC in each of the next 12 STS. (2SC in next ST, SC in each of the next 6 STS) 3 times. DO NOT join. (72)
We are now switching to a seamless spiral. Do not join, turn or chain until instructed, and mark the first stitch of each round with a stitch marker so you don’t lose your place.
Round 9: Continuing in the same direction, SC in first ST (the ST you would have joined in, if we had joined the previous round) and in each ST around. Do not join. (72)
Switch to COLOR B. For the best transition, use the jogless method (demonstrated in the tutorial video for Part 2).
Round 16: SL ST in first ST of the round. (If you used the jogless color change method, you will have already done this.) SC in each remaining ST around. Pull the loop on your hook up a couple inches so it doesn’t unravel, then remove your hook. (72)
Round 16B: Insert hook into top loops of next ST; attach COLOR C and CH1; SC in same ST. SC SPIKE STITCH into next ST and each remaining ST. Pull the loop on your hook up a couple inches so it doesn’t unravel, then remove your hook. (72)
Round 17: Reinsert hook into loop from COLOR B. SC in each ST around (you’re working in the top loops of the SC Spike Stitches from the previous round). Remove hook. (72)
Round 17B: Reinsert hook into loop from COLOR C. SC Spike Stitch in each ST around. Remove hook. (72)
Rounds 18-30B: Repeat Rounds 17-17B. (72)
Round 31: Reinsert hook into loop from COLOR B. SC in each of the first 71 STS. SL ST in remaining ST. Remove hook. (72)
Round 31B: Reinsert hook into loop from COLOR C. SC Spike Stitch in each of the first 71 STS. SL ST in remaining ST. Remove hook. (72)
Fasten off both COLOR B and COLOR C (but don’t weave in ends yet).
Turn bag right side out (if not already so). Fold it lengthwise along the bottom seam, and lay it flat so that the side with the joins and color changes is face up. Locate the stitch that sits atop the right-hand crease. Counting that stitch as #1, count over 6 stitches. Attach COLOR A into that 6th stitch; CH1.
Round 32: SC in same ST as CH1, and in each ST around. Join. (72)
Round 33: CH1, turn. SC in each ST around. Join. (72)
Round 34: CH1, turn. SC in each of the first 8 STS. CH1, SK next ST. (SC in each of the next 8 STS; CH1, SK next ST) 7 times. Join. (72)
Round 35: CH1, turn. SC in first CH1 space. Continue to SC in each ST around, putting 1SC in each CH1 space. Join. (72)
Round 36: CH1, turn. SC in each of the first 28 STS. SC each of the next 6 STS over a D-Ring. SC in each of the next 30 STS. SC each of the next 6 STS over a D-Ring. SC in each of the remaining 2 STS. Join. (72)
Round 37: CH1, turn. SC in each of the first 2 STS. SC SPIKE STITCH in each of the 6 STS inside the D-Ring. SC in each of the next 30 STS. SC SPIKE STITCH in each of the 6 STS inside the D-Ring. SC in each of the remaining 28 STS. Join. (72)
Fasten off and weave in all ends.
Proceed to ADDING EYELETS.
– – – – – – – – – – – –
ADDING EYELETS
With eyelets, eyelet setting tool and hammer ready, turn your bag inside out. Follow the instructions on your eyelet kit (or watch my video demonstration!) to add eyelets to each of the eight holes at the top of the bag.
– – – – – – – – – – – –
ADDING DRAWSTRING
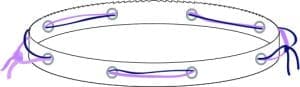
Option 1: Double Side Drawstrings
Lay bag flat (right side out). Starting on outside of bag, insert first length of craft cord (represented in purple) into the first eyelet on the left. Moving right (counter-clockwise), weave cord in and out through all 8 eyelets around the bag; the last one should exit the bag so that both ends of cord are outside the bag. Make sure bag is uncinched, then bring cord ends together and tie a tight knot close to the bag. Complete with second length of craft cord (represented in navy), but start on the eyelet on the right side of the bag and move left (clockwise).
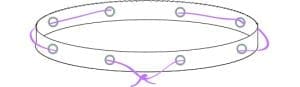
Option 2: Single Centered Drawstring
Lay bag flat (right side out), seam side down. Starting on front of bag, locate center and insert craft cord in first eyelet to the left. Working left (in a clockwise direction), weave cord in and out through all 8 eyelets around the bag; the last one should exit the bag so that both ends of cord are outside the bag and can meet in the center. Make sure bag is uncinched, then bring cord ends together and tie a tight knot close to the bag.
– – – – – – – – – – – –
ADDING A STRAP
The following are very bare-bones instructions for making your own strap, but these instructions are meant specifically for someone like me who is nota seamstress and just needs something basic. Other options include purchasing straps online, or sewing your own from fabric. There are plenty of tutorials on YouTube for this if you are handy with a sewing machine!
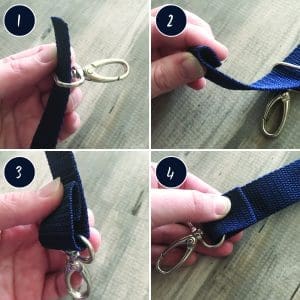
For the rest of us, here’s what I did:
1. Thread strap through lobster clasp.
2. Fold the tip of the strap over about 1/2”.
3. Hold the fold from Step 2 in place and make another fold about 1” down, resting the hardware in that fold.
4. Use the texture of the material as a guide to sew a straight line across the strap, just below the first fold (as indicated in the photo), going through all three layers.
– – – – – – – – – – – –
DONE! If you’re sharing your bag on social media,be sure to use hashtag #mosaicbucketbagcal and tag me @yarnandchai.design!