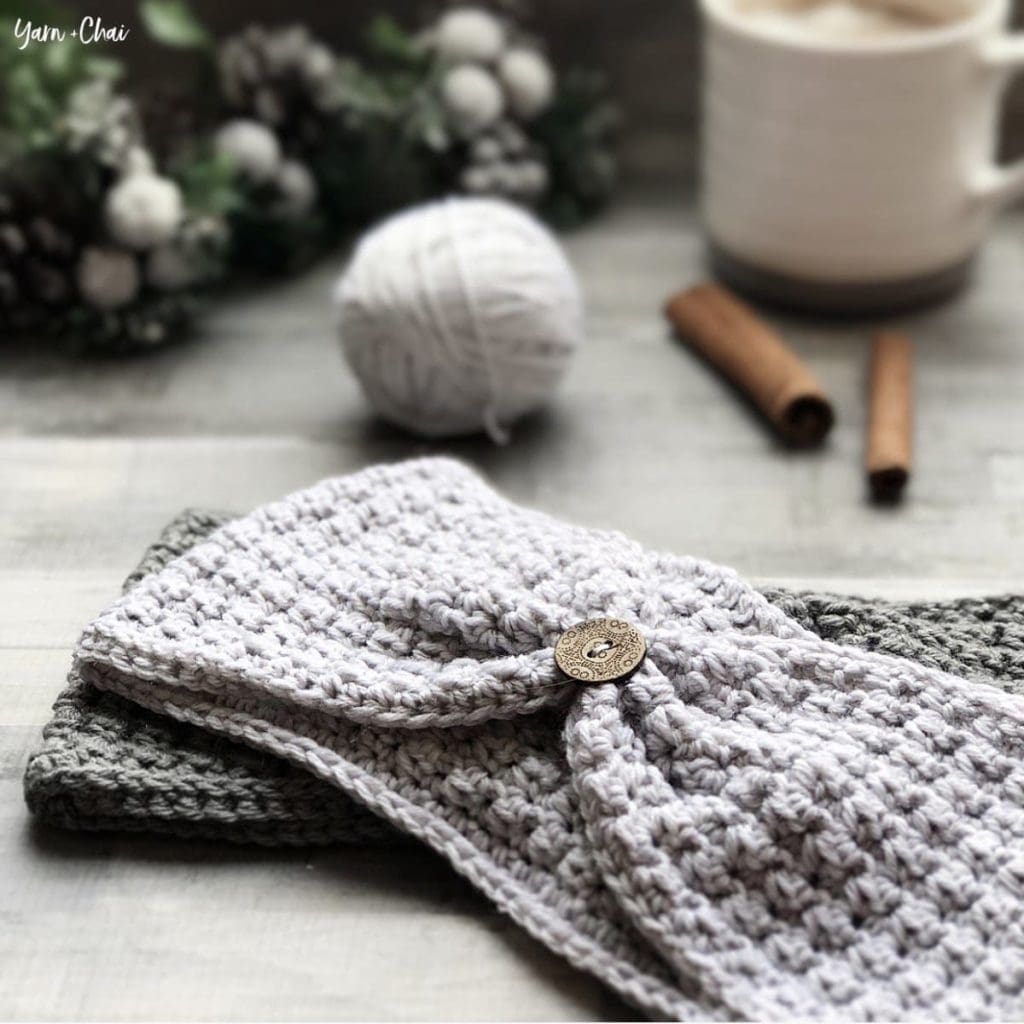
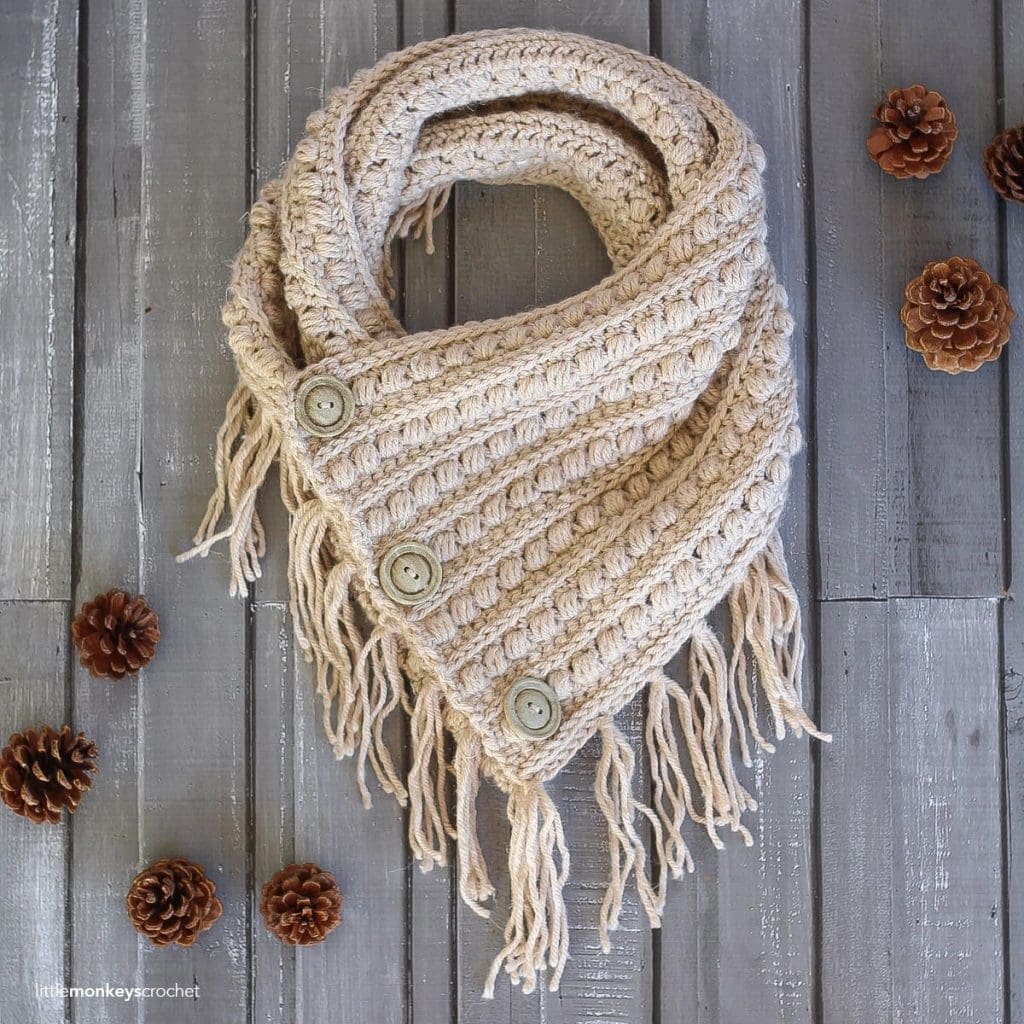
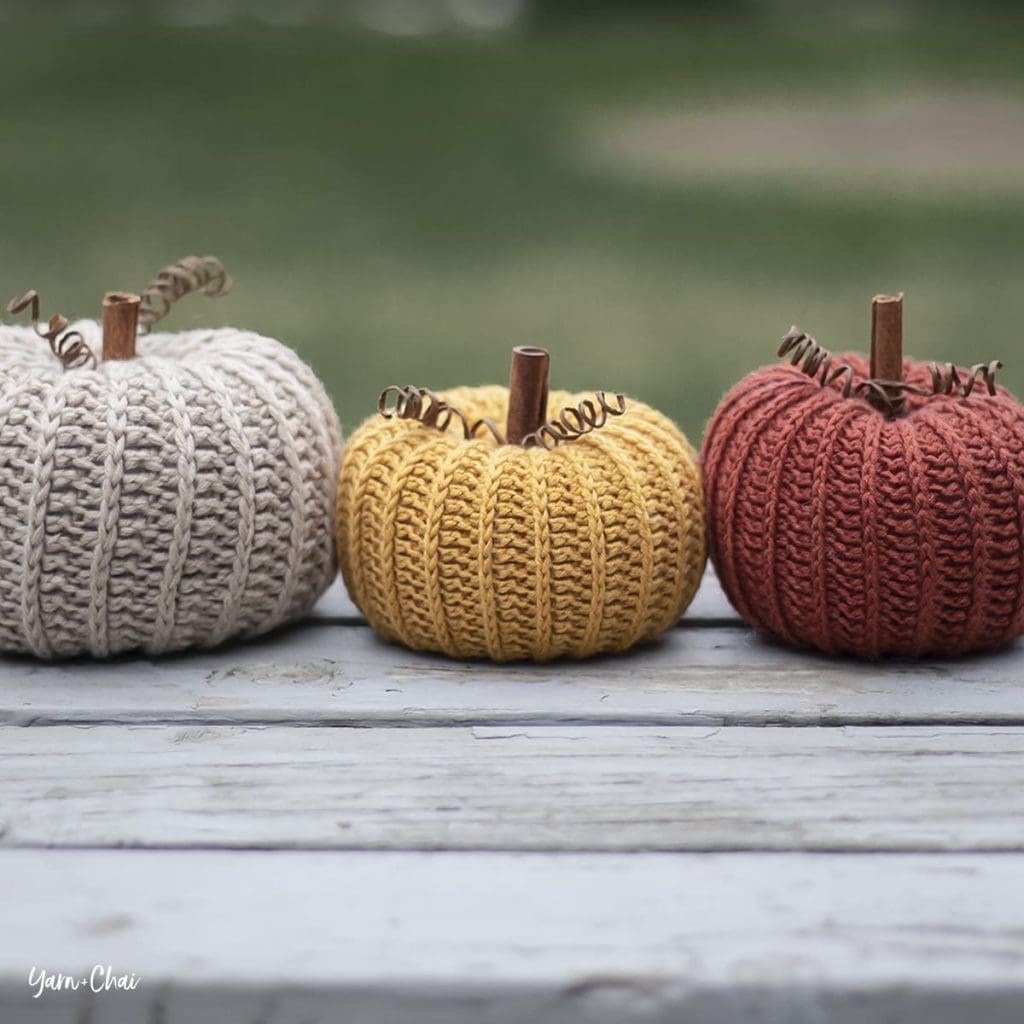
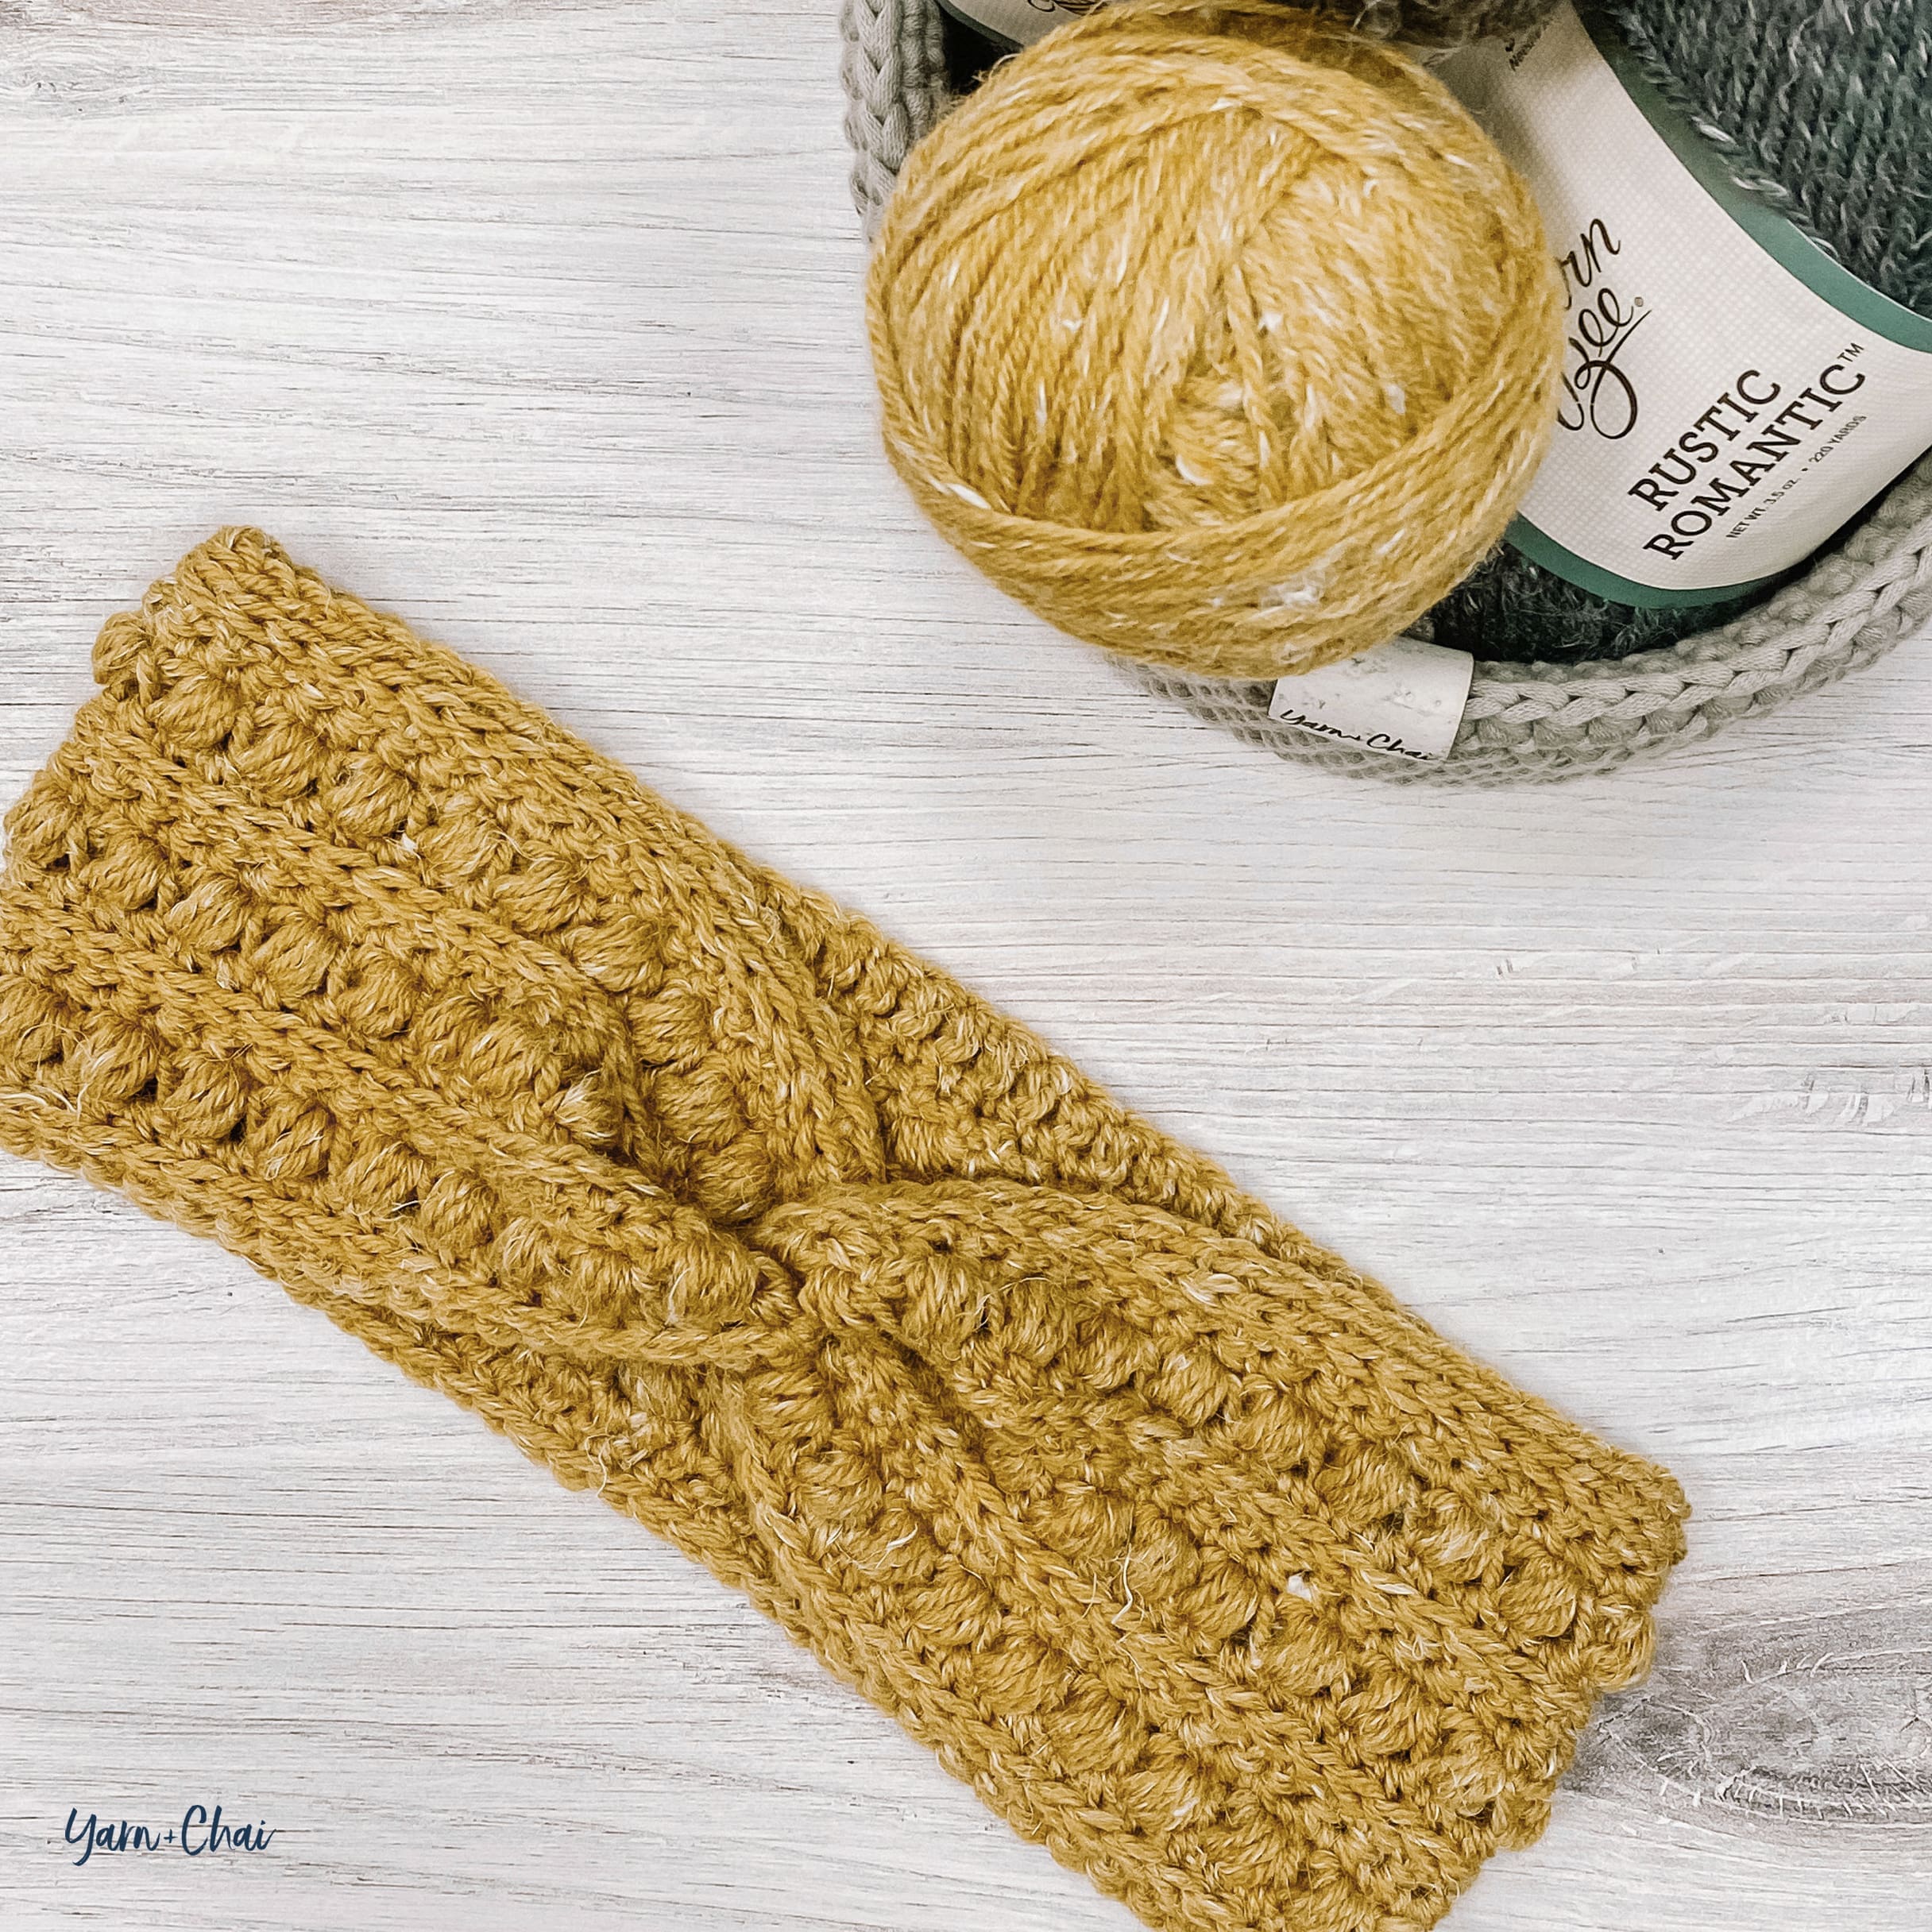
Malia is making a quick reappearance this season, in the form of a cute twisted earwarmer!
I always thought this stitch pattern would look great as a twisted earwarmer, and with the weather finally starting to cool off here, it’s time for me to start thinking about how to keep cozy! I always love a good earwarmer / headband, because it does the job with minimal fuss.
If you need a little help with the stitches, check out the tutorial video I made during the original Malia Crochet-Along for the cowl and scarf; just use the numbers in this pattern instead of the ones called for on the video!
Prefer a PDF?
This pattern can be completed using the 100% free version right here on this page. However, many people prefer the convenience of a printable, ad-free PDF.
All-Access Passholders get the ad-free version of this and all of my other blog patterns. It’s a pretty sweet deal, if I do say so myself! Learn more about it here or continuing scrolling for the free version.
Finished Size: 20″ long (before seaming) x 3.75″ wide
Hook: I (5.50 mm) or whichever hook is needed to obtain correct gauge
Yarn: 100 yards of a #4 aran weight. I used Yarn Bee’s Rustic Romantic in “Okie Wheat” for my sample.
Gauge: To ensure the best results, the gauge check is a swatch taken straight from the pattern. Upon completion, you should have a 4” square. If yours is larger, consider using a smaller hook or a thinner #4 yarn. If yours is smaller, consider using a larger hook.
Pattern for Gauge:
CH17. Row 1: SC in 2nd CH from hook and in each remaining CH. (16) Row 2: CH1, turn. SC in first ST. (SK next ST, LBS in next ST) 7 times. SC in final ST. (16) Row 3: CH1, turn. HDC in each ST across. (16) Row 4: CH1, turn. SC in first ST. SC in 3rd loop of each of the next 14 STS. SC in final ST. (16) Row 5: CH1, turn. SC in each ST across. (16) Row 6: CH1, turn. SC in first ST. (LBS in next ST, SK next ST) 7 times. SC in final ST. (16) Row 7: CH1, turn. HDC in each ST across. (16) Row 8: CH1, turn. SC in first ST. SC in 3rd loop of each of the next 14 STS. SC in final ST. (16) Row 9: CH1, turn. SC in each ST across. (16) Rows 10-16: Repeat Rows 2-8. (16)
Terms and Abbreviations: ST/STS (stitch/stitches) SL ST (slip stitch) SK (skip) CH (chain) SC (single crochet) HDC (half double crochet) LBS (large bean stitch – see “Special Stitches”) BLO (back loop only) 3rd LOOP (work stitch into 3rd loop only – see “Special Stitches”)
Special Stitches:
Large Bean Stitch (LBS) Insert hook into stitch, yarn over and pull through (2 loops on hook). Yarn over, insert hook into same stitch, yarn over and pull through (4 loops on hook). Yarn over, insert hook into same stitch, yarn over and pull through (6 loops on hook). Yarn over, insert hook into same stitch, yarn over and pull through (8 loops on hook). Yarn over and pull through all 8 loops. Chain 1 to close the stitch. (Because this stitch creates two sets of loops – one when creating the bean, and one when closing the stitch – each completed Large Bean Stitch will count for two stitches in the row or round’s final stitch count.)
3rd Loop Only Half double crochet stitches have a 3rd loop that we utilize in this pattern. When working in turned rows, as in this pattern, the 3rd loop can be found just below the front loop on the side of the work that is facing you. When instructed to work in “3rd loop only”, insert your hook into this special loop. This creates a delicate braided look on the opposite side of the pattern.
Notes: (1) This pattern is written in American Standard Terms.
(2) CH1s at the beginning of rows do not count as a stitch in the final stitch count.
(3) A video tutorial for the stitch pattern is available up in the post, or by clicking here.
(4) To make earwarmer larger or smaller, add or subtract an even number of stitches from the starting row or chain. For reference, if you met gauge, 4 stitches = 1″.
INSTRUCTIONS
Tobegin: CH79.
Row 1: HDC in 2nd CH from hook and in each remaining CH. (78)
Row 2: CH1, turn. SC in first ST. SC in 3rd loop of each of the next 76 STS. SC in final ST. (78)
Row 3: CH1, turn. SC in each ST across. (78)
Row 4: CH1, turn. SC in first ST. (SK next ST, LBS in next ST) 38 times. SC in final ST. (78)
Row 5: CH1, turn. HDC in each ST across. (78)
Row 6: CH1, turn. SC in first ST. SC in 3rd loop of each of the next 76 STS. SC in final ST. (78)
Row 7: CH1, turn. SC in each ST across. (78)
Row 8: CH1, turn. SC in first ST. (LBS in next ST, SK next ST) 38 times. SC in final ST. (78)
Row 9: CH1, turn. HDC in each ST across. (78)
Row 10: CH1, turn. SC in first ST. SC in 3rd loop of each of the next 76 STS. SC in final ST. (78)
Row 11: CH1, turn. SC in each ST across. (78)
Row 12: CH1, turn. SC in first ST. (SK next ST, LBS in next ST) 38 times. SC in final ST. (78)
Row 13: CH1, turn. HDC in each ST across. (78)
Row 14: CH1, turn. SC in first ST. SC in 3rd loop of each of the next 76 STS. SC in final ST. (78)
Fasten off, leaving a long tail for seaming. Weave in starting tail.
Adding the Twist
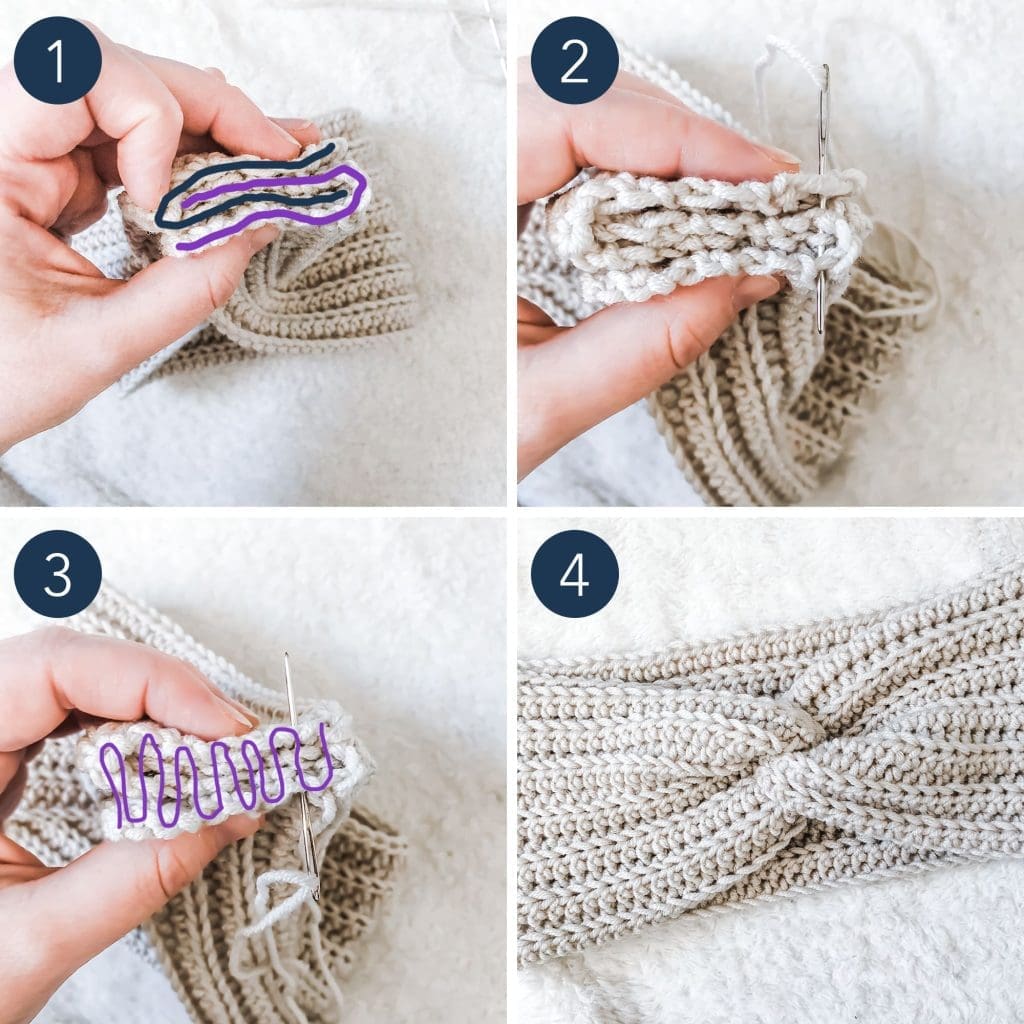
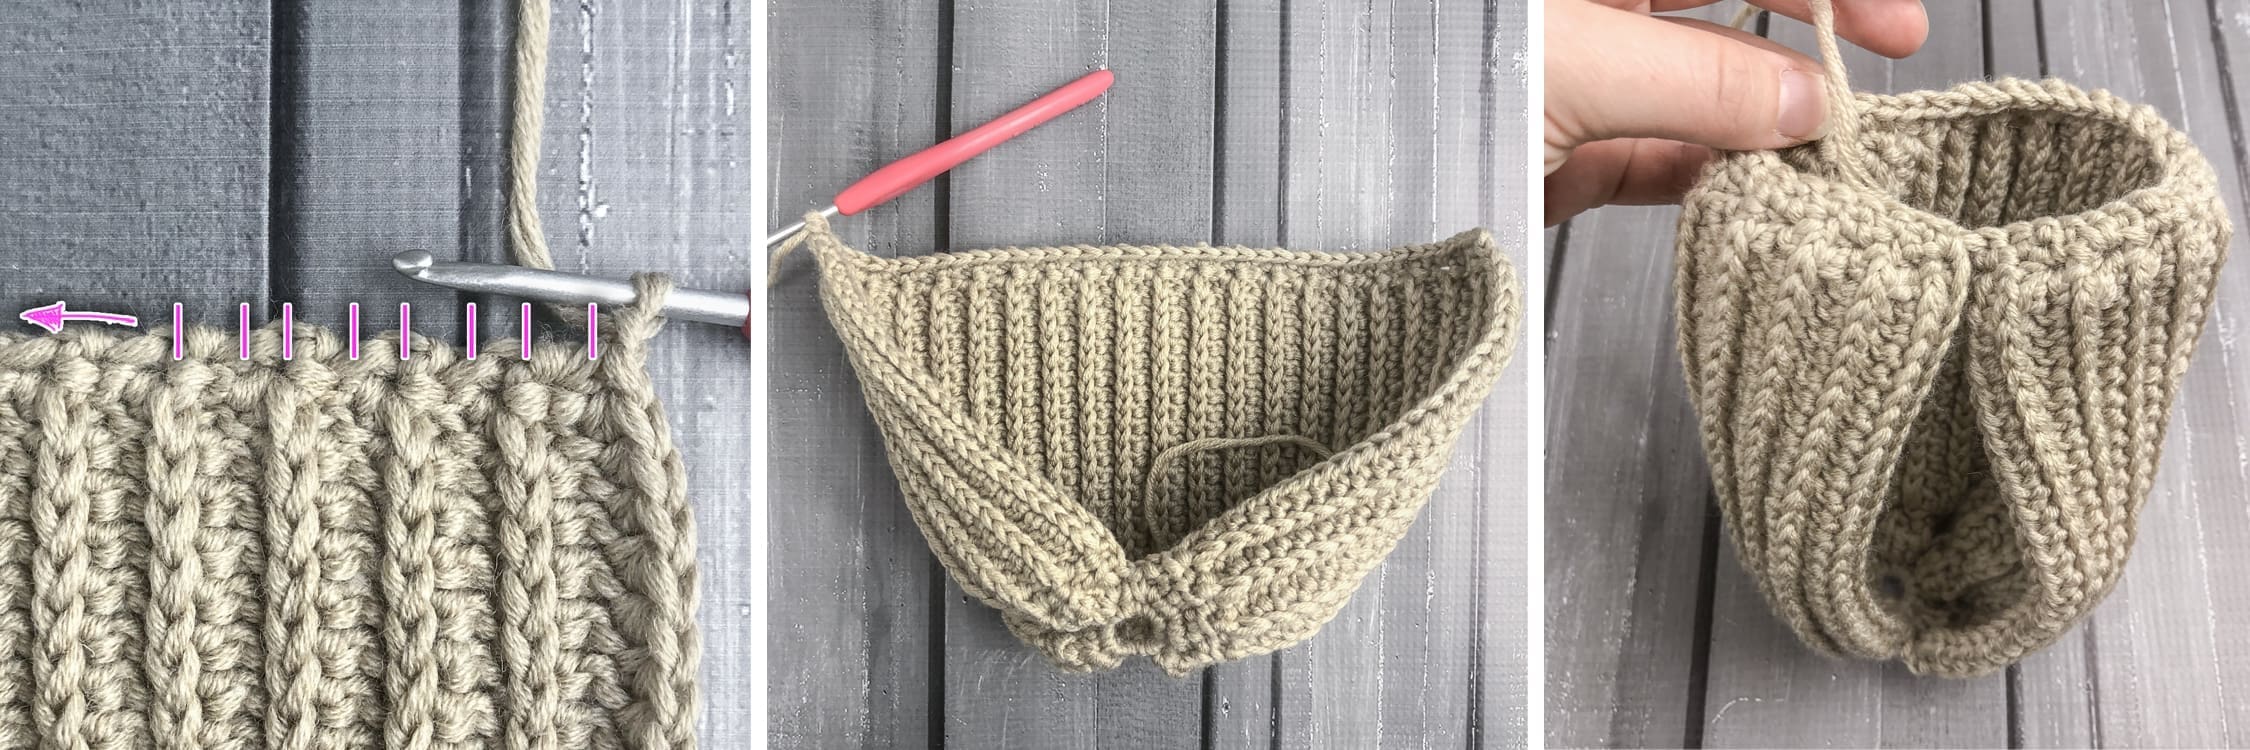
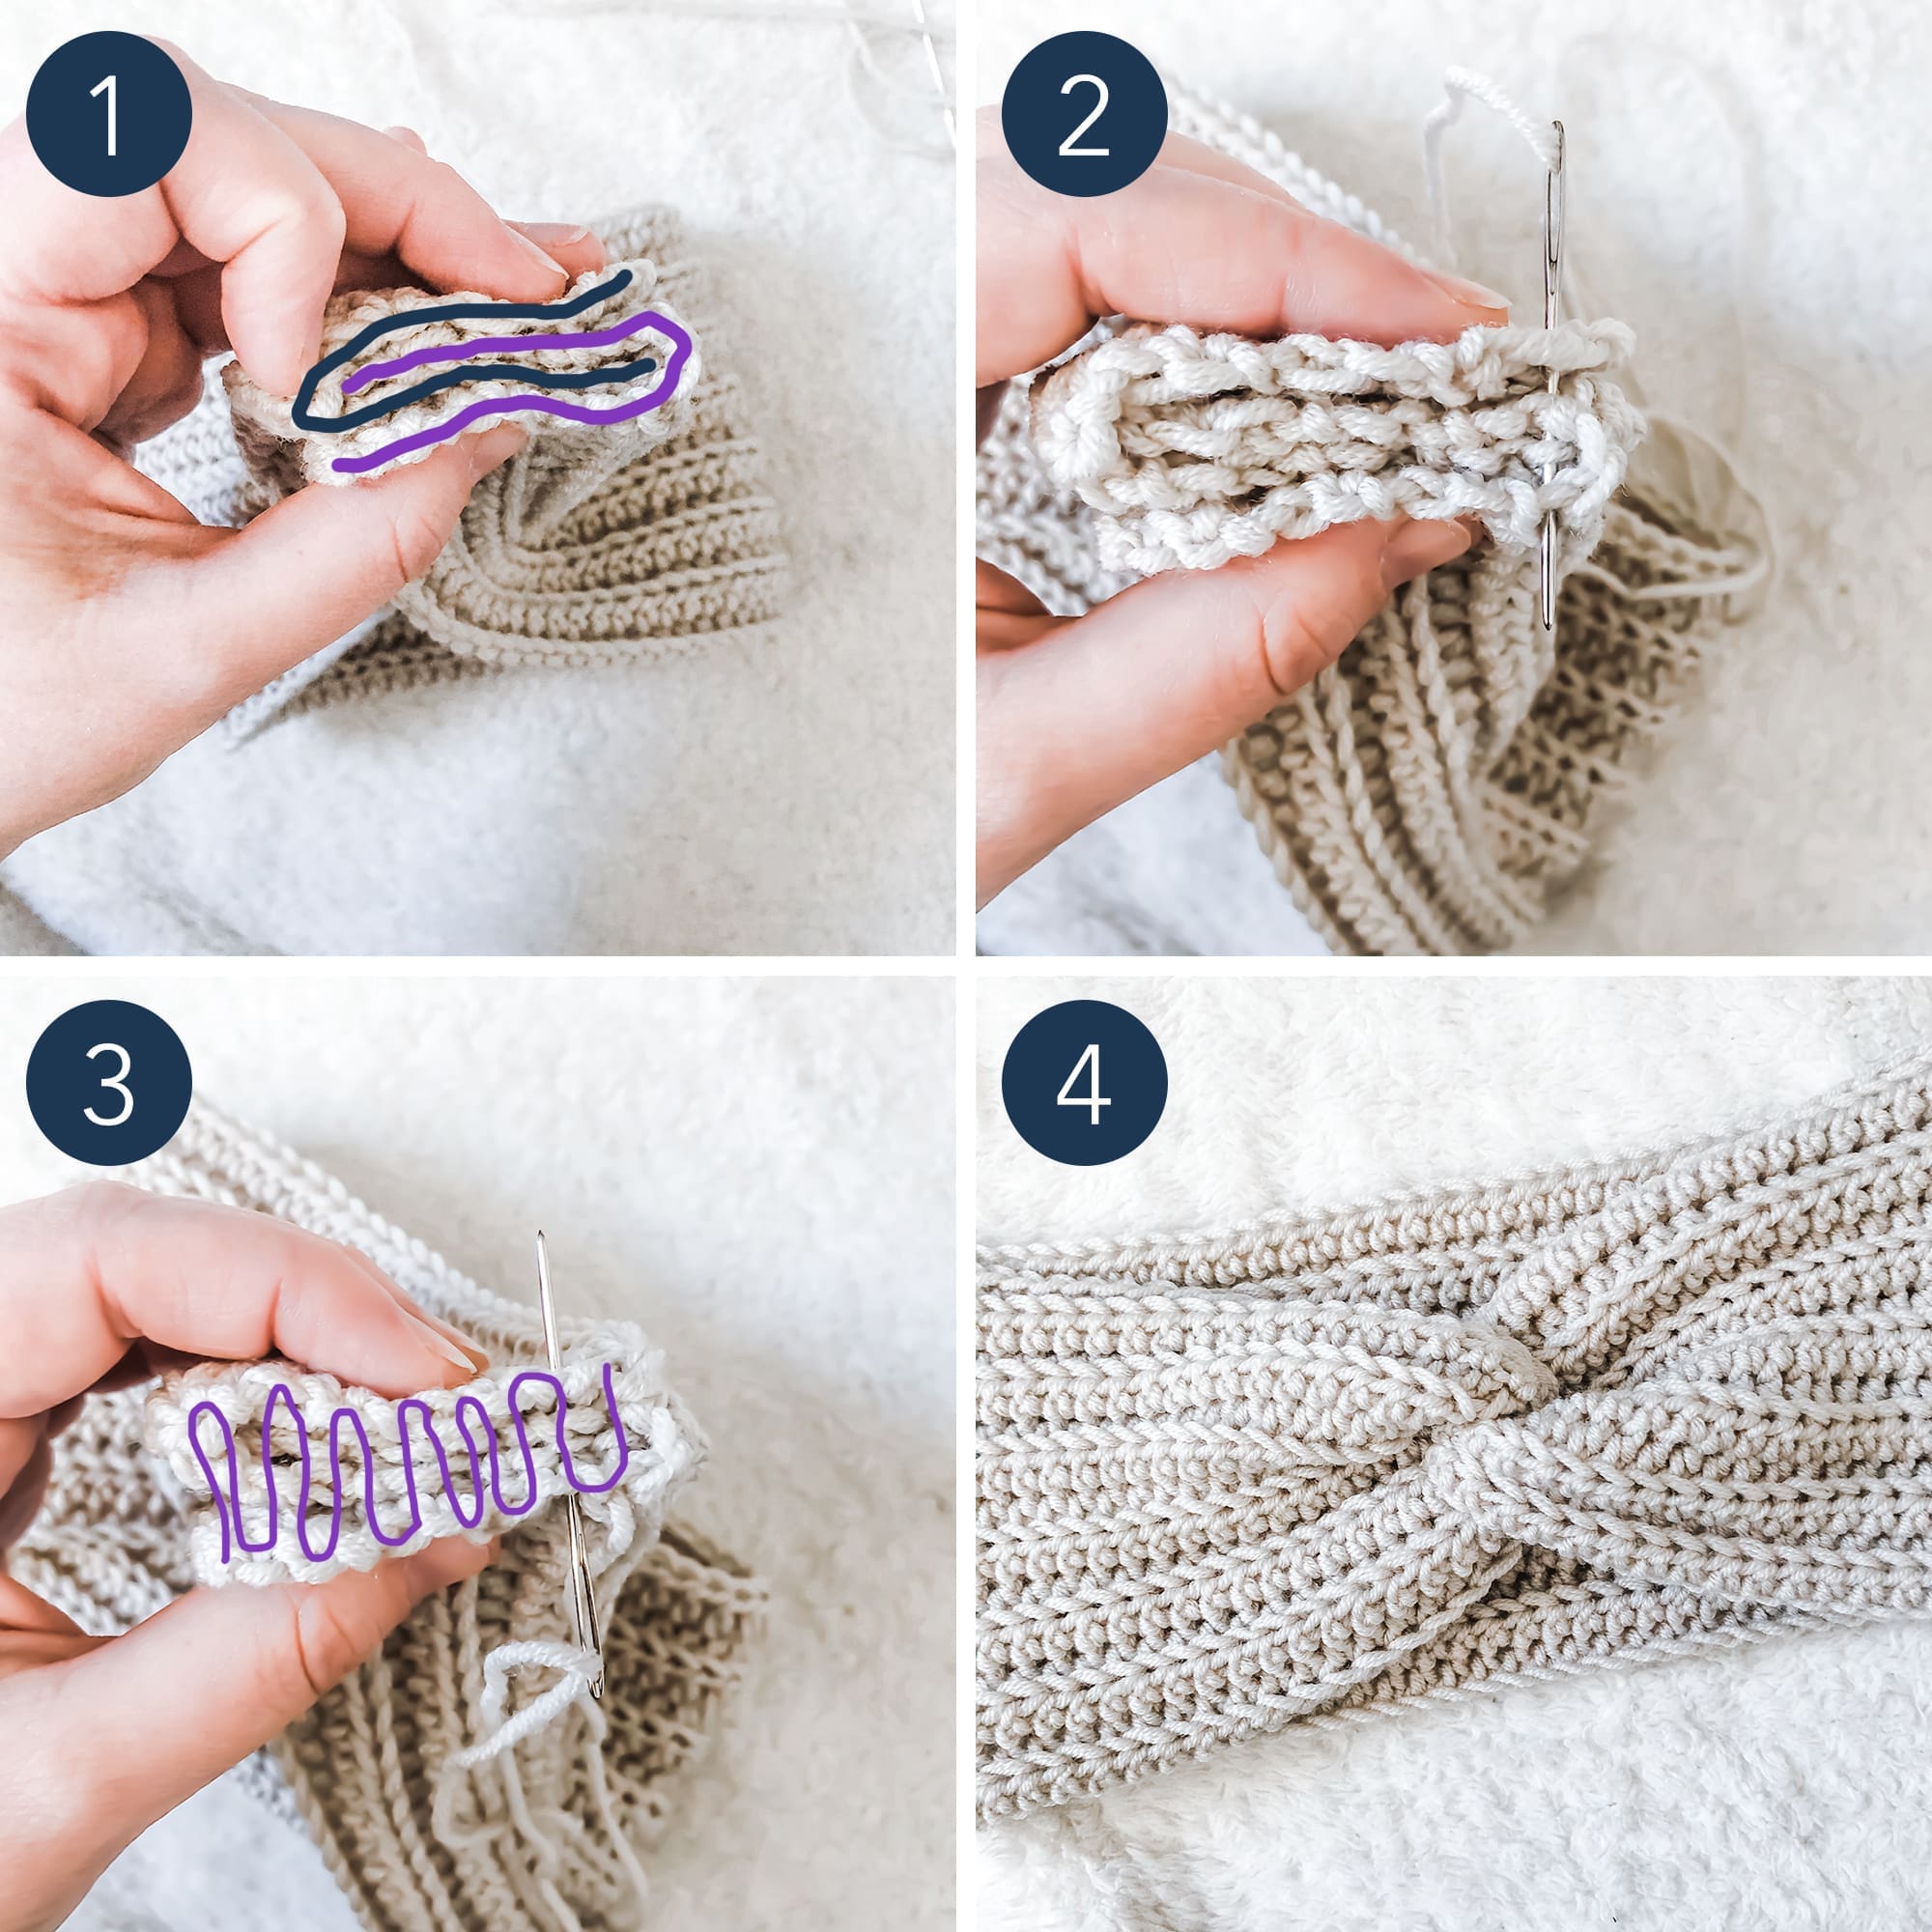
Follow the instructions below to seam your earwarmer with a twist. Use the image below to guide you. (They are actually from my Simple Twisted Earwarmer pattern, but the technique is the same.)
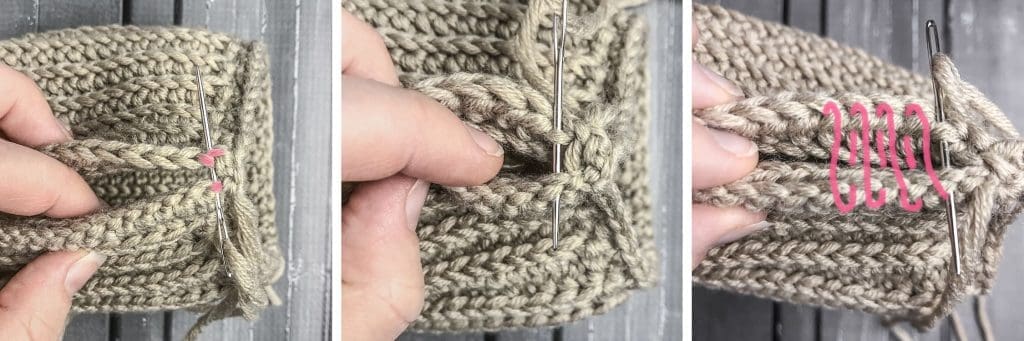
1. Thread the long finishing tail through your yarn needle and gently set it aside. Lay ear warmer flat, wrong side up, then gather the edges and layer them together as shown.
2. Thread the yarn needle across the edges, being sure to grab yarn from all four layers.
3. Continue to weave the yarn needle back and forth across the surface of the edges, being sure to grab yarn from all four layers each time.
4. Weave in the tail, then turn earwarmer right side out.
Done! If you’re sharing on social media, be sure to tag me @yarnandchai.design. Hope you enjoyed it!
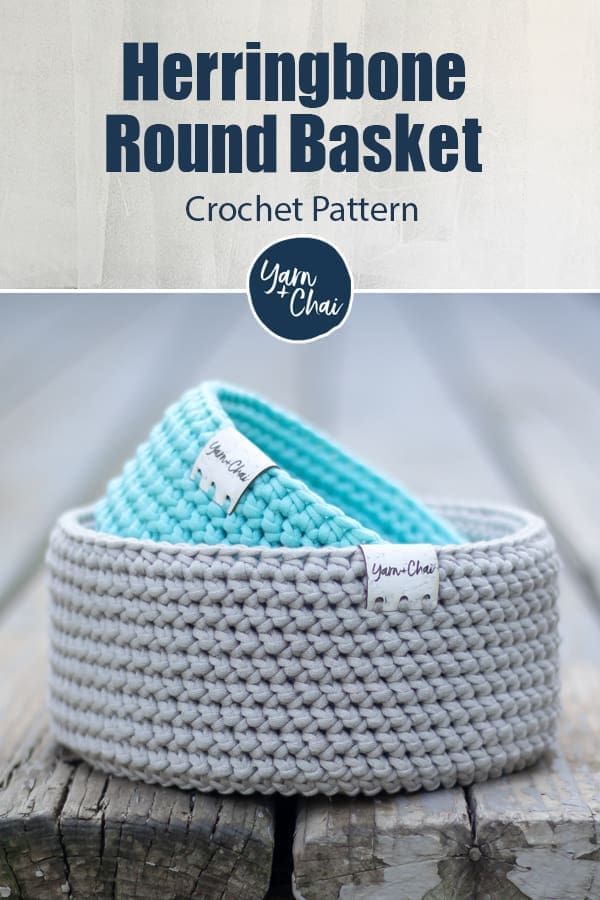
I love crocheted baskets. I love making them, I love displaying them, and I love using them. Ever since I came up with my plastic canvas method for stability, I just can’t get enough of these easy projects!
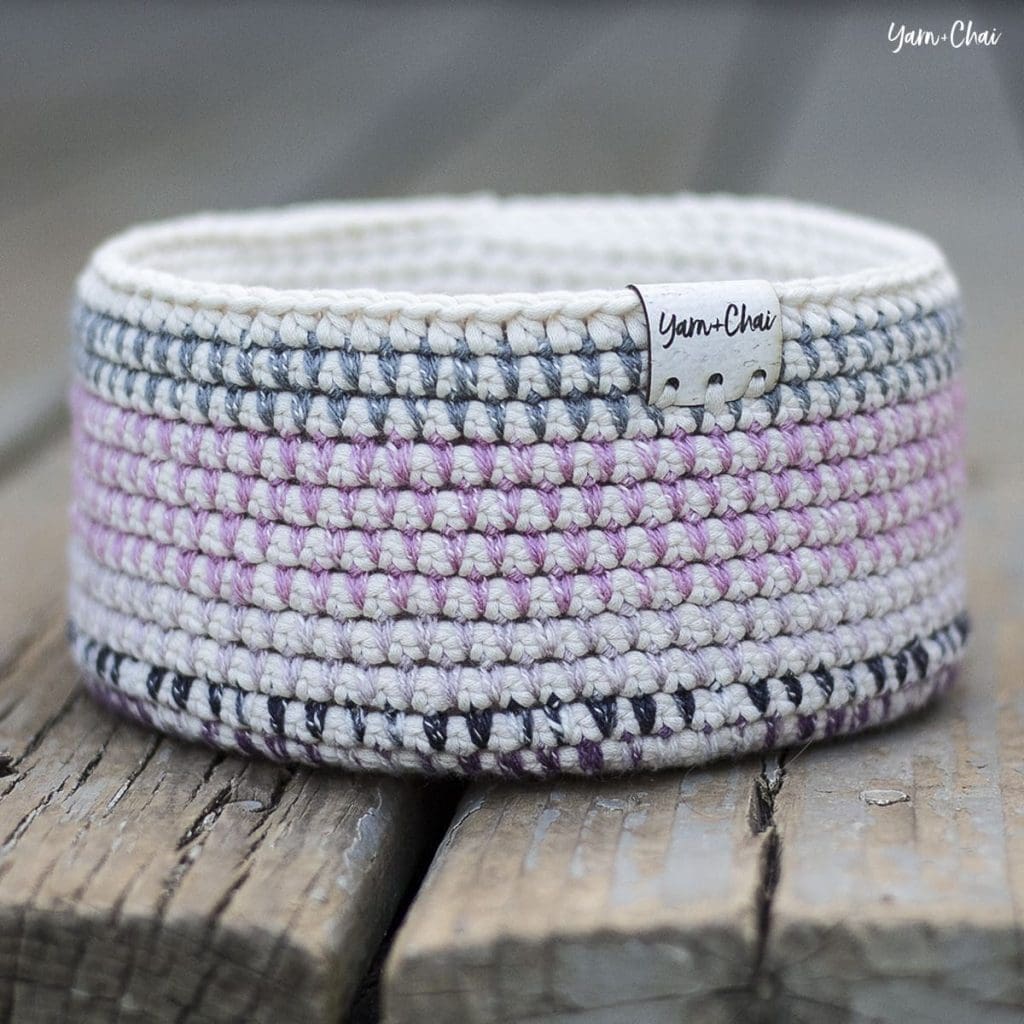
I wanted my next basket pattern to be chic, simple and modern looking. So I returned to one of my favorite stitches – the herringbone half double crochet worked in the round. Such pretty texture!
(My tribe has been begging for a square basket pattern, too, and that’s right here.)
About Those Cute Leather Tags
Those adorable tags on my baskets aren’t actually leather at all – they’re cork! I had mine printed by All This Wood (affiliate link). They always do a great job for me. If you purchase tags of your own through this link, you won’t pay any extra, but I’ll get a small percentage of the sale. My affiliate links are just one of the ways I am able to keep releasing free patterns, so I am always incredibly appreciative of anyone who uses them!
Video Help
While this is a very simple pattern, I know that many of you are visual learners. I don’t have a video tutorial specifically for this pattern, but I have three tutorials that you can use together to basically make the entire basket! Here they are:
Crocheting the smooth-circle base
Timestamp 3:40 – 19:05 covers 12 rounds of the Smooth Circle Increase. (It’s a different basket pattern that uses the same technique.)
Crocheting the rest of the basket
Timestamp 4:31 – 27:35 covers crocheting the rest of the basket. (It’s the same basket, just the square version. So while the video will begin by telling you to HHDC around the perimeter of the square, you’ll just HHDC around the circle, continuing seamlessly as you already were.)
This pattern can be completed using the 100% free version right here on this page. However, many people prefer the convenience of a printable, ad-free PDF.
All-Access Passholders get the ad-free version of this and all of my other blog patterns. It’s a pretty sweet deal, if I do say so myself! Learn more about it here or continuing scrolling for the free version.
Herringbone Round Basket Set
Difficulty: Easy
Yarn: I used Bernat Maker Home Dec (a #5 bulky weight cotton/nylon blend) in “Clay”. Yarn amounts are listed with individual pattern sizes.
Hooks: H (5.0mm) and G (4.25mm)
Gauge: Your first 5 rounds should measure 2.5″ across.
You’ll also need: Yarn needle, stitch marker, heavy duty plastic canvas
Terms and Abbreviations: MC (magic circle – view tutorial here)
ST/STS (stitch/stitches) SL ST (slip stitch) SK (skip) CH (chain) SC (single crochet) HDC (half double crochet) HHDC (herringbone half double crochet; see Special Stitches, below)
3rd Loop (see Special Stitches, below)
Special Stitches:
HHDC: Yarn over, insert hook into stitch. Yarn over, pull loop through stitch AND through first loop on hook (this is similar to a slip stitch motion). Two loops remain on hook. Yarn over and pull through both loops.
3rd Loop: Half double crochet stitches have a 3rd loop that we utilize in this pattern. For this pattern the 3rd loop can be found just below the front loop on the side of the work that is facing away from you. When instructed to work in “3rd loop only”, reach over the two top loops and insert your hook into this special loop. This creates a delicate braided look on the right side of the pattern. Also called Camel Stitch or RibHDC.
Notes: (1) This pattern is written in American Standard Terms.
(2) IMPORTANT: Most of this pattern is worked seamlessly, but a small portion is worked in joined rounds. Pay attention, and only join, chain and/or turn when specifically instructed. Use a stitch marker to mark the beginning of your rounds when working seamlessly.
(3) The finished size of each basket is listed on its individual pattern.
(4) This basket uses the Smooth-Circle Base method of increasing, which is different than a standard circle increase pattern. Please see the video tutorial listed under “Video Help” up in the blog post for a thorough walk-through of this method.
– – – – – – – – – – – – – – –
SMALLER BASKET
Yards Used: 120 Finished Size: 5.5″ wide x 2.75″ tall
To Begin: With larger hook and bulky yarn, make a magic circle; CH1 (does not count as a stitch).
Round 1: 6SC in MC. (6)
Round 2: 2SC in each ST around. (12)
Round 3: (2SC in next ST, SC in next ST) around. (18)
Round 4: (SC in next ST, 2SC in next ST, SC in next ST) around. (24)
Round 5: (2SC in next ST, SC in each of the next 3 STS) around. (30)
Round 6: (SC in each of the next 2 STS, 2SC in next ST, SC in each of the next 2 STS) around. (36)
Round 7: (2SC in next ST, SC in each of the next 5 STS) around. (42)
Round 8: (SC in each of the next 3 STS, 2SC in next ST, SC in each of the next 3 STS) around. (48)
Round 9: (2SC in next ST, SC in each of the next 7 STS) around. (54)
Rounds 10-15: HHDC in each ST around. (54)
Round 16: HHDC in each of the first 52 STS. SC in each of the remaining 2 STS. Join with a SL ST to the top of the first ST of the round. (54)
Round 17: CH1. HDC in each ST around. Join with a SL ST to the top of the first HDC. (54)
Switch to smaller hook.
Round 18: CH1. SC in 3rd loop of each ST around. Do not join. (54)
Rounds 19-27: SC in each ST around. (54)
SL ST into the next ST to smooth down the round. Fasten off and weave in ends, then proceed to “Adding Plastic Canvas.”
– – – – – – – – – – – – – – –
LARGER BASKET
Yards Used: 190
Finished Size: 7″ wide x 3.25″ tall
To Begin: With larger hook and bulky yarn, make a magic circle; CH1 (does not count as a stitch).
Round 1: 6SC in MC. (6)
Round 2: 2SC in each ST around. (12)
Round 3: (2SC in next ST, SC in next ST) around. (18)
Round 4: (SC in next ST, 2SC in next ST, SC in next ST) around. (24)
Round 5: (2SC in next ST, SC in each of the next 3 STS) around. (30)
Round 6: (SC in each of the next 2 STS, 2SC in next ST, SC in each of the next 2 STS) around. (36)
Round 7: (2SC in next ST, SC in each of the next 5 STS) around. (42)
Round 8: (SC in each of the next 3 STS, 2SC in next ST, SC in each of the next 3 STS) around. (48)
Round 9: (2SC in next ST, SC in each of the next 7 STS) around. (54)
Round 10: (SC in each of the next 4 STS, 2SC in next ST, SC in each of the next 4 STS) around. (60)
Round 11: (2SC in next ST, SC in each of the next 9 STS) around. (66)
Round 12: (SC in each of the next 5 STS, 2SC in next ST, SC in each of the next 5 STS) around. (72)
Rounds 13-20: HHDC in each ST around. (72)
Round 21: HHDC in each of the first 70 STS. SC in each of the remaining 2 STS. Join with a SL ST to the top of the first ST of the round. (72)
Round 22: CH1. HDC in each ST around. Join with a SL ST to the top of the first HDC. (72)
Switch to smaller hook.
Round 23: CH1. SC in 3rd loop of each ST around. Do not join. (72)
Rounds 24-34: SC in each ST around. (72)
SL ST into the next ST to smooth down the round. Fasten off and weave in ends, then proceed to “Adding Plastic Canvas.”
– – – – – – – – – – – – – – –
Adding Plastic Canvas
Cut across your plastic canvas to make strips that are the same height as the inner layer of the basket. Set your basket so that it is completely unfolded. Roll up a strip of canvas and insert it into the bottom of the basket, allowing it to expand up against the walls of the basket. Continue adding as many layers as you want to make it as stiff as you want. Fold the inside layer down over the canvas. Work the fabric until it all lays neat and flat.
If you want, you can sew the inner edge of the fabric to the bottom of the basket to keep everything in place. (Avoid doing this if you want your basket to be machine washable.)
You’re done!
I hope you enjoyed this tutorial. If you’re sharing your baskets on social media, be sure to use hashtag #herringbonebasket and tag me @yarnandchai.design!
So at the time I’m writing up this pattern, many of us are at the beginning of a long “social distancing” quarantine. A week ago, I wouldn’t have even known what that sentence meant, but now life is changing daily. What a strange time we are living in!
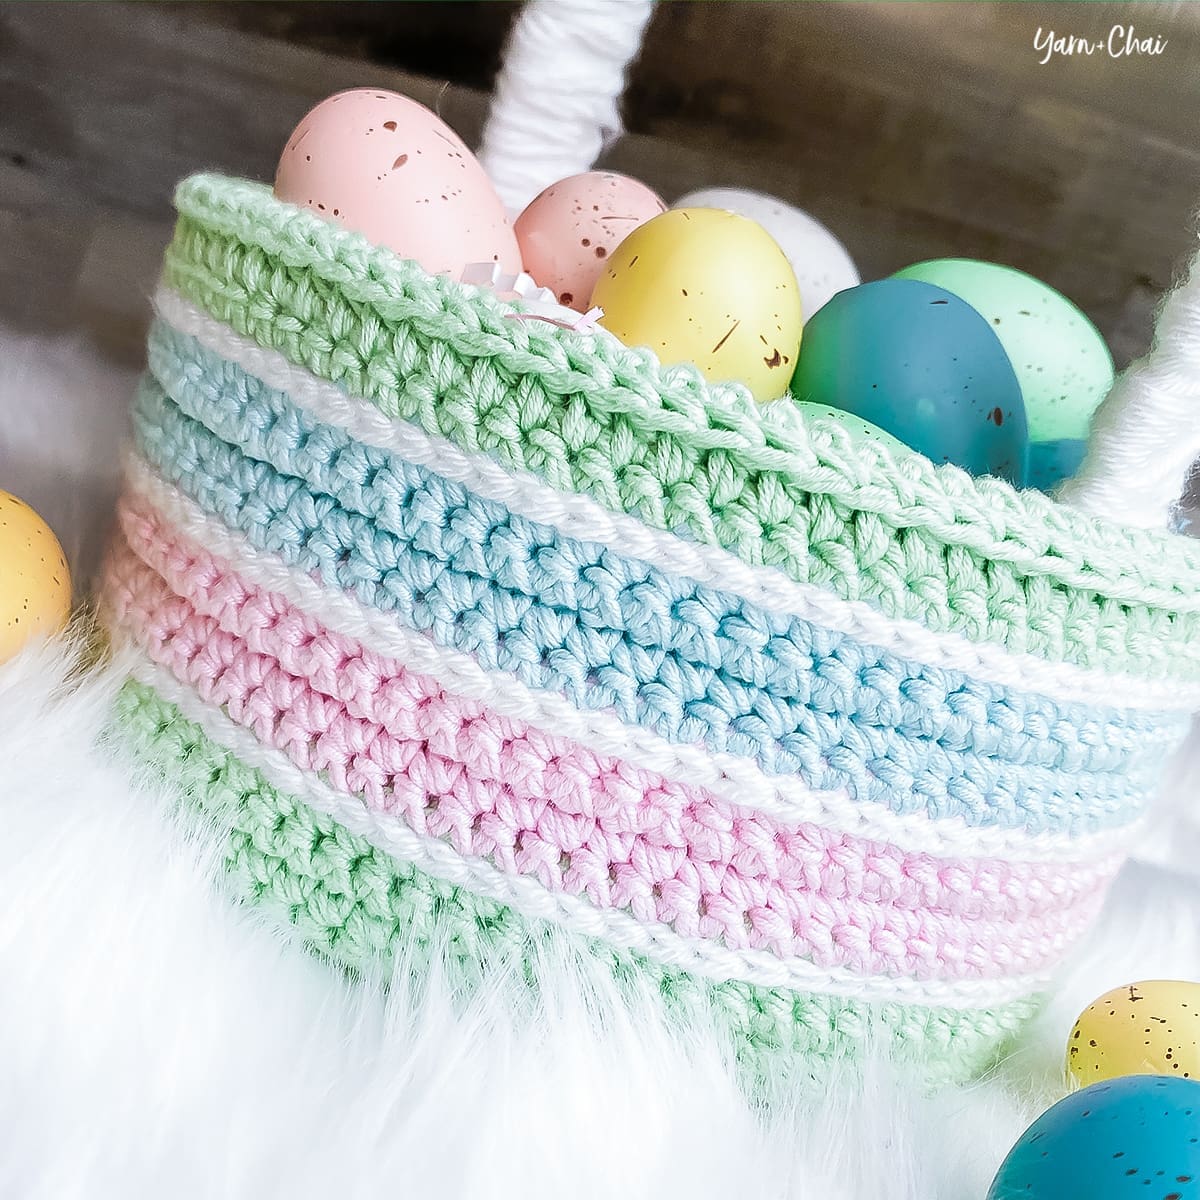
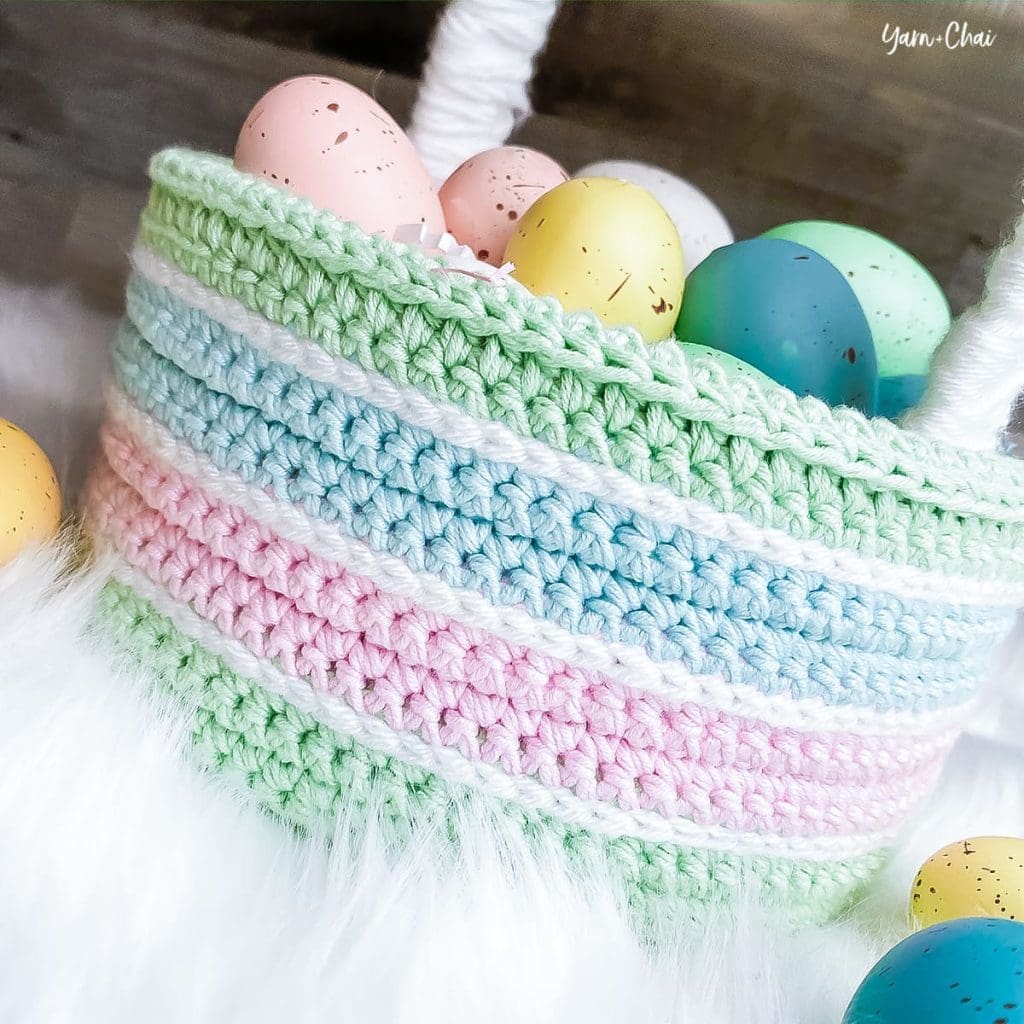
Before we know it, Easter will be upon us! So here’s a fun pattern to get you ready, and if you already have a good cotton stash, you might not even have to make a craft store run.
I’m sorry there’s no video for this one; now that I have all three boys home with me all day every day during the quarantine, there’s not much quiet time available for filming. (Let’s be honest, they’re boys; there’s, like, no quiet time whatsoever.) Luckily, many of the techniques will be familiar to anyone who has already made Yarn + Chai baskets!
About the Yarn
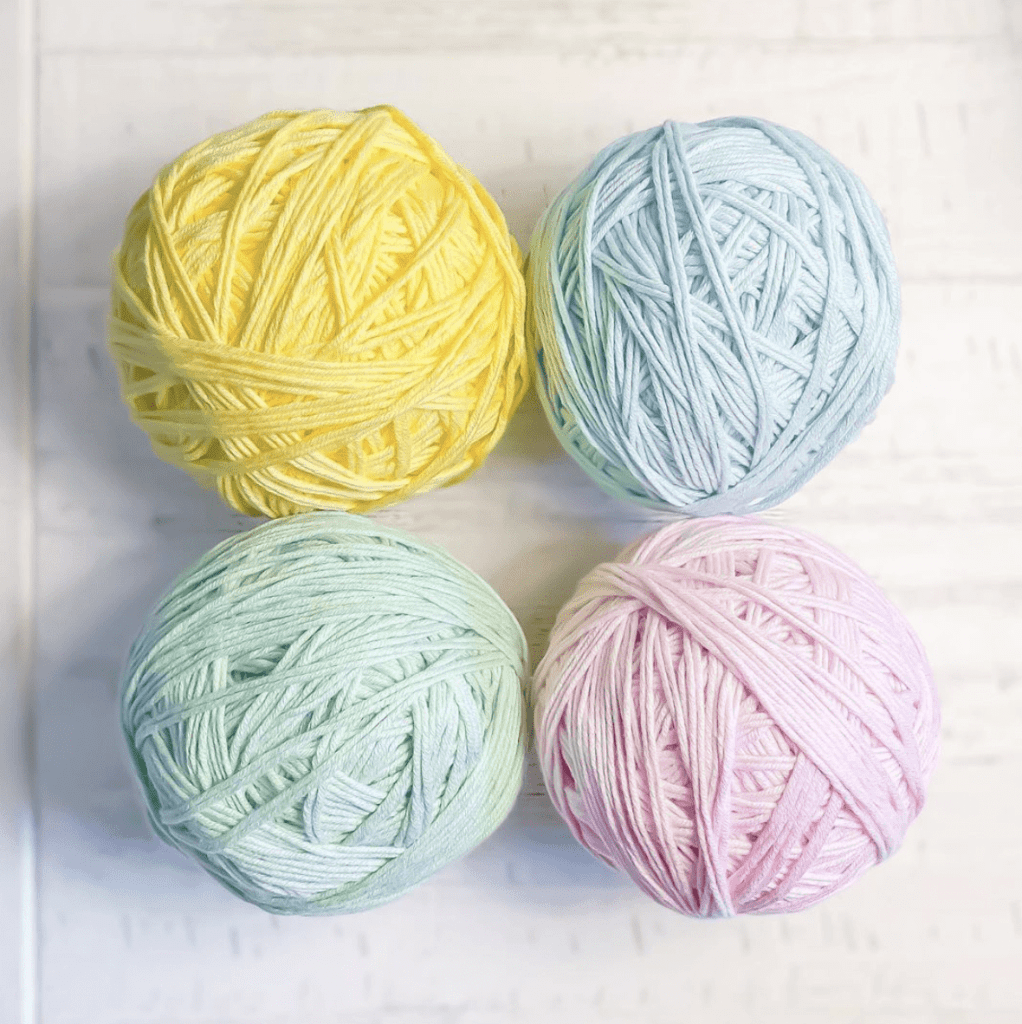
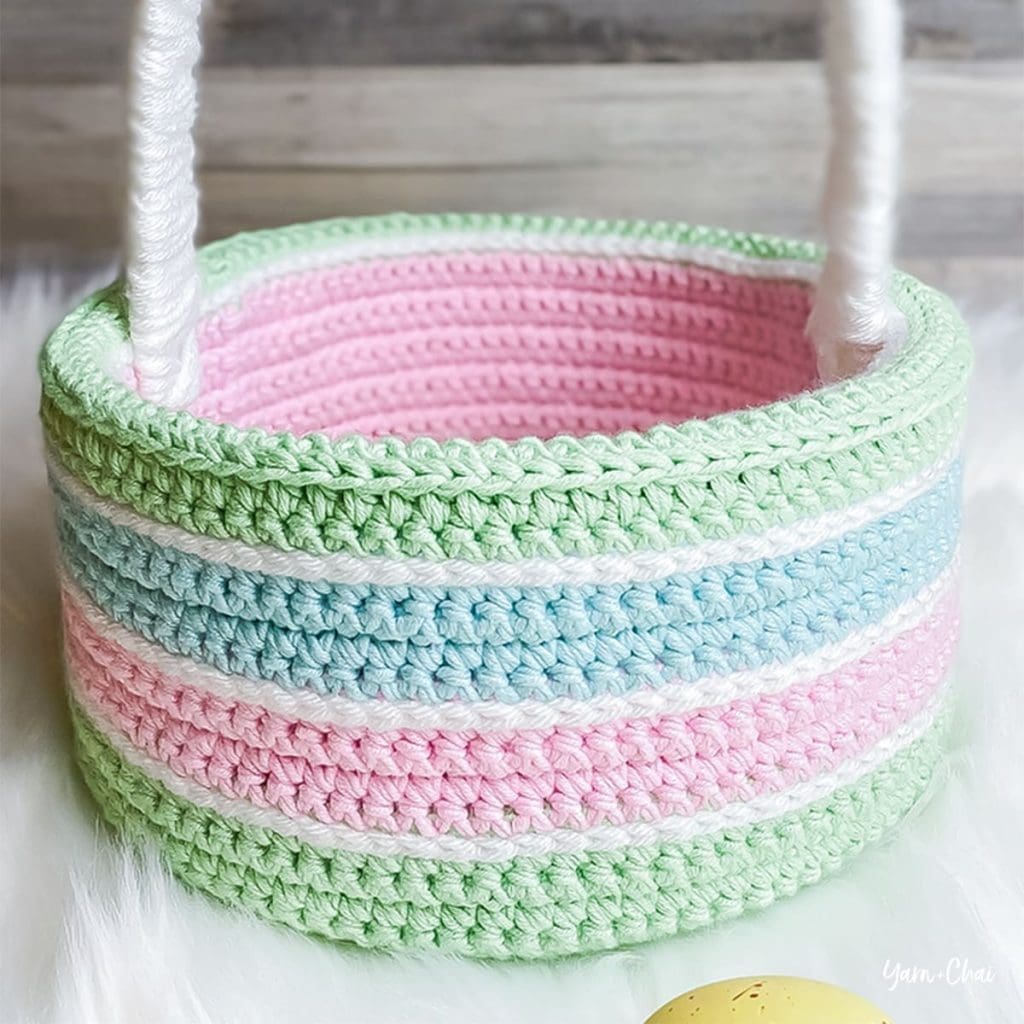
I used two different yarns to make this basket. The bulk of the basket is made with Bernat Softee Baby Cotton, double stranded throughout. The baby hues of this yarn offer lots of options for the perfect Easter color scheme! The white stripes around the basket were made with a small amount of Yarn Bee Soft & Sleek, which I already had in my stash, but any #4 aran weight yarn should work fine. I also used the Soft & Sleek to cover a strip of plastic canvas to serve as the handle.
Download Total Fitness – Home & Gym Workout Mod APK 8.0.7 for Android. winstrol dosing health & fitness courses – brindisi in brindisi – kijiji: ebay classifieds
I didn’t need more than one skein of any color to complete the project, so in order to double-strand the yarn, I brought both ends of the skein together and wound them into an already-double-stranded ball. That way, I could crochet from one ball instead of two skeins at a time. It took some prep work, but was well worth it!
Leaving out the yellow color was a last-minute decision, so that’s why it’s still in the photo.
Prefer a PDF?
This pattern can be completed using the 100% free version right here on this page. However, many people prefer the convenience of a printable, ad-free PDF.
All-Access Passholders get the ad-free version of this and all of my other blog patterns. It’s a pretty sweet deal, if I do say so myself! Learn more about it here or continuing scrolling for the free version.
Finished Size: 8″ wide x 3.75″ tall (excludes handle)
Yarn: I used Bernat Softee Baby Cotton, a #3 weight cotton/acrylic blend, in these colors / amounts:
COLOR A (“Jade Frost”): 225 yards
COLOR B (“Dusk Sky”): 100 yards
COLOR C (“Petal”): 225 yards
I also used a small amount of #4 aran weight stash yarn for the white surface-stitched lines around the basket, and about 30 yards of the same yarn to wrap around the basket handle.
Hooks: H (5.0mm) and G/7 (4.25-4.50mm)
Gauge: Your first 6 rounds should measure 2.75″ across.
You’ll also need: Heavy duty plastic canvas
Terms and Abbreviations: MC (magic circle – view tutorial here)
ST/STS (stitch/stitches) SL ST (slip stitch) CH (chain) HDC (half double crochet) 3rd Loop (see Special Stitches) CSC (crossed single crochet; see Special Stitches)
Special Stitches:
Crossed Single Crochet (CSC): Insert your hook, yarn under*, draw yarn through stitch (2 loops on hook), yarn over, draw through both loops. (*This is the only difference between a crossed single crochet and a standard single crochet, for which you would yarn over after inserting your hook.)
3rd Loop: The 3rd loop can be found just below the front loop on the side of the work that is facing you. When instructed to work in “3rd loop only”, insert your hook into this loop from the bottom.
Notes: (1) This pattern is written in American Standard Terms.
(2) Much of the pattern is worked double-stranded.
(3) When instructed to “join”, join with a SL ST to the top of the first ST of the round.
(4) The pattern uses the Crossed Single Crochet stitch, but could also be made with standard SC.
– – – – – – – – – – – – – – –
PATTERN
To Begin: With larger hook and COLOR A double stranded, make a magic circle; CH1 (does not count as a stitch).
Round 1: 6CSC in MC. Join. (6)
Round 2: CH1, turn. 2CSC in each ST around. Join. (12)
Round 3: CH1, turn. (2CSC in next ST, CSC in next ST) around. Join. (18)
Round 4: CH1, turn. (2CSC in next ST, CSC in each of the next 2 STS) around. Join. (24)
Round 5: CH1, turn. (2CSC in next ST, CSC in each of the next 3 STS) around. Join. (30)
Round 6: CH1, turn.(2CSC in next ST, CSC in each of the next 4 STS) around. Join. (36)
Round 7: CH1, turn.(2CSC in next ST, CSC in each of the next 5 STS) around. Join. (42)
Round 8: CH1, turn.(2CSC in next ST, CSC in each of the next 6 STS) around. Join. (48)
Round 9: CH1, turn. (2CSC in next ST, CSC in each of the next 7 STS) around. Join. (54)
Round 10: CH1, turn. (2CSC in next ST, CSC in each of the next 8 STS) around. Join. (60)
Round 11: CH1, turn. (2CSC in next ST, CSC in each of the next 9 STS) around. Join. (66)
Round 12: CH1, turn. (2CSC in next ST, CSC in each of the next 10 STS) around. Join. (72)
Round 13: CH1, turn. (2CSC in next ST, CSC in each of the next 11 STS) around. Join. (78)
Round 14: CH1, turn. (2CSC in next ST, CSC in each of the next 12 STS) around. Join. (84)
Round 15: CH1, turn. (2CSC in next ST, CSC in each of the next 13 STS) around. Join. (90)
Round 16: CH1, turn. (2CSC in next ST, CSC in each of the next 14 STS) around. Join. (96)
Rounds 17-20: CH1, turn. CSC in each ST around. Join. (96)
Attach COLOR B double stranded. Fasten off COLOR A.
Rounds 21-24: CH1, turn. CSC in each ST around. Join. (96)
Attach COLOR C double stranded. Fasten off COLOR B.
Rounds 25-28: CH1, turn. CSC in each ST around. Join. (96)
Attach COLOR A double stranded. Fasten off COLOR C.
Round 29: CH1, turn. CSC in each ST around. Join. (96)
Round 30: CH1, turn. HDC in each ST around. Join. (96)
Switch to smaller hook.
Round 31: CH1, turn. CSC in 3rd loop only of each St around. Join. (96)
Round 32: CH1, turn. CSC in each ST around. Join. (96)
Attach COLOR B double stranded. Fasten off COLOR A.
Rounds 33-46 (or until last round reaches bottom of basket when folded down inside): CH1, turn. CSC in each ST around. Join. (96)
Fasten off; weave in all ends.
– – – – – – – – – – – – – – –
Adding White Lines with Surface Crochet (Optional)
With larger hook and white #4 aran weight yarn (single-stranded), and beginning at the seam, use the surface crochet technique to slip stitch 4 white lines around the basket, along the lines where two colors meet. Fasten off and weave in ends. B. Hooked Crochet has a great video on how to do this technique if you have never done it before.
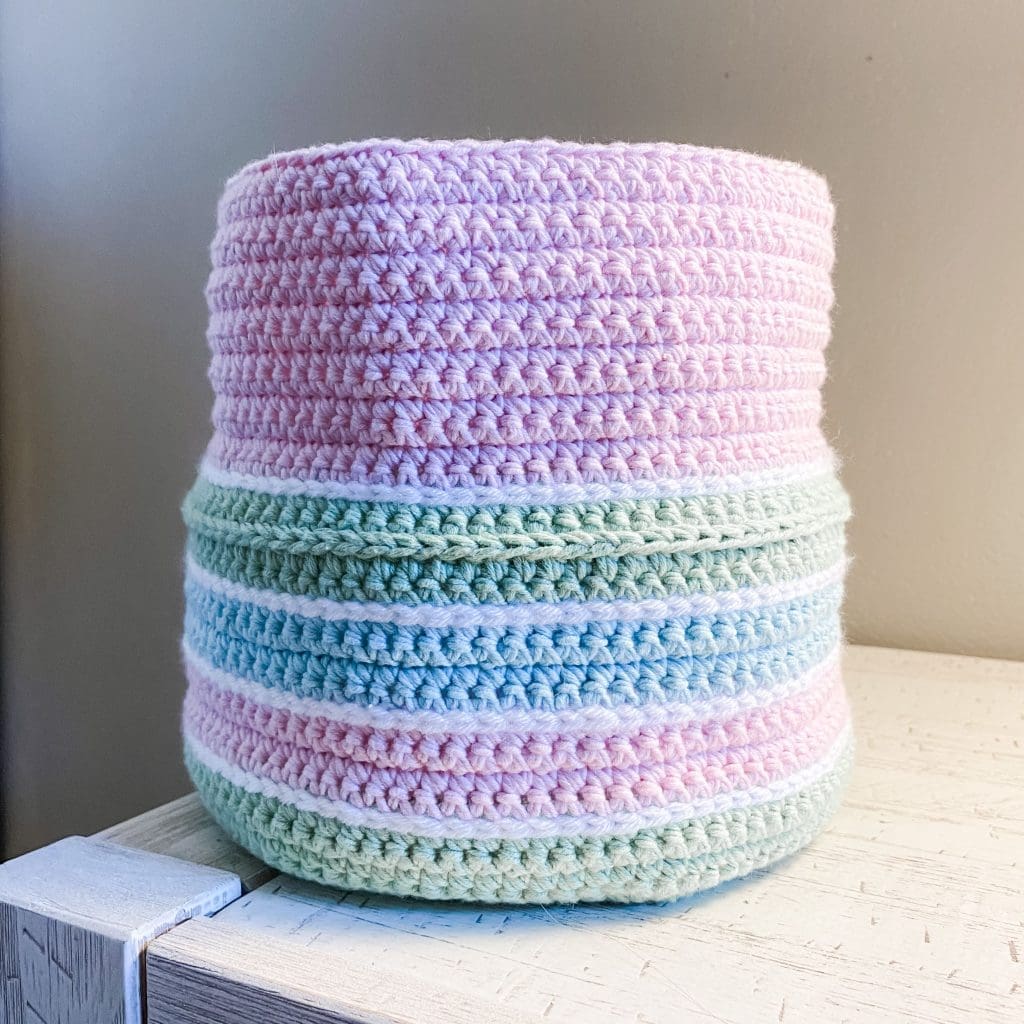
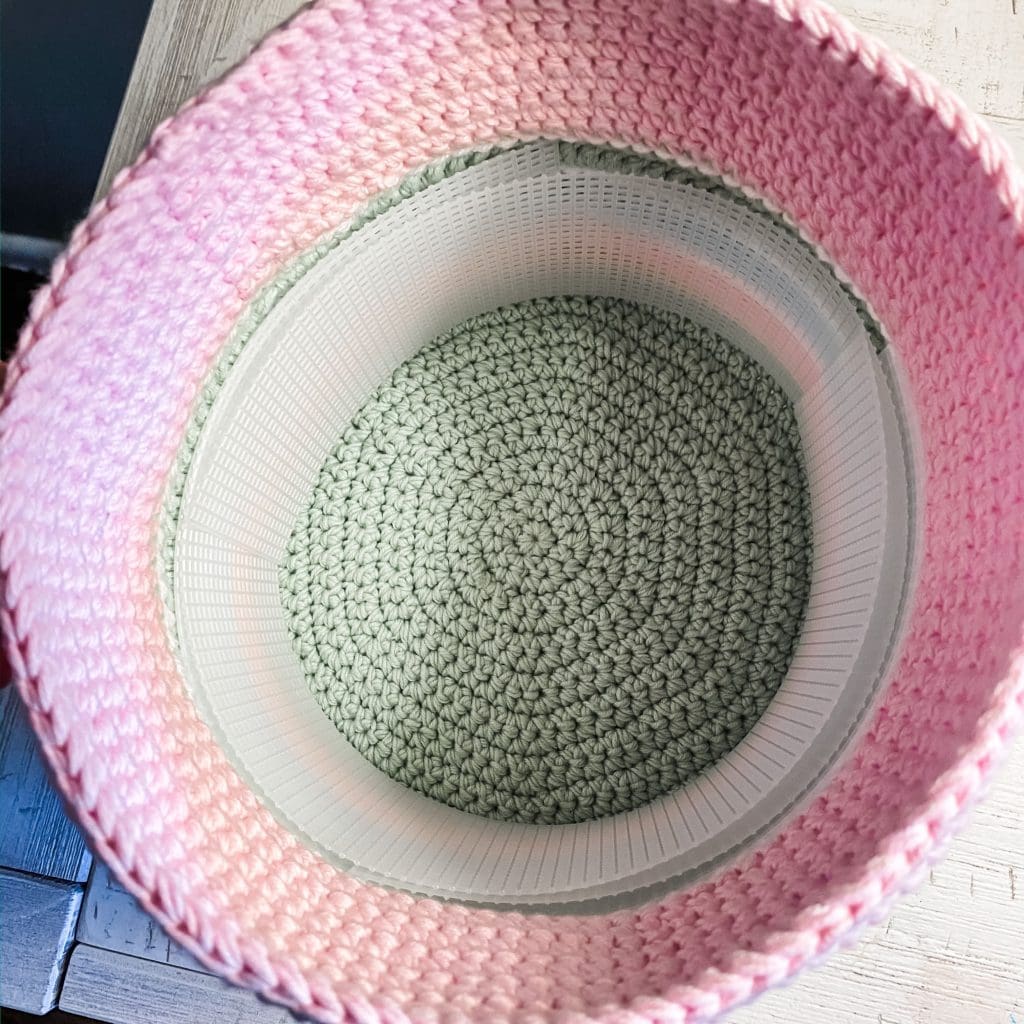
Once you’ve done this, here’s what your basket should look like when unfolded:
– – – – – – – – – – – – – – –
Adding Plastic Canvas
Cut across your plastic canvas to make strips that are the same height as the inner layer of the basket. Set your basket so that it is completely unfolded. Roll up a strip of canvas and insert it into the bottom of the basket, allowing it to expand up against the walls of the basket. Continue adding as many layers as you want to make it as stiff as you want. Fold the inside layer down over the canvas. Work the fabric until it all lays neat and flat.
– – – – – – – – – – – – – – –
Adding a Handle
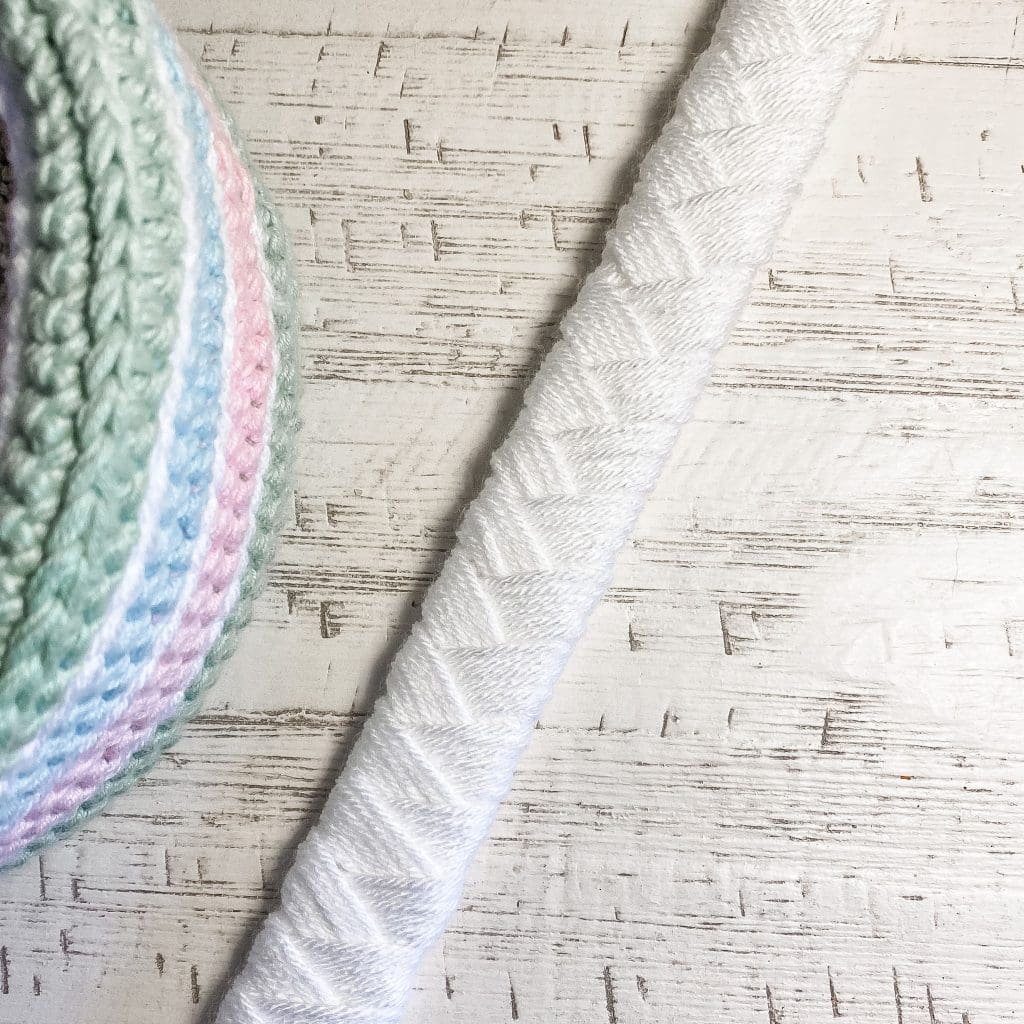
Cut two more long strips of plastic canvas, this time only about 6 squares wide. Hold the strips together (layered one on top of the other) and use your white aran weight yarn to cover them using either a simple wrap-around, or a woven look (as I did). For my strap, I attached 6 very long strands of yarn to the top row of squares so that I had 12 long strands to work with (we’re talking a few yards long). I divided them in half and very carefully layered them over the canvas and each other, over and over down the canvas, similar to a braiding motion. I was careful to smooth out the yarn each time so it laid nice and flat and covered the most ground. When I got to the ends, I superglued everything in place and cut off the excess. Once I was done I superglued the handles to the inside of the basket.
– – – – – – – – – – – – – – –
You’re done!
I hope you enjoyed this pattern. If you’re sharing your easter basket on social media, be sure to use hashtag #classiceasterbasket and tag me @yarnandchai.design!
If you happened to be watching ESPN on Christmas Day, you might have seen something pretty cool… something that will forever be referred to in our home as “that time mommy crocheted a Christmas stocking for ESPN.” Whaaaaat!?
Yeah, it’s officially the most random, and possibly the coolest, thing I’ve been asked to do since becoming a blogger. You can see the stocking in the teaser commercial below, which aired on ABC and ESPN in the afternoon on Christmas Day 2019 ahead of the basketball game between the Bucks and the 76ers. For a brief moment at 0:20 you can see my red hand-crocheted NBA Countdown stocking hanging from the mantle along with some green (store-bought) stockings, and you can see a closeup of the stocking at 1:03.
On the morning of December 5, I checked my email and saw what I at first assumed was just another junk message. (You wouldn’t believe some of the ridiculous emails I’ve gotten since becoming a blogger.) THANKFULLY I read it a little closer after scanning it over, and realized — oh my goodness — I think this is actually legit! It was from a production agency and they were looking for someone to crochet a few green stockings with different names on them. (I’m guessing they found me by searching for crocheted stockings online, and came across the Malia stocking.)
They needed the stockings as background props for a commercial for the show “NBA Countdown”, and they needed them ASAP. I screenshot the emails and texted them to my husband, who freaked out. (He’s the sports person in the family.) We decided it was definitely legitimate, so I replied to the email and accepted the assignment.
Change of Plans
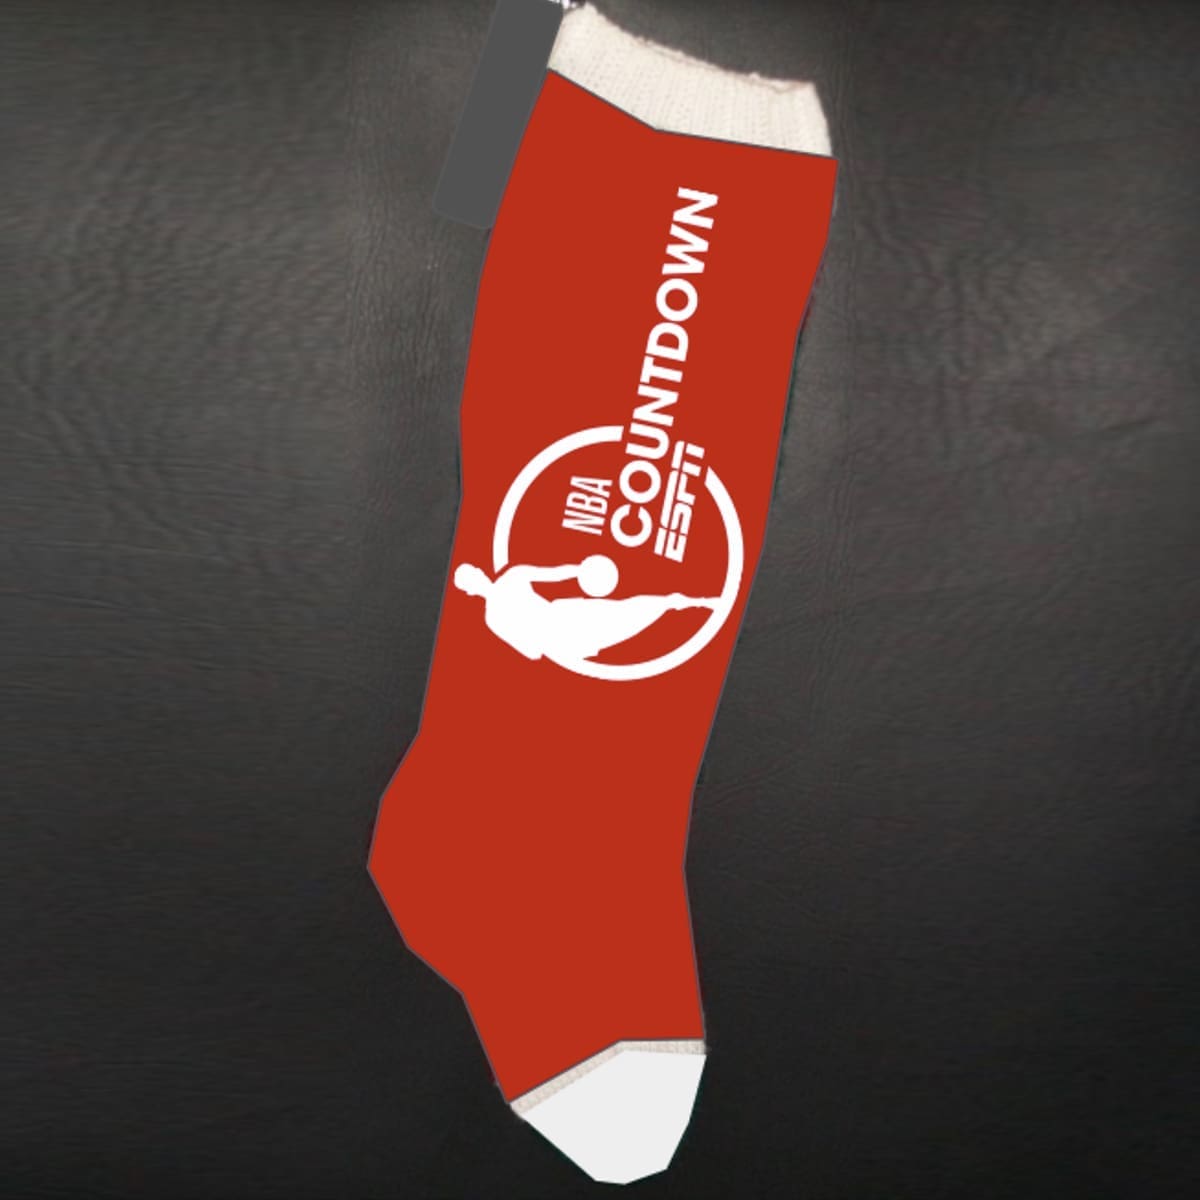
Over the next couple of days, I emailed back and forth with the head of the production company as we figured out the logistics. The big question for me was, how am I going to add the names? After lots of brainstorming, we decided that using the cross-stitching method would be best. So the next day, I headed to Hobby Lobby for yarn. But right after I got home, there was an apology email in my inbox from the producer, saying that the “higher ups” had changed the plan, and now they wanted one stocking, simple and red (not green), and they wanted the NBA Countdown logo on it. Here’s the rough mockup he sent me:
YIKES!
I looked at the complexity of the logo and knew there was no yarn technique I could use that would recreate the detailing to make it recognizable… at least not in the timeframe I had. So, after a bit of panicking, I realized there was really only one way to add the NBA Countdown logo to the stocking.
Vinyl!
Back to the Store
The only problem was, I didn’t own a Cricut. I’d been daydreaming about having one, but never had a good reason to spend the money on it. Now I did! So I went straight to JoAnn Fabrics and got a brand new Cricut Explore Air 2 (that’s an affiliate link). I had no idea how to use it, but I was going to learn… and quick.
No Time to Waste
Over the next couple of days, I watched tons of Cricut tutorial videos while I crocheted the stocking. For the stocking, I knew that the fabric needed to be as flat as possible so that the soft vinyl wouldn’t get too distorted when it was adhered to the yarn. I had just started another pattern with a new-to-me stitch that I was in love with — the linked double crochet — and decided that would be the way to go. It would produce a nice tight fabric in case they wanted to put anything in the stocking, it wasn’t too textured, and it would be much quicker than single crocheting the whole thing. And at this point, time was running out… once the “higher ups” finalized the design, I only had 4 days to make it and overnight it to Philadelphia for the shoot!
Nothing gets your adrenaline going quite like knowing a national television commercial is waiting on a prop from you.
The Eleventh Hour
Once I finished crocheting the stocking, my nerves really set in. Even though I had practiced adding vinyl to some cotton potholders, I knew that I only had one shot at adding it to the stocking. If I messed up, I would be pulling an all-nighter to remake the stocking and try again, because it was due at FedEx the next day. No pressure.
I cut the vinyl, turned on the heat press, said a prayer, held my breath, and went for it.
It worked! The next morning I packaged it up and dropped it off at FedEx to be overnighted to where the commercial would be shot in Philly, and that was that.
Christmas Day
I had no idea what the commercial was about, who would be in it, or when it would air. All I knew was that it had something to do with the basketball game on Christmas Day, and my stocking would be hanging on a mantle. Of course, we kept ESPN on all day on Christmas. A little before 3pm, right in the middle of opening gifts with extended family at my parents’ house, the commercial aired! There was Joel Embiid (a name I didn’t know before all this happened, because a again, not a sports person), and there behind him on the mantle was a row of store-bought stockings… and one red handmade stocking with the NBA Countdown logo on it.
It was brief but so fun to see, and so surreal! It made me realize just how much thought is put into commercials and everything in them. And I’m so glad I got to be a tiny part of it!
Many, many years ago, my grandpa was on a game show on television, and I remember how cool I thought that was. Now I get to tell my own grandkids someday about the time Grandma crocheted a stocking and it was on national television on Christmas Day!
What a randomly unexpected and crazy fun little adventure that was. You never know what the blogging life is going to bring… but I sure do love my job!
And that Cricut Explore Air 2? I’m making great use of it! Just in the week before Christmas, I made…
Fun shirts for my boys
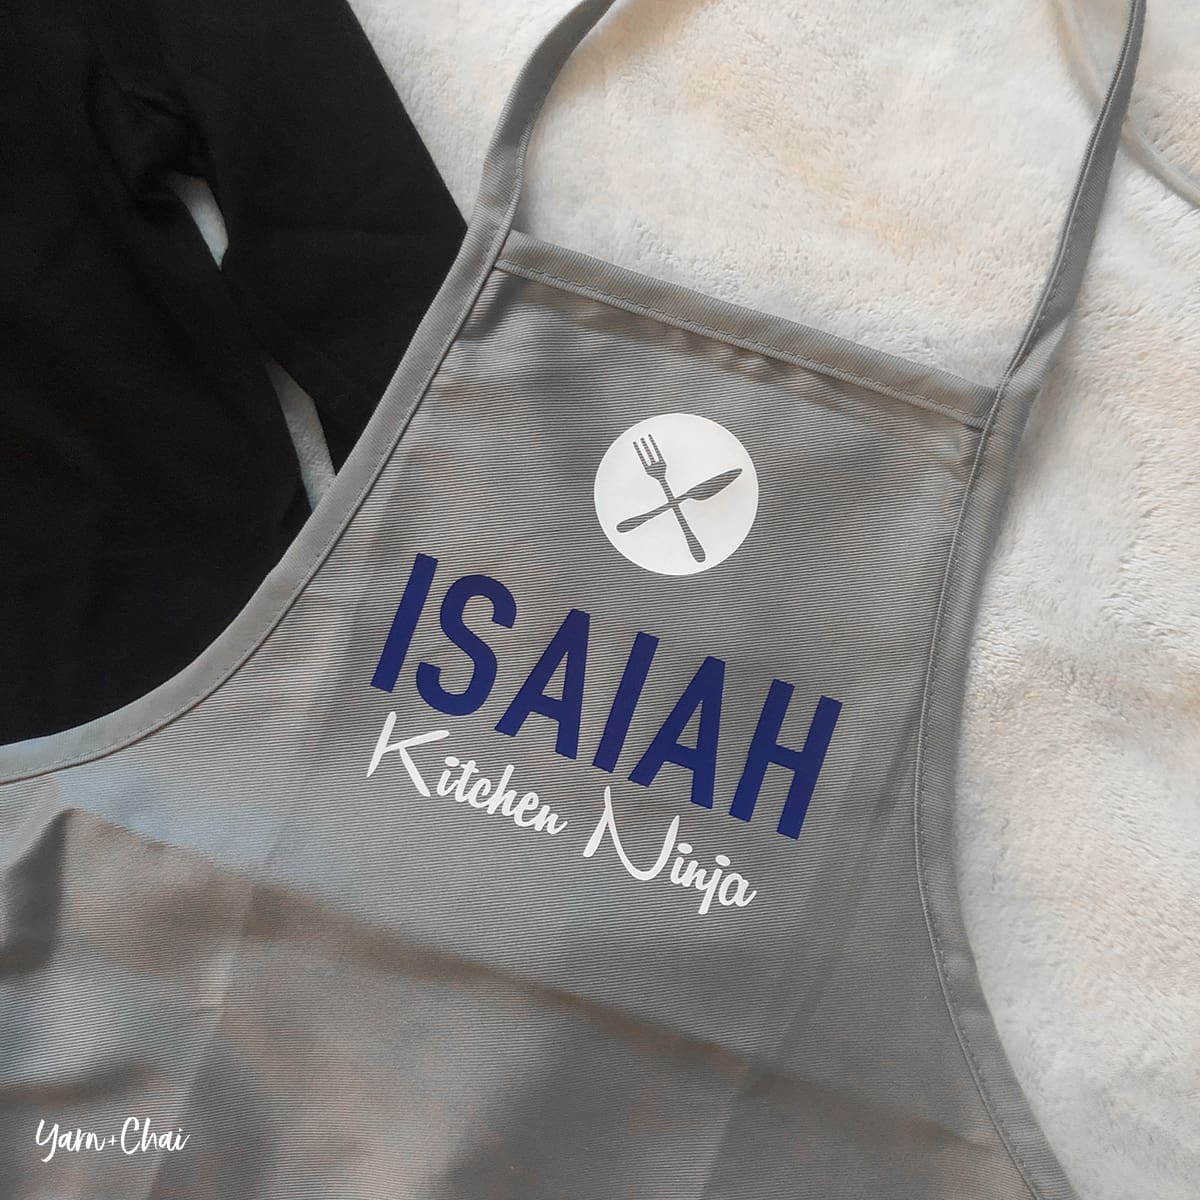
A personalized apron for my middle son, who has discovered a love of cooking
Several bags and shirts for extended family members for Christmas
I am having so much fun with it! Stay tuned for some gorgeous Yarn + Chai and yarn-related merchandise in the coming year! And if you’ve been thinking about getting your own Cricut, I highly recommend it.
– – – – – –
If you’re wondering… no, I didn’t write out the pattern for the stocking. There just wasn’t enough time! But I do have a stocking pattern here that you might love 🙂
It’s hard to believe I’m ready to release my first garment pattern, because this has been a looooong process!
I can’t even tell you how many times over the last year that I’ve started designing a garment and ended up scrapping the whole thing. I can create hats and scarves in my sleep, but garment design is a whole new beast!
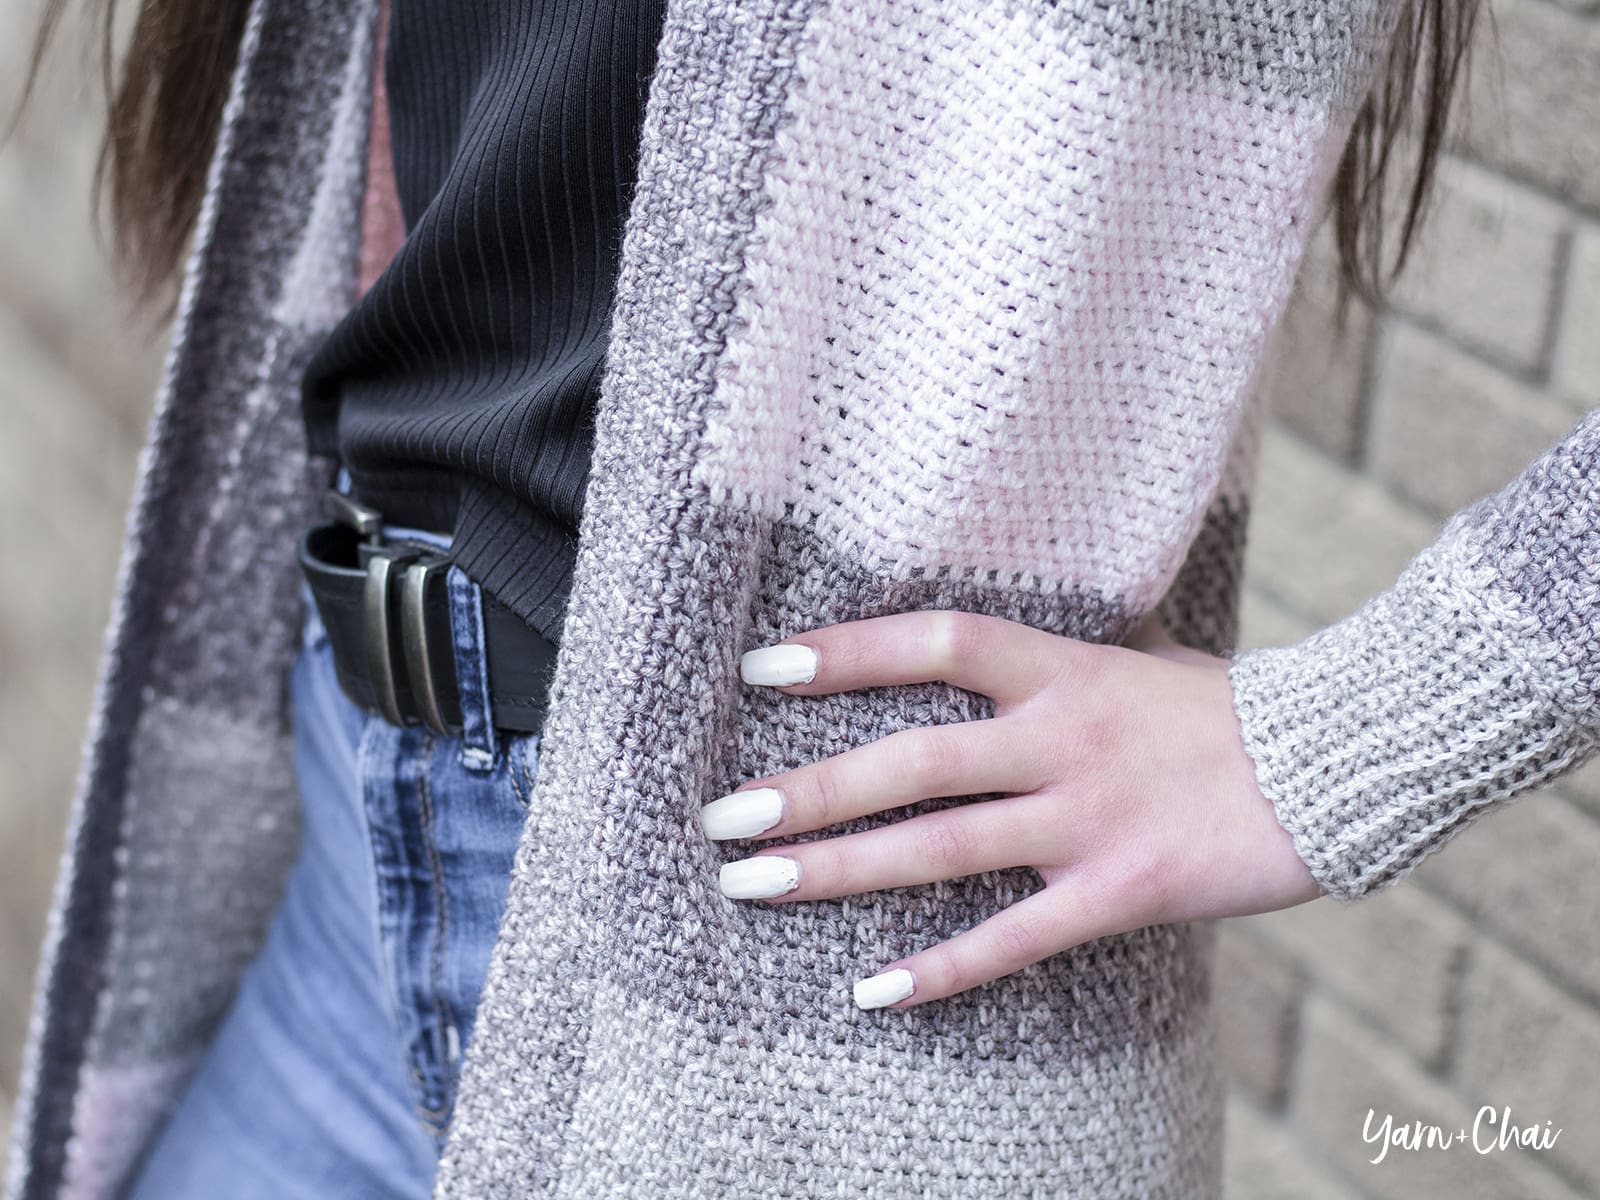
Part of the reason it was such a process is because I was determined to design it the right way — with size inclusivity. This cardigan pattern includes 9 sizes, from XS through 5XL, because we all deserve to wear our beautiful creations! But… it meant lots of learning and lots of calculations. Now that I’ve done it, I can say that I definitely did learn a lot and my next design should be much easier on my brain. (FYI, my model is 5’1 and is wearing XS, her usual clothing size.)
ABOUT THE YARN
The beautiful heathered yarn in my sample is Yarn Bee Soft & Sleek DK (order it through my affiliate link here). I strongly recommend it, BUT, please read on for my important notes about it.
It’s just as soft as it is pretty, and I absolutely loved working with it. The skeins are generous at 478 yards, and while I can’t say I’ve really tested it out, it is a low-pill yarn. I used Mink (color A), Cloud Control (color B), and Pink Lemonade (color C) in my sample cardigan.
The only strange thing about this particular yarn is that while it’s classified as a #3 weight, it feels a whole lot more like a #1. That’s quite a difference, right!? I did some investigating online, and most of the reviews I found agreed. I also compared its yards-to-grams ratio with other #1, #2 and #3 yarns, and it most definitely fit in the #1 category. I have no explanation for this, but you’ll need to keep it in mind if you decide to use a substitute; you’ll want to start with a #1, or thin #2, yarn. And it should go without saying, but please do a gauge check.
Update: I asked in my Facebook group what substitute yarns people were using successfully with this pattern, and here’s a list! Please note that crocheters have been able to meet the pattern gauge with each of these yarns, but they may have used a slightly smaller or larger hook size to do so. It’s all part of the gauging process!
Loops & Threads Woolike (Michael’s)
Cotton Kings (Hobbii)
Dotted Line (Lion Brand)
It’s A Wrap Rainbow (Red Heart)
Yarn Bee Glint of Glam (Hobby Lobby)
Amazing Lace (Lion Brand)
Yarn Bee Pigment (Hobby Lobby)
VIDEO TUTORIAL
I’ve put together a step-by-step video tutorial for you visual learners! This video is meant to help you as you work from the written pattern and goes over each technique that you’ll need to complete your cardigan, from the linen stitch to seaming.
Prefer a PDF?
This pattern can be completed using the 100% free version right here on this page. However, many people prefer the convenience of a printable, ad-free PDF.
All-Access Passholders get the ad-free version of this and all of my other blog patterns. It’s a pretty sweet deal, if I do say so myself! Learn more about it here or continuing scrolling for the free version.
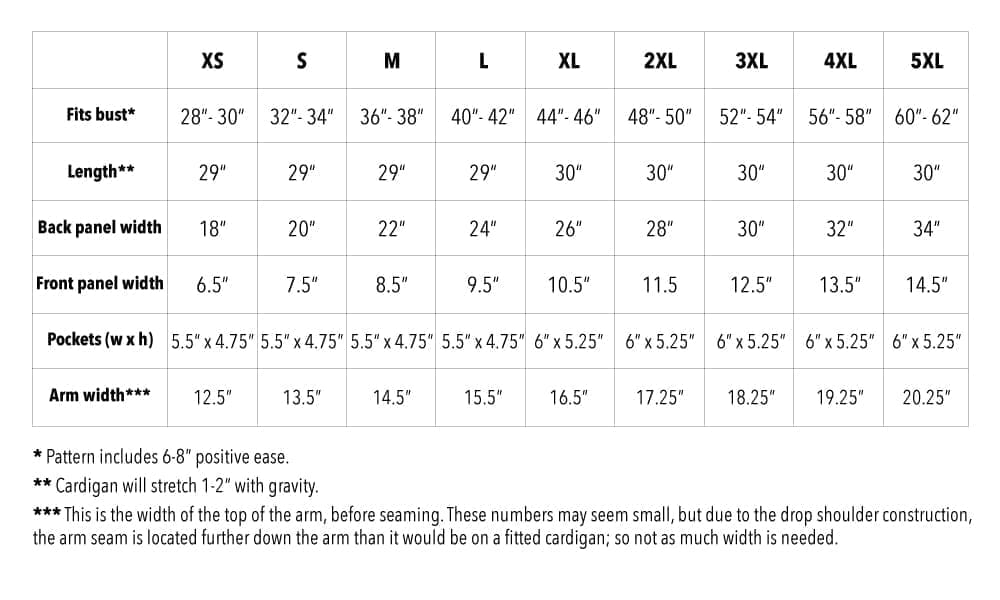
Finished Sizes Pattern is written for sizes XS – 5XL (see chart for specific measurements). Cardigan has a loose fit, with 6-8″ positive ease.
Hook G (4.5mm) or whichever hook is needed to meet gauge. You may also want to have a smaller hook handy (see Note #2). My favorite hooks are Clover Amour (affiliate link).
Yarn I used Yarn Bee Soft & Sleek DK (affiliate link), a soft, heathered yarn from Hobby Lobby that is categorized as a #3 weight, but please note that it feels more like a fingering weight (#1!). Most of the online reviews I’ve read agree with this assessment, and its yardage-to-grams ratio would suggest that it is a fingering weight. It was a great yarn to work with, but if you don’t have access to it, I strongly suggest working up a gauge swatch in a fingering or light sport yarn as #3 weights will be too thick.
The table below will tell you how much yarn you will need for your size. Please note that the number of skeins required is specific to Yarn Bee Soft & Sleek DK, and if you use a different yarn, you’ll need to go by yardage when deciding how much to purchase.
Gauge 25 STS x 27 rows = 4″ square (worked in the linen stitch). To get an accurate gauge, which is especially important in a garment pattern, you should work up a swatch that is larger than 4″ and measure within it, away from the edges. (Tip: Work up one of the pockets as your gauge swatch. That way, you’ll already have one pocket ready to go!)
You’ll also need Yarn needle
Terms and Abbreviations ST/STS (stitch/stitches) SL ST (slip stitch) SK (skip) CH (chain) SC (single crochet) SC2TOG (single crochet 2 together; see Special Stitch) BLO (back loop only)
Special Stitch
SC2TOG (single crochet 2 together): In this pattern, SC2TOGs will be worked over two CH1 spaces. Complete them as follows: Insert hook in next CH1 space, yarn over and pull up loop (2 loops on hook); insert hook in next CH1 space, yarn over and pull up loop (3 loops on hook); yarn over and draw through all 3 loops on hook. This will decrease your stitch count by 2 (1 SC and 1 CH1 space).
Notes
A video tutorial is available up in the post, or by clicking here.
When I work the linen stitch (the stitch used throughout this pattern), my fabric tends to pull in a bit after the first couple of rows. To avoid this, I use a smaller (3.5mm) hook for the initial chain and the first row, before switching to my regular hook. This is not noted in the pattern, but you might find it helpful if your first couple of rows are coming out wider. If you choose to stick with the regular hook, be sure to keep a tight tension in those first couple of rows.
Each row will have an equal number of stitches and CH1 spaces. The sum of these is reflected in the stitch counts. For example, a stitch count of 78 means that row has 39 stitches + 39 CH1 spaces.
Pattern is written for sizes Xs-5XL, with counts for sizes S-5XL written in parentheses. Example: XS (S, M, L, XL, 2XL, 3XL, 4XL, 5XL) It might help to highlight the correct counts for your size before you begin.
To avoid redundancy, pattern has been written out as “regular rows” and “decrease rows”, with applicable stitch counts included for each row.Use the following instructions for each:
Regular Row: CH2 (counts as first CH1 space), turn. SC in first CH1 space. (CH1, SC in next CH1 space) across. Decrease Row: CH2 (counts as first CH1 space), turn. SC2TOG over first 2 CH1 spaces. (CH1, SC in next CH1 space) across.
– – – – – – – – – –
Back Panel (make 1)
For this panel, you’ll crochet 7 color blocks of 28 (sizes XS-L) or 29 (sizes XL-5XL) rows per block. There are no increases or decreases.
To begin: With COLOR A, CH116 (128,140,152,164,178,190,202,214).
Row 1: SC in 4th CH from hook (counts as first CH1 space and first SC). (CH1, SK1, SC in next) across.
Stitch count (will remain the same for each row): 114 (126,138,150,162,176,188,200,212)
Rows 2-28 (XS-L) OR 2-29 (XL-5XL): Regular row.
Switch to COLOR B.
Rows 29-56 (XS-L) OR 30-58 (XL-5XL): Regular row.
Switch to COLOR C.
Rows 57-84 (XS-L) OR 59-87 (XL-5XL): Regular row.
Switch to COLOR A.
Rows 85-112 (XS-L) OR 88-116 (XL-5XL): Regular row.
Switch to COLOR B.
Rows 113-140 (XS-L) OR 117-145 (XL-5XL): Regular row.
Switch to COLOR C.
Rows 141-168 (XS-L) OR 146-174 (XL-5XL): Regular row.
Switch to COLOR A.
Rows 169-196 (XS-L) OR 175-203 (XL-5XL): Regular row.
Fasten off and weave in all ends.
– – – – – – – – – –
Front Panels (make 2)
For these panels, you’ll crochet 7 color blocks of 28 (sizes XS-L) or 29 (sizes XL-5XL) rows per block. There are no increases or decreases.
To begin: With COLOR A, CH44 (50,56,62,68,74,80,88,94).
Row 1: SC in 4th CH from hook (counts as first CH1 space and first SC). (CH1, SK1, SC in next) across.
Stitch count (will remain the same for each row): 42 (48,54,60,66,72,78,86,92)
Rows 2-28 (XS-L) OR 2-29 (XL-5XL): Regular row.
Switch to COLOR B.
Rows 29-56 (XS-L) OR 30-58 (XL-5XL): Regular row.
Switch to COLOR C.
Rows 57-84 (XS-L) OR 59-87 (XL-5XL): Regular row.
Switch to COLOR A.
Rows 85-112 (XS-L) OR 88-116 (XL-5XL): Regular row.
Switch to COLOR B.
Rows 113-140 (XS-L) OR 117-145 (XL-5XL): Regular row.
Switch to COLOR C.
Rows 141-168 (XS-L) OR 146-174 (XL-5XL): Regular row.
Switch to COLOR A.
Rows 169-196 (XS-L) OR 175-203 (XL-5XL): Regular row.
Fasten off and weave in all ends.
– – – – – – – – – –
Sleeves (make 2)
For the sleeves, you’ll begin with COLOR B and crochet 3 color blocks of 28 rows per block, with decrease rows scattered throughout, before adding ribbing at the end. As a reminder, a decrease row is: CH2 (counts as first CH1 space), turn. SC2TOG over first 2 CH1 spaces. (CH1, SC in next CH1 space) across.
IMPORTANT: When you finish a color, fasten it off with a tail long enough to be used for seaming the edges of that color block together.
To begin: With COLOR B, CH80 (86,92,98,104,110,116,122,128).
Row 1: SC in 4th CH from hook (counts as first CH1 space and first SC). (CH1, SK1, SC in next) across. (78 [84, 90, 96, 102, 108, 114, 120, 126] )
Rows 79-85 (switch to COLOR B on Row 85): Regular row.(54 [60, 66, 72, 78, 84, 90, 96, 102] )
Row 86: CH1, turn. SC in first SC, SK first CH1 space, SC in next SC, SC in next CH1 space, SK next SC, SC in next CH1 space. (SC in next SC, SK next CH1 space, SC in next SC, SC in next CH1 space, SK next SC, SC in next CH1 space) across. (36 [40, 44, 48, 52, 56, 60, 64, 68] )
Keep hook inserted for next step.
Next, we will be creating the ribbing by making vertical ribs and attaching them with slip stitches to the last row of the sleeve as we go. We’ll be referring to “Row 86”; that’s the last row of the sleeve we completed, and that’s what the ribbing will be attaching to. I cover this in the video tutorial for this pattern, but if you feel you need a little more in-depth help with this part, here’s another tutorial video that is specifically about this technique.
CH17.
Row 1: Turn. SC in 2nd chain from hook and in each of the remaining 15 chains. SL ST into the first SC from Row 86, the stitch on which your CH17 was built. SL ST into the next ST from Row 86. (16, plus the two slip stitches along Row 86)
The section we just created, built on the CH17, will hereafter be referred to as the “ribbing.”
Row 2: CH1, turn. Skipping over the 2 SL STS you put in Row 86, SC in BLO of each of the first 15 STS of the ribbing. SC in both loops of the last ST. (16)
Row 3: CH1, turn. SC in 1st ST. SC in BLO of each of the remaining 15 STS of the ribbing. SL ST in each of the next 2 SCs along row 86. (16, plus the 2 SL STS along Row 86)
Row 4: CH1, turn. Skipping over the 2 SL STS you put in Row 86, SC in BLO of each of the first 15 STS of the ribbing. SC in both loops of the last ST. (16)
Rows 5-the end: Repeat Rows 3-4 all the way across Row 86. Fasten off, leaving a long tail for seaming this color section.
Fold sleeve in half lengthwise and use long finishing tails to seam each color block together. Weave in all ends and keep sleeve inside out.
– – – – – – – – – –
Pockets (make 2)
For the pockets, you’ll simply crochet two rectangles with Color A. Easy!
To begin: With COLOR A, CH36 (36, 36, 36, 40, 40, 40, 40, 40).
Row 1: SC in 4th CH from hook (counts as first CH1 space and first SC). (CH1, SK1, SC in next) across.
Stitch count (will remain the same for each row): 34 (34, 34, 34, 38, 38, 38, 38, 38)
Rows 2-32 (XS-L) OR 2-36 (XL-5XL): Regular row.
Fasten off, leaving a long tail for sewing pocket to cardigan later. Weave in starting tail.
– – – – – – – – – –
Seaming
It’s time to seam it all together! Here are a few tips before you begin:
Use the mattress stitch to seam your work (demonstrated in the tutorial video).
Be sure to seam everything inside out. There are no “wrong sides” on your flat panels, but once you begin seaming, stay consistent and make sure all of your seams are facing out (including the arm seams that you already did). When you’re done seaming, you can flip everything right-side out.
When seaming the arms to the cardigan, you can use a 1:1 ratio; meaning, each single stitch along the arm hole will be seamed up with a single row along the side of the cardigan.
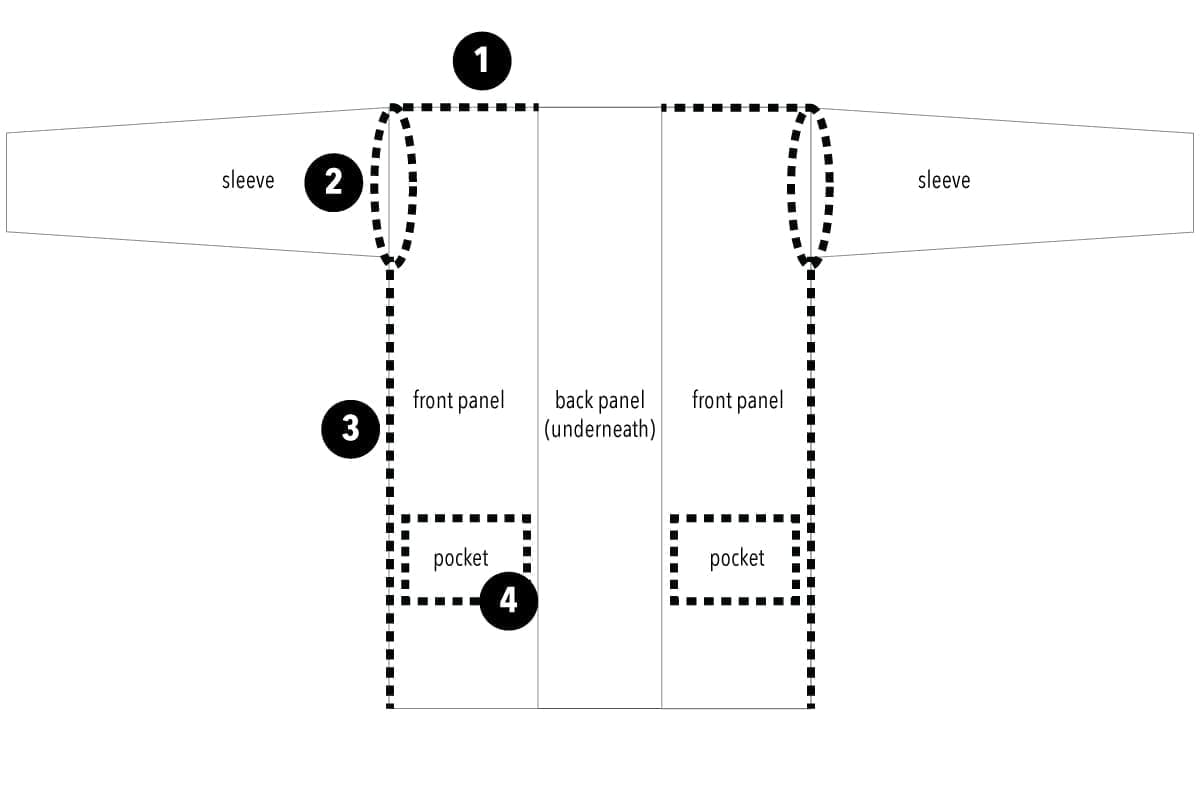
Seam up your cardigan in this order, using the diagram below as a visual:
With COLOR A, seam the tops of the front panels to the top of the back panel as shown.
With COLOR B, seam the arms (make sure they’re inside out!) to body of cardigan.
Seam down the sides of the cardigan using whichever color you are joining. You’ll have more ends to weave in, but it looks better than seaming it with all one color.
Sew the pockets to the front panels, just above the last color block.
– – – – – – – – – –
Collar
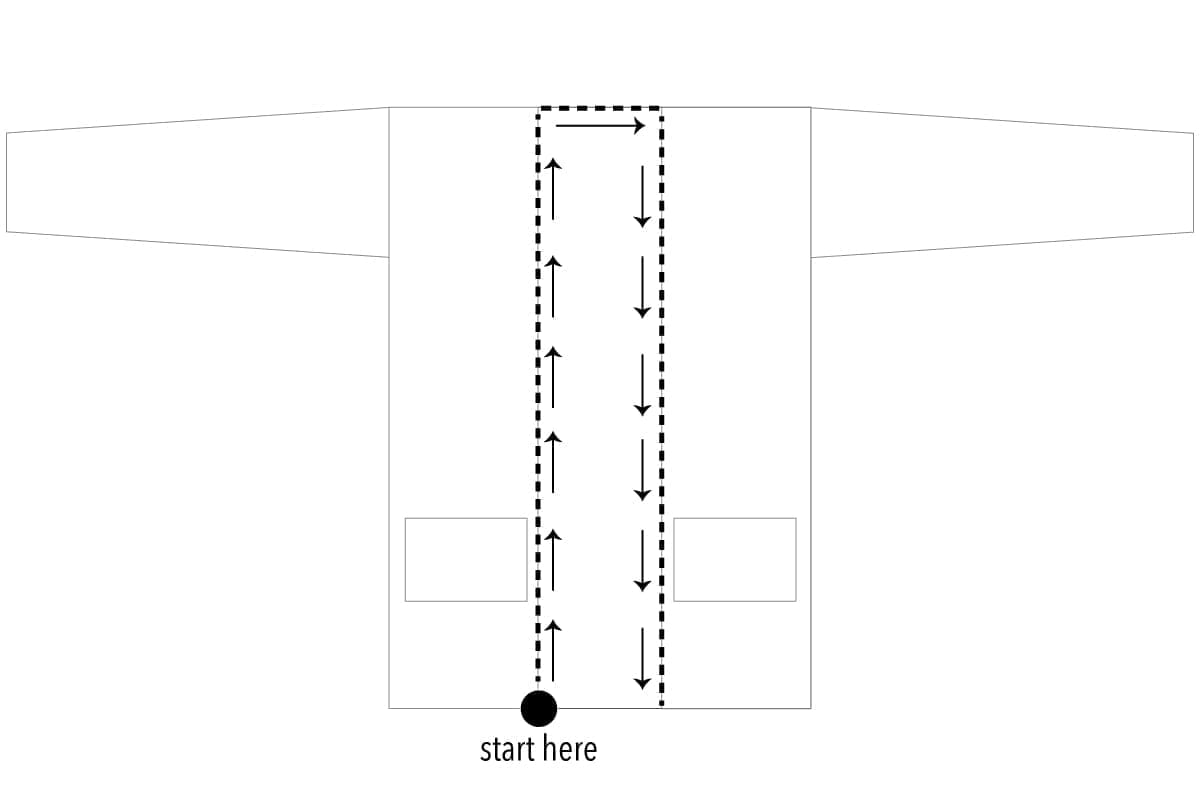
Our final step is to add the collar with COLOR A. We’re going to lay the foundation by starting at the bottom corner of the front panel (indicated on the diagram below) and working a “regular row” up the side, across the middle of the back panel, and down the opposite side. Since there are no stitches to work into along the edges of the front panels, you’ll be treating each row as one stitch. This is demonstrated in the tutorial video.
To begin: Attach COLOR A; CH2 (counts as first CH1 space). (CH1, SK1, SC in next) across, working up the side, across the back and down the other side. Be sure to end with an SC.
Rows 2-12: Regular rows.
Fasten off and weave in ends.
– – – – – – – – – –
Done! If you’re sharing on social media, be sure to hashtag #evacardigan and tag me @yarnandchai.design.I can’t wait to see your finished cardigan!
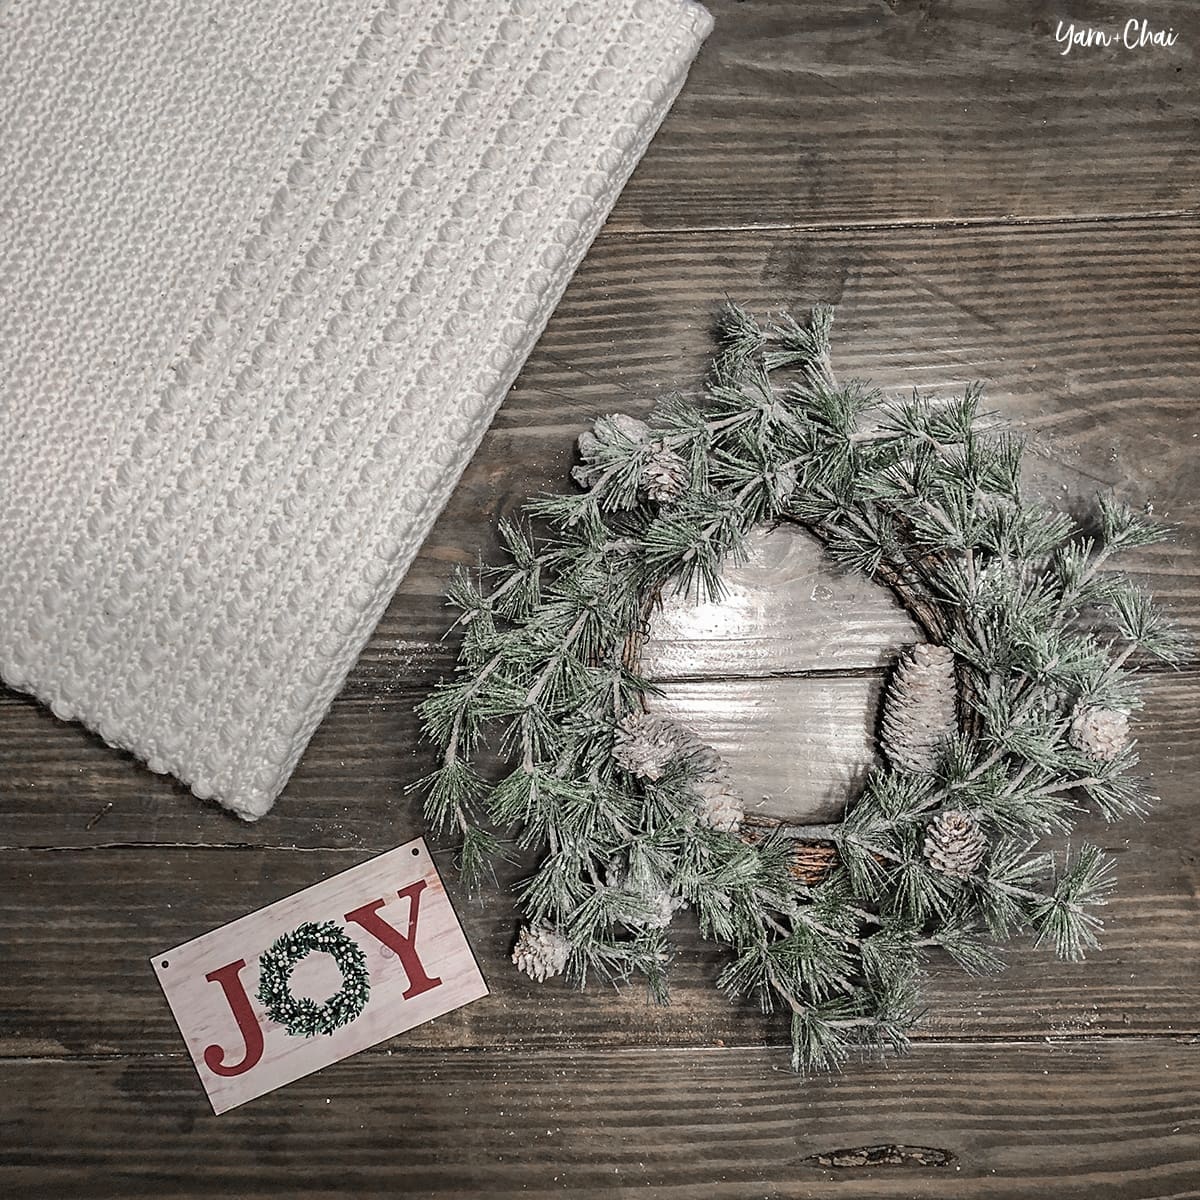
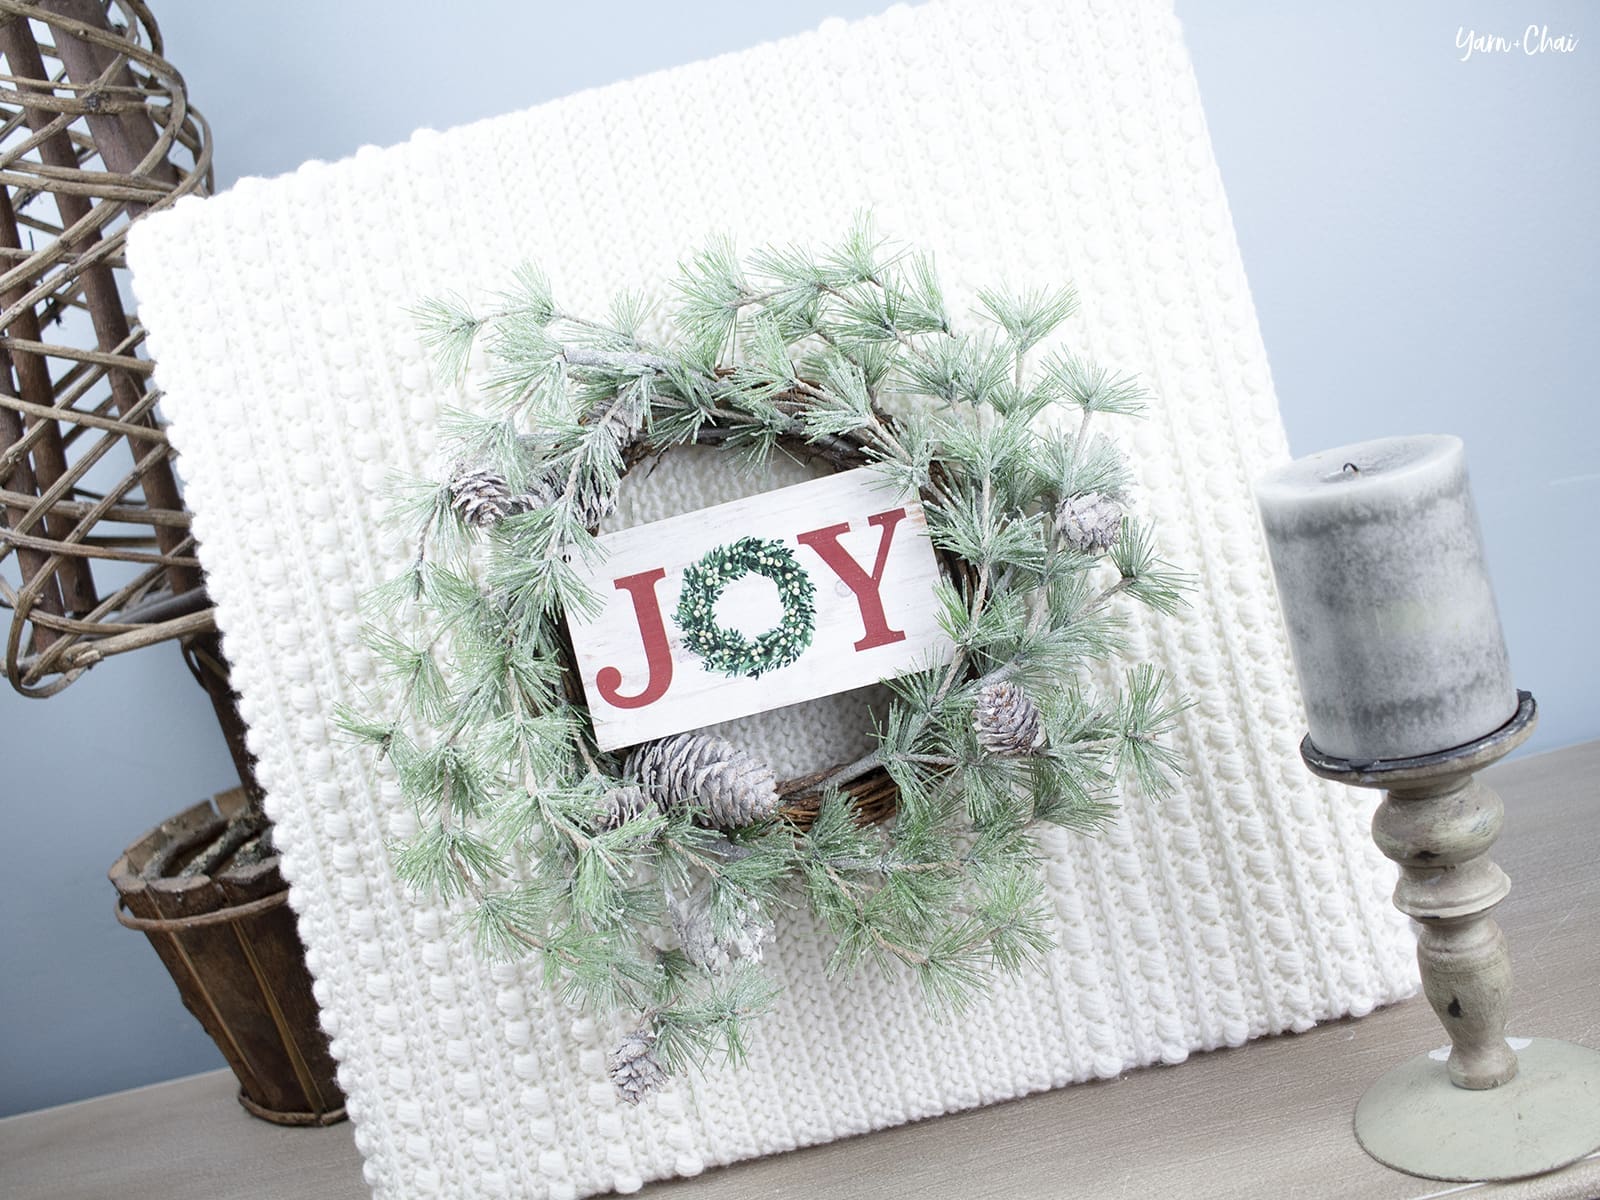
I got the idea for this crocheted wall art while I was walking through the Christmas section of Hobby Lobby. I kept seeing these popular farmhouse-style paintings of a wreath mounted on wood, and I thought… I could do something like that! Of course I wanted to put my own crocheted spin on it, so I gathered some supplies and got to work.
The 18″x18″ canvas, wreath and “Joy” ornament were all from Hobby Lobby, as well as the yarn I used: Yarn Bee Must Be Merino Aran in White.
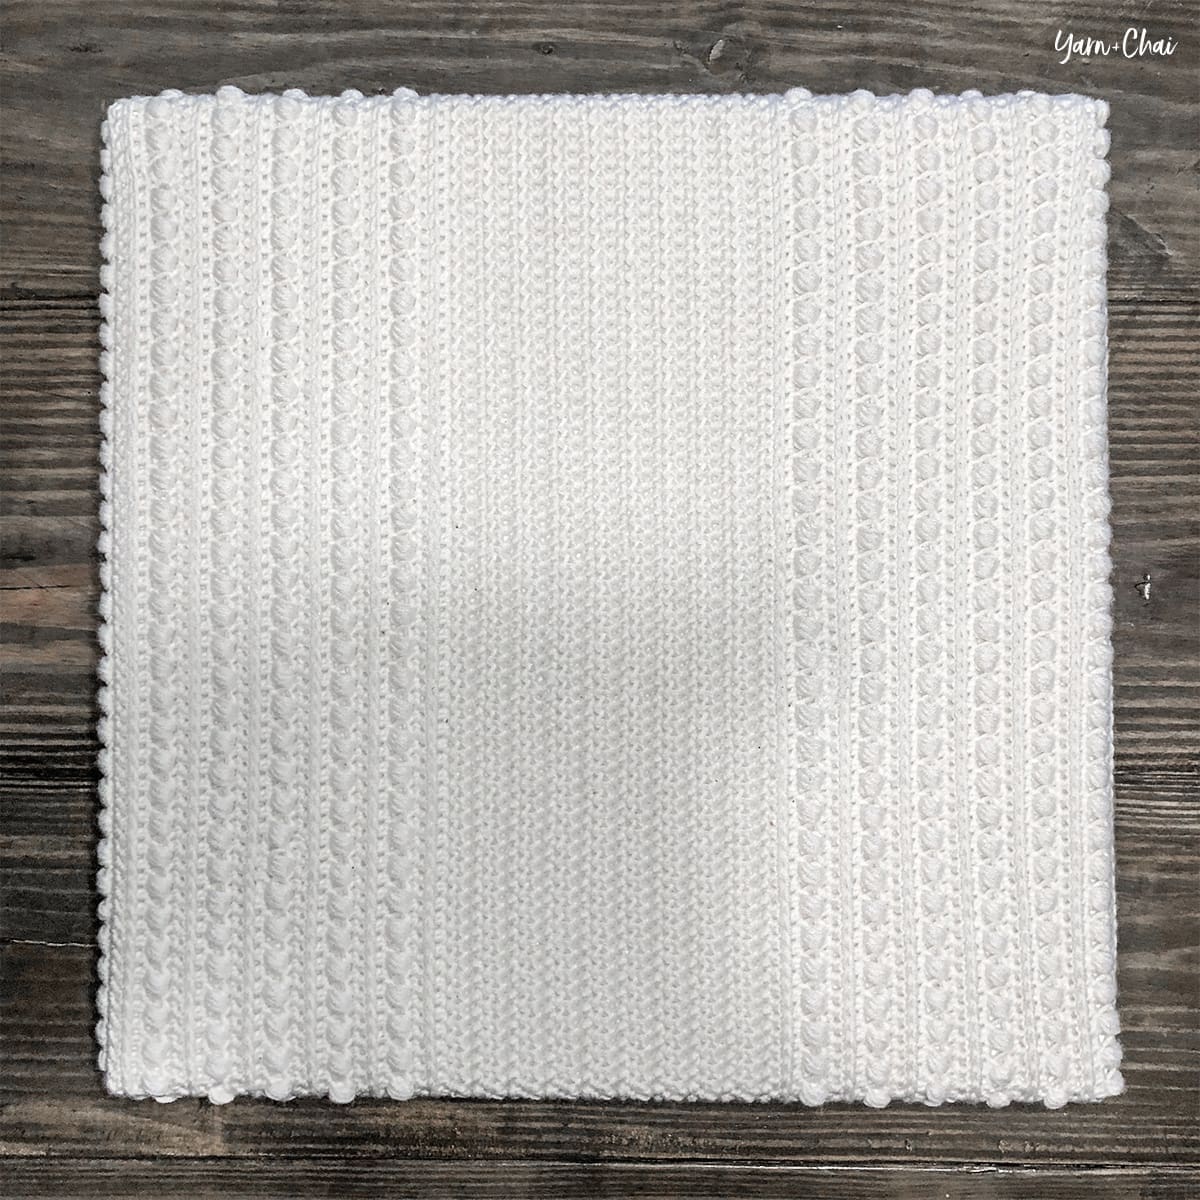
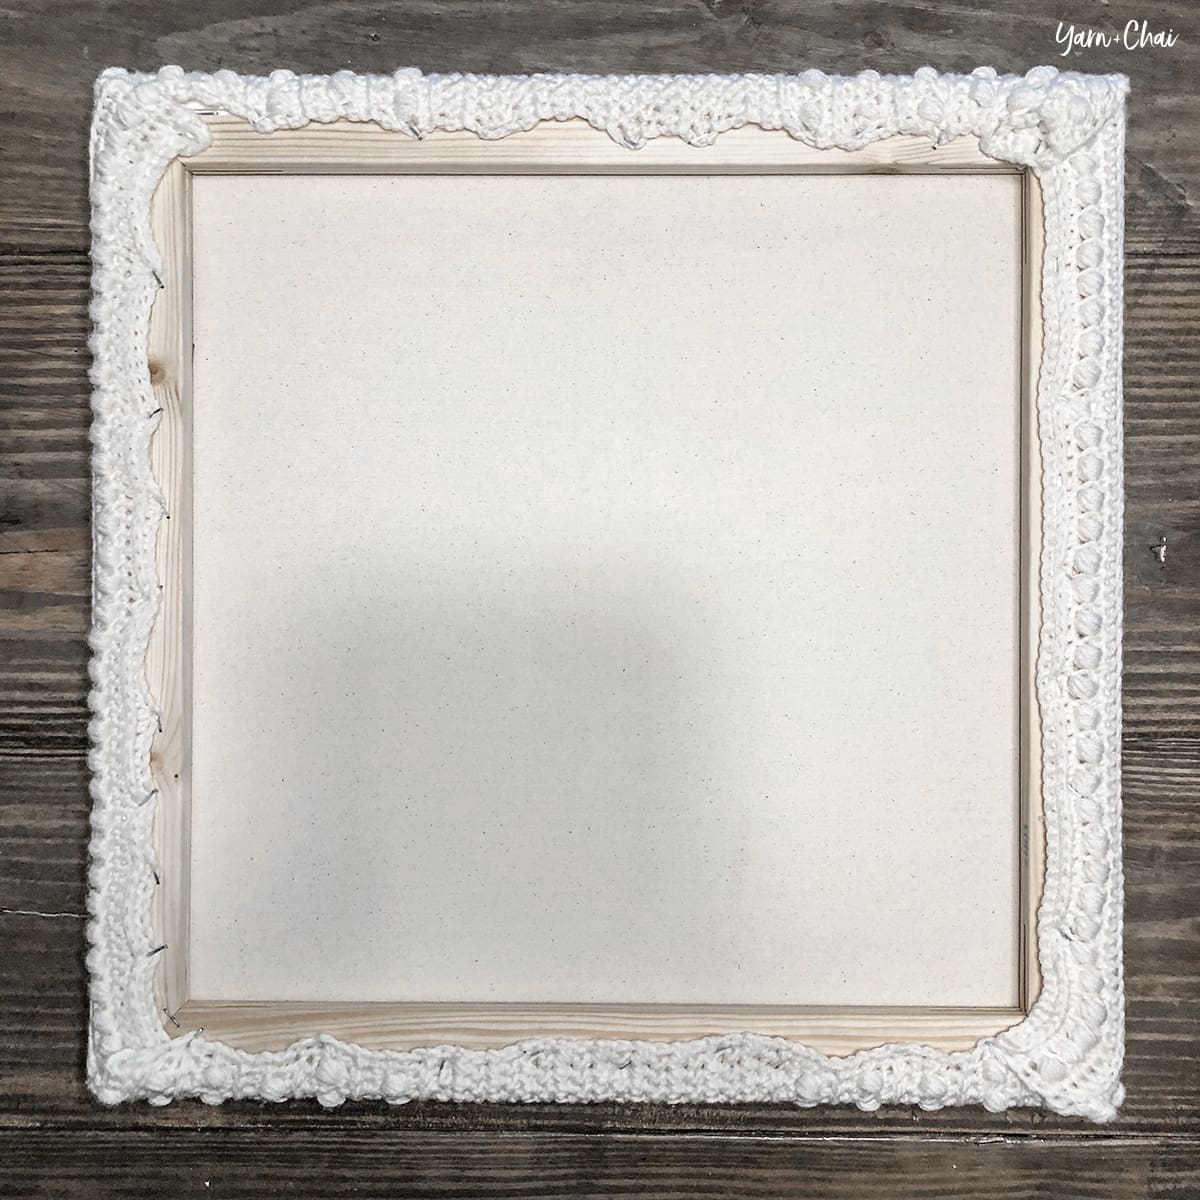
First, I crocheted a 20″x20″ square piece of fabric. I did the first third of it in the Malia stitch pattern, the middle in the herringbone half double crochet stitch, and the last section in Malia again. Then, I staple-gunned it to the canvas (shout out to my dad, who is alway up for helping me with my projects), being careful to keep everything nice and straight and taut. Here’s what it looked like on the front:
And on the back:
Not so pretty on the back! But that’s just the nature of crocheted fabric. As long as the front is nice and smooth, who cares!
After I finished with the canvas, I attached the small wreath using some 20 gauge wire that I found in the jewelry section. I simply stuck the wire through the wreath in two nearby places, then through the crocheted fabric and canvas to the back, where I joined the wire ends by twisting them together. I did that again in two more places around the wreath to keep everything in place. Then I set the “joy” ornament in the middle; I didn’t attach it, because I want to be able to change it out, but you could easily hot glue it in place.
And that’s all there is to it!
You could totally crochet up a different fabric for the canvas; you don’t have to use the same stitches I did. Just make sure it’s about 2″ wider than the canvas you are using, all the way around. You’ll need those extra inches to wrap it around the edge.
Prefer a PDF?
This pattern can be completed using the 100% free version right here on this page. However, many people prefer the convenience of a printable, ad-free PDF.
All-Access Passholders get the ad-free version of this and all of my other blog patterns. It’s a pretty sweet deal, if I do say so myself! Learn more about it here or continuing scrolling for the free version.
Crocheted Christmas Wall Hanging
Difficulty: Easy
Finished Size: 20″ x 20″ fabric (to cover an 18″ square canvas)
Hook: H (5.0 mm) or whichever hook is needed to obtain correct gauge
Yarn: Yarn Bee Must Be Merino Aran, a #4 aran weight yarn. I used about 500 yards, or a little more than 3 skeins, of the color “White”.
Gauge: 15 HDC = 4″ across.
You’ll also need: 18″ square canvas, wreath (mine is about 12″), decoration for center, staple gun, 20 gauge wire
Terms and Abbreviations: ST/STS (stitch/stitches) SL ST (slip stitch) SK (skip) CH (chain) SC (single crochet) HDC (half double crochet) LBS (large bean stitch – see “Special Stitches”) 3rd LOOP (work stitch into 3rd loop only – see “Special Stitches”) HHDC (herringbone half double crochet – see “Special Stitches”)
Special Stitches:
Large Bean Stitch (LBS) Insert hook into stitch, yarn over and pull through (2 loops on hook). Yarn over, insert hook into same stitch, yarn over and pull through (4 loops on hook). Yarn over, insert hook into same stitch, yarn over and pull through (6 loops on hook). Yarn over, insert hook into same stitch, yarn over and pull through (8 loops on hook). Yarn over and pull through all 8 loops. Chain 1 to close the stitch. (Because this stitch creates two sets of loops – one when creating the bean, and one when closing the stitch – each completed Large Bean Stitch will count for two stitches in the row or round’s final stitch count.)
3rd Loop Half double crochet stitches have a 3rd loop that we utilize in this pattern. When working in turned rows, as in this pattern, the 3rd loop can be found just below the front loop on the side of the work that is facing you. When instructed to work in “3rd loop only”, insert your hook into this special loop. This creates a delicate braided look on the opposite side of the pattern.
Herringbone HDC (HHDC) Yarn over, insert hook into stitch. Yarn over, pull loop through stitch AND through first loop on hook (this is similar to a slip stitch motion). Two loops remain on hook. Yarn over and pull through both loops.
Notes: (1) This pattern is written in American Standard Terms.
(2) CH1s at the beginning of rows do not count as a stitch in the final stitch count.
(3) If you don’t want to worry about gauge, just use a ruler and chain any odd amount. Measure your first couple of rows to make sure they are about 2″ wider than the canvas.
INSTRUCTIONS
To begin: CH77.
Row 1: HDC in 2nd CH from hook and in each remaining CH. (76)
Row 2: CH1, turn. SC in first ST. SC in 3rd loop of each of the next 74 STS. SC in final ST. (76)
Row 3: CH1, turn. SC in each ST across. (76)
Row 4: CH1, turn. SC in first ST. (SK next ST, LBS in next ST) 37 times. SC in final ST. (76)
Row 5: CH1, turn. HDC in each ST across. (76)
Row 6: CH1, turn. SC in first ST. SC in 3rd loop of each of the next 74 STS. SC in final ST. (76)
Row 7: CH1, turn. SC in each ST across. (76)
Row 8: CH1, turn. SC in first ST. (LBS in next ST, SK next ST) 37 times. SC in final ST. (76)
Row 9: CH1, turn. HDC in each ST across. (76)
Rows 10-25: Repeat Rows 2-9, in order, 2 more times. (76)
Rows 26-30: Repeat Rows 2-6. (76)
Rows 31-48: CH1, turn. HHDC in each ST across. (76)
Row 49: CH1, turn. HDC in each ST across. (76)
Row 50: CH1, turn. SC in first ST. SC in 3rd loop of each of the next 74 STS. SC in final ST. (76)
Row 51: CH1, turn. SC in each ST across. (76)
Row 52: CH1, turn. SC in first ST. (SK next ST, LBS in next ST) 37 times. SC in final ST. (76)
Row 53: CH1, turn. HDC in each ST across. (76)
Row 54: CH1, turn. SC in first ST. SC in 3rd loop of each of the next 74 STS. SC in final ST. (76)
Row 55: CH1, turn. SC in each ST across. (76)
Row 56: CH1, turn. SC in first ST. (LBS in next ST, SK next ST) 37 times. SC in final ST. (76)
Row 57: CH1, turn. HDC in each ST across. (76)
Rows 58-73: Repeat Rows 50-57, in order, 2 more times. (76)
Rows 74-78: Repeat Rows 50-54. (76)
Fasten off and weave all ends into the wrong side of the fabric.
Attaching Fabric to Canvas
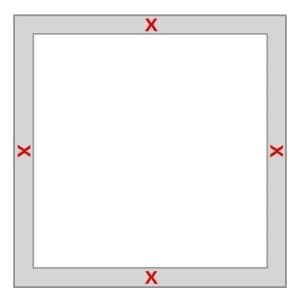
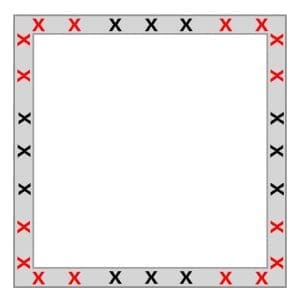
Carefully attach the fabric to the canvas by wrapping it around the edges and securing it with a staple gun.Begin by choosing one edge and stapling right in its center, then stretch fabric taut and straight across canvas and staple center on the opposite edge. Keeping fabric taut, staple the center on the third edge, then staple 4th and final edge. See image for visual:
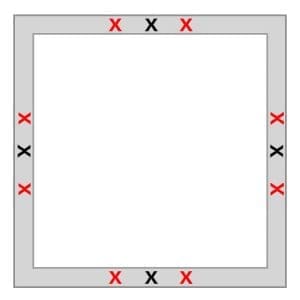
After all 4 edges are attached, continue by stapling fabric on either side of the first staple, on each edge. (I turned my canvas over several times to make sure everything was nice and straight, using the lines of the fabric as a guide.) See red Xs in image:
Continue to staple out from the center on each edge until fabric is completely attached. You can then go around and add more staples where you think they are needed.
Attaching wreath
After your fabric is attached to the canvas, it’s time to add the wreath! I attached mine with 20 gauge wire by threading both ends of one piece of wire through a section of the wreath (two different spots, but super close together), through the fabric, and through the canvas, then twisting them together on the back of the canvas. I did this in three parts of the wreath to keep everything secure.
If you want, you can add another decoration to the center. I used an ornament that I found at Hobby Lobby; I simply removed the string, and placed it strategically so that the branches covered up the holes in the ornament. I did not permanently attach the ornament, but if you want to, you can use a hot glue gun.
And that’s it! I hope you love your new wall decor!
If you’re sharing on social media, be sure to tag me @yarnandchai.design. Stay cozy!
There are so many reasons I love earwarmers. I love wearing them on days when I want my hair up; but beyond that, they’re such a quick, easy crochet project! This one is particularly mindless because it’s simply rows of half double crochet in back loops only, and finished with a beautiful twist that’s much easier than it looks.
And, if you’re trying to build a craft fair inventory, earwarmers can be a great addition! (Tip: choose just a handful of styles, and work them up in several modern colors. They’re sure to sell!)
But whether you’re selling, making Christmas gifts, or just making yourself something to feel beautiful in, this pattern is for you.
Video Tutorial
You can follow along with me with this tutorial video, regardless of what size you are making! I put the pattern instructions right on screen so you can relax and go at your own pace. Be sure to subscribe, too!
Prefer a PDF?
This pattern can be completed using the 100% free version right here on this page. However, many people prefer the convenience of a printable, ad-free PDF.
All-Access Passholders get the ad-free version of this and all of my other blog patterns. It’s a pretty sweet deal, if I do say so myself! Learn more about it here or continuing scrolling for the free version.
Simple Twisted Earwarmer
Difficulty: Beginner/Easy
Finished Sizes: 17″ x 3.5″ (toddler), 18″ x 4″ (child), 20″ x 4.5″ (teen/adult small), 21″ x 4.5″ (adult large)
Hook: H (5.0 mm) or whichever hook is needed to obtain correct gauge
Yarn: Cascade Longwood Sport, a #3 weight yarn, in the following amounts: 80 yds (toddler), 90 yds (child), 110 yds (teen/adult small), 115 yds (adult large). Color used in sample is “Oatmeal”.
Gauge: 16 HDC (worked in BLO) x 12.5 rows = 4″ square
Notes: (1) This pattern is written in American Standard Terms.
(2) CH1s at the beginning of rows do not count as a stitch in the final stitch count.
(3) To resize earwarmer, your starting chain can be any number.
(4) Pattern is written for toddler size with additional sizes in brackets [child, teen/adult small, adult large]. So, for example, if it says “CH71 [75, 85, 89]”, the first number is for the toddler size, and the numbers in brackets are child, teen/adult small, and adult large instructions, respectively. If you are working from printed instructions, it helps to circle or highlight the numbers you are following before you begin.
INSTRUCTIONS
To begin: CH69 [73, 81, 85].
Row 1: HDC in 2nd CH from hook and in each remaining CH. (68 [72, 80, 84])
Rows 2-12 [2-13, 2-14, 2-14]: CH1, turn. HDC in first ST. HDC in BLO of each of the next 66 [70, 78, 82] STS; 1 ST remains. HDC in both loops of final ST. (68 [72, 80, 84])
Fasten off, leaving a tail for seaming. Weave in starting tail only.
Seaming with a Twist
1. Thread the long finishing tail through your yarn needle and gently set it aside. Lay ear warmer flat, then gather the edges and layer them together as shown.
2. Thread the yarn needle across the edges, being sure to grab yarn from all four layers.
3. Continue to weave the yarn needle back and forth across the surface of the edges, being sure to grab yarn from all four layers each time.
4. Weave in the tail, then turn earwarmer right side out.
Done! If you’re sharing on social media, be sure to hashtag #simpletwistedearwarmer and tag me @yarnandchai.design. Stay warm out there!
Sometimes it can feel overwhelming coming up with just the right items to fill your table… especially if it’s your first fair!
So here are a few tips for deciding what to sell. At the end, I’ll share with you the five best-selling Yarn + Chai patterns for craft fairs!
But first, the tips..
Tip #1: Smaller purchases add up!
It’s ok to have a few bigger ticket items on your table, like a blanket or wrap, but for the most part your sales are going to come from items in a lower price range. Plus, it’s easier to crochet multiple samples of something in various colors when it’s a small item, giving your customers more options.
Tip #2: Instead of filling your table with dozens and dozens of different patterns, consider choosing 6-10 items and crocheting several of each one in a range of colors.
Do a few in neutrals (like ivory or gray) and a few in more colorful hues (like cranberry or mustard or forrest green). Think of when you shop for clothes at the store; the clearance racks, where random pieces of clothing are all mixed together, are more overwhelming to sort through. But a rack filled with the same sweater offered in multiple colors feels relaxing and increases the likelihood that you’ll find just the right one for you. Don’t make your customers work too hard, or you’ll lose them!
Tip #3: When choosing what to sell, think of what shoppers will be looking for at that time of year.
If it’s a fall craft show, they’ll probably be looking for small gifts for teachers or friends, holiday home decor, or maybe a scarf or hat for the upcoming winter. In the spring and summer, you can turn your focus to cute bags, kitchen items, and holidays like Easter and Independence Day (for my American friends).
– – – – – – – –
The Best-Selling Yarn + Chai Patterns
To help you guys out a little, I asked my tribe what their bestselling Yarn + Chai items have been. I narrowed it down to a list of the top 5 patterns that multiple people have had awesome success with. (Oh, and guess what? These are all free patterns on my blog!)
The idea for this easy belt came when I bought a dress for an upcoming autumn wedding. I loved the dress but it was a busy fabric from top to bottom, and I felt like it needed something to break it up a bit. I was hesitant to crochet anything because I wanted it to stay really simple and modern looking, but I decided to take on the challenge with some pretty mustard-colored yarn I had leftover from my Little Rustic Pumpkins.
I looked all over the place for a belt buckle clasp that would really up the fashion factor, and was delighted when I found this cute, modern clasp on Etsy! (Here’s my affiliate link for My Chic Mercerie on Etsy; at the time of publishing, her shop is taking a mini break, but she’ll be back soon.)
So here’s the outfit all put together. What do you think? (I think I need to remake this belt in several colors for other outfits!)
I actually bought the dress on Amazon and I LOVE it. (It has pockets!!) Here’s my affiliate link if you want to shop for one of your own. It comes in all kinds of pretty designs; I also got one with a black top and black/white plaid bottom. (I’m thinking I’ll make an aqua-colored belt for that one to give it a pop of color!)
VIDEO TUTORIAL
I’ve put together a step-by-step video tutorial for you visual learners! The instructions for the pattern are written right on the screen, so you can follow along visually while also developing your pattern-reading skills. It’s a feature I’ve gotten lots of compliments for on my videos, so it’s definitely worth the extra effort it takes to include it!
Prefer a PDF?
This pattern can be completed using the 100% free version right here on this page. However, many people prefer the convenience of a printable, ad-free PDF.
All-Access Passholders get the ad-free version of this and all of my other blog patterns. It’s a pretty sweet deal, if I do say so myself! Learn more about it here or continuing scrolling for the free version.
CROCHETED WAIST BELT
Difficulty: Easy
Finished Size: You decide!
Hook: C (2.75mm)
Yarn: #3 DK weight. How much you’ll need will totally depend on how wide and long you make your belt; but for reference, I made a 34″ x 2.75″ belt and used about 160 yards of Yarn Bee Must Be Merino (in “Gold”).
Gauge: Done in 3rd loops, 14 HDC x 9 rows = 2″ square. Gauge is not important as long as you’re measuring against your buckle closure and your body as you go.
Terms and Abbreviations: ST/STS (stitch/stitches) SL ST (slip stitch) CH (chain) HDC (half double crochet) 3rd LOOP (work stitch into 3rd loop only – see “Special Stitches”)
Special Stitches:
3rd Loop Only Half double crochet stitches have a 3rd loop that we utilize in this pattern. When working in turned rows, as in this pattern, the 3rd loop can be found just below the front loop on the side of the work that is facing you. When instructed to work in “3rd loop only”, insert your hook into this special loop. This creates a delicate braided look on the opposite side of the pattern.
Notes: (1) This pattern is written in American Standard Terms.
(2) CH1s at the beginning of rows do not count as a stitch in the final stitch count.
(3) When determining the length your belt should be, keep in mind that (1) the belt will stretch quite a few inches, and (2) the buckle will account for part of the length, as well. It is best to measure your belt around the small of your waist as you go.
INSTRUCTIONS
To begin: CH to a length about 1/2″ shorter than the width of your belt buckle clasp opening. (I chained 16.)
Row 1: HDC in 2nd CH from hook and in each remaining CH.
Row 2: CH1, turn. HDC in first ST. HDC 3rd loops of all but the final ST. HDC (in top loops) of final ST.
Repeat Row 2 until belt is the length you want it to be; be sure to work an even number of rows.
Edging
Have metal clasps ready, then follow the instructions. Each bullet represents one side of the belt.
CH1, do not turn. Working down the long edge, put 3SC (in a single spot) between each row of ribbing (see image).
Working through belt buckle opening, SC into each ST along short side of belt.
Working down next long edge, put 3SC (in a single spot) between each row of ribbing to the end.
Working through 2nd belt buckle opening, making sure you attach it so that it will clasp correctly with the buckle at the other end, SC into each ST along short side of belt.
Join with a SL ST to top of first SC of edging.
Double check to ensure buckles clasp correctly, then fasten off and weave in ends.
– – – – – – – – – –
Done! If you’re sharing on social media, be sure to hashtag #crochetedwaistbelt and tag me @yarnandchai.design. Hope you enjoyed it!
I love fall. I absolutely adore it. While most of my friends are mourning the passing of summer, I feel like I come alive when the air starts to get crisp and the big tree in front of my house starts to turn fiery red. Apple cider? Love it. Cozy sweaters? Bring it on. Fireplace? LIGHT IT UP.
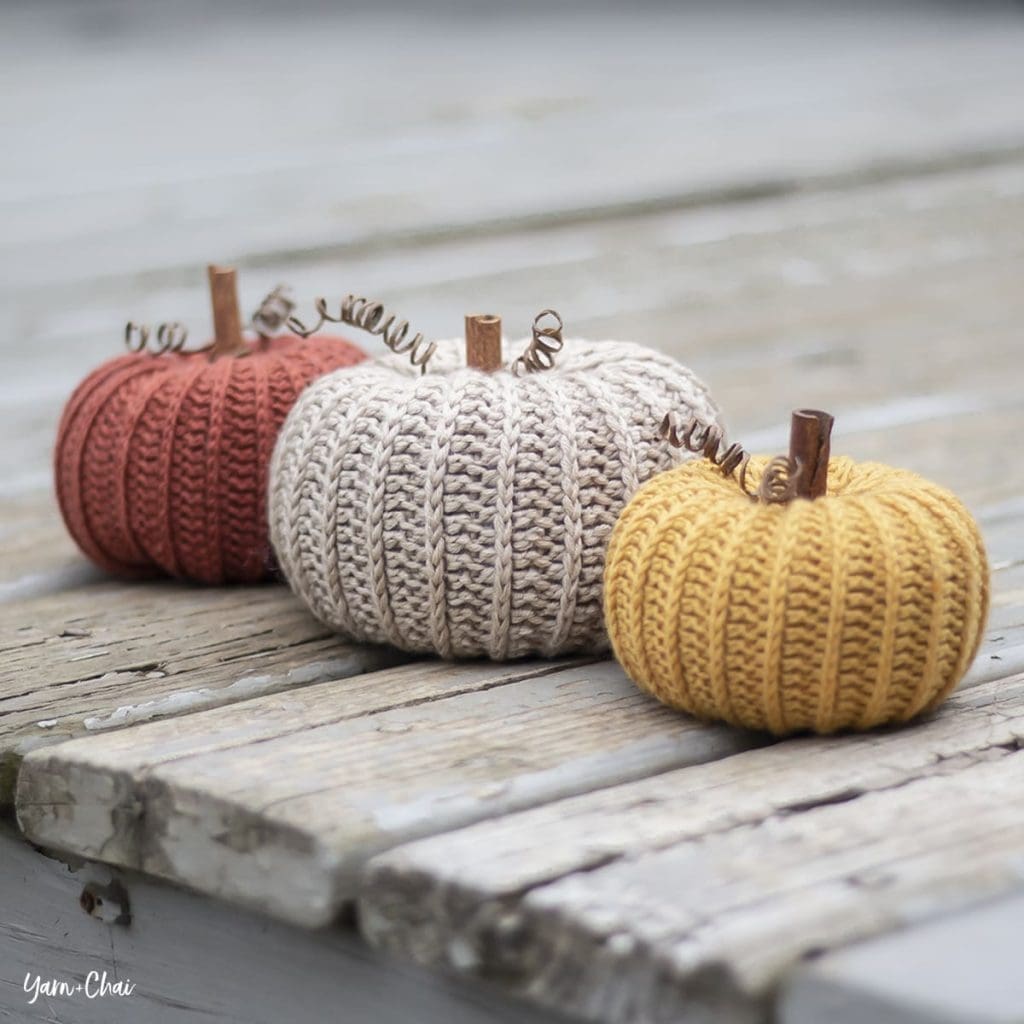
What better way to usher in my favorite season than with a cute little crocheted pumpkin?
I mean, really. That fall-colored yarn? Those curly thingys? So cute.
I posted a preview of these on Facebook and someone tried to tell me they were knitted. Which would be quite the miracle, considering the fact that I have no idea how to knit. I promise, they’re crocheted!
Even Simba agrees.
So if you’re ready to make one or two or twenty for yourself, read on!
VIDEO TUTORIAL
I’ve put together a step-by-step video tutorial for you visual learners! The instructions for the pattern are written right on the screen, so you can follow along visually while also developing your pattern-reading skills. It’s a feature I’ve gotten lots of compliments for on my videos, so it’s definitely worth the extra effort it takes to include it!
Prefer a PDF?
This pattern can be completed using the 100% free version right here on this page. However, many people prefer the convenience of a printable, ad-free PDF.
All-Access Passholders get the ad-free version of this and all of my other blog patterns. It’s a pretty sweet deal, if I do say so myself! Learn more about it here or continuing scrolling for the free version.
LITTLE RUSTIC PUMPKIN
Difficulty: Easy
Finished Size: 3″ tall x 4.5″ wide
Hook: E (3.5mm)
Yarn: Approx. 80 yards of #3 dk weight yarn. For the samples, I used Yarn Bee Must Be Merino in “Rust” and “Gold”. (The off-white, slightly larger pumpkin in the photos was made with the same pattern, but using Must Be Merino Aran (#4 yarn) in “Khaki” and a 4.5mm hook.)
Gauge: 8 rows of 21 HDC worked in 3rd loops = 4″ square. Unless you are concerned about having enough yarn to complete your pumpkin, gauge is really not that important.
You’ll also need: Yarn needle, polyester fiber fill, hot glue gun, cinnamon stick, and covered wire.
Terms and Abbreviations:
MC (magic circle – view tutorial here) ST/STS (stitch/stitches) SL ST (slip stitch) CH (chain) SC (single crochet) HDC (half double crochet) 3rd LOOP (work stitch into 3rd loop only – see “Special Stitch”)
Special Stitch:
3rd Loop Only Half double crochet stitches have a 3rd loop that we utilize in this pattern. When working in turned rows, as in this pattern, the 3rd loop can be found just below the front loop on the side of the work that is facing you. When instructed to work in “3rd loop only”, insert your hook into this special loop. This creates a delicate braided look on the opposite side of the pattern.
Notes: (1) This pattern is written in American Standard Terms.
(2) CH1s at the beginning of rows do not count as a stitch in the final stitch count.
(3) Yarn, hook size and gauge are only meant as a guide, and this pattern will work with any yarn you choose; just use a hook that is smaller than the yarn’s recommended size for a nice tight fabric, and keep in mind your yarn amounts and finished dimensions will be affected by any changes.
(4) Any time the pattern references the “top” of the pumpkin, it is referring to the end with the magic circle.
INSTRUCTIONS
To begin: Make a magic circle, CH1.
Round 1: 14 SC in MC, join with a SL ST to the top of the first SC. Do not pull MC hole closed; we want it to remain a bit open for the stem later. (14)
Round 2: CH1. 3 SC in each ST around. Join with a SL ST to the top of the first SC. (42)
– – – – – –
Next we’re going to make the body of the pumpkin, and we will be working in vertical rows, attaching to Round 2 with SL STS as we go.
– – – – – –
Row 1: CH27. SC in 2nd chain from hook, HDC in each of the next 24 STS, SC in final ST. SL ST into the first SC from Round 2, the stitch on which your CH27 was built. SL ST into the next SC from Round 2. (26, plus the two slip stitches along Round 2)
Row 2: CH1, turn. Skipping over the 2 SL STS you put in Round 2, SC in first ST, HDC in 3rd loop of each of the next 24 STS, SC in final ST. (26)
Row 3: CH1, turn. SC in 1st ST, HDC in 3rd loop of each of the next 24 STS, SC in final ST. SL ST into each of the next 2 STS of Round 2. (26, plus the 2 SL STS along Round 2)
Row 4: CH1, turn. Skipping over the 2 SL STS you put in Round 2, SC in first ST, HDC in 3rd loop of each of the next 24 STS, SC in final ST. (26)
Rows 5-42: Repeat Rows 3-4 all the way along Round 2.
Bottom Edge Round: CH1, do not turn. SC evenly along the bottom edge of the pumpkin, putting one SC at the end of each row; you should have 42 SC. (See photo for guidance). Join with a SL ST to the top of the first SC. (42)
Fasten off, leaving a yard-long tail (more if you’re using thicker than DK yarn).
– – – – – – – – – –
Shaping + Finishing
Follow these steps to shape and finish your pumpkin. Remember, the “top” of the pumpkin is where your magic circle is. Watch the video tutorial for additional help.
Stem: Cut a length of cinnamon stick to serve as the pumpkin stem. Insert into the hole created by the magic circle, then pull the starting tail so that it tightens up around the stem. Weave in starting tail; remove stem. (You’ll glue it in place at the end.)
Seaming:
With finishing tail threaded into yarn needle, hold pumpkin so that the magic circle end is to the left, and the final row of HDC is above the initial chain row. (Depending on how you were holding your pumpkin as you crocheted it, you may need to turn it inside out to accomplish this.) Begin by running yarn needle up through first chain and first (SC) stitch (first image). Then, coming back the other way, insert needle down through the 3rd loop of the HDC, and down across through the corresponding chain (2nd image). Do the exact same thing on the next stitch; come down through the 3rd loop of the next HDC, and down across through the corresponding chain. Seam each HDC to its corresponding chain in this way (3rd image), and when you get to the final stitch (which is an SC), run needle through it and down to the final chain. Tie a knot to prevent pulling; do not fasten off.
Cinching, Stuffing and Closing:
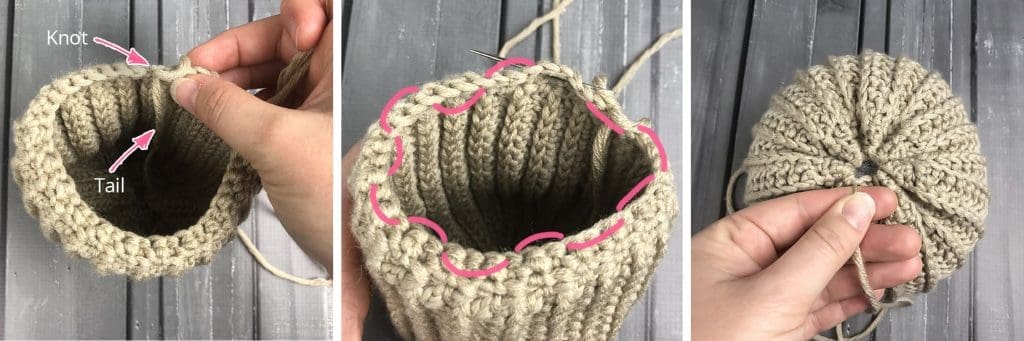
Turn pumpkin right-side out so that your finishing tail is inside. Still using the finishing tail and yarn needle, bring yarn down through the middle of the pumpkin and insert needle into one of the stitches along the bottom edge of the pumpkin. Pull excess yarn through the stitch, and without pulling it tight (leave it somewhat inside the pumpkin), tie another knot (first image). Use yarn needle to weave tail along the edge of the pumpkin, weaving every 3 stitches until you’re back where you started (2nd image). Set yarn needle down and stuff pumpkin, then pull yarn tail to cinch closed (3rd image). Weave yarn needle across the cinch in a couple different directions to reinforce closure; tie a knot, but do not fasten off.
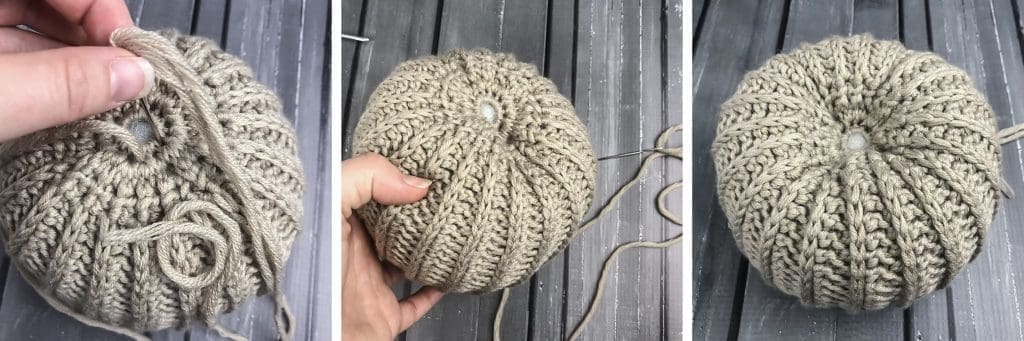
Shaping: Take a look at the top of your pumpkin, and identify the circle of 14 holes created when you crocheted Round 2 (the small holes that were the result of putting three SCs into each stitch). Still threaded with finishing tail, push yarn needle up through the middle of the pumpkin and out one of those holes, then reinsert needle into the next hole to the right and back down through the middle of the pumpkin (first image), and out the bottom, being sure to catch a couple strands of yarn from the bottom cinched edge. Then repeat the process, going back up through the pumpkin and out through the next hole to the right, then back down through the hole after that and back down to the bottom. Each time you make a pass, pull the yarn a bit to shape the pumpkin (the centers should begin to pull inward; 2nd image). Do this all the way around the 14 holes until center is completely pulled inward (3rd image). Tie a couple knots at the bottom and fasten off yarn.
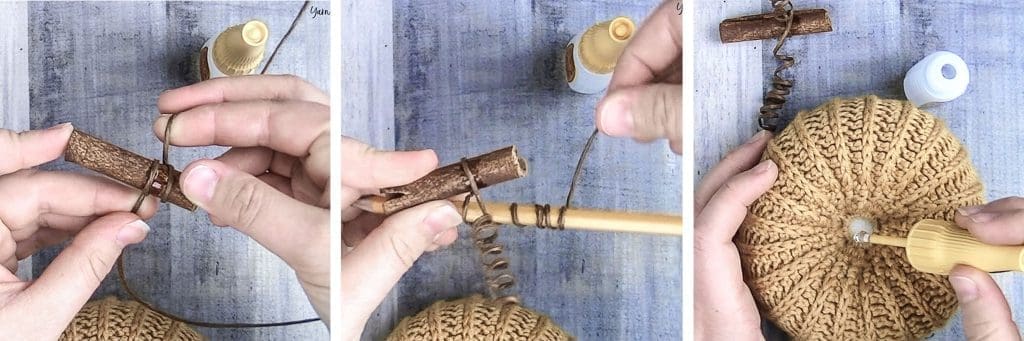
Stem + Covered Wire: Add a bit of fast-drying glue to the cinnamon stick where you want to attach your covered wire curls, then quickly wrap the middle of the covered wire around the glue a couple of times; hold to set (first image). Wrap each end of the wire around a pencil to shape into a curl (2nd image). Add more glue to the magic circle area of the pumpkin (image 3), then quickly insert cinnamon stick and push down; hold to set.
– – – – – – – – – –
Done! If you’re sharing on social media, be sure to hashtag #littlerusticpumpkin and tag me @yarnandchai.design. Hope you enjoyed it!
Get the Mosaic Basket Pattern for FREE!
Sign up for the Yarn + Chai email newsletter and receive the Mosaic Basket Pattern in ad-free PDF format for FREE!





 (that’s an affiliate link). I had no idea how to use it, but I was going to learn… and quick.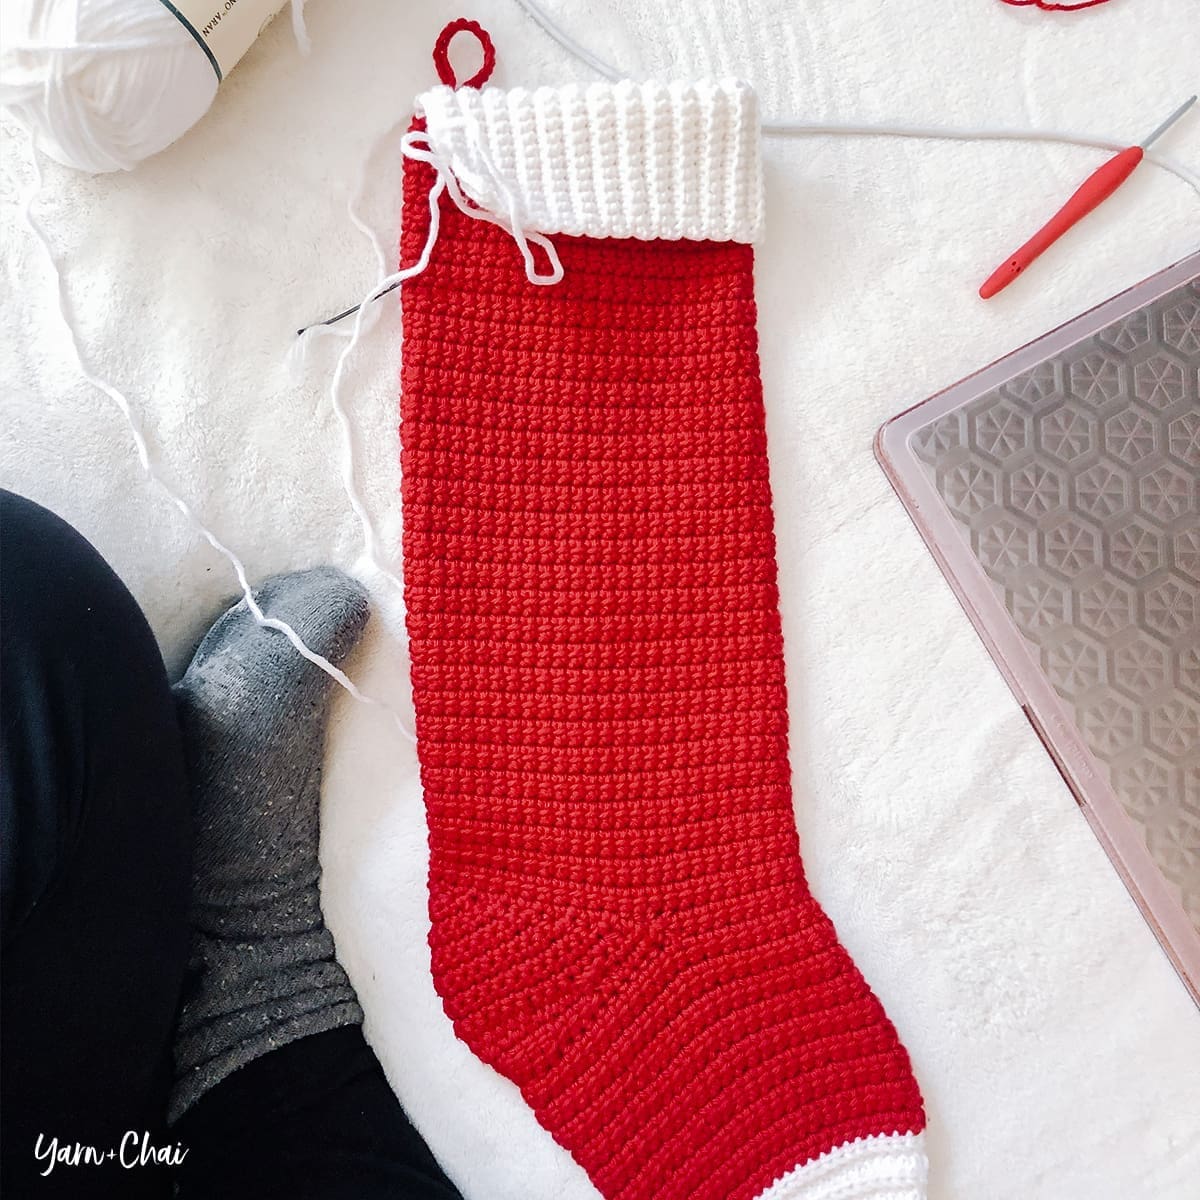





 Hook
Hook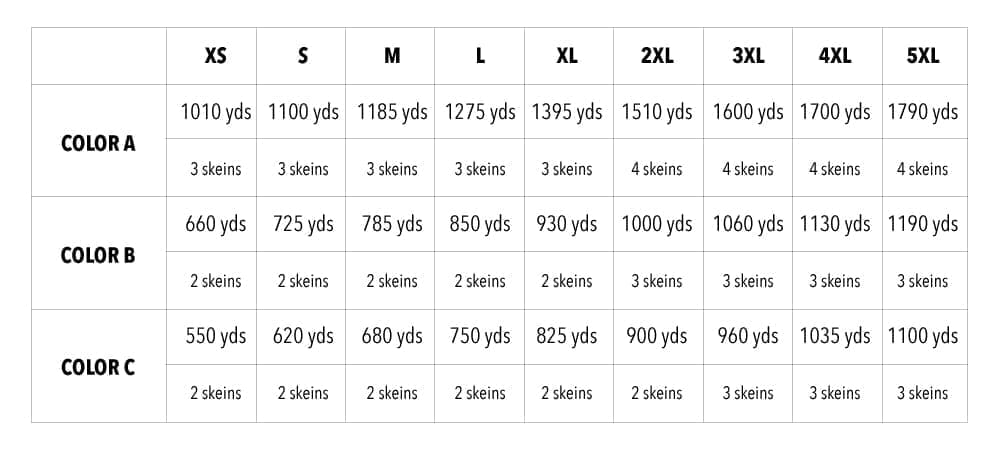
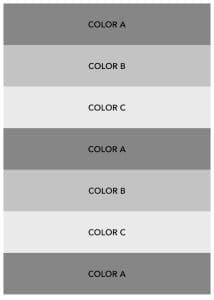 For this panel, you’ll crochet 7 color blocks of 28 (sizes XS-L) or 29 (sizes XL-5XL) rows per block. There are no increases or decreases.
 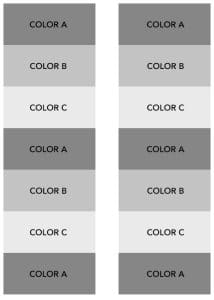 For these panels, you’ll crochet 7 color blocks of 28 (sizes XS-L) or 29 (sizes XL-5XL) rows per block. There are no increases or decreases.
 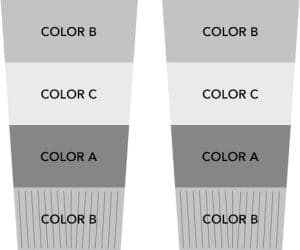 For the sleeves, you’ll begin with COLOR B and crochet 3 color blocks of 28 rows per block, with decrease rows scattered throughout, before adding ribbing at the end. As a reminder, a decrease row is: CH2 (counts as first CH1 space), turn. SC2TOG over first 2 CH1 spaces. (CH1, SC in next CH1 space) across.
 For the pockets, you’ll simply crochet two rectangles with Color A. Easy!