Category: Crochet-Alongs

  • Amigurumi Teddy Bear

    Amigurumi Teddy Bear

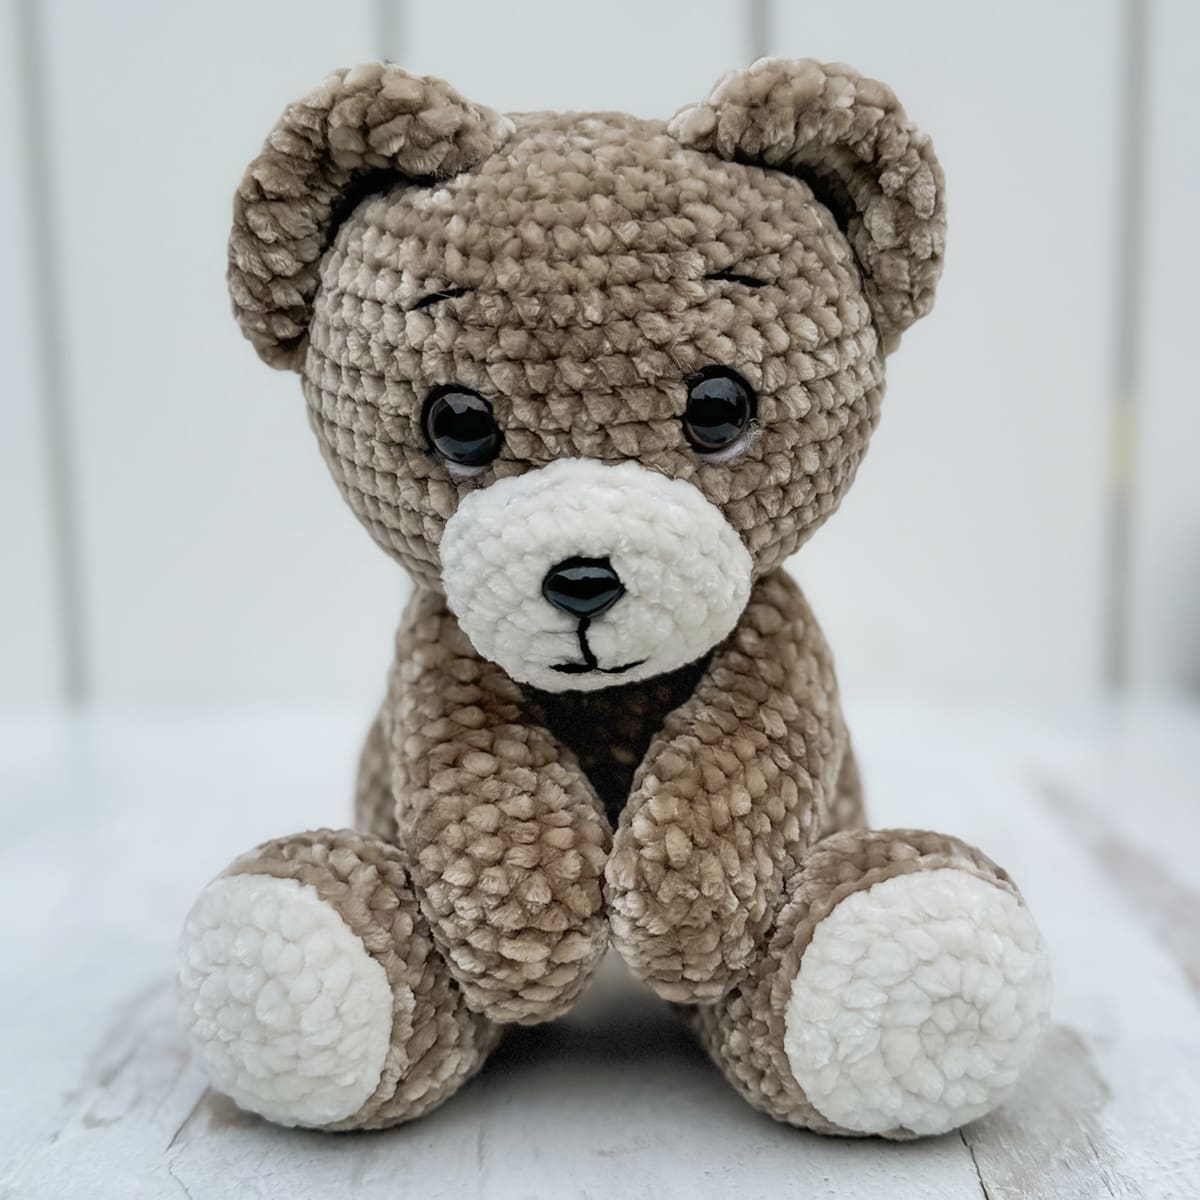
    After what had been quite a long hiatus for the blog, the Yarn + Chai community joined me this summer for a fun crochet-along! The much loved pattern for this Amigurumi Teddy Bear is now available to all, and I hope you enjoy it as much as we did. You can join the Facebook group to see lots of finished bears, and jump in with those who are still working on theirs.

    If you’ve never done amigurumi before, I would suggest working up the pattern with non-furry yarn first. But if you’re comfortable with amigurumi or have played around with chenille or velvet yarns before, I highly recommend making this teddy bear as plush as can be! The finished bear will be so soft and sweet.

    All-Access Pass

    If you prefer working from the convenience of an ad-free PDF pattern, consider becoming a Yarn + Chai All-Access Passholder. It’s a sweet deal that gives you access to all of my PDF patterns, including this one!

    And now, on to the pattern…


    AMIGURUMI TEDDY BEAR

    Difficulty: Easyish

    Crochet Language: American Standard

    Finished Size: 12″ tall

    Yarn: #5 (bulky) velvet or chenille yarn recommended. (Sample is made with Luxe Velour by Juicy Couture.) The approximate amounts needed are:

    • COLOR A (I used โ€œFrothy Fawnโ€): 185yds 
    • COLOR B( I used โ€œAngelโ€): 12yds

    Youโ€™ll also need a very small amount of thinner black yarn and white yarn for facial features.

    Hook: 4.0mm (G) hook

    Gauge: 18 CSC x 20 rows = 4″ square

    Youโ€™ll also need: 
    Yarn needle (long)
    Polyester Fiber-Fill
    (2) 15mm animal eyes
    (1) 15mm animal nose

    Terms and Abbreviations:
    ST/STS (stitch/stitches)
    CH/CHS (chain/chains)
    SL ST (slip stitch)
    CSC (crossed single crochet: Insert your hook, yarn UNDER, draw yarn through stitch (2 loops on hook), yarn over, draw through both loops.)
    BLO (back loop only) 
    FLO (front loop only) 
    INC (2 CSC in same ST)
    DEC (Insert hook into FLO of ST, then immediately insert it into the FLO of the next ST as well; yarn UNDER, draw yarn through stitch (2 loops on hook), yarn over, draw through both loops.)

    Notes:
    (1) CHANGING COLORS
    : In the stitch before a color change, complete the final step of the stitch with the new color; so youโ€™ll work the stitch right before the change, and when itโ€™s time to pull through the final loops, youโ€™ll drop the first color and pull through with the new color.

    (2) When pattern instructs with a number followed by a stitch
    (ex: โ€œ5 CSCโ€), it means to work one CSC in each of the next 5 stitches (not to work 5 CSC in one stitch).

    (3) Repeats are represented in (parentheses). Make sure you complete everything in the parentheses before repeating it. For example:

    โ€œ(CSC, INC, CSC) 3 timesโ€
    means
    CSC, INC, CSC | CSC, INC, CSC | CSC, INC, CSC

    (4) Yarn, hook size and gauge are only meant as a guide, and this pattern will work with any yarn you choose; just use a hook that is smaller than the yarnโ€™s recommended size for a nice tight fabric, and keep in mind your yarn amounts and finished dimensions will be affected by any changes.


    INSTRUCTIONS

    ARMS (make 2)
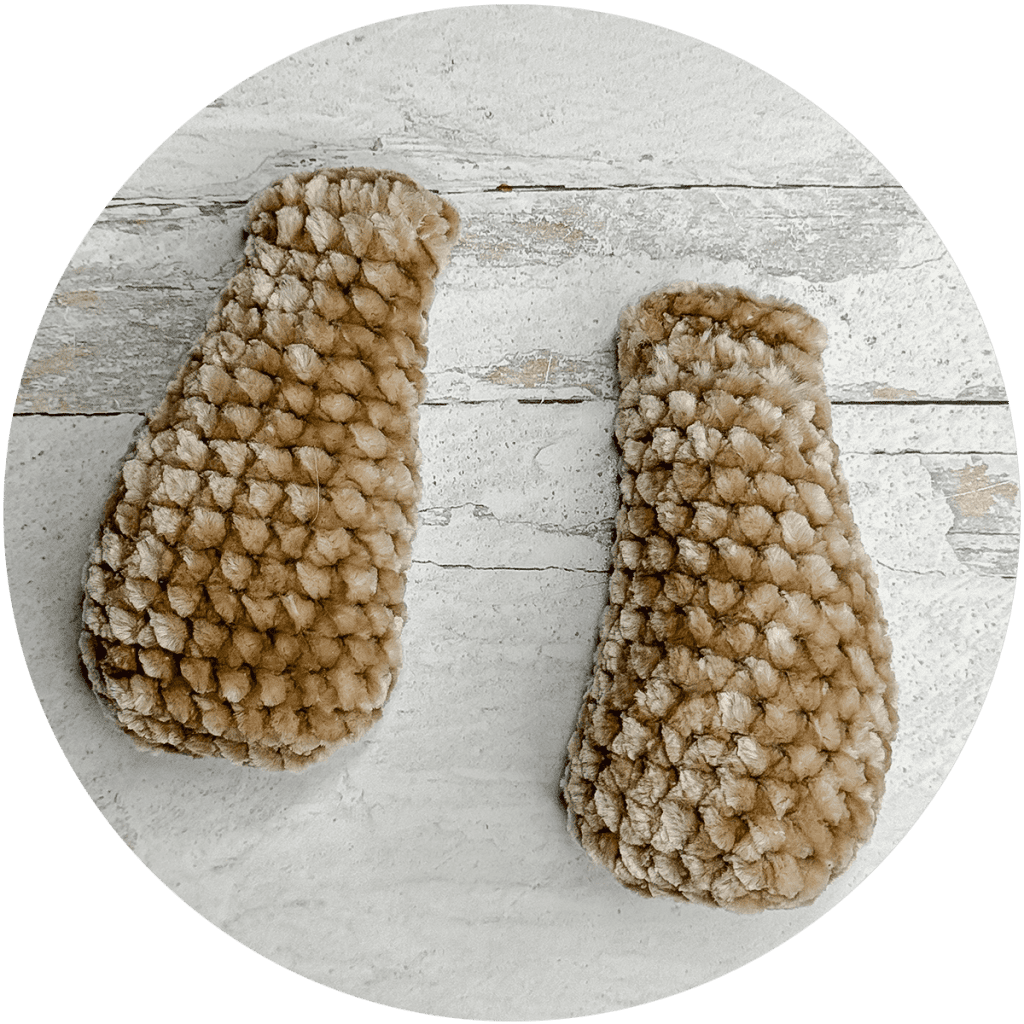
    To begin: With COLOR A, CH6.

    Round 1: Starting in 2nd CH from hook, and working into only the back loop of each chain stitch, INC, 3 CSC, INC. Working around the chain* to the other side: INC, 3 CSC, INC. (14)

    Round 2: INC, 5 CSC, INC, INC, 5CSC, INC. (18) 

    Rounds 3-8: CSC in each ST around. (18) 

    Round 9: DEC, 16 CSC. (17)

    Round 10: DEC, 15 CSC. (16)

    Round 11: DEC, 14 CSC. (15) 

    Round 12: DEC, 13 CSC. (14) 

    Round 13: DEC, 12 CSC. (13) 

    Round 14: DEC, 11 CSC. (12)

    Round 15: DEC, 10 CSC. (11) 

    Round 16: DEC, 9 CSC. (10)

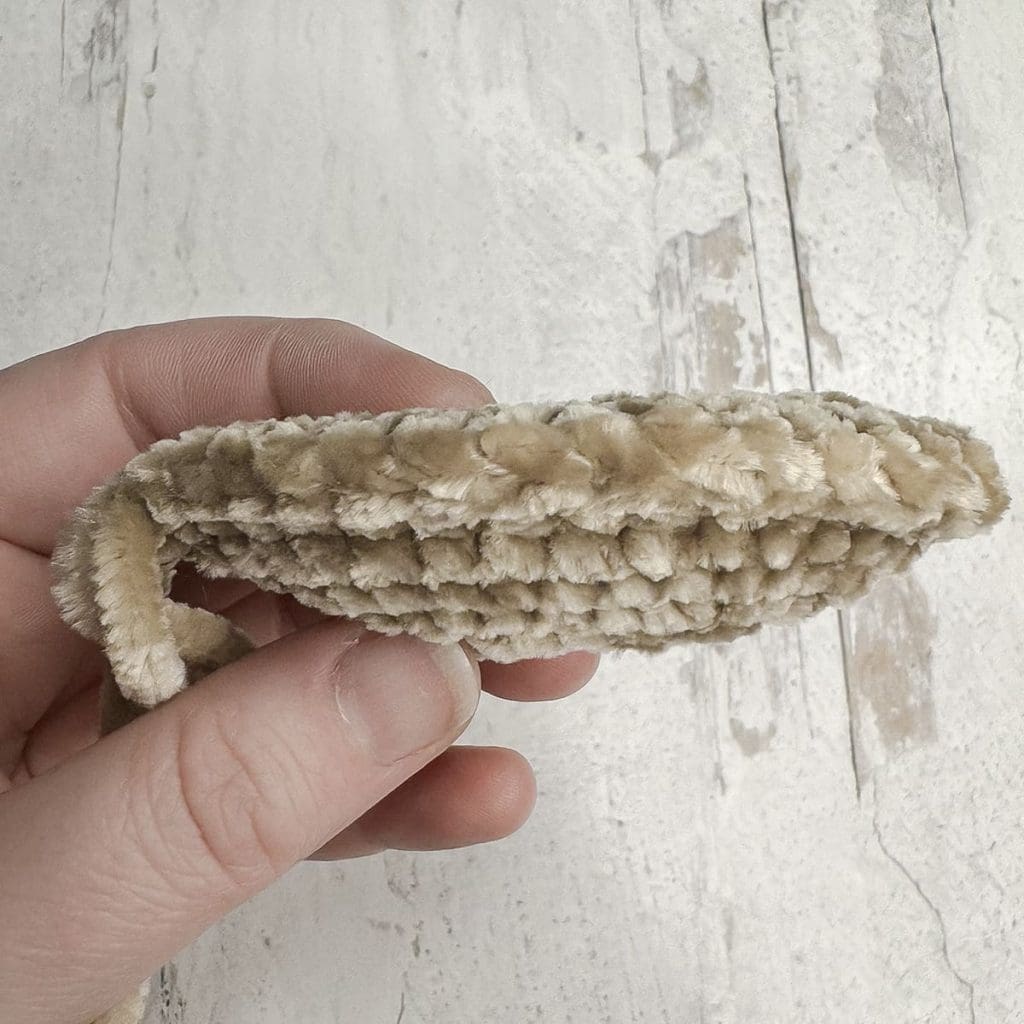
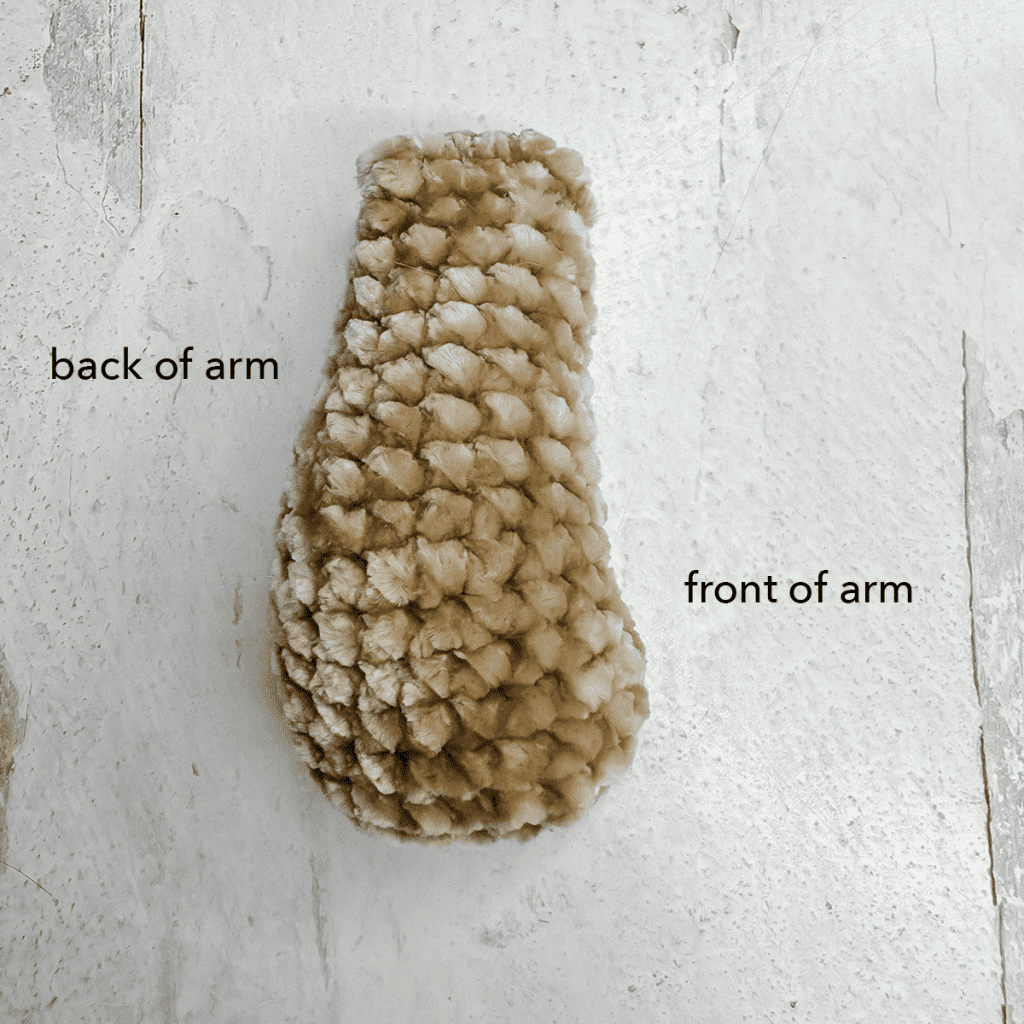
    To finish: Stuff lightly, then CSC closed by holding sides of opening together and working through both sets of corresponding loops across. (4 or 5 CSC, depending on the number you decide fits best; just be consistent with both arms.)
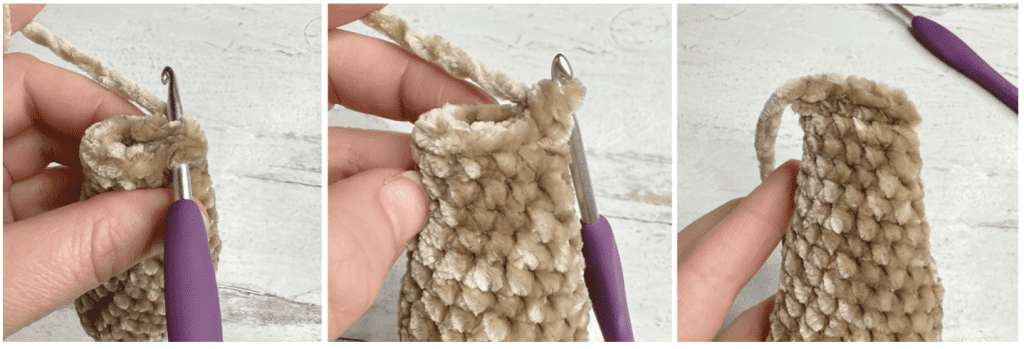
    Fasten off and hide ends inside. Set arms aside for later.
    LEGS (make 2)
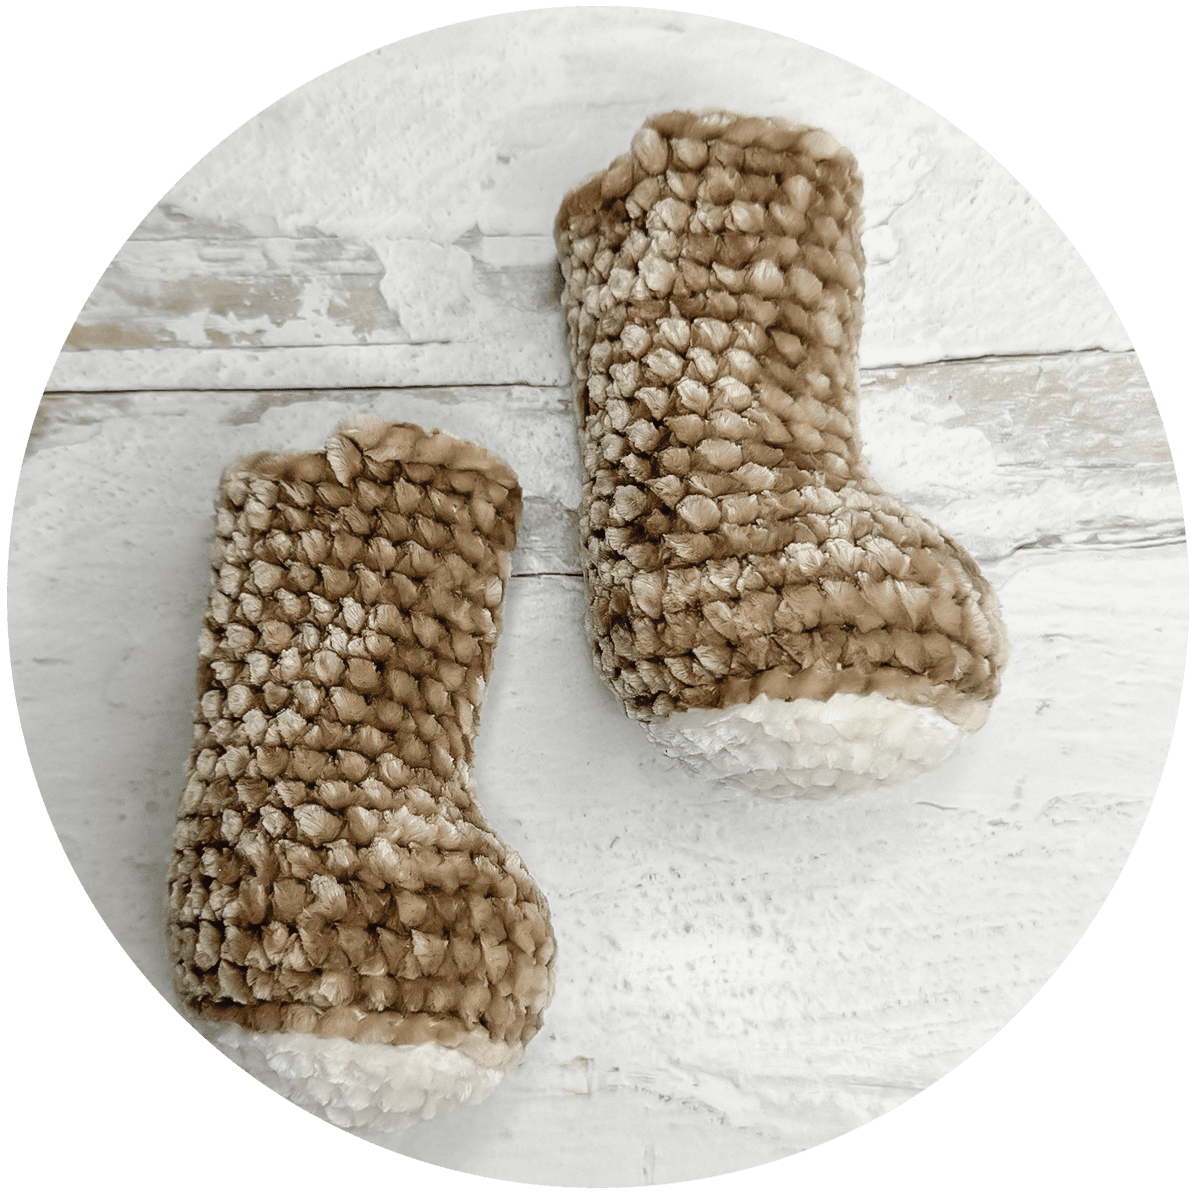
    To begin: With COLOR B, make a Magic Circle; CH1.

    Round 1: 7 CSC in MC. (7)

    Round 2: INC in each ST around. (14)

    Round 3: (INC, CSC) around. (21)

    Round 4: (CSC, INC, CSC) around. (28)

    Switch to COLOR A. Fasten off COLOR B.

    Round 5: With a loose tension, SL ST in BLO of each ST around. (28)

    Round 6: In BLO, (3 CSC, INC, 3 CSC) around. (32)

    Rounds 7-8: CSC in each ST around. (32)

    Round 9: (3 CSC, DEC, 3 CSC) around. (28)

    Round 10: 10 CSC, 4 DEC, 10 CSC. (24)

    Round 11: 8 CSC, 4 DEC, 8 CSC. (20)

    Rounds 12-22: CSC in each ST around. (20)

    Fasten off. Add stuffing. (I stuff the bottom part of the leg quite densely, then lightly stuff the skinni- er part and leave about 1/2โ€ at the top competely unstuffed. This helps the legs stay flexible.)
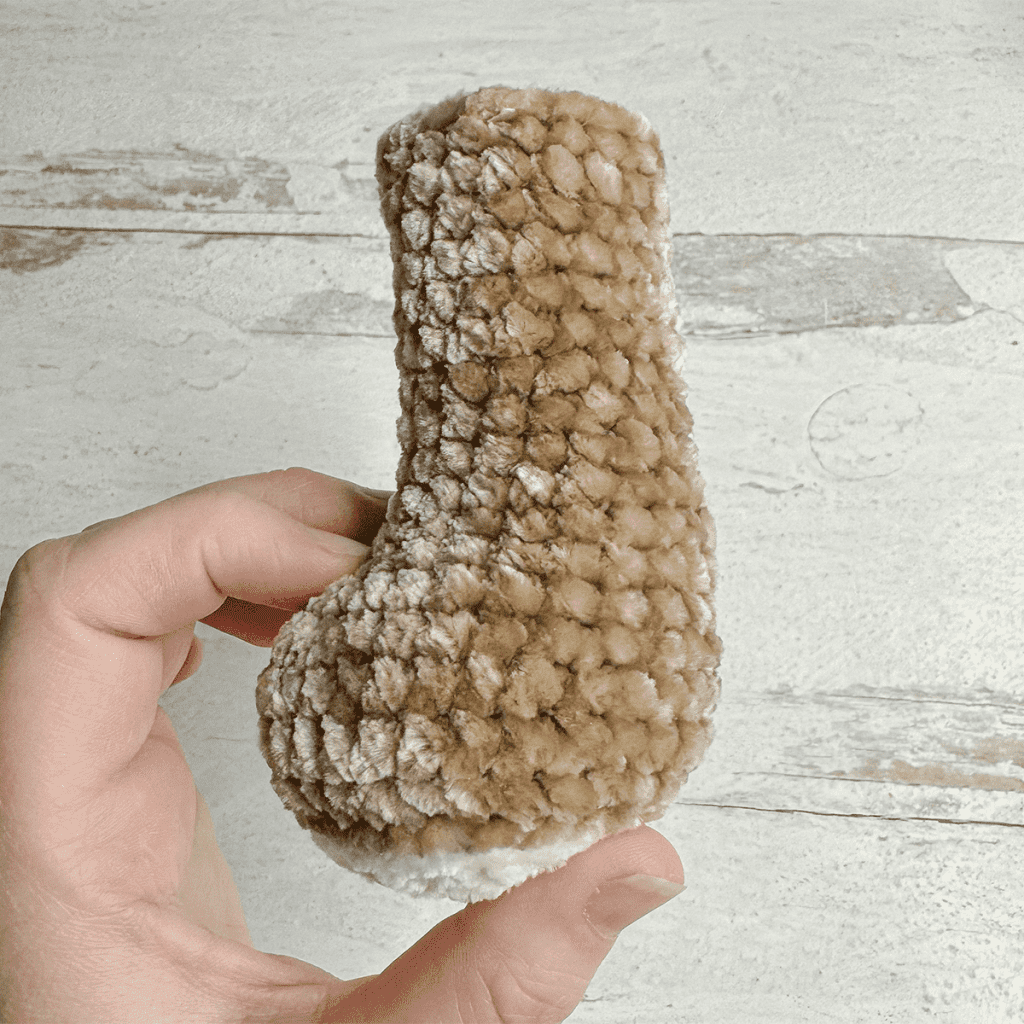
    Continue on to BODY.

    BODY
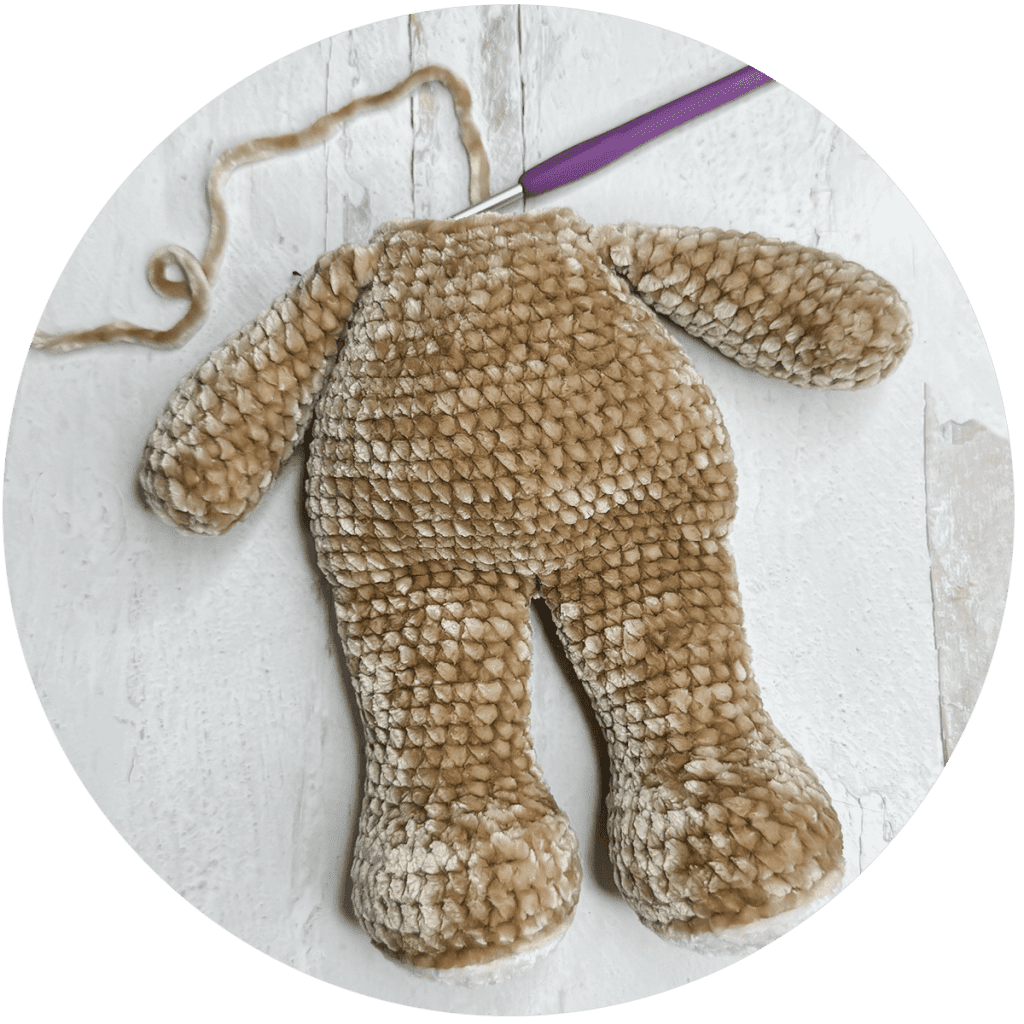
    To Begin: Place legs side by side, fronts facing away from you. On the inner sides that sit closest together, locate the centermost stitch on each leg. With COLOR A, join legs together by joining yarn through top loops of BOTH opposing stitches; CH1.
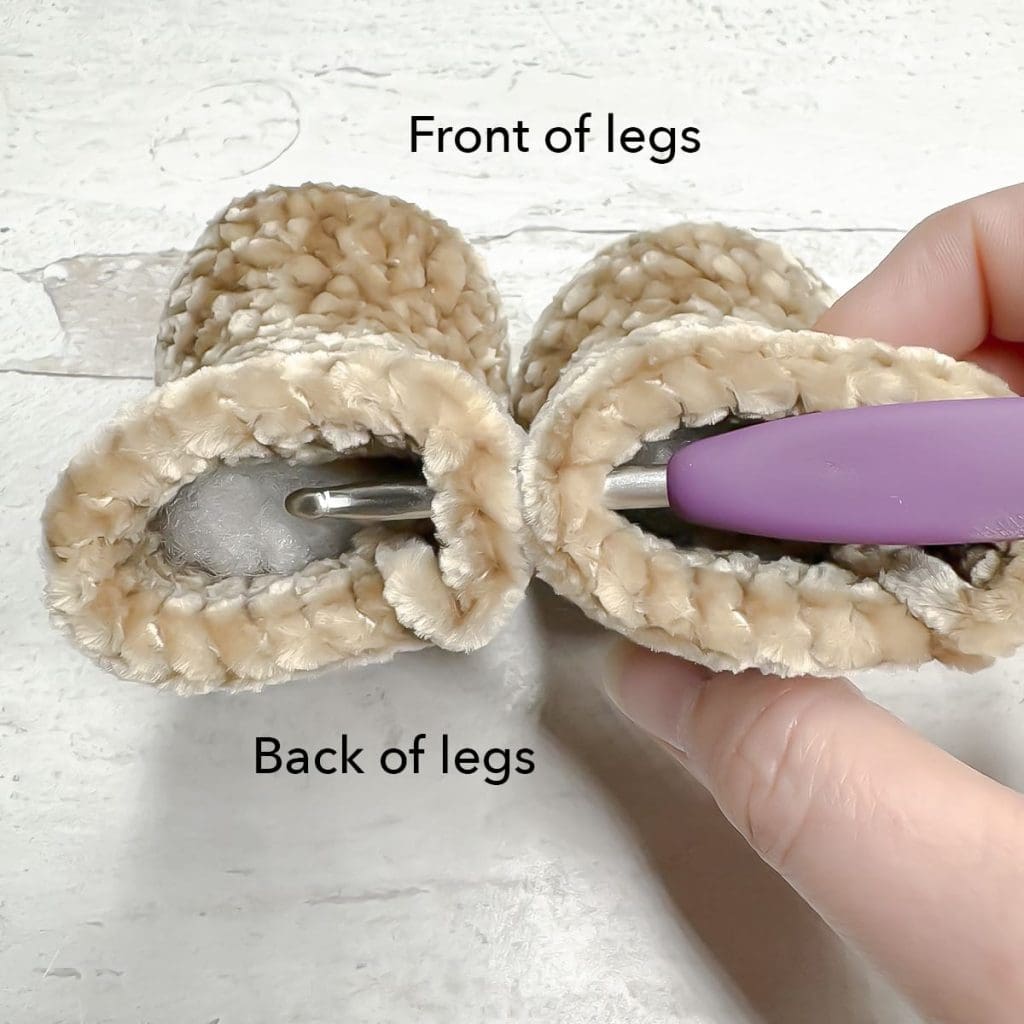
    Round 1: CSC in same ST as your CH1 on the left leg, and moving clockwise, CSC in each remain- ing ST around left leg (20 CSC). Continue to the right leg, and CSC again in the same ST as your initial CH1; continue to CSC in each ST around the right leg (20 CSC). (40)

    NOTE: When you come to the part on each leg that has the โ€œdropoffโ€ created by the end of the final round, simply CSC until the dropoff and continue immediately to the next unworked stitch after it. (Pretend the dropoff isnโ€™t even there.

    Round 2: In FLO for this round only, (INC, 3 CSC) around. (50) 

    Rounds 3-11: CSC in each ST around. (50)

    Round 12: (4 CSC, DEC, 4 CSC) around. (45)

    Round 13: CSC in each ST around. (45)

    Round 14: (DEC, 7 CSC) around. (40) 

    Round 15: CSC in each ST around. (40) 

    Round 16: (3 CSC, DEC, 3 CSC) around. (35) 

    Round 17: CSC in each ST around. (35) 

    Round 18: (DEC, 5 CSC) around. (30)

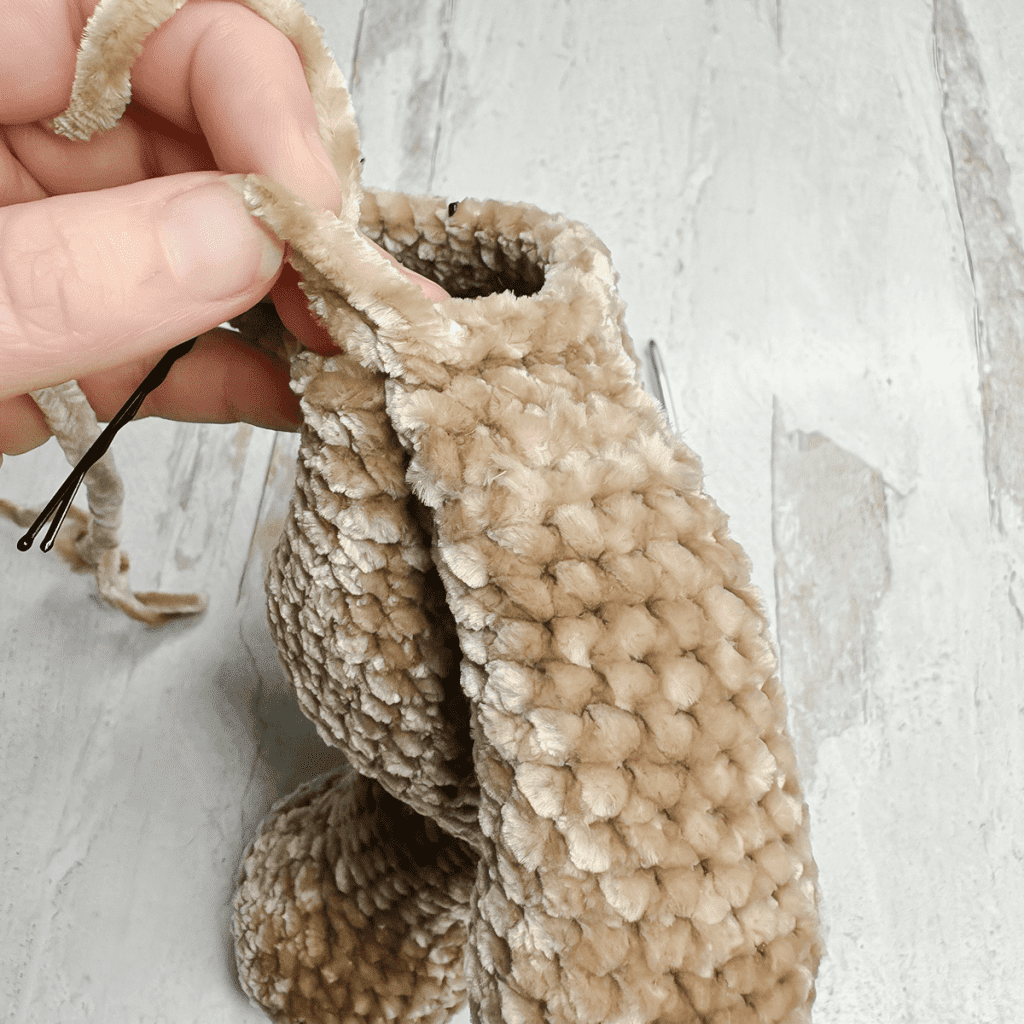
    Stuff. Then, along Round 18, use stitch markers to mark 4 or 5 STS for each arm (depending on how many STS you used to seam the arms).
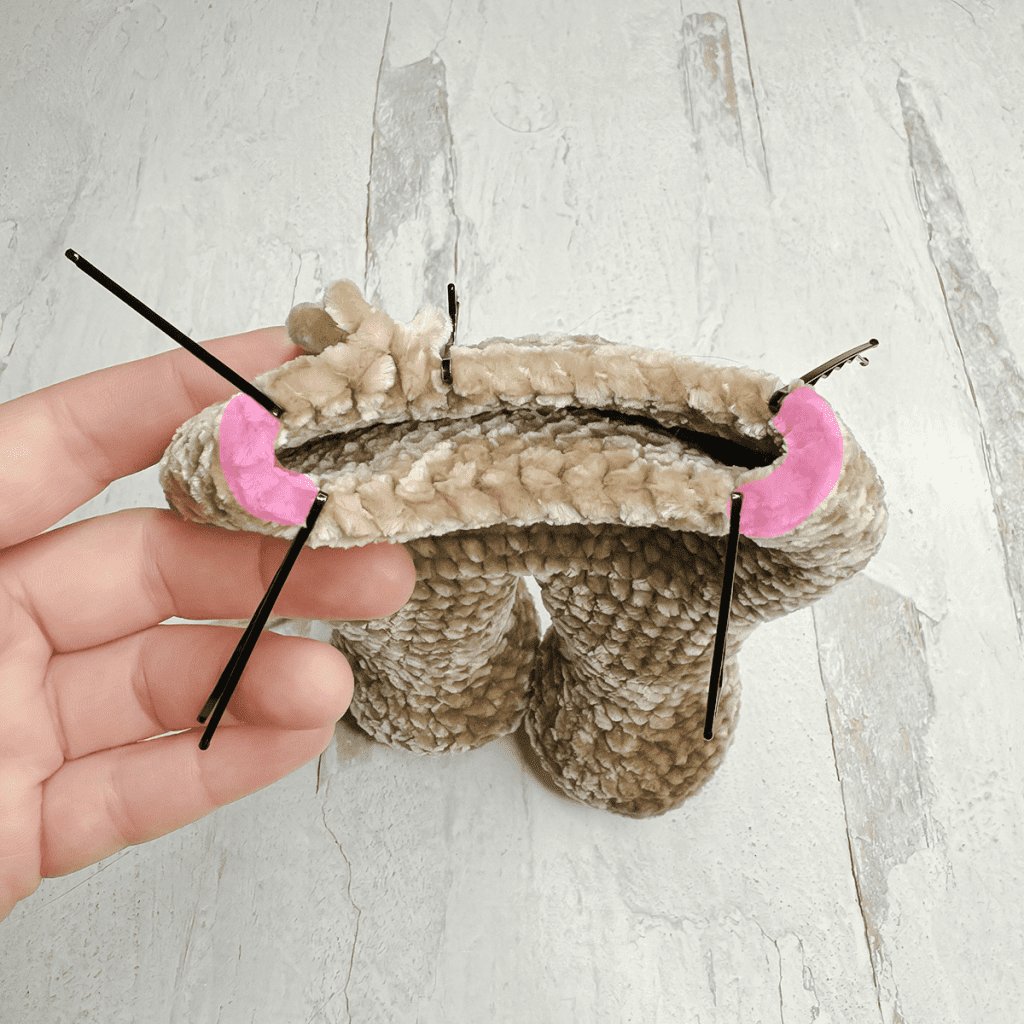
    Round 19: CSC in each ST around, attaching arms as you go by inserting hook into corresponding ST on arm AND body. (30)
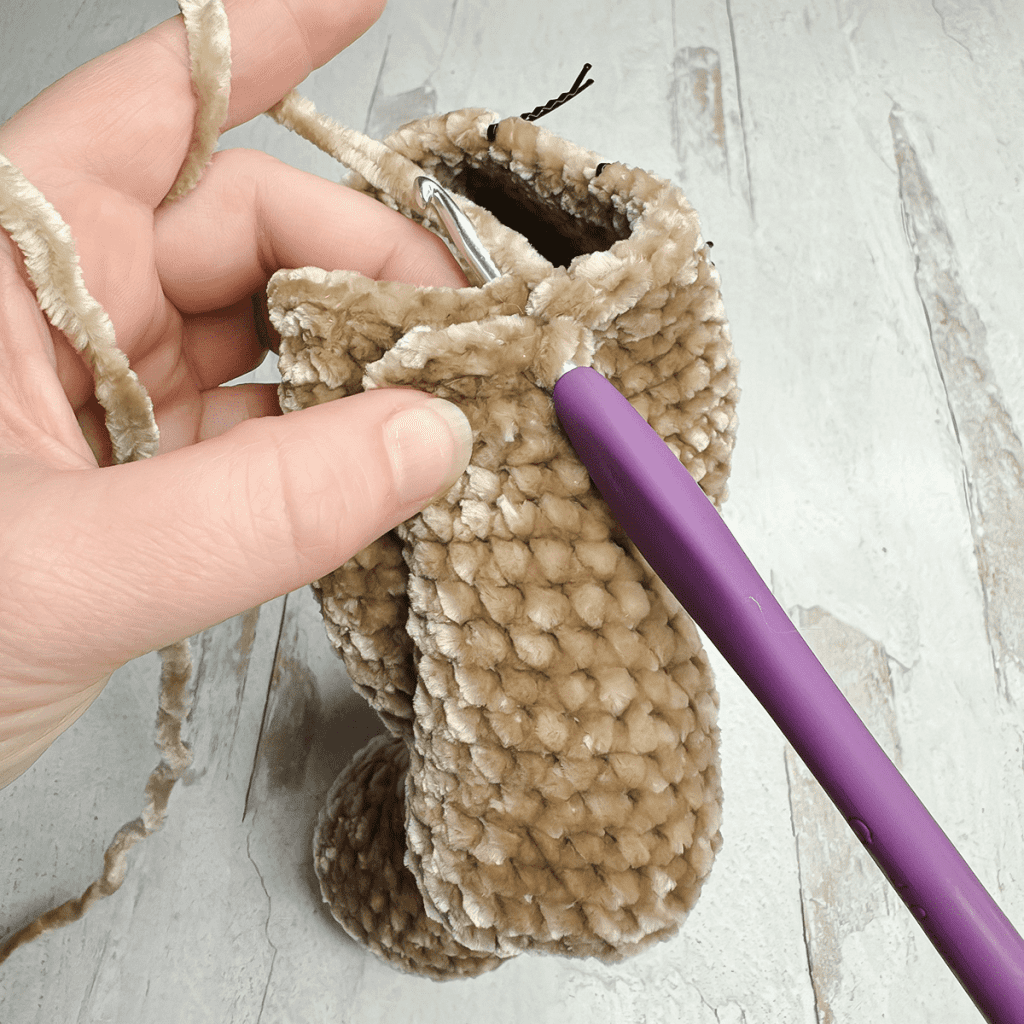
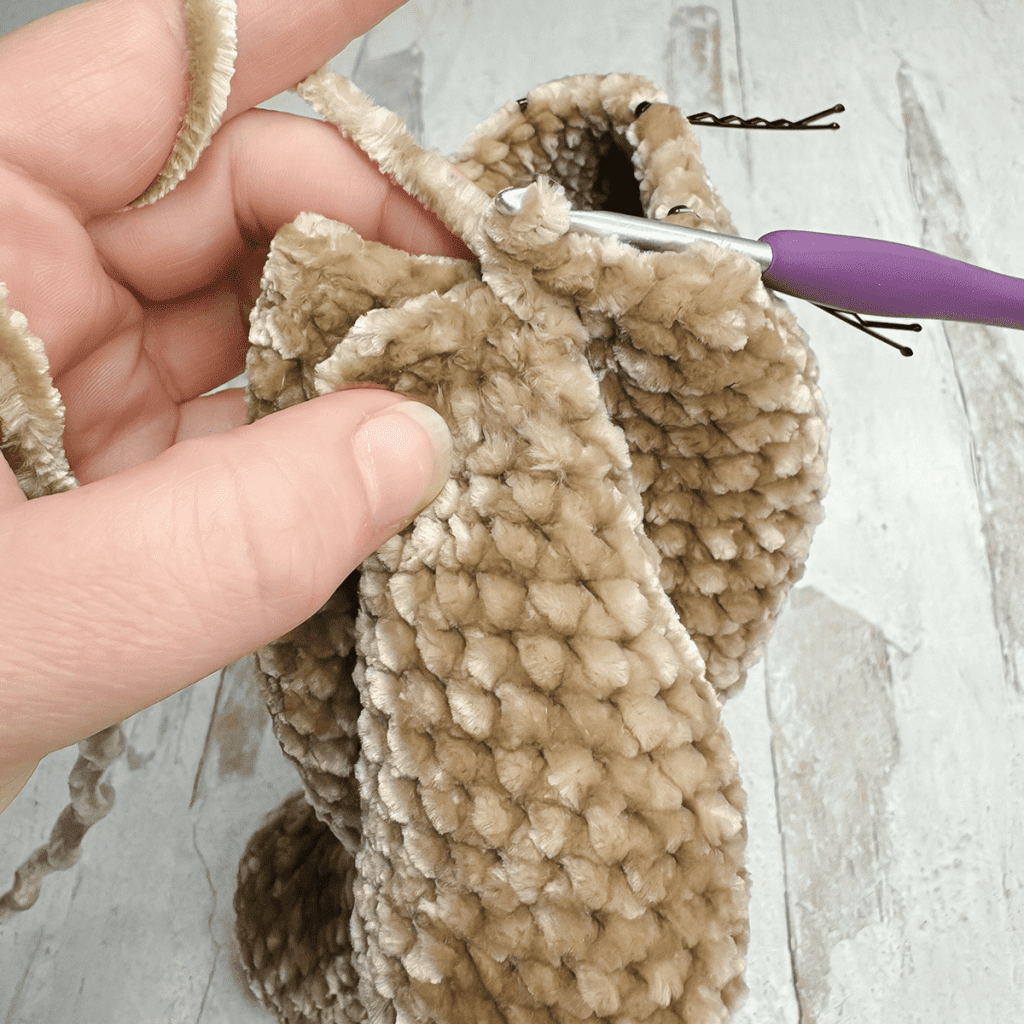
    Round 20: (DEC, 3 CSC) around. (24)

    HEAD
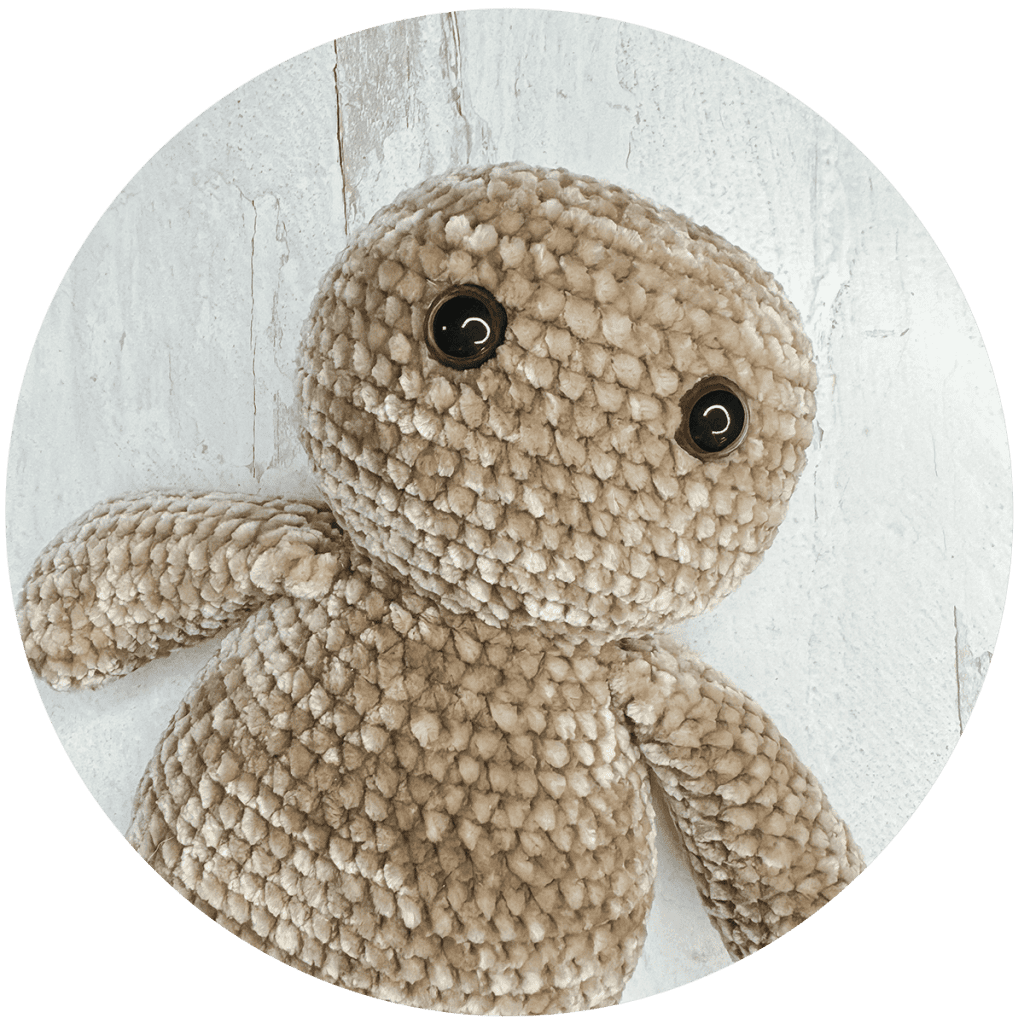
    Round 21: In FLO for this round only, (CSC, INC, CSC) around. (32)

    Round 22: (INC, 3 CSC) around. (40)

    Round 23: (2 CSC, INC, 2 CSC) around. (48)

    Round 24: (INC, 11 CSC) around. (52)

    Round 25-35: CSC in each ST around. (52)

    Pause and add the eyes between Rounds 31 and 32. I placed mine 8 stitches apart.
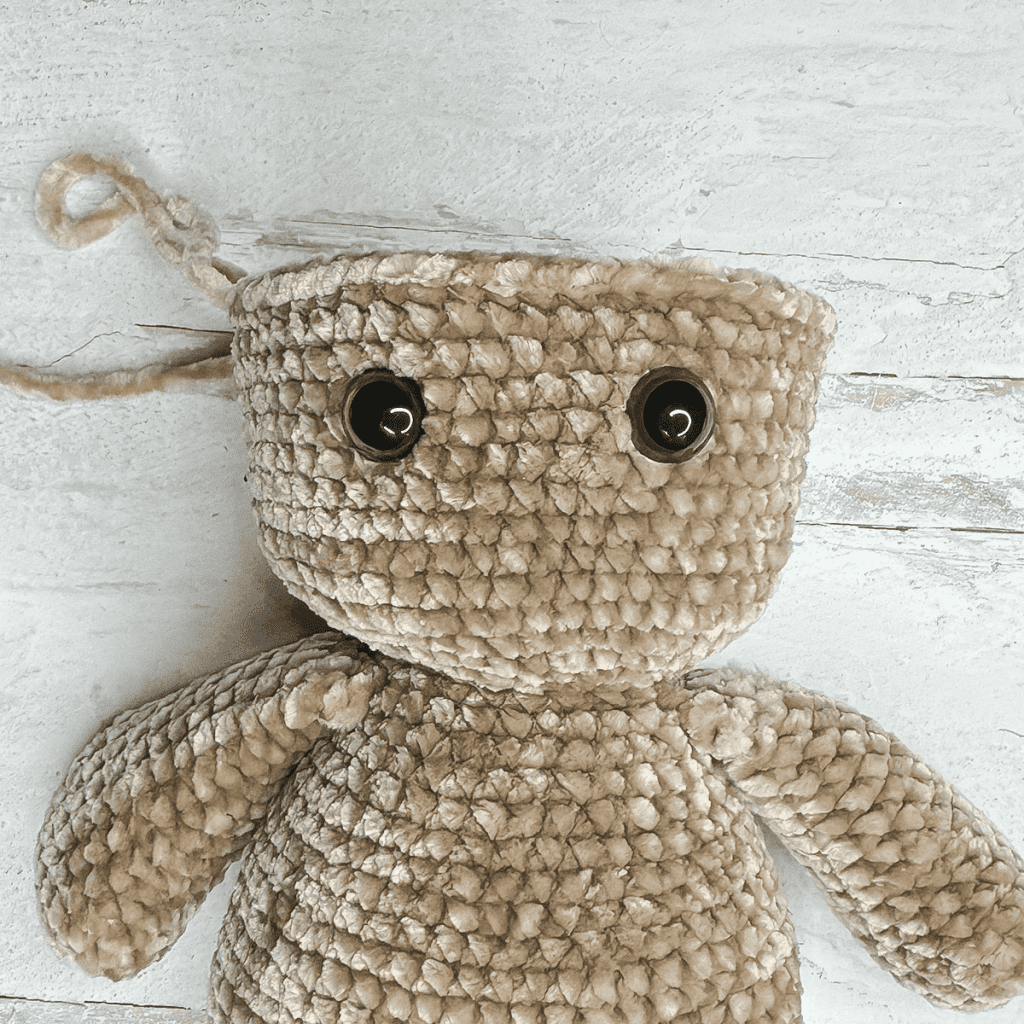
    Round 36: (DEC, 11 CSC) around. (48)

    Round 37: (2 CSC, DEC, 2 CSC) around. (40)

    Round 38: (DEC, 3 CSC) around. (32)

    Round 39: (CSC, DEC, CSC) around. (24)

    Stuff here, and continue to add stuffing as desired until you close it up

    Round 40: (DEC, CSC) around. (16)

    Round 41: DEC around. (8)

    To finish: Fasten off with a long tail. Thread tail through a yarn needle and weave the needle in and out of the outer loops of the previous round, all the way around. Slowly pull circle closed. (Be careful if youโ€™re using single-ply yarn, it breaks easily!)
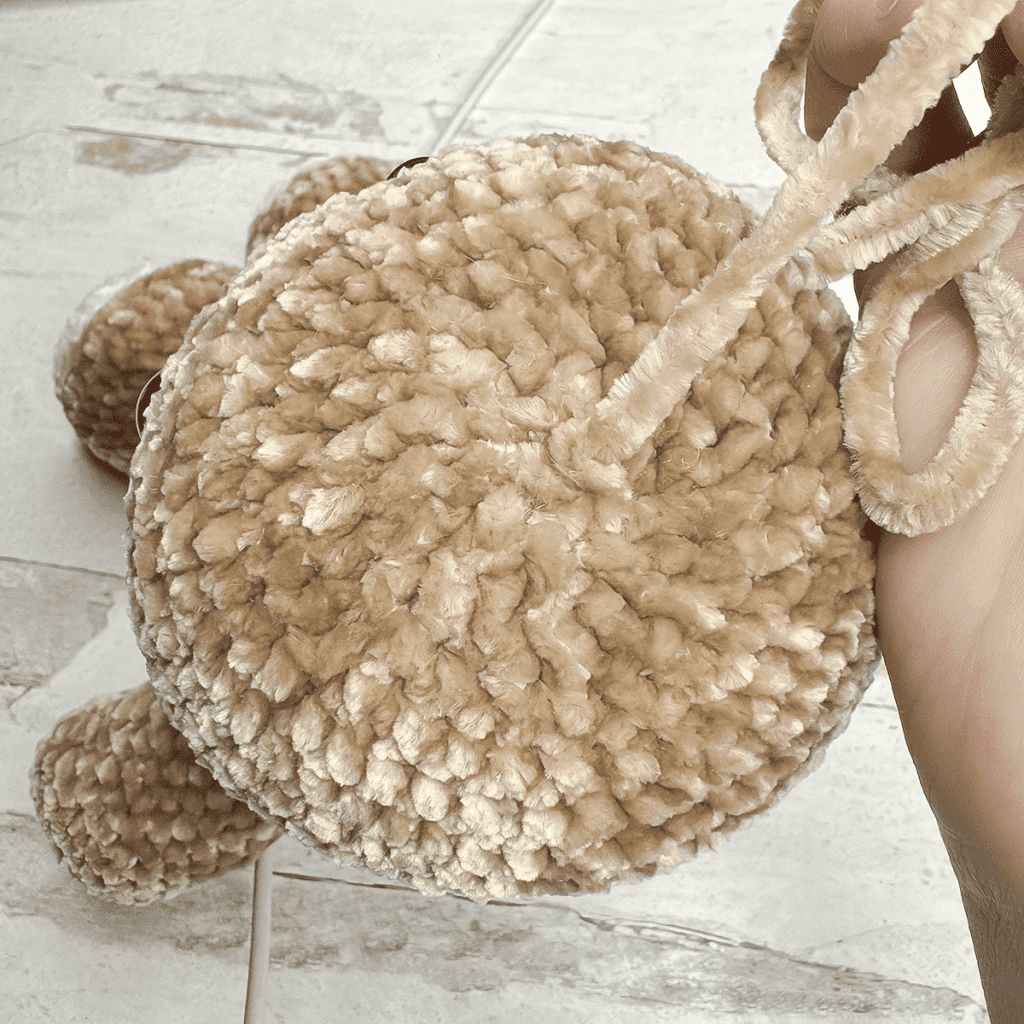
    Tie a knot, then hide knot and tail inside head.

    SNOUT
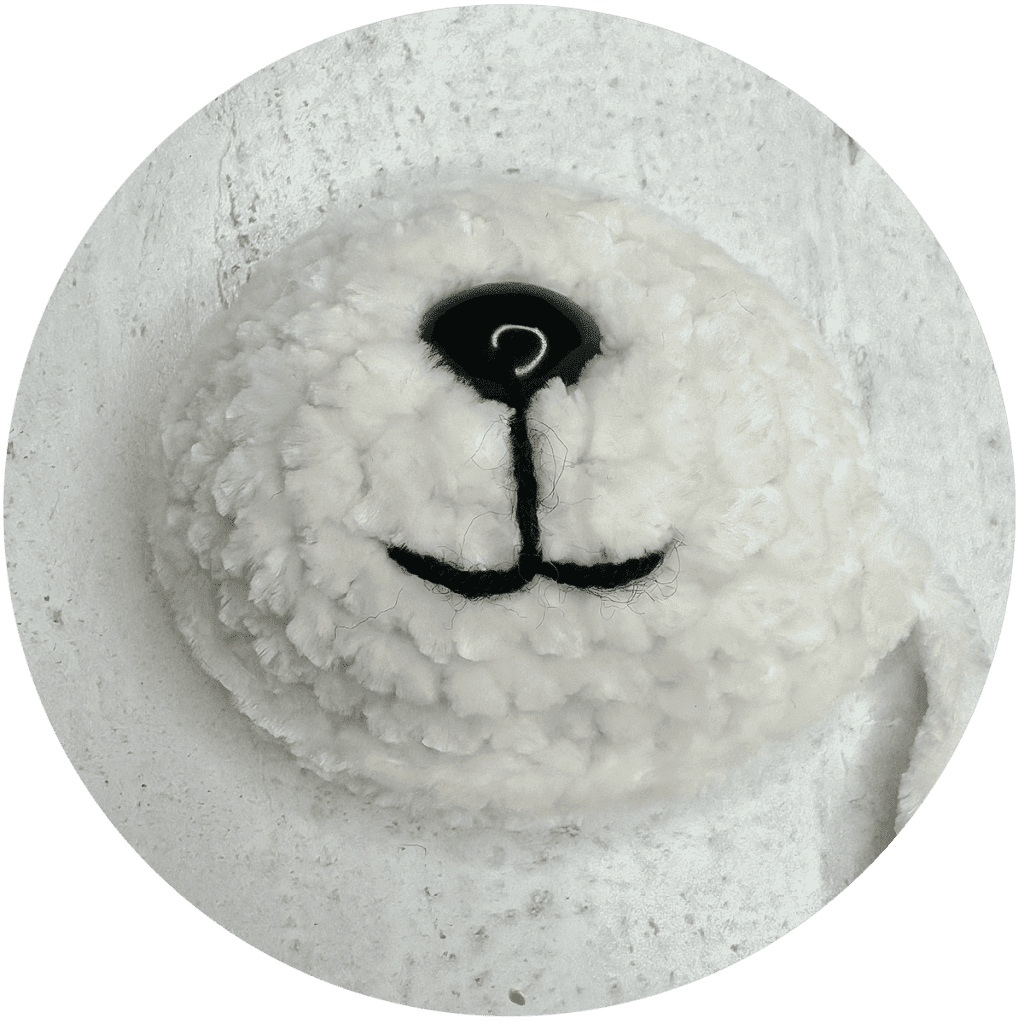
    To Begin: With COLOR B, CH4.

    Round 1: Starting in 2nd CH from hook, and working into only the back loop of each chain stitch, INC, CSC, INC. Working around to the other side of the CH, and working in the unworked loops of each chain stitch, INC, CSC, INC. (10)

    Round 2: 2 INC, CSC, 4 INC, CSC, 2 INC. (18)

    Round 3: INC, CSC, INC, 2 CSC, (INC, CSC) 4 times, CSC, INC, CSC, INC, CSC. (26)

    Rounds 4-5: CSC in each ST around. (26)

    To finish: SL ST in next ST. Fasten off, leaving a long tail for sewing. Weave in starting tail.

    MOUTH and NOSE

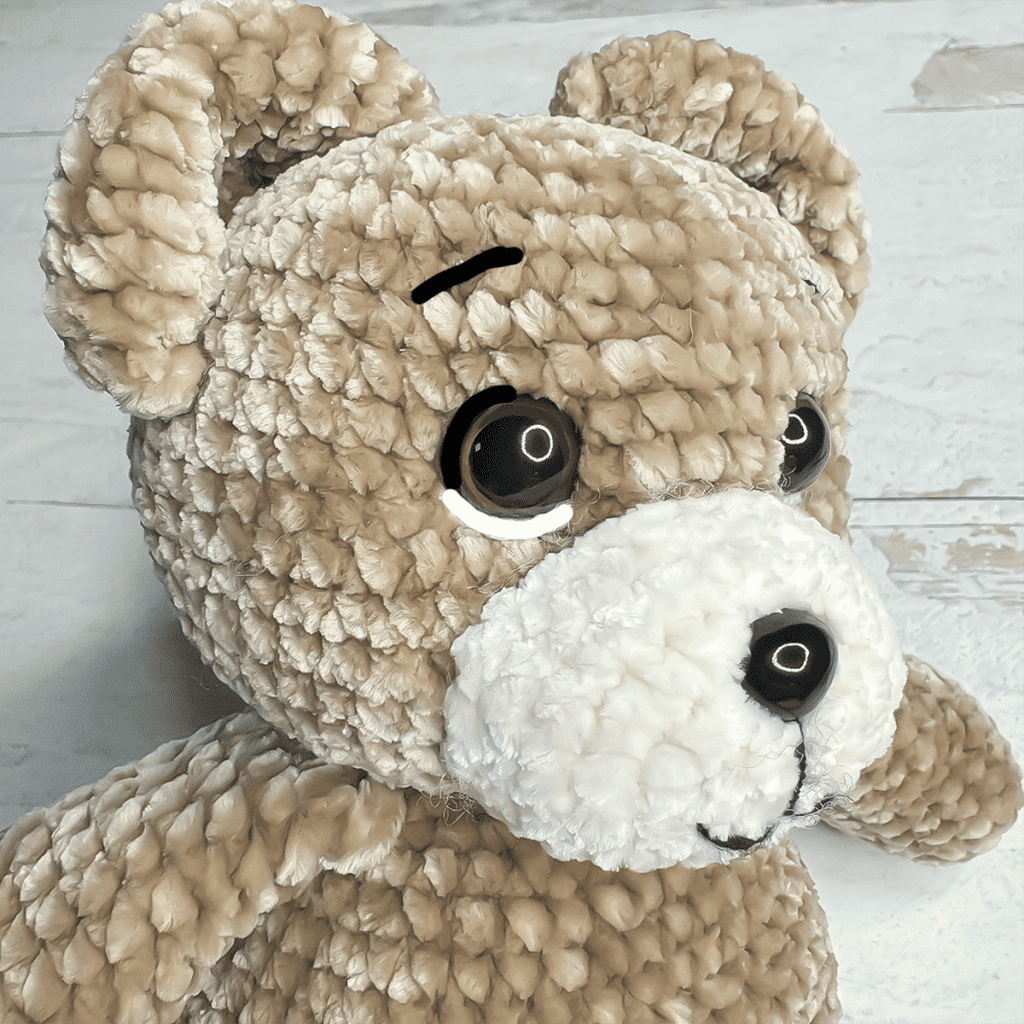
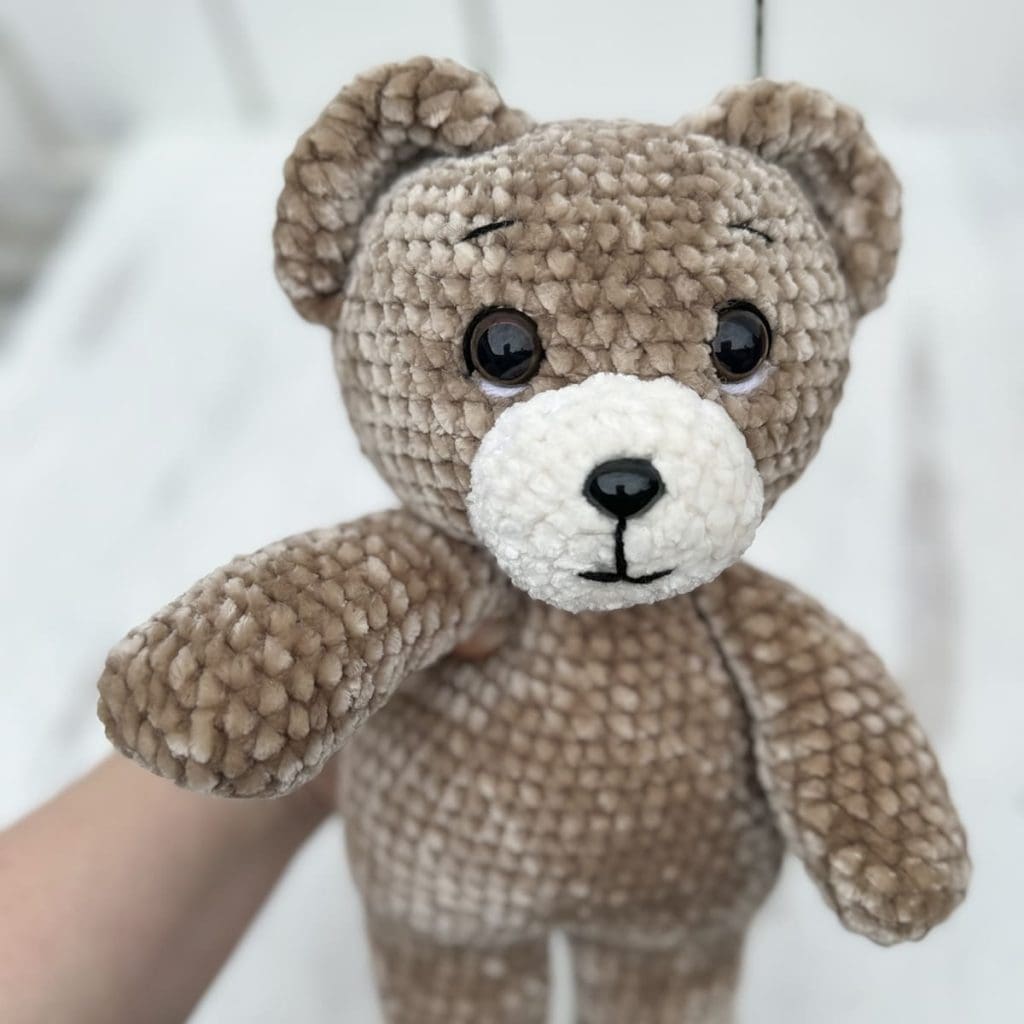
    Use thin black yarn to โ€œdrawโ€ the mouth, using photos for reference.

    • Vertical line starts between Rounds 2 and 3 above the middle of the snout, and ends between Rounds 1 and 2 below the middle of the snout.
    • Horizontal line is actually two lines beginning from 2 stitches to the right and left of the bottom of the vertical line, and meeting at the bottom of the vertical line.
    • Safety nose is inserted at the top of the vertical line.
      Secure tails and trim so theyโ€™ll be able to be hidden inside the snout.
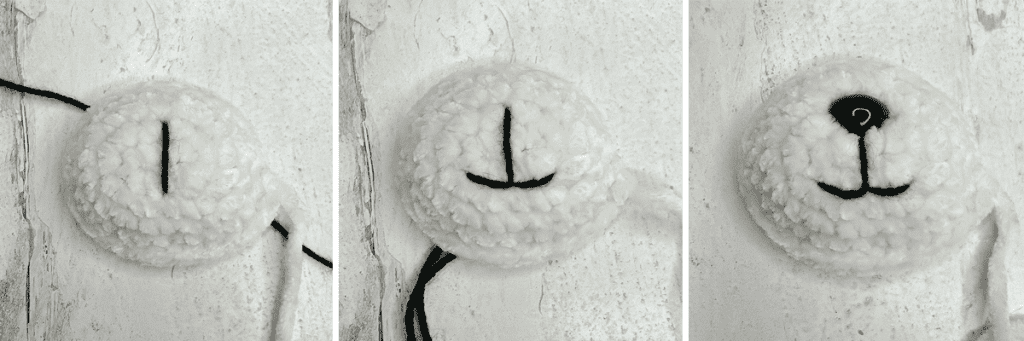

    ATTACHING THE SNOUT

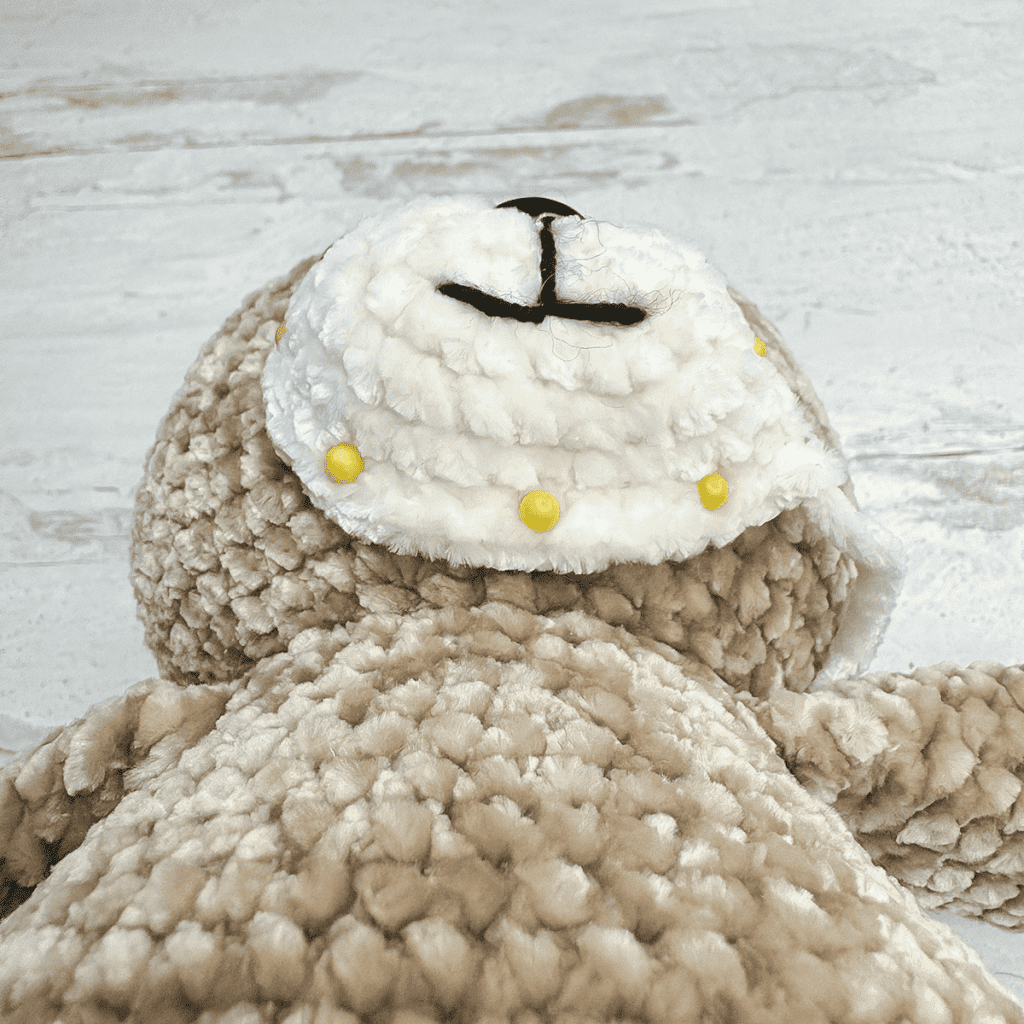
    Use pins to hold snout in place, if desired.

    • Top of snout should be just slightly above the bottom of the eyes
    • Sides of snout should be just about lined up with the outer edges of the eyes
    • Bottom of snout should be just a round or two above the crease of the neck
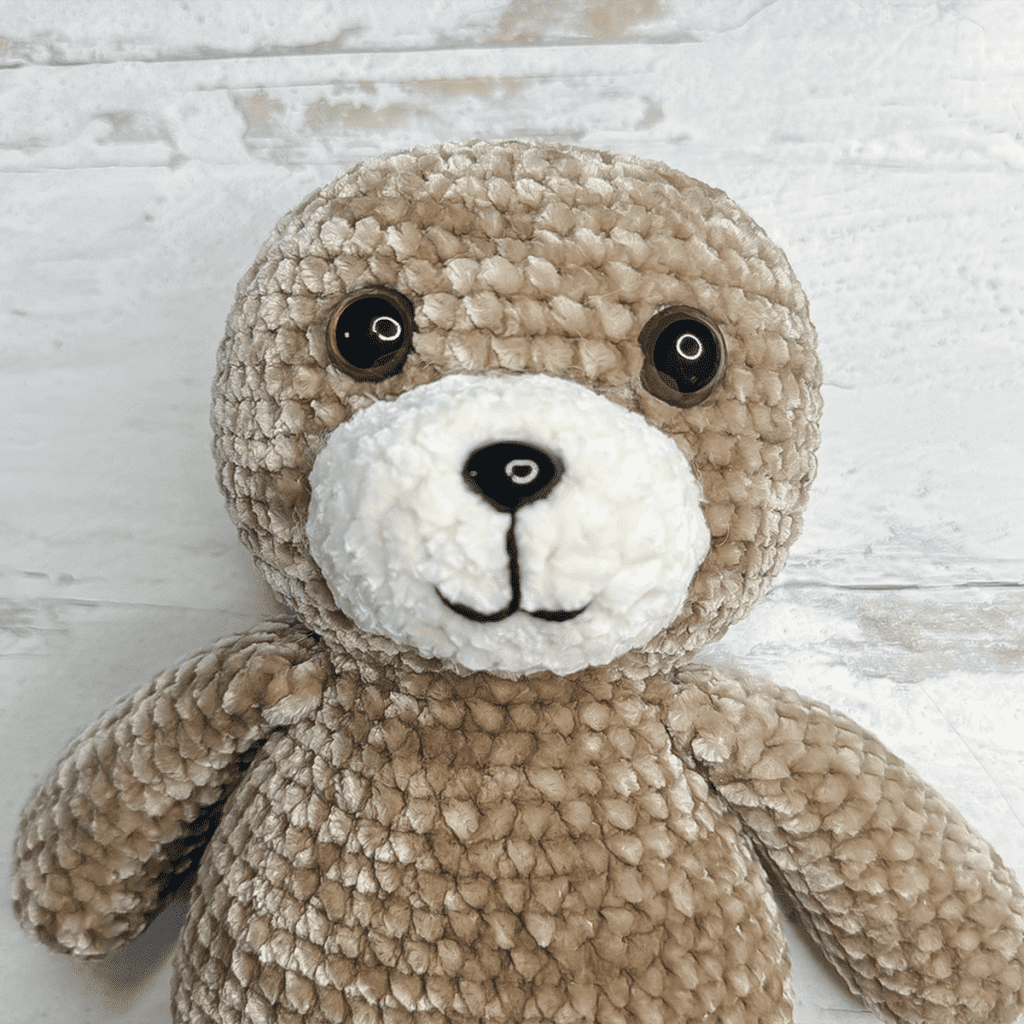
    Use finishing tail to sew snout to face. Add stuffing when halfway around, and continue to add stuffing as desired until finished. Knot and hide finishing tail inside head.

    EARS
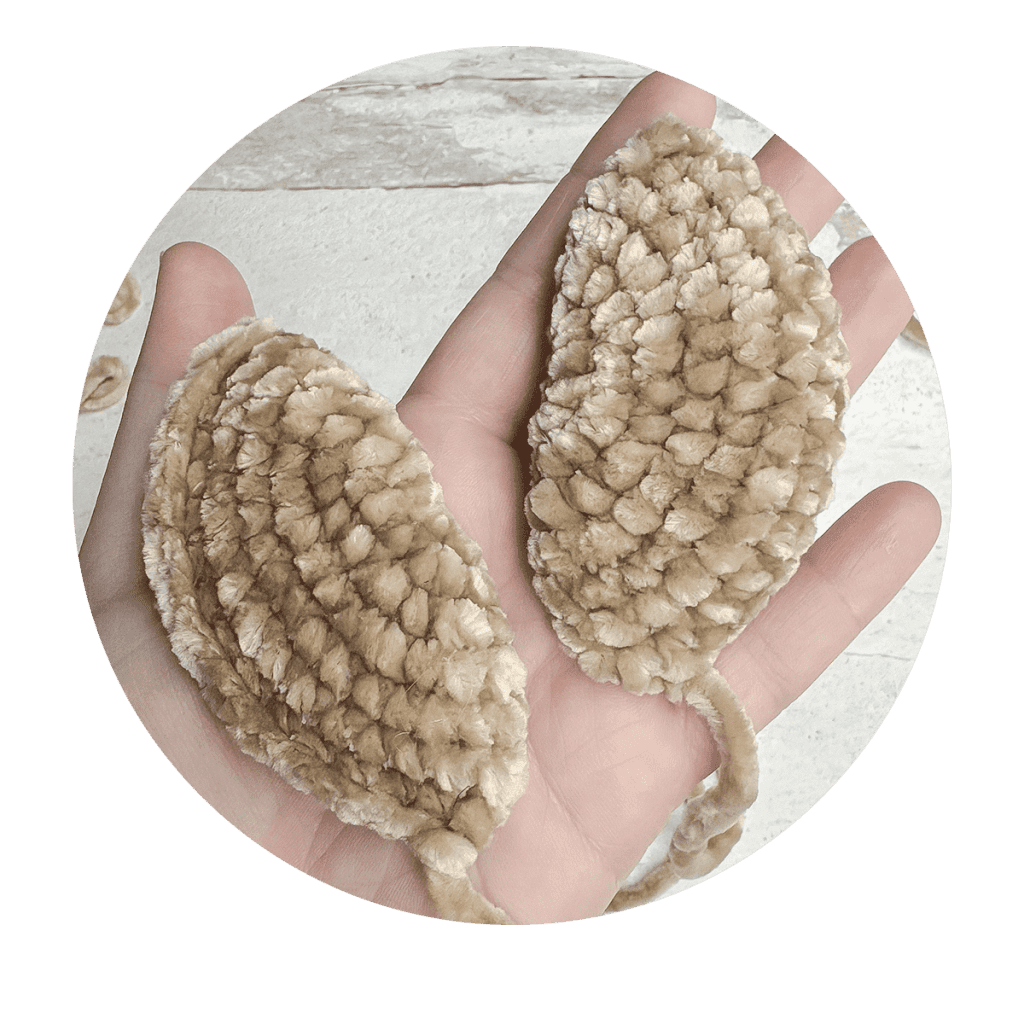
    To Begin: With COLOR A, CH4.

    Rounds 1-3: Follow instructions (Rounds 1-3) from SNOUT.

    Round 4: (2 CSC, INC) 2 times. CSC. (2 CSC, INC) 4 times. CSC. (2 CSC, INC) 2 times. (34)

    Rounds 5-6: CSC in each ST around. (34)

    To finish: SL ST in each of the next 2 STS; remove hook. Secure and trim starting tail, then CSC ear closed by folding in half along the starting chain, and working through both sets of corresponding loops across. Fasten off, leaving a long tail for sewing.
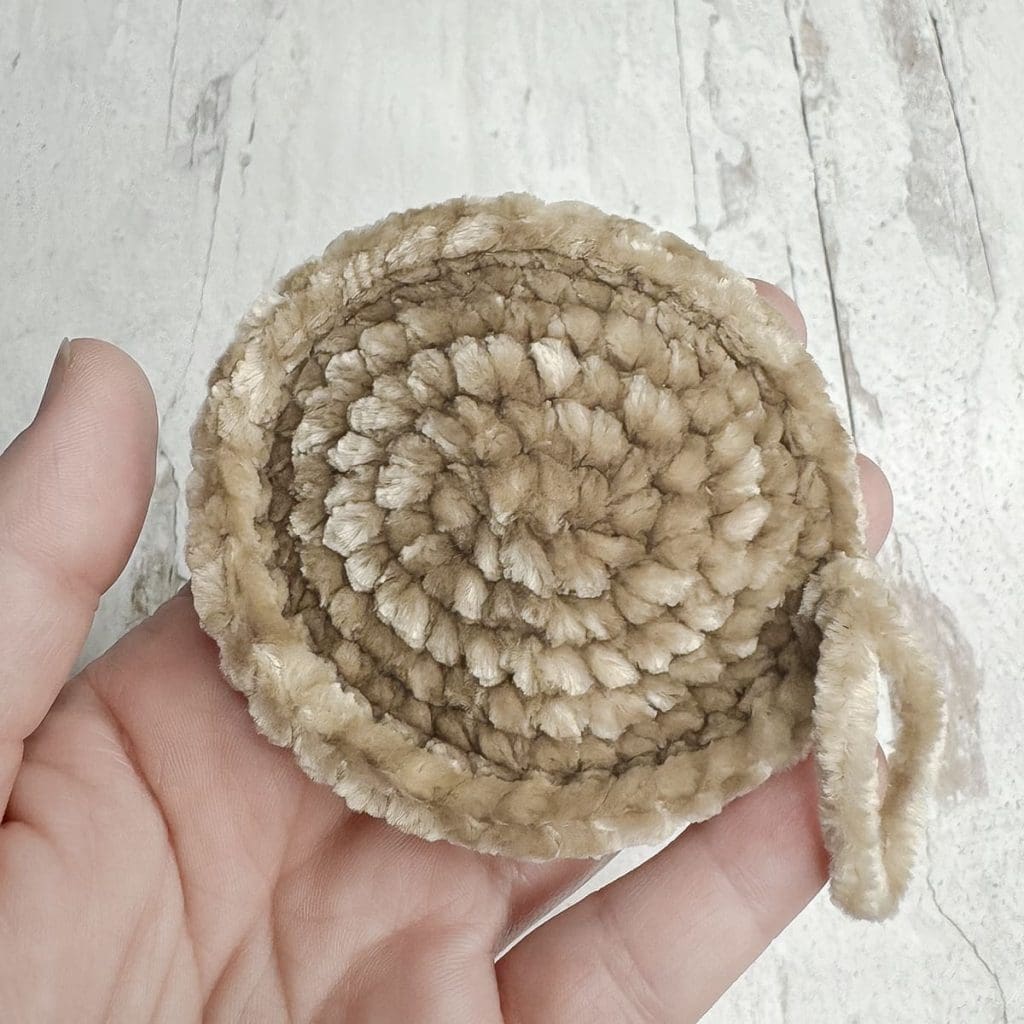
    ATTACHING THE EARS

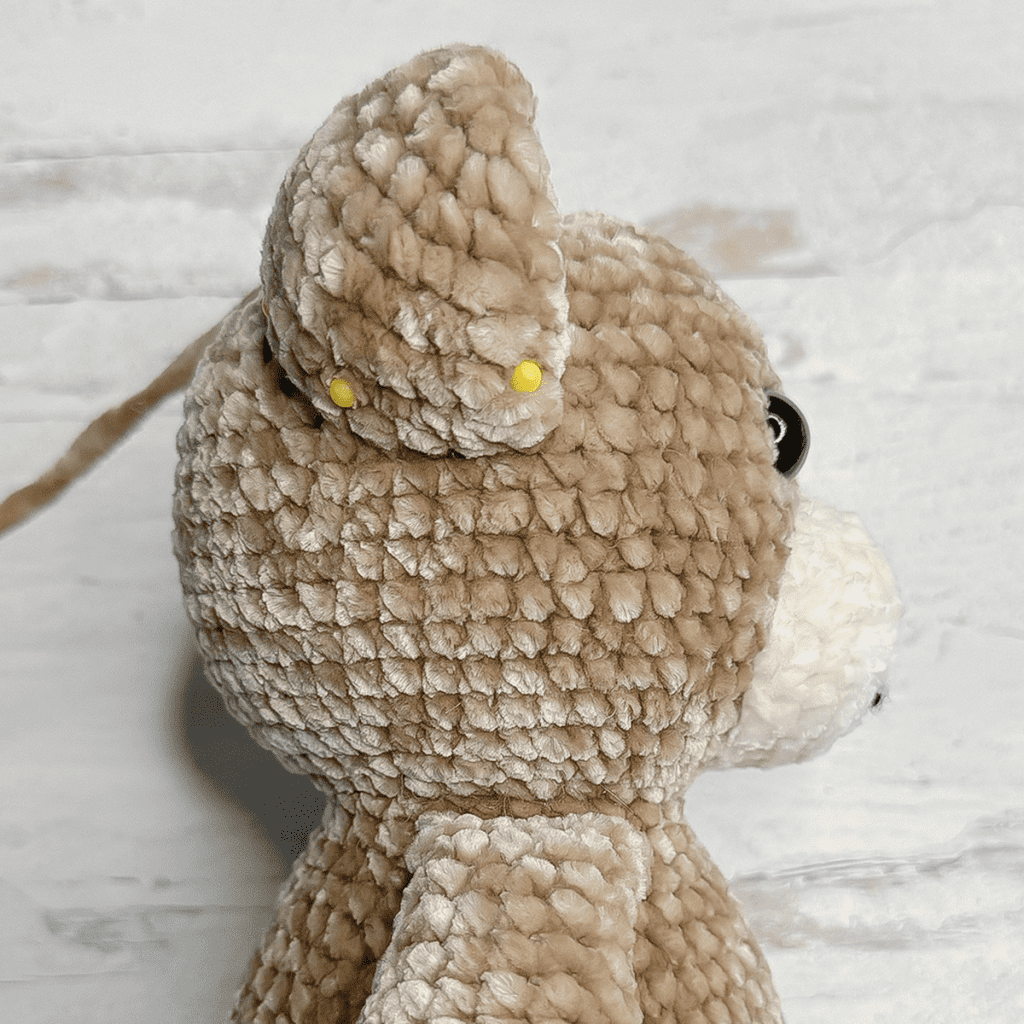
    Use pins to hold ears in place, if desired. Sew the seamed side of the ears to the head in desired placement. When finished, knot and hide tail inside head.

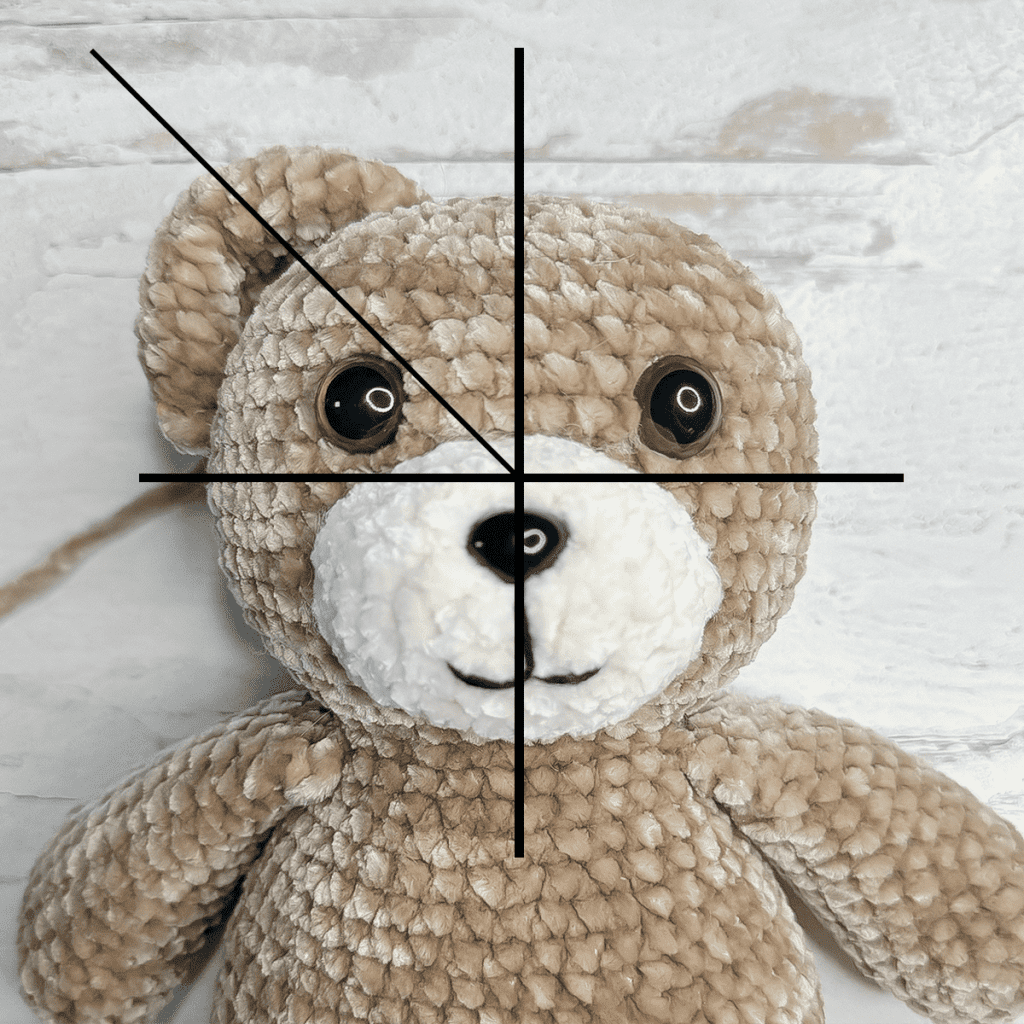
    • The ears should be toward the lower part of the top left and top right quadrants (see photo).
    • Ears should be placed about halfway back on the head, in line with the middle of the arm below them.

    TAIL

    To Begin: With COLOR A, make a Magic Circle; CH1. 

    Round 1: 6 CSC in MC. (6)

    Round 2: INC in each ST around. (12)

    Rounds 3-5: CSC in each ST around. (12)

    To Finish: SL ST in next ST. Remove hook; secure and trim starting tail. Reinsert hook and CSC tail closed by holding sides of opening to- gether, and working through both sets of corresponding loops across. (This is the same technique you used to seam the arms.) Fasten off, leaving a long tail for sewing.
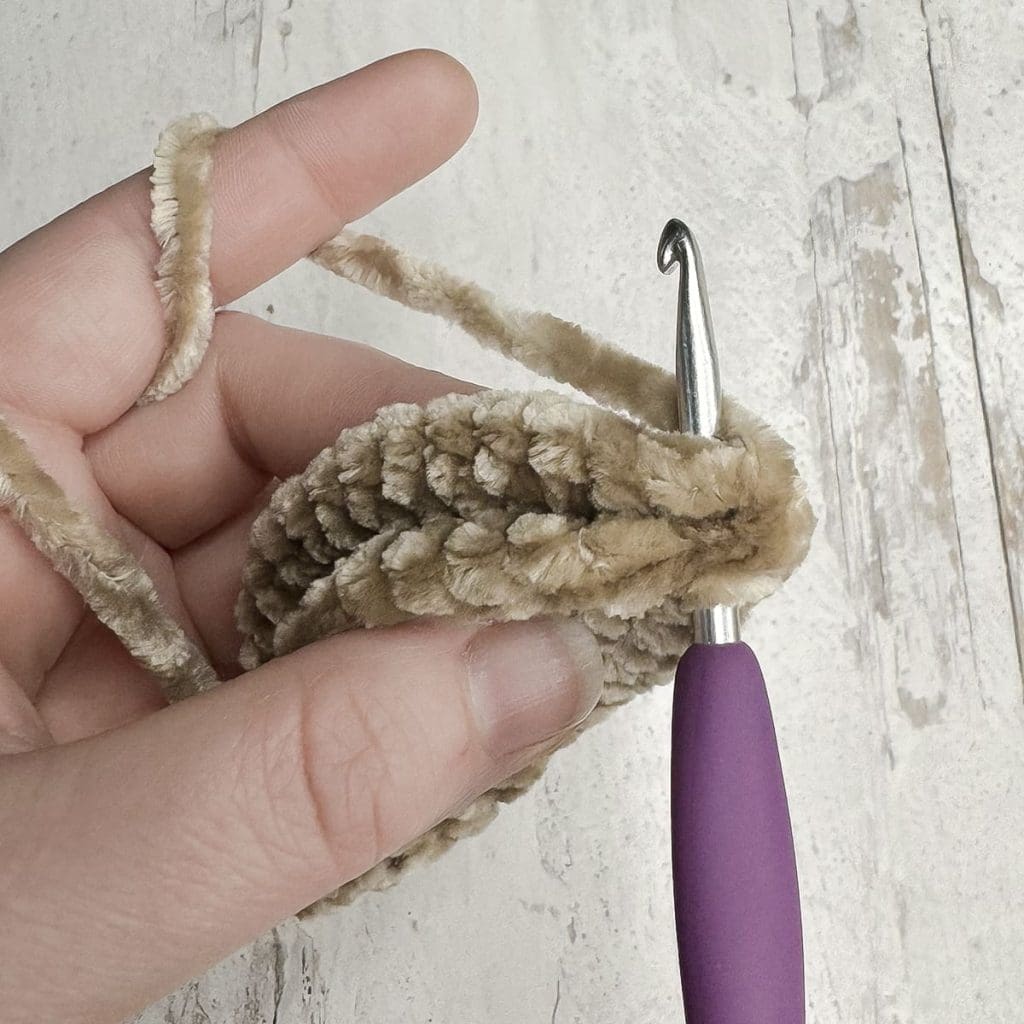
    ATTACHING THE TAIL

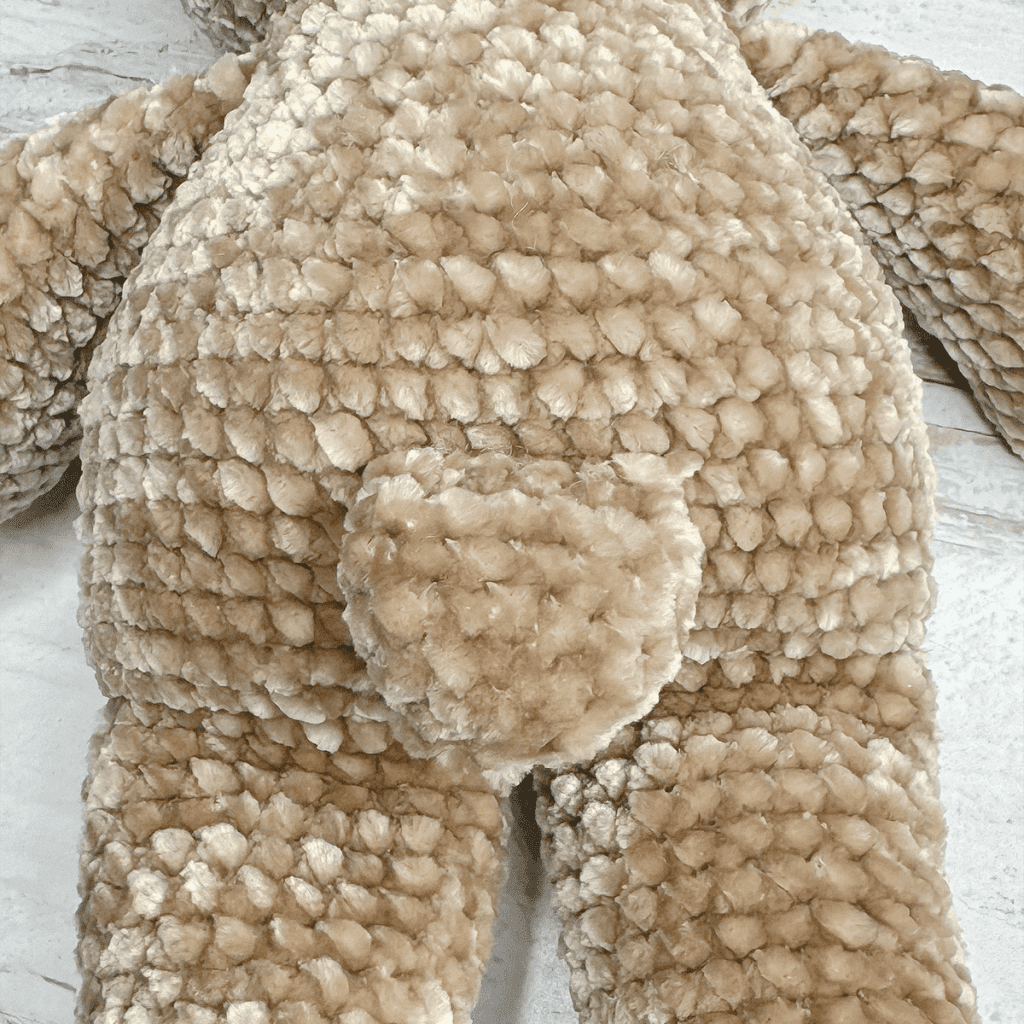
    Use pins to hold tail in place, if desired. Sew tail to back of body.

    • I sewed my tail so that the top was in line with Rounds 6-7 of the body. When finished, knot and hide finishing tail inside body.
    SHAPING THE HEAD
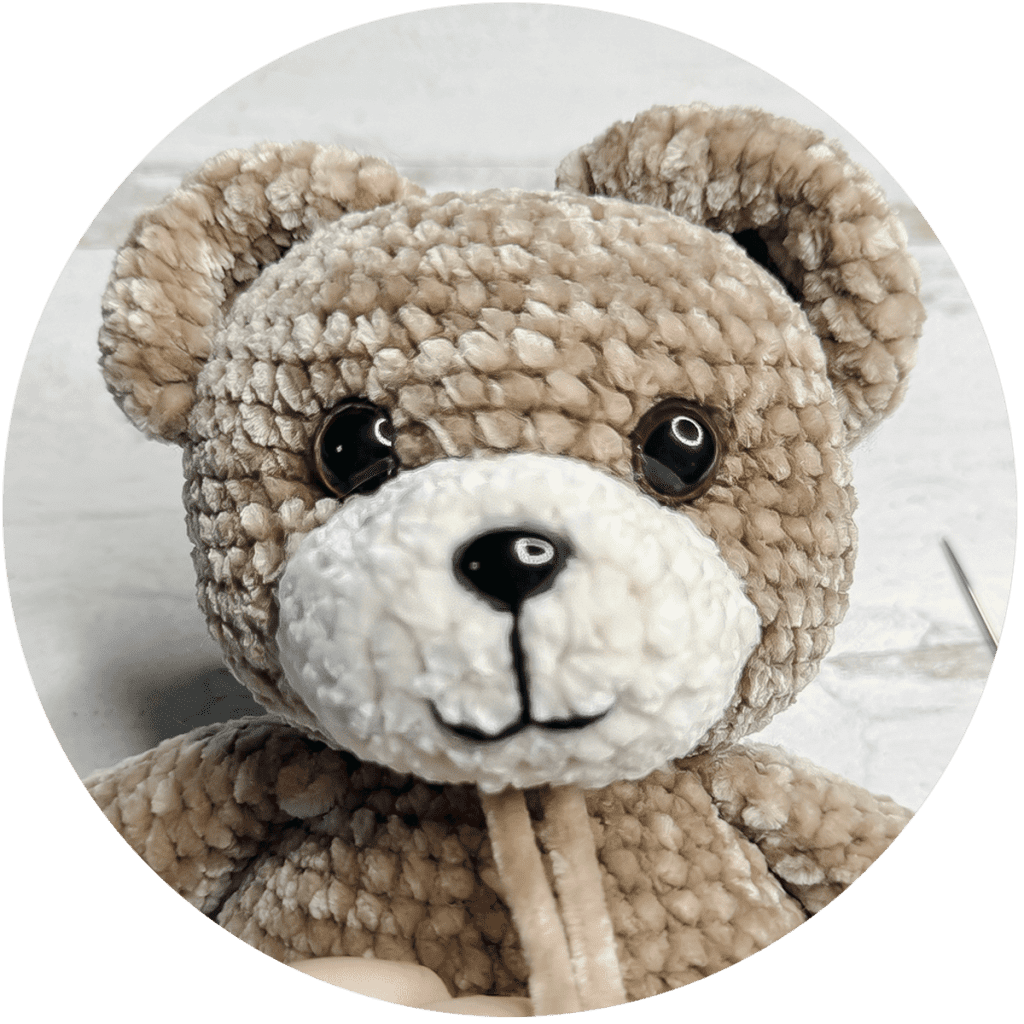
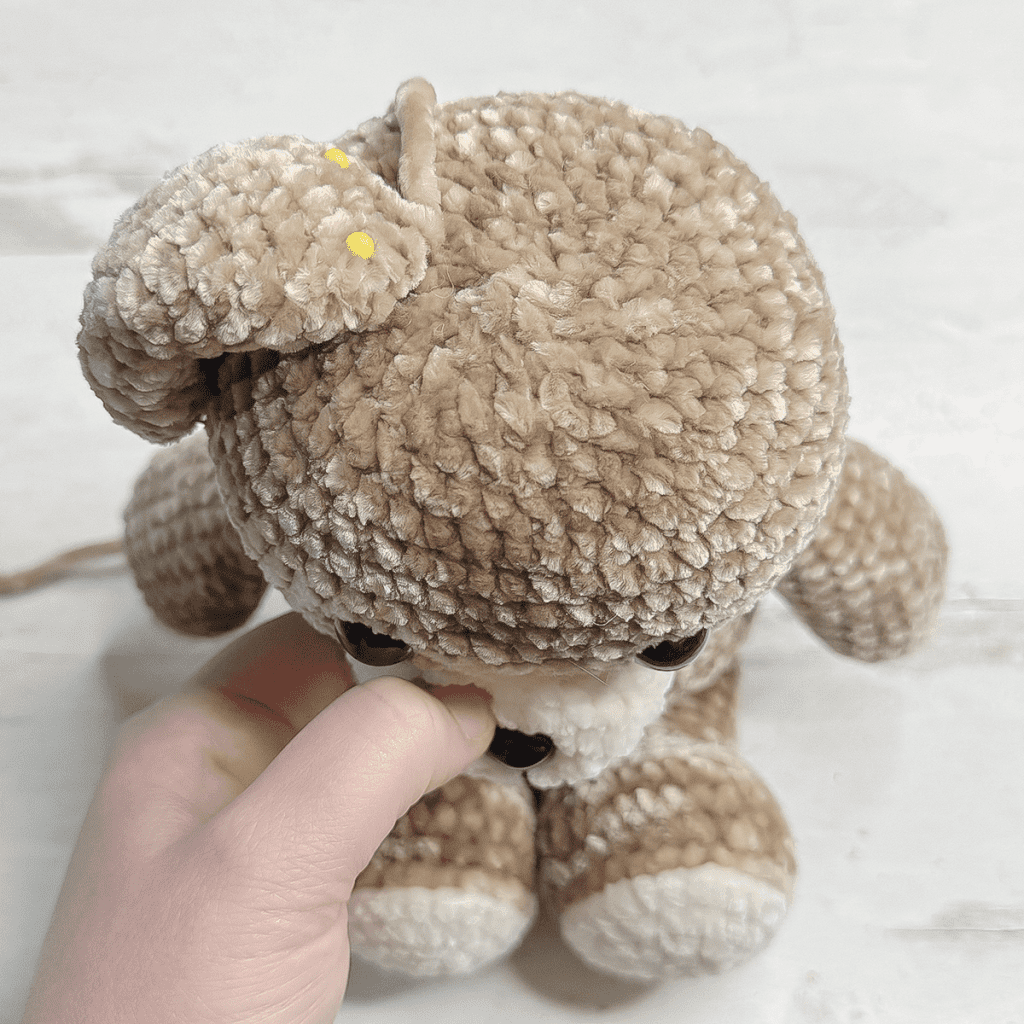
    Cut a long length of yarn (COLOR A) and thread it through a long yarn needle, then follow these steps carefully, using the picture as a guide. (My yarn has been highlighted in yellow.)

    • Insert needle at the base of the neck (1), and pull it out at the lower right part of the first eye (2). (When working near the eyes, try to get your needle as close to the eye as you can.)
    • Insert it into the lower left part of the same eye (3), and pull it out of the same spot at the base of the neck where you first inserted it (1).
    • Move one stitch to the right (4) and insert hook, then pull it out at the lower left part of the 2nd eye (5).
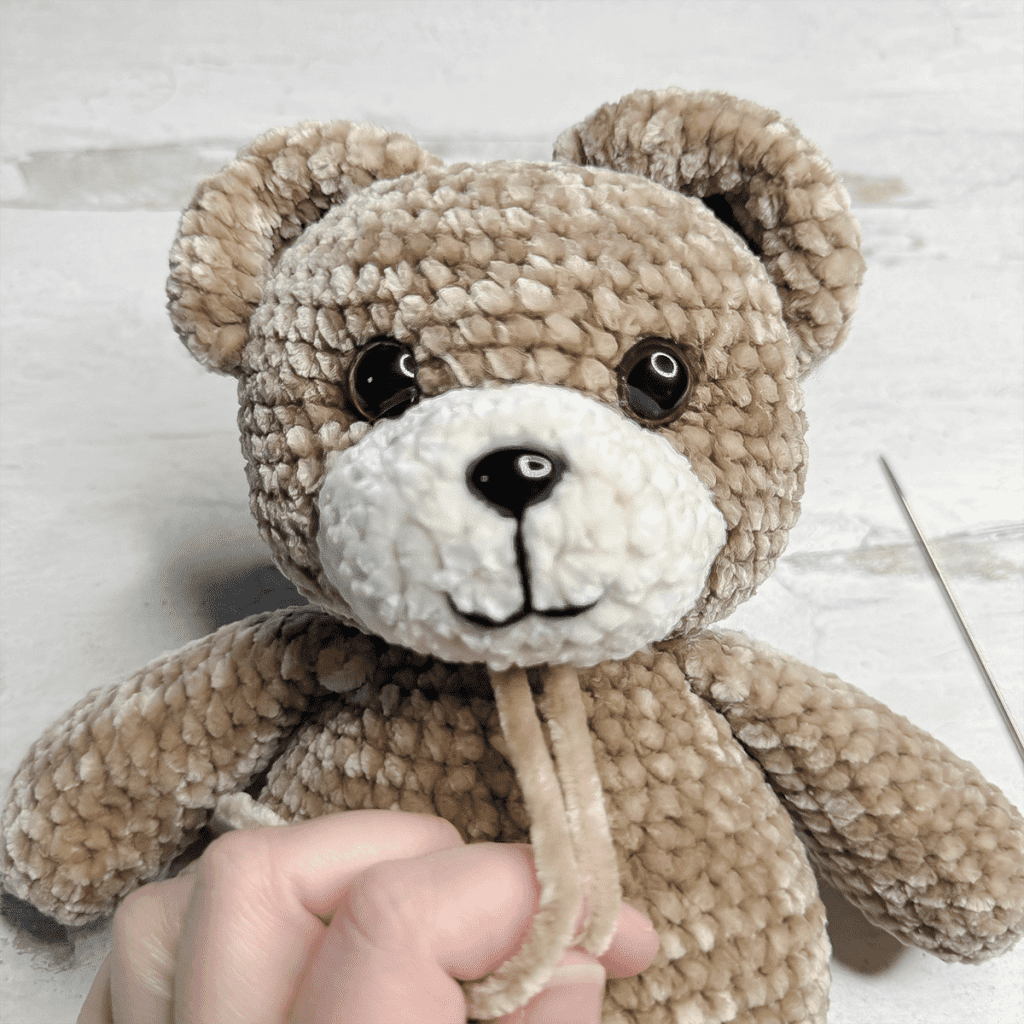
    • Insert it into the lower right part of the same eye (6), and pull it out of the same spot at the base of the neck where you most recently inserted it (4).You should now have two ends coming out of the base of the neck. Gently pull them (at the same time) until you are happy with the indentation of the eyes, then tie them in a knot and hide the knot inside the head.
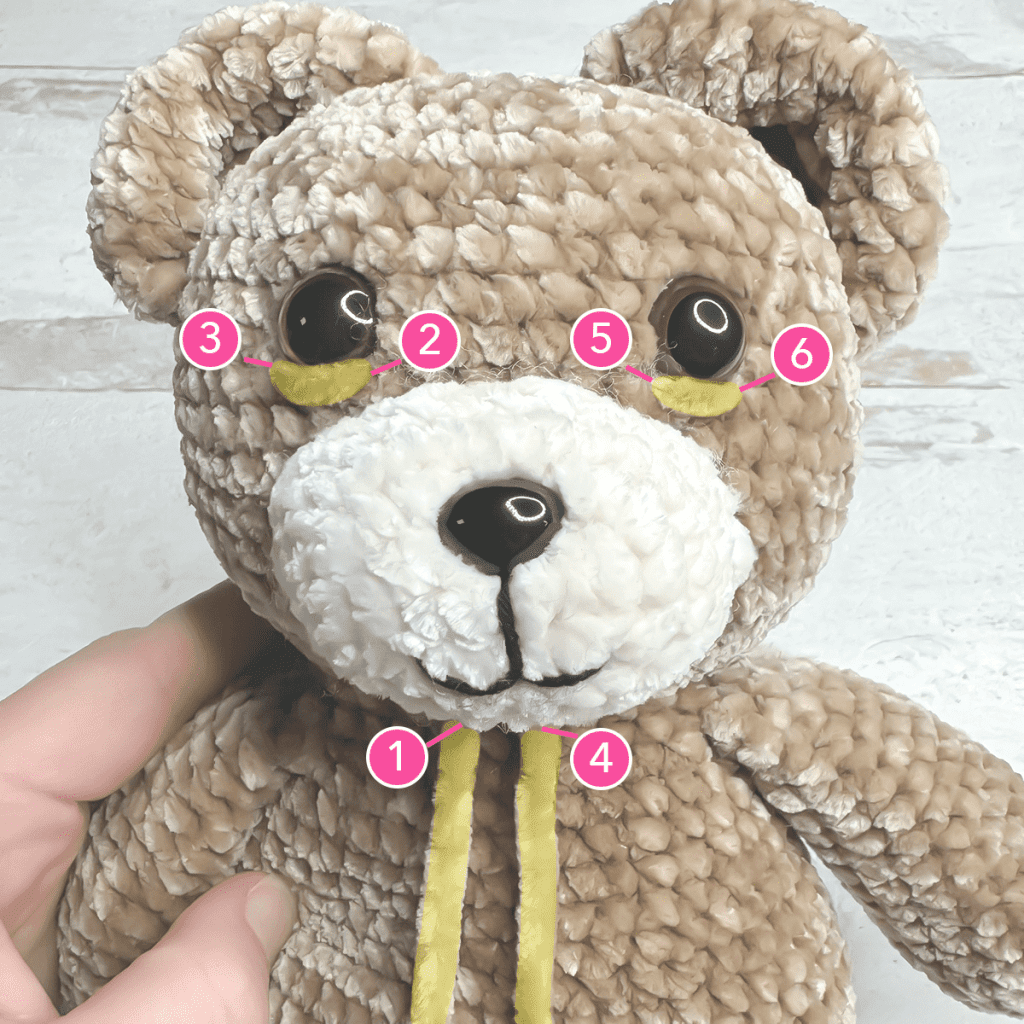
    (Notice how pulling on the yarn brings the eyes closer to the snout.)
    FINISHING TOUCHES
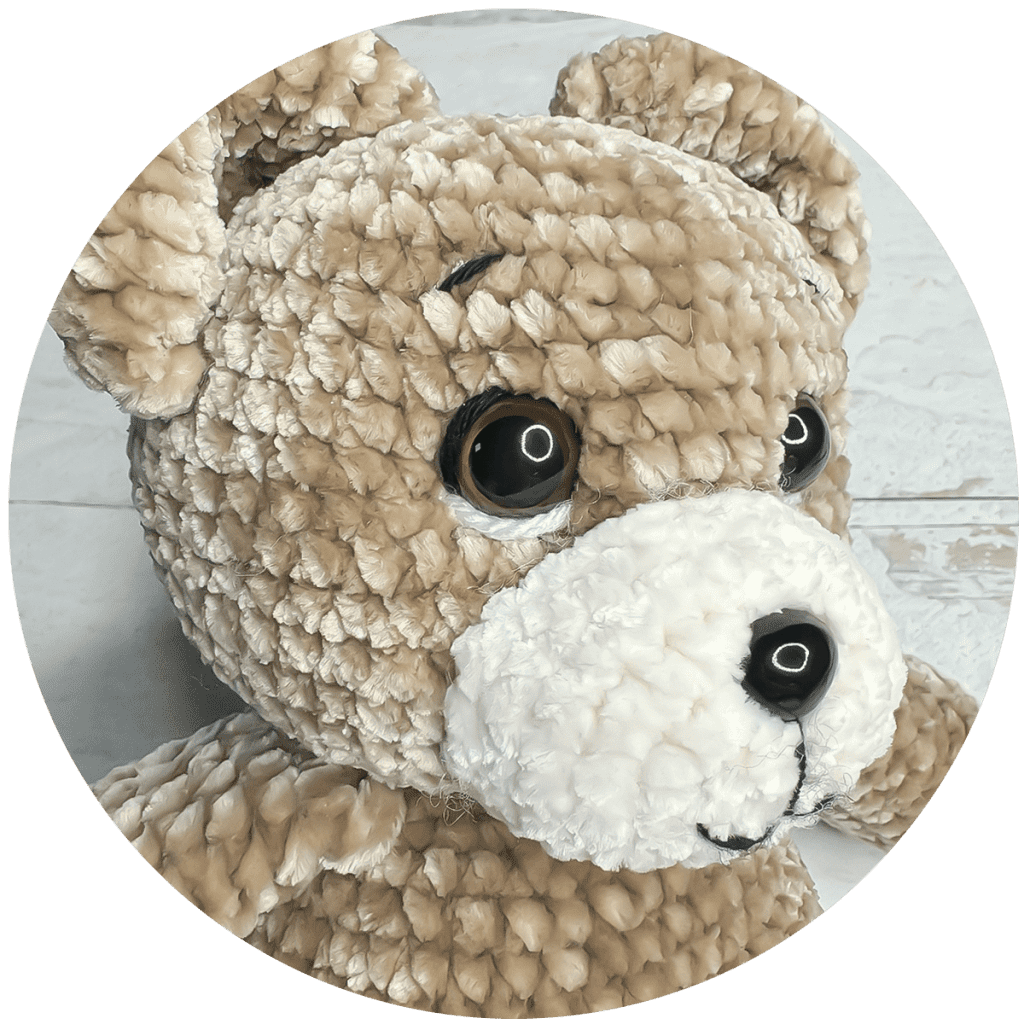
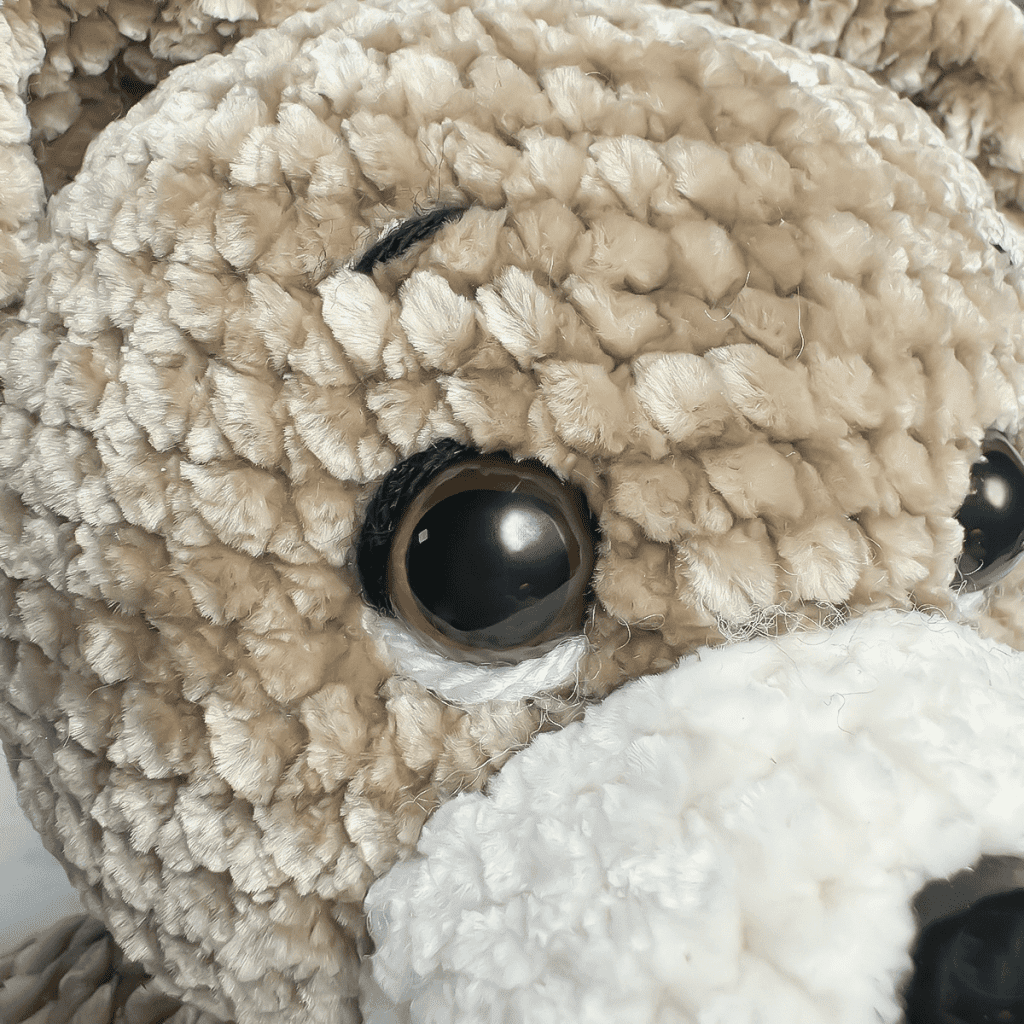
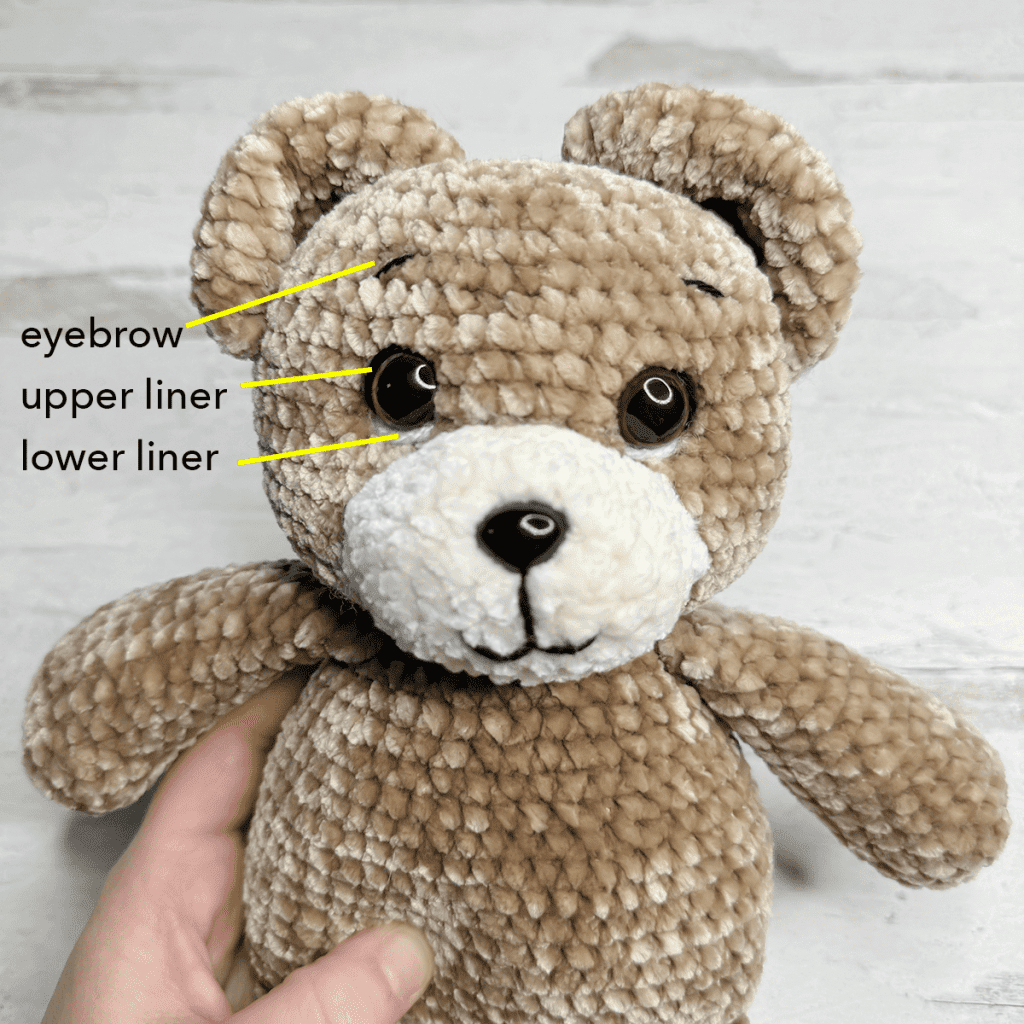
    My favorite part of this pattern is adding the finishing touches at the end. With just a few well- placed bits of yarn, you can take your teddy bear to the next level of cuteness.

    Adding these facial features is simply a matter of โ€œdrawingโ€ with yarn. For each color, cut a long strand, insert somewhere on the head, draw the desired lines, and exit out the same place you entered. Tie ends in a knot and hide the knot inside the head. Thatโ€™s it!

    Use the photos to guide you, or make it your own by experimenting with different placements. If you donโ€™t like what you do, just take it out and try again.
    I hope youโ€™ve enjoyed this pattern.
    Thank you for your support!

  • Mosaic Bucket Bag Crochet-Along

    Mosaic Bucket Bag Crochet-Along

    – – – – – – – – – – – – – –

    Click here to get your FREE Mosaic Bucket Bag PDF Planning Guide!

    – – – – – – – – – – – – – –

    First Things First… What’s A CAL?

    ***PLEASE NOTE: THIS CAL HAS FINISHED. YOU CAN STILL FIND THE PATTERN BELOW!***

    A CAL (Crochet-Along) is an online event where a pattern is released in segments over the course of a number of weeks, and a community of crocheters works on it together. The Mosaic Bucket Bag CAL will begin on March 27 and last for 3 weeks. For this CAL, I’ll be keeping everything on this page; I’ll just update the page each time a new part of the pattern is released. The schedule is as follows:

    Pre-Launch: Supply List (published)
    Week 1:
     Base (published)
    Week 2: Mosaic Section (published)
    Week 3: Top, Drawstring, + Strap (published)

    What’s the first thing you should do?

    If you haven’t already, you should download your FREE Mosaic Bucket Bag PDF Planning Guide! This 8-page guide will walk you through the complete supply list, explain how the colors are chosen and how they work together, and give you lots of inspiration to fuel your creativity. It even includes a handy checklist so you know exactly what supplies you need and when!

    (FYI, this is optional, and you’ll still be able to follow along with the crochet-along without the Planning Guide… but, I worked really hard on it and I am so excited about it, and I think you’re going to love it!)

    – – – – – – – – – – – – – –

    Click here to view your FREE Mosaic Bucket Bag PDF Planning Guide!

    – – – – – – – – – – – – – –

    Mosaic Bucket Bag on Ravelry

    Ravelry lover? Click here to add the Mosaic Bucket Bag to your Ravelry favorites!

    Join my Crochet-Along Facebook Group

    Life is better together, right? Thatโ€™s the heart behind a crochet-along, too! If youโ€™re on Facebook and want to join our private group to ask questions, post progress pics, or just meet new friends while you work through the CAL, request your invite by clicking here.

    Prefer a PDF?

    This pattern can be completed using the 100% free version right here on this page. However, many people prefer the convenience of a printable, ad-free PDF.

    All-Access Passholders get the ad-free version of this and all of my other blog patterns. It’s a pretty sweet deal, if I do say so myself! Learn more about it here or continuing scrolling for the free version.

    Need a little extra help?

    If you’re a visual learner, my tutorial videos are for you! You’ll find the step-by-step tutorials right here when they are published (according to the CAL schedule). Currently available: Video Planning Guide, Part 1: Base, Part 2: Mosaic, and Part 3: Top + Straps.

    – – – – – – – – – – – – – – –

    MOSAIC BUCKET BAG

    DIFFICULTY: Easy

    FINISHED SIZES: Please note that measurements are approximate and may vary slightly depending on thickness of yarn used for COLOR C.

    Laid flat:
    Classic size: 12.5โ€ (w) x 13โ€ (h)
    Mini size: 9.5โ€ (w) x 8.5โ€ (h)

    Standing up with flat base, uncinched:
    Classic size:   10โ€ (w) x 5โ€ (d) x 10โ€ (h)
    Mini size:   7.5โ€ (w) x 4โ€ (d) x 7โ€ (h)

    HOOK: F/G (4.0 mm) or whichever hook is needed to obtain correct gauge

    YARN: Bag is comprised of 3 different yarns. For a full explanation of how each yarn is used, please download your FREE PDF Planning Guide or watch the Video Planning Guide.

    COLOR A: #4 worsted weight (preferably cotton) in any color.
    Classic size: 150 yds / Mini size: 100 yds

    COLOR B: #4 worsted weight (same type yarn as COLOR A) in a light color.
    Classic size: 140 yds / Mini size: 70 yds

    COLOR C: Can be any weight, any fiber, as long as it is thinner than COLOR B.  Use darker colors for more contrast.
    Classic size: 150 yds / Mini size: 80 yds

    GAUGE: With COLOR A, 16SC x 20 rows = 4โ€ square

    ADDITIONAL SUPPLIES: 

    • (8) 6mm or 8mm Eyelets.ย You can find packages of eyelets at craft stores, and they are usually available in colors like silver, gunmetal, and gold. Either size (6mm or 8mm) will work.
    • Eyelet Setting Tool.ย Sometimes this comes with your eyelets, but may need to be purchased separately. Just be sure to get the right size (6mm or 8mm)! Youโ€™ll also need a hammer.
    • (2) 1โ€ D-Rings.ย Get the same color as the eyelets you chose.
    • (2) Swivel Lobster Clasps.ย Again, make sure these match your eyelets and D-Rings.
    • Craft Cord, 2mm or 4mm.ย This is for the drawstring. Youโ€™ll need two lengths of 34โ€ each for the Classic size, and for the Mini size, two lengths of 30โ€ each.
    • Shoulder Strap. Nylon or cotton ribbon (sold by the yard) is an economical choice, but feel free to get creative! You’ll also need a needle and thread for sewing it. Choose measurements based on the wearer; for adults, youโ€™ll need about 42โ€, and for kids, about 30โ€.ย Other options include sewing your own from another fabric, or ordering one online.

    TERMS AND ABBREVIATIONS:

    ST/STS (stitch/stitches)
    SL ST (slip stitch)
    SK (skip)
    CH (chain)
    SC (single crochet)
    Spike Stitch (see Special Stitches, below)

    SPECIAL STITCHES:

    SC Spike Stitch: Instead of inserting your hook into the top loops of the stitch, insert them into its base, then complete an SC. This will wrap your SCs over the top of the SCs from the previous round.

    SL ST Spike Stitch: Follow instructions for SC Spike Stitch, but instead of completing an SC, complete a SL ST.

    NOTES:
    (1) This pattern is written in American Standard Terms.
    (2) CH1s at the beginning of rounds do not count as a stitch in the final stitch count.
    (3) When instructed to “join”, join with a slip stitch to the first stitch of the round.
    (4) Because we utilize the SC Spike Stitch for entire rounds throughout the pattern, we will be referring to those rounds as an extension of the SC rounds they are being worked into. For example, if Round 32 is a round of SC, then the very next round which places spike stitches on top of those SCs will be referred to as Round 32B. This just makes for easier counting.

    CLASSIC SIZE

    – – – – – – – – – – – –
    PART 1: BOTTOM
    – – – – – – – – – – – –

    To begin: CH15.

    Round 1: 3SC in 2nd CH from hook, SC in each of the next 12 CH, 3SC in final CH (working around the tail to the other side). Working down the other side of the chain, SC in each of the next 12 CH. Join.  (30)

    Round 2: CH1, turn. SC in each of the first 12 STS. 2SC in each of the next 3 STS. SC in each of the next 12 STS. 2SC in each of the next 3 STS. Join. (36)

    Round 3: CH1, turn. 2SC in first ST, SC in next ST. (2SC in next ST, SC in next ST) 2 times. SC in each of the next 12 STS. (2SC in next ST, SC in next ST) 3 times. SC in each of the next 12 STS. Join. (42)

    Round 4: CH1, turn. SC in each of the first 12 STS. (2SC in next ST, SC in each of the next 2 STS) 3 times. SC in each of the next 12 STS. (2SC in next ST, SC in each of the next 2 STS) 3 times. Join. (48)

    Round 5: CH1, turn. 2SC in first ST, SC in each of the next 3 STS. (2SC in next ST, SC in each of the next 3 STS) 2 times. SC in each of the next 12 STS. (2SC in next ST, SC in each of the next 3 STS) 3 times. SC in each of the next 12 STS. Join. (54)

    Round 6: CH1, turn. SC in each of the first 12 STS. (2SC in next ST, SC in each of the next 4 STS) 3 times. SC in each of the next 12 STS. (2SC in next ST, SC in each of the next 4 STS) 3 times. Join. (60)

    Round 7: CH1, turn. 2SC in first ST, SC in each of the next 5 STS. (2SC in next ST, SC in each of the next 5 STS) 2 times. SC in each of the next 12 STS. (2SC in next ST, SC in each of the next 5 STS) 3 times. SC in each of the next 12 STS. Join. (66)

    Round 8: CH1, turn. SC in each of the first 12 STS. (2SC in next ST, SC in each of the next 6 STS) 3 times. SC in each of the next 12 STS. (2SC in next ST, SC in each of the next 6 STS) 3 times. Join. (72)

    Round 9: CH1, turn. 2SC in first ST, SC in each of the next 7 STS. (2SC in next ST, SC in each of the next 7 STS) 2 times. SC in each of the next 12 STS. (2SC in next ST, SC in each of the next 7 STS) 3 times. SC in each of the next 12 STS. Join. (78)

    Round 10: CH1, turn. SC in each of the first 12 STS. (2SC in next ST, SC in each of the next 8 STS) 3 times. SC in each of the next 12 STS. (2SC in next ST, SC in each of the next 8 STS) 3 times. Join. (84)

    Round 11: CH1, turn. 2SC in first ST, SC in each of the next 9 STS. (2SC in next ST, SC in each of the next 9 STS) 2 times. SC in each of the next 12 STS. (2SC in next ST, SC in each of the next 9 STS) 3 times. SC in each of the next 12 STS. Join. (90)

    Round 12: CH1, turn. SC in each of the first 12 STS. (2SC in next ST, SC in each of the next 10 STS) 3 times. SC in each of the next 12 STS. (2SC in next ST, SC in each of the next 10 STS) 3 times. DO NOT join. (96)

    We are now switching to a seamless spiral. Do not join, turn or chain until instructed, and mark the first stitch of each round with a stitch marker so you donโ€™t lose your place.

    Round 13: Continuing in the same direction, SC in first ST (the ST you would have joined in, if we had joined the previous round) and in each ST around. Do not join. (96)

    Rounds 14-22: SC in each ST around.

    – – – – – – – – – – – –
    PART 2: MOSAIC
    – – – – – – – – – – – –

    Switch to COLOR B. For the best transition, use the jogless method (demonstrated in the tutorial video for Part 2).

    Round 23: SL ST in first ST of the round. (If you used the jogless color change method, you will have already done this.)  SC in each remaining ST around. Pull the loop on your hook up a couple inches so it doesnโ€™t unravel, then remove your hook. (96)

    Round 23B: Insert hook into top loops of next ST; attach COLOR C and CH1; SC in same ST. SC SPIKE STITCH into next ST and each remaining ST. Pull the loop on your hook up a couple inches so it doesnโ€™t unravel, then remove your hook. (96)

    Round 24: Reinsert hook into loop from COLOR B. SC in each ST around (youโ€™re working in the top loops of the SC Spike Stitches from the previous round). Remove hook. (96)

    Round 24B: Reinsert hook into loop from COLOR C. SC Spike Stitch in each ST around. Remove hook. (96)

    Rounds 25-47B: Repeat Rounds 24-24B. (96)

    Round 48: Reinsert hook into loop from COLOR B. SC in each of the first 95 STS. SL ST in the final ST.  Remove hook. (96)

    Round 48B: Reinsert hook into loop from COLOR C. SC Spike Stitch in each of the first 95 STS. SL ST in the remaining ST. Remove hook. (96)

    Fasten off both COLOR B and COLOR C (but donโ€™t weave in ends yet).

    – – – – – – – – – – – –
    PART 3: TOP
    – – – – – – – – – – – –

    Turn bag right side out (if not already so). Fold it lengthwise along the bottom seam, and lay it flat so that the side with the joins and color changes is face up. Locate the stitch that sits atop the right-hand crease. Counting that stitch as #1, count over 8 stitches. Attach COLOR A into that 8th stitch; CH1.

    Round 49: SC in same ST as CH1, and in each ST around. Join. (96)

    Rounds 50-52: CH1, turn. SC in each ST around. Join. (96)

    Round 53: CH1, turn. SC in each of the first 11 STS. CH1, SK next ST. (SC in each of the next 11 STS; CH1, SK next ST) 7 times. Join. (96)

    Round 54: CH1, turn. SC in first CH1 space. Continue to SC in each ST around, putting 1SC in each CH1 space. Join. (96)

    Round 55: CH1, turn. SC in each of the first 39 STS. SC each of the next 6 STS over a D-Ring. SC in each of the next 42 STS. SC each of the next 6 STS over a D-Ring. SC in each of the remaining 3 STS. Join. (96)

    Round 56: CH1, turn. SC in each of the first 3 STS. SC SPIKE STITCH in each of the 6 STS inside the D-Ring. SC in each of the next 42 STS. SC SPIKE STITCH in each of the 6 STS inside the D-Ring. SC in each of the remaining 39 STS. Join. (96)

    Fasten off and weave in all ends.

    Proceed to ADDING EYELETS, located after instructions for Mini Size bag.

    – – –

    MINI SIZE

    – – – – – – – – – – – –
    PART 1: BOTTOM
    – – – – – – – – – – – –

    To begin: CH15.

    Round 1: 3SC in 2nd CH from hook, SC in each of the next 12 CH, 3SC in final CH (working around the tail to the other side). Working down the other side of the chain, SC in each of the next 12 CH. Join.  (30)

    Round 2: CH1, turn. SC in each of the first 12 STS. 2SC in each of the next 3 STS. SC in each of the next 12 STS. 2SC in each of the next 3 STS. Join. (36)

    Round 3: CH1, turn. 2SC in first ST, SC in next ST. (2SC in next ST, SC in next ST) 2 times. SC in each of the next 12 STS. (2SC in next ST, SC in next ST) 3 times. SC in each of the next 12 STS. Join. (42)

    Round 4: CH1, turn. SC in each of the first 12 STS. (2SC in next ST, SC in each of the next 2 STS) 3 times. SC in each of the next 12 STS. (2SC in next ST, SC in each of the next 2 STS) 3 times. Join. (48)

    Round 5: CH1, turn. 2SC in first ST, SC in each of the next 3 STS. (2SC in next ST, SC in each of the next 3 STS) 2 times. SC in each of the next 12 STS. (2SC in next ST, SC in each of the next 3 STS) 3 times. SC in each of the next 12 STS. Join. (54)

    Round 6: CH1, turn. SC in each of the first 12 STS. (2SC in next ST, SC in each of the next 4 STS) 3 times. SC in each of the next 12 STS. (2SC in next ST, SC in each of the next 4 STS) 3 times. Join. (60)

    Round 7: CH1, turn. 2SC in first ST, SC in each of the next 5 STS. (2SC in next ST, SC in each of the next 5 STS) 2 times. SC in each of the next 12 STS. (2SC in next ST, SC in each of the next 5 STS) 3 times. SC in each of the next 12 STS. Join. (66)

    Round 8: CH1, turn. SC in each of the first 12 STS. (2SC in next ST, SC in each of the next 6 STS) 3 times. SC in each of the next 12 STS. (2SC in next ST, SC in each of the next 6 STS) 3 times. DO NOT join. (72)

    We are now switching to a seamless spiral. Do not join, turn or chain until instructed, and mark the first stitch of each round with a stitch marker so you donโ€™t lose your place.

    Round 9: Continuing in the same direction, SC in first ST (the ST you would have joined in, if we had joined the previous round) and in each ST around. Do not join. (72)

    Rounds 10-15: SC in each ST around. (72)

    – – – – – – – – – – – –
    PART 2: MOSAIC
    – – – – – – – – – – – –

    Switch to COLOR B. For the best transition, use the jogless method (demonstrated in the tutorial video for Part 2).

    Round 16: SL ST in first ST of the round. (If you used the jogless  color change method, you will have already done this.)  SC in each remaining ST around. Pull the loop on your hook up a couple inches so it doesnโ€™t unravel, then remove your hook. (72)

    Round 16B: Insert hook into top loops of next ST; attach COLOR C and CH1; SC in same ST. SC SPIKE STITCH into next ST and each remaining ST. Pull the loop on your hook up a couple inches so it doesnโ€™t unravel, then remove your hook. (72)

    Round 17: Reinsert hook into loop from COLOR B. SC in each ST around (youโ€™re working in the top loops of the SC Spike Stitches from the previous round). Remove hook. (72)

    Round 17B: Reinsert hook into loop from COLOR C. SC Spike Stitch in each ST around. Remove hook. (72)

    Rounds 18-30B: Repeat Rounds 17-17B. (72)

    Round 31: Reinsert hook into loop from COLOR B. SC in each of the first 71 STS. SL ST in remaining ST.  Remove hook. (72)

    Round 31B: Reinsert hook into loop from COLOR C. SC Spike Stitch in each of the first 71 STS. SL ST in remaining ST. Remove hook. (72)

    Fasten off both COLOR B and COLOR C (but donโ€™t weave in ends yet).

    – – – – – – – – – – – –
    PART 3: TOP
    – – – – – – – – – – – –

    Turn bag right side out (if not already so). Fold it lengthwise along the bottom seam, and lay it flat so that the side with the joins and color changes is face up. Locate the stitch that sits atop the right-hand crease. Counting that stitch as #1, count over 6 stitches. Attach COLOR A into that 6th stitch; CH1.

    Round 32: SC in same ST as CH1, and in each ST around. Join. (72)

    Round 33: CH1, turn. SC in each ST around. Join. (72)

    Round 34: CH1, turn. SC in each of the first 8 STS. CH1, SK next ST. (SC in each of the next 8 STS; CH1, SK next ST) 7 times. Join. (72)

    Round 35: CH1, turn. SC in first CH1 space. Continue to SC in each ST around, putting 1SC in each CH1 space. Join. (72)

    Round 36: CH1, turn. SC in each of the first 28 STS. SC each of the next 6 STS over a D-Ring. SC in each of the next 30 STS. SC each of the next 6 STS over a D-Ring. SC in each of the remaining 2 STS. Join. (72)

    Round 37: CH1, turn. SC in each of the first 2 STS. SC SPIKE STITCH in each of the 6 STS inside the D-Ring. SC in each of the next 30 STS. SC SPIKE STITCH in each of the 6 STS inside the D-Ring. SC in each of the remaining 28 STS. Join. (72)

    Fasten off and weave in all ends.

    Proceed to ADDING EYELETS.

    – – – – – – – – – – – –

    ADDING EYELETS

    With eyelets, eyelet setting tool and hammer ready, turn your bag inside out. Follow the instructions on your eyelet kit (or watch my video demonstration!) to add eyelets to each of the eight holes at the top of the bag. 

    – – – – – – – – – – – –

    ADDING DRAWSTRING

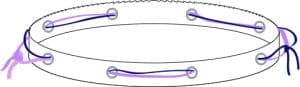
    Option 1: Double Side Drawstrings

    Lay bag flat (right side out). Starting on outside of bag, insert first length of craft cord (represented in purple) into the first eyelet on the left. Moving right (counter-clockwise), weave cord in and out through all 8 eyelets around the bag; the last one should exit the bag so that both ends of cord are outside the bag. Make sure bag is uncinched, then bring cord ends together and tie a tight knot close to the bag. Complete with second length of craft cord (represented in navy), but start on the eyelet on the right side of the bag and move left (clockwise).

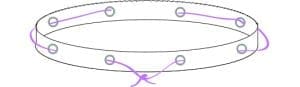
    Option 2: Single Centered Drawstring

    Lay bag flat (right side out), seam side down. Starting on front of bag, locate center and insert craft cord in first eyelet to the left. Working left (in a clockwise direction), weave cord in and out through all 8 eyelets around the bag; the last one should exit the bag so that both ends of cord are outside the bag and can meet in the center. Make sure bag is uncinched, then bring cord ends together and tie a tight knot close to the bag.

    – – – – – – – – – – – –

    ADDING A STRAP

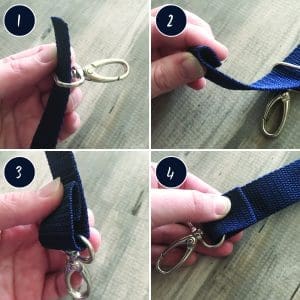
    The following are very bare-bones instructions for making your own strap, but these instructions are meant specifically for someone like me who is not a seamstress and just needs something basic. Other options include purchasing straps online, or sewing your own from fabric. There are plenty of tutorials on YouTube for this if you are handy with a sewing machine!

    For the rest of us, hereโ€™s what I did:

    1. Thread strap through lobster clasp.

    2. Fold the tip of the strap over about 1/2โ€.

    3. Hold the fold from Step 2 in place and make another fold about 1โ€ down, resting the hardware in that fold.

    4. Use the texture of the material as a guide to sew a straight line across the strap, just below the first fold (as indicated in the photo), going through all three layers.

    – – – – – – – – – – – –

    DONE! If youโ€™re sharing your bag on social media, be sure to use hashtag #mosaicbucketbagcal and tag me @yarnandchai.design!

  • Malia CAL (Fall 2017 Crochet-Along)

    The Malia CAL is officially over…

    …but the patterns will remain on my blog free for use! I’ve left the original CAL information below.

    Malia Beanie | Malia Slouchy | Malia Infinity Scarf | Malia Buttoned Cowl | Malia Newborn Beanie | Malia Earwarmer | Malia Messy Bun Beanie | Malia Boot Cuffs | Malia Wrist Warmers

    Remember, All Access Passhttps://members.yarnandchai.comholders get ALL of these patterns in ad-free format, plus ALL of my other patterns!

    – – – – – –

    First Things First… What’s a CAL?

    A CAL (Crochet-Along) is an online event where a pattern (or series of patterns) is released over the course of a number of weeks, and a community of crocheters works on it together. The Malia CAL will begin on October 25 and last for 4 weeks.

    I’ve designed this CAL so that you can pick and choose which patterns you want to create based on your own personal style! The first week is hat week, which includes a beanie and a slouchy version of the Malia Hat. The second week is scarf week, which includes an infinity scarf and a buttoned cowl. (The third week is a bonus week, which I’ll talk more about later.) So, you can choose which patterns you want to make… or, make them all! Each pattern from the first 2 weeks will include a video tutorial. All patterns are sized for a teen / adult (with the exception of one of the bonus patterns).

    –

    Here’s the Schedule:

    You’ll find all of the links for the CAL right here as they are released.

    Week 1: Malia Beanie + Malia Slouchy
    Week 2: Malia Infinity Scarf + Malia Buttoned Cowl
    Week 3: BONUS WEEK! Malia Newborn Beanie + Malia Earwarmer + Malia Messy Bun Beanie
    Week 4: BONUS BONUS WEEK! Malia Boot Cuffs + Malia Wrist Warmers

    (What’s Bonus Week, you ask? Well… it’s a week of awesome bonuses, like more patterns for you using the beautiful Malia stitch pattern, plus even more goodies that I can’t reveal yet!)

    –

    Join the CAL Facebook Group

    Life is better together, right? That’s the heart behind a crochet-along, too! If you’re on Facebook and want to join our private group to ask questions, post progress pics, or just meet new friends while you work through the CAL, request your invite by clicking here.

    ––

    Choose Your Yarn

    For these patterns, you’ll want to look for a soft aran weight yarn. Aran is part of the #4 family of yarn weights and is just a tad bit thicker than worsted. The three yarns listed here are my recommendations for this CAL; I’ve gauge-checked all of them and come up with the same results (see later section, “Check Your Gauge”). Of course, you can choose any yarn you want, as long as you can match gauge!

    Rustic Romantic | Yarn Bee
    The absolutely gorgeous yarn you see in my CAL photos is Rustic Romantic by Yarn Bee (a Hobby Lobby brand). As soon as I saw it I was smitten! The colors, though limited, are sophisticated and charming. If you’re into the rustic modern look and you love natural-looking hues, this is a great option. It is 85% acrylic and 15% hemp; the hemp provides those beautiful white flecks running throughout the strands that gives it a weathered look. It is surprisingly soft and warm, with great stitch definition and absolutely charming color names like “Faded Porch Swing” and “Blueberry Bushel.” It is machine washable but lay flat to dry, so if that’s an issue for you, it’s something to consider. Rustic Romantic sells for $5.49 for 228 yards.

    I Love This Yarn | Hobby Lobby
    A staple for Hobby Lobby shoppers, I Love This Yarn is a soft aran available in a huge range of colors, from bright and cheery to soft and subtle. Besides solid colors, it also offers various shades of metallic, tweed, and multis. It has good stitch definition, good drape, and you get 355 yards in a $3.99 skein, making it a great option if you’re budget-conscious. It’s 100% acrylic and machine washable and dryable.

    Vanna’s Choice | Lion Brand
    One of Lion Brand’s most popular yarns, Vanna’s Choice comes in a large selection of colors and is readily available in most large craft stores and online. It has a similar look and feel to Rustic Romantic (minus the hemp) and usually rings in at about $3.99 for 170 yards.

    –

    How Much Yarn Do You Need?

    Because this CAL includes two different hat styles and two different scarf styles to choose from, you’ll need to determine which patterns you want to make in order to know how much yarn you need. Here is the breakdown of each pattern and how much yarn it uses:

    Beanie (Week 1): 200 yards
    Slouchy (Week 1): 260 yards
    Infinity Scarf (Week 2): 580 yards
    Buttoned Cowl (Week 2): 355 yards

    On Week 3 of the CAL (a.k.a. “Bonus Week”) I’ll be revealing a few more patterns that use the same beautiful stitch pattern, but those are a surprise (and we won’t be making them together) so I won’t have yarn totals for those until Week 3. Same for Week 4.

    –

    Check Your Gauge

    Before you jump into these patterns, you need to check your gauge. Why is it so important? Because we all crochet differently! You and I could use the exact same yarn and the exact same hook and the exact same pattern, and mine could come out larger or smaller than yours. It’s not such a big deal for things like scarves and cowls, but for a hat, it’s important. Don’t put all the work into this project only to end up with a hat that is too large or too small!

    The importance of checking your gauge for this project cannot be understated. Because of the construction of the hats, it is difficult to adjust mid-pattern if you discover yours is turning out too large. Even if you typically do not complete gauge checks, I strongly encourage you to do so this time. To ensure the best results, the gauge check is a swatch taken straight from the patterns. Upon completion, you should have a 4โ€ square. If yours is larger, consider using a smaller hook or a thinner #4 yarn. If yours is smaller, consider using a larger hook.

    Pattern for Gauge:
    CH17.
    Row 1: SC in 2nd CH from hook and in each remaining CH. (16)
    Row 2: CH1, turn. SC in first ST. (SK next ST, LBS in next ST) 7 times. SC in final ST. (16)
    Row 3: CH1, turn. HDC in each ST across. (16)
    Row 4: CH1, turn. SC in first ST. SC in 3rd loop of each of the next 14 STS. SC in final ST. (16)
    Row 5: CH1, turn. SC in each ST across. (16)
    Row 6: CH1, turn. SC in first ST. (LBS in next ST, SK next ST) 7 times. SC in final ST. (16)
    Row 7: CH1, turn. HDC in each ST across. (16)
    Row 8: CH1, turn. SC in first ST. SC in 3rd loop of each of the next 14 STS. SC in final ST. (16)
    Row 9: CH1, turn. SC in each ST across. (16)
    Rows 10-16: Repeat Rows 2-8. (16)

    Now grab a ruler and measure the square. Is it 4″? Great! Stick with the I (5.5mm) hook. Is it smaller than 4″? You might need to go up a hook size or choose a thicker yarn. Larger than 4″? You might need to go down a hook size or choose a thinner yarn. Once you’ve determined what hook size and yarn will get you the correct gauge, remember it; you’ll use the same hook all throughout this CAL.

    –

    Get Ready, Get Set…

    Now that you’ve chosen which patterns to make, joined the Facebook group, chosen your yarn and checked your gauge, you’re ready to jump into the Malia CAL!

  • Wildflower Shoulder Bag (Crochet-Along)

    Wildflower Shoulder Bag (Crochet-Along)

    :::-

    ::: UPDATE :::

    The CAL is officially DONE! But don’t worry, the pattern will remain on my blog for free.ย If you would like to purchase an inexpensive, ad-free, concise PDF version (American Standard Version only), you can find it onย Ravelryย orย Etsy or get access to this an ALL of my other patterns with an All-Access Pass!

    (Original post below)

    – – – – – – – – – – – – – –

    HEY! Guess what? I’m about to start the very first Little Monkeys Crochet CAL! For those of you who are newer to the crochet world, CAL is short for Crochet-Along. It basically means that a pattern is released in sections over a period of time, and we all follow along together to make it. This CAL will produce a pretty adorable bagย I’m calling the Wildflower Shoulder Bag! Using the recommended yarn, its base will measure about 15″ across.

    Interested? Great!

    The Wildflower Shoulder Bag patternย will include clearly-written instructions, helpful photos, and a video tutorial that I’ve been working really hard on over the last few weeks. So whether you work best from a pattern or you’re a more visual learner, you’ll be able to follow along with this easy-level pattern. The schedule for the CAL is as follows:

    June 25: Start Here! Intro Postย andย Materials List (this post)
    July 2:ย Part 1, Flower Squares and GIVEAWAY INFO!
    July 9:ย Part 2, Body of the Bag
    July 16:ย Part 3, Base, Embellishments and Strap

    Here’s what you canย do now to get the most out of the CAL experience:

    1. Join the CAL Facebook group (optional)
    2.ย Join the Little Monkeys Crochet mailing list (via the aqua-colored form at the top of the blog) so you don’t miss anything (also optional)
    3. Share this blog post in your favorite crochet groups on Facebook (again, optional)
    4.ย Read through the FAQs at the bottom of this post
    5. Start gathering your materials

    —

    Supply List

    Here’s what you’ll need for this CAL:

    Cotton-Ease Yarn (4 skeins) –ย This worsted weight yarn from Lion Brand is a blend of cotton and acrylic, and it’s very easy to work with. I made the bag in the photos with the color Stone, which is a lighter medium gray. (You can substitute with 800 yards of a different worsted weight yarn.)

    Wildflower Shoulder Bag CAL | Free Crochet Purse Pattern by Little Monkeys Crochet5.0mm (H) Hook –ย Gauge is generally unimportant, as this pattern will work with any yarn and appropriately-sized hook. To achieve the size of the bag in the photo (shown on a petite model), which is 15″ wide x 12″ tall (strap not included), use this gauge:

    4 rows of 6 HDC = 1.5″ square

    Button (1″ย orย 1-1/8″)

    Plastic Canvas – This can be found at craft stores for less than a dollar. It’s a sheet of plastic mesh that is sold in various sizes. I usedย a sheet of 13.5″x10.5″. You won’t need this until Week 3 of the CAL.

    (2) 32mm Split Rings – Like what holds your keys on your keychain.

    Needle & Thread – For sewing on your button(s).

    Crochet Basics – Tapestry Needle, Scissors, and a Stitch Marker – I use a bobby pin as a stitch marker.

    OPTIONAL:

    6 Buttons – If you want to add buttons to the center of your flower squares. These buttons should match the button from the list above, which will be used as a closure.

    Leather Purse Strap – If you want to give your shoulder bag a bit fancier of a look.

    2 Rings With Clasps – If you would like your strap to be removable, you can crochet it to these. Then you can switch between the crocheted (casual) look and the leather (chic) look. I also happen to love the look of the extra hardware, so I chose to include these in my bag.

    Frequently Asked Questions

    Q. Do I have to join the Facebook group? Is the CAL free?
    A. The CAL is 100% free and you are not required to join/sign up anywhere to participate. You only need access to my blog, which is free. The Facebook group is just a fun way to stay connected and help each other out. Joining my blog e-mail list will ensure that you receive an email when each new part of the CAL is published. These things are all optional.

    Q. Can I use [insert name of a different yarn] instead?
    A. This pattern will work fine with any yarn and appropriately-sized hook. You should consider whether the yarn you wish to use will hold up as a bag. Also, the dimensions of the bag using Cotton-Ease and an H hook will be approximately 15″ wide, so keep that in mind if you choose a thinner or thicker yarn. The width will change.

    Q. What are the details of Cotton-Ease so that I can find something comparable in my home country?
    A. Cotton-Ease, by Lion Brand, is a 50/50 cotton/acrylic blend. It’s a #4 worsted weight yarn and is machine washable and dryable. The skeins come in 3.5oz (100g), 207 yds (188m).

    Q.ย Is the pattern on Ravelry?
    A.ย Yes! View on Ravelry.

    Q. What is the plastic canvasย for, and can I use [insert a different material here] instead?
    A. The plastic canvas will be used as a base liner (for stability) and will be hiddenย in between two crocheted pieces. So if you have another material in mind, you can use it instead. Just make sure it’s washable!

    Q. Will the CAL include instructions for lining the bag?
    A. Unfortunately, no… unless you consider “give your bag to your friend who knows how to sew and ask her to line it for you” to be complete instructions. ๐Ÿ˜‰ This bag would benefit from a lining and zipper, though, so if you know how to do it, your bag will be all the better for it. Here is an awesome tutorial that is very similar to the style of this bag.

    Q. Is the CAL going to be available in [insert your native language here]?
    A.ย The patternย is currently available in American Standard Terms, UK Terms, Dutch, German, Norwegian, Danish, French and Spanish. Everything except the original (American Standard) exists because of kind-hearted translators who simply wanted to help. These versions have very limited support (because I don’t speak the languages), but you can access them all here.

    Q. Will the patterns be printable?
    A.ย You can purchase an ad-free PDF of the American Standard version in my Etsy shop!
    —

    See you next week!


    —Wildflower Shoulder Bag CAL | Free Crochet Purse Pattern by Little Monkeys Crochet