With October behind us, it’s (gasp) time to start thinking winter vibes! Fall is my favorite season, but winter is definitely a close second. Because CHRISTMAS!
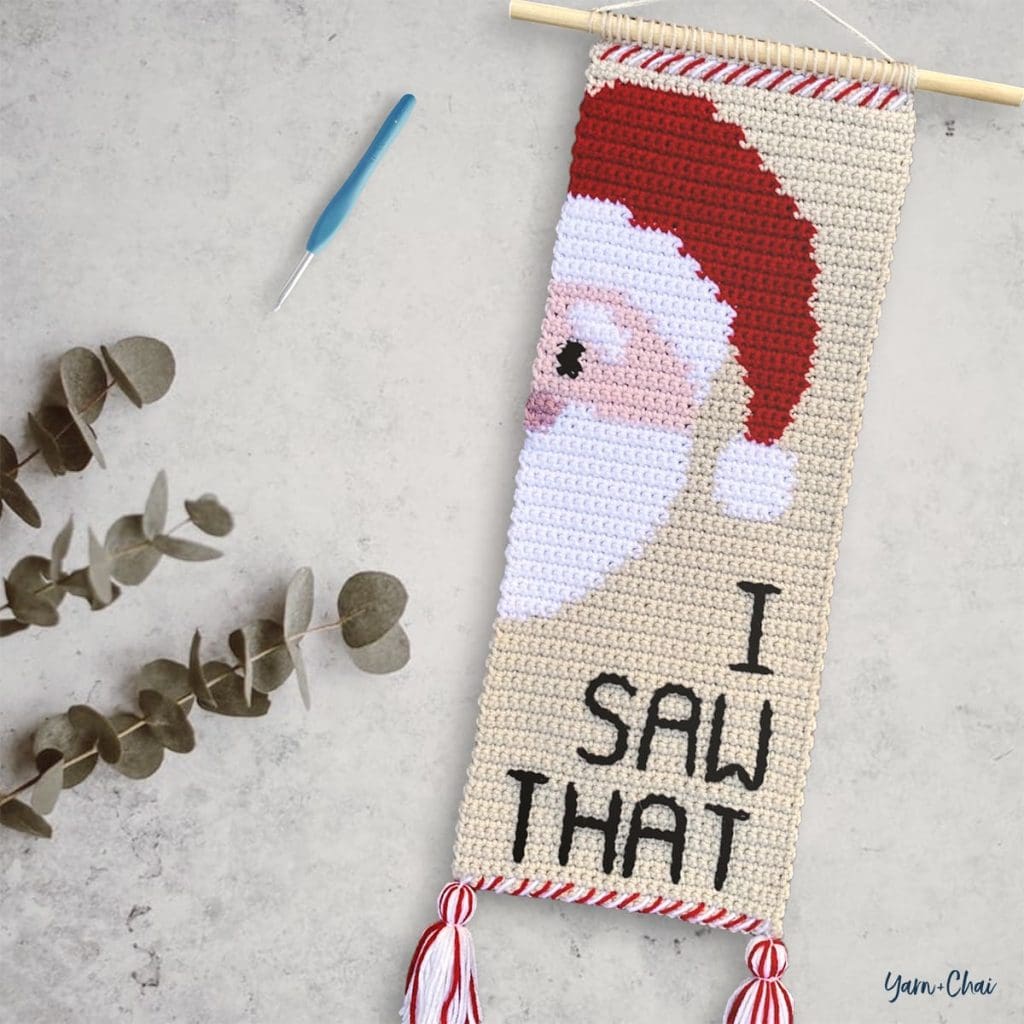
We don’t go crazy with Santa stuff at our house, but he does bring one gift to each of our kids on Christmas morning. (The 6 year old is the only one who still believes… but the 11 and 13 year olds play along for his sake.) And I’ve never been a huge fan of the whole “be good or you won’t get presents” thing, but when I recently saw some wall art at a store that featured a spying Santa and the “I Saw That” phrase, I laughed out loud and knew I wanted to create a crocheted wall hanging version! I showed it to my older boys, and they got a kick out of it, too.
So while this particular finished piece will probably sit in Christmas storage until my youngest grows out of Santa and can appreciate the silly joke, I thought I’d share the pattern for it with all of you!
I used a wooden dowel from the craft store for my wall hanging, but you could also use a strong stick from your yard. And while I embellished mine with tassels, you could do fringe instead. Make it your own!
Prefer Working From an Ad-Free PDF?
This pattern chart is also available as an ad-free, printable PDF for All-Access Passholders. It’s a pretty sweet deal, if I do say so myself! Learn more about it here.
You can purchase the All-Access Pass, or scroll on to view the pattern right here on the blog.
Finished Size: 19.5″ tall x 7.5″ wide (not including tassels or dowel)
Yarn: #4 medium weight acrylic yarn recommended. The approximate amounts and colors I used are:
COLOR A (ivory): 110 yds
COLOR B (white): 35 yds
COLOR C (mauve): 2 yds
COLOR D (pale pink): 15 yds
COLOR E (red): 25 yds
COLOR F (black): 10 yds
Hook: 5.0mm (H) hook
Gauge: 16 SC x 18 rows = 4”
You’ll also need: 12″ dowel (or stick cut to size)
Terms and Abbreviations:
ST/STS (stitch/stitches) CH (chain) SL ST (slip stitch) SC (single crochet) YO (yarn over) SURFACE CROCHET (slip stitching across the top of the crocheted fabric – Repeat Crafter Me has a great tutorial here)
Pattern Notes: (1) CH1s at the beginning of rows/rounds do not count as stitches. (2)CHANGING COLORS: In the stitch before a color change, complete the final step of the stitch with the new color; sp you’ll work the stitch, and when it’s time to pull through the final loops, you’ll drop the first color and pull through with the new color. (3)READING THE CHART: Odd-numbered rows are worked right-to-left, and even-numbered rows are worked left-to-right. You’ll begin in the bottom-right corner of the chart. (4)CARRYING YARN: For this project, I did not carry any yarn within stitches of different colors. If I only needed to drop a color for a handful of stitches, I simply picked it back up again when it was time.
– – – – – – – – – – – – – – –
INSTRUCTIONS FOR WALL HANGING
With COLOR A, CH31.
Row 1: Beginning in 2nd CH from hook, SC across. (30)
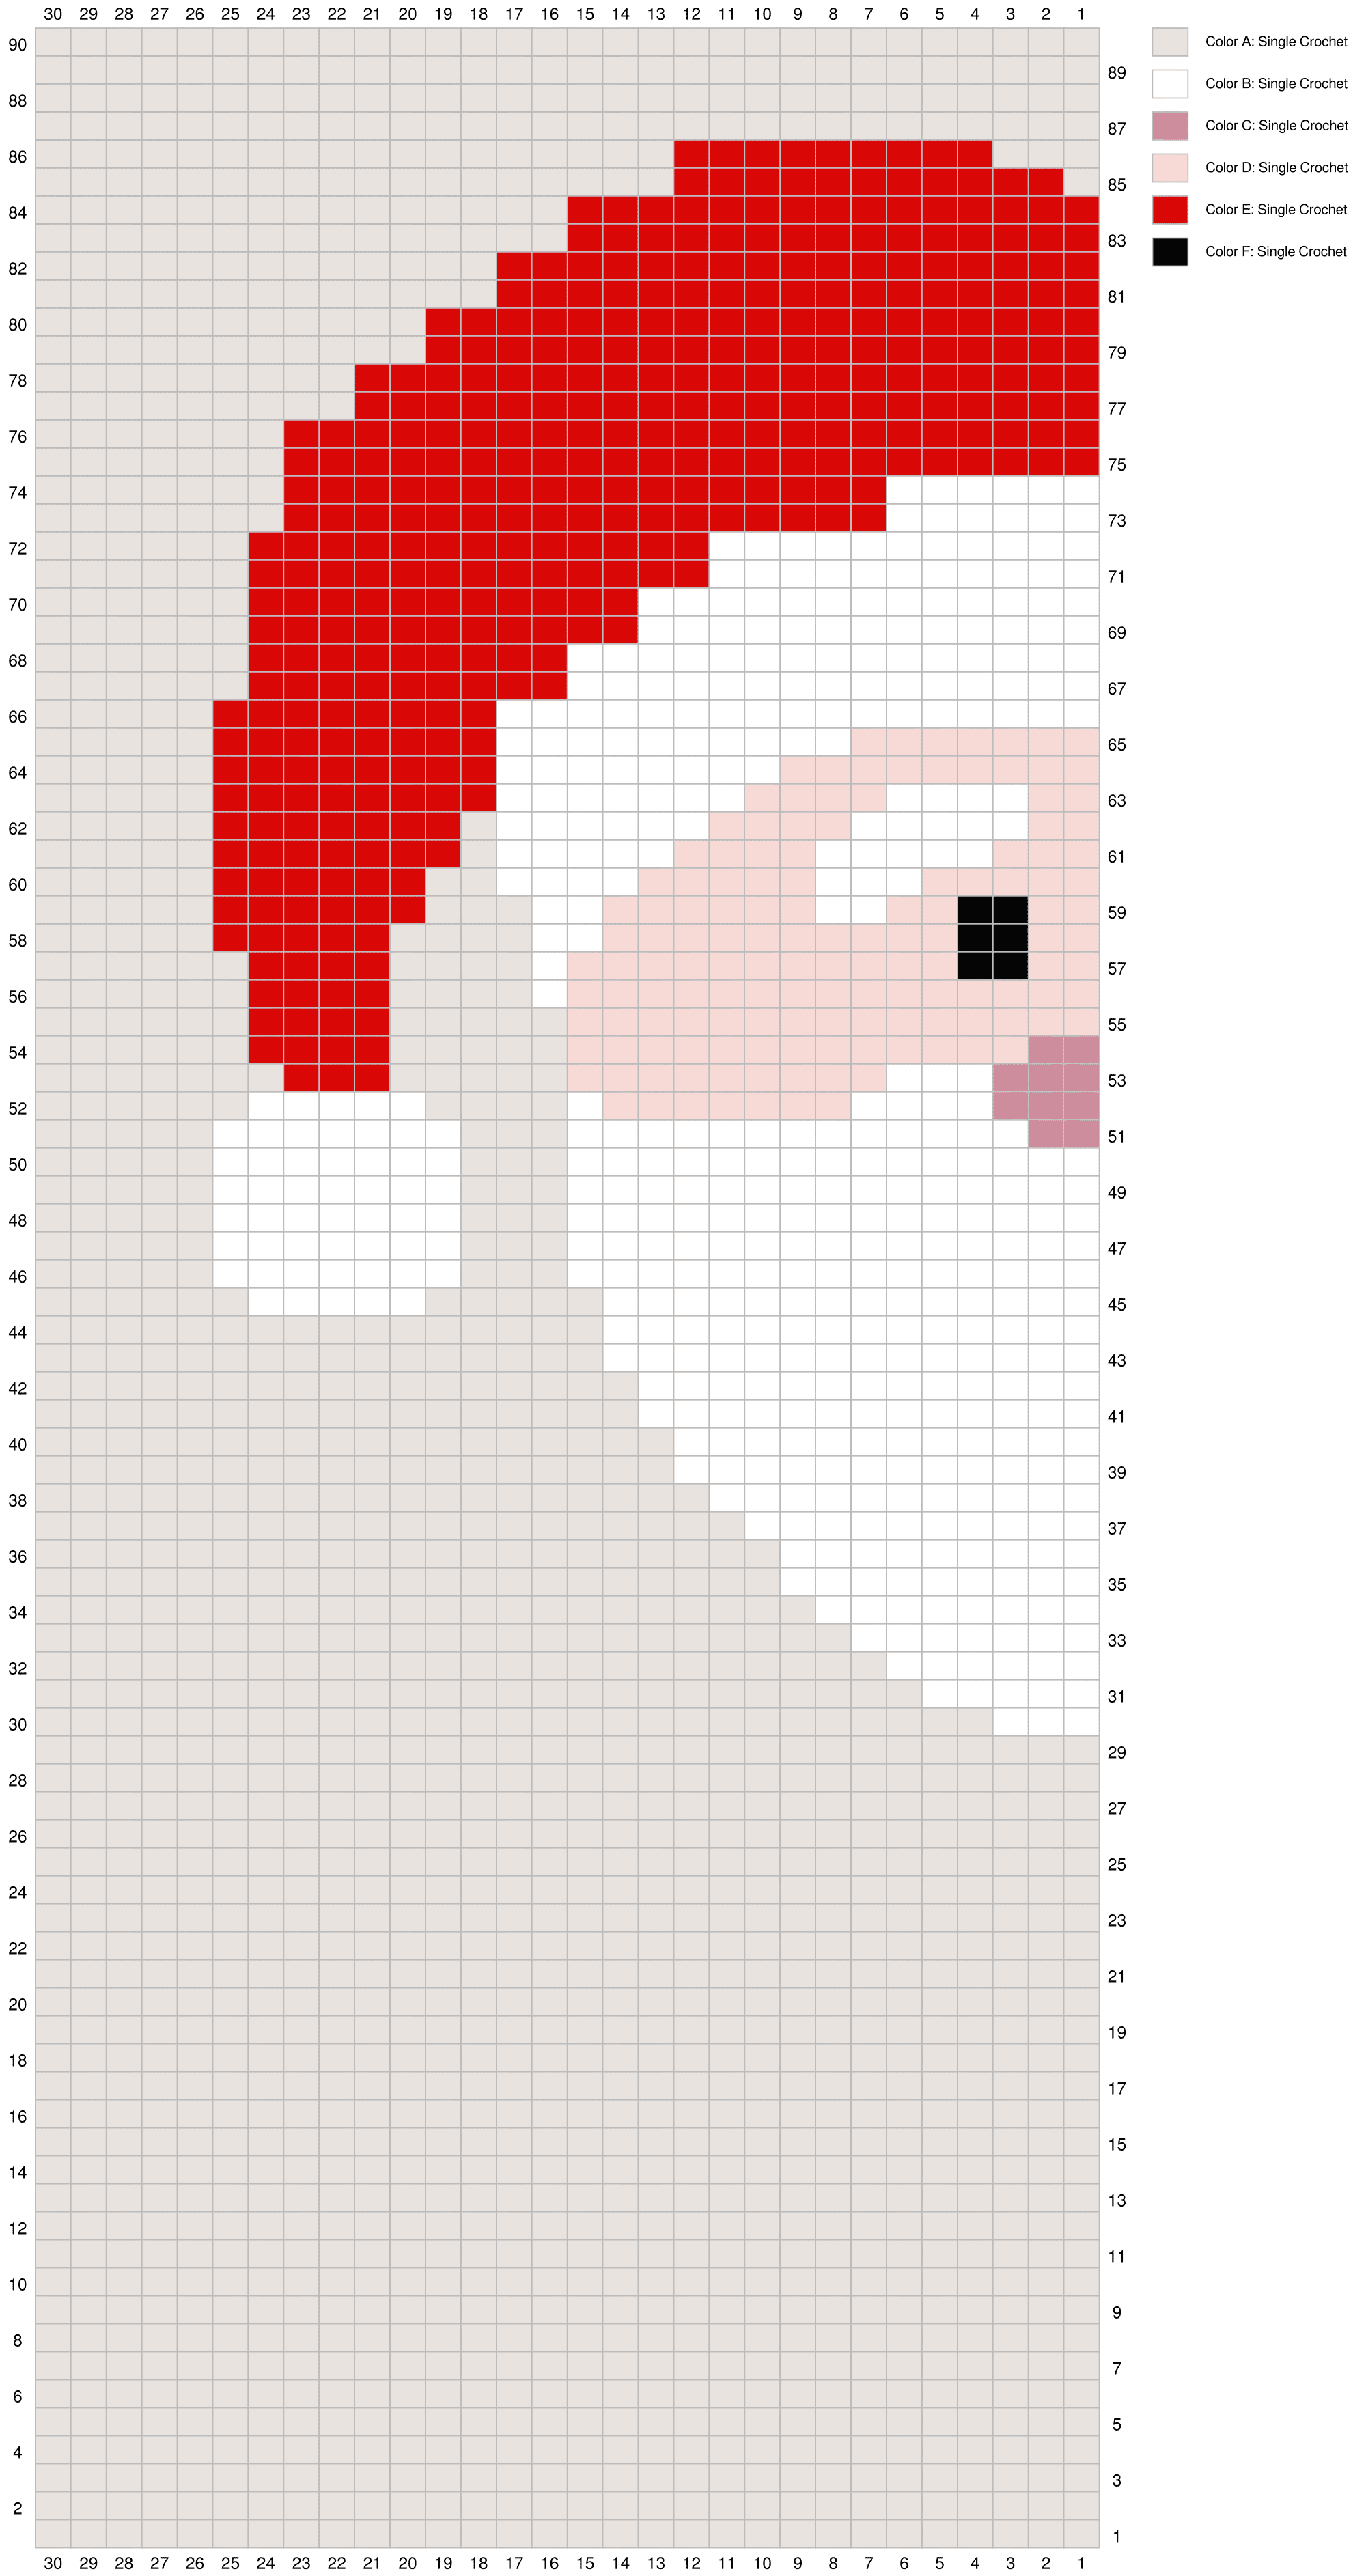
Rows 2-90: CH1, turn; complete corresponding row on Color Chart A.* (You’ve already completed chart Row 1.) (30)
COLOR CHART A(Click chart to enlarge):
Once you’ve completed the first chart, fasten off. Weave any ends into the back of the project.
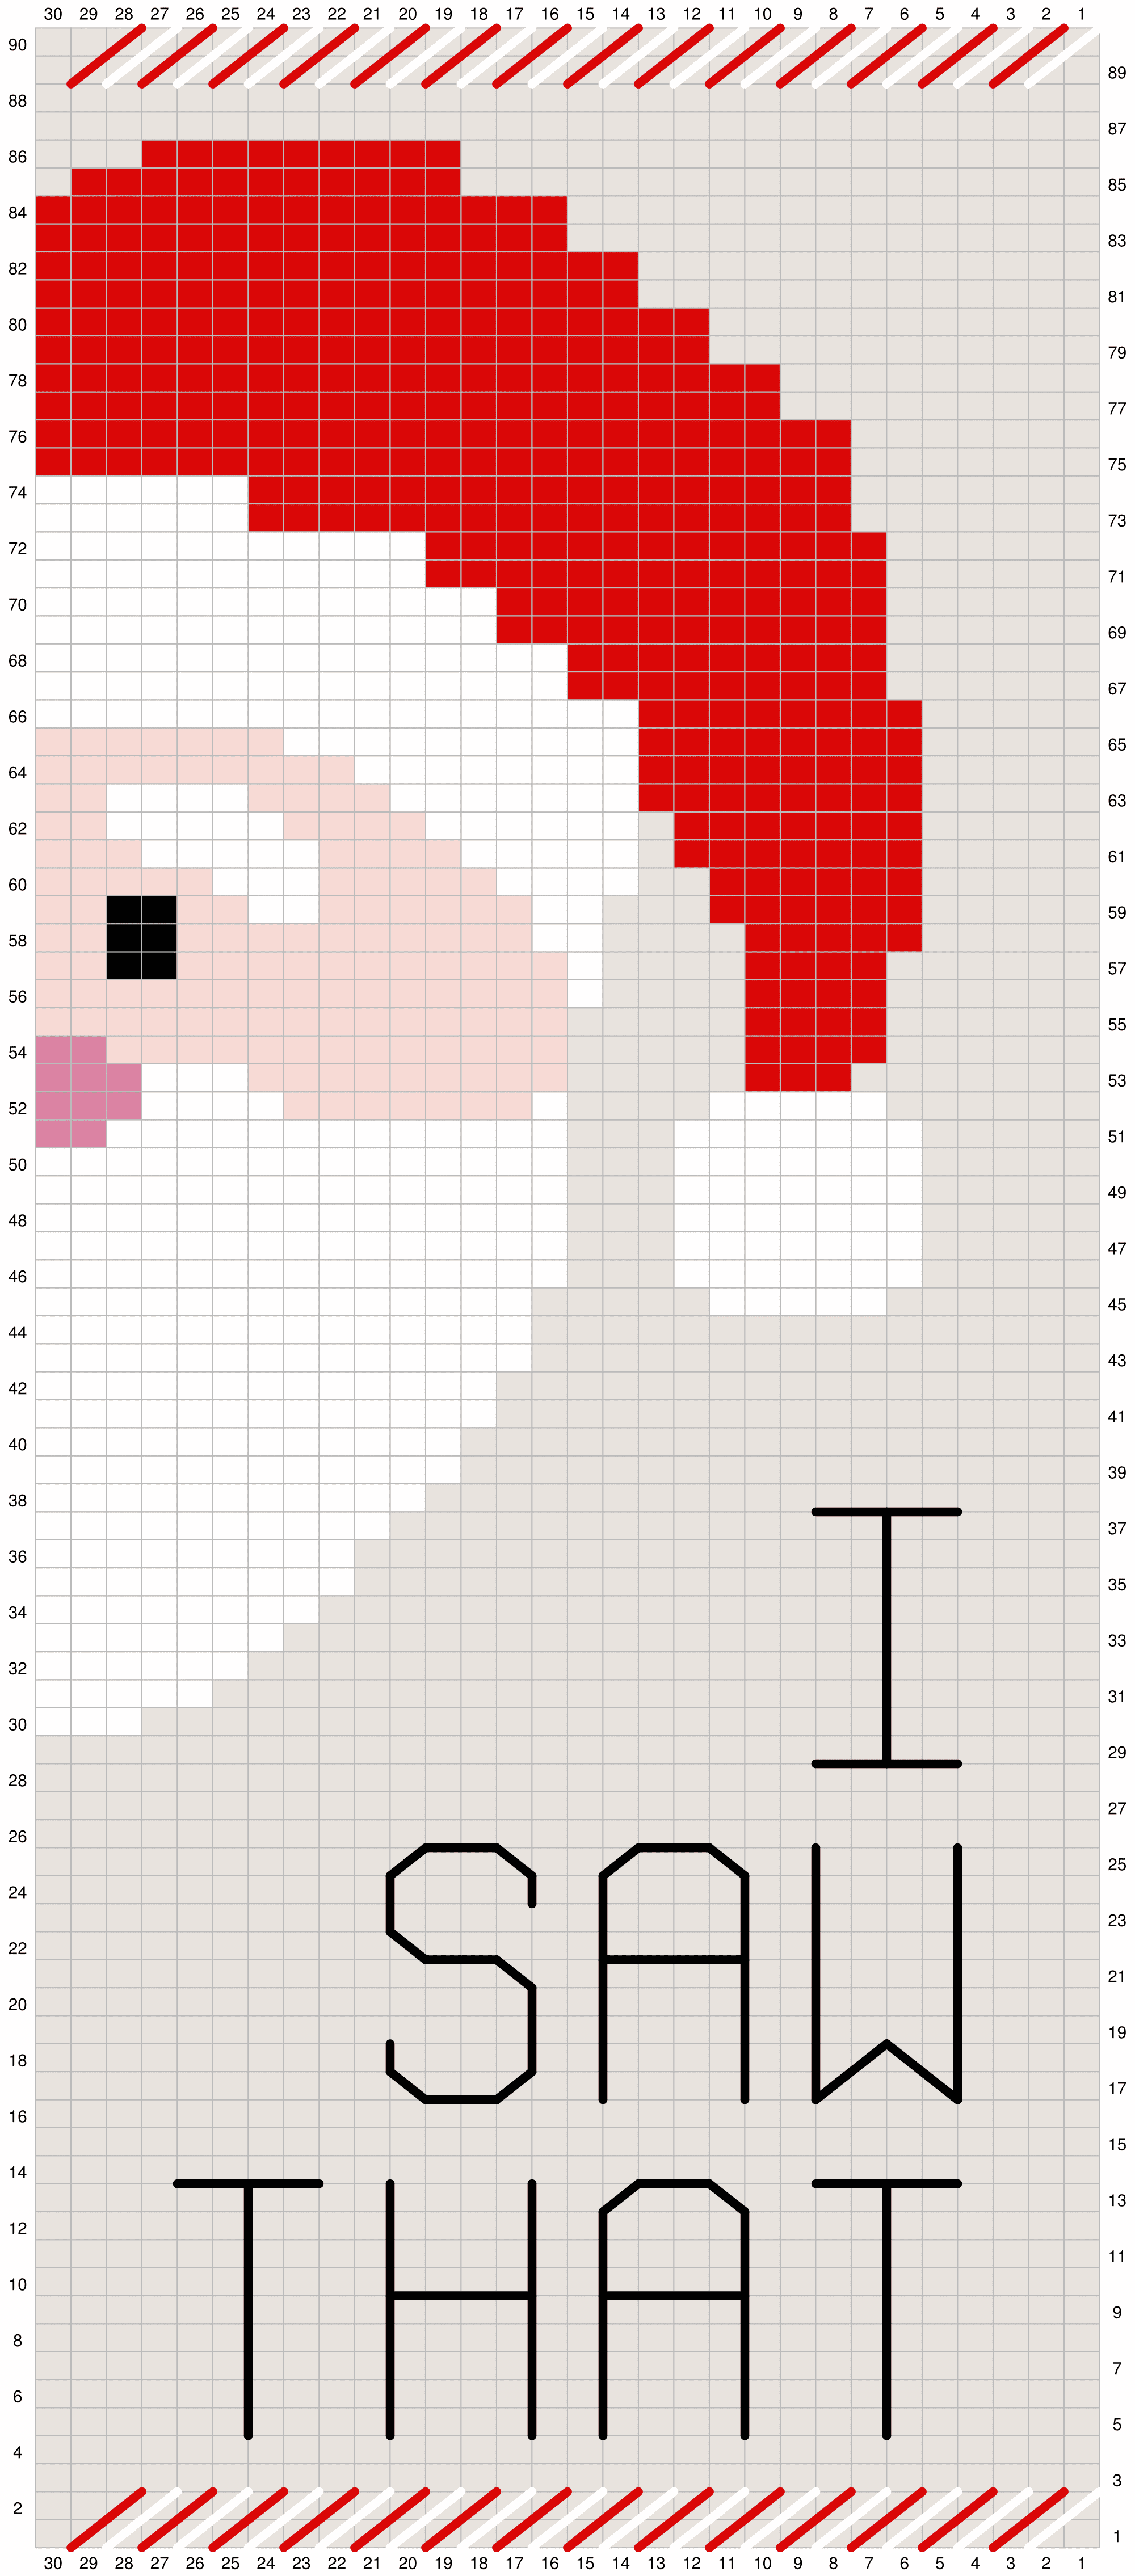
Use the next chart to add the black “I SAW THAT” lettering and the red and white borders on the top and bottom of the project. The lettering is done with surface crochet using a crochet hook (see pattern notes above for a link to a tutorial); the borders are done with a yarn needle (one color at a time).
COLOR CHART B(Click chart to enlarge):
Secure all ends into the back of the project.
Complete the following:
Block project (optional, recommended)
Add tassels or fringe (optional)
Attach project to dowel
– – – – – – – – – – – – – – –
That’s it!
I hope you enjoyed this tutorial. If you’re sharing your project on social media, be sure to tag me @yarnandchai.design!
It seems like a lot of you are really enjoying the fall-themed wall hangings I’ve designed recently (see here and here), and since I can’t get enough of them either, I thought it was a good time to start looking toward the next season!
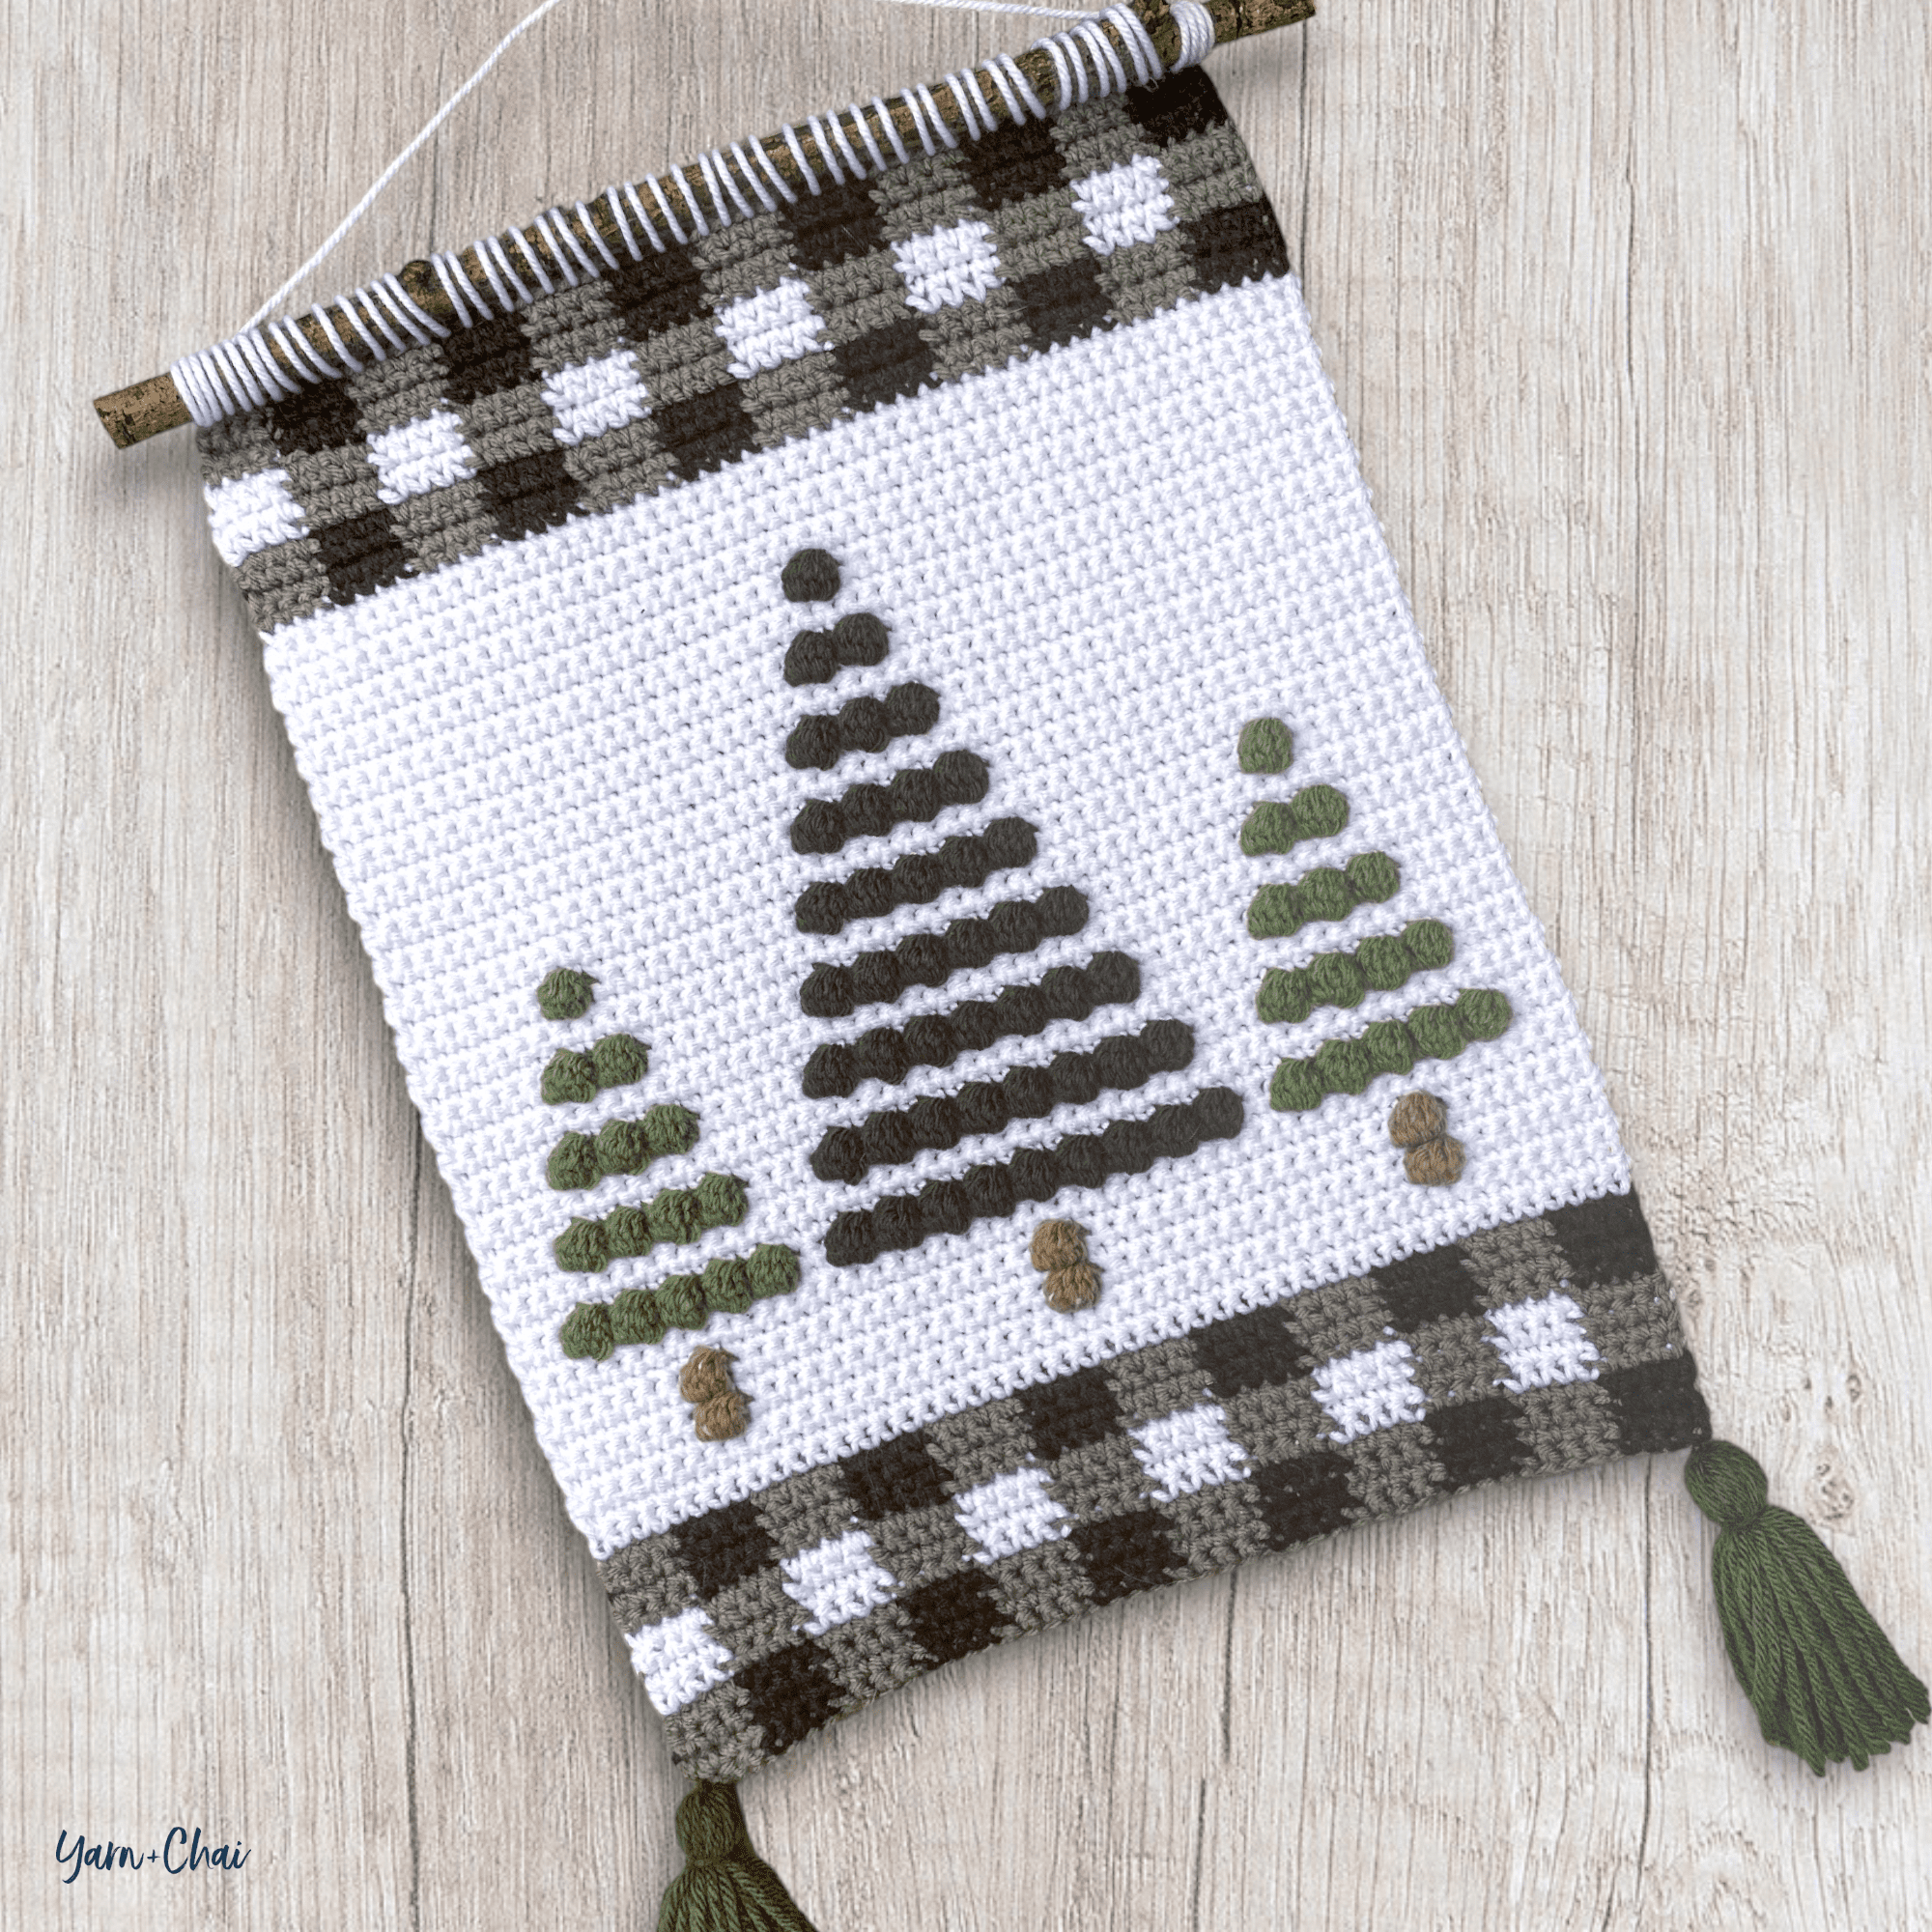
Perfect for Christmas but neutral enough to last the whole winter through, this cute new design features three pine trees framed at the top and bottom by black, white, and gray plaid, a popular holiday home decor trend.
I used a strong stick from my yard for the dowel, but you could use a regular wooden dowel found at most craft stores. And while I embellished mine with tassels, you could do fringe instead. Make it your own!
Blog Version vs. PDF Version
I’ll say this up front: While I normally try to create my ad-free PDF versions of my blog patterns as similarly to the blog version itself as I can, in this case, the PDF version is packed with helpful tips and info that I just couldn’t reasonably fit into the blog post without it getting long and confusing. So with that said…
If you’ve never made a bobble stitch wall hanging before, I recommend youwork from the ad-free PDF version of this pattern which is available to All-Access Passholders.
Here’s what you’ll get in the PDF:
How to follow a color chart
How to make tassels (photo tutorial)
How to attach the dowel (photo tutorial)
Enlarged printable version of the color chart
No ads
All-Access Passholders get the ad-free version of this and all of my other blog patterns. It’s a pretty sweet deal, if I do say so myself! Learn more about it here.
You can purchase the All-Access Pass, or scroll on to view the pattern right here on the blog.
Yarn: #4 medium weight acrylic yarn recommended. The approximate amounts and colors I used are:
COLOR A (gray): 40 yds I Love This Yarn in “Grey Beard”
COLOR B (black): 25 yds I Love This Yarn in “Black”
COLOR C (white): 150 yds I Love This Yarn in “White“
COLOR D (brown): 5 yds Loops & Threads Impeccable Tweed in “Walnut”
COLOR E (lighter green): 20 yds Loops & Threads Impeccable in “Forest”
COLOR F (darker green): 30 yds Loops & Threads Impeccable in “Deep Forest”
Hook: 5.0mm (H) hook
Gauge: 16 SC x 18 rows = 4”
You’ll also need: Stick or wooden dowel cut to 14”
Terms and Abbreviations:
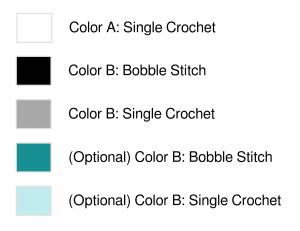
ST/STS (stitch/stitches) CH (chain) SL ST (slip stitch) SC (single crochet) YO (yarn over) BOBBLE STITCH 1: YO and insert the hook into the stitch 2: YO and pull up a loop 3: YO and pull through the first 2 loops on the hook 4: Repeat 1-3 four more times until you have 6 loops on the hook 5: YO and pull through all 6 loops
Notes about the Bobble Stitch: (1) Bobble stitches will always be followed by a single crochet (SC) of the same color. (2) Bobble stitches are worked on the “wrong side” of the pattern, but the bobble will show up on the correct side.
Pattern Notes: (1) CH1s at the beginning of rows/rounds do not count as stitches. (2)CHANGING COLORS: In the stitch before a color change, complete the final step of the stitch with the new color. In this pattern, the stitch before a color change will always be a single crochet; so you’ll work the stitch, and when it’s time to pull through the final loops, you’ll drop the first color and pull through with the new color. (3)READING THE CHART: Odd-numbered rows are worked right-to-left, and even-numbered rows are worked left-to-right. You’ll begin in the bottom-right corner of the chart. (4)CARRYING YARN: For this project, I carried my yarn through the plaid sections (dropping whichever of the three colors I wasn’t using on that row, and picking it back up again when needed). For the tree area, I carried the background color (white) throughout, but only carried the tree colors across a single row of a single tree, fastening them off when finished with then and rejoining when needed in the next row.
– – – – – – – – – – – – – – –
INSTRUCTIONS FOR WALL HANGING
With COLOR A, CH49.
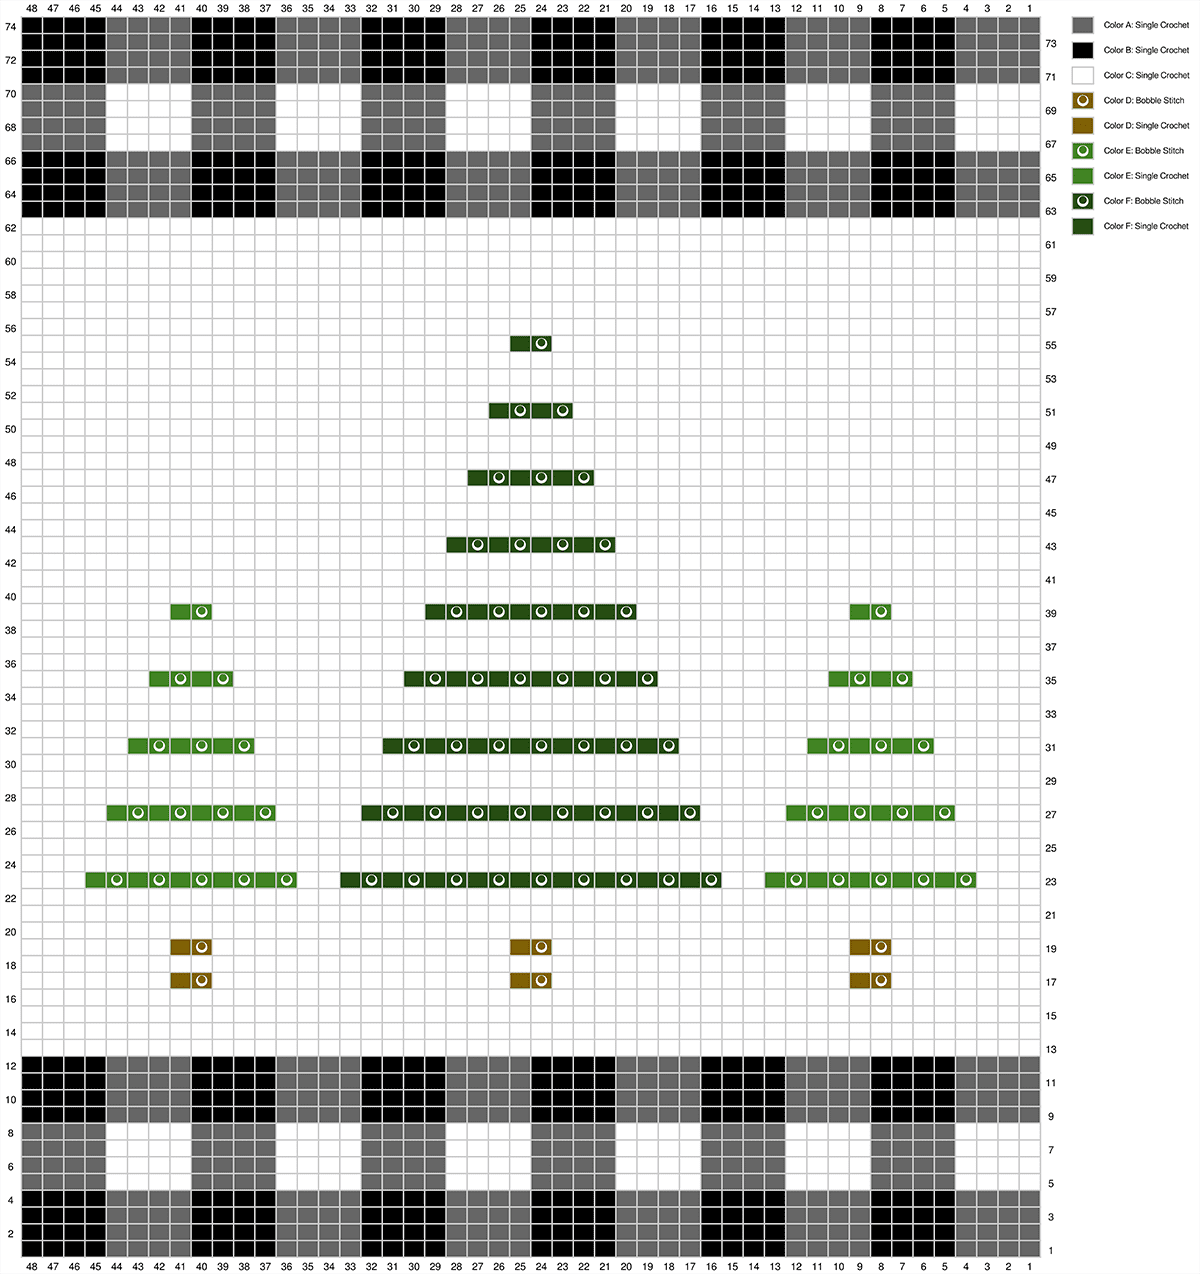
Row 1: Beginning in 2nd CH from hook, (4 SC in COLOR A, 4 SC in COLOR B) across. (48)
Rows 2-74: CH1, turn; complete corresponding row on color chart.* (You’ve already completed chart Row 1.) (48)
(Click chart to enlarge.)
Once you’ve completed the chart, fasten off.
Complete the following:
Relocate all yarn ends to the back of the project and weave in.
Block project (optional, recommended)
Add tassels or fringe (optional)
Attach project to dowel
– – – – – – – – – – – – – – –
That’s it!
I hope you enjoyed this tutorial. If you’re sharing your project on social media, be sure to tag me @yarnandchai.design!
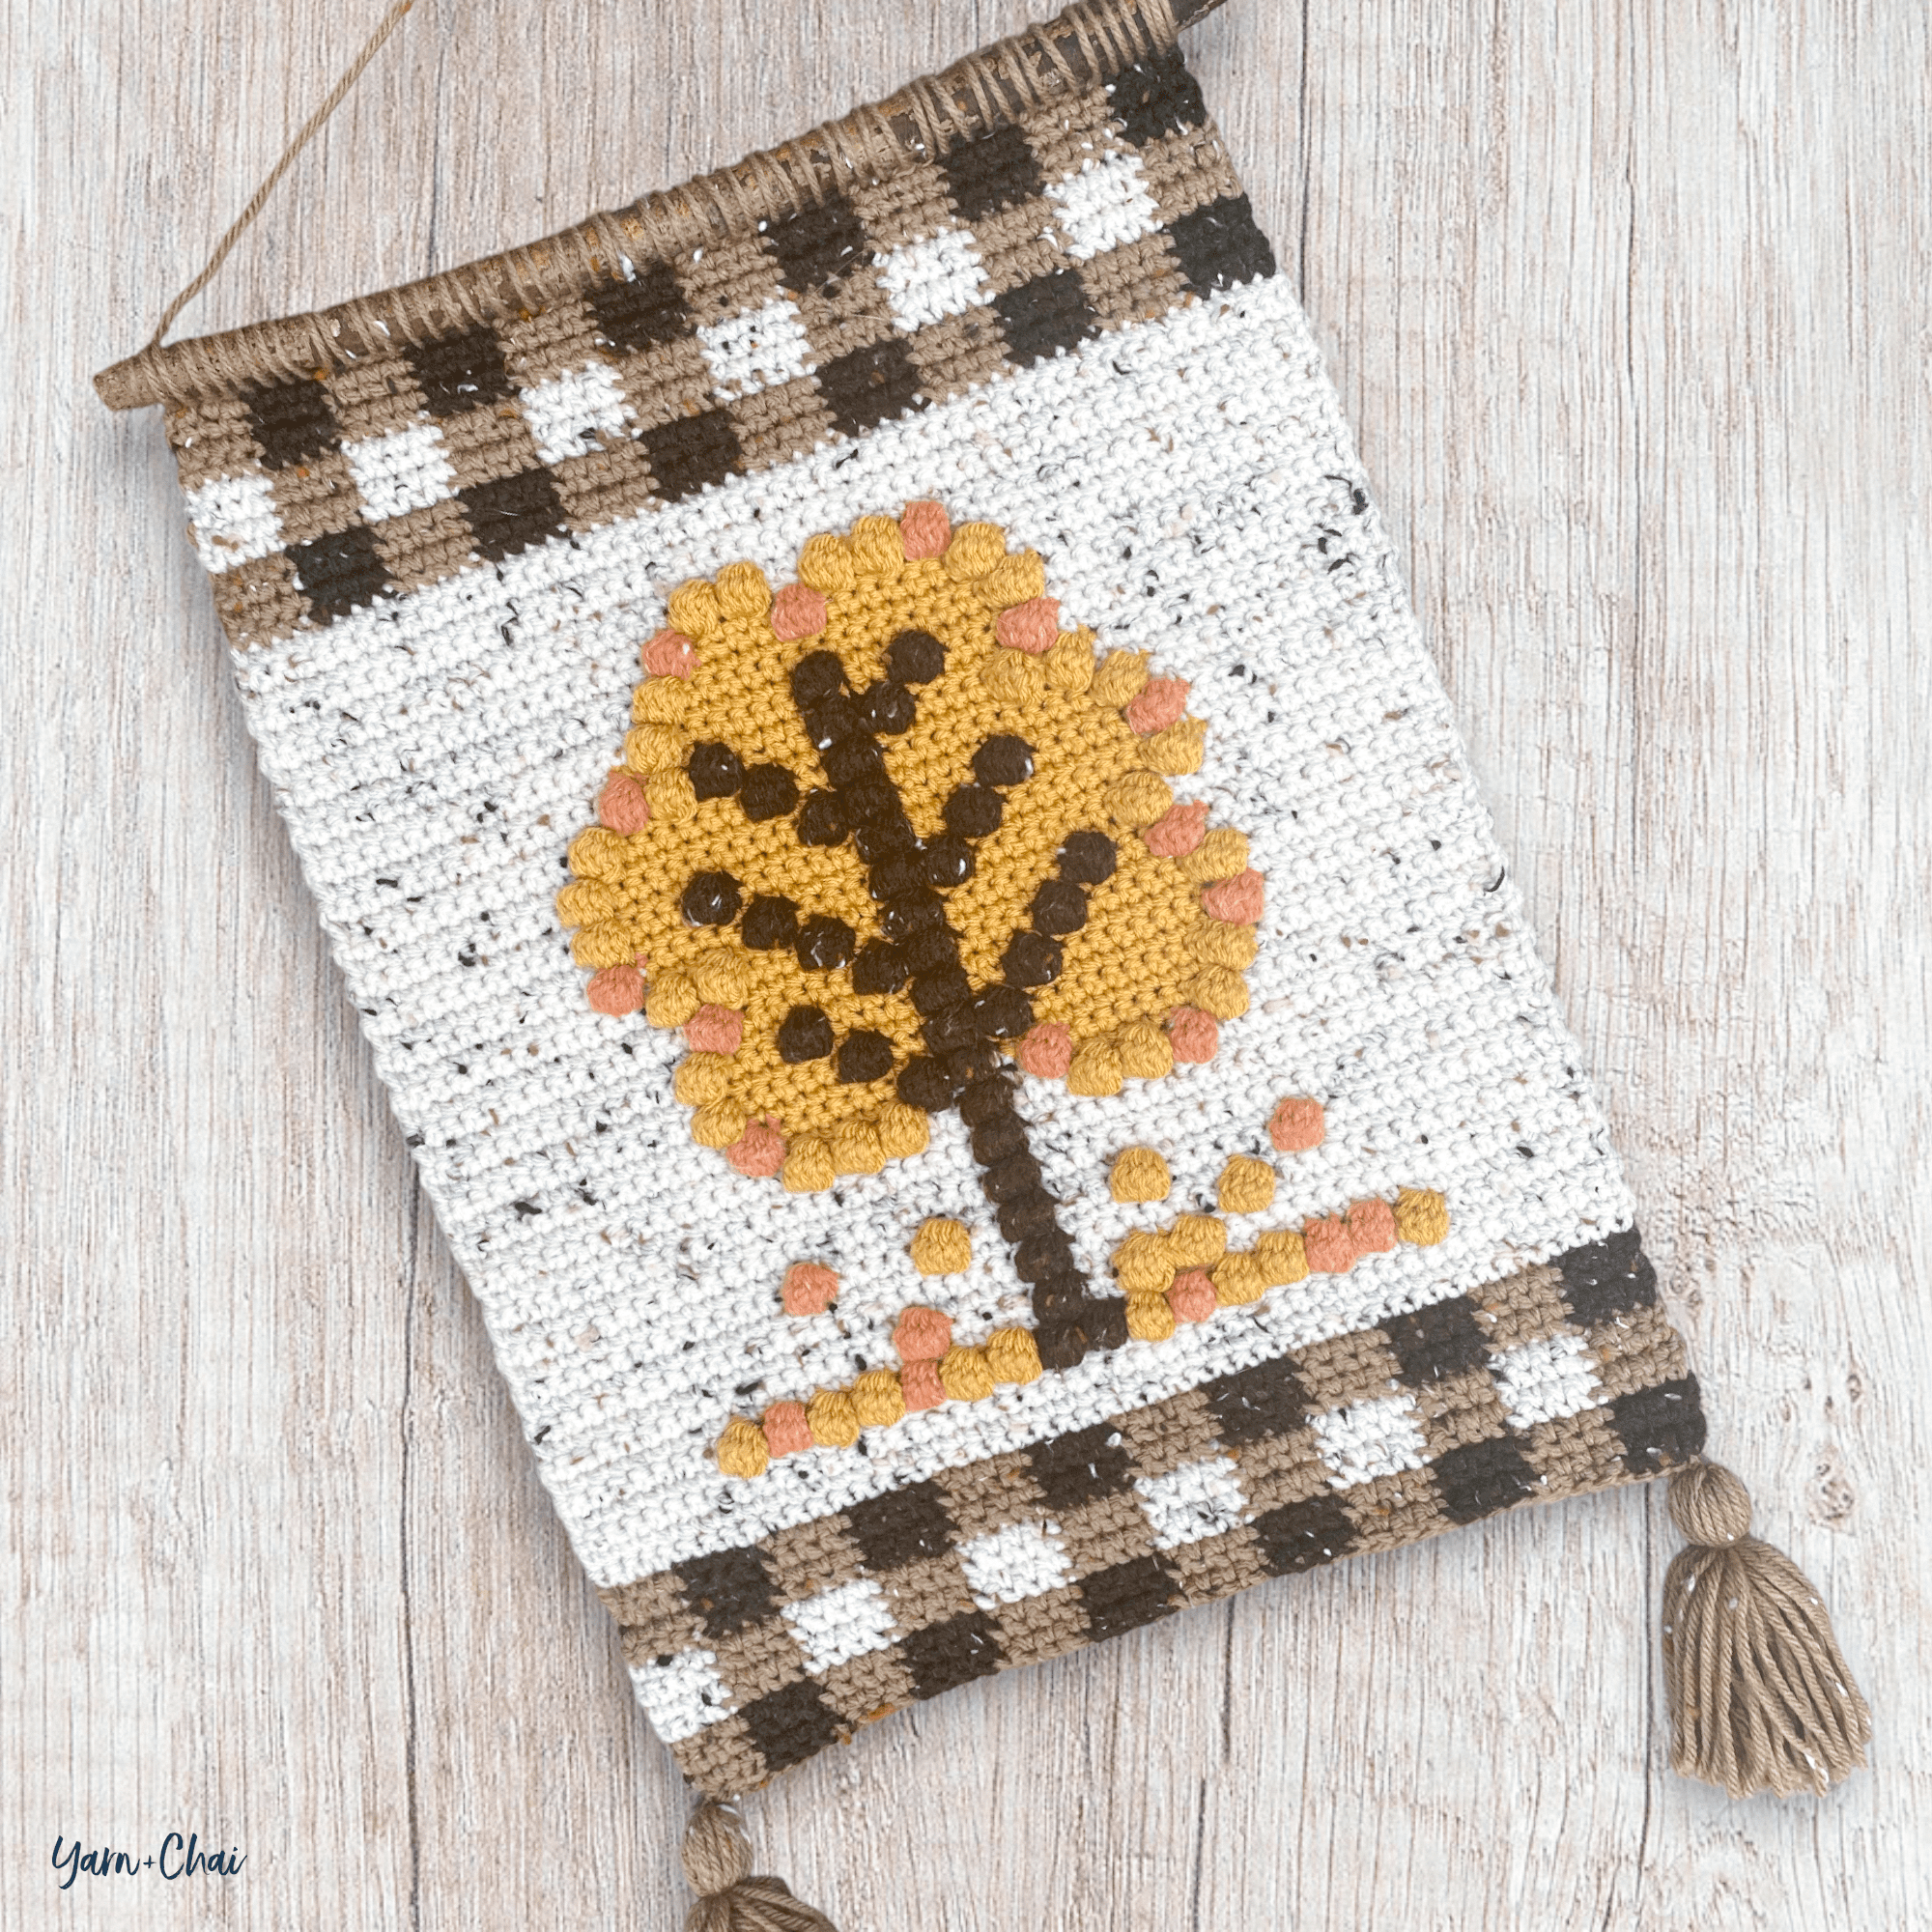
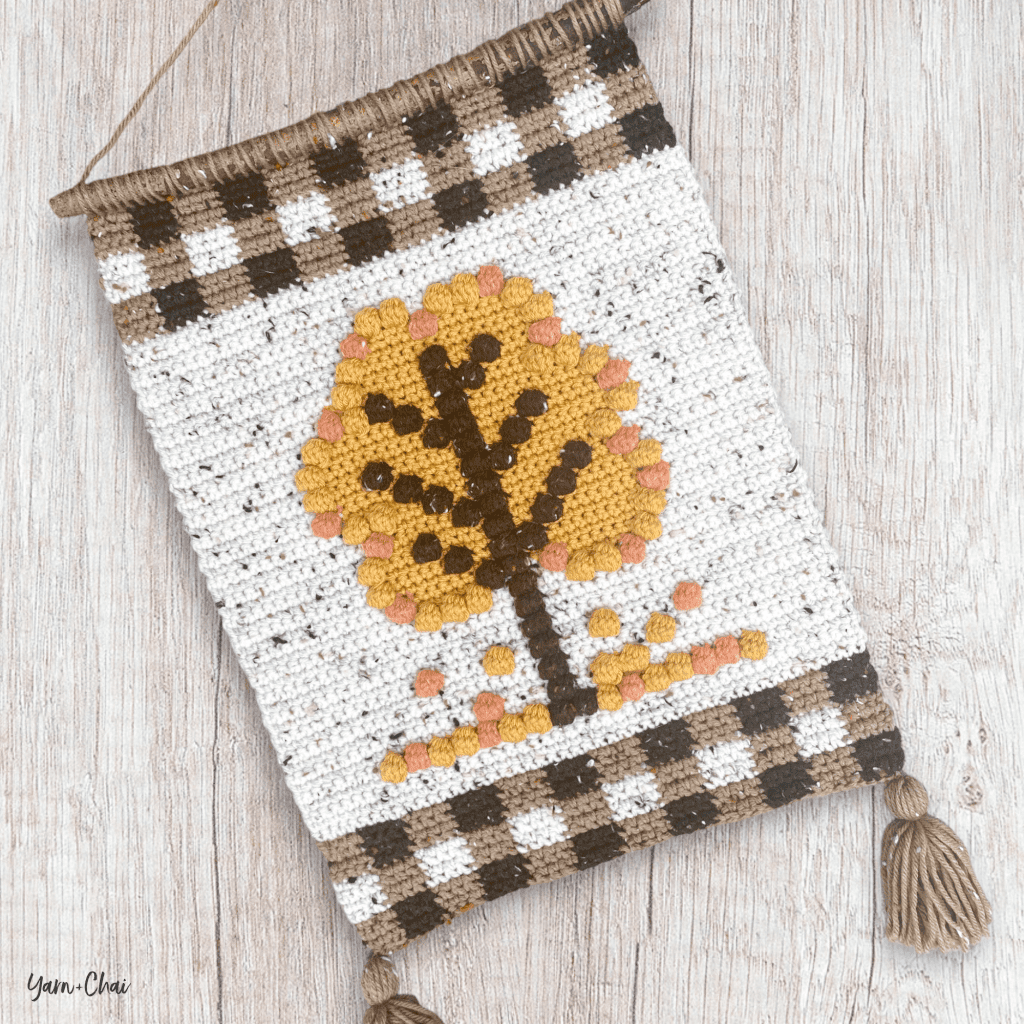
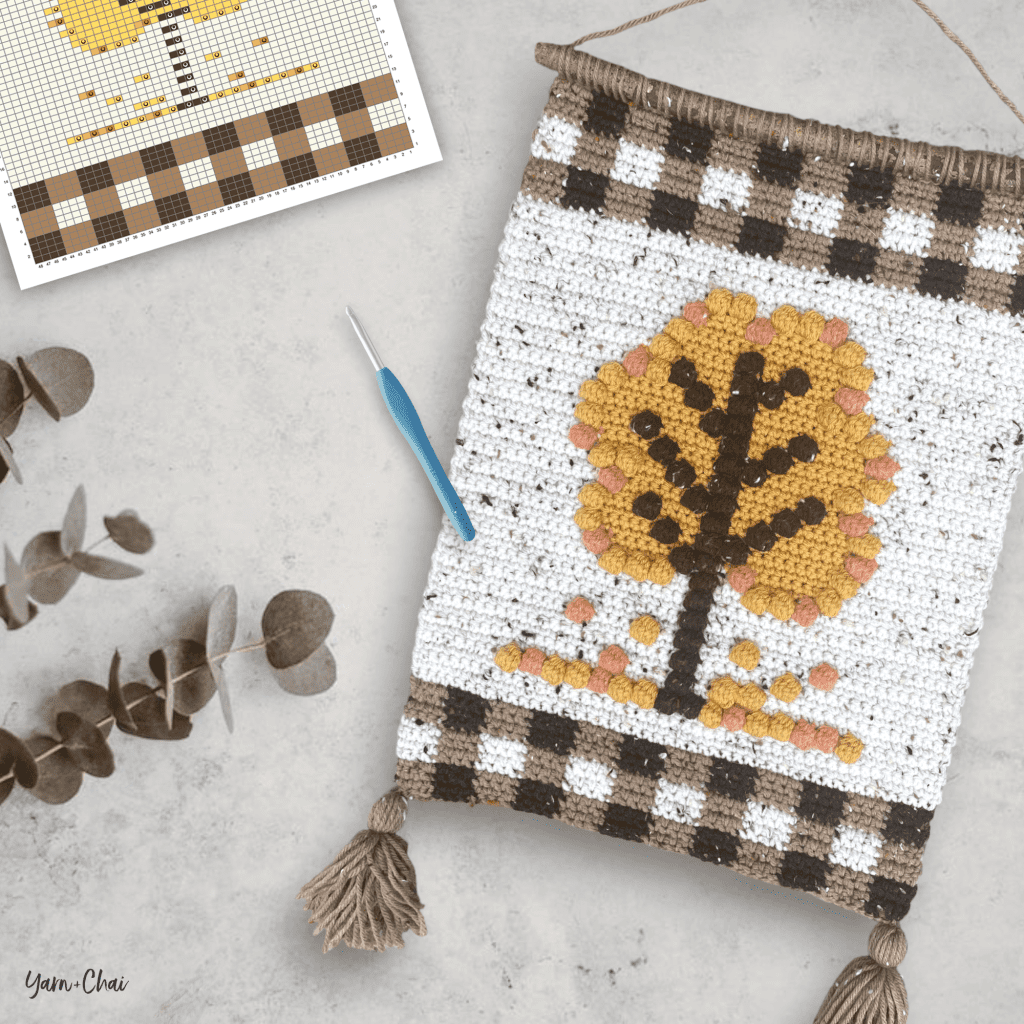
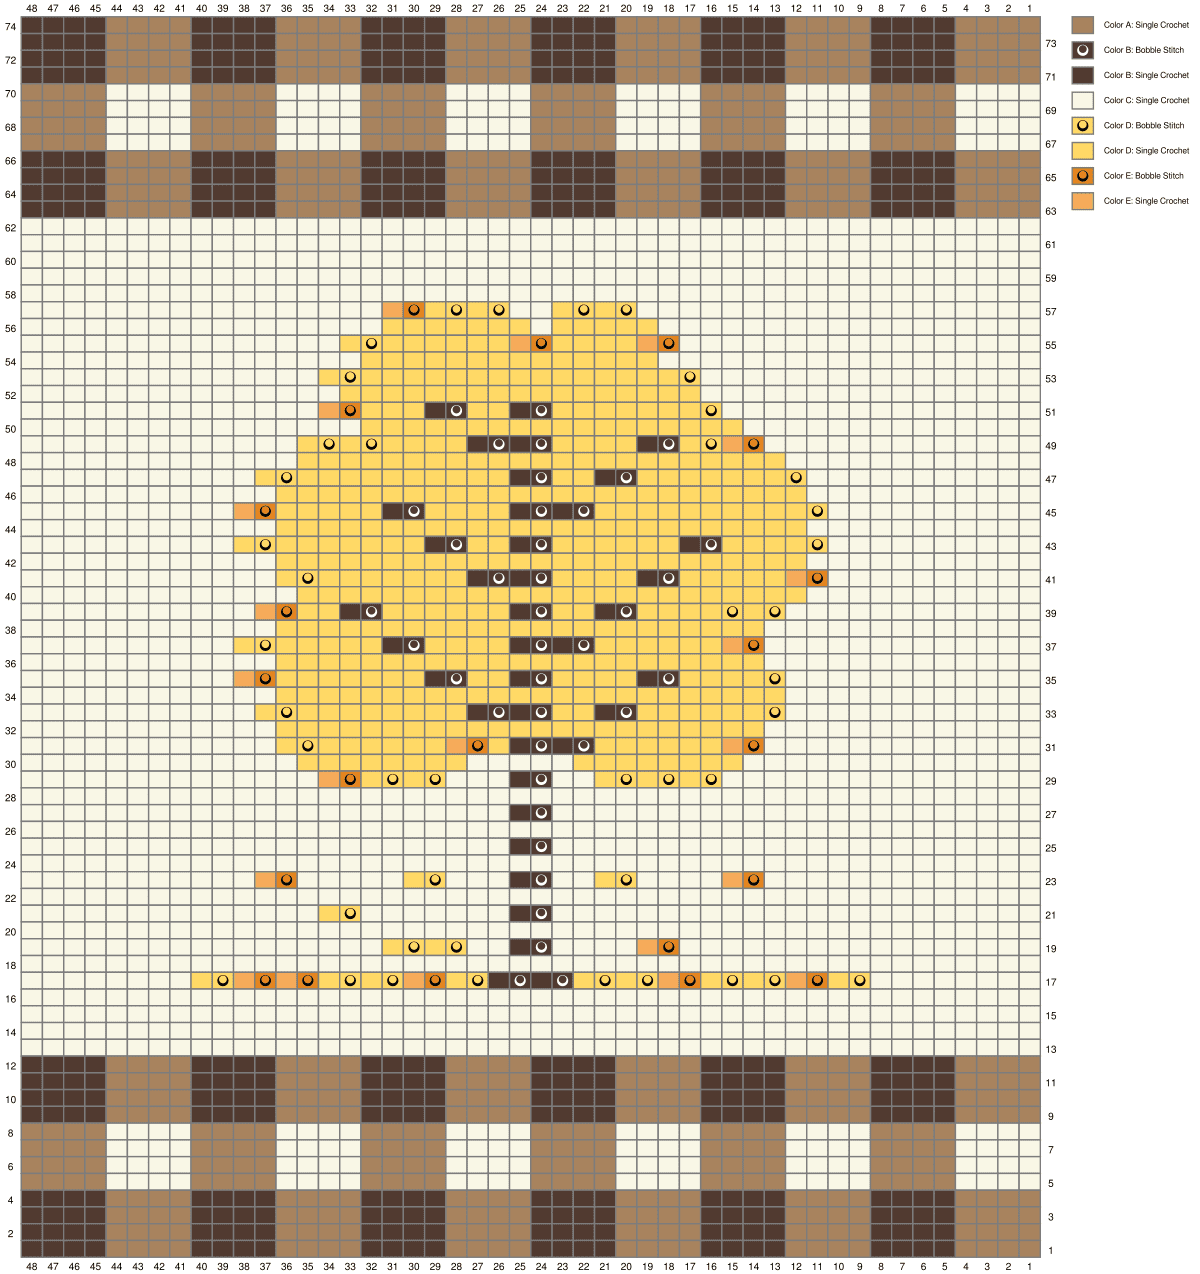
For the fall-lovers out there, here’s a new bobble stitch wall hanging design — a cozy late-autumn tree with falling leaves. Framed at the top and bottom by plaid in shades of brown and ivory, the tree in the center can be changed to represent your favorite fall hues!
I used a strong stick from my yard for the dowel, but you could use a regular wooden dowel found at most craft stores. And while I embellished mine with tassels, you could do fringe instead. Make it your own!
I’ll say this up front: While I normally try to create my ad-free PDF versions of my blog patterns as similarly to the blog version itself as I can, in this case, I’ll say this up front: While I normally try to create my ad-free PDF versions of my blog patterns as similarly to the blog version itself as I can, in this case, the PDF version is packed with helpful tips and info that I just couldn’t reasonably fit into the blog post without it getting long and confusing. So with that said…
If you’ve never made a bobble stitch wall hanging before, I recommend youwork from the ad-free PDF version of this pattern which is available to All-Access Passholders.
Here’s what you’ll get in the PDF:
How to follow a color chart
How to make tassels (photo tutorial)
How to attach the dowel (photo tutorial)
Enlarged printable version of the color chart
No ads
All-Access Passholders get the ad-free version of this and all of my other blog patterns. It’s a pretty sweet deal, if I do say so myself! Learn more about it here.
You can purchase the All-Access Pass, or scroll on to view the pattern right here on the blog.
Yarn: #4 medium weight acrylic yarn recommended. The approximate amounts and colors I used are:
COLOR A (lighter brown): 40 yds Loops & Threads Impeccable Tweedin “Chocolate”
COLOR B (darker brown): 55 yds Loops & Threads Impeccable Tweedin “Walnut”
COLOR C (ivory tweed): 120 yds Loops & Threads Impeccable Tweed in“Aran“
COLOR D (yellow): 60 yds Yarn Bee Soft & Sleek in “Mustard”
COLOR E (orange tweed): 15 yds Yarn Bee Rustic Romanticin “Pumpkin Spice”
Hook: 5.0mm (H) hook
Gauge: 16 SC x 18 rows = 4”
You’ll also need: Stick or wooden dowel cut to 14”
Terms and Abbreviations:
ST/STS (stitch/stitches) CH (chain) SL ST (slip stitch) SC (single crochet) YO (yarn over) BOBBLE STITCH 1: YO and insert the hook into the stitch 2: YO and pull up a loop 3: YO and pull through the first 2 loops on the hook 4: Repeat 1-3 four more times until you have 6 loops on the hook 5: YO and pull through all 6 loops
Notes about the Bobble Stitch: (1) Bobble stitches will always be followed by a single crochet (SC) of the same color. (2) Bobble stitches are worked on the “wrong side” of the pattern, but the bobble will show up on the correct side.
Pattern Notes: (1) CH1s at the beginning of rows/rounds do not count as stitches. (2)CHANGING COLORS: In the stitch before a color change, complete the final step of the stitch with the new color. In this pattern, the stitch before a color change will always be a single crochet; so you’ll work the stitch, and when it’s time to pull through the final loops, you’ll drop the first color and pull through with the new color. (3)READING THE CHART: Odd-numbered rows are worked right-to-left, and even-numbered rows are worked left-to-right. You’ll begin in the bottom-right corner of the chart. (4)CARRYING YARN: For this project, I carried my yarn through the plaid sections (dropping whichever of the three colors I wasn’t using on that row, and picking it back up again when needed). For the tree area, I carried the background color (the ivory tweed) throughout, but only carried the colors of the tree if I only needed to carry them for a few stitches; otherwise I just fastened off and rejoined when needed.
– – – – – – – – – – – – – – –
INSTRUCTIONS FOR WALL HANGING
With COLOR A, CH49.
Row 1: Beginning in 2nd CH from hook, (4 SC in COLOR A, 4 SC in COLOR B) across. (48)
Rows 2-74: CH1, turn; complete corresponding row on color chart.* (You’ve already completed chart Row 1.) (48)
(Click chart to enlarge.)
Once you’ve completed the chart, fasten off.
Complete the following:
Relocate all yarn ends to the back of the project and weave in.
Block project (optional, recommended)
Add tassels or fringe (optional)
Attach project to dowel
– – – – – – – – – – – – – – –
That’s it!
I hope you enjoyed this tutorial. If you’re sharing your project on social media, be sure to tag me @yarnandchai.design!
It’s official. I’m obsessed with crocheted wall hangings.
The design possibilities are so endless that I can’t believe it’s taken me this long to create my own!
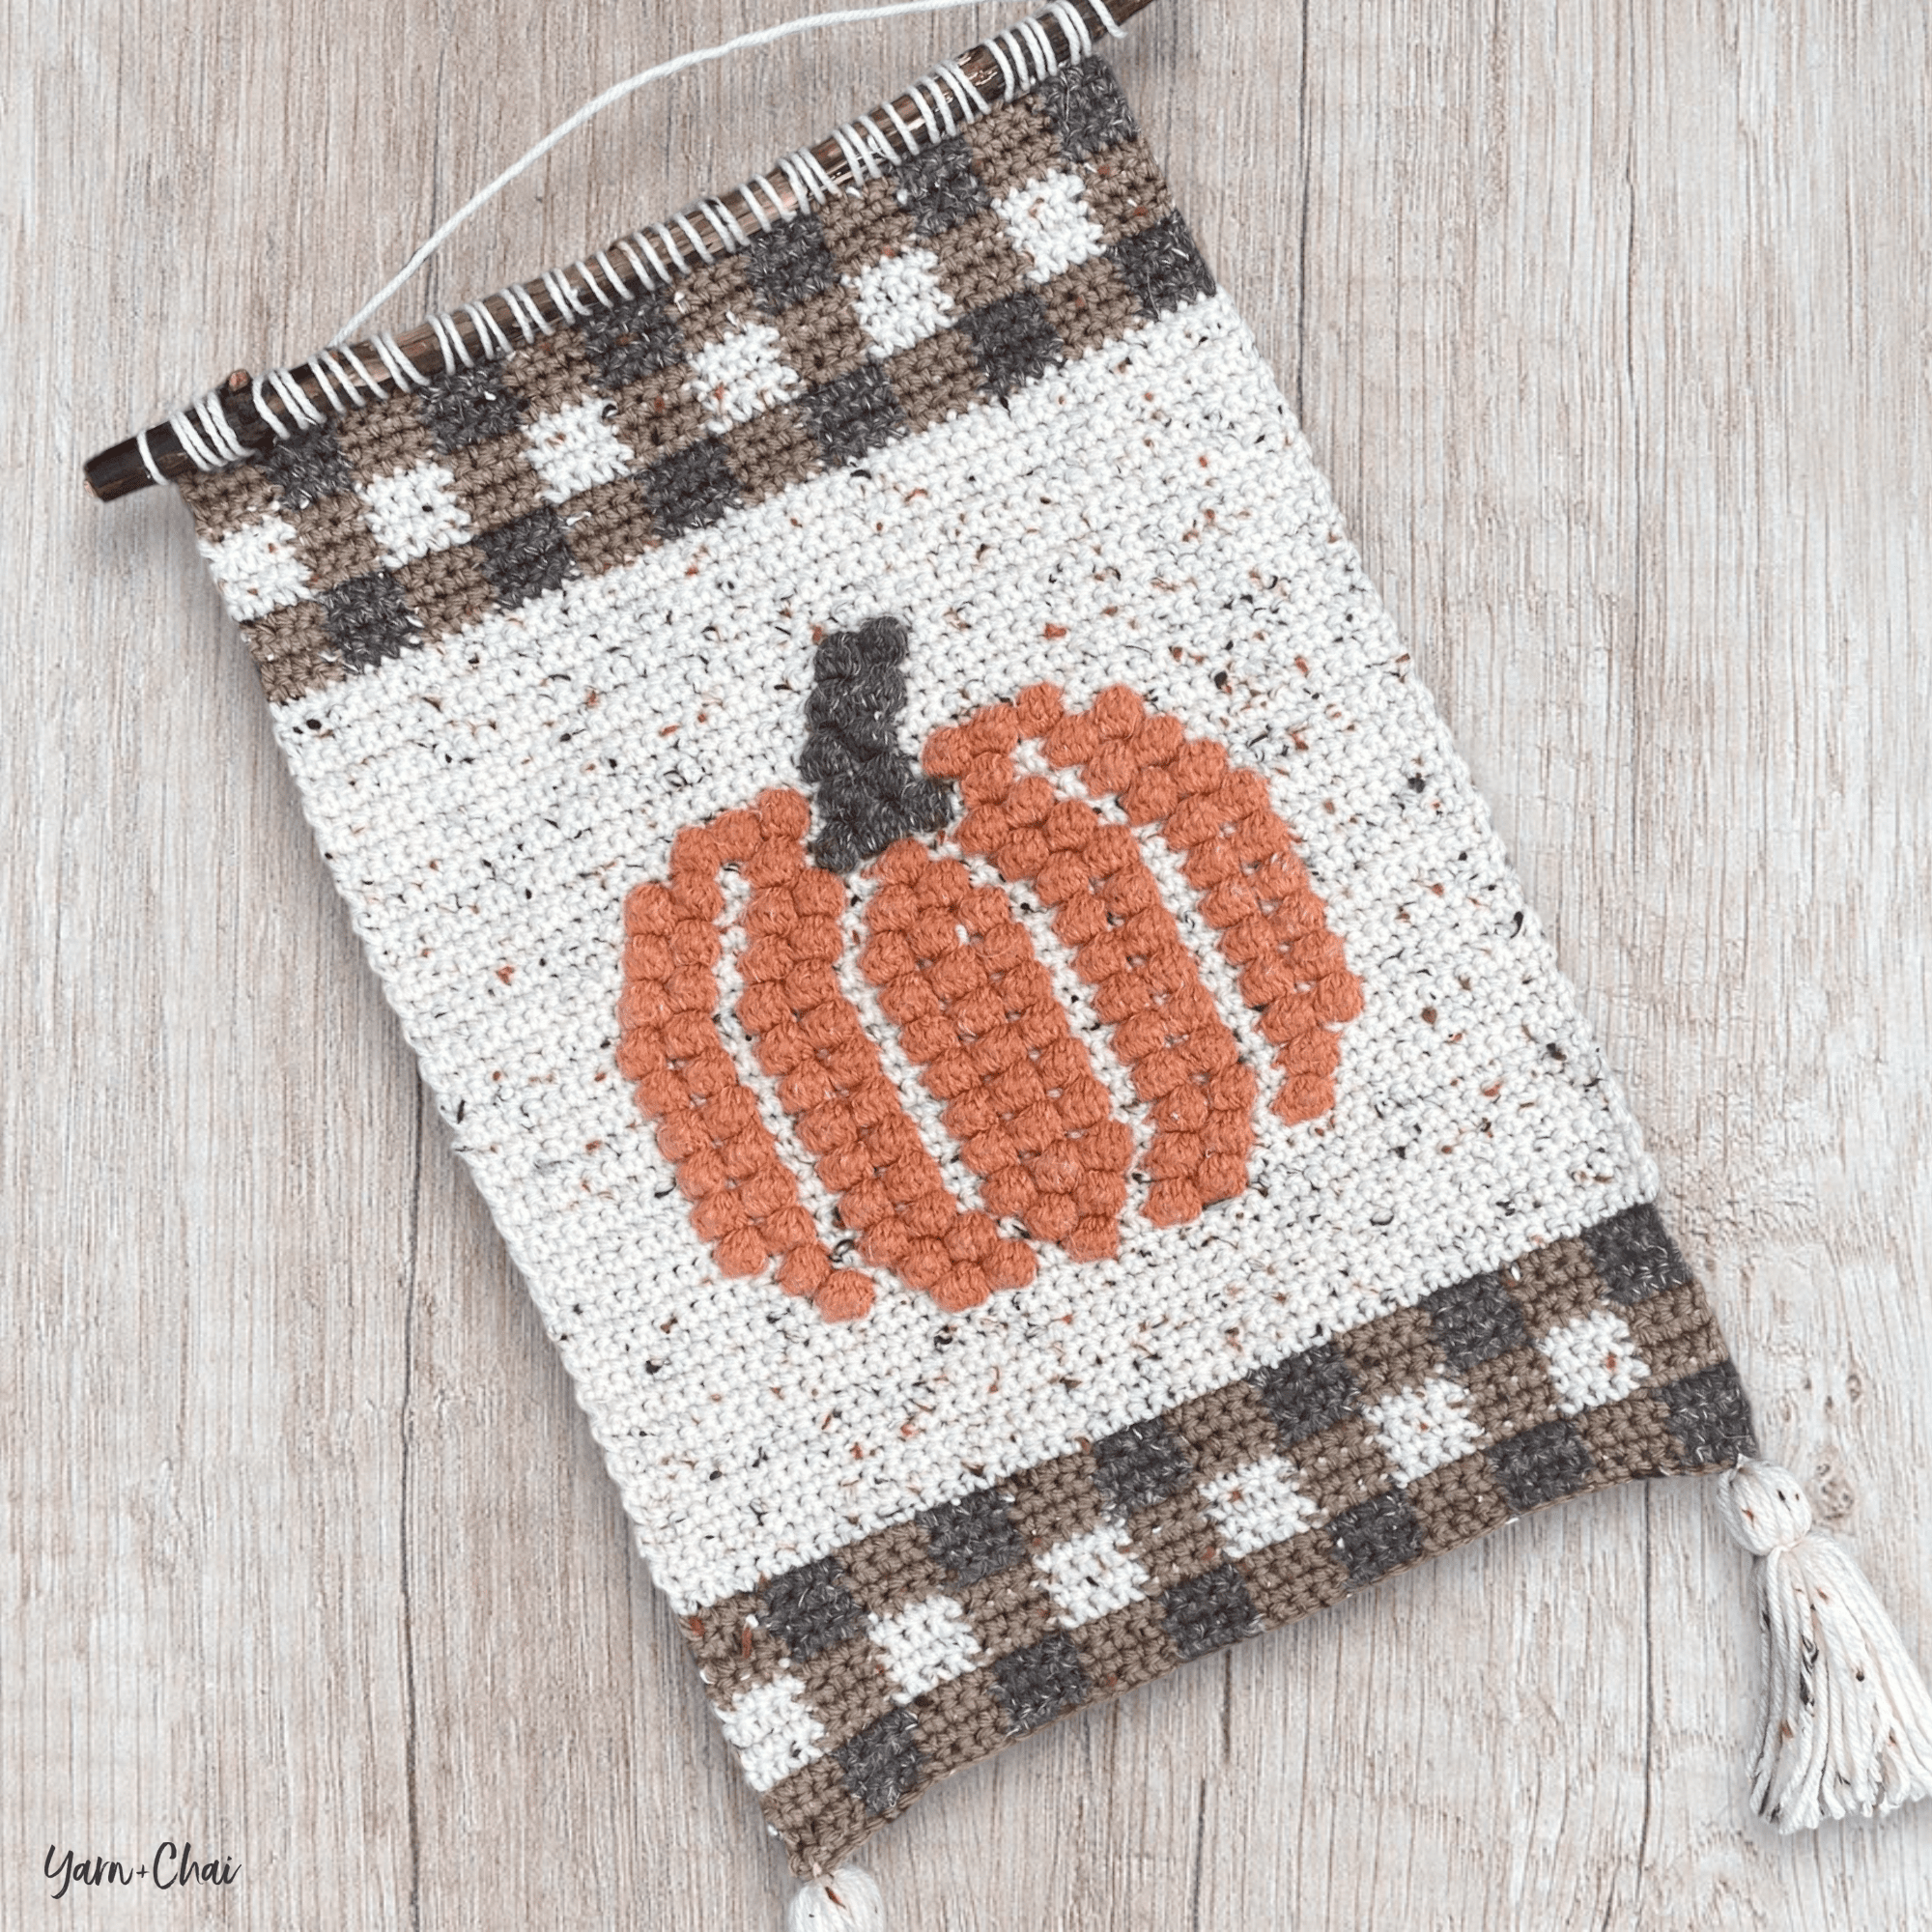
So for my 2nd wall hanging pattern (the first being the “Welcome” Wall Hanging), I present to you this cozy, rustic autumn pumpkin decor piece! Framed at the top and bottom by a bit of plaid in shades of ivory and brown, the orange bobble stitch pumpkin is the focal point of this design.
I combined two different brands of acrylic tweed yarn to achieve the color palette I had in my head, and it didn’t give me any issues. The orange and dark brown are both Yarn Bee’s Rustic Romantic (Hobby Lobby), and the ivory and lighter brown are from Loops & Threads’ Impeccable Tweed line (Michael’s). The ivory color from Impeccable has flecks of brown and orange in it that pull all of the colors together… almost like it was meant to be!
There are lots of other tweed yarns out there, too, so use what you have available to you. You could even skip the tweed look altogether and opt for a cleaner, sleeker look with solid colors. (I debated doing a white base with white/gray/black plaid, but I think I’m going to save that look for a future design.)
I used a strong stick from my yard for the dowel, but you could use a regular wooden dowel found at most craft stores. And while I embellished mine with tassels, you could do fringe instead. Make it your own!
Blog Version vs. PDF Version
I’ll say this up front: While I normally try to create my ad-free PDF versions of my blog patterns as similarly to the blog version itself as I can, in this case, the PDF version is packed with helpful tips and info that I just couldn’t reasonably fit into the blog post without it getting long and confusing. So with that said…
If you’ve never made a bobble stitch wall hanging before, I recommend you work from the ad-free PDF version of this pattern which is available to All-Access Passholders.
Here’s what you’ll get in the PDF:
How to follow a color chart
How to make tassels (photo tutorial)
How to attach the dowel (photo tutorial)
Enlarged printable version of the color chart
No ads
All-Access Passholders get the ad-free version of this and all of my other blog patterns. It’s a pretty sweet deal, if I do say so myself! Learn more about it here.
Yarn: #4 medium weight acrylic yarn recommended. The approximate amounts and colors I used are:
COLOR A: 45 yds Loops & Threads Impeccable Tweed in “Taupe”
COLOR B: 40 yds Yarn Bee Rustic Romantic in “Barnwood Fence”
COLOR C: 175 yds Loops & Threads Impeccable Tweed in “Aran“
COLOR D: 75 yds Yarn Bee Rustic Romantic in “Pumpkin Spice”
Hook: 5.0mm (H) hook
Gauge: 16 SC x 18 rows = 4”
You’ll also need: Stick or wooden dowel cut to 14”
Terms and Abbreviations:
ST/STS (stitch/stitches) CH (chain) SL ST (slip stitch) SC (single crochet) YO (yarn over) BOBBLE STITCH 1: YO and insert the hook into the stitch 2: YO and pull up a loop 3: YO and pull through the first 2 loops on the hook 4: Repeat 1-3 four more times until you have 6 loops on the hook 5: YO and pull through all 6 loops
Notes about the Bobble Stitch: (1) Bobble stitches will always be followed by a single crochet (SC) of the same color. (2) Bobble stitches are worked on the “wrong side” of the pattern, but the bobble will show up on the correct side.
Pattern Notes: (1) CH1s at the beginning of rows/rounds do not count as stitches. (2)CHANGING COLORS: In the stitch before a color change, complete the final step of the stitch with the new color. In this pattern, the stitch before a color change will always be a single crochet; so you’ll work the stitch, and when it’s time to pull through the final loops, you’ll drop the first color and pull through with the new color. (3)READING THE CHART: Odd-numbered rows are worked right-to-left, and even-numbered rows are worked left-to-right. You’ll begin in the bottom-right corner of the chart. (4)CARRYING YARN: For this project, I carried my yarn through the plaid sections (dropping whichever of the three colors I wasn’t using on that row, and picking it back up again when needed). For the pumpkin area, I carried the background color (aran) throughout, but only carried the pumpkin color (orange) across a single row, fastening it off when finished with it and rejoining when needed in the next row.
– – – – – – – – – – – – – – –
INSTRUCTIONS FOR WALL HANGING
With COLOR A, CH49.
Row 1: Beginning in 2nd CH from hook, (4 SC in COLOR A, 4 SC in COLOR B) across. (48)
Rows 2-74: CH1, turn; complete corresponding row on color chart.* (You’ve already completed chart Row 1.) (48)
(Click chart to enlarge.)
Once you’ve completed the chart, fasten off.
Complete the following:
Relocate all yarn ends to the back of the project and weave in.
Block project (optional, recommended)
Add tassels or fringe (optional)
Attach project to dowel
– – – – – – – – – – – – – – –
That’s it!
I hope you enjoyed this tutorial. If you’re sharing your project on social media, be sure to tag me @yarnandchai.design!
Pattern Errata (7.6.23) Pattern had incorrect stitch count. Current stitch count is correct. (7.9.23) WELCOME chart fixed. Current chart is correct.
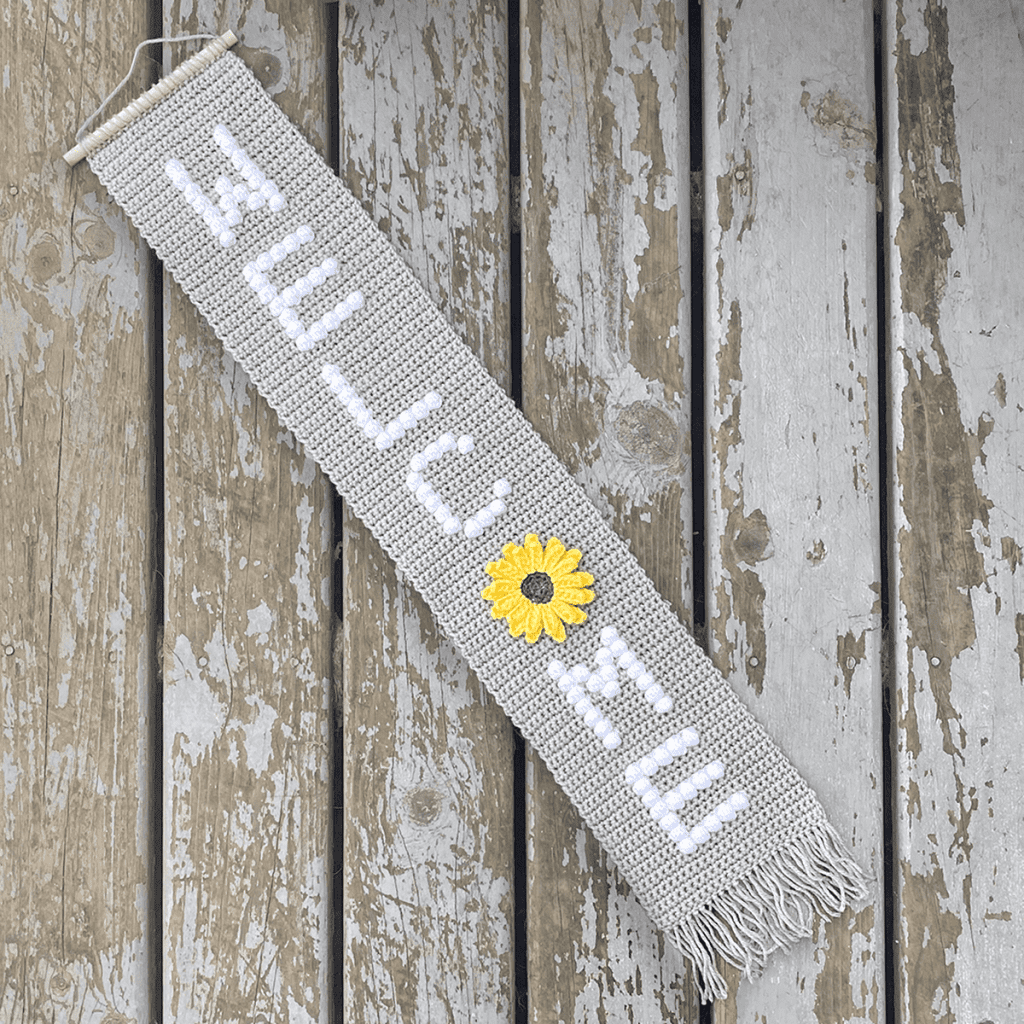
Making that project got me really excited about wall hangings, so I decided to create my first pattern for one!
Blog Version vs. PDF Version
I’ll say this up front: While I normally try to create my ad-free PDF versions of my blog patterns as similarly to the blog version itself as I can, in this case, the PDF version is packed with helpful tips and info that I just couldn’t reasonably fit into the blog post without it getting long and confusing. So with that said…
If you’ve never made a bobble stitch wall hanging before, I recommend you work from the ad-free PDF version of this pattern which is available to All-Access Passholders.
Here’s what you’ll get in the PDF:
How to follow a color chart
The “tie-and-trim” method (photo tutorial)
How to add fringe (photo tutorial)
How to attach the dowel (photo tutorial)
Enlarged printable version of the color chart
No ads
All-Access Passholders get the ad-free version of this and all of my other blog patterns. It’s a pretty sweet deal, if I do say so myself! Learn more about it here.
You can purchase the All-Access Pass, or scroll on to view the pattern right here on the blog.
Gauge: Wall hanging: 16 SC x 18 rows = 4” Flower: First 3 rounds should measure about 1.125” across
You’ll also need: Wooden dowel cut to 8”
Terms and Abbreviations:
MC (magic circle – tutorial here) ST/STS (stitch/stitches) CH (chain) SL ST (slip stitch) SC (single crochet) HDC (half double crochet) YO (yarn over) FLO (front loop only) BLO (back loop only)
BOBBLE STITCH 1: YO and insert the hook into the st 2: YO and pull up a loop 3: YO and pull through the first 2 loops on the hook 4: Repeat 1-3 four more times until you have 6 loops on the hook 5: YO and pull through all 6 loops
Notes about the Bobble Stitch: (1) Bobble stitches will always be followed by a single crochet (SC) of the same color. (2) Bobble stitches are worked on the “wrong side” of the pattern, but the bobble will show up on the correct side.
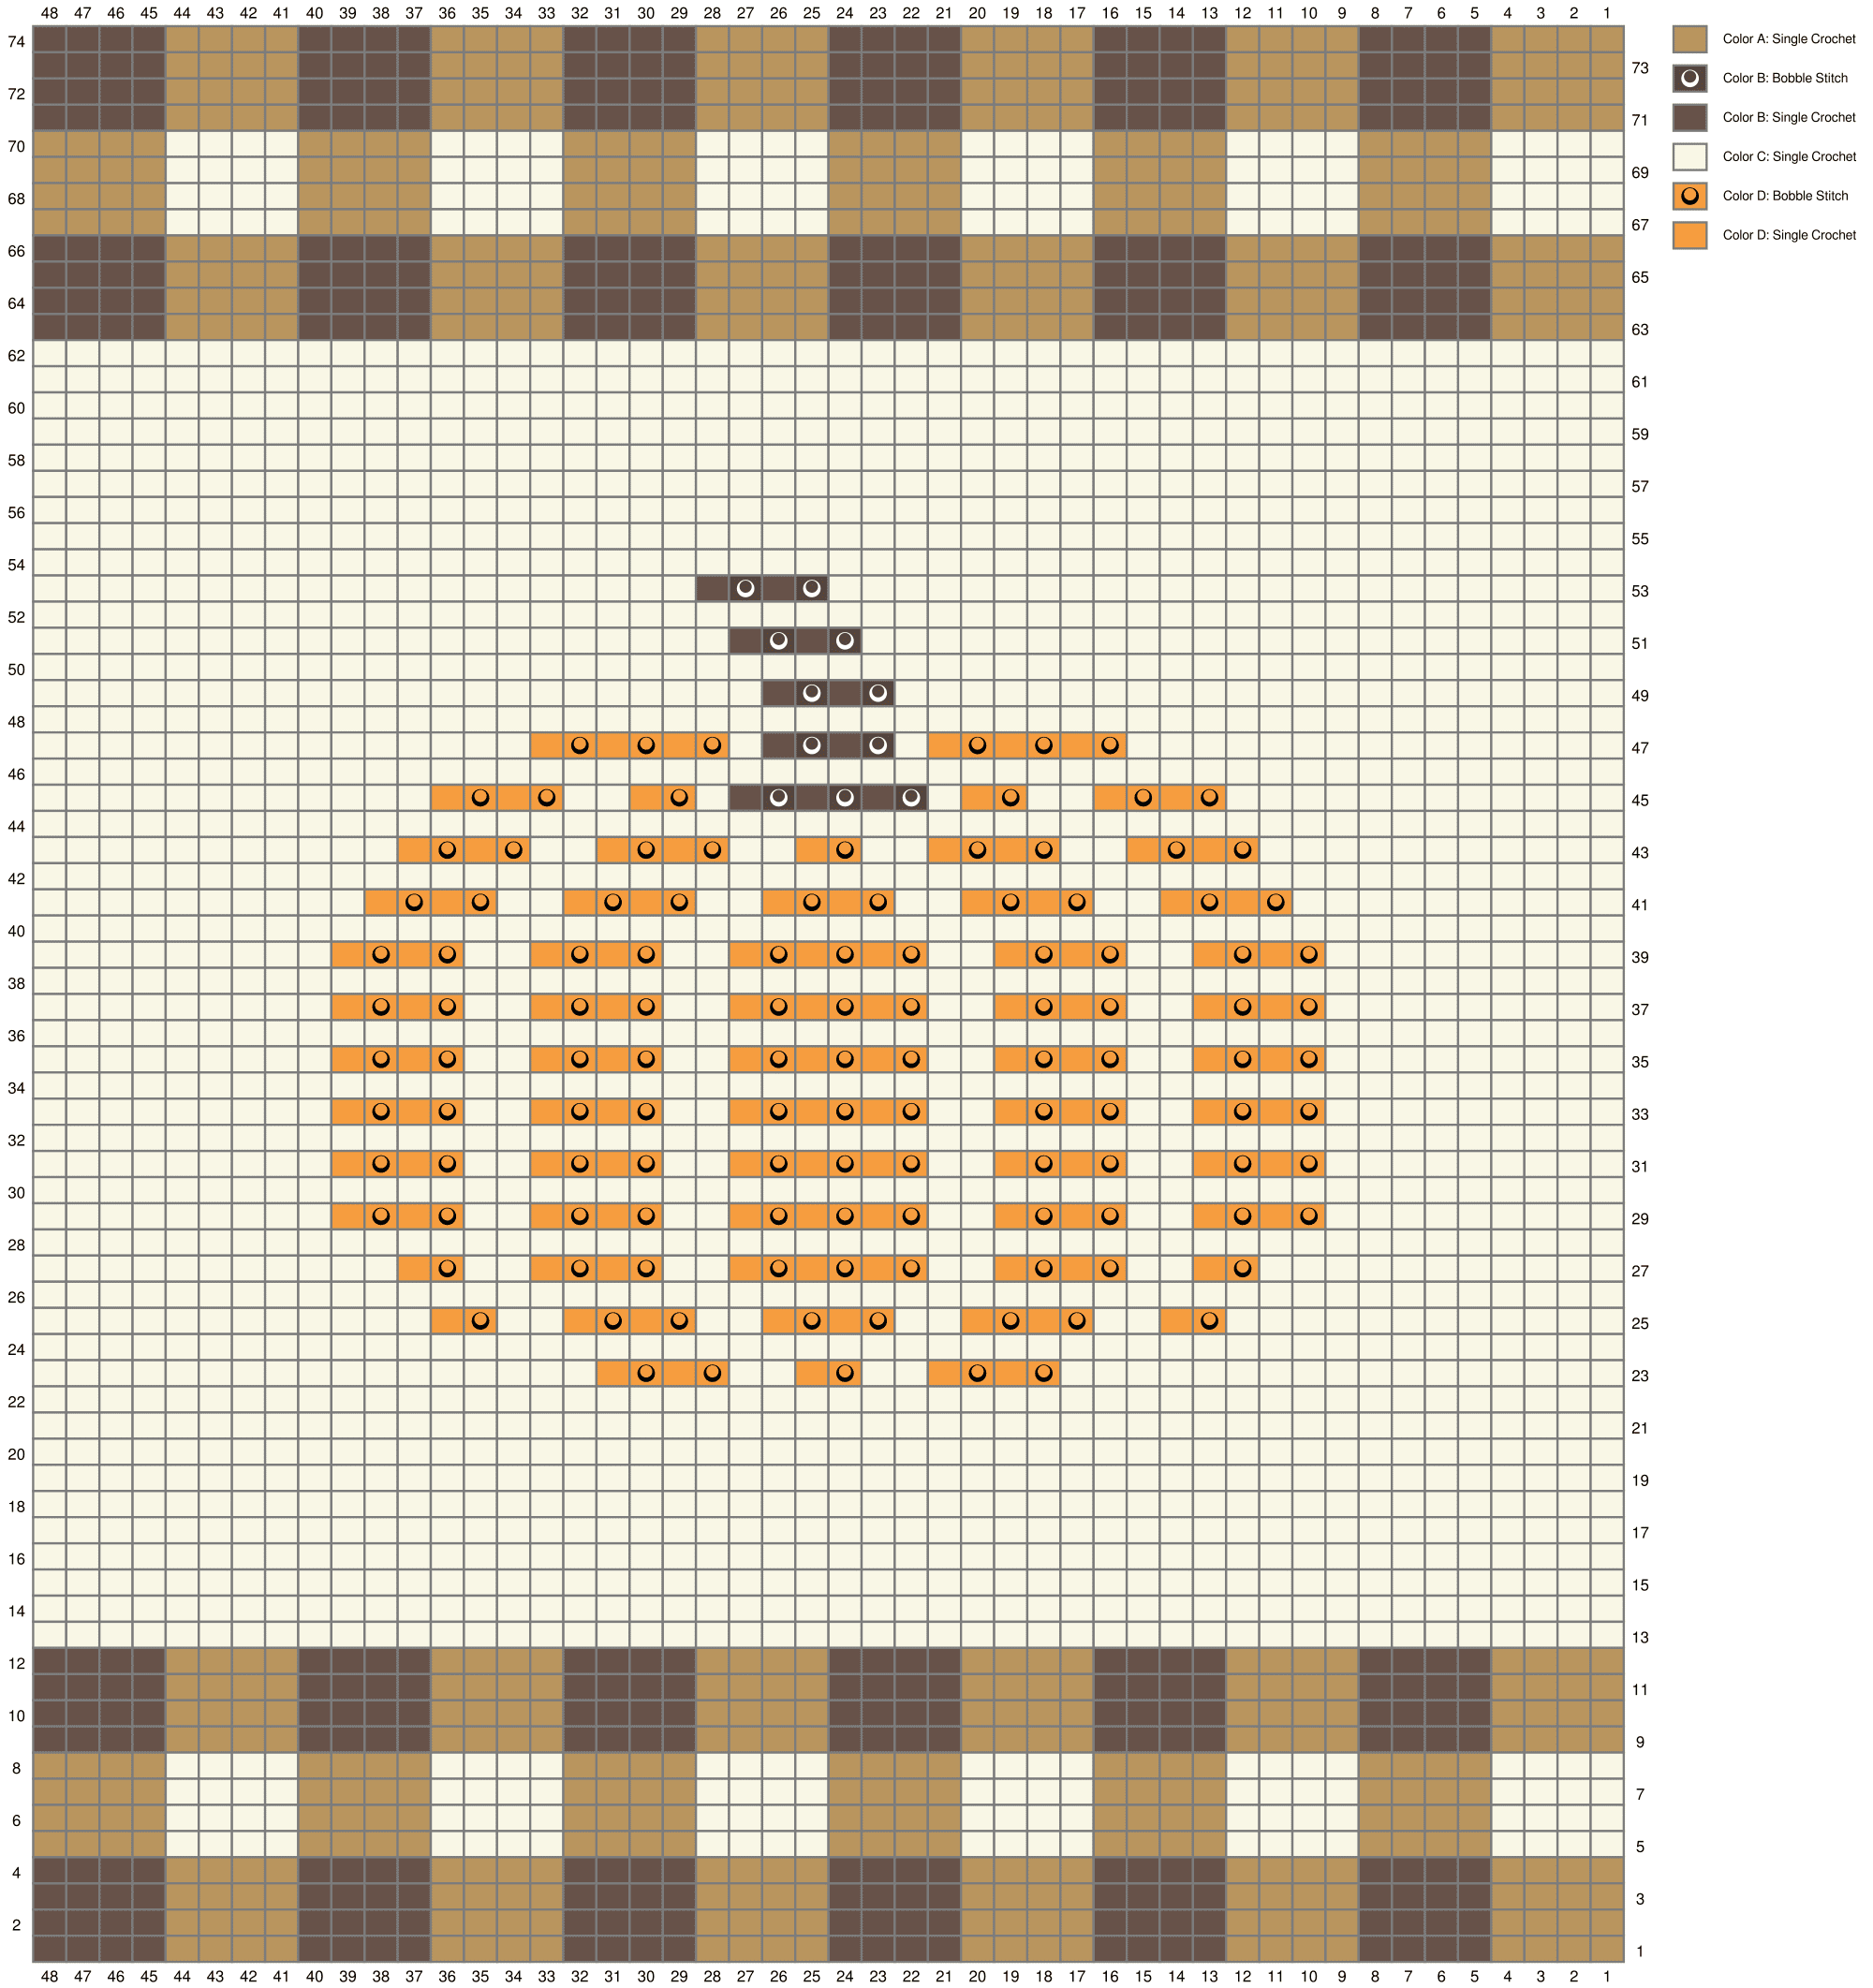
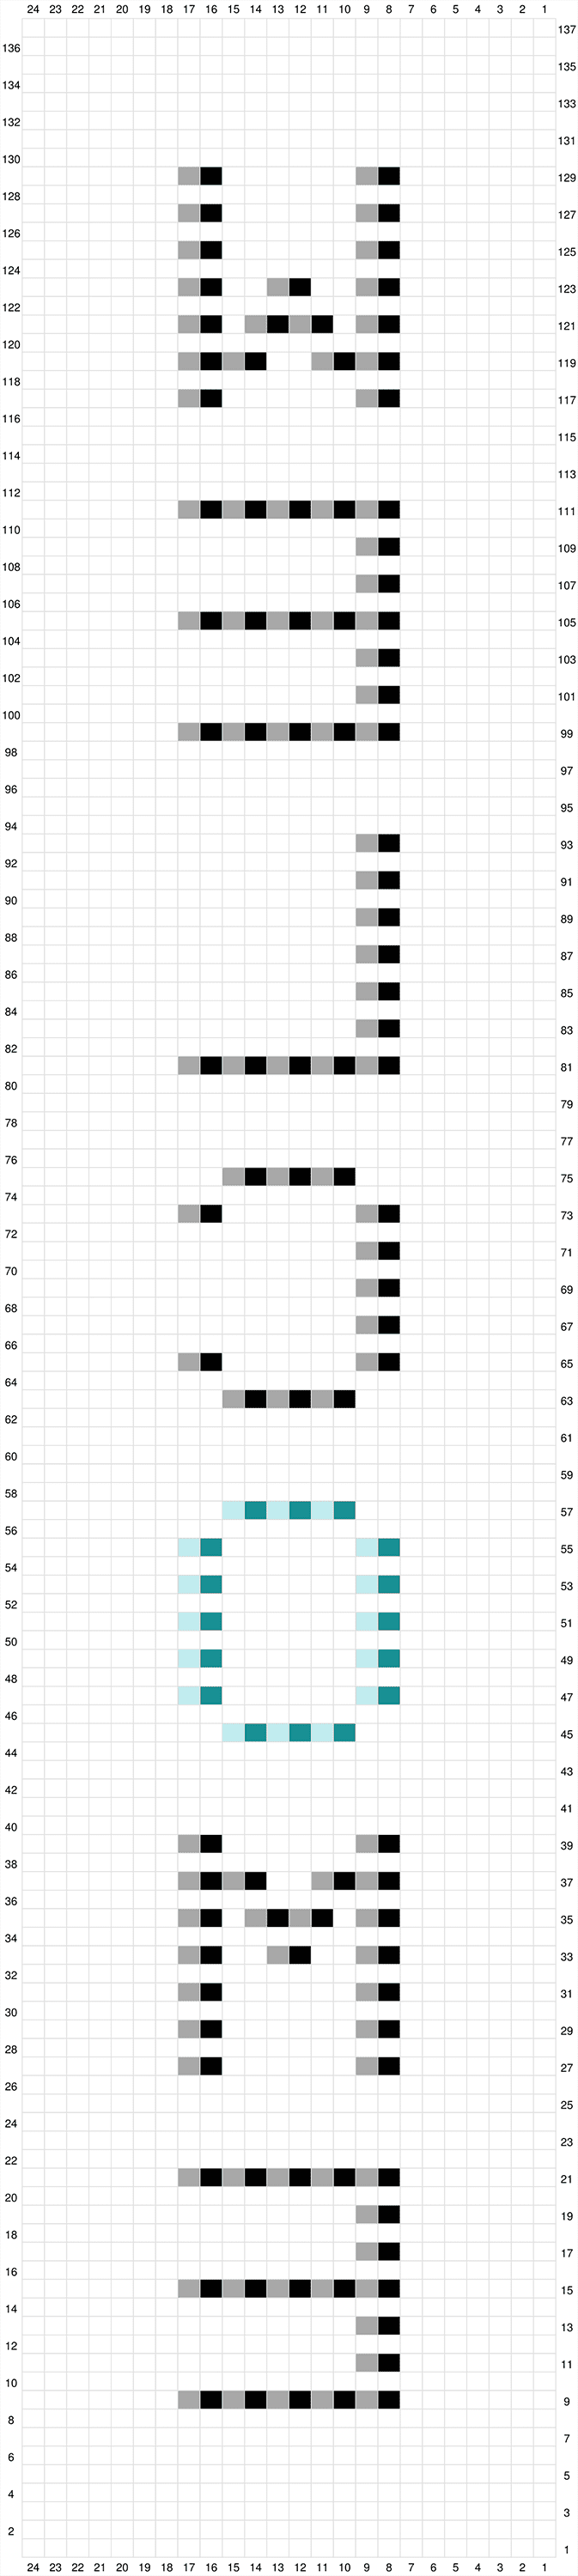
Pattern Notes: (1) CH1s at the beginning of rows/rounds do not count as stitches. (2) Instructions for the “O” in WELCOME are included in the chart in case you opt to not attach a flower there. (3) CHANGING COLORS: In the stitch before a color change, complete the final step of the stitch with the new color. In this pattern, the stitch before a color change will always be a single crochet; so you’ll work the stitch, and when it’s time to pull through the final loops, you’ll drop the first color and pull through with the new color. (4) Reading the chart: Odd-numbered rows are worked right-to-left, and even-numbered rows are worked left-to-right. (5) Carrying colors: Whenever I was using COLOR B (white), I did carry COLOR A (ivory) along because it is well-hidden in the bobble stitches. I did not, however, carry COLOR B (white) at all; I simply cut it when I was done with it, and rejoined a new strand when I needed it again.
– – – – – – – – – – – – – – –
INSTRUCTIONS FOR WALL HANGING
To begin: With COLOR A, CH25.
Row 1: SC in 2nd CH from hook and in each remaining CH. (24)
Row 2: CH1, turn. SC across. (24)
Rows 3-137: CH1, turn; complete corresponding row on color chart. (24)
(click chart to enlarge)
When you complete the chart, fasten off. Weave in COLOR A ends.
Complete the following:
Secure COLOR B ends with “Tie-and-Trim” method (use yarn needle to relocate all ends to back side of project, then tie nearby ends together with a knot and trim to half an inch or less)
Block project (optional, recommended)
Add fringe (you’ll need at least 24 8″ strands)
Attach flower (optional — pattern below)
Attach project to dowel
– – – – – – – – – – – – – – –
INSTRUCTIONS FOR FLOWER
Reference these instructions when pattern calls for front or back petals:
FRONT Petal Instructions: SL ST to FLO of next ST, CH6, SC in 3rd CH from hook, HDC in each of the 3 remaining CHS, SL ST in FLO of same ST you started in.
BACK Petal Instructions: SL ST to BLO of next ST, CH7, SC in 3rd CH from hook, HDC in each of the 4 remaining CHS, SL ST in BLO of same ST you started in.
To begin: To begin: With BROWN YARN, make a magic circle; CH1.
Round 1: 5 SC in MC. Join. (5)
Round 2: CH1. 2 SC in each ST around. Join. (10)
Round 3: CH1. 2 SC in first ST, SC in next ST, (2 SC in next ST, SC in next ST) around. Insert hook into first ST of the round to begin your join, switch to YELLOW YARN, and complete join. (15)
Fasten off BROWN YARN, leaving a long tail for attaching flower to project (if desired).
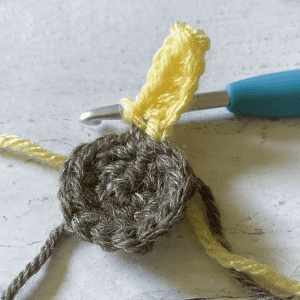
Round 4-A (1st Round of Petals): SL ST into FLO of first ST. (Mark the unworked BACK loop of the stitch with a stitch marker or bobby pin; it will come in handy later.) CH6, SC in 3rd CH from hook, HDC in each of the 3 remaining CHS, SL ST in FLO of the same stitch you started in; this is your first petal.
Complete “Front Petal Instructions” once in each of the next 3 STS. SK next ST. Complete “Front Petal Instructions” once in each of the next 4 STS. SK next ST. Complete “Front Petal Instructions” once in each of the next 5 STS.
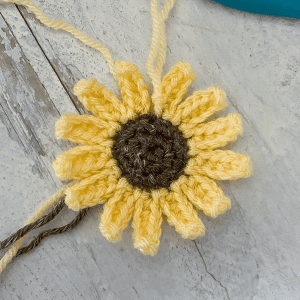
You should now have 13 petals total.
Turn flower over and notice the unworked back loops from Round 3, starting with the loop we marked with a stitch marker; we’ll be doing our second round of petals along these back loops.
Round 4-B (2nd Round of Petals): CH1. SL ST into the 1st back loop of Round 3 (the loop we marked with a stitch marker). CH7, SC in 3rd CH from hook, HDC in each of the 4 remaining CHS, SL ST in BLO of same ST you started in. This is your first back petal.
Complete “Back Petal Instructions” once in each of the next 3 STS. SK next ST. Complete “Back Petal Instructions” once in each of the next 4 STS. SK next ST. Complete “Back Petal Instructions” once in each of the next 5 STS.
You should now have 13 back petals, 26 petals total.
Leaving the long BROWN YARN tail (if you’re using it to attach your flower to your project), weave in all other ends.
SHAPING THE PETALS
If your petals are curling up too much, you can invert them by pinching the backside of the tips of the petals. Block flower if desired to maintain shape.
That’s it!
I hope you enjoyed this tutorial. If you’re sharing your project on social media, be sure to tag me @yarnandchai.design!
This pattern is part of the Yarn + Chai Spring 2023 Crochet-Along.
The final pattern in our kitchen-themed CAL is this cute and functional towel holder!
I went with the wooden ring style of towel holder because I love how it allows you to change out the towel whenever you need to without wearing out the crocheted part from over-washing.
The Striped Towel Holder is part of a matching set of three cute + modern kitchen accessories, which are all available as part of my Spring 2023 Crochet-Along. I strongly recommend completing each individual project in order (potholder, oven mitt, towel holder), as the techniques involved do build on each other somewhat.
Here is where you’ll be able to find the links for each project:
Hobby Lobby’s I Love This Cotton has definitely become my go-to cotton. It’s affordable and soft, and there are lots of colors available! But there are several other cottons to choose from when crocheting kitchen items. Here are a few other options you could use:
K + C Essential Cotton (available at Joann Fabrics)
Lily Sugar ‘n Cream
Lion Brand 24/7 Cotton
Yarn Bee Fundamental Cotton (available at Hobby Lobby)
Whatever you pick, make sure it’s a 100% cotton yarn if you’ll be making the coordinating potholder and oven mitt. Other fibers like wool and acrylic will melt if they get too hot… and what a mess that would be!
Prefer a PDF?
This pattern can be completed using the 100% free version right here on this page. However, many people prefer the convenience of a printable, ad-free PDF to holders of an All Access Pass.
– – – – – – – – – – – – – –
Striped Towel Holder
Difficulty: Easyish
Crochet Language: American Standard
Finished Size: 8.5″ long x 1.75″ wide (laid flat), not including wooden rings. When in use, towel will hang about 5.5″ from top.
Yarn: I used Hobby Lobby’s I Love This Cotton, but you can use your favorite #4 weight kitchen cotton. You’ll need approximately 50 yards of BASE COLOR (I used “Parchment” and “Dove” in my samples), and 10 yards of STRIPE COLOR (I used “White”).
Hook: H (5.5mm), or whichever hook size is needed to achieve gauge.
Gauge: 20 CSC x 19 rows = 4″ square
You’ll Also Need: 2 wooden macrame craft rings, large enough to run a towel through. I used 2.75″ wide rings (with an approx. 2″ wide opening).
Terms and Abbreviations: ST/STS (stitch/stitches) SL ST (slip stitch) CH (chain) SC (single crochet) CSC (crossed single crochet: Insert hook into stitch. Yarn UNDER, pull through; 2 loops on hook. Yarn over, pull through both loops. FLO (front loop only) JOIN (Join with a SL ST to the top loops of the first ST of the round)
Notes: (1) Pattern is worked in joined, unturned rounds. CSC stitches worked into FLO stack nice and straight on top of each other, which allows the seam to stay straight and clean. (2) CH1s at the beginning of rounds do not count as stitches in final stitch counts. (3) Unless otherwise noted, the first stitch of each round is always worked into the same ST as the CH1. (4) The slip stitched stripes (worked in white in my sample) are labeled in the pattern as “STRIPE #1”, “STRIPE #2”, etc. They are not a part of the main round count because when we work these stripes after a round of CSC, the top loops of those CSCs remain exposed so that when we move on to the next round of CSC, we are still working into the loops from the previous round of CSC. (This will probably make more sense once you’ve gotten started!) (5) Instructional photos are located below their respective written instructions.
– – – – – – – – – – – – – – –
PATTERN
– – – – – – – – – – – – – – –
To begin: With BASE COLOR, make a slipknot (1st image). Drape working yarn over top of ring (2nd image).
Base Row: Reach hook through ring opening, yarn over, pull hook back through opening; two loops on hook (1st image — one loop will be loose). Yarn over and pull through both loops — this is your first SC (2nd image). Repeat 9 times for a total of 10 SC (3rd image).
Tip: If any of the strands around the ring are crossed with each other, you can use a yarn needle to uncross them for a nice clean look.
Round 1: CH1, turn. CSC in FLO of each ST across (1st image). Turn again, and notice the 10 back loops left exposed (2nd image). CSC in each one. Join (3rd image, top view). (20)
Rounds 2-3: CH1 (do not turn). CSC in FLO of each ST around. Join. (20)
Pull up a large loop so that your work doesn’t unravel, then remove your hook.
STRIPE #1: Pull STRIPE COLOR through top loops of first ST of the round. Do not chain; instead, immediately insert hook into next stitch (1st image) and work a SL ST (2nd image). Continue to SL ST in each ST around (3rd image). Fasten off without joining (4th image). (19)
Notice how the top loops from the previous BASE COLOR round are still visible (image); that’s where you’ll work the next round as we continue on.
Round 4: Reinsert hook into loop from BASE COLOR. CH1 (do not turn). CSC in FLO of each ST around. Join. (20)
At this point, we’re going to PAUSE to take care of our STRIPE ends before they get buried too far inside the project and out of reach. We’ll use our yarn needle to manually create two more stitches to close the gap between the first and last slip stitches, giving us an almost seamless finish for the stripes. Here’s how to do it:
1. With seam area visible, notice two locations (holes) as marked on the image. Hole #1 is halfway between the first and last slip stitches of the STRIPE round; Hole #2 is where the top loops of the first slip stitch come together (the bottom of the sideways “V”). Keep these locations in mind.
2. Thread finishing tail through yarn needle, and make a loop. Hold it in place with your thumb.
3. Insert yarn needle down between the two loops of the last SL ST (same place the tail is coming from) …
4. … and up through Hole #1, making sure it travels up through the loop you created.
5. Pull it through; you’ll see our first manually-created stitch form.
6. Repeat the process: Make a loop, insert needle down into the same place the tail is emerging from, and up through Hole #2 this time. Pull through. Image shows what it should look like once you’ve finished both stitches.
7. We need the finishing tail on the inside of our project, so insert yarn needle into the first slip stitch of the round …
8. … and pull it tight.
9. Tie 3 or 4 knots with the yarn tails, then trim the excess yarn. (This will be hidden inside the project, but if you would rather weave in your ends, go ahead.)
Continuing on with our pattern…
Rounds 5-8:CH1 (do not turn). CSC in FLO of each ST around. Join. (20)
STRIPE #2: Follow instructions from STRIPE #1. (19)
Round 9: Return to BASE COLOR, CH1 (do not turn). CSC in FLO of each ST around. Join. (20)
Take care of STRIPE #2 ends the same way you did for STRIPE #1.
Rounds 10-13: CH1 (do not turn). CSC in FLO of each ST around. Join. (20)
STRIPE #3: Follow instructions from STRIPE #1. (19)
Round 14: Return to BASE COLOR, CH1 (do not turn). CSC in FLO of each ST around. Join. (20)
Take care of STRIPE #3 ends.
Rounds 15-18: CH1 (do not turn). CSC in FLO of each ST around. Join. (20)
STRIPE #4: Follow instructions from STRIPE #1. (19)
Round 19: Return to BASE COLOR, CH1 (do not turn). CSC in FLO of each ST around. Join. (20)
Take care of STRIPE #4 ends.
Rounds 20-23: CH1 (do not turn). CSC in FLO of each ST around. Join. (20)
STRIPE #5: Follow instructions from STRIPE #1. (19)
Round 24: Return to BASE COLOR, CH1 (do not turn). CSC in FLO of each ST around. Join. (20)
Take care of STRIPE #5 ends.
Rounds 25-28: CH1 (do not turn). CSC in FLO of each ST around. Join. (20)
STRIPE #6: Follow instructions from STRIPE #1. (19)
Round 29: Return to BASE COLOR, CH1 (do not turn). CSC in FLO of each ST around. Join. (20)
Take care of STRIPE #6 ends.
Rounds 30-31: CH1 (do not turn). CSC in FLO of each ST around. Join. (20)
Fasten off and weave in any ends.
SEAMING + ADDING SECOND RING
Lay work flat, make sure seam is straight, and align the top stitches; rejoin BASE COLOR at rightmost stitch, going through all 4 loops (2 loops from the front stitch, and two loops from the corresponding back stitch).
CH1, CSC in same ST and in each ST across. Fasten off, leaving a long finishing tail (about a yard) for attaching second ring. Weave in starting tail.
Thread finishing tail through yarn needle. Hold ring up to edge of project and begin to attach it by inserting yarn needle up through ring and down through first stitch; repeat, working through the same stitch a second time. Continue process with each stitch across the seam, being sure to work into each stitch twice. You should finish with about 20 loops around the ring.
Fasten off and weave in finishing tail.
That’s it!
I hope you enjoyed this tutorial. If you’re sharing your project on social media, be sure to tag me @yarnandchai.design!
For several Fall seasons, I’ve thought to myself, “I bet a mosaic pumpkin would be really cute.” But I never got around to making one until now, and let me tell you… I was right. IT’S SO CUTE!
If you’ve done any of my other mosaic patterns (like the Mosaic Basket, Mosaic Potholder or Mosaic Bucket Bag), then this pumpkin should be a breeze. If you haven’t, that’s ok too… it’s not as complicated as it looks!
About the Yarn
My mosaic patterns call for one yarn color as a base, and another darker color for the spike stitches. For these pumpkins, I mostly opted for the new Lazy Days yarn from Lion Brand as my base color (it’s an awesome chainette-style yarn that is so easy to work with). I say “mostly” because the light tan pumpkin in my photos was actually made with Yarn Bee Comfy Classic, which is a slightly thicker #4 yarn… so it came out slightly larger than the other size large pumpkin I made. And for the thread color on all of my pumpkins, I used #10 cotton crochet thread.
For reference, here’s a breakdown of the yarn and size of each pumpkin in my photos:
YARN A:
Purple pumpkin (small): LB Lazy Days in “Woodrose”
Orange pumpkin (large): LB Lazy Days in “Clay”
Tan pumpkin (large): Yarn Bee Comfy Classic in “Linen”
Greenish yellow pumpkin (small): LB Lazy Days in “Lichen”
Aqua pumpkin (medium): LB Lazy Days in “Surf Spray”
YARN B:
All pumpkins: Artiste #10 Cotton Crochet Thread in “Chocolate”
Video Help (sort of)
I do not currently have a video tutorial for the mosaic pumpkins. However, if you need a visual on how the spike stitches work to form the mosaic pattern, you might take a look at my video tutorial for the Mosaic Basket! Start at the 19:33 mark for a demonstration on the spike stitch and how to switch between yarns.
Prefer a PDF?
This pattern can be completed using the 100% free version right here on this page. However, many people prefer the convenience of a printable, ad-free PDF.
All-Access Passholders get the ad-free version of this and all of my other blog patterns. It’s a pretty sweet deal, if I do say so myself! Learn more about it here or continuing scrolling for the free version.
Finished Sizes: Laid flat, before stuffing: 4″ x 4″ (S), 4.75″ x 4.75″ (M), 5.5″ x 5.5″ (L) Stuffed and assembled: 3.5″ x 2.25″ (S), 4″ x 2.5″ (M), 4.5″ x 2.75″ (L)
Yarn:
Yarn A: Approximately 50 yards (S), 65 yards (M), or 80 yards (L) of Lion Brand Lazy Days, a #4 weight chainette-style yarn, or other #4 weight yarn.
Yarn B: Approximately 45 yards (S), 60 yards (M), or 75 yards (L) of Artiste #10 Cotton Crochet Thread or other #10 crochet thread. For best results, YARN B should be a darker color than YARN A.
Hook: G (4.0mm)
Gauge: Not crucial, but 18 SC x 22 rows = 4″
You’ll also need: Yarn needles, regular & extra long (your fingers will thank you!) Polyester fiber-fill 1″ stick or other chosen material for stem Fast-acting glue Twine and other decorations (optional)
Terms and Abbreviations: MC (magic circle – view tutorial here) ST/STS (stitch/stitches) SL ST (slip stitch) CH (chain) SC (single crochet) SC Spike Stitch (Instead of inserting your hook into the top loops of the stitch, insert them into its base, then complete an SC. This will wrap your SCs over the top of the SCs from the previous round.)
Notes: (1) Pattern is worked in a seamless round. Do not join, chain and/or turn unless instructed. If needed, use a stitch marker to mark the beginning of your rounds. (2) Pattern is written for the smallest size, with medium and large sizes in parentheses. Any time there is only one number, it applies to all sizes. (3) Because we utilize the SC Spike Stitch for entire rounds throughout the pattern, we will be referring to those rounds as an extension of the SC rounds they are being worked into. For example, if Round 3 is a round of SC, then the very next round which places spike stitches on top of those SCs will be referred to as Round 3B. This just makes for easier counting. (4) Yarn, hook size and gauge are only meant as a guide, and this pattern will work with any yarn you choose; just use a hook that is smaller than the yarn’s recommended size for a nice tight fabric, and keep in mind your yarn amounts and finished dimensions will be affected by any changes. (5) When stuffing your pumpkins, it’s important that you don’t over-stuff. If the rounds start to separate and the stuffing is showing through them, ease up.
– – – – – – – – – – – – – – –
INSTRUCTIONS
To begin: With YARN A, make a magic circle; CH1.
Round 1: 12 (14, 16) SC in MC. (Don’t pull the circle closed yet; we’ll do that later!) Stitch count: 12 (14, 16)
Round 2: 3SC in each ST around. (It will be crowded; that’s ok.) Stitch count: 36 (42, 48)
Round 3: SC in each ST around. Pull the loop on your hook up a couple inches so it doesn’t unravel, then remove your hook. Stitch count: 36 (42, 48)
Round 3B: Insert hook into top loops of next ST. Attach YARN B and CH1; SC into same ST, then SC SPIKE STITCH into next ST and each remaining ST around. Pull the loop on your hook up a couple inches so it doesn’t unravel, then remove your hook. Stitch count: 36 (42, 48)
Round 4: Reinsert hook into loop from YARN A. SC in each ST around (you’re working in the top loops of the SC Spike Stitches from the previous round). Remove hook. Stitch count: 36 (42, 48)
Round 4B: Reinsert hook into loop from YARN B. SC Spike Stitch in each ST around. Remove hook. Stitch count: 36 (42, 48)
Round 19 (21, 23): Reinsert hook into loop from YARN A. SC in each ST around (still working in the top loops of the SC Spike Stitches from the previous round). Stitch count: 36 (42, 48)
To finish: SL ST in FLO of each of the next 2 STS to smooth down the round, then fasten off, leaving a finishing tail about a yard long. Fasten off YARN B and weave in end. Pull on your YARN A starting tail to cinch the first round of the pumpkin closed, then weave in that tail securely and trim excess. Weave in YARN B starting tail and any other loose ends, not including the long YARN A finishing tail.
Cinching, Stuffing and Closing: Make sure pumpkin is right-side out. Use yarn needle and finishing tail to weave in and out along the stitches of the final round, weaving every 3 stitches until you’re back where you started (1st photo*). Set yarn needle down and stuff pumpkin (2nd photo), then pull yarn tail to cinch closed (3rd photo). Weave yarn needle across the cinch in a couple different directions to reinforce closure; tie a knot, but do not fasten off.
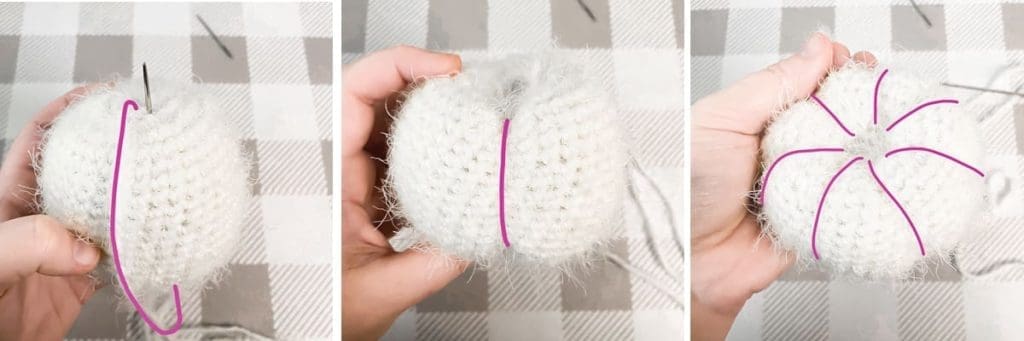
Shaping: Using extra long yarn needle and finishing tail, bring the tail down along the outside of the pumpkin, then back through the pumpkin down the center (1st photo). Pull tight to cinch the pumpkin (2nd photo) and hold it in place with your other hand as you move on to the next cinch, continuing the process around the whole pumpkin (3rd photo). I eyeballed where I wanted my cinches, and ended up with 6; but pumpkins come in all different variations, so feel free to play with it to find whatever you think looks best!
When you finish the last cinch, tie a knot and weave in the end, or pull the knot inside the pumpkin to hide it.
Stem Embellish chosen stem with leaves, twine, covered wire, etc. (optional), then use fast-acting glue to secure to the center of the pumpkin.
That’s it!
I hope you enjoyed this pattern. If you’re sharing your project on social media, be sure to hashtag #mosaicpumpkin and tag me @yarnandchai.design so that I can see your beautiful creations!
“It wouldn’t be fall without a new Yarn + Chai pumpkin pattern!”
That’s what someone commented when I showed a preview of this pattern, and it put such a smile on my face. And she’s right. It wouldn’t!
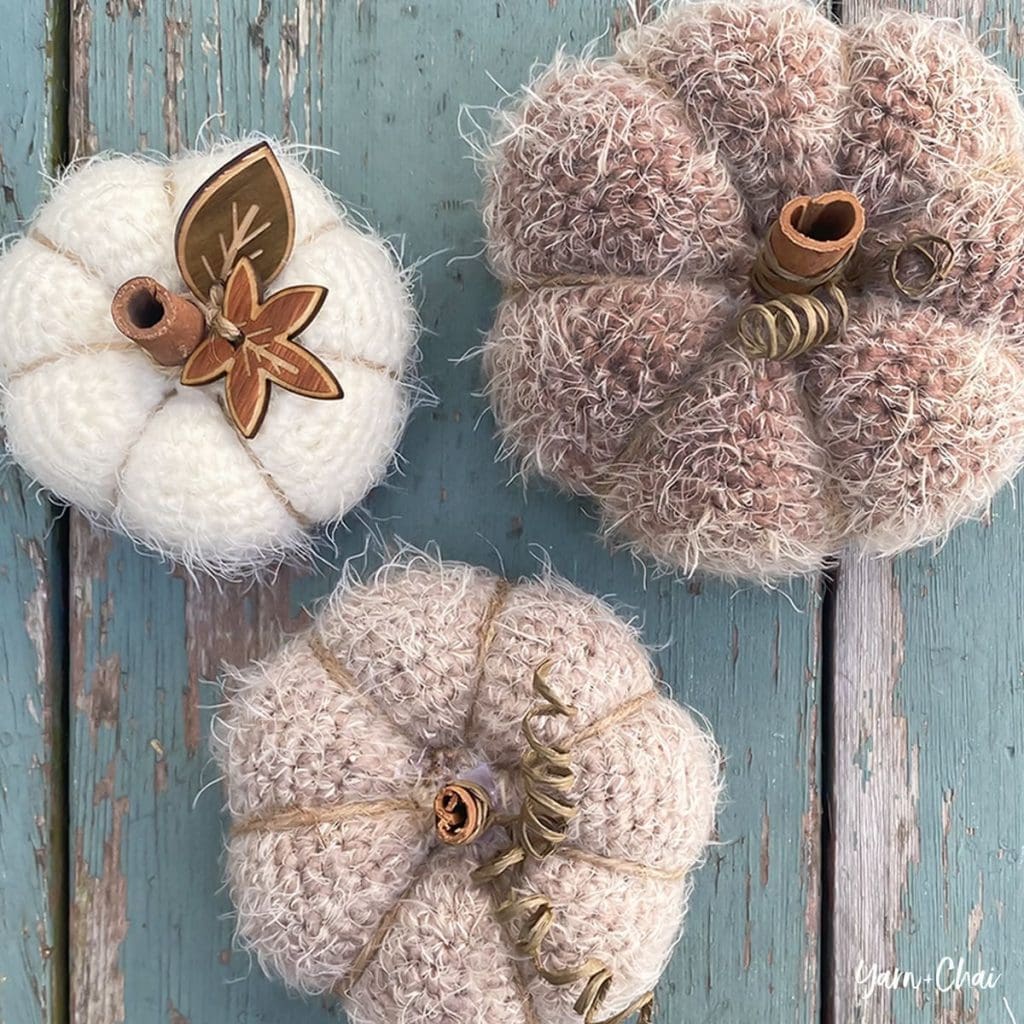
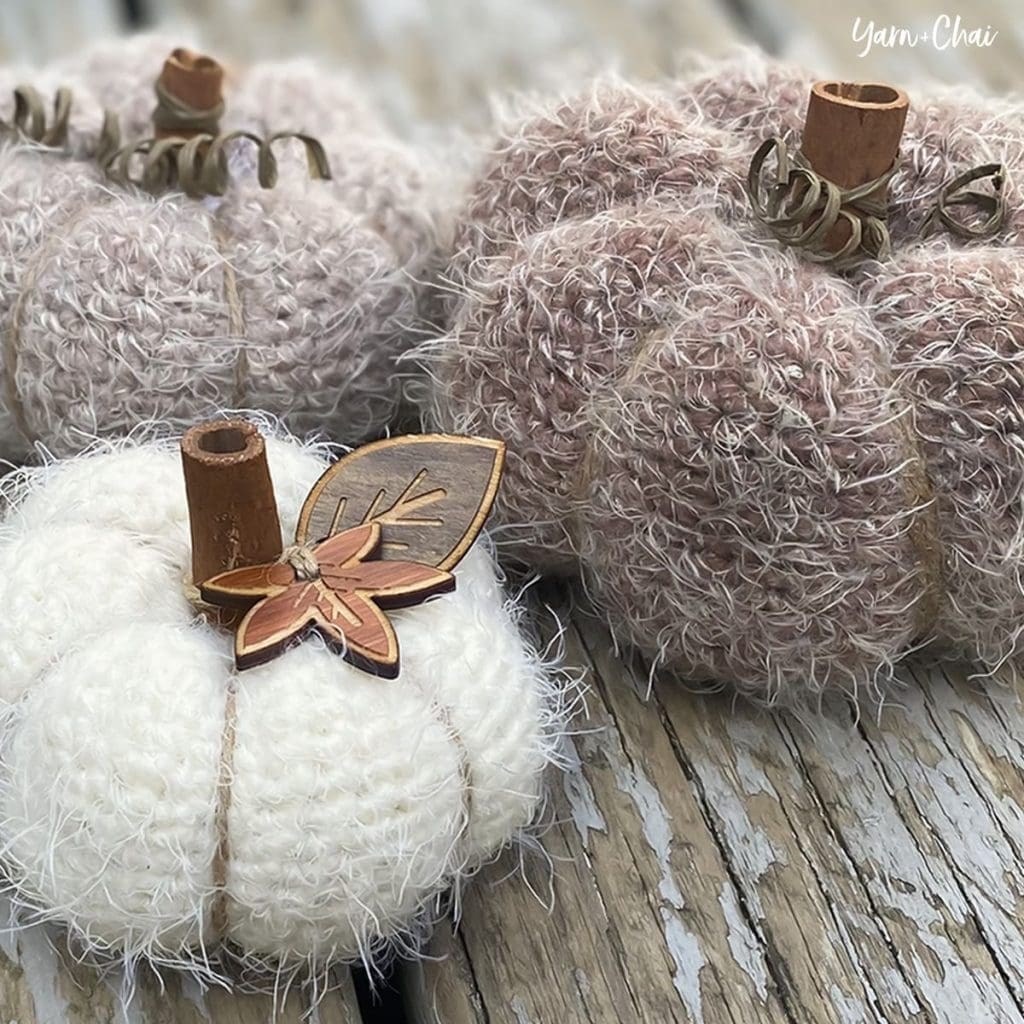
Pumpkins are such a fun, simple home decor item to crochet. And you can get away with making different styles and throwing them all together… and they’ll still look great! So why not try adding a fuzzy pumpkin (or a dozen) to your home collection or your autumn fair booth?
About the Yarn
For this pattern, I chose Caron Latte Cakes. Despite the fuzziness of this eyelash yarn, Latte Cakes are actually really nice to work with. The yarn glides on the hook without being slippery, and the stitches are visible enough to be easily worked into. And it’s soooooooft.
What makes the Caron Latte Cakes extra fun is the long sections of color contained in the self-striping versions. It makes creating a set of coordinated pumpkins a breeze… we just have to “deconstruct” the cakes to get to the colors we want! (Deconstructing is basically separating a multi-colored skein into its individual colors so that you can access them when needed. You can use a yarn winder, but I found it pretty easy to remove the colors one-by-one starting at the center of the cake.)
And there’s a lot of yarn in one cake… enough for up to 6 of the large sized pumpkins!
Wooden Leaves
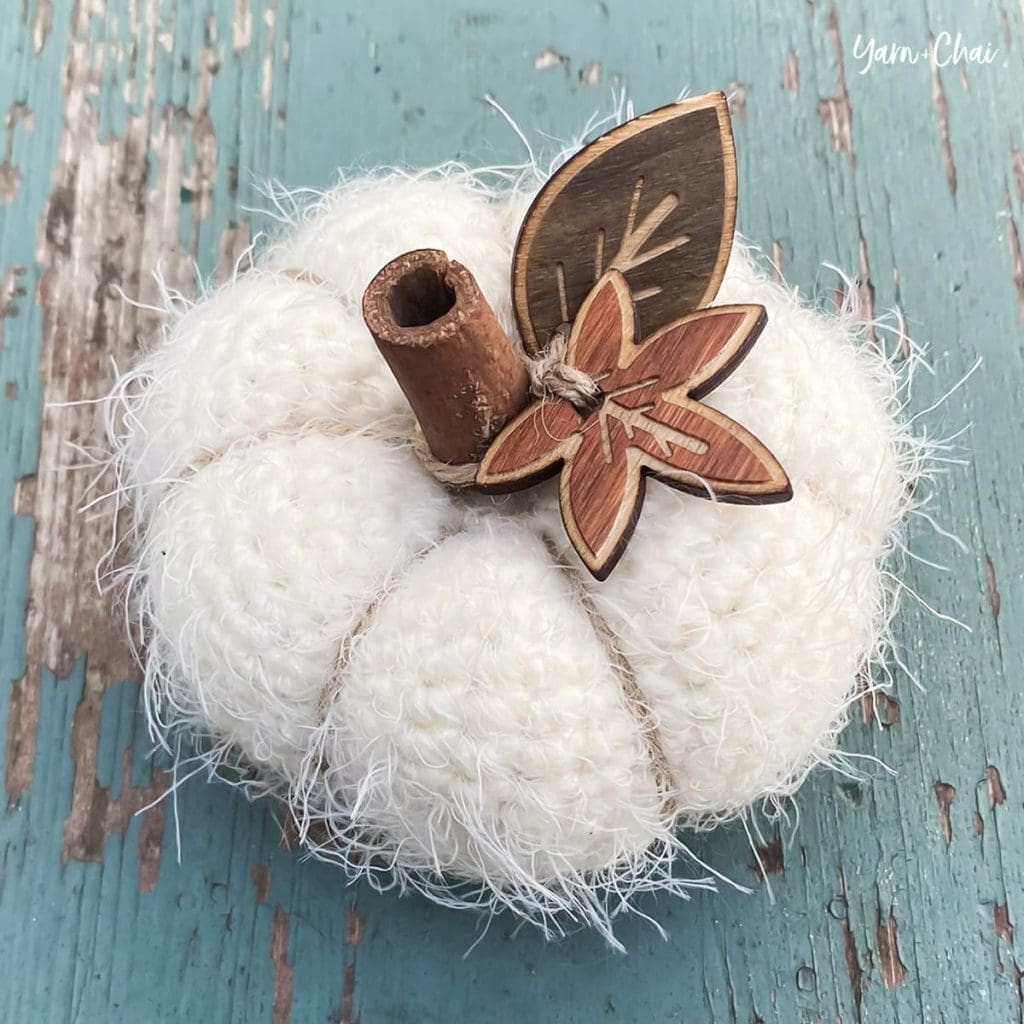
My absolute favorite feature of these pumpkins, though, is the wooden leaves, which arrived just in time for my little photo shoot. The moment I saw them online, I knew I had to have them for this year’s pumpkins!
Not surprisingly, these gorgeous leaf tags come from my favorite Etsy shop: All This Wood. (That’s where I get cork and leather tags for my hats and baskets, too!)
Prefer a PDF?
This pattern can be completed using the 100% free version right here on this page. However, many people prefer the convenience of a printable, ad-free PDF.
All-Access Passholders get the ad-free version of this and all of my other blog patterns. It’s a pretty sweet deal, if I do say so myself! Learn more about it here or continuing scrolling for the free version.
– – – – – – – – – – – – – –
Country Cottage Pumpkin
View on Ravelry
Difficulty: Easy
Crochet Language: American Standard
Finished Sizes: Laid flat, before stuffing: 4″ x 4″ (S), 4.5″ x 4.5″ (M), 5″ x 5″ (L) Stuffed and assembled: 3.5″ x 1.75″ (S), 4″ x 2.25″ (M), 4.5″ x 2.75″ (L)
Yarn: Approximately 40 yards (S), 60 yards (M), or 85 yards (L) of Caron Latte Cakes, a #5 weight, self-striping, eyelash-style acrylic/nylon yarn. I used color “Coconut Cream.” You’ll get several pumpkins from one Latte Cake!
Hook: E (3.5mm)
Gauge: Not crucial, but 18SC x 23 rows = 4″ square
You’ll also need: Yarn needles, regular & extra long (your fingers will thank you!) Polyester fiber-fill 1″ cinnamon stick or other chosen material for stem Fast-acting glue Twine and other decorations (optional)
Terms and Abbreviations: MC (magic circle – view tutorial here) ST/STS (stitch/stitches) SL ST (slip stitch) CH (chain) SC (single crochet)
Notes: (1) You’ll need to “deconstruct” your Latte Cake yarn to separate it into its various colors, since one pumpkin will probably require yarn from more than one section of the chosen color. I found it relatively easy to pull out one color at a time (starting from the center of the cake) and cut, but you could also use a yarn winder to wind the entire cake into several yarn balls. (2) Pattern is worked in a seamless round. Do not join, chain and/or turn unless instructed. Use a stitch marker to mark the beginning of your rounds. (3) Pattern is written for the smallest size, with medium and large sizes in parentheses. Any time there is only one number, it applies to all sizes. (4) Yarn, hook size and gauge are only meant as a guide, and this pattern will work with any yarn you choose; just use a hook that is smaller than the yarn’s recommended size for a nice tight fabric, and keep in mind your yarn amounts and finished dimensions will be affected by any changes.
– – – – – – – – – – – – – – –
INSTRUCTIONS
To begin: Make a magic circle; CH1.
Round 1: 12 (14, 16) SC in MC. (Don’t pull the circle closed yet; we’ll do that later!) Stitch count: 12 (14, 16)
Round 2: 3SC in each ST around. (It will be crowded; that’s ok.) Stitch count: 36 (42, 48)
Rounds 3-22 (3-26, 3-30): SC in each ST around. Stitch count: 36 (42, 48)
To finish: SL ST in FLO of each of the next 2 STS to smooth down the round, then fasten off, leaving a finishing tail about 2 yards long. Pull on your starting tail to cinch the first round of the pumpkin closed, then weave in that tail securely and trim excess.
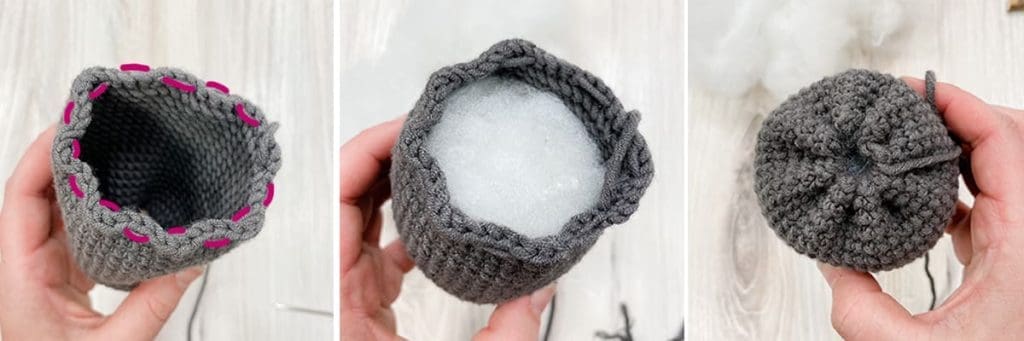
Cinching, Stuffing and Closing: Make sure pumpkin is right-side out. Use yarn needle and finishing tail to weave in and out along the stitches of the final round, weaving every 3 stitches until you’re back where you started (1st photo*). Set yarn needle down and stuff pumpkin (2nd photo), then pull yarn tail to cinch closed (3rd photo). Weave yarn needle across the cinch in a couple different directions to reinforce closure; tie a knot, but do not fasten off.
*These photos are actually from the Petite Autumn Pumpkin pattern; the concept is the same, but much easier to see on a pumpkin that isn’t so fuzzy!
Shaping: Using extra long yarn needle and finishing tail, bring the tail down along the outside of the pumpkin, then back through the pumpkin up the center (1st photo). Pull tight to cinch the pumpkin (2nd photo) and hold it in place with your other hand as you move on to the next cinch, continuing the process around the whole pumpkin (3rd photo). I eyeballed where I wanted my cinches, and ended up with 7; but pumpkins come in all different variations, so feel free to play with it to find whatever you think looks best!
When you finish the last cinch, tie a knot and weave in the end, or pull the knot inside the pumpkin to hide it.
Adding Twine (Optional) Cut a long length of twine or jute and use a yarn needle to retrace the cinches, the same way you created them in the previous step. Secure and trim or hide excess.
Stem Embellish chosen stem with leaves, twine, covered wire, etc. (optional), then use fast-acting glue to secure to the center of the pumpkin.
That’s it!
I hope you enjoyed this pattern. If you’re sharing your project on social media, be sure to hashtag #countrycottagepumpkin and tag me @yarnandchai.design so that I can see your beautiful creations!
Spring is here, and before we know it, summer will arrive with its holidays, pool parties and barbecues.
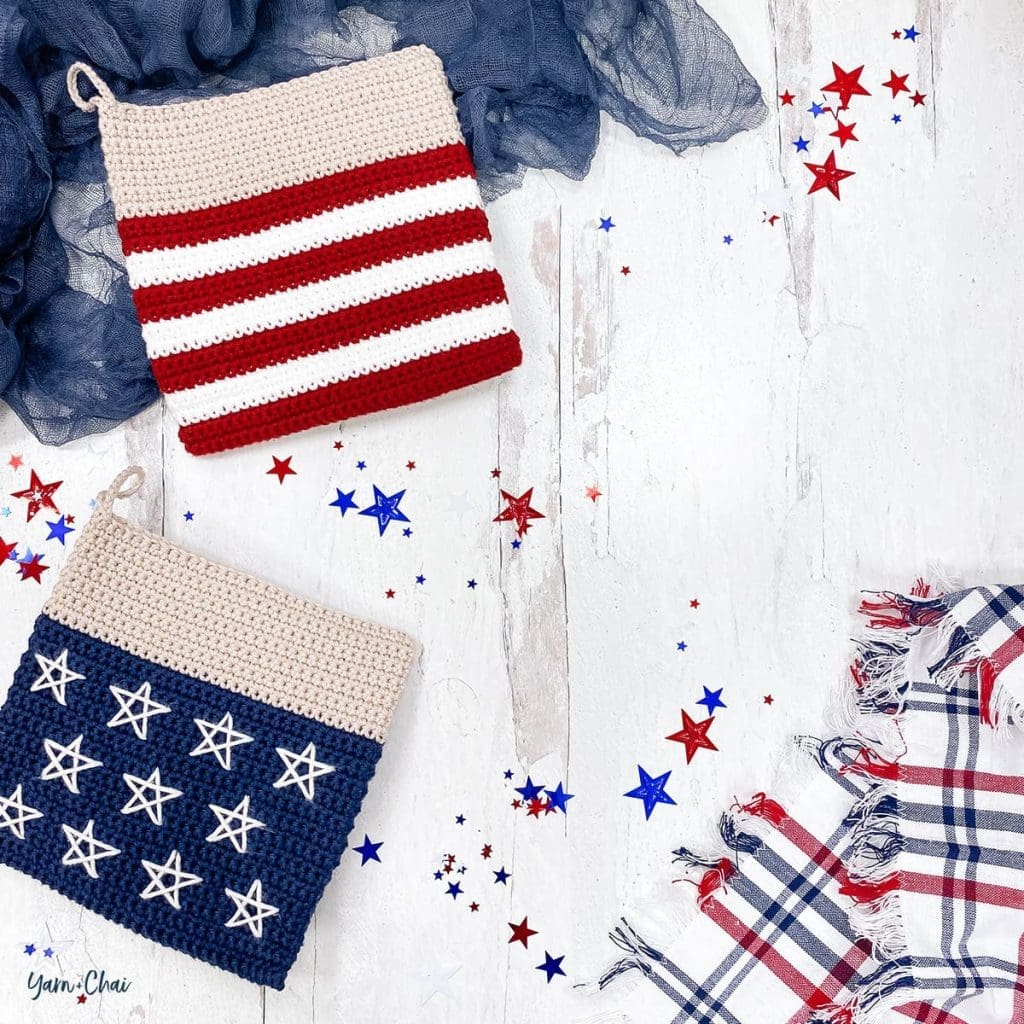
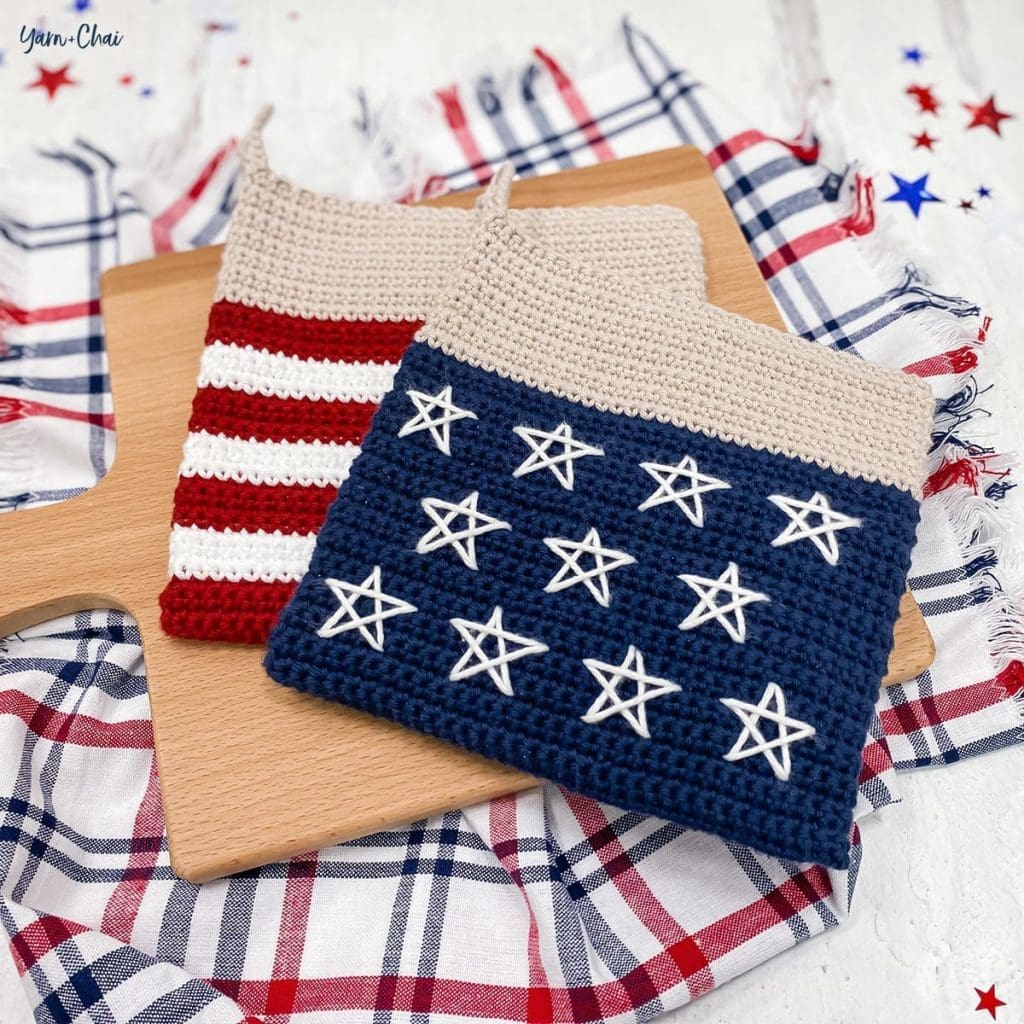
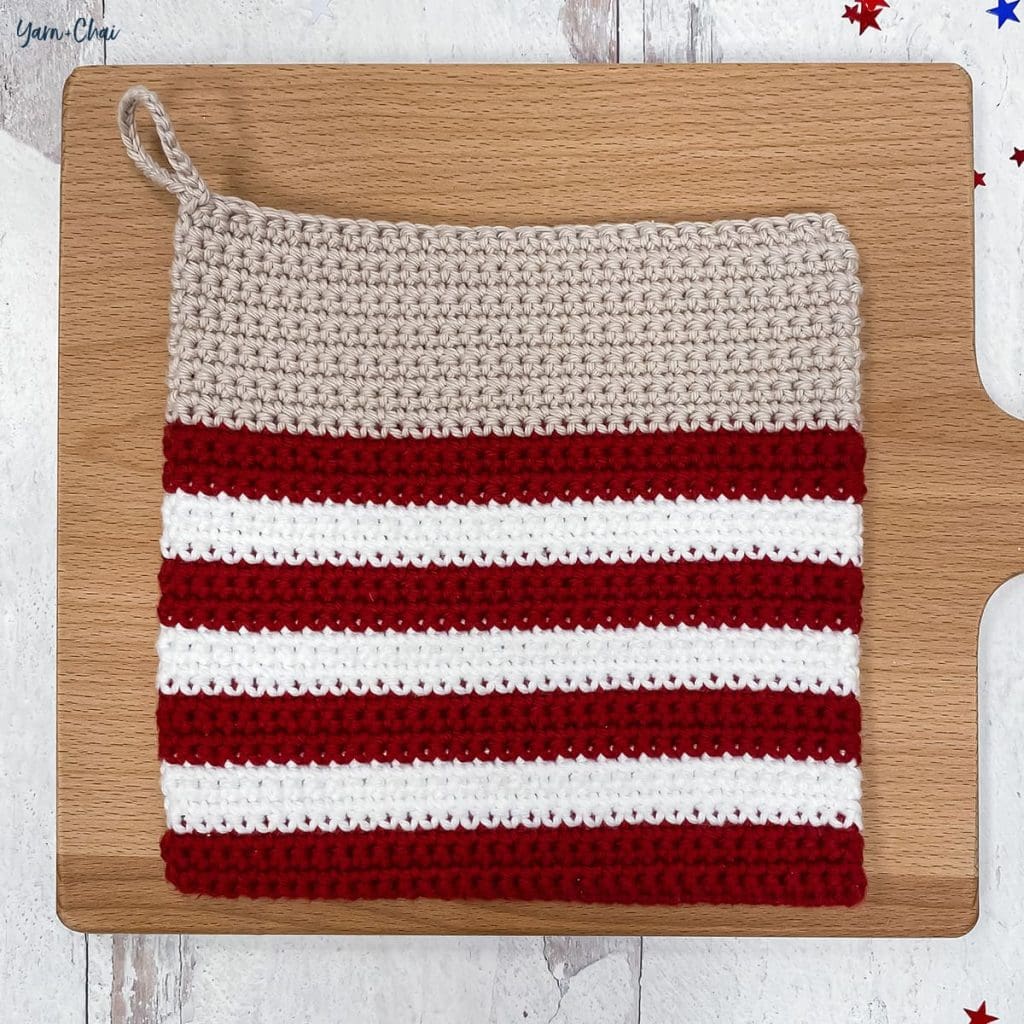
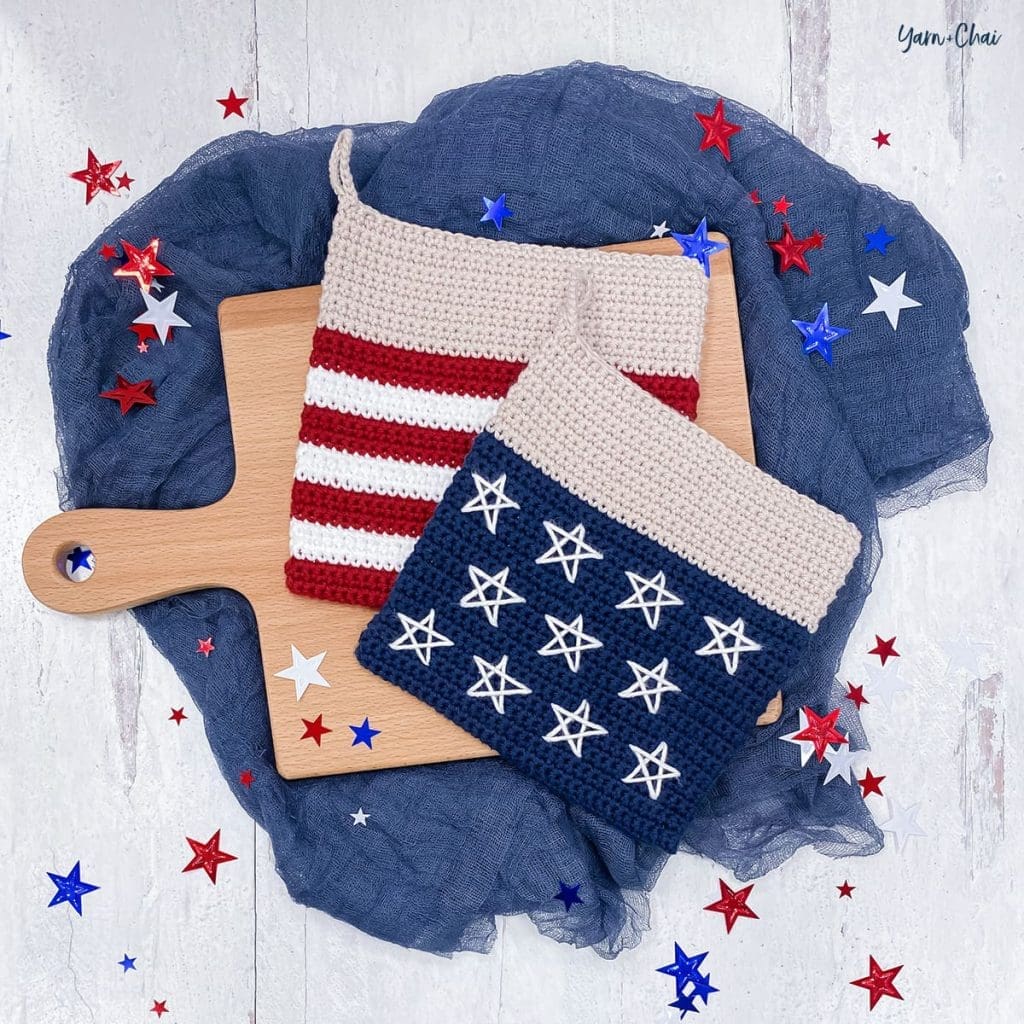
These double-thick red, white and blue potholders are the perfect project to get you in the patriotic spirit!
It’s important to use a 100% cotton yarn for items that will come into contact with intense heat, such as a potholder. For the red, white and blue colors, I used my go-to: Hobby Lobby’s I Love This Cotton. For the tan color at the top of the potholders, I turned to one of their newer yarns, Yarn Bee Pima Suprema, which is also a #4 weight and 100% cotton. I love the color “Bone”; It’s a beautiful light tan and exactly what I was looking for. Pima Suprema is a bit softer than I Love This Cotton, but we’re using such a small hook that it wasn’t an issue. Of course, there are tan colors within the I Love This Cotton line… use the one that calls to you!
Prefer a PDF?
This pattern can be completed using the 100% free version right here on this page. However, many people prefer the convenience of a printable, ad-free PDF.
All-Access Passholders get the ad-free version of this and all of my other blog patterns. It’s a pretty sweet deal, if I do say so myself! Learn more about it here or continuing scrolling for the free version.
Yarn: #4 worsted weight, 100% cotton yarn in 4 colors, in the amounts below:
COLOR A (red): 65 yards. I used I Love This Cotton in “Burnt Sienna”.
COLOR B (white): 65 yards. I used I Love This Cotton in “White”.
COLOR C (tan): 105 yards. I used Yarn Bee Pima Suprema in “Bone”.
COLOR D (blue): 105 yards. I used I Love This Cotton in ‘Dark Denim”.
Hook: 3.5mm (E)
Gauge: 18SC x 23 rows = 4″ square
You’ll also need: Yarn needle
Terms and Abbreviations: ST/STS (stitch/stitches) SL ST (slip stitch) CH (chain) SC (single crochet)
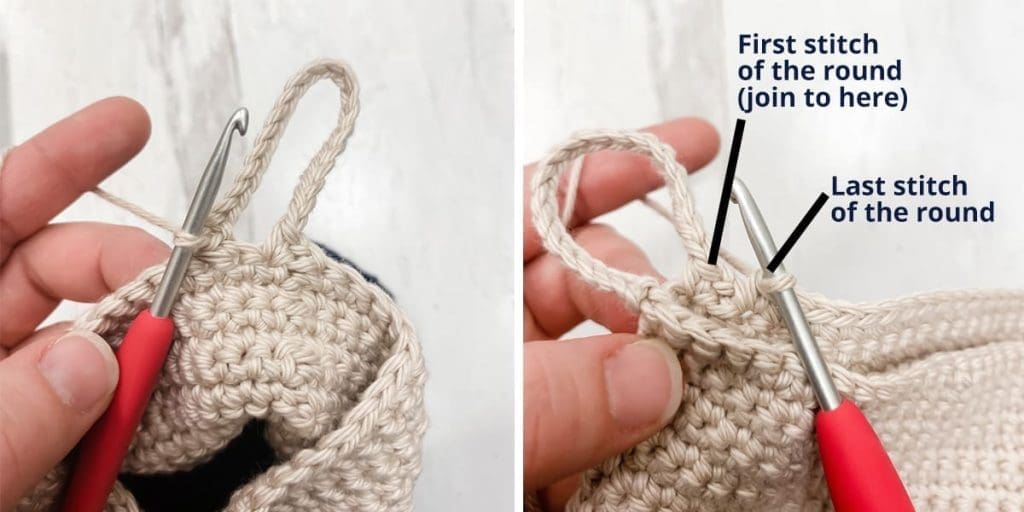
Notes: (1) Pattern is worked in joined, turned rounds. When instructed to “join”, always join with a SL ST to the top of the first SC of the round. (2) For the striped potholder, you can carry your colors up the inside of the potholder so that there are fewer ends to weave in.
– – – – – – – – – – – – – – –
STRIPES POTHOLDER
To begin: With COLOR A, CH34.
Round 1: SC in 2nd CH from hook and in each remaining CH. Working around to the opposite side of the starting chain, SC in each CH across. You have now worked in both sides of each chain. Join. (68)
Rounds 2-4: CH1, turn. SC in each ST around. Join. (68)
Switch to COLOR B.
Rounds 5-8: CH1, turn. SC in each ST around. Join. (68)
Switch to COLOR A.
Rounds 9-12: CH1, turn. SC in each ST around. Join. (68)
Switch to COLOR B.
Rounds 13-16: CH1, turn. SC in each ST around. Join. (68)
Switch to COLOR A.
Rounds 17-20: CH1, turn. SC in each ST around. Join. (68)
Switch to COLOR B.
Rounds 21-24: CH1, turn. SC in each ST around. Join. (68)
Switch to COLOR A. (You can fasten off COLOR B.)
Rounds 25-28: CH1, turn. SC in each ST around. Join. (68)
Switch to COLOR C. (You can fasten off COLOR A.)
Rounds 29-40: CH1, turn. SC in each ST around. Join. (68)
Round 41: CH1, turn. SC in first ST, CH20, SC into next ST to form a loop (first image). SC in each remaining ST around (second image). Join. (68 + CH20)
Fasten off, leaving a long tail for closing the top of the potholder. Weave in all other ends.
SEAMING
Holding the potholder and making sure the top stitches are lined up so that the seam on the side is straight up-and-down, use the finishing tail and a yarn needle to sew the potholder closed. Secure with a knot, then run tail down into the potholder using the yarn needle; pull the knot so that it disappears into the inside of the potholder. Trim end so that it also disappears into the inside of the potholder.
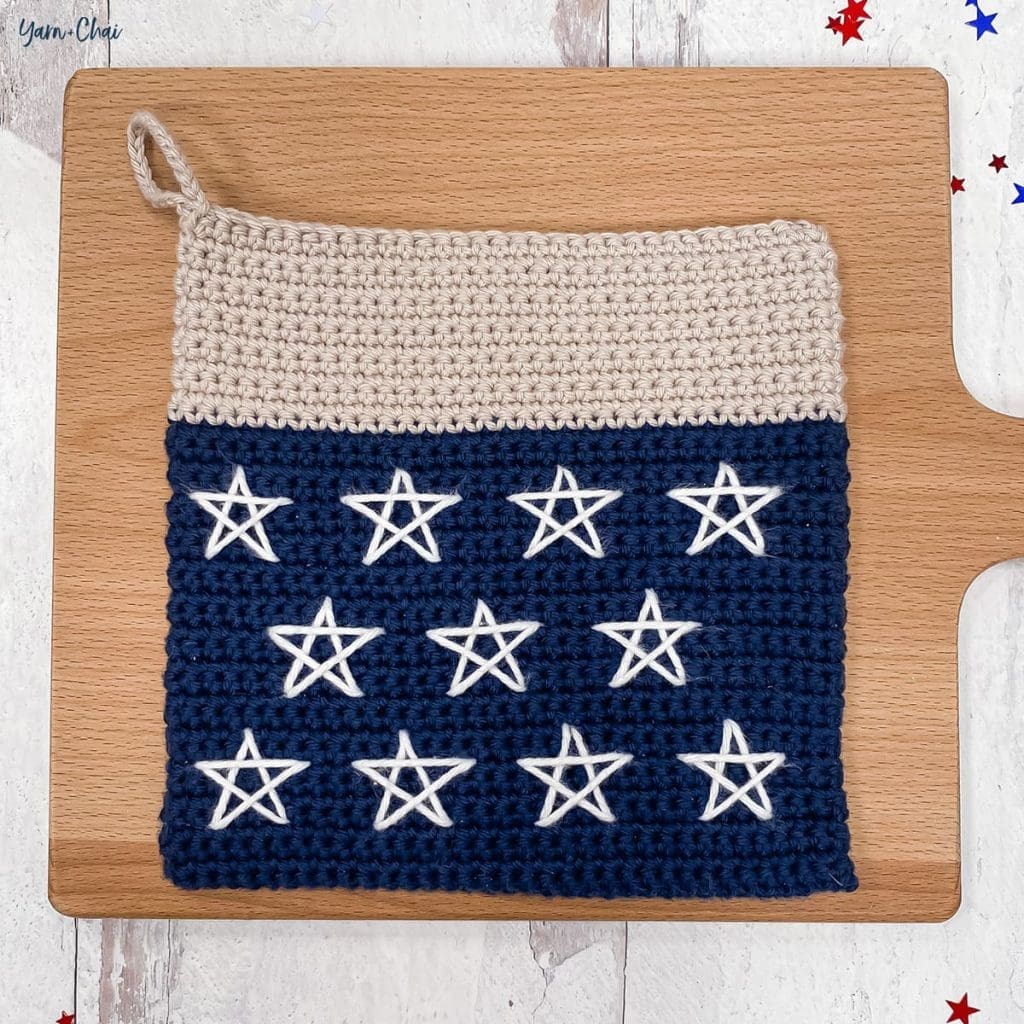
STARS POTHOLDER
To begin: With COLOR D, CH34.
Round 1: SC in 2nd CH from hook and in each remaining CH. Working around to the opposite side of the starting chain, SC in each CH across. You have now worked in both sides of each chain. Join. (68)
Rounds 2-28: CH1, turn. SC in each ST around. Join. (68)
Switch to COLOR C. (You can fasten off COLOR D.)
Rounds 29-40: CH1, turn. SC in each ST around. Join. (68)
Round 41: CH1, turn. SC in first ST, CH20, SL ST into next ST to form a loop. SC in each remaining ST around. Join. (68 + CH20)
Fasten off, leaving a long tail for closing the top of the potholder. Weave in all other ends.
EMBROIDERING THE STARS
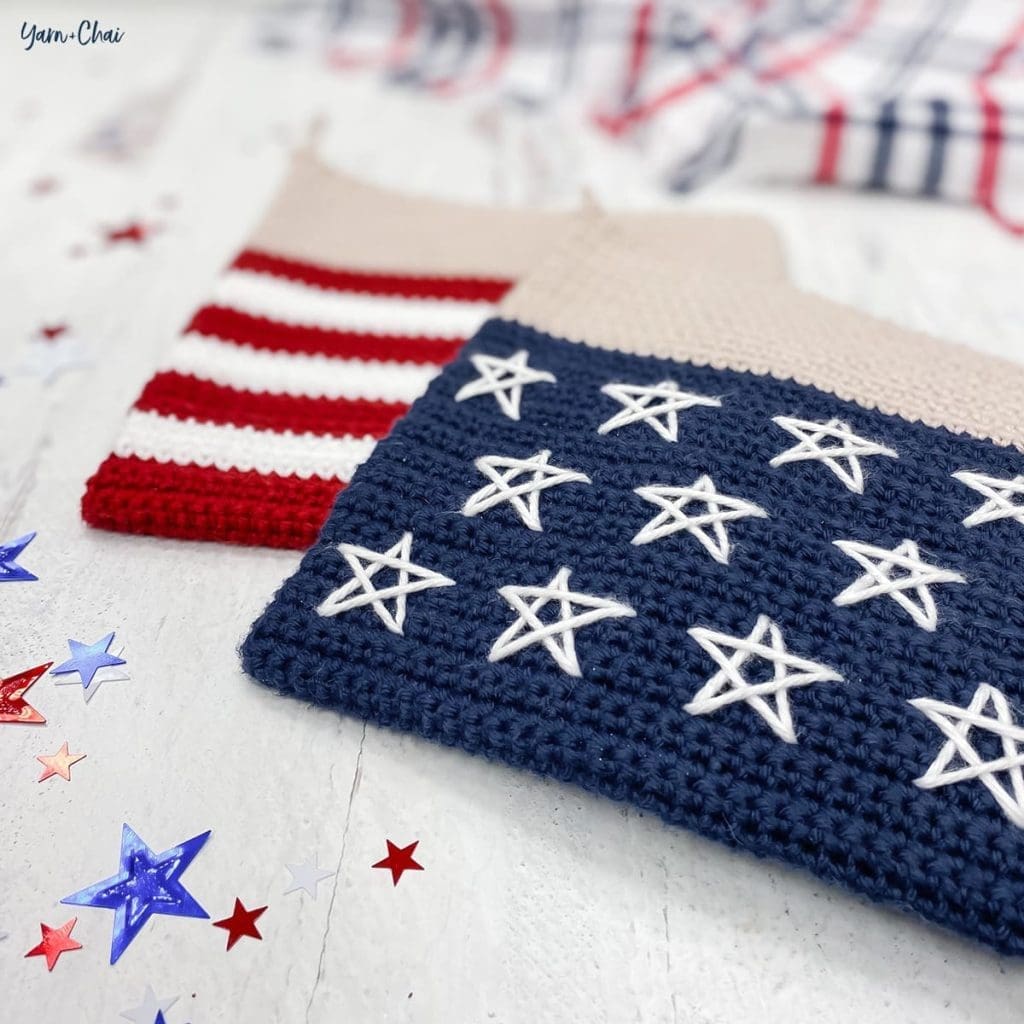
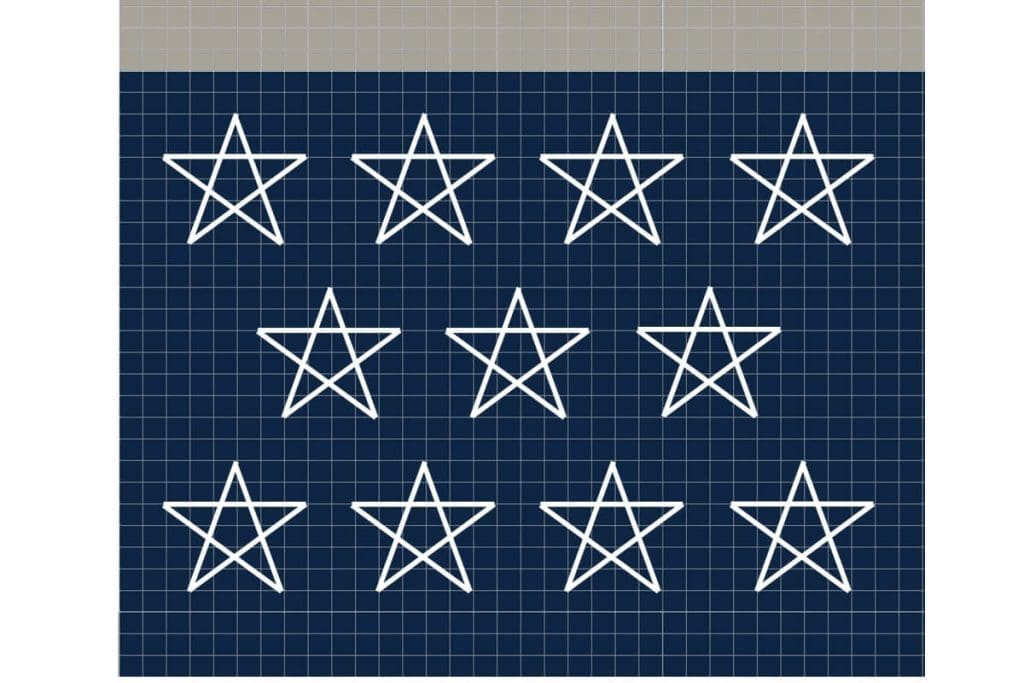
Using COLOR B (white), a yarn needle, and the chart below, embroider your stars onto both sides of the potholder by cutting a long length of yarn (however long you are comfortable with; you can just start with a new length of yarn when you run out) and following the pattern on the chart.
A few tips:
Each star is 6 rows tall and 6 stitches wide. There are 8 stitches between the top points of stars that are next to each other, and two empty rows between each row of stars.
If you look closely on my sample potholder (the finished one, not this chart), you’ll see that my first star (the top left) starts one stitch to the left from what the chart shows; I shifted everything over one stitch when creating this chart for you because it evens out the spacing around the outer edges of the blue section. I just didn’t want to rip out all of my stars, so I called it good enough. Follow the chart, and don’t be confused if you notice this slight difference in my photos. 🙂
Try to be consistent when pulling each strand through; too tight, and your flat potholder will start to warp, but too loose, and they’ll start to look sloppy.
Don’t forget to secure the start and end of each strand of white yarn! You can weave in the ends or tie knots and leave them loose inside the potholder, as long as they’re secure.
SEAMING
Holding the potholder and making sure the top stitches are lined up so that the seam on the side is straight up-and-down, use the finishing tail and a yarn needle to sew the potholder closed. Secure with a knot, then run tail down into the potholder using the yarn needle; pull the knot so that it disappears into the inside of the potholder. Trim end so that it also disappears into the inside of the potholder.
That’s it!
I hope you enjoyed this tutorial. If you’re sharing your project on social media, be sure to tag me @yarnandchai.design!
I feel like Christmas was… a week ago? Yet here we are, getting ready for Easter!
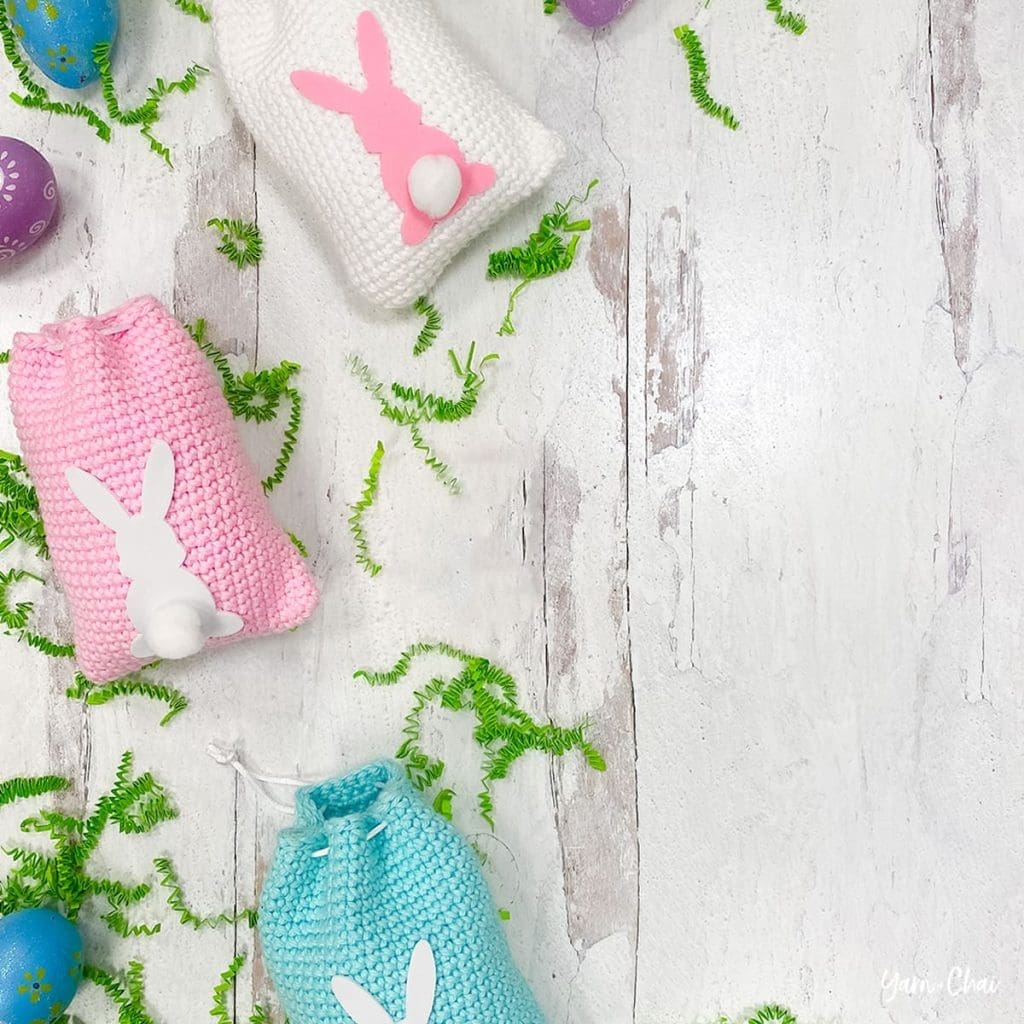
When I made the St. Patrick’s Day Treat Bags (inspired by the Potpourri Pouches), I decided these little crocheted pouches could be redone to accommodate pretty much any holiday. They are perfect for little surprises for the kids or grandkids, students, Sunday school kids, and more. It doesn’t hurt that they can be made quickly and easily.
So here’s my Easter version… solid-colored bag, a simple bunny silhouette (included), and a little puffy tail to finish it off!
Prefer a PDF?
This pattern can be completed using the 100% free version right here on this page. However, many people prefer the convenience of a printable, ad-free PDF.
All-Access Passholders get the ad-free version of this and all of my other blog patterns. It’s a pretty sweet deal, if I do say so myself! Learn more about it here or continuing scrolling for the free version.
Yarn: Approximately 70 yards of a #4 weight yarn. My samples were made with Hobby Lobby’s I Love This Cotton in White, Turquoise, and Pink.
Hook: 4.5mm
Gauge: 20CSC x 22 rows = 4″ square
You’ll also need: Thin ribbon or cord, sheet of craft foam or felt, small white craft pom (for bunny tail), super glue or glue gun, cord stop (optional)
Terms and Abbreviations: ST/STS (stitch/stitches) SL ST (slip stitch) CH (chain) CSC (crossed single crochet: Insert hook into stitch. Yarn UNDER, pull through; 2 loops on hook. Yarn over, pull through both loops.)
Notes: (1) This pattern is worked in a seamless spiral. Do not join, chain or turn unless instructed. (2) To change the width, add or subtract any number from the starting chain. To change the height, add or subtract any number of rounds. (3) I used the CSC (crossed single crochet) stitch throughout because I like the look of it, but a regular SC will work fine as well. (4) The downloadable bunny silhouette is 1.5″ in width. Check to make sure your program or device has not resized it before printing.
– – – – – – – – – – – – – – –
INSTRUCTIONS
To begin: CH21.
Round 1: CSC in 2nd CH from hook and in each remaining CH. Working around to the opposite side of the starting chain, CSC in each CH across. You have now worked in both sides of each chain. (40)
Rounds 2-29: CSC in each ST around. (40)
Round 30: SL ST in each ST around. (40)
Fasten off and weave in all ends.
ADDING THE BUNNY
Use this template to cut out a 1.5″ wide bunny silhouette from craft foam or your material of choice. (I used my Cricut machine to cut mine, but you can also just print the bunny, cut it out and use it as a stencil!)
(click bunny to download)
Glue the bunny to the treat bag, about 3 rows from the bottom, centered. Add the small pom for the bunny’s tail.
DRAWSTRING CLOSURE
Using a yarn needle, locate the top center of the bag and count 2 STS to the right; run cord through from the outside going in, just underneath the final round. Weave in and out every 4 STS all around the top of the bag; cord should finish on the outside, 4 STS away from where it first went in.
Thread both ends through a cord stop if desired (I didn’t, but will probably go back and add one for better closure), then secure with a knot. Trim as needed.
That’s it!
I hope you enjoyed this tutorial. If you’re sharing your project on social media, be sure to tag me @yarnandchai.design!
Get the Mosaic Basket Pattern for FREE!
Sign up for the Yarn + Chai email newsletter and receive the Mosaic Basket Pattern in ad-free PDF format for FREE!