Category: Wall Hangings

  • I Saw That – Santa Wall Hanging

    I Saw That – Santa Wall Hanging

    With October behind us, it’s (gasp) time to start thinking winter vibes! Fall is my favorite season, but winter is definitely a close second. Because CHRISTMAS!

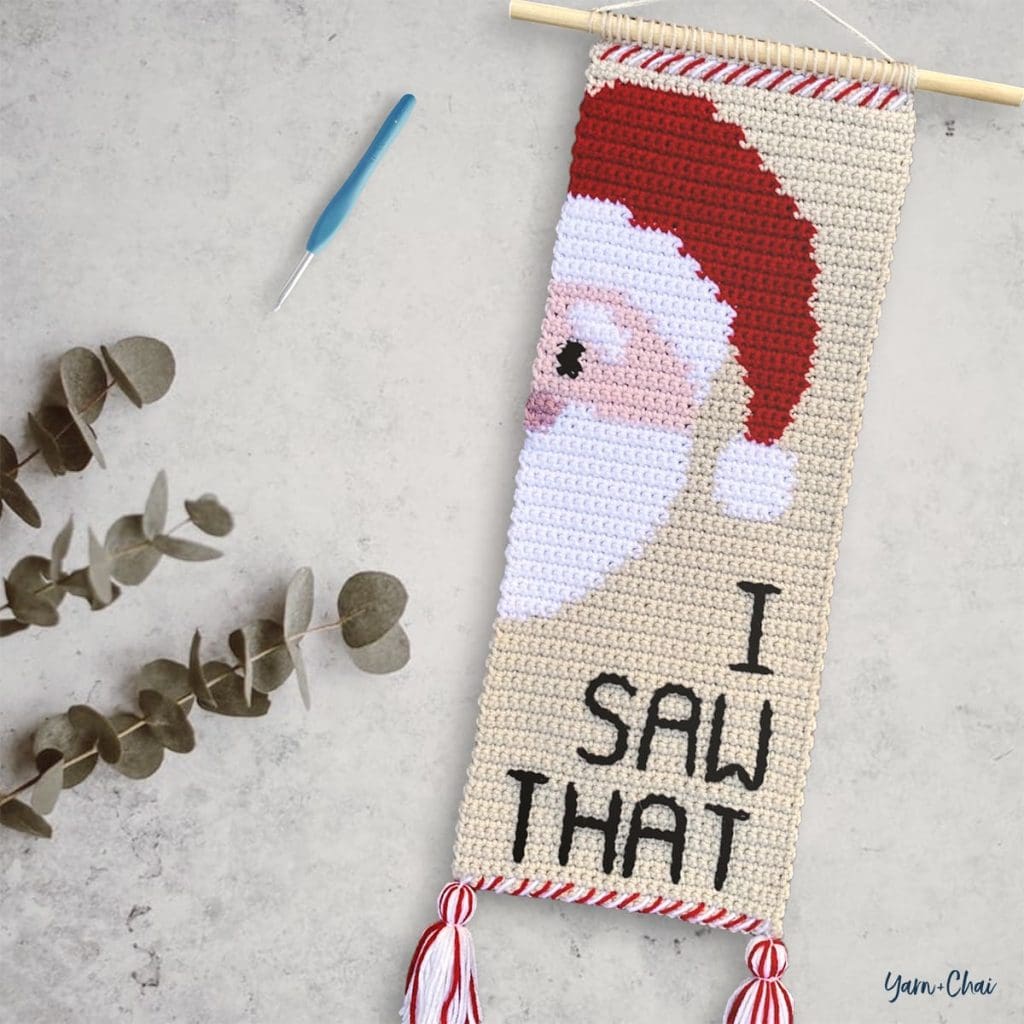
    We don’t go crazy with Santa stuff at our house, but he does bring one gift to each of our kids on Christmas morning. (The 6 year old is the only one who still believes… but the 11 and 13 year olds play along for his sake.) And I’ve never been a huge fan of the whole “be good or you won’t get presents” thing, but when I recently saw some wall art at a store that featured a spying Santa and the “I Saw That” phrase, I laughed out loud and knew I wanted to create a crocheted wall hanging version! I showed it to my older boys, and they got a kick out of it, too.

    So while this particular finished piece will probably sit in Christmas storage until my youngest grows out of Santa and can appreciate the silly joke, I thought I’d share the pattern for it with all of you!

    I used a wooden dowel from the craft store for my wall hanging, but you could also use a strong stick from your yard. And while I embellished mine with tassels, you could do fringe instead. Make it your own!

    Prefer Working From an Ad-Free PDF?

    This pattern chart is also available as an ad-free, printable PDF for All-Access Passholders. It’s a pretty sweet deal, if I do say so myself! Learn more about it here.

    You can purchase the All-Access Pass, or scroll on to view the pattern right here on the blog.

    – – – – – – – – – – – – – –

    “I Saw That” Santa Wall Hanging

    View on Ravelry

    Difficulty: Easy

    Crochet Language: American Standard

    Finished Size:
    19.5″ tall x 7.5″ wide (not including tassels or dowel)

    Yarn: 
    #4 medium weight acrylic yarn recommended. The approximate amounts and colors I used are:

    COLOR A (ivory): 110 yds

    COLOR B (white): 35 yds

    COLOR C (mauve): 2 yds

    COLOR D (pale pink): 15 yds

    COLOR E (red): 25 yds

    COLOR F (black): 10 yds

    Hook:
    5.0mm (H) hook

    Gauge:
    16 SC x 18 rows = 4”

    You’ll also need: 12″ dowel (or stick cut to size)

    Terms and Abbreviations:

    ST/STS (stitch/stitches)
    CH (chain)
    SL ST (slip stitch)
    SC (single crochet)
    YO (yarn over)
    SURFACE CROCHET (slip stitching across the top of the crocheted fabric – Repeat Crafter Me has a great tutorial here)

    Pattern Notes:
    (1) CH1s at the beginning of rows/rounds do not count as stitches.
    (2) CHANGING COLORS: In the stitch before a color change, complete the final step of the stitch with the new color; sp you’ll work the stitch, and when it’s time to pull through the final loops, you’ll drop the first color and pull through with the new color.
    (3) READING THE CHART: Odd-numbered rows are worked right-to-left, and even-numbered rows are worked left-to-right. You’ll begin in the bottom-right corner of the chart.
    (4) CARRYING YARN: For this project, I did not carry any yarn within stitches of different colors. If I only needed to drop a color for a handful of stitches, I simply picked it back up again when it was time.

    – – – – – – – – – – – – – – –

    INSTRUCTIONS FOR WALL HANGING

    With COLOR A, CH31.

    Row 1: Beginning in 2nd CH from hook, SC across. (30)

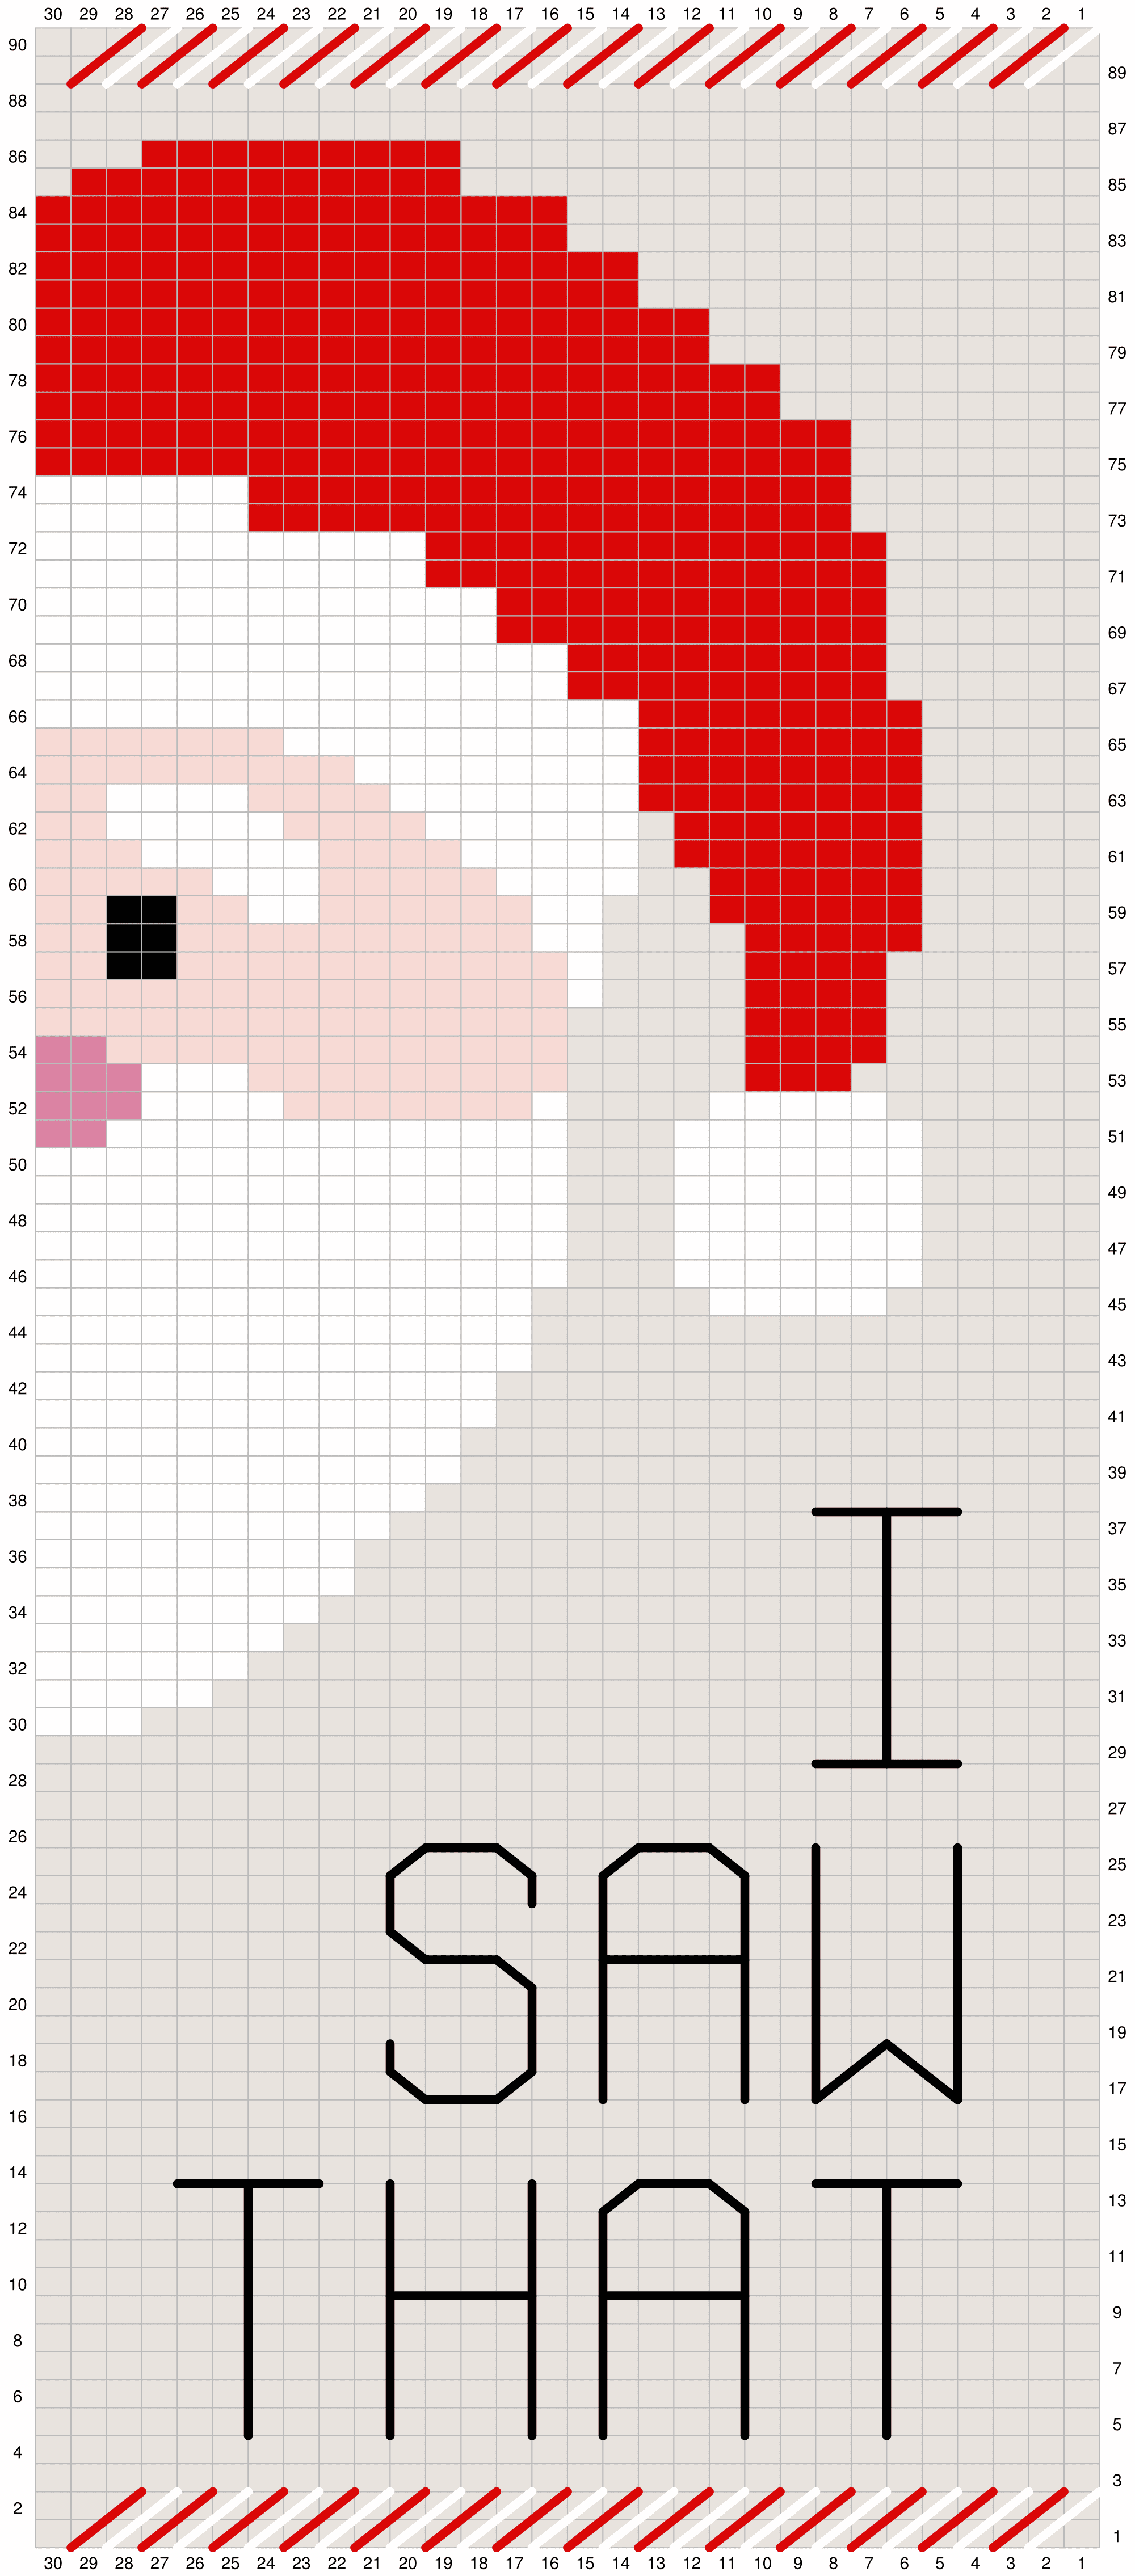
    Rows 2-90: CH1, turn; complete corresponding row on Color Chart A.* (You’ve already completed chart Row 1.) (30)  

    COLOR CHART A (Click chart to enlarge):
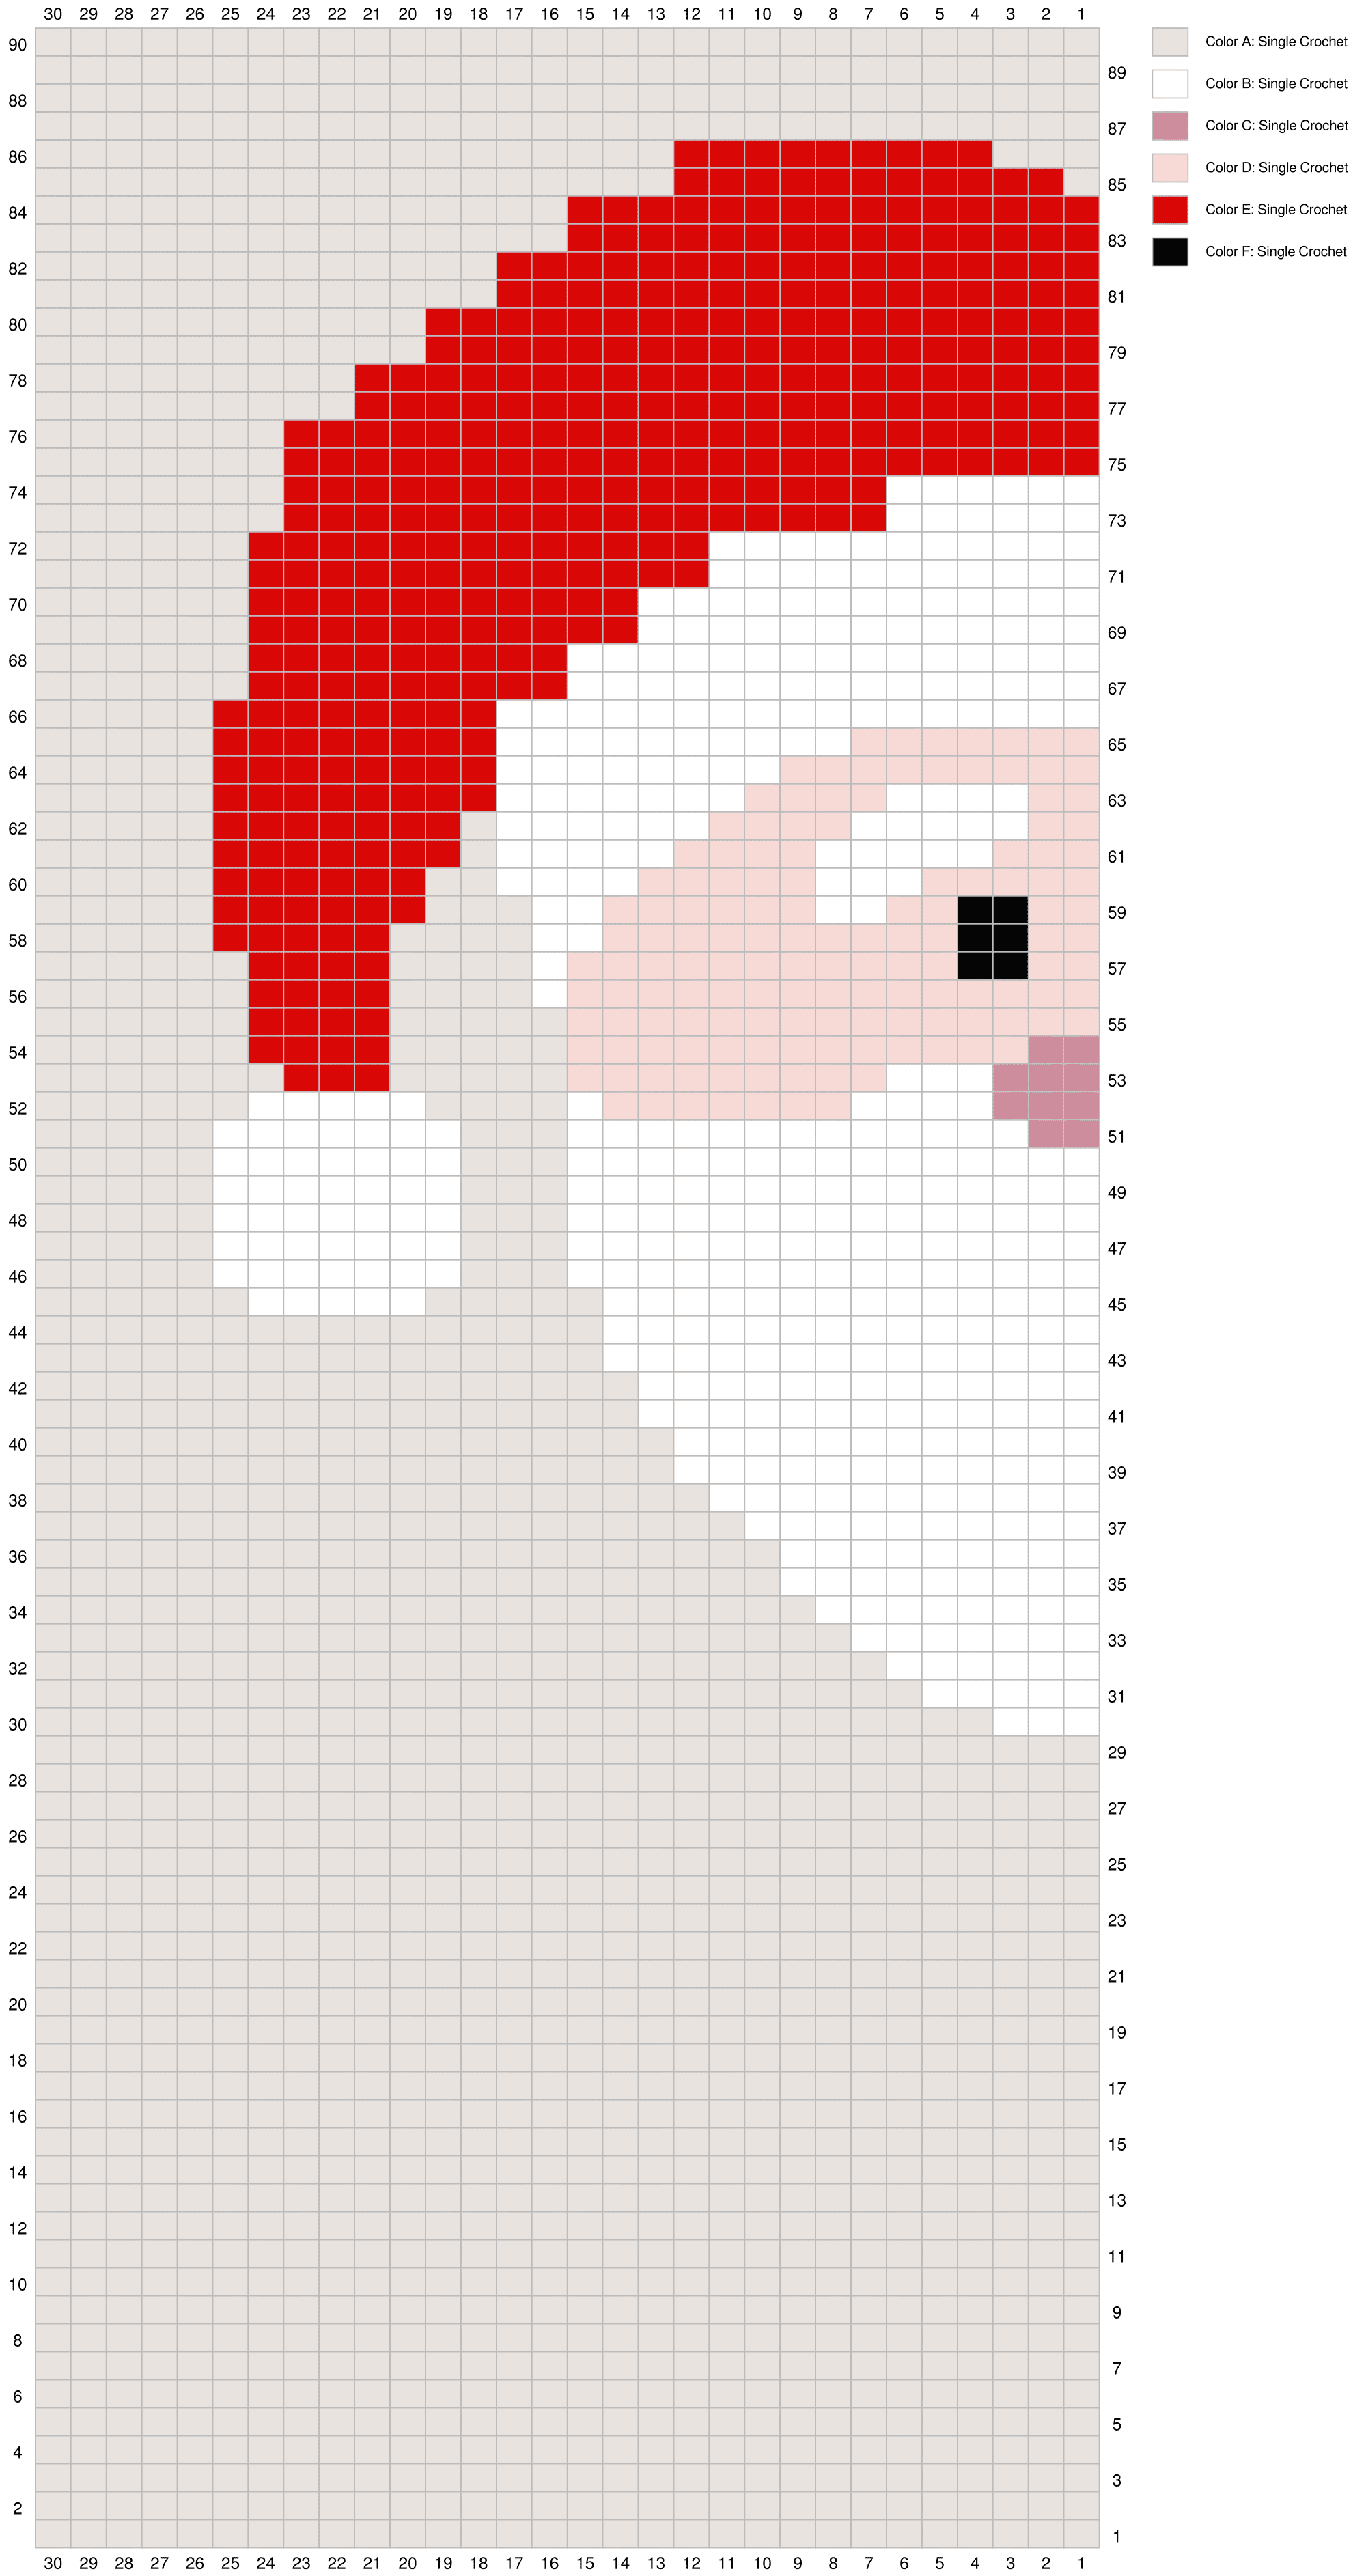
    Once you’ve completed the first chart, fasten off. Weave any ends into the back of the project.

    Use the next chart to add the black “I SAW THAT” lettering and the red and white borders on the top and bottom of the project. The lettering is done with surface crochet using a crochet hook (see pattern notes above for a link to a tutorial); the borders are done with a yarn needle (one color at a time).

    COLOR CHART B (Click chart to enlarge):
    Secure all ends into the back of the project.

    Complete the following:

    • Block project (optional, recommended)
    • Add tassels or fringe (optional)
    • Attach project to dowel

    – – – – – – – – – – – – – – –

    That’s it!

    I hope you enjoyed this tutorial. If you’re sharing your project on social media, be sure to tag me @yarnandchai.design!
  • Cozy Pines Wall Hanging

    Cozy Pines Wall Hanging

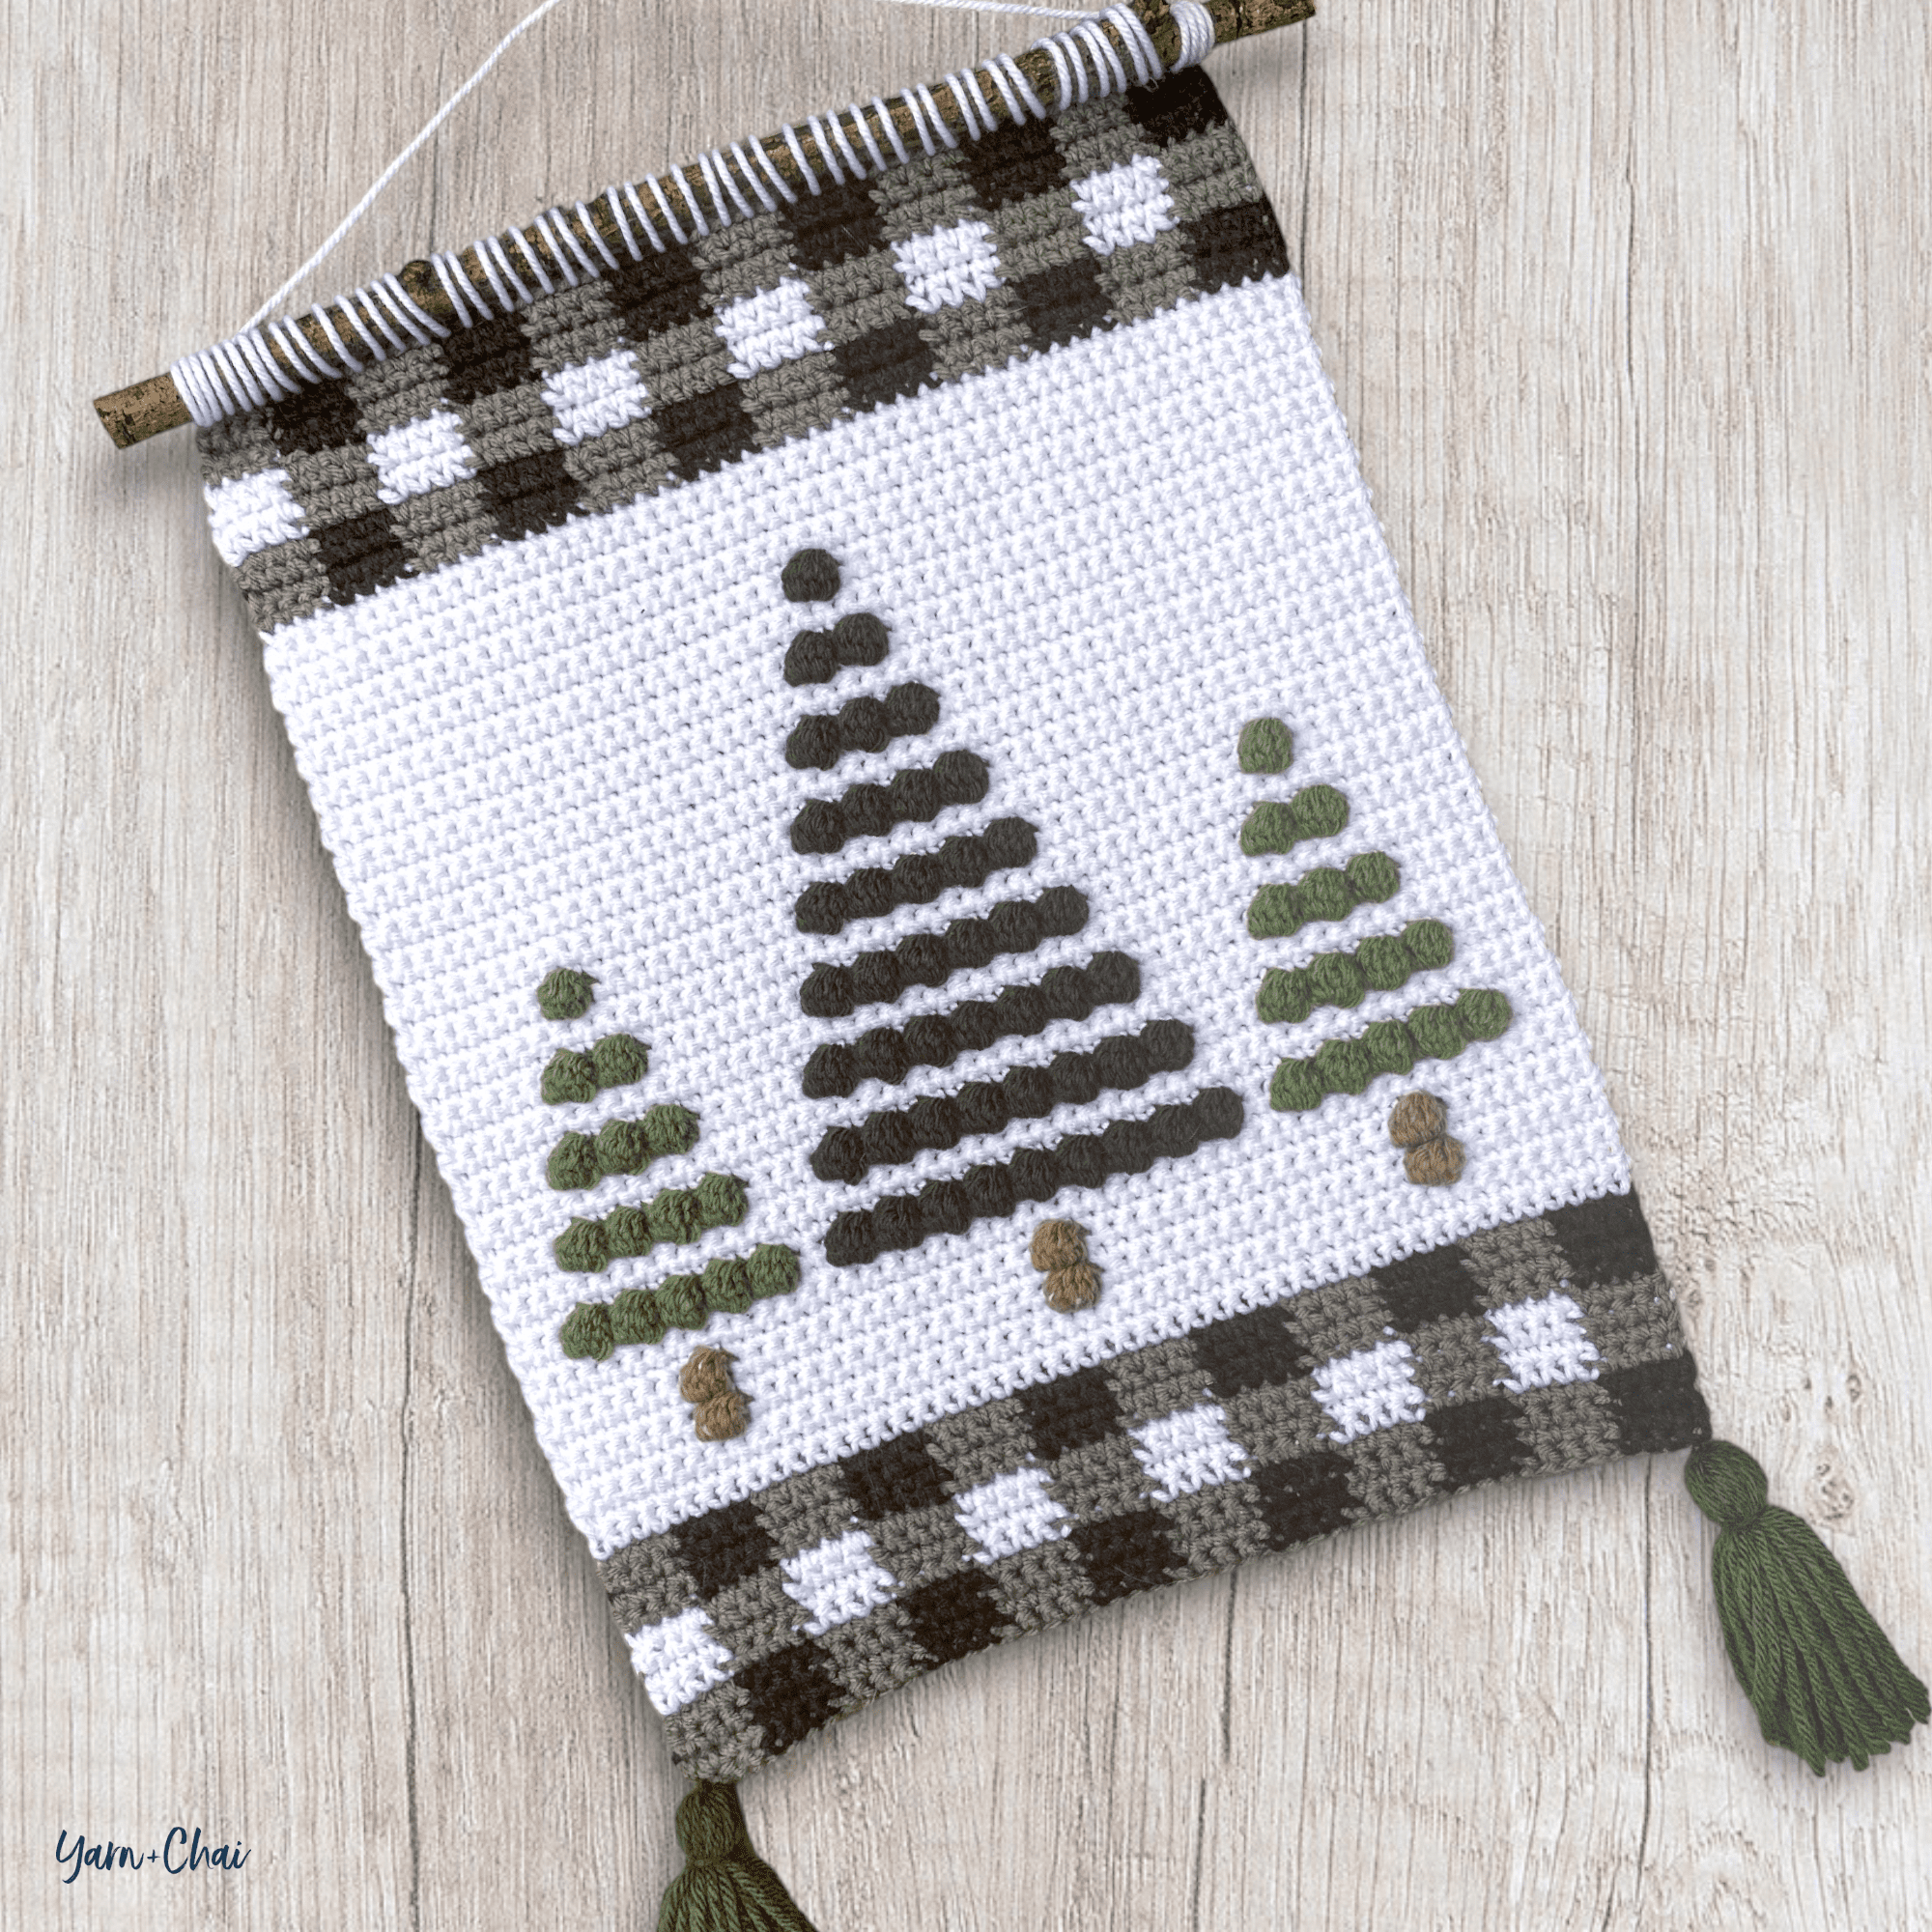
    It seems like a lot of you are really enjoying the fall-themed wall hangings I’ve designed recently (see here and here), and since I can’t get enough of them either, I thought it was a good time to start looking toward the next season!

    Perfect for Christmas but neutral enough to last the whole winter through, this cute new design features three pine trees framed at the top and bottom by black, white, and gray plaid, a popular holiday home decor trend.

    I used a strong stick from my yard for the dowel, but you could use a regular wooden dowel found at most craft stores. And while I embellished mine with tassels, you could do fringe instead. Make it your own!


    Blog Version vs. PDF Version

    I’ll say this up front: While I normally try to create my ad-free PDF versions of my blog patterns as similarly to the blog version itself as I can, in this case, the PDF version is packed with helpful tips and info that I just couldn’t reasonably fit into the blog post without it getting long and confusing. So with that said…

    If you’ve never made a bobble stitch wall hanging before, I recommend you work from the ad-free PDF version of this pattern which is available to All-Access Passholders.

    Here’s what you’ll get in the PDF:

    • How to follow a color chart
    • How to make tassels (photo tutorial)
    • How to attach the dowel (photo tutorial)
    • Enlarged printable version of the color chart
    • No ads

    All-Access Passholders get the ad-free version of this and all of my other blog patterns. It’s a pretty sweet deal, if I do say so myself! Learn more about it here.

    You can purchase the All-Access Pass, or scroll on to view the pattern right here on the blog.

    – – – – – – – – – – – – – –

    Cozy Pines Wall Hanging

    View on Ravelry

    Difficulty: Easy

    Crochet Language: American Standard

    Finished Size:
    17″ tall x 12″ wide

    Yarn: 
    #4 medium weight acrylic yarn recommended. The approximate amounts and colors I used are:

    COLOR A (gray): 40 yds
    I Love This Yarn in “Grey Beard”

    COLOR B (black): 25 yds
    I Love This Yarn in “Black” 

    COLOR C (white): 150 yds
    I Love This Yarn in “White“

    COLOR D (brown): 5 yds
    Loops & Threads Impeccable Tweed in “Walnut”

    COLOR E (lighter green): 20 yds
    Loops & Threads Impeccable in “Forest”

    COLOR F (darker green): 30 yds
    Loops & Threads Impeccable in “Deep Forest”

    Hook:
    5.0mm (H) hook

    Gauge:
    16 SC x 18 rows = 4”

    You’ll also need: Stick or wooden dowel cut to 14”

    Terms and Abbreviations:

    ST/STS (stitch/stitches)
    CH (chain)
    SL ST (slip stitch)
    SC (single crochet)
    YO (yarn over)
    BOBBLE STITCH
    1: YO and insert the hook into the stitch
    2: YO and pull up a loop
    3: YO and pull through the first 2 loops on the hook 
    4: Repeat 1-3 four more times until you have 6 loops on the hook
    5: YO and pull through all 6 loops

    Notes about the Bobble Stitch: 
    (1) Bobble stitches will always be followed by a single crochet (SC) of the same color.
    (2) Bobble stitches are worked on the “wrong side” of the pattern, but the bobble will show up on the correct side.

    Pattern Notes:
    (1) CH1s at the beginning of rows/rounds do not count as stitches.
    (2) CHANGING COLORS: In the stitch before a color change, complete the final step of the stitch with the new color. In this pattern, the stitch before a color change will always be a single crochet; so you’ll work the stitch, and when it’s time to pull through the final loops, you’ll drop the first color and pull through with the new color.
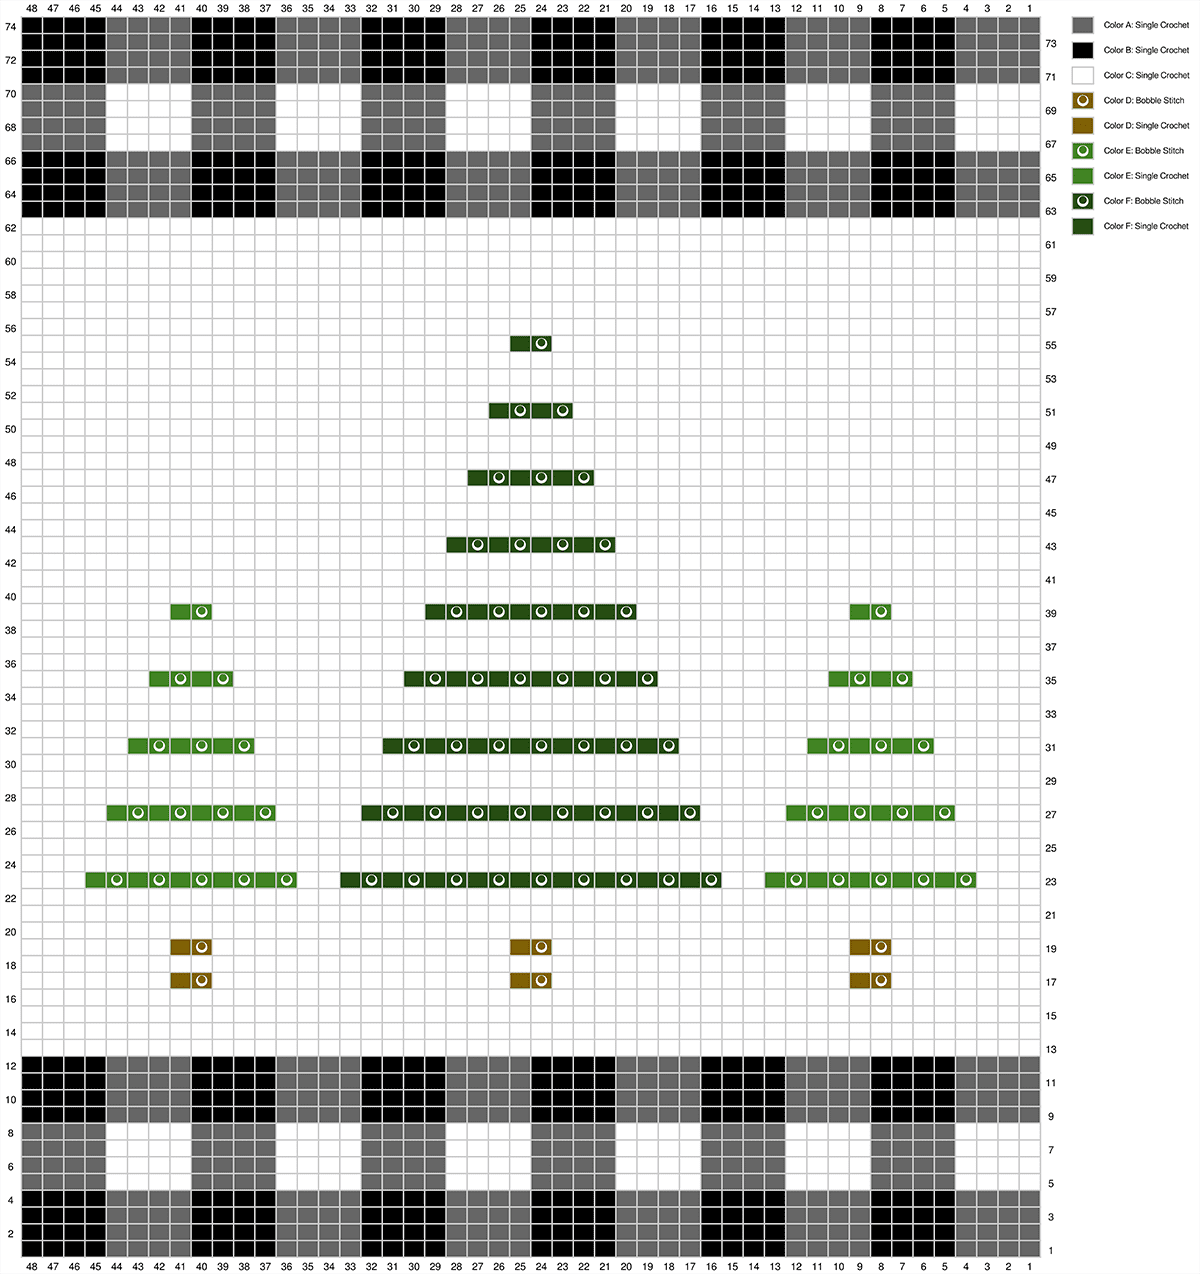
    (3) READING THE CHART: Odd-numbered rows are worked right-to-left, and even-numbered rows are worked left-to-right. You’ll begin in the bottom-right corner of the chart.
    (4) CARRYING YARN: For this project, I carried my yarn through the plaid sections (dropping whichever of the three colors I wasn’t using on that row, and picking it back up again when needed). For the tree area, I carried the background color (white) throughout, but only carried the tree colors across a single row of a single tree, fastening them off when finished with then and rejoining when needed in the next row.

    – – – – – – – – – – – – – – –

    INSTRUCTIONS FOR WALL HANGING

    With COLOR A, CH49.

    Row 1: Beginning in 2nd CH from hook, (4 SC in COLOR A, 4 SC in COLOR B) across. (48)

    Rows 2-74: CH1, turn; complete corresponding row on color chart.* (You’ve already completed chart Row 1.) (48)  

    (Click chart to enlarge.)

    Once you’ve completed the chart, fasten off. 

    Complete the following:

    • Relocate all yarn ends to the back of the project and weave in.
    • Block project (optional, recommended)
    • Add tassels or fringe (optional)
    • Attach project to dowel

    – – – – – – – – – – – – – – –

    That’s it!

    I hope you enjoyed this tutorial. If you’re sharing your project on social media, be sure to tag me @yarnandchai.design!

  • Autumn Tree Wall Hanging

    Autumn Tree Wall Hanging

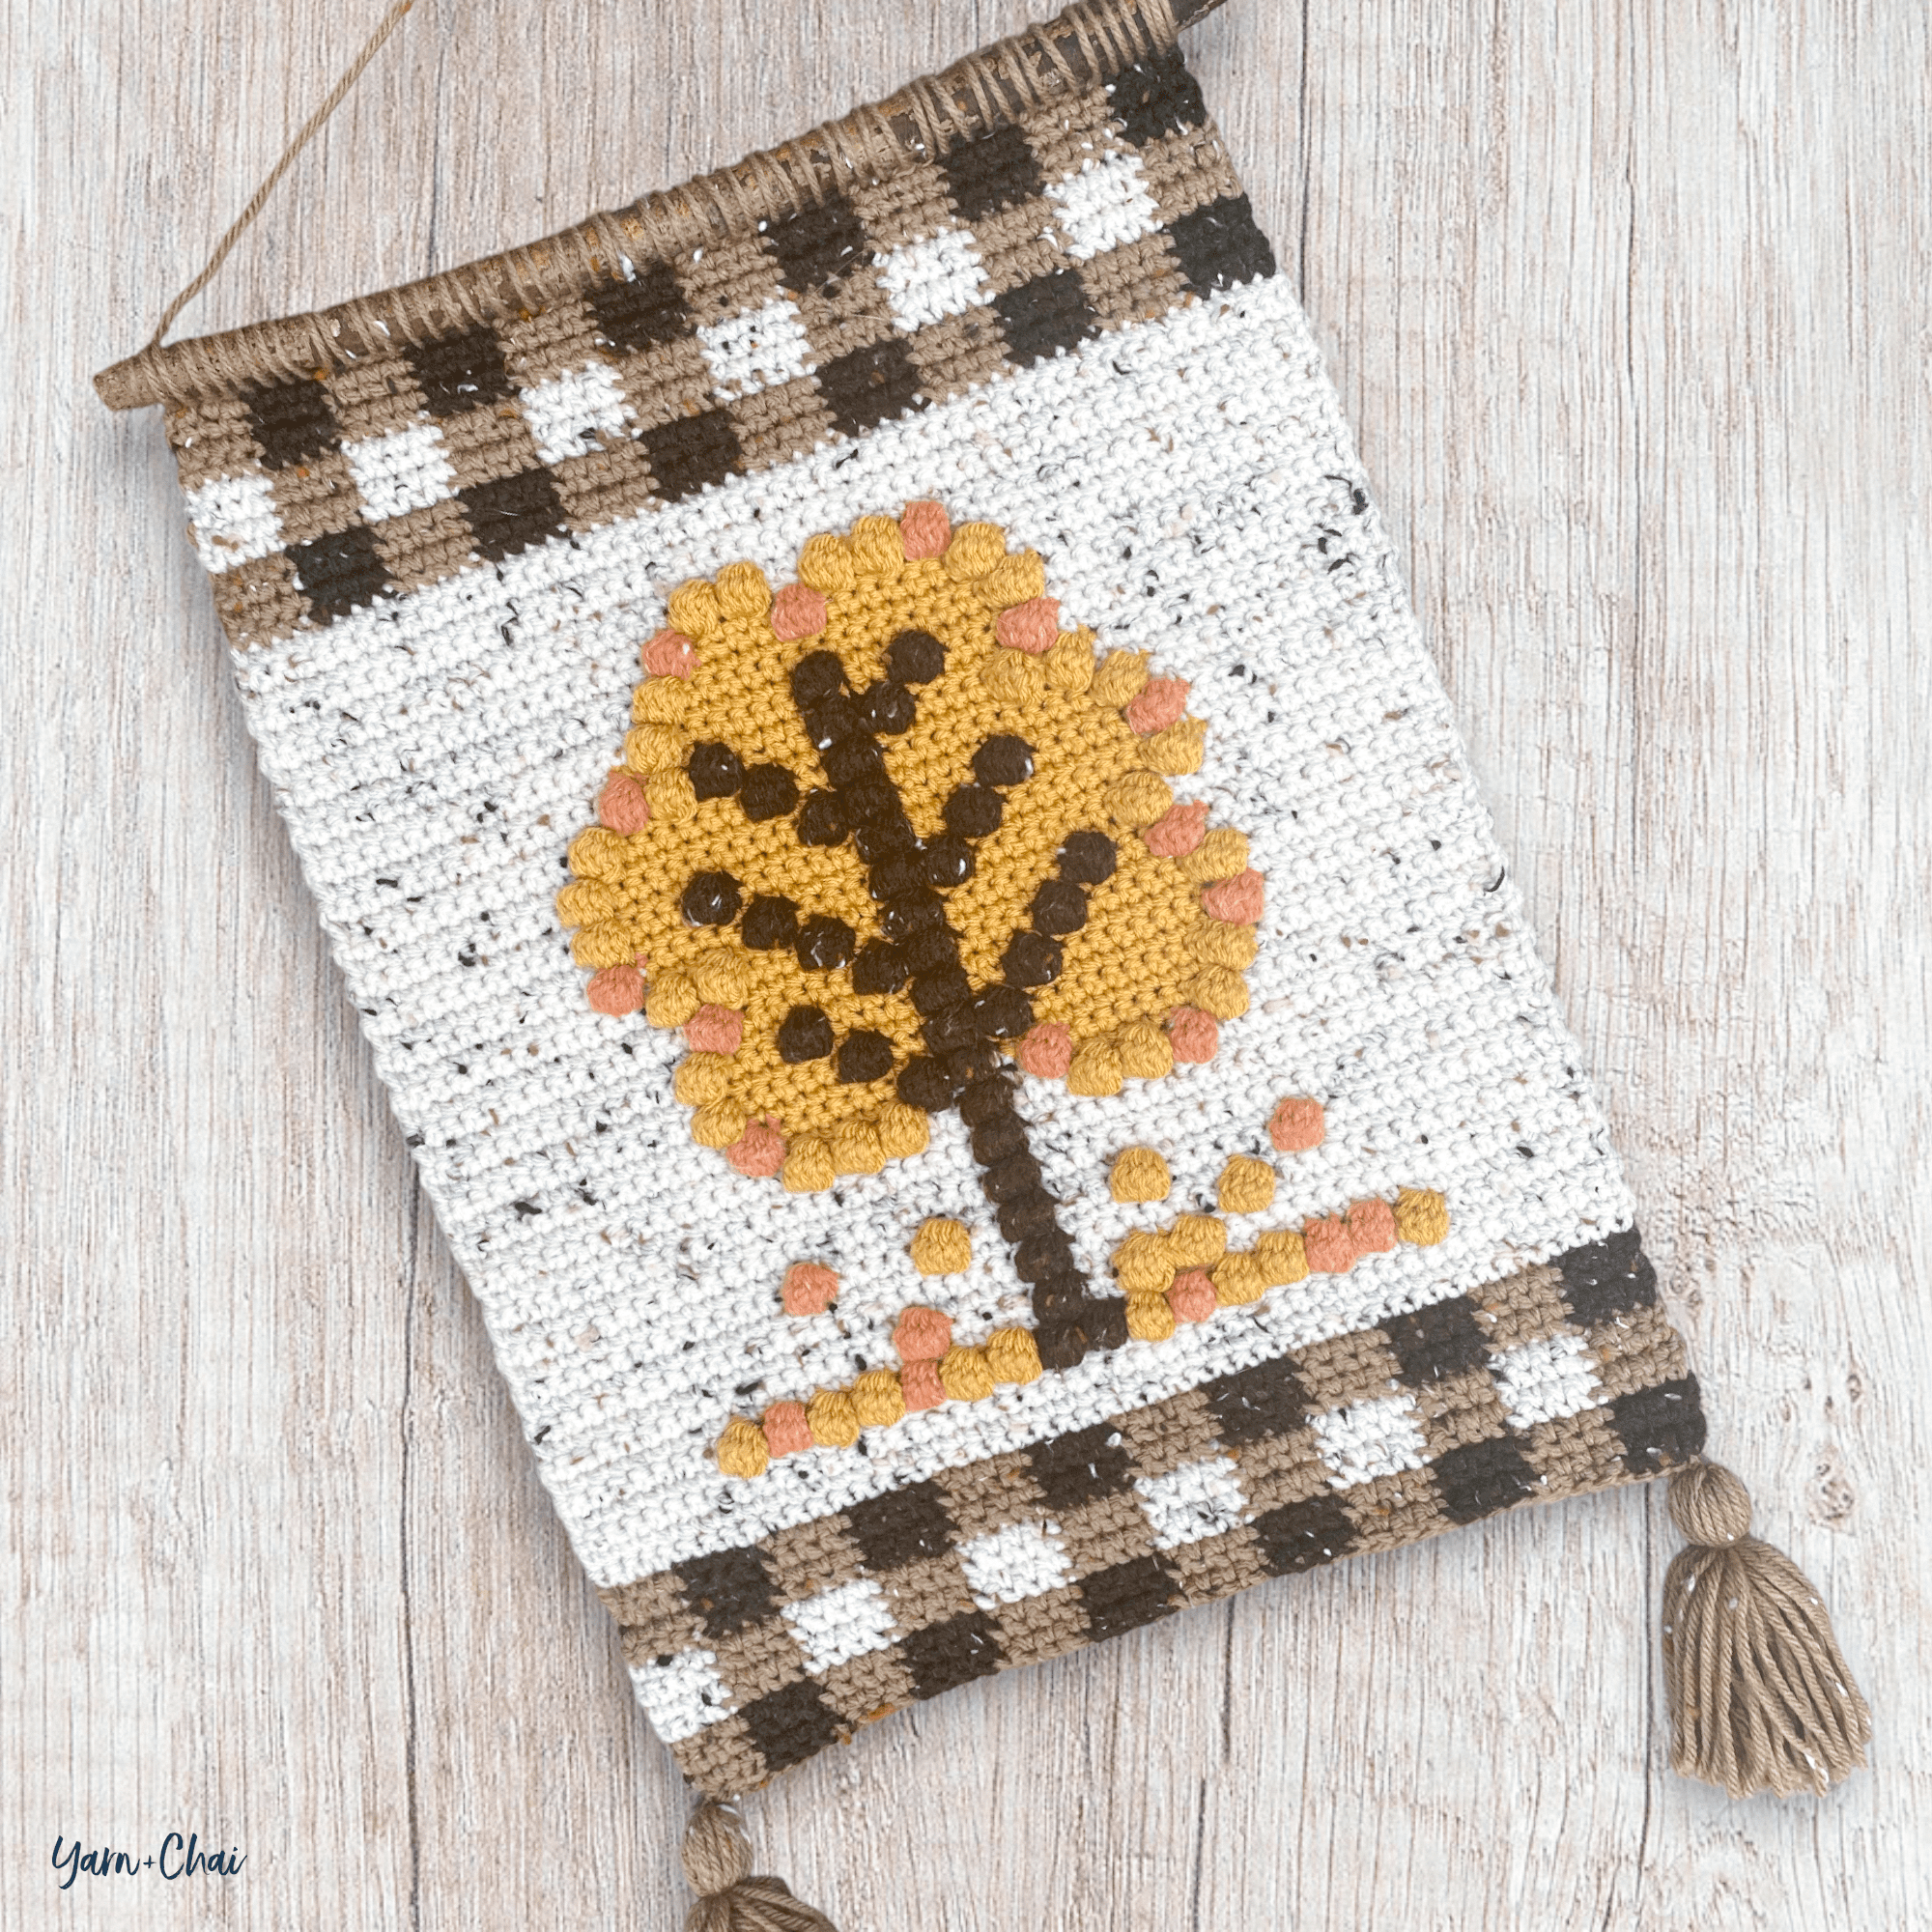
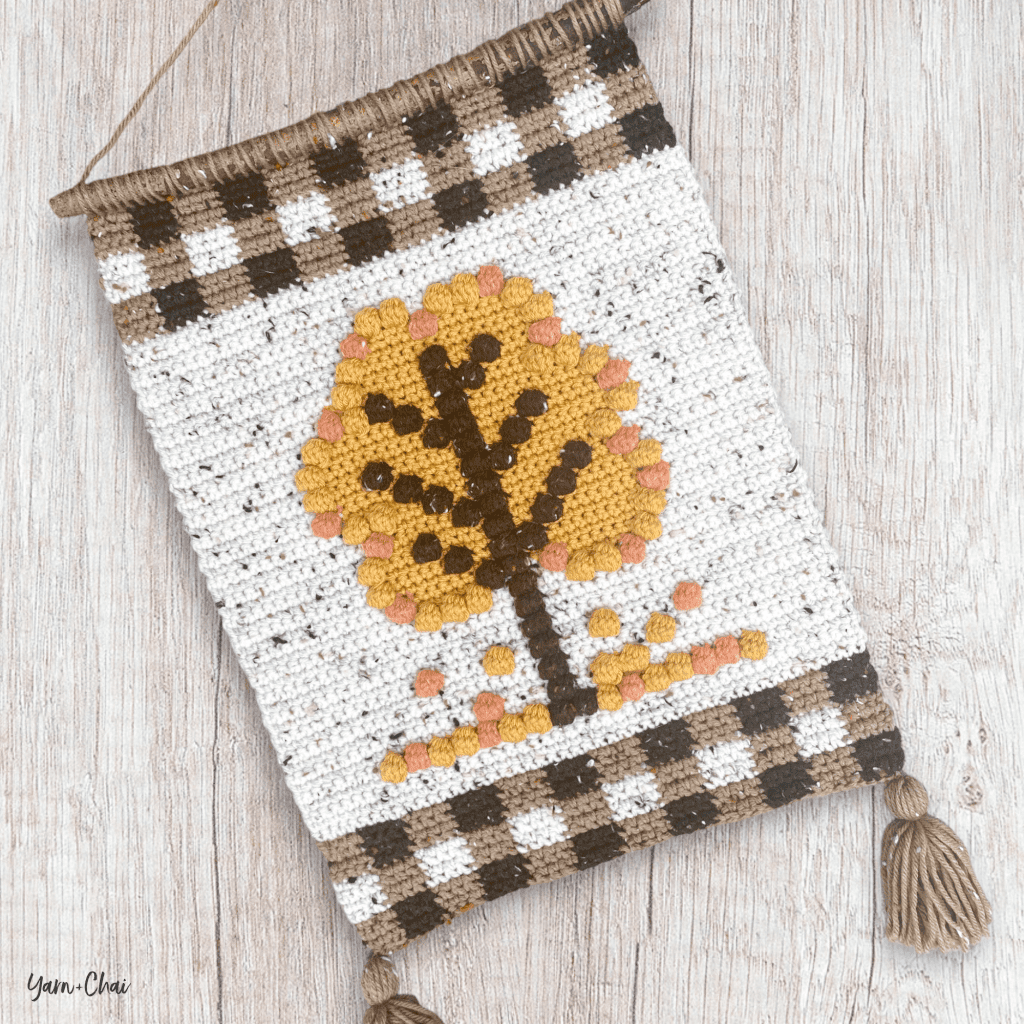
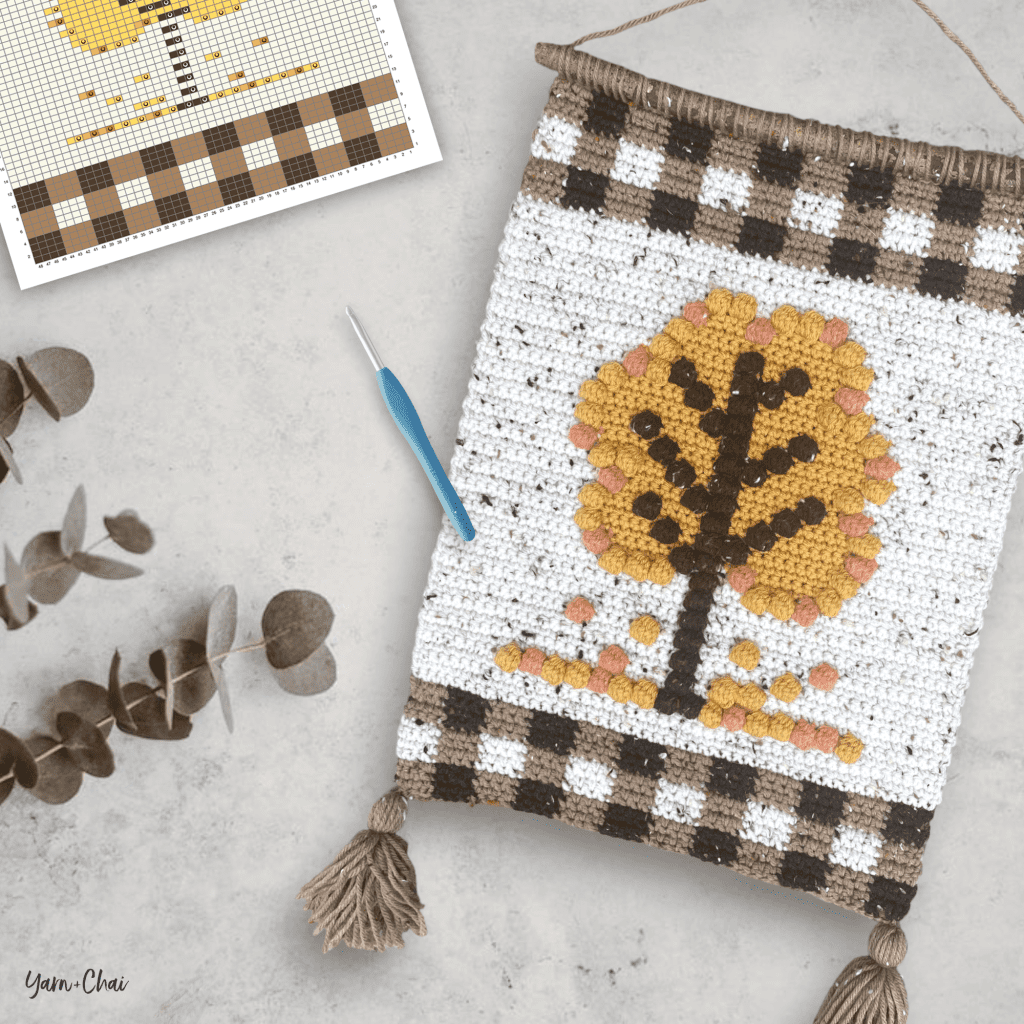
    For the fall-lovers out there, here’s a new bobble stitch wall hanging design — a cozy late-autumn tree with falling leaves. Framed at the top and bottom by plaid in shades of brown and ivory, the tree in the center can be changed to represent your favorite fall hues!

    I used a strong stick from my yard for the dowel, but you could use a regular wooden dowel found at most craft stores. And while I embellished mine with tassels, you could do fringe instead. Make it your own!

    (And if you like this one, check out my previous pattern release — the Autumn Pumpkin Wall Hanging!)


    Blog Version vs. PDF Version

    I’ll say this up front: While I normally try to create my ad-free PDF versions of my blog patterns as similarly to the blog version itself as I can, in this case, I’ll say this up front: While I normally try to create my ad-free PDF versions of my blog patterns as similarly to the blog version itself as I can, in this case, the PDF version is packed with helpful tips and info that I just couldn’t reasonably fit into the blog post without it getting long and confusing. So with that said…

    If you’ve never made a bobble stitch wall hanging before, I recommend you work from the ad-free PDF version of this pattern which is available to All-Access Passholders.

    Here’s what you’ll get in the PDF:

    • How to follow a color chart
    • How to make tassels (photo tutorial)
    • How to attach the dowel (photo tutorial)
    • Enlarged printable version of the color chart
    • No ads

    All-Access Passholders get the ad-free version of this and all of my other blog patterns. It’s a pretty sweet deal, if I do say so myself! Learn more about it here.

    You can purchase the All-Access Pass, or scroll on to view the pattern right here on the blog.

    – – – – – – – – – – – – – –

    Autumn Tree Wall Hanging

    View on Ravelry

    Difficulty: Easy

    Crochet Language: American Standard

    Finished Size:
    17″ tall x 12″ wide

    Yarn: 
    #4 medium weight acrylic yarn recommended. The approximate amounts and colors I used are:

    COLOR A (lighter brown): 40 yds
    Loops & Threads Impeccable Tweed in “Chocolate”

    COLOR B (darker brown): 55 yds
    Loops & Threads Impeccable Tweed in “Walnut”

    COLOR C (ivory tweed): 120 yds
    Loops & Threads Impeccable Tweed in “Aran“

    COLOR D (yellow): 60 yds
    Yarn Bee Soft & Sleek in “Mustard”

    COLOR E (orange tweed): 15 yds
    Yarn Bee Rustic Romantic in “Pumpkin Spice”

    Hook:
    5.0mm (H) hook

    Gauge:
    16 SC x 18 rows = 4”

    You’ll also need: Stick or wooden dowel cut to 14”

    Terms and Abbreviations:

    ST/STS (stitch/stitches)
    CH (chain)
    SL ST (slip stitch)
    SC (single crochet)
    YO (yarn over)
    BOBBLE STITCH
    1: YO and insert the hook into the stitch
    2: YO and pull up a loop
    3: YO and pull through the first 2 loops on the hook 
    4: Repeat 1-3 four more times until you have 6 loops on the hook
    5: YO and pull through all 6 loops

    Notes about the Bobble Stitch: 
    (1) Bobble stitches will always be followed by a single crochet (SC) of the same color.
    (2) Bobble stitches are worked on the “wrong side” of the pattern, but the bobble will show up on the correct side.

    Pattern Notes:
    (1) CH1s at the beginning of rows/rounds do not count as stitches.
    (2) CHANGING COLORS: In the stitch before a color change, complete the final step of the stitch with the new color. In this pattern, the stitch before a color change will always be a single crochet; so you’ll work the stitch, and when it’s time to pull through the final loops, you’ll drop the first color and pull through with the new color.
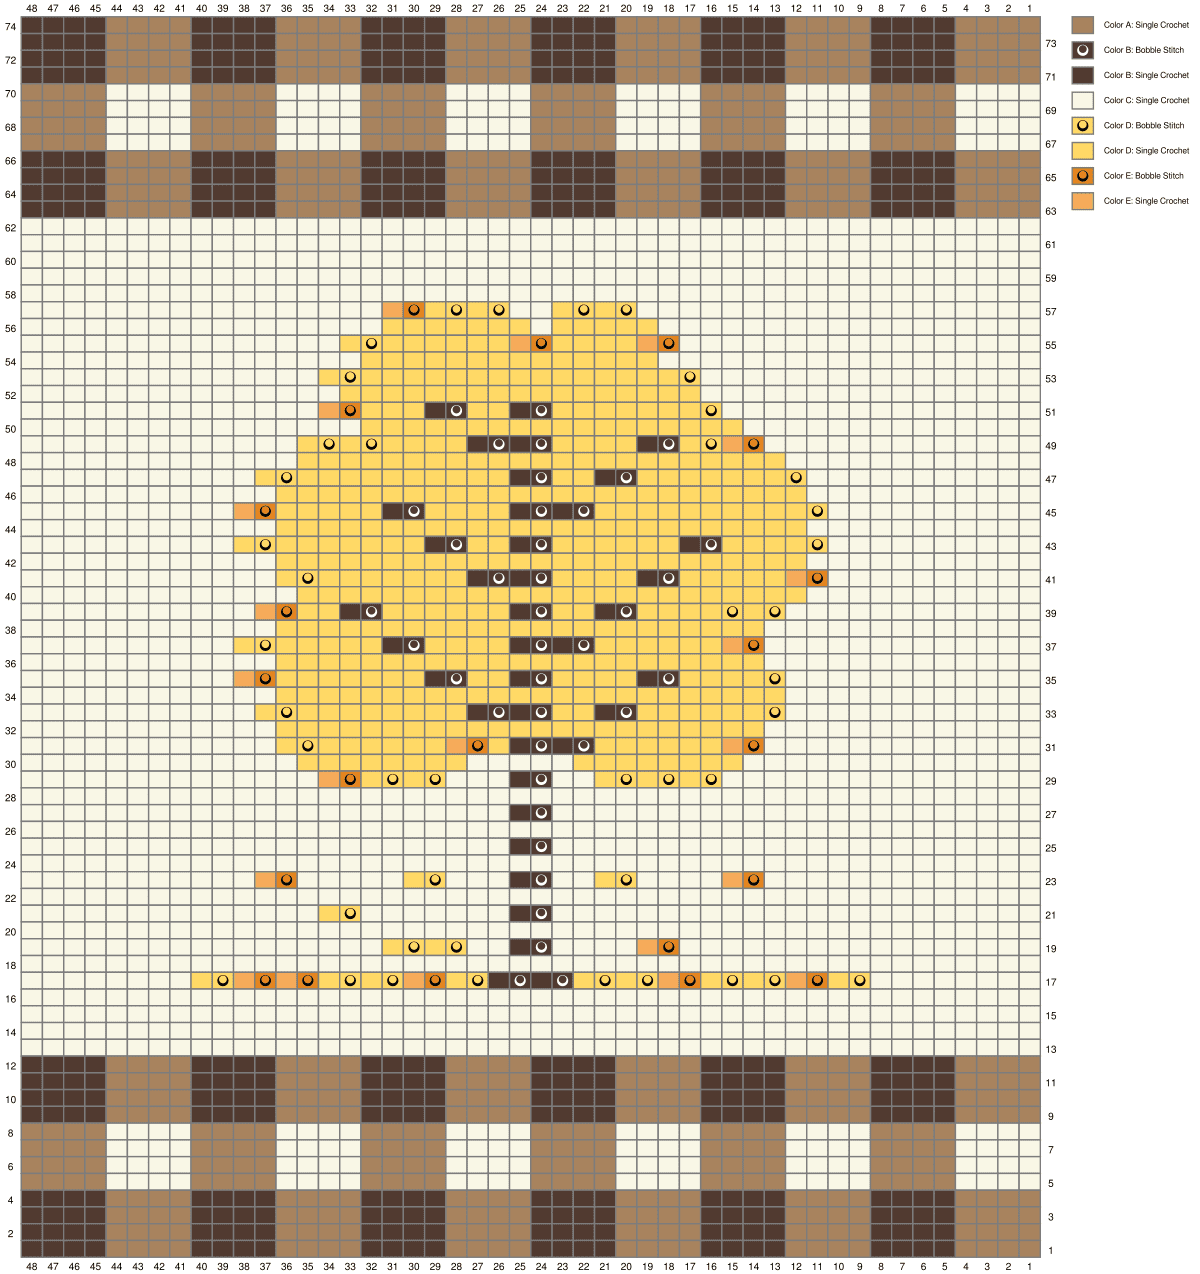
    (3) READING THE CHART: Odd-numbered rows are worked right-to-left, and even-numbered rows are worked left-to-right. You’ll begin in the bottom-right corner of the chart.
    (4) CARRYING YARN: For this project, I carried my yarn through the plaid sections (dropping whichever of the three colors I wasn’t using on that row, and picking it back up again when needed). For the tree area, I carried the background color (the ivory tweed) throughout, but only carried the colors of the tree if I only needed to carry them for a few stitches; otherwise I just fastened off and rejoined when needed.

    – – – – – – – – – – – – – – –

    INSTRUCTIONS FOR WALL HANGING

    With COLOR A, CH49.

    Row 1: Beginning in 2nd CH from hook, (4 SC in COLOR A, 4 SC in COLOR B) across. (48)

    Rows 2-74: CH1, turn; complete corresponding row on color chart.* (You’ve already completed chart Row 1.) (48)  

    (Click chart to enlarge.)

    Once you’ve completed the chart, fasten off. 

    Complete the following:

    • Relocate all yarn ends to the back of the project and weave in.
    • Block project (optional, recommended)
    • Add tassels or fringe (optional)
    • Attach project to dowel

    – – – – – – – – – – – – – – –

    That’s it!

    I hope you enjoyed this tutorial. If you’re sharing your project on social media, be sure to tag me @yarnandchai.design!

  • Autumn Pumpkin Wall Hanging

    Autumn Pumpkin Wall Hanging

    It’s official. I’m obsessed with crocheted wall hangings.

    The design possibilities are so endless that I can’t believe it’s taken me this long to create my own!

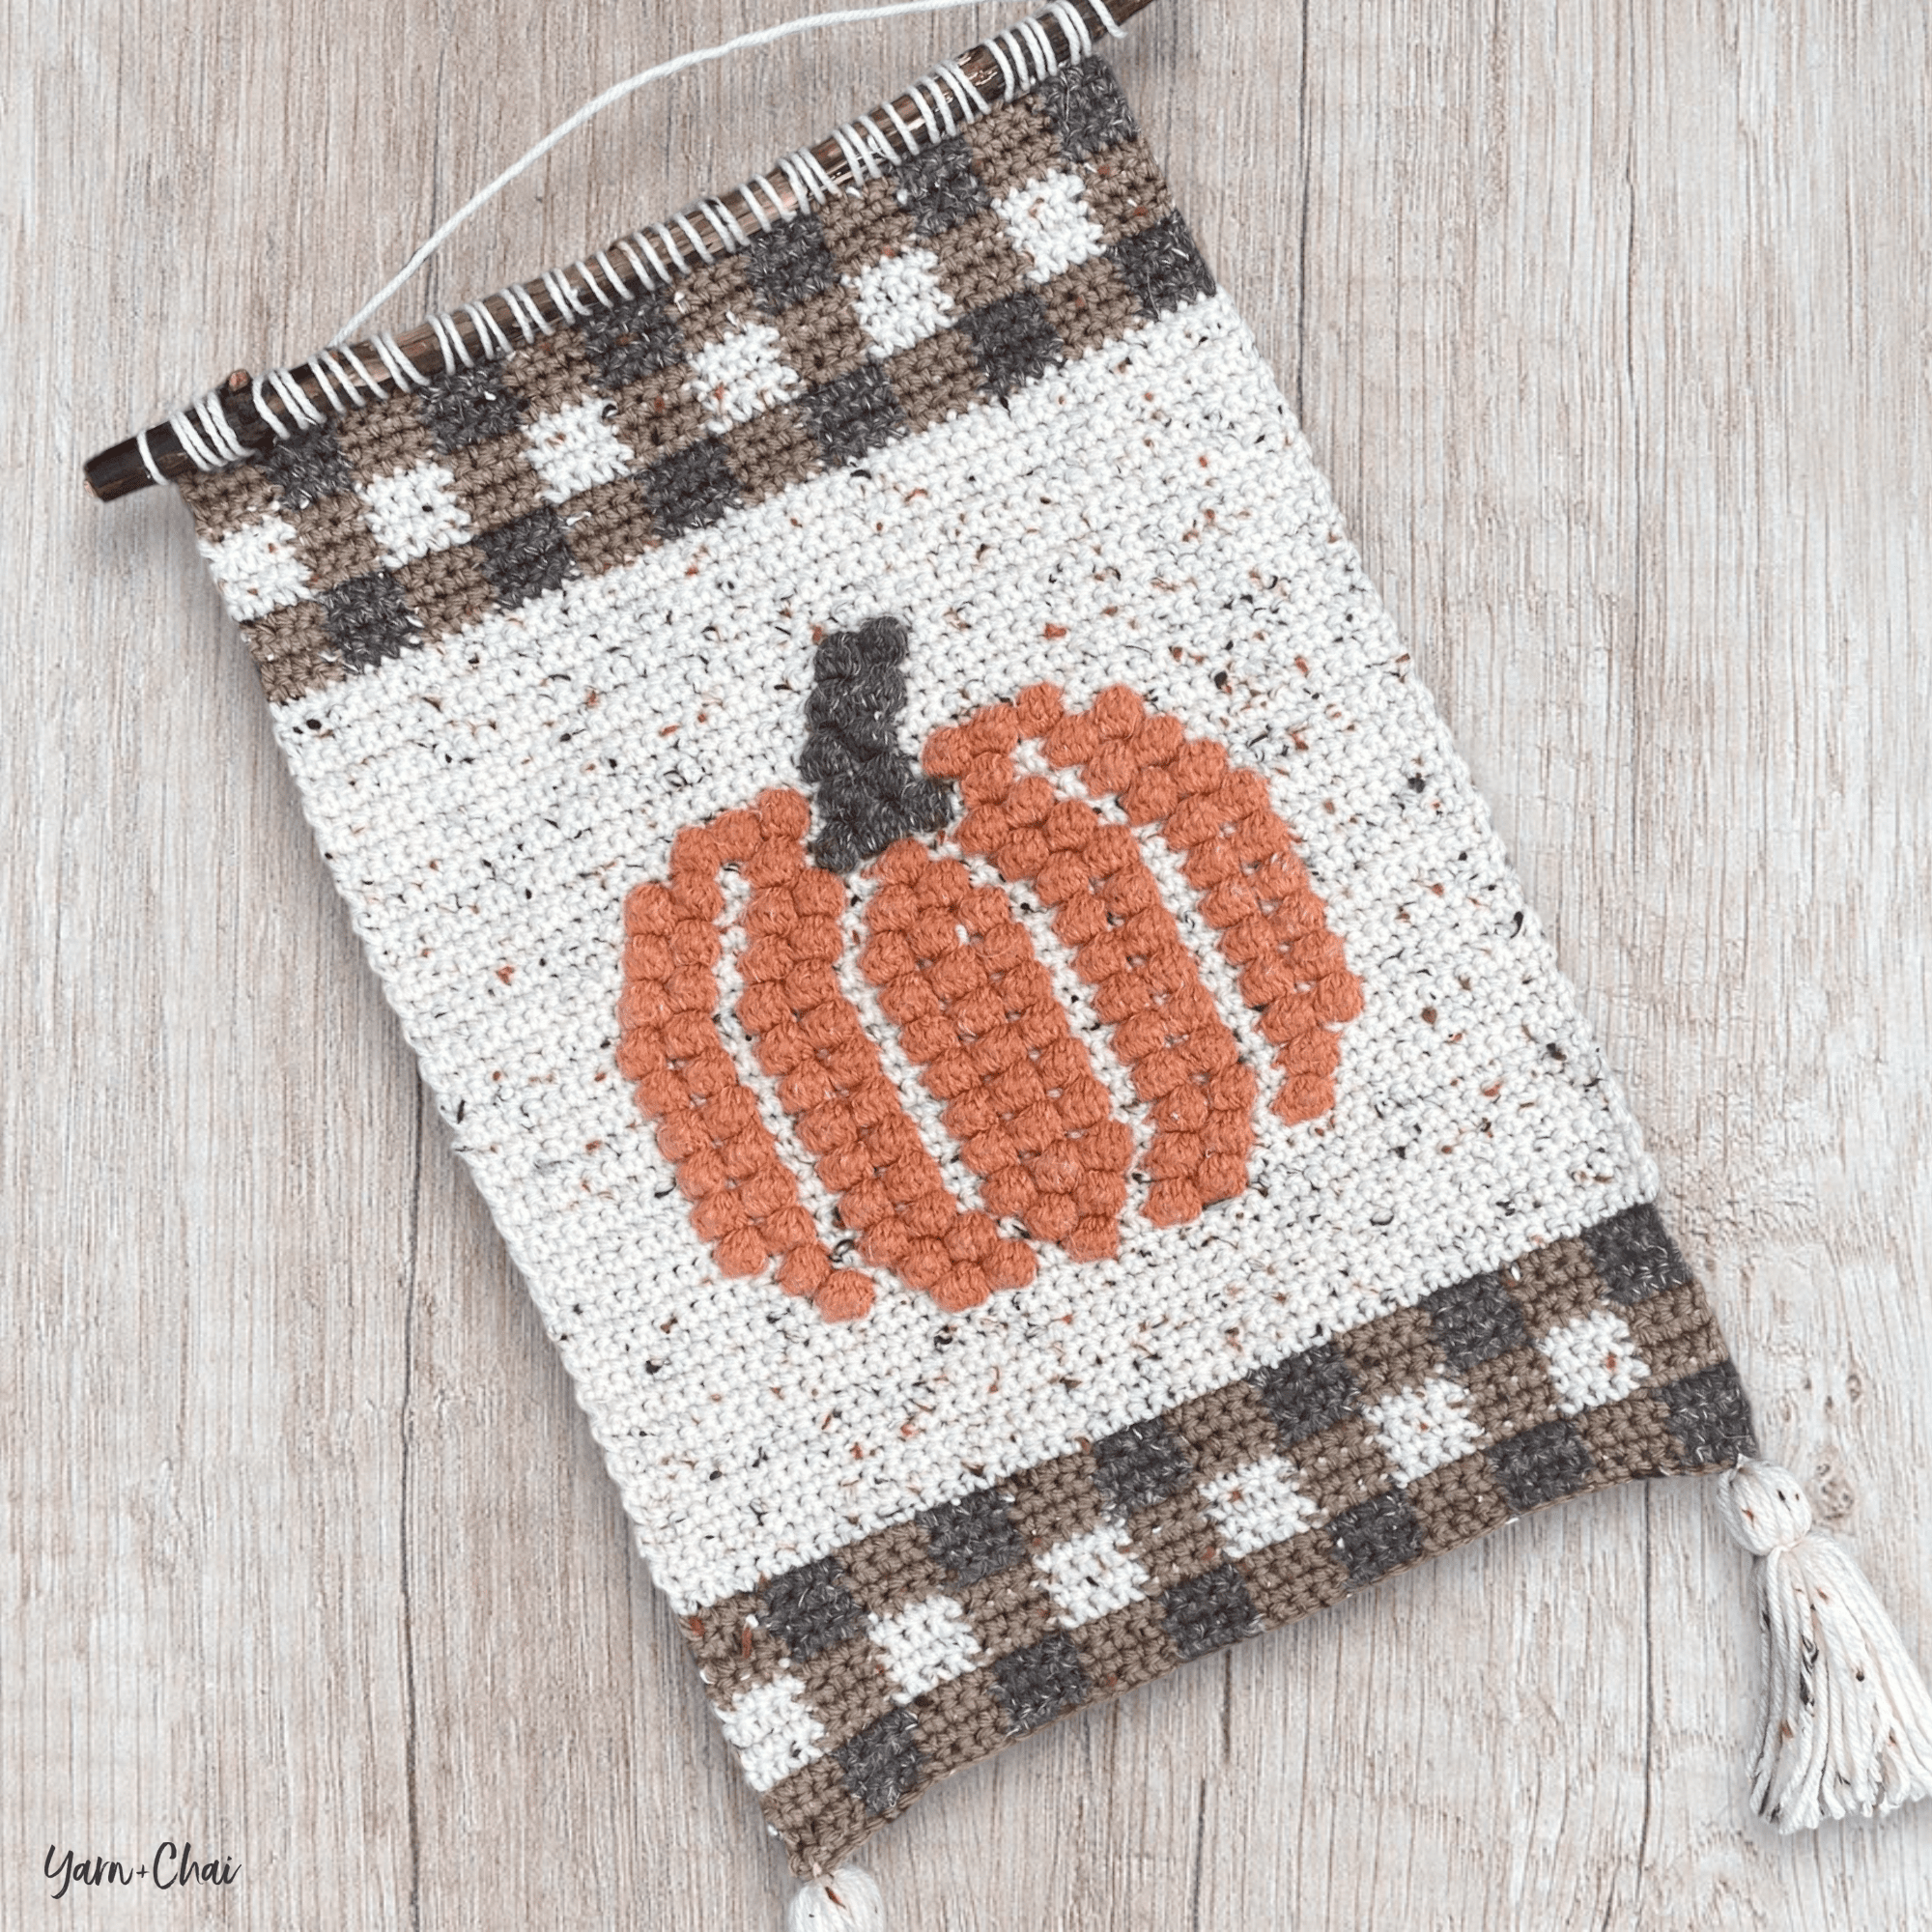
    So for my 2nd wall hanging pattern (the first being the “Welcome” Wall Hanging), I present to you this cozy, rustic autumn pumpkin decor piece! Framed at the top and bottom by a bit of plaid in shades of ivory and brown, the orange bobble stitch pumpkin is the focal point of this design.

    I combined two different brands of acrylic tweed yarn to achieve the color palette I had in my head, and it didn’t give me any issues. The orange and dark brown are both Yarn Bee’s Rustic Romantic (Hobby Lobby), and the ivory and lighter brown are from Loops & Threads’ Impeccable Tweed line (Michael’s). The ivory color from Impeccable has flecks of brown and orange in it that pull all of the colors together… almost like it was meant to be!

    There are lots of other tweed yarns out there, too, so use what you have available to you. You could even skip the tweed look altogether and opt for a cleaner, sleeker look with solid colors. (I debated doing a white base with white/gray/black plaid, but I think I’m going to save that look for a future design.)

    I used a strong stick from my yard for the dowel, but you could use a regular wooden dowel found at most craft stores. And while I embellished mine with tassels, you could do fringe instead. Make it your own!


    Blog Version vs. PDF Version

    I’ll say this up front: While I normally try to create my ad-free PDF versions of my blog patterns as similarly to the blog version itself as I can, in this case, the PDF version is packed with helpful tips and info that I just couldn’t reasonably fit into the blog post without it getting long and confusing. So with that said…

    If you’ve never made a bobble stitch wall hanging before, I recommend you work from the ad-free PDF version of this pattern which is available to All-Access Passholders.

    Here’s what you’ll get in the PDF:

    • How to follow a color chart
    • How to make tassels (photo tutorial)
    • How to attach the dowel (photo tutorial)
    • Enlarged printable version of the color chart
    • No ads

    All-Access Passholders get the ad-free version of this and all of my other blog patterns. It’s a pretty sweet deal, if I do say so myself! Learn more about it here.

    You can purchase the All-Access Pass, or scroll on to view the pattern right here on the blog.

    – – – – – – – – – – – – – –

    Autumn Pumpkin Wall Hanging

    View on Ravelry

    Difficulty: Easy

    Crochet Language: American Standard

    Finished Size:
    17″ tall x 12″ wide

    Yarn: 
    #4 medium weight acrylic yarn recommended. The approximate amounts and colors I used are:

    COLOR A: 45 yds
    Loops & Threads Impeccable Tweed in “Taupe”

    COLOR B: 40 yds
    Yarn Bee Rustic Romantic in “Barnwood Fence” 

    COLOR C: 175 yds
    Loops & Threads Impeccable Tweed in “Aran“

    COLOR D: 75 yds
    Yarn Bee Rustic Romantic in “Pumpkin Spice”

    Hook:
    5.0mm (H) hook

    Gauge:
    16 SC x 18 rows = 4”

    You’ll also need: Stick or wooden dowel cut to 14”

    Terms and Abbreviations:

    ST/STS (stitch/stitches)
    CH (chain)
    SL ST (slip stitch)
    SC (single crochet)
    YO (yarn over)
    BOBBLE STITCH
    1: YO and insert the hook into the stitch
    2: YO and pull up a loop
    3: YO and pull through the first 2 loops on the hook 
    4: Repeat 1-3 four more times until you have 6 loops on the hook
    5: YO and pull through all 6 loops

    Notes about the Bobble Stitch: 
    (1) Bobble stitches will always be followed by a single crochet (SC) of the same color.
    (2) Bobble stitches are worked on the “wrong side” of the pattern, but the bobble will show up on the correct side.

    Pattern Notes:
    (1) CH1s at the beginning of rows/rounds do not count as stitches.
    (2) CHANGING COLORS: In the stitch before a color change, complete the final step of the stitch with the new color. In this pattern, the stitch before a color change will always be a single crochet; so you’ll work the stitch, and when it’s time to pull through the final loops, you’ll drop the first color and pull through with the new color.
    (3) READING THE CHART: Odd-numbered rows are worked right-to-left, and even-numbered rows are worked left-to-right. You’ll begin in the bottom-right corner of the chart.
    (4) CARRYING YARN: For this project, I carried my yarn through the plaid sections (dropping whichever of the three colors I wasn’t using on that row, and picking it back up again when needed). For the pumpkin area, I carried the background color (aran) throughout, but only carried the pumpkin color (orange) across a single row, fastening it off when finished with it and rejoining when needed in the next row.

    – – – – – – – – – – – – – – –

    INSTRUCTIONS FOR WALL HANGING

    With COLOR A, CH49.

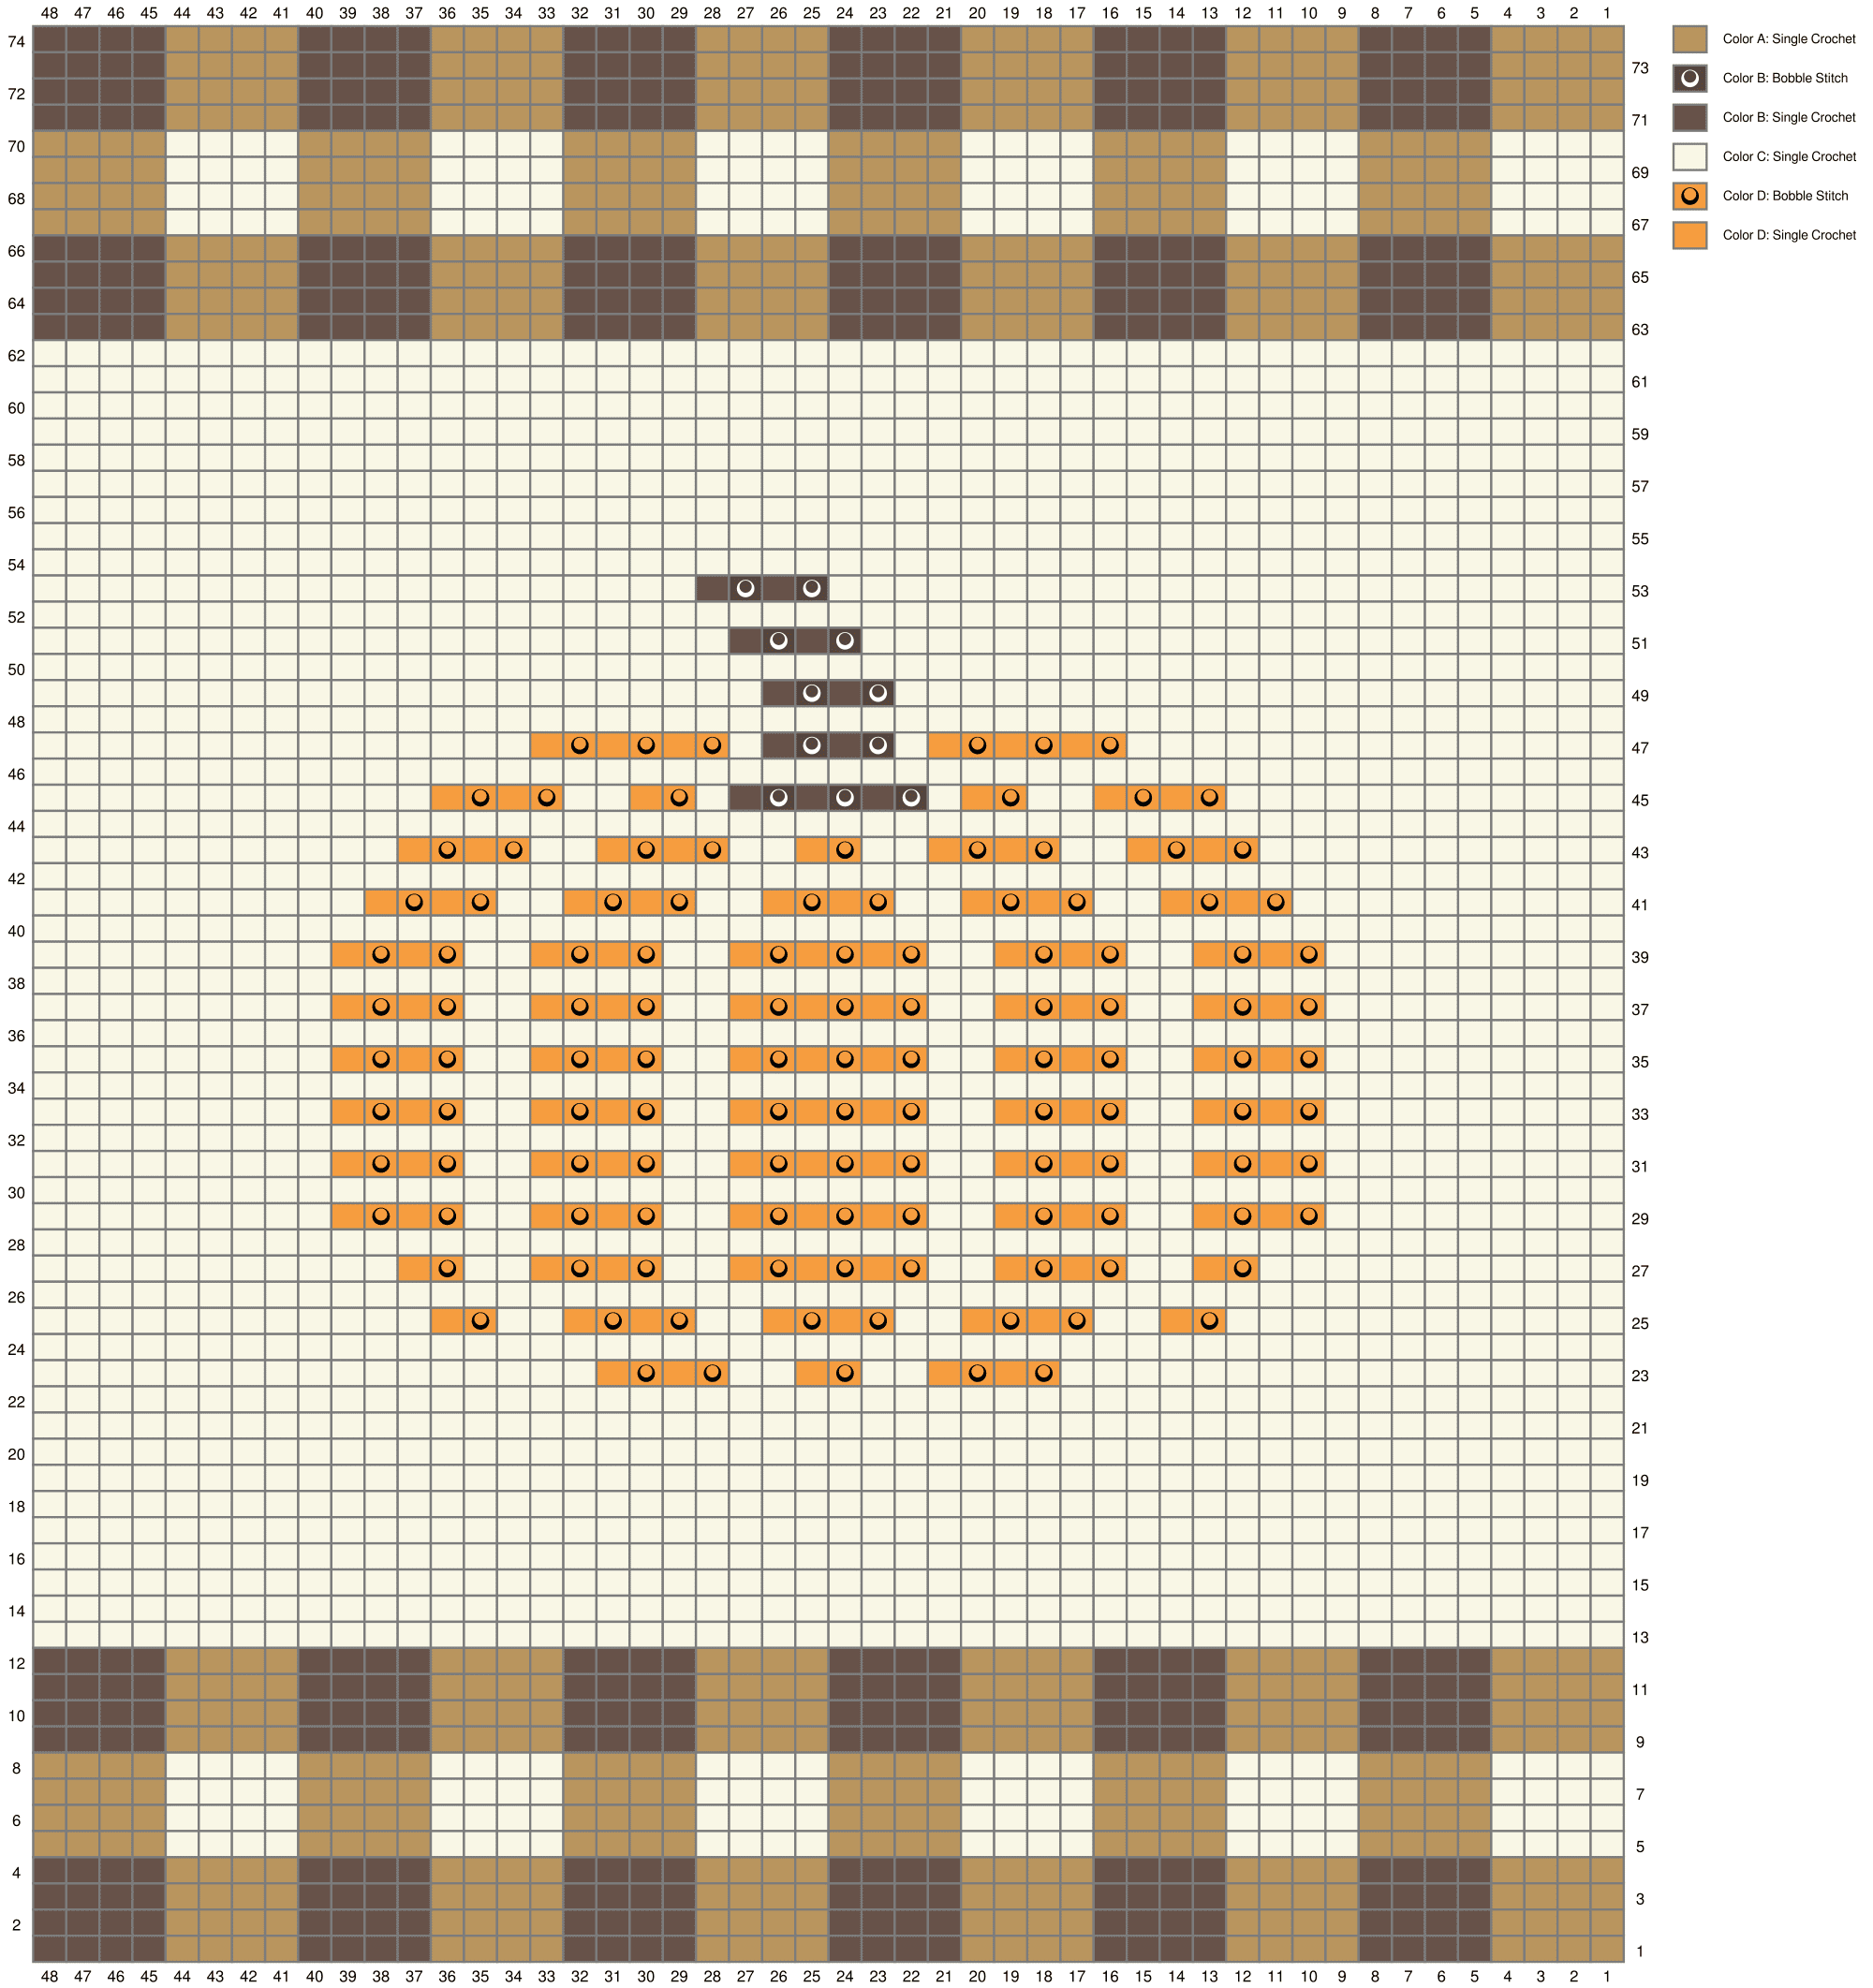
    Row 1: Beginning in 2nd CH from hook, (4 SC in COLOR A, 4 SC in COLOR B) across. (48)

    Rows 2-74: CH1, turn; complete corresponding row on color chart.* (You’ve already completed chart Row 1.) (48)  

    (Click chart to enlarge.)

    Once you’ve completed the chart, fasten off. 

    Complete the following:

    • Relocate all yarn ends to the back of the project and weave in.
    • Block project (optional, recommended)
    • Add tassels or fringe (optional)
    • Attach project to dowel

    – – – – – – – – – – – – – – –

    That’s it!

    I hope you enjoyed this tutorial. If you’re sharing your project on social media, be sure to tag me @yarnandchai.design!
  • Welcome Wall Hanging

    Welcome Wall Hanging

    Pattern Errata
    (7.6.23) Pattern had incorrect stitch count. Current stitch count is correct.
    (7.9.23) WELCOME chart fixed. Current chart is correct.

    Making that project got me really excited about wall hangings, so I decided to create my first pattern for one!


    Blog Version vs. PDF Version

    I’ll say this up front: While I normally try to create my ad-free PDF versions of my blog patterns as similarly to the blog version itself as I can, in this case, the PDF version is packed with helpful tips and info that I just couldn’t reasonably fit into the blog post without it getting long and confusing. So with that said…

    If you’ve never made a bobble stitch wall hanging before, I recommend you work from the ad-free PDF version of this pattern which is available to All-Access Passholders.

    Here’s what you’ll get in the PDF:

    • How to follow a color chart
    • The “tie-and-trim” method (photo tutorial)
    • How to add fringe (photo tutorial)
    • How to attach the dowel (photo tutorial)
    • Enlarged printable version of the color chart
    • No ads

    All-Access Passholders get the ad-free version of this and all of my other blog patterns. It’s a pretty sweet deal, if I do say so myself! Learn more about it here.

    You can purchase the All-Access Pass, or scroll on to view the pattern right here on the blog.

    – – – – – – – – – – – – – –

    “WELCOME” Wall Hanging

    View on Ravelry

    Difficulty: Easy

    Crochet Language: American Standard

    Finished Size:
    Wall hanging: 31.5” tall x  6.75” wide (not including fringe)
    Flower: 3.5” x 3.5”

    Yarn: 
    #4 medium weight acrylic yarn recommended.

    Wall hanging:
    250 yards of COLOR A (base) – I used Impeccable in “Putty”
    50 yards of COLOR B (letters) – I used Impeccable in “White”

    Flower:
    5 yards for center of flower – I used Rustic Romantic in “Barnwood Fence”
    20 yards for petals – I used Impeccable in “Butterscotch”

    Hook:
    Wall hanging: 5.0mm (H) hook
    Flower: 4.5mm (G/7) hook

    Gauge:
    Wall hanging: 16 SC x 18 rows = 4”
    Flower: First 3 rounds should measure about 1.125” across

    You’ll also need: Wooden dowel cut to 8”

    Terms and Abbreviations:

    MC (magic circle – tutorial here)
    ST/STS (stitch/stitches)
    CH (chain)
    SL ST (slip stitch)
    SC (single crochet)
    HDC (half double crochet)
    YO (yarn over)
    FLO (front loop only)
    BLO (back loop only)

    BOBBLE STITCH
    1: YO and insert the hook into the st
    2: YO and pull up a loop
    3: YO and pull through the first 2 loops on the hook 
    4: Repeat 1-3 four more times until you have 6 loops on the hook
    5: YO and pull through all 6 loops

    Notes about the Bobble Stitch: 
    (1) Bobble stitches will always be followed by a single crochet (SC) of the same color.
    (2) Bobble stitches are worked on the “wrong side” of the pattern, but the bobble will show up on the correct side.

    Pattern Notes:
    (1) CH1s at the beginning of rows/rounds do not count as stitches.
    (2) Instructions for the “O” in WELCOME are included in the chart in case you opt to not attach a flower there. 
    (3) CHANGING COLORS: In the stitch before a color change, complete the final step of the stitch with the new color. In this pattern, the stitch before a color change will always be a single crochet; so you’ll work the stitch, and when it’s time to pull through the final loops, you’ll drop the first color and pull through with the new color.
    (4) Reading the chart: Odd-numbered rows are worked right-to-left, and even-numbered rows are worked left-to-right.
    (5) Carrying colors: Whenever I was using COLOR B (white), I did carry COLOR A (ivory) along because it is well-hidden in the bobble stitches. I did not, however, carry COLOR B (white) at all; I simply cut it when I was done with it, and rejoined a new strand when I needed it again.

    – – – – – – – – – – – – – – –

    INSTRUCTIONS FOR WALL HANGING

    To begin: With COLOR A, CH25.

    Row 1: SC in 2nd CH from hook and in each remaining CH. (24)

    Row 2: CH1, turn. SC across. (24)

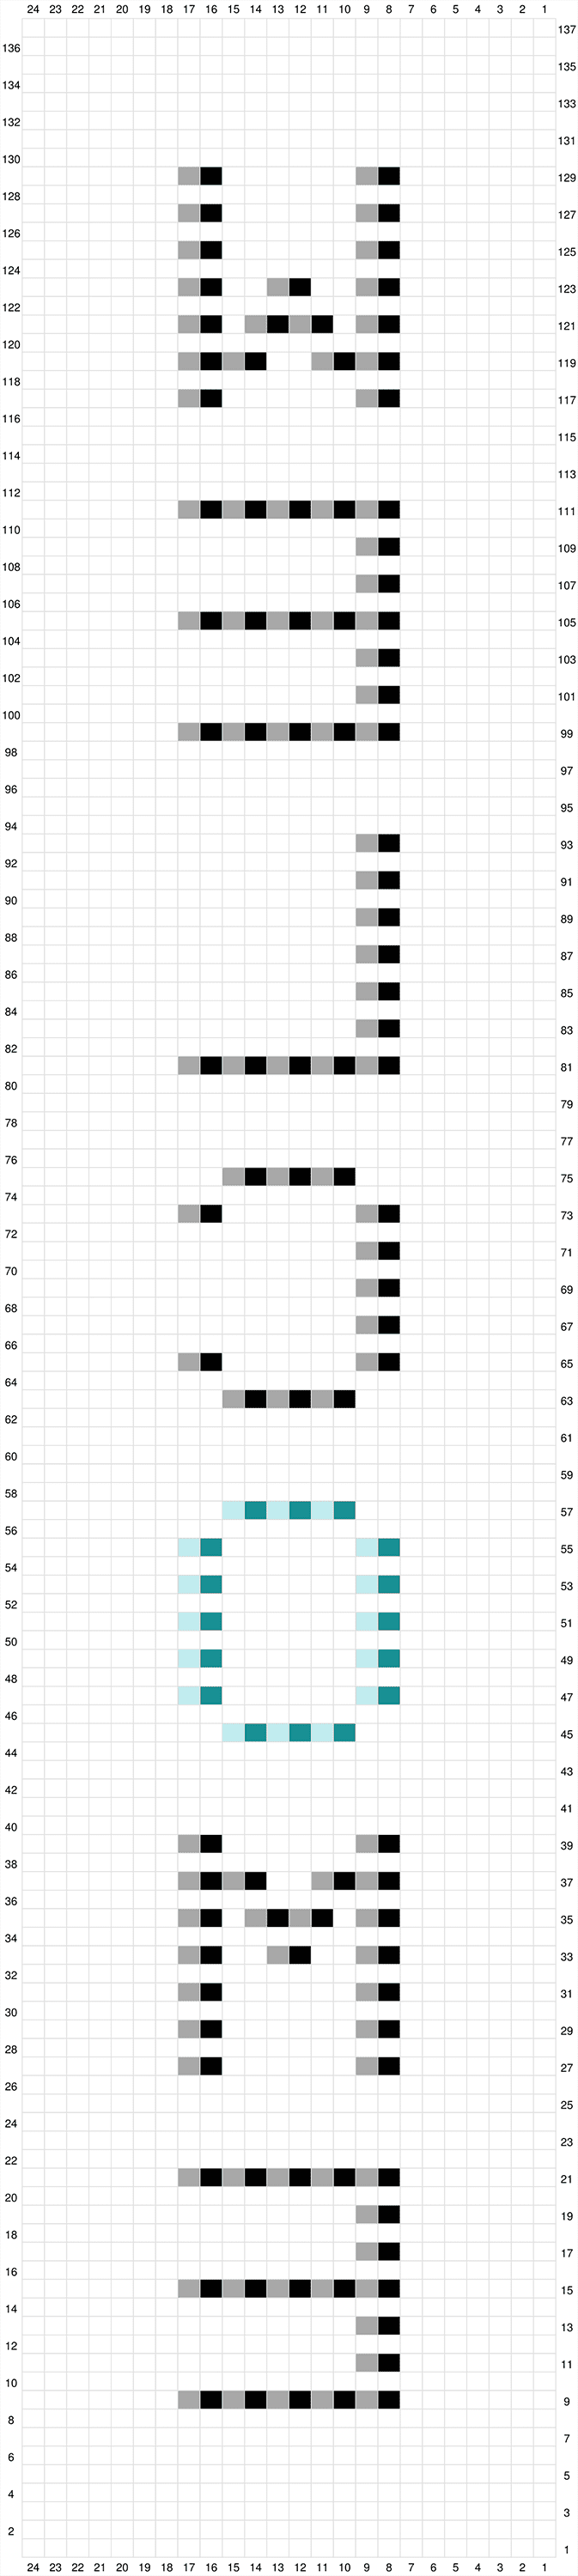
    Rows 3-137: CH1, turn; complete corresponding row on color chart. (24)

    (click chart to enlarge)

    When you complete the chart, fasten off. Weave in COLOR A ends. 

    Complete the following:

    • Secure COLOR B ends with “Tie-and-Trim” method (use yarn needle to relocate all ends to back side of project, then tie nearby ends together with a knot and trim to half an inch or less)
    • Block project (optional, recommended)
    • Add fringe (you’ll need at least 24 8″ strands)
    • Attach flower (optional — pattern below)
    • Attach project to dowel

    – – – – – – – – – – – – – – –

    INSTRUCTIONS FOR FLOWER

    Reference these instructions when pattern calls for front or back petals:

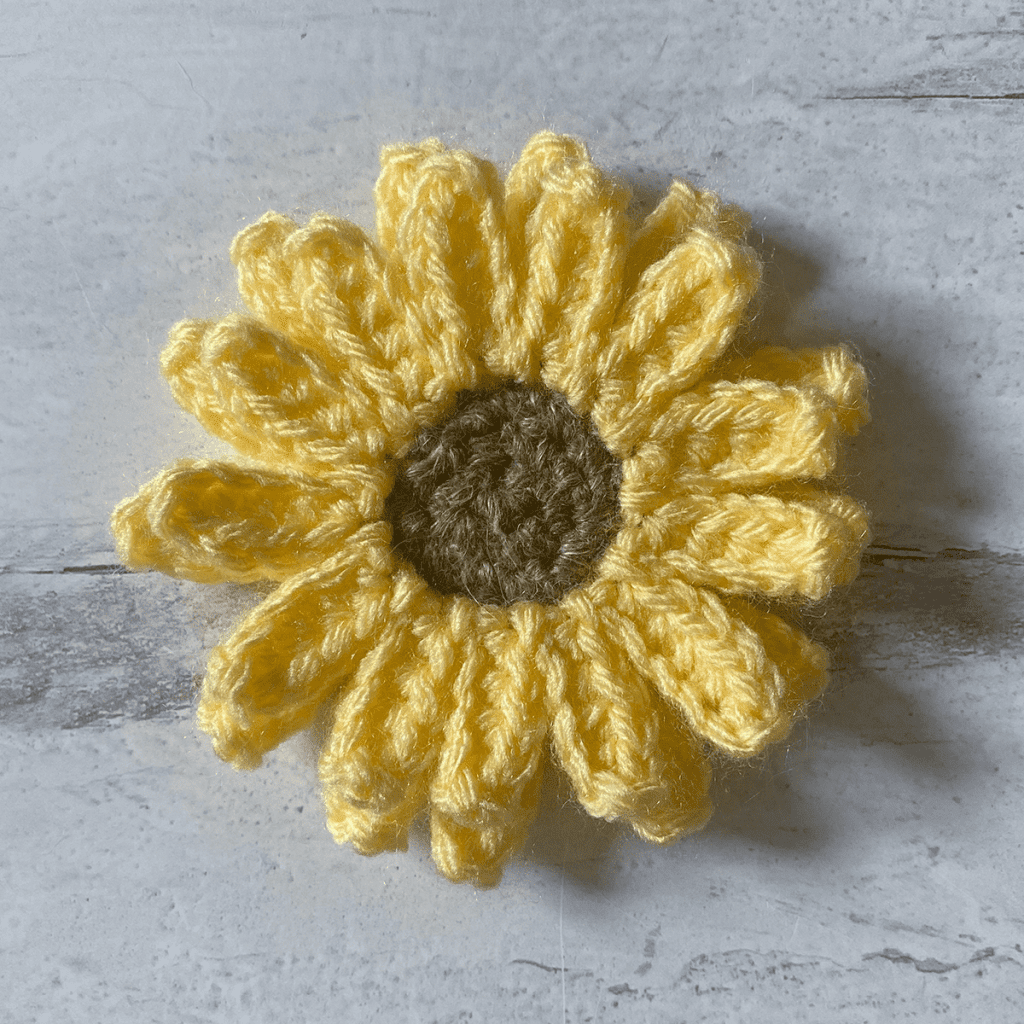
    FRONT Petal Instructions: SL ST to FLO of next ST, CH6, SC in 3rd CH from hook, HDC in each of the 3 remaining CHS, SL ST in FLO of same ST you started in.

    BACK Petal Instructions:
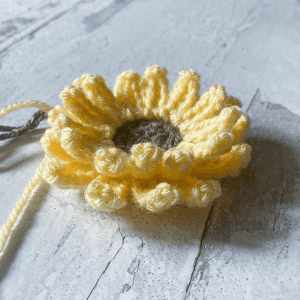
    SL ST to BLO of next ST, CH7, SC in 3rd CH from hook, HDC in each of the 4 remaining CHS, SL ST in BLO of same ST you started in.

    To begin: To begin: With BROWN YARN, make a magic circle; CH1.

    Round 1: 5 SC in MC. Join. (5)

    Round 2: CH1. 2 SC in each ST around. Join. (10)

    Round 3: CH1. 2 SC in first ST, SC in next ST, (2 SC in next ST, SC in next ST) around. Insert hook into first ST of the round to begin your join, switch to YELLOW YARN, and complete join. (15)

    Fasten off BROWN YARN, leaving a long tail for attaching flower to project (if desired).

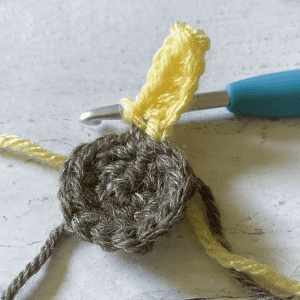
    Round 4-A (1st Round of Petals): SL ST into FLO of first ST. (Mark the unworked BACK loop of the stitch with a stitch marker or bobby pin; it will come in handy later.) CH6, SC in 3rd CH from hook, HDC in each of the 3 remaining CHS, SL ST in FLO of the same stitch you started in; this is your first petal. 

    Complete “Front Petal Instructions” once in each of the next 3 STS. SK next ST. Complete “Front Petal Instructions” once in each of the next 4 STS. SK next ST. Complete “Front Petal Instructions” once in each of the next 5 STS. 

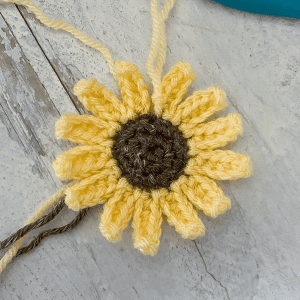
    You should now have 13 petals total.

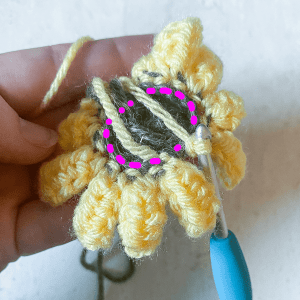
    Turn flower over and notice the unworked back loops from Round 3, starting with the loop we marked with a stitch marker; we’ll be doing our second round of petals along these back loops.

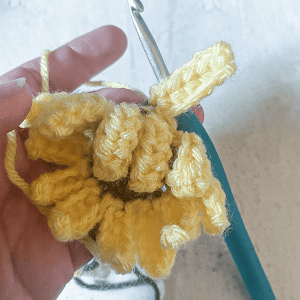
    Round 4-B (2nd Round of Petals): CH1. SL ST into the 1st back loop of Round 3 (the loop we marked with a stitch marker). CH7, SC in 3rd CH from hook, HDC in each of the 4 remaining CHS, SL ST in BLO of same ST you started in.  This is your first back petal.

    Complete “Back Petal Instructions” once in each of the next 3 STS. SK next ST. Complete “Back Petal Instructions” once in each of the next 4 STS. SK next ST.  Complete “Back Petal Instructions” once in each of the next 5 STS. 

    You should now have 13 back petals, 26 petals total.

    Leaving the long BROWN YARN tail (if you’re using it to attach your flower to your project), weave in all other ends.

    SHAPING THE PETALS

    If your petals are curling up too much, you can invert them by pinching the backside of the tips of the petals. Block flower if desired to maintain shape.

    That’s it!

    I hope you enjoyed this tutorial. If you’re sharing your project on social media, be sure to tag me @yarnandchai.design!