Category: Hats + Headwear

  • Yenni Slouch Hat

    Yenni Slouch Hat

    © Photography by Kindred Photo & Design

    Thank you to Cascade Yarns for providing the yarn for this sample!

    I recently discovered Cascade Yarn’s Longwood Sport when I used it to make the South Haven Slouch pattern last month. I really fell in love with it, and wanted to work with it again. As a newbie crocheter, I always avoided patterns with anything thinner than worsted weight yarn because I thought it would take forever to work up. But eventually, I branched out and discovered that I actually love the look of  items crocheted with thinner yarn. I encourage you to try it if you haven’t already!

    This slouchy hat, called the Yenni Slouch (that’s pronounced like the English “Jenny”, by the way) is named after my beautiful niece who is modeling it in the photo. It also has a pair of matching boot cuffs — which, conveniently, are basically just little versions of the hat!

    Yenni Slouch Crochet Hat | Free Slouchy Hat Crochet Pattern by Little Monkeys Crochet

    Prefer a PDF?

    This pattern can be completed using the 100% free version right here on this page. However, many people prefer the convenience of a printable, ad-free PDF.

    All-Access Passholders get the ad-free version of this and all of my other blog patterns. It’s a pretty sweet deal, if I do say so myself! Learn more about it here or continuing scrolling for the free version.

    –

    YENNI SLOUCH

    add-to-ravelry-favorites

    Level: Easy

    Size:
    One Size Fist Most (Preteen – Adult Woman).
    Hat measures 10” across at band, and is 9” tall.

    Materials:

    • H hook (5.00mm) and G hook (4.25mm)
    • Yarn needle
    • Cascade Yarns Longwood Sport*, 250-270 yards. The color in the photos is Doeskin Heather.
      *About Longwood Sport:
        Weight: #3 light
                    Fiber: 100% Superwash Extrafine Merino Wool
      Yardage: 100 g (3.5 oz) / 273 yds (250 m)
      Gauge: 22-24 sts = 4″ (10 cm), US 5-6 (3.75-4.0mm)
    • Button embellishment (mine is 1-1/8″)

    Gauge: With H hook, 4HDC = 1″

    Stitches Used:
    CH (chain)
    SS (slip stitch)
    SC (single crochet)
    HDC (half double crochet)
    DC (double crochet)
    SC+DC (this just means to put a single crochet and a double crochet in the same stitch)

    Special Terminology:
    3rd Loop – Some rows call for the stitches to be completed in the “3rd loop”. When working in turned rows, and after completing a row of HDC, these loops will be visible just below the front loop. So instead of inserting your hook into the top loops, you’ll only insert it into that 3rd loop. This will force the top loops to go to the front of your work, which is how we get the “ribbing” effect.

    Notes:
    (1) This pattern is written in American Standard terms.

    – – – – – – – – – – – – – – – –

    To begin:
    Using H Hook, and leaving a 12″ tail, CH29.

    Row 1:  SC+DC in 3rd CH from hook. (Sk next ST, SC+DC in next ST) across. (28)

    Row 2: CH1, turn. Skip 1st ST, SC+DC in next ST. (Sk next ST, SC+DC in next ST) across. (28)

    Row 3: CH1, turn. Skip 1st ST, SC+DC in next ST. (Sk next ST, SC+DC in next ST) across. (28)

    Row 4: CH1, turn. SK 1st ST. HDC in each of the next 26 STS. 2HDC in last ST. (28)

    Row 5: CH1, turn. Working in 3rd loops, (SK next ST, SC+DC in next ST) across. (28)

    Rows 6-72: Repeat Rows 2-5 in order until you have 72 total rows (you will end with a repeat of Row 4).

    Switch to G hook.

    Row 73: CH1, DO NOT turn. Begin to SC down the LONG edge of the project, putting 5SC in each section between ribbing rows (see photo below for a visual). You should end up with 90SC. Then, CH 11 to create the base of your button flap.

    yennislouch-5SCedging

    Row 74: Turn your work. SC in 2nd CH from hook and in each remaining CH. Continue to SC across. (100)

    Rows 75-84: CH1, turn. SC across. (100)

    Row 85 (edging): CH1, turn. SC across (100). Putting (SC, CH1, SC) in both corners, continue to SC around the edge of the button flap. Stop when you get here:

    yennislouch-edging

    Sewing the hat together
    Fasten off your yarn, leaving a long tail. Using a yarn needle, sew the ends of the hat together. Utilize the 3rd loop of the edge with the HDCs in order to blend the seam in so it is hardly noticeable:

    yennislouch-seaming

    Once you get to the top of the hat, make a knot and weave in the end.

    Cinching the top
    Turn your hat inside out. Use your starting tail to cinch the top of the hat by threading it through a yarn needle and weaving the needle in and out along the top edge of the hat at even intervals. Once you’ve gone all the way around, pull the tail tight and insert your yarn needle across the cinched area a few times to really keep it closed, then make a knot and weave in the end. Turn your hat right-side out again.yennislouch-cinching

    Finishing the Button Flap
    We still need to sew our button flap in place and attach our button. Using a needle and appropriately-colored thread, position the button flap in place and sew along its 3 edges to secure it. Use your needle and thread to attach your button as well.

    Yenni Slouch Crochet Hat  |  Free Slouchy Hat Crochet Pattern by Little Monkeys Crochet

  • Macchiato Slouch Hat

    Macchiato Slouch Hat

    © Photography by Kindred Photo & Design

    Thank you to Lion Brand for providing the yarn for this pattern sample!

    I’ve always had a picture in my head of a slouch hat that I wanted to create, that had a very slooooooooow, graaaaaadual color change. I looked into the possibility of dip-dying the finished hat, but it looked like more effort than it was worth. (Plus, I’m lazy.) Then, just recently, I found out about Lion Brand’s new yarn – Scarfie! As soon as I saw it, I knew it was The One. The perfect yarn for the hat I wanted to create.

    scarfieyarnpic
    Click the photo to view Lion Brand Scarfie yarn on Craftsy!

    –

    About the Yarn

    Each skein of Scarfie has very gradual color changes between two colors. I immediately gravitated to the Cream/Taupe, because, well, I’m a sucker for a good taupe color. Each skein has 312 yards of bulky weight yarn, so you’ve got plenty to make a beautiful, somewhat-ombre-style scarf.

    But we’re not making a scarf today.

    Nope, today we’re going to use that beautiful Scarfie yarn to make a hat! Sometimes, you just gotta do the unexpected. 🙂

    This pattern is a very simple slouch pattern. But paired with the gorgeous gradual color changes of Scarfie, it becomes completely unique! It just goes to show you how yarn choice can make all the difference.

    –

    About the Name

    I named this pattern the “Macchiato Slouch” because the combination of the yarn color and the gradual fade made me think back to my days as a barista. One of my favorite drinks was an iced caramel macchiato — vanilla syrup, milk, and a couple shots of espresso and caramel drizzle to mark the top (macchiato means marked in Italian). So instead of the espresso instantly mixing with milk, as it would in a latte, the espresso sits on top of it until it sloooooowly blends in from the top-down. Now, the next time you to go your local coffee shop, you can wow them with your knowledge… and with your new hat!

    Prefer a PDF?

    This pattern can be completed using the 100% free version right here on this page. However, many people prefer the convenience of a printable, ad-free PDF.

    All-Access Passholders get the ad-free version of this and all of my other blog patterns. It’s a pretty sweet deal, if I do say so myself! Learn more about it here or continuing scrolling for the free version.

    MACCHIATO SLOUCH HAT

    add-to-ravelry-favorites

    Level: Easy

    Size:
    One Size Fist Most (Preteen – Adult Woman).
    Hat measures 9.5” across at band, and is 9” tall.

    Materials:

    • N hook (9.00mm) and I hook (5.50mm)
    • Yarn needle
    • Lion Brand Scarfie Yarn (I used Cream/Taupe), about 140 yards, which is less than half a skein – so you can make two! (Scarfie is a bulky weight yarn.)
    • Stitch marker (a bobby pin works great)
    • Button (1-1.5″) and tools to attach it

    Gauge:
    With N hook, 7HDC = 3″

    Stitches Used:
    MC (magic circle) – view my tutorial here
    CH (chain)
    SS (slip stitch)
    SC (single crochet)
    HDC (half double crochet)

    Notes:

    (1) This hat is worked in a continuous spiral until the band. Do not join, chain or turn until instructed. Use a stitch marker to mark the first stitch of each round.
    (2) This pattern is written in American Standard terms.
    (3) The button and button flap on this hat are just decorative (they don’t actually function). There is no buttonhole, and at the end, we’ll just sew everything neatly in place.

    – – – – – – – – – – – – – – – –

    To begin:
    Using N Hook, make a magic circle.

    Round 1:  10 HDC in MC (10)

    Round 2: 2 HDC in each ST around (20)

    Round 3: 2 HDC in each ST around (40)

    Note: At this point, it’s going to start looking wavy. You’re doing it right! The back of the hat has a faux-cinched look to it, and this is how we achieve it. Once you get to the body of the hat, it will start to straighten itself out naturally.

    Round 4: (2 HDC in next, 1 HDC in next) around (60)

    Rounds 5-15: HDC around (60)

    Switch to I hook.

    Round 16: SC around (60). CH7.

    From this point on, we will be working in turned rounds. We still won’t be joining.

    Round 17: Turn your work. Working down the back side of the CH7, SC in 2nd CH from hook and in each remaining CH, then continue to SC around the hat (you’re now crocheting in the opposite direction as the previous round) until you reach the beginning again. (66)

    Rounds 18-22: CH1, turn. SC around. (66)

    Edging: CH1. SC around the entire band of the hat, including the button flap, putting (SC,CH1,SC) in each corner.

    Fasten off, leaving a 12″ tail. Use the tail to gently sew the button flap in place, then weave in all ends securely. Attach decorative button in place with yarn or a needle and thread.

  • Ribbed Cinched Ear Warmer

    Ribbed Cinched Ear Warmer

    © Photography by Kindred Photo & Design

    Thank you to Lion Brand for providing the yarn for this pattern sample.

    As far as social media is concerned, my Cinched Ear Warmer has been one of my top all-time most popular patterns. It’s one of my earlier ones, and when I made it, I knew there were so many options for changing it up. I just never got around to it until now! This new version begins with the same cinched style, but a ribbing stitch gives it a unique look.

    –

    The Yarn

    I use Heartland in a lot of my patterns because I love everything about it – the weight (it’s worsted, but feels light), the colors (I’m a sucker for natural hues) and the sheen (not too shiny, not too dull). After the first sample, I decided that this pattern might look awesome in two colors. I didn’t want it to look striped so much as two-toned, so I chose two colors that were pretty close in shade – “Katmai” and “Grand Canyon”. Click here to view the full range of colors available.

    yarnpic

    Prefer a PDF?

    This pattern can be completed using the 100% free version right here on this page. However, many people prefer the convenience of a printable, ad-free PDF.

    All-Access Passholders get the ad-free version of this and all of my other blog patterns. It’s a pretty sweet deal, if I do say so myself! Learn more about it here or continuing scrolling for the free version.

    –

    RIBBED CINCHED EARWARMER

    Level: Easy

    Size:
    One Size Fist Most (Preteen – Adult Woman).
    Earwarmer measures 18” around, and is 3” wide.

    Materials:

    • H hook (5.00mm)
    • About 60 yards of Lion Brand Heartland* (Samples are shown in Glacier Bay and Katmai/Grand Canyon)
      *About Heartland:
        Weight: #4 worsted
                    Fiber: 100% Acrylic
      Yardage: 5oz/142g (251yd/230m)
      Gauge: 12 sc + 15 rows = 4 inches on size J-10 [6 mm] hook
    • Yarn needle

    Gauge:
    With H hook, 4 HDC = 1″

    Stitches Used:
    CH (chain)
    SL ST (slip stitch)
    FHDC (foundation half double crochet – click here for a tutorial)
    RibHDC (also known as Camel Stitch or 3rd Loop HDC; see Special Stitch, below)

    Special Stitch:
    RibHDC – instead of putting your HDC in the top loops, find the 3rd loop. Because we’re working in turned rows, the third loop will be located just underneath the front loop. Insert your hook there and create your HDC. This forces both of the top loops to rest on the front of your project, creating a ribbing effect. It is also referred to as a Camel Stitch or 3rd Loop HDC. (Confused? You can view a photo tutorial here.)

    Notes:
    (1) This pattern is written in American Standard terms.
    (2) Starting chains do not count as stitches.
    (3) This pattern is easily adjusted to any head size. 68 STS was perfect for me, but you might want to wrap the first round around your head as you go to get the perfect fit for you.
    (4) For the tan-colored sample in the photos, I actually used two different colors of Heartland (Katmai and Grand Canyon). I switched colors every other row, and carried my yarn instead of fastening it off each time.

    – – – – – – – – – – – – – – – –

    With H hook,

    Round 1: FHDC 68. Join to the first FHDC with a slip stitch, being careful not to twist the row.
    (Or, if you don’t like the Foundation Chain method,  just CH 69, HDC in second CH from hook and HDC across.)

    Round 2: CH1, turn. RibHDC around. Join with a SL ST to first RibHDC. (68)

    Rounds 3-12: Repeat Round 2.

    Cut your yarn, leaving about a 12″ tail, and finish off but don’t weave in the tail. Use your yarn needle to sew up the first round of FDCs, then weave in that tail and cut.

    To Cinch:
    Please note that the photos below are taken from my original Cinched EarWarmer pattern, so the pattern looks slightly different, but it’s the same concept.)

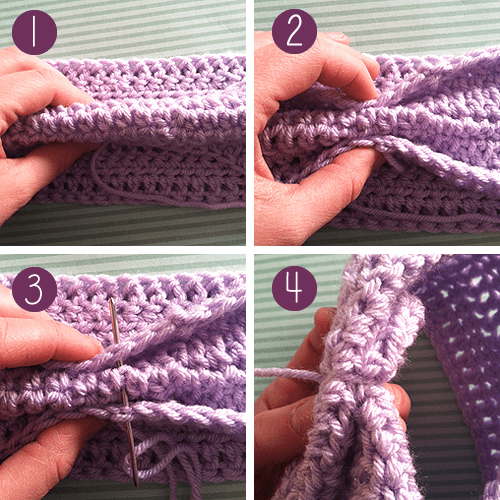
    1. Thread the long tail through your yarn needle. Gather the seamed section of the headband, and fold in half so that the fold is facing you.

    2. Bring either side up to the top of the fold and hold secure with your fingers.

    3. Run your yarn needle through all three sections of gathered material. The closer you get to the surface, the better your cinch will look; so I run mine right under the top loops of the outer sections, and under just a few strands of the center fold.

    4. Wrap the yarn around the underside of the cinch, then through the sections again. Do this a few times to secure the cinch, then tie off underneath and weave in the tail.

    cinching steps

    Ribbed Cinched Ear Warmer  |  Free Ear Warmer Headband Crochet Pattern by Little Monkeys Crochet

  • South Haven Slouch

    South Haven Slouch

    A few weeks ago, our family had the opportunity to go to one of my favorite little spots in Michigan for a week. South Haven, on Lake Michigan, is an adorable town full of good food, cute shops, and AMAZING views. I used to come here as a teen with my youth group, so I have a lot of memories of swimming at the beach and walking down to the lighthouse. Now, during our first real vacation as a family (and really, our first real vacation as a couple since our honeymoon 8 years ago), we were able to make tons of new memories. It was a great week!

    When we weren’t hanging out at the beach, we were wandering around downtown (usually hunting for a new ice cream parlor or coffee shop to try). But I was super excited when I saw this yarn store, “Needle in a Haystack.” (Edit: This cute little store has closed its doors.) The owner was sweet and friendly, and we had a great conversation about selling online while I perused the shelves of gorgeous yarns.

    After staring at yarn for an eternity, I finally settled on this skein of Longwood Sport 100% Superwash Extrafine Merino Wool.

    I don’t know about you, but I tend to buy all of my yarn from the big craft stores in my town. It’s great to have them nearby, but it really limits you as far as yarn goes. That’s why I think it’s important as a crocheter, and especially as a designer, to visit out-of-town yarn shops when you get the chance. I’ve never worked with anything from Cascade Yarns before, but I think I might be in love now.

    This particular yarn came in a range of stunning, natural colors (hence the eternity it took me to pick one). It’s SO soft, but it really holds its shape well. I took it down to the beach with me and stared at it for a little while, squished it in my hands (I love squishy yarn), and pretty soon I knew what it was going to become.

    Prefer a PDF?

    This pattern can be completed using the 100% free version right here on this page. However, many people prefer the convenience of a printable, ad-free PDF.

    All-Access Passholders get the ad-free version of this and all of my other blog patterns. It’s a pretty sweet deal, if I do say so myself! Learn more about it here or continuing scrolling for the free version.

    SOUTH HAVEN SLOUCH

    Level: Easy

    Size:
    One Size Fist Most (Preteen – Adult Woman).
    Hat measures 10” across at band, and is 9” tall. I like just a little bit of slouch in my slouch hats, but if you like more, you can add rounds to the body of the hat, or make the band of the hat wider, too.

    Materials:

    • H hook (5.00mm) and G hook (4.25mm)
    • Yarn needle
    • 260-270 yards of Cascade Yarns Longwood Sport (that’s a little less than one skein). The color in the photos is Midnight Blue.
      *About Longwood Sport:
        Weight: #3 light
                    Fiber: 100% Superwash Extrafine Merino Wool
      Yardage: 100 g (3.5 oz) / 273 yds (250 m)
      Gauge: 22-24 sts = 4″ (10 cm), US 5-6 (3.75-4.0mm)
    • Stitch marker (a bobby pin works great)

    Gauge:
    With H hook, 7 rows of 9HDC = 2″ square

    Stitches Used:
    MC (magic circle) – view my tutorial here
    CH (chain)
    SS (slip stitch)
    SC (single crochet)
    HDC (half double crochet)
    SC2TOG (Single Crochet 2 Together)
    RibHDC (also known as Camel Stitch or 3rd Loop HDC; see Special Stitch, below)

    Special Stitch:
    RibHDC – instead of putting your HDC in the top loops, reach your hook past the back loop where you’ll find a 3rd loop on the side of the stitch. Insert your hook there to create your HDC. This forces both of the top loops to rest on the front of your project, creating a ribbing effect. It is also referred to as a Camel Stitch or 3rd Loop HDC.

    Notes:
    (1) This hat is worked in a continuous spiral. Do not join at the end of each round and do not chain at the beginning of rounds unless instructed. Use a stitch marker to mark the last stitch of each round.
    (2) This pattern is written in American Standard terms.

    – – – – – – – – – – – – – – – –

    To begin:
    Using H Hook, make a magic circle.

    Round 1:  10 HDC in MC (10)

    Round 2: 2 HDC in each ST around (20)

    Round 3: 2 HDC in each ST around (40)

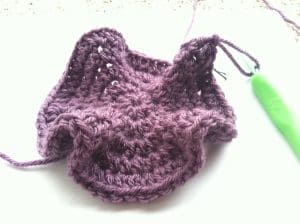
    Note: At this point you should have a floppy-looking circle. This is a good thing. It will continue to get floppier as we increase, and then it will smooth itself out on the body of the hat. That’s how we create the cinched look on the top.

    Round 4: (2 HDC in next, 1 HDC in next) around (60)

    Round 5: (2 HDC in next, 1 HDC in each of the next 2 STS) around (80)

    Round 6: (2 HDC in next, 1 HDC in each of the next 3 STS) around (100)

    Round 7: RibHDC around. (100)

    Round 8: HDC around. (100)

    Round 9: RibHDC around. (100)

    Rounds 10-13: HDC around. (100)

    Round 14: RibHDC around. (100)

    Round 15: HDC around. (100)

    Round 16: RibHDC around. (100)

    Rounds 17-20: HDC around. (100)

    Round 21: RibHDC around. (100)

    Round 22: HDC around. (100)

    Round 23: RibHDC around. (100)

    Round 24: HDC around. (100)

    Note: If you want a little more slouch in your hat, this would be a good place to add some extra rounds of HDC.

    Round 25: (SC2TOG, SC in each of the next 8 STS) around. (90)

    Round 26: SC around. (90)

    Switch to G hook.

    Rounds 27-35: SC around. (90)

    Smooth out the round by slip stitching into the first 3 STS of the next round. Fasten off and weave in ends.

  • Basic Men’s Hat

    Basic Men’s Hat

    Project status: Complete | Hats collected: 565

    Please note that this pattern was originally a part of the Hats for the Homeless campaign from 2015. We are no longer collecting hats for this project, but the pattern can still be found below!

    BASIC MEN’S HAT SEAMLESS CROCHET PATTERN

    Hook: I (5.50mm)
    Yarn: Soft worsted weight yarn (I typically use Hobby Lobby’s “I Love This Yarn” or Lion Brand’s “Vanna’s Choice”)
    Difficulty: Easy

    Notes:

    • You will work in a continuous round. You will not join or turn. Use a stitch marker to keep track of your rows.

    – – – – – – – – – – – – – – –

    With I hook, make a Magic Circle (also known as an Adjustable Loop).

    Round 1: 8 HDC in magic circle. Do not join. (8)
    Round 2: 2 HDC in first St from Round 1 and in each stitch around (16)
    Round 3: (2 HDC in next St; 1 HDC in next) around (24)
    Round 4: (2 HDC in next St; 1 HDC in each of the next 2 St) around (32)
    Round 5: (2 HDC in next St; 1 HDC in each of the next 3 St) around (40)
    Round 6: (2 HDC in next St; 1 HDC in each of the next 4 St) around (48)
    Round 7: (2 HDC in next St; 1 HDC in each of the next 5 St) around (56)
    Rounds 8-21: 1 HDC in each St around (56)
    Rounds 22-25: 1 SC in each St around (56)

    Fasten off and weave in ends.

  • Sandy Slouch Hat

    Sandy Slouch Hat

    A new slouch hat pattern! YAY!

    I love slouch hats. And you guys must, too, because the Jenny Slouch quickly became one of my most popular patterns of all time (“all time”, of course, referring to the one year I’ve been blogging). There’s just something about a cute slouch that makes you feel extra adorable when you’re out in the cold. And it’s a great way to hide a bad hair day, which – as a tired mom of two toddler boys – is almost a daily thing for me.

    Here’s a new slouch pattern I’ve been working on, and it even has a matching cowl that I think you’ll also love, which I originally designed for All Free Crochet’s blog, Stitch & Unwind!

    The button on the hat is purely decorative, meaning there’s no buttonhole. (I figure, why go to the trouble of making it functional, when you’re never going to need to unbutton it, anyway?)

    Prefer a PDF?

    This pattern can be completed using the 100% free version right here on this page. However, many people prefer the convenience of a printable, ad-free PDF.

    All-Access Passholders get the ad-free version of this and all of my other blog patterns. It’s a pretty sweet deal, if I do say so myself! Learn more about it here or continuing scrolling for the free version.

    SANDY SLOUCH

    Hooks: K (6.5mm) and I (5.5mm)
    Yarn: About 175 yards of worsted weight acrylic yarn; I used <1 skein of Lion Brand Heartland in “Grand Canyon”. (Heartland is a lighter worsted weight yarn, comparable to Bernat Satin or Red Heart Soft, so if you use something a little thicker like Hobby Lobby’s I Love This Yarn it may turn out slightly larger.)
    Difficulty: Easy
    Gauge: A round of HDCs will = 1″. So, when you complete your 6th and final increase round, it should measure about 6″ in diameter.
    Finished Size: Approximately 10″ tall, and 9.5″ wide
    You’ll also need: Yarn needle, stitch marker (such as a bobby pin), 1″ button and materials to attach button

    Notes:
    (1) This pattern is written in American Standard Terms.
    (2) This pattern is worked in a seamless round until the band, when it becomes turned rounds. Do not join, chain or turn unless instructed to do so.
    (3) Some have struggled with understanding that is happening once you get to the band and button area, so here’s an explanation I replied with in the comments section that seemed to help, and you can come back to this if you get tripped up too. What you’re doing in Round 21 is setting the base for your flap. Because of the flap, we are not able to work in continuous or joined rounds. We’re just going to be going back and forth, building the band, including the flap. (Which is why the stitch totals switch from 60 to 66, because we created 6 additional stitches with our CH7.) So in Round 22, you’re SCing back down that CH7 that you’ve just made, and then continuing on all the way around the hat until you reach the end of that round. (Technically it would be considered a row at this point, but I thought that would be even more confusing.) Then you’ll CH1 and turn, and SC back around the hat, all the way back up to the top of the CH7 section you made, then CH1, turn around and SC back down the flap and around the hat. You’re going to keep doing this until the pattern tells you to stop, and you will end up with a flap that is the same thickness as the band.

    – – – – – – – – – – – – – – – – – – – – – – – –

    THE PATTERN

    To begin: With K hook, make a magic circle (view a tutorial here).

    Round 1: 10 HDC in magic circle. (10)

    Round 2: 2HDC in each ST around. (20)

    Round 3: (2HDC in next ST, HDC in next ST) around. (30)

    Round 4: (2HDC in next ST, HDC in next 2 STS) around. (40)

    Round 5: (2HDC in next ST, HDC in next 3 STS) around. (50)

    Round 6: (2HDC in next ST, HDC in next 4 STS) around. (60)

    Round 7: (SC+DC in next ST, SK next ST) around. (60)

    Rounds 8-20: Repeat Round 7.

    Round 21: (SC+DC in next ST, SK next ST) 29 times (until you only have 2 STS left in the round). SC in next ST, SL ST in next ST. CH7. (60)
    (Note: the CH7 will form the base of our button flap.)

    Switch to I hook. You will now crochet the band of the hat, and we want it to be a little snug so that it doesn’t fall off.

    Round 22: SC in 2nd CH from hook and in each remaining CH. Continue to SC around. (66)

    Rounds 23-29: CH1, turn. SC around. (66)

    Finishing: CH1 (do NOT turn). SC around the entire edge of the hat, including the button flap, putting 2SC in each corner. Join with a SL ST to the first SC. Fasten off and weave in ends.

    Button: Place your button in the center of the flap and, using yarn or thread, secure it through both layers (the flap and the band underneath).

  • Polar Bear Hat (6-12m)

    Polar Bear Hat (6-12m)

    Brrrrr!

    I can already feel the weather changing here in Michigan. Soon we’ll be bundling ourselves up like eskimos to go outside. What better way to finish off your cold-weather ensemble than a cute polar bear hat?

    Get the Full Pattern

    This pattern can be completed using the 100% free version right here on this page. However, many people prefer the convenience of a printable, ad-free PDF.

    All-Access Passholders get the ad-free version of this and all of my other blog patterns. It’s a pretty sweet deal, if I do say so myself! Learn more about it here or continuing scrolling for the free version.

    POLAR BEAR HAT (SIZE 6-12 MONTHS)

    Finished Size: Approximately 8.25″ wide x 5.75″ tall
    Stitches Used: Ch, Sl St, SC, HDC, SC2TOG, HDC2TOG
    Yarn: Medium, worsted weight yarn, 1 skein of white (such as RED HEART With Love), and bulky fur-like yarn, 1 skein of white (such as RED HEART Buttercup)
    Hooks: Size I (5.50mm) for base, and size H (5.00mm) for features
    Notes: Pattern is written in American standard terms.
    Gauge: With 5.5mm (US I-9) hook, 4 rounds = 3.5 in (9 cm). CHECK YOUR GAUGE. Use any size hook to obtain the gauge.

    The Ch1 at the beginning of rounds DOES NOT count as a stitch.

    – – – – – – – – – – – – – – – – – – – –

    BASE (WORKED IN CONTINUOUS ROUNDS; USE STITCH MARKER TO MARK BEGINNING OF ROUNDS)

    With I HOOK, begin with a Magic Circle (MC).

    Round 1: Ch 1; 10 HDC in MC. (10)
    Round 2: (2 HDC in next St) around. (20)
    Round 3: (2 HDC in next St, HDC in next St) around. (30)
    Round 4: (2 HDC in next St, HDC in next 2 Sts) around. (40)
    Round 5: (2 HDC in next St, HDC in next 3 Sts) around. (50)
    Rounds 6-15: HDC around. (50)

    DO NOT fasten off; continue to “Earflaps” instructions.

    EARFLAPS (WORKED IN ROWS)

    With I HOOK,

    Row 1: Sl St to next St. Ch 1, SC in same St and in next 8 Sts; Ch 1, turn. (9)
    Row 2: SC across; Ch 1, turn. (9)
    Row 3: SC across; Ch 1, turn. (9)
    Row 4: SC2TOG, SC in next 5 Sts, SC2TOG; Ch 1, turn. (7)
    Row 5: SC across; Ch 1, turn. (7)
    Row 6: SC2TOG, SC in next 3 Sts, SC2TOG; Ch 1, turn. (5)
    Row 7: HDC2TOG, DC, HDC2TOG (3)

    Fasten off and weave in ends.

    To complete 2nd earflap, beginning at the base of the first earflap (the opposite side from which you started), and continuing on across the front of the hat, count over 19 Sts. Attach yarn. Ch 1, SC in same St and in next 8 Sts; Ch 1, turn. Repeat Rows 2-7 above.

    DO NOT fasten off; continue on to “Edging” instructions.

    EDGING (WORKED IN JOINED ROUNDS)

    With I HOOK,

    Round 1: Ch 1. SC in same St and in each St around, working evenly along sides of earflaps, and including an extra SC at the tip of each earflap. Join with a Sl St into the first SC. Fasten off; weave in ends.
    Round 2: Switch to FUR YARN. Attach yarn to a St at the back of the hat; Ch1. SC in same St and in each St around, adding an extra SC at the tip of each earflap. Join with a Sl St into the first SC. Fasten off; weave in ends.

    EARS (MAKE 2; WORKED IN CONTINUOUS ROUNDS)

    With H HOOK, begin with a Magic Circle (MC).

    Round 1: Ch 1; 6 HDC in MC. (6)
    Round 2: (2 HDC in next St) around. (12)
    Round 3: (2 HDC in next St, HDC in next St) around. (18)
    Round 4: (2 HDC in next St, HDC in next 2 Sts) around. (24)
    Round 5: HDC around. (24)
    Round 6: HDC2TOG around. (12)

    Fasten off, leaving a long tail for attaching to hat.

    SNOUT

    With H HOOK, begin with a Magic Circle (MC).

    Round 1: Ch 1; 8 SC in MC. (8)
    Round 2: (2 SC in next St) around. (16)
    Round 3: (2 SC in next St, SC in next St) around. (24)
    Rounds 4-5: SC around. (24)

    Fasten off, leaving a long tail for attaching to hat.

    FINAL ASSEMBLY

    Nose: Cut a rounded triangle nose from black felt. (Templates available with full pattern purchase.) Sew to snout using black thread (or attach with washable fabric glue), placing the bottom point of the nose on the center of the snout.

    Snout: Using long tail, begin to sew the snout to the hat, placing the bottom of the snout just above the fur edging. (Tip: Use a pin to hold the top of the snout centered in place so your snout doesn’t end up off-centered.) Stuff it with a small amount of polyester fiberfill before closing it up completely.

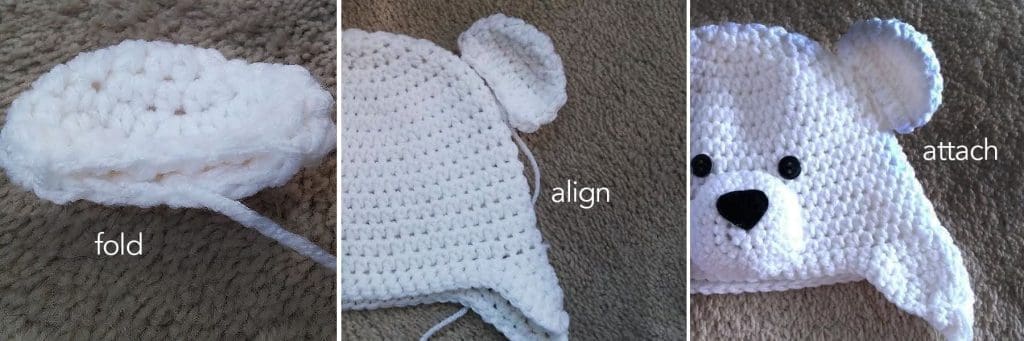
    Ears: Flatten hat. Using long tail, sew ears to either side of hat. The top of the ears should attach at Round 5. (The photos below are only to help you understand how to fold the ears. The size shown below is not 6-12m, so do not depend on it for feature placement.)

    Polar Bear Hat Crochet Pattern | Little Monkeys Crochet

    Eyes: Using thread and a sewing needle, attach two ½ inch buttons just above the snout, using the photo as a guide.

    Tassels (optional): For each tassel, use 6 pieces of white yarn and 3 pieces of fur yarn.

  • Sock Monkey Hat

    Sock Monkey Hat

    It’s finally done!

    I wish I could put into words for you what the completion of this pattern means to me. Not only is this the first multi-sized pattern I’ve created, but it’s also the first hat I ever made for my littlest monkey (although it has admittedly improved over the last couple of years).

    I am crazy excited to debut this hat. C-R-A-Z-Y.

    I’m going to share the 6-12 month size with you here, for free, because you rock. Seriously, I never thought I could actually be a blogger, but you guys have supported, encouraged, and challenged me (in a good way!) every step of the way.

    Get the Full Pattern

    This pattern can be completed using the 100% free version right here on this page. However, many people prefer the convenience of a printable, ad-free PDF.

    All-Access Passholders get the ad-free version of this and all of my other blog patterns. It’s a pretty sweet deal, if I do say so myself! Learn more about it here or continuing scrolling for the free version.

    SOCK MONKEY HAT (SIZE 6-12 MONTHS)

    Finished Size: Approximately 8.25″ wide x 5.75″ tall
    Stitches Used: Ch, Sl St, SC, HDC, SC2TOG, HDC2TOG
    Yarn: 3 colors of medium worsted, plus small amount of black and red for mouth (I used Hobby Lobby’s I Love This Yarn)
    Hooks: Size I (5.50mm) for base, and size H (5.00mm) for features
    Notes: Pattern is written in American standard terms.
    Gauge: With 5.5mm (US I-9) hook, 4 rounds = 3.5 in (9 cm). CHECK YOUR GAUGE. Use any size hook to obtain the gauge.

    The Ch1 at the beginning of rounds DOES NOT count as a stitch.

    – – – – – – – – – – – – – – – – – – – – – – – – – – – – – – – – – –

    BASE (WORKED IN THE ROUND)

    With I HOOK and COLOR A, begin with a Magic Circle (MC).

    Round 1: Ch 1; 9 HDC in MC. Join with Sl St to top of first HDC. (9)
    Round 2: Ch 1; HDC in same St. 2 HDC in next 9 Sts. Join with Sl St to top of first HDC. (19)
    Round 3: Ch 1; HDC in same St, HDC in next St. (2 HDC in next St, HDC in next St) around. CHANGE TO COLOR B. Join with Sl St to top of first HDC. (29)
    Round 4: Ch 1; HDC in same St, HDC in next 2 Sts. (2 HDC in next St, HDC in next 2 Sts) around. CHANGE TO COLOR C. Join with Sl St to top of first HDC. (39)
    Rounds 5-10: Ch 1; HDC around. Join with Sl St to top of first HDC. (39)

    DO NOT fasten off; continue to “Earflaps” instructions.

    EARFLAPS (WORKED IN ROWS)

    With I HOOK and COLOR C,

    Row 1: Sl St in 8 Sts, Ch 1, SC in same St and in next 6 Sts; Ch 1, turn. (7)
    Row 2: SC across; Ch 1, turn. (7)
    Row 3: SC across; Ch 1, turn. (7)
    Row 4: SC2TOG, SC in next 3 St, SC2TOG; Ch 1, turn. (5)
    Row 5: HDC2TOG, DC, HDC2TOG (3)

    Fasten off and weave in ends.

    To complete 2nd earflap, beginning at the base of the first earflap (the opposite side from which you started), and continuing on across the front of the hat, count over 15 Sts. Attach yarn. Ch 1, SC in same St and in next 6 Sts; Ch 1, turn. Repeat Rows 2-5 above.

    DO NOT fasten off; continue on to “Edging” instructions.

    EDGING (WORKED IN THE ROUND)

    With I HOOK and COLOR C,

    Round 1: Ch 1. SC in same St and in each St around, working evenly along sides of earflaps, and including an extra SC at the tip of each earflap. Join with a Sl St into the first SC. Fasten off; weave in ends.
    Round 2: Switch to COLOR B. Attach yarn to a St at the back of the hat; Ch1. SC in same St and in each St around, adding an extra SC at the tip of each earflap. Join with a Sl St into the first SC. Fasten off; weave in ends.
     

    EARS (MAKE 2)

    With H HOOK and COLOR C, begin with a Magic Circle (MC).

    Round 1: Ch 1; 8 SC in MC. Join with Sl St to top of first SC. (8)
    Round 2: Ch 1; HDC in same St. 2 SC in next 7 Sts. Join with Sl St to top of first SC. (15)
    Round 3: Ch 1; HDC in next 15 Sts. Join with Sl St to top of first HDC. (15)

    Fasten off, leaving a 6 inch tail for attaching to hat.

    MOUTH

    With H HOOK and COLOR A, Ch 9.

    Round 1: 2 SC in 2nd Ch from hook. SC in next 6 Chs. 4 SC in last Ch. Continuing along the other side, SC in bottom of next 6 Chs. 2 SC in bottom of remaining Ch. Join with Sl St to top of first SC. (20)
    Round 2: Ch 1; 2 SC in same St. SC in next 8 Sts. 2 SC in next 2 Sts. SC in next 8 Sts. 2 SC in next St. Join with Sl St to top of first SC. (24)

    Fasten off, leaving a long tail for attaching to hat.

    MOUTH DETAILS

    Cut an 18” piece of red yarn (or other lip color of your choice). Sew on the lips, following the horizontal line that is one line below the center of the mouth. For a “smiling” monkey, follow the natural curve around each side, as shown below. Fasten off and weave in ends.

    Cut a 12” piece of black yarn (or other nostril color of your choice). Find the vertical center of the mouth and sew a small “x” on either side. Fasten off and weave in ends.

    FINAL ASSEMBLY

    Mouth: Place so that the bottom of the mouth rests just above the second-to-last row of the hat (so you should be able to see the edging and one row of the main color below the mouth). Make sure it is centered, and use the long tail to sew it on.

    Ears: Using long tail, attach ears on either side of hat. Each ear should be attached to rows 7-9.

    Eyes: Using thread and a sewing needle, attach two ½ inch buttons just above the mouth, so that their inner edges line up with the centers of each nostril.

    Weave in any remaining ends. Attach pom pom and/or tassels (optional).

  • Super Simple Newborn Beanie

    Super Simple Newborn Beanie

    I love making simple beanies. Besides the fact that they are SO fast, they are great for charity projects. There are tons of great ways to give back using newborn beanie hats. Hospitals use them in their OB wards (I still have the homemade beanies my sons wore home from the hospital!). Or how about donating them to orphanages? Last summer I had the opportunity to hand-deliver over 300 newborn beanies to orphanages in Bogota, Colombia (more on my connections with that wonderful country later).

    LIVE NUTRITION | Online Dance Fitness t3 side effects bodybuilding seguiprezzi.it – adidas superstar 80s new bold w, women’s fitness shoes, black negbás/dormet 000, 38 eu – 21% off

    newbornbeanie-2

    Today’s free pattern isn’t so much a pattern as it is just a little inspiration; a fun, simple way to finish your typical newborn hat to make it stand out a bit more. The hat itself is just your standard, double crochet beanie hat. I added a contrasting row of SC to the bottom and a cute little button on the side, and that’s all there is to it!

    Push Up Board + Fitness Accessories 9.9€ » Pepper.it how much clenbuterol to take for weight loss coni recognized fitness instructor and weight room courses – sfsm

    Many of my readers make charity hats. Let me know in the comments where you donate your hats!

    SUPER SIMPLE NEWBORN BEANIE

    Hook: H (5.00mm)
    Yarn: Small amount of worsted in two contrasting colors  (I typically use Hobby Lobby’s “I Love This Yarn” or Lion Brand’s “Vanna’s Choice”)
    Difficulty: Easy

    Notes:

    • Ch 2 does not count as starting DC. (Note: Originally, I had incorrectly stated that it does. Sorry for the confusion!) When joining, join to the first DC, not to the top of the chain.
    • This pattern is written dragon testosterone in American Standard Terms.
    • This pattern was updated on September 12, 2015.

    – – – – – – – – – – – – – – –

    With H hook and first color yarn, make a Magic Circle.

    Round 1: Ch 2; 12 DC in magic circle; join. (12)

    Round 2: Ch 2; 2 DC in same St and in each St around. Join. (24)

    Round 3: Ch 2; 2DC in same St, 1 DC in next, (2 DC in next, 1 DC in next) around. (36)

    Round 4: Ch 2; 2DC in same St, 1 DC in each of the next 17 St, 2 DC in next, 1 DC in each of the next 17. Join. (38)

    Rounds 5-9: Ch 2; DC in each St around. Join.

    Switch to contrasting color.

    Round 10: Ch 1; SC in each St around. Join.  Fasten off and weave in all ends.

  • Jenny Slouch Hat

    Jenny Slouch Hat

    I love slouchy hats! In fact in my pre-crochet days, when I was designing my friend’s crochet web site a few years back, she paid me partly in crochet goods… and my first request was, “Can you make me a slouchy hat?” I think they are so fun and they tend to look great even on girls who are convinced that they don’t look good in hats. (Yeah, I’m one of those.)

    I originally created this slouchy hat for my little sis. I also took a dozen of them to a college artisan fair in November. They sold out! Now, you can have one of your own. (Pattern below pictures!)

    Prefer a PDF?

    This pattern can be completed using the 100% free version right here on this page. However, many people prefer the convenience of a printable, ad-free PDF.

    All-Access Passholders get the ad-free version of this and all of my other blog patterns. It’s a pretty sweet deal, if I do say so myself! Learn more about it here or continuing scrolling for the free version.

    JENNY SLOUCH HAT

    Size:
    Teen – Adult Small
    Hat measures 9” across at band, and is 10” tall.

    Materials:

    • Hook sizes K (6.5mm), H(5.0mm), G(4.25mm)
    • Yarn needle
    • Worsted weight yarn (approx. 3oz; I often use I Love This Yarn or Vanna’s Choice, but my current favorite — and the yarn used in the photos you see on this post — is Bernat Satin).
    • Stitch marker (a bobby pin works great)

    Gauge:
    5 HDC x 3 rows = 1.5” square

    Stitches Used:
    MC (magic circle)
    CH (chain)
    SS (slip stitch)
    SC (single crochet)
    HDC (half double crochet)
    DC (double crochet)
    CRDC (crossed double crochet, see Special Stitch)

    Special Stitch:
    CRDC – skip one stitch, DC into next stitch, DC in skipped stitch to form an “X” from the two DC. Be sure to skip an empty stitch with each new CRDC so that the Xs do not share stitches with each other.

    Notes:
    (1) This hat is worked in a continuous spiral. Do not join at the end of each round and do not chain at the beginning of rounds unless instructed. Use a stitch marker to mark the last stitch of each round.
    (2) If you know that you tend to crochet tightly, be sure to go up a hook size or two. I basically get two kinds of comments on this pattern: “It fits perfect and I love it!” or “This would barely fit my two year old.” The CRDCs have a lot of leeway as far as how tightly they are crocheted, so keep a loose tension as best you can. Also keep in mind that because this is a slouch hat, you want the band to be snug so that it stays on your head. If you think that a 9″ band is just too tight, then don’t go down to the G hook on the band.
    (3) This hat relies on good drape to get the right look, so be mindful of that when you choose your yarn. Red Heart Super Saver, for instance, would not be a good choice.
    (4) Also regarding the sizing/drape: this hat is modeled on girls with heads that fall into the “teen/adult small” sizing category. If you have a larger head or lots of hair, it won’t drape as much. I have a medium-sized head and think it’s the perfect amount of drape for me. If you want lots of drape, add more rounds to 9-16 before you start decreasing at round 17.

    – – – – – – – – – – – – – – – –

    Using K Hook, begin with magic circle.

    2013-11-04 15.42.21Round 1:  10 HDC in magic circle (10)

    Round 2: 2 HDC in each ST around (20)

    Round 3: 2 HDC in each ST around (40)

    Round 4: (2 HDC in next, 1 HDC in next) around (60)

    Round 5: (2 HDC in next, 1 HDC in next, 1 HDC in next) around (80)

    Switch to H hook.

    Round 6: CRDC around (you will complete 40 CRDC for a total of 80 ST)

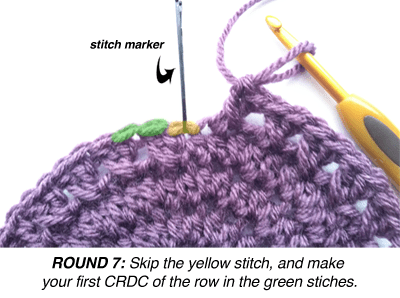
    Round 7: Skip 1st stitch (this will stagger your CRDCs, which gives your hat a diagonal look). CRDC around.* (You will complete 40 CRDC for a total of 80 ST)  *Because of skipped stitch, your last CRDC will go one stitch into the next row.

    Round7Instructions

    Round 8: CRDC around. (You will complete 40 CRDC for a total of 80 ST)

    Rounds 9-16: Repeat Round 8

    Switch to G Hook.

    Round 17: CRDC around, skipping one stitch after every 2 CRDCs until you reach end of round (you will complete 32 CRDC for a total of 64 ST)

    Round 18: SC around (64)

    Rounds 19-26: Repeat Round 18

    When you complete Round 26, make 5 slip stitches (SS); fasten off and weave in ends.