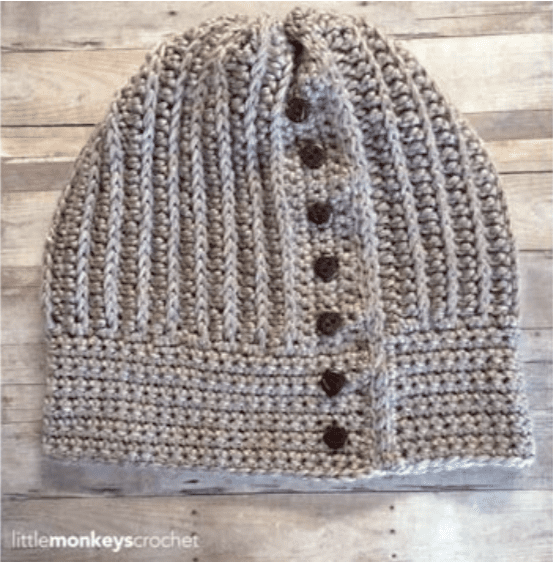
Category: Hats + Headwear

  • Carlyle Slouch Hat

    Carlyle Slouch Hat

    Thank you to Cascade Yarns for providing the yarn for this sample!

    I love the idea of color-blocking. It’s such a modern twist on the classic stripes, and there aren’t nearly as many ends to weave in at the end. That’s a win for me!

    Carlyle Slouch Hat Crochet Pattern | Free slouchy hat crochet pattern by Little Monkeys Crochet

    For this hat pattern, I chose 3 neutral colors from Cascade Yarn’s Longwood line (which has soooo many color options). Longwood is one of my absolute all-time favorite yarns; I used it in the Herringbone Baby Hat, Easy Herringbone Earwarmer, Super Plush Infinity Scarf, and the Yenni and South Haven Slouches (the latter two use the sport weight version of the yarn). I honestly can’t get enough of its softness, drape and amazing stitch definition!

     Carlyle Slouch Hat Crochet Pattern | Free slouchy hat crochet pattern by Little Monkeys Crochet

    For the pom pom (which is optional and not explained in the pattern), I used my brand new Clover Pom-Pom Maker. I love that thing and wish I’d picked one up long ago. I’ve always made my pom poms the old fashioned way, wrapping yarn around a piece of cardboard and then giving it a significant “haircut”. But with the pom pom maker, the pom pom comes out almost perfect and only a little trimming is required – which means fuller, rounder pom poms.

    Carlyle Slouch Hat Crochet Pattern | Free slouchy hat crochet pattern by Little Monkeys Crochet

    And since you guys love pattern sets, I designed a cowl to match!

    Prefer a PDF?

    This pattern can be completed using the 100% free version right here on this page. However, many people prefer the convenience of a printable, ad-free PDF.

    All-Access Passholders get the ad-free version of this and all of my other blog patterns. It’s a pretty sweet deal, if I do say so myself! Learn more about it here or continuing scrolling for the free version.

    CARLYLE SLOUCH HAT

    add-to-ravelry-favorites

    Difficulty: Easy

    Finished Size: 9″ tall x 9.5″ wide (when laid flat)

    Hook: I (5.50mm)

    Yarn: Approximately 215 yards (not including optional pom pom) of Cascade Longwood, a #4 medium yarn. Broken down, you will need about 55 yards of Color A (not including optional pom pom), 65 yards of Color B, and 95 yards of Color C. I used colors “Oatmeal”, “Doeskin Heather” and “Walnut”, respectively.

    Gauge: 7 rows of 8 HHDC = 2″ square

    You’ll also need: Yarn needle, stitch marker

    Abbreviations Used:
       MC (magic circle – view tutorial here)
    ST
     (stitch)
    SL ST (slip stitch)
    SK (skip)
    CH (chain)
    SC (single crochet)
    HDC (half double crochet)
    HHDC (herringbone half double crochet; see “special stitch” below)
    SC2TOG (single crochet two together)
    BLO (back loop only)

    Special Stitch:
    HHDC – Herringbone Half Double Crochet. Here’s how you do it:

    HHDC: Yarn over, insert hook into stitch. Yarn over, pull loop through stitch AND through first loop on hook (this is similar to a slip stitch motion). Two loops remain on hook. Yarn over and pull through both loops.

    (If you need additional help, Moogly has an excellent video tutorial here.)

    Notes:
    (1) This pattern is written in American Standard Terms.
    (2) Pattern is worked in a continuous, seamless round until the band. Use a stitch marker to mark the beginning of rounds and do not join unless instructed to do so.

    – – – – – – – – – – – – – – – – – – – – – – – –

    THE PATTERN

    To begin: With I hook and COLOR A, make a magic circle; CH1 (does not count as a stitch).

    Round 1: 10 HHDC in MC. (10)

    Round 2: 2 HHDC in each ST around. (20)

    Round 3: 2 HHDC in each ST around. (40)

    Round 4: 2 HHDC in each ST around. (80)

    Rounds 5-8: HHDC in each ST around. (80)

    Switch to COLOR B; fasten off COLOR A.

    Rounds 9-16: HHDC in each ST around. (80)

    Switch to COLOR C; fasten off COLOR B.

    Rounds 17-23: HHDC in each ST around. (80)

    Round 24: HHDC in each of the first 78 STS. SC in next ST. SL ST in last ST. (80)

    Round 25: CH1. SC in same ST and in each of the next 7 STS. SC2TOG. (SC in each of the next 8 STS, SC2TOG) around. Join with a SL ST to the top of the first SC. (72)

    Next we’re going to make the band of the hat, and we will be working in vertical rows, attaching it to the final round of the hat with SL STS as we go.

    Row 1: CH9. SC in 2nd CH from hook. SC in remaining 7 CHS. SL ST in next 2 STS of the hat. (8, plus the 2 SL STS at the base of the hat)

    Row 2: CH1, turn. Skipping over the 2 SL STS, SC in BLO of each of the next 7 STS. SC in both loops of the last ST. (8)

    Row 3: CH1, turn. SC in first ST. SC in BLO of each of the next 7 STS. SL ST in next 2 STS of the hat.

    Repeat Rows 2-3 all the way around the hat (72 rows). Fasten off and use your tail to whip stitch the first and last rows together. Weave in all ends.

    Carlyle Slouch Hat Crochet Pattern | Free slouchy hat crochet pattern by Little Monkeys Crochet

  • Riverbed Slouch Hat

    Riverbed Slouch Hat

    If you’ve been around my blog for a while (or if you take one look at my patterns page), you’ve probably noticed that I am drawn to single-color, neutral yarns. This is totally a preference thing, and I have nothing against those of you who like variegated yarn… it’s just not what I normally reach for.

    But this season, I gave myself a challenge. My challenge was to find ways to use multi-colored (a.k.a. self-striping) yarns in some of my designs, while still keeping them modern-looking. So I went to one of my yarn stores and wandered the aisles until I found my first target: Lion Brand’s Tweed Stripes in “Caramel”. Of course I was drawn to the neutral hues, so I thought that might be a good compromise for me to begin with!

    Riverbed Slouch Hat Crochet Pattern | Free slouchy hat crochet pattern by Little Monkeys Crochet

    I wanted to keep the pattern really simple, because in my opinion, the busier the yarn, the simpler the stitches should be. Intricate stitches tend to get lost more easily in multi-colored yarns, and even more so in tweeds. Sometimes, less really is more. So, the body of this hat is just comprised of alternating SC and HDC rounds.

    Riverbed Slouch Hat Crochet Pattern | Free slouchy hat crochet pattern by Little Monkeys Crochet

    I also really wanted to balance out the busyness of all of the colors, so I chose a yarn from the Vanna’s Choice line, also by Lion Brand (color: “linen”) that matched the lightest color in the tweed yarn, and used that to make the band and the pom pom. Honestly, I would not have liked my result nearly as much if I’d done the entire thing in the tweed, but I think the linen color at the top and bottom of the hat really brings it all together and makes it work.

    Riverbed Slouch Hat Crochet Pattern | Free slouchy hat crochet pattern by Little Monkeys Crochet

    Prefer a PDF?

    This pattern can be completed using the 100% free version right here on this page. However, many people prefer the convenience of a printable, ad-free PDF.

    All-Access Passholders get the ad-free version of this and all of my other blog patterns. It’s a pretty sweet deal, if I do say so myself! Learn more about it here or continuing scrolling for the free version.

    RIVERBED SLOUCH HAT
    add-to-ravelry-favorites

    Level: Easyish

    Size:
    One Size Fits Most (Preteen – Adult Woman).
    Hat measures 9.5” across at band, and is 10” tall.

    Materials:

    • K hook (6.50mm) and H hook (5.0mm)
    • Yarn needle
    • 120 yards of Yarn A: Lion Brand Tweed Stripes (sample shown in Caramel) and about 60 yards of Yarn B: Vanna’s Choice in a coordinating color (sample shown in Linen). Tweed Stripes is a Bulky #5 yarn, and Vanna’s Choice is a Worsted/Aran #4 yarn.
    • Stitch marker (a bobby pin works great)

    Gauge:
    With larger hook, 6 rows of 7 HDC & SC (alternate each row) = 2″ square.

    Abbreviations Used:
    MC (magic circle) – view my tutorial here
    ST/STS (stitch/stitches)
    CH (chain)
    SL ST (slip stitch)
    SC (single crochet)
    HDC (half double crochet)
    BLO (back loop only)

    Notes:

    (1) This pattern is written in American Standard terms.
    (2) This hat is worked in a continuous spiral until the band. Do not join, chain or turn until instructed. Use a stitch marker to mark the first stitch of each round.
    (3) The pom pom is optional.

    – – – – – – – – – – – – – – – –

    To begin:
    Using K (6.50mm) hook, with Yarn A, make a magic circle.

    Round 1:  10 HDC in MC (10)

    Round 2: 2 HDC in each ST around (20)

    Round 3: 2 HDC in each ST around (40)

    Note: At this point, it’s going to start looking wavy. You’re doing it right! The back of the hat has a faux-cinched look to it, and this is how we achieve it. Once you get to the body of the hat, it will start to straighten itself out naturally.

    Round 4: (2 HDC in next, 1 HDC in next) around (60)

    Round 5: (2 HDC in next, 1 HDC in each of the next 5 STS) around (70)

    Round 6: SC around (70)

    Round 7: HDC around (70)

    Rounds 8-21: Repeat Rounds 6-7 (70)

    Round 22: SC in first 69 STS (all but the last ST), SL ST in final stitch of the round (70)

    Join Yarn B. Fasten off Yarn A. Switch to H (5.0mm) hook.

    Round 23: CH1; SC around. Join with a SL ST to first SC. (70)

    Next we’re going to make the band of the hat, and we will be working in vertical rows, attaching it to the final round of the hat with SL STS as we go. Click here to view my video tutorial for this technique.

    Row 1: CH9. SC in 2nd CH from hook. SC in remaining 7 CHS. SL ST in next 2 STS of the hat. (8, plus the 2 SL STS at the base of the hat)

    Row 2: CH1, turn. Skipping over the 2 SL STS, SC in BLO of each of the next 7 STS. SC in both loops of the last ST. (8)

    Row 3: CH1, turn. SC in first ST. SC in BLO of each of the next 7 STS. SL ST in next 2 STS of the hat.

    Repeat Rows 2-3 all the way around the hat (70 rows). Fasten off and use your tail to whip stitch the first and last rows together. Weave in all ends.

  • Easy Herringbone Earwarmer

    Easy Herringbone Earwarmer

    Ready for a quick project that doesn’t use lots of yarn, is easy enough for a confident beginner, and will make a great Christmas present?

    The Easy Herringbone Earwarmer is a simple fall accessory, perfect for those autumn nights when the air is getting crisp. Throw your hair up in a messy bun or wear it down; either way, the Easy Herringbone Earwarmer will be a perfect addition. (And it goes great with my last pattern release, the Herringbone Buttoned Cowl!)

    The Yarn

    For this pattern, I used Longwood Sport from Cascade Yarns. Longwood Sport is a #3 light, 100% super wash extra fine merino wool. It is unbelievably soft and has perfect stitch definition. It’s my favorite yarn of anything I’ve ever tried; a little pricier than what you find in the big stores, but soooo worth it, especially for special projects!

    Prefer a PDF?

    This pattern can be completed using the 100% free version right here on this page. However, many people prefer the convenience of a printable, ad-free PDF.

    All-Access Passholders get the ad-free version of this and all of my other blog patterns. It’s a pretty sweet deal, if I do say so myself! Learn more about it here or continuing scrolling for the free version.

    HERRINGBONE EARWARMER

    Difficulty: Easy/Beginner

    Finished Size: 19.5″ around (when buttoned) x 3.25″ wide

    Hook: H (5.00mm)

    Yarn: About 80 yards of Longwood Sport from Cascade Yarns. (Longwood Sport is a #3 light yarn.)

    Gauge: 4 rows of 8 HHDC = 2″ (see “Special Stitch” below for explanation of HHDC)

    You’ll also need: Yarn needle, 1″ button, sewing needle, and thread to match yarn color.

    Abbreviations Used:
    ST/STS
     (stitches)
    SL ST (slip stitch)
    SK (skip)
    CH (chain)
    SC (single crochet)
    HHDC (herringbone half double crochet; see “special stitch” below)
    SC2TOG (single crochet two together)

    Special Stitch:
    HHDC – Herringbone Half Double Crochet. Here’s how you do it:

    HHDC: Yarn over, insert hook into stitch. Yarn over, pull loop through stitch AND through first loop on hook (this is similar to a slip stitch motion). Two loops remain on hook. Yarn over and pull through both loops.

    (If you need additional help, Moogly has an excellent video tutorial here. Please note that while her video considers the CH2 at the beginning of rows as a stitch, the pattern below does not.)

    Notes:
    (1) This pattern is written in American Standard Terms.
    (2) CH1 at the beginning of rows does not count as a stitch.
    (3) To adjust for different sizes: All you need to do to make the headband smaller or larger is subtract from or add to your starting chain. There are 4 stitches in an inch, so if – for instance – you wanted a headband that was 17.5″ long instead of 19.5″ long, you would start with 8 fewer chains.
    – – – – – – – – – – – – – – – – – – – – – – – –

    THE PATTERN

    To begin: CH66.

    Row 1: HHDC in 2nd CH from hook and in each CH across. (65)

    Rows 2-11: CH1, turn. HHDC in each ST across. (65)

    We are now moving on to the first side section of the earwarmer.

    Row 12: CH1, do not turn. SC in same ST, and working down the short end of the piece, SC in each row (from rows 2-11) across, for a total of 11 STS. (11)

    Row 13: CH1, turn. SC2TOG, SC in each of the next 7 STS, SC2TOG. (9)

    Rows 14-15: CH1, turn. SC in each ST across. (9)

    Row 16: CH1, turn. SC2TOG, SC in each of the next 5 STS, SC2TOG. (7)

    Rows 17-18: CH1, turn. SC in each ST across. (7)

    Row 19: CH1, turn. SC2TOG, SC in each of the next 3 STS, SC2TOG. (5)

    Row 20: CH1, turn. SC in each ST across. (5)

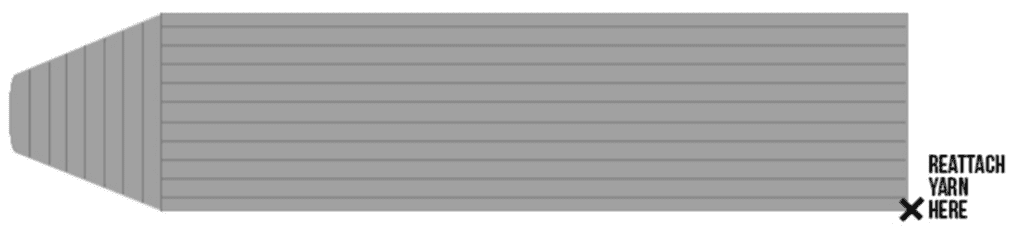
    Fasten off yarn and weave in ends. Next, we’re going to add the other side section. Reattach yarn on opposite end of the piece, starting at the right side.

    Row 21: CH1, SC in same ST. Working down the short end of the piece, SC in each row (from rows 2-11) across, for a total of 11 STS. (11)

    Row 22: CH1, turn. SC2TOG, SC in each of the next 7 STS, SC2TOG. (9)

    Rows 23-24: CH1, turn. SC in each ST across. (9)

    Row 25: CH1, turn. SC2TOG, SC in each of the next 5 STS, SC2TOG. (7)

    Row 26: CH1, turn. SC in each ST across. (7)

    Row 27: CH1, turn. SC in each of the first 2 STS. CH3, SK 3 STS. SC in each of the remaining 2 STS. (4, + CH3)

    Row 28: CH1, turn. SC2TOG. 3SC in the CH3 space from previous row. SC2TOG. (5)

    Row 29: CH1, turn. SC in each ST across. (5)

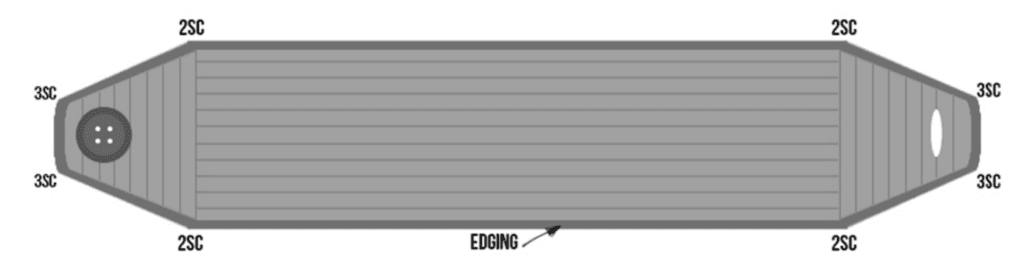
    Edging: CH1, do not turn. SC evenly around the entire piece, putting 3SC in each end corner, and 2SC in each slight corner where the HHDC rows meet the SC rows. (Use the diagram below for help with corners.) Join with a SL ST to the first SC.

    Fasten off and weave in all ends.

    Button: Sew your button to the end with no buttonhole.

  • Herringbone Baby Hat

    Herringbone Baby Hat

    Thank you to Cascade Yarns for providing the yarn for this sample!

    If you follow me on Facebook or subscribe to my e-newsletter, you probably already know my good news: we’re adding another little monkey to our family in December! Our baby boy will join us right around Christmastime, and we are beyond excited.

    Believe it or not, I didn’t even know how to crochet when my other two boys (now 6 and 4) were born. Luckily, some of the wonderful women in our church made beautiful crocheted items for both of them when they were born. Now, it’s my turn!

    Oh, and – side note – that’s my oldest monkey up there in the photo holding his future baby brother’s hat. How adorable is that!?

    –

    About the Yarn

    For this hat pattern, I used Cascade Longwood, one of my all-time favorite #4 worsted weight yarns. (It also has a thinner version, Longwood Sport, which just so happens to be one of my all-time favorite #3 light yarns.) It is soooo soft, and works up soooo beautifully. I had a few balls of it from another pattern project, so I used what was left to work up baby hats in newborn – 1 year sizes. I’ve turned my business focus so much to adult patterns over the last couple of years that sitting down to make baby hats for a few days was refreshing (they work up so quick!) and Cascade Longwood makes it all that much more enjoyable.

    –

    About the Herringbone Stitch

    This pattern uses a beautiful stitch called the Herringbone Half Double Crochet. I tend to get fixated on a certain stitch each season (last year was the SC+HDC combo), and this year, you’ll be seeing the Herringbone in a lot of my pattern releases. There are so many variations of this stitch that change its look drastically. In this pattern, we’ll be using the Herringbone HDC variation in a continuous, unturned spiral, resulting in a great texture that is a welcome change from the typical HDC hat.

    –

    Prefer a PDF?

    This pattern can be completed using the 100% free version right here on this page. However, many people prefer the convenience of a printable, ad-free PDF.

    All-Access Passholders get the ad-free version of this and all of my other blog patterns. It’s a pretty sweet deal, if I do say so myself! Learn more about it here or continuing scrolling for the free version.

    HERRINGBONE BABY HAT

    add-to-ravelry-favorites

    Difficulty: Easy

    Hook: I (5.50mm)

    Yarn: Cascade Longwood (a #4 medium yarn). Yardage will be listed under individual pattern sizes.

    Gauge: Upon completion of Round 5 (in all sizes), your flat circle should measure 3.75″ across. For best results, adjust your hook size to match this gauge.

    You’ll also need: Yarn needle, stitch marker

    Abbreviations Used:
       MC (magic circle – view tutorial here)
    ST
     (stitch)
    SL ST (slip stitch)
    SK (skip)
    CH (chain)
    SC (single crochet)
    HDC (half double crochet)
    HHDC (herringbone half double crochet; see “special stitch” below)
    SC2TOG (single crochet two together)
    BLO (back loop only)

    Special Stitch:
    HHDC – Herringbone Half Double Crochet. Here’s how you do it:

    HHDC: Yarn over, insert hook into stitch. Yarn over, pull loop through stitch AND through first loop on hook (this is similar to a slip stitch motion). Two loops remain on hook. Yarn over and pull through both loops.

    (If you need additional help, Moogly has an excellent video tutorial here.)

    Notes:
    (1) This pattern is written in American Standard Terms.
    (2) Pattern is worked in a continuous, seamless round until the band. Use a stitch marker to mark the beginning of rounds and do not join unless instructed to do so.
    (3) Measurements and yarn totals are included on individual sizes and do not include the optional pom pom.
    (4) Several people have noted that the pattern comes out too large; however, I stand by it. PLEASE CHECK YOUR GAUGE.

    – – – – – – – – – – – – – – – – – – – – – – – –

    NEWBORN

    Measurements: 5″ tall x 6″ wide (when laid flat)
    Yards of yarn used: 55

    To begin: With I hook, make a magic circle; CH1.

    Round 1: 9 HHDC in MC. (9)

    Round 2: 2 HHDC in each ST around. (18)

    Round 3: (2 HHDC in next ST, HHDC in next ST) around. (27)

    Round 4: (2 HHDC in next ST, HHDC in each of the next 2 STS) around. (36)

    Round 5: (2 HHDC in next ST, HHDC in each of the next 3 STS) around. (45)

    Round 6: (2 HHDC in next ST, HHDC in each of the next 8 STS) around. (50)

    Rounds 7-11: HHDC in each ST around. (50)

    Round 12: HHDC in each of the first 48 STS. SC in next ST. SL ST in final ST. (50)

    If you are using a different color for the band of the hat, change colors now.

    Round 13: CH1. SC in each ST around. Join with a SL ST to the top of the first SC. (50)

    Switch to H hook.

    Next we’re going to make the band of the hat, and we will be working in vertical rows, attaching it to the final round of the hat with SL STS as we go.

    Row 1: CH5. SC in 2nd CH from hook and in each remaining CH. SL ST in next 2 STS of the hat. (4, plus the 2 SL STS at the base of the hat)

    Row 2: CH1, turn. Skipping over the 2 SL STS, SC in BLO of each of the next 4 STS. (4)

    Row 3: CH1, turn. SC in BLO of each of the next 4 STS. SL ST in next 2 STS of the hat. (4, plus the 2 SL STS at the base of the hat)

    Repeat Rows 2-3 all the way around the hat (50 rows). Fasten off and use your tail to whip stitch the first and last rows together. Weave in all ends.

    – – – – – – – – – – – – – – – – – – – – – – – –

    0-3 MONTHS

    Measurements: 5.5″ tall x 6.5″ wide (when laid flat)
    Yards of yarn used: 65

    To begin: With I hook, make a magic circle; CH1.

    Round 1: 9 HHDC in MC. (9)

    Round 2: 2 HHDC in each ST around. (18)

    Round 3: (2 HHDC in next ST, HHDC in next ST) around. (27)

    Round 4: (2 HHDC in next ST, HHDC in each of the next 2 STS) around. (36)

    Round 5: (2 HHDC in next ST, HHDC in each of the next 3 STS) around. (45)

    Round 6: (2 HHDC in next ST, HHDC in each of the next 4 STS) 8 times; 5 STS remain unworked. HHDC in each of the remaining STS. (53)

    Rounds 7-14: HHDC in each ST around. (53)

    Round 15: HHDC in each of the first 51 STS. SC in next ST. SL ST in final ST. (53)

    If you are using a different color for the band of the hat, change colors now.

    Round 16: CH1. SC in each ST around. Join with a SL ST to the top of the first SC. (53)

    Switch to H hook.

    Next we’re going to make the band of the hat, and we will be working in vertical rows, attaching it to the final round of the hat with SL STS as we go.

    Row 1: CH5. SC in 2nd CH from hook and in each remaining CH. SL ST in next 2 STS of the hat. (4, plus the 2 SL STS at the base of the hat)

    Row 2: CH1, turn. Skipping over the 2 SL STS, SC in BLO of each of the next 4 STS. (4)

    Row 3: CH1, turn. SC in BLO of each of the next 4 STS. SL ST in next 2 STS of the hat. (4, plus the 2 SL STS at the base of the hat)

    Repeat Rows 2-3 all the way around the hat (53 rows). Fasten off and use your tail to whip stitch the first and last rows together. Weave in all ends.

    – – – – – – – – – – – – – – – – – – – – – – – –

    3-6 MONTHS

    Measurements: 6.25″ tall x 7″ wide (when laid flat)
    Yards of yarn used: 90

    To begin: With I hook, make a magic circle; CH1.

    Round 1: 9 HHDC in MC. (9)

    Round 2: 2 HHDC in each ST around. (18)

    Round 3: (2 HHDC in next ST, HHDC in next ST) around. (27)

    Round 4: (2 HHDC in next ST, HHDC in each of the next 2 STS) around. (36)

    Round 5: (2 HHDC in next ST, HHDC in each of the next 3 STS) around. (45)

    Round 6: (2 HHDC in next ST, HHDC in each of the next 4 STS) around. (54)

    Round 7: (2 HHDC in next ST, HHDC in each of the next 26 STS) around. (56)

    Rounds 8-16: HHDC in each ST around. (56)

    Round 17: HHDC in each of the first 54 STS. SC in next ST. SL ST in final ST. (56)

    If you are using a different color for the band of the hat, change colors now.

    Round 18: CH1. SC in each ST around. Join with a SL ST to the top of the first SC. (56)

    Switch to H hook.

    Next we’re going to make the band of the hat, and we will be working in vertical rows, attaching it to the final round of the hat with SL STS as we go.

    Row 1: CH6. SC in 2nd CH from hook and in each remaining CH. SL ST in next 2 STS of the hat. (5, plus the 2 SL STS at the base of the hat)

    Row 2: CH1, turn. Skipping over the 2 SL STS, SC in BLO of each of the next 5 STS. (5)

    Row 3: CH1, turn. SC in BLO of each of the next 5 STS. SL ST in next 2 STS of the hat. (5, plus the 2 SL STS at the base of the hat)

    Repeat Rows 2-3 all the way around the hat (56 rows). Fasten off and use your tail to whip stitch the first and last rows together. Weave in all ends.

    – – – – – – – – – – – – – – – – – – – – – – – –

    6-9 MONTHS

    Measurements: 6.5″ tall x 7.5″ wide (when laid flat)
    Yards of yarn used: 105

    To begin: With I hook, make a magic circle; CH1.

    Round 1: 9 HHDC in MC. (9)

    Round 2: 2 HHDC in each ST around. (18)

    Round 3: (2 HHDC in next ST, HHDC in next ST) around. (27)

    Round 4: (2 HHDC in next ST, HHDC in each of the next 2 STS) around. (36)

    Round 5: (2 HHDC in next ST, HHDC in each of the next 3 STS) around. (45)

    Round 6: (2 HHDC in next ST, HHDC in each of the next 4 STS) around. (54)

    Round 7: (2 HHDC in next ST, HHDC in each of the next 8 STS) around. (60)

    Rounds 8-17: HHDC in each ST around. (60)

    Round 18: HHDC in each of the first 58 STS. SC in next ST. SL ST in final ST. (60)

    If you are using a different color for the band of the hat, change colors now.

    Round 19: CH1. SC in each ST around. Join with a SL ST to the top of the first SC. (60)

    Switch to H hook.

    Next we’re going to make the band of the hat, and we will be working in vertical rows, attaching it to the final round of the hat with SL STS as we go.

    Row 1: CH6. SC in 2nd CH from hook and in each remaining CH. SL ST in next 2 STS of the hat. (5, plus the 2 SL STS at the base of the hat)

    Row 2: CH1, turn. Skipping over the 2 SL STS, SC in BLO of each of the next 5 STS. (5)

    Row 3: CH1, turn. SC in BLO of each of the next 5 STS. SL ST in next 2 STS of the hat. (5, plus the 2 SL STS at the base of the hat)

    Repeat Rows 2-3 all the way around the hat (60 rows). Fasten off and use your tail to whip stitch the first and last rows together. Weave in all ends.

    – – – – – – – – – – – – – – – – – – – – – – – –

    9-12 MONTHS

    Measurements: 6.5″ tall x 7.75″ wide (when laid flat)
    Yards of yarn used: 110

    To begin: With I hook, make a magic circle; CH1.

    Round 1: 9 HHDC in MC. (9)

    Round 2: 2 HHDC in each ST around. (18)

    Round 3: (2 HHDC in next ST, HHDC in next ST) around. (27)

    Round 4: (2 HHDC in next ST, HHDC in each of the next 2 STS) around. (36)

    Round 5: (2 HHDC in next ST, HHDC in each of the next 3 STS) around. (45)

    Round 6: (2 HHDC in next ST, HHDC in each of the next 4 STS) around. (54)

    Round 7: (2 HHDC in next ST, HHDC in each of the next 5 STS) around. (63)

    Round 8: 2 HHDC in next ST. HHDC in next 62 STS. (64)

    Rounds 9-17: HHDC in each ST around. (64)

    Round 18: HHDC in each of the first 62 STS. SC in next ST. SL ST in final ST. (64)

    If you are using a different color for the band of the hat, change colors now.

    Round 19: CH1. SC in each ST around. Join with a SL ST to the top of the first SC. (64)

    Switch to H hook.

    Next we’re going to make the band of the hat, and we will be working in vertical rows, attaching it to the final round of the hat with SL STS as we go.

    Row 1: CH6. SC in 2nd CH from hook and in each remaining CH. SL ST in next 2 STS of the hat. (5, plus the 2 SL STS at the base of the hat)

    Row 2: CH1, turn. Skipping over the 2 SL STS, SC in BLO of each of the next 5 STS. (5)

    Row 3: CH1, turn. SC in BLO of each of the next 5 STS. SL ST in next 2 STS of the hat. (5, plus the 2 SL STS at the base of the hat)

    Repeat Rows 2-3 all the way around the hat (64 rows). Fasten off and use your tail to whip stitch the first and last rows together. Weave in all ends.

  • Marion Slouch

    Marion Slouch

    Thank you to Lion Brand Yarn for supplying the yarn for this sample!

    If you’ve spent any time around my blog, you know how much I loooooove slouch hats. I just can’t get enough of them. I never considered myself a hat person until I created and tried on my first slouchy hat, but from that moment on, I was hooked.

    Today, I’m adding another slouchy pattern to my growing collection!

    This one is sort of a “sister hat” to the South Haven Slouch. It uses the same basic structure, but I’ve added some cute new detailing between the ribbing sections to create a very different finished look.

    For the sample, I used Lion Brand’s LB Collection 100% Superwash Merino Wool in “Cherry”. I love this yarn. It’s only available on Lion Brand’s web site or in their stores, but it’s so worth ordering. It’s the same yarn I used for this gorgeous cowl.

    I tried to photograph the hat from a few different angles to really give you a sense of the finished look. Here’s what it looks like from the (angled) front:

    Marion Slouch Hat Crochet Pattern | Free Crochet Pattern by Little Monkeys Crochet

    And here’s the back. Like the South Haven Slouch, this one has a rippled top that gives it a faux-cinched look.

    Marion Slouch Hat Crochet Pattern | Free Crochet Pattern by Little Monkeys Crochet

    So grab your hooks and yarn, and let’s get started!

    Prefer a PDF?

    This pattern can be completed using the 100% free version right here on this page. However, many people prefer the convenience of a printable, ad-free PDF.

    All-Access Passholders get the ad-free version of this and all of my other blog patterns. It’s a pretty sweet deal, if I do say so myself! Learn more about it here or continuing scrolling for the free version.

    THE MARION SLOUCH HAT

    add-to-ravelry-favorites

    Level: Easyish (technically closer to intermediate, but if you’re a confident crocheter and comfortable with reading patterns, you canpull this off!)

    Size:
    One Size Fits Most (Teen – Adult Woman).
    Hat measures 10” across at band, and is 9” tall. I like just a little bit of slouch in my slouch hats, but if you like more, you can add rounds to the body of the hat.

    Materials:

    • H hook (5.00mm) and G hook (4.25mm)
    • Yarn needle
    • 240-250 yards of Lion Brand LB Collection 100% Superwash Merino Wool. The color in the photos is Cherry.
    • Stitch marker or bobby pin (optional, but super helpful)

    Gauge:
    With H hook, 7 rows of 9HDC = 2″ square

    Abbreviations Used:
    MC (magic circle) – view my tutorial here
    CH (chain)
    ST/STS (stitch/stitches)
    SK (skip)
    SL ST (slip stitch)
    SC (single crochet)
    HDC (half double crochet)
    SC+HDC (this just means to put a single crochet and a half double crochet in the same stitch)
    SC2TOG (single crochet 2 together)
    RibHDC (also known as Camel Stitch or 3rd Loop HDC; see Special Terminology, below)

    Special Terminology:
    3rd Loop – Some rows call for the stitches to be completed in the “3rd loop”. Instead of putting your HDC in the top loops, reach your hook past the back loop where you’ll find a 3rd loop on the side of the stitch. Insert your hook there to create your HDC. This forces both of the top loops to rest on the front of your project, creating a ribbing effect. In other patterns it is also referred to as a Camel Stitch or RibHDC.

    Notes:
    (1) This pattern is written in American Standard terms.
    (2) This pattern is worked in joined rounds. You will turn at the beginning of some rounds, and not others. Pay attention!
    (3) Even though this pattern is worked in joined rounds, it is recommended that you keep a stitch marker or two handy. I found that placing a stitch marker in the first and last stitches of my rounds really helped me to not get confused about my starting and ending stitches. When working back and forth between regular loops and 3rd loops (beginning on Round 7), it can be hard to tell which stitch is technically your last stitch of the round… and, when we start turning our rounds during the SC+HDC texture in Round 11, it’s just easier to keep track of where to place your stitches.
    (4) Starting CHs do not count as stitches.
    (5) It goes without saying, but count your stitches! Once you’re done increasing, you should consistently have 100 stitches per round (until you get to the band).

    – – – – – – – – – – – – – – – –

    To begin:
    Using H Hook, make a magic circle.

    Round 1:  CH1. 10 HDC in MC. Join to the top of the first HDC with a SL ST. (10)

    Round 2: CH1. 2 HDC in each ST around. Join to the top of the first HDC with a SL ST. (20)

    Round 3: CH1. 2 HDC in each ST around. Join to the top of the first HDC with a SL ST. (40)

    Note: At this point you should have a floppy-looking circle. This is a good thing. It will continue to get floppier as we increase, and then it will smooth itself out on the body of the hat. That’s how we create the cinched look on the top.

    Round 4: CH1. (2 HDC in next, 1 HDC in next) around. Join to the top of the first HDC with a SL ST. (60)

    Round 5: CH1. (2 HDC in next, 1 HDC in each of the next 2 STS) around. Join to the top of the first HDC with a SL ST. (80)

    Round 6: CH1. (2 HDC in next, 1 HDC in each of the next 3 STS) around. Join to the top of the first HDC with a SL ST. (100)

    Round 7: CH1. In 3rd loops, HDC around. Join to the top of the first HDC with a SL ST. (100)

    Round 8: CH1. HDC around. Join to the top of the first HDC with a SL ST. (100)

    Round 9: CH1. In 3rd loops, HDC around. Join to the top of the first HDC with a SL ST. (100)

    Round 10: CH1. SK first ST, SC+HDC in next ST. (SK next ST, SC+HDC in next ST) around. Join to the top of the first SC with a SL ST. (100)

    Note: Joining and turning while working in the round is something you don’t see very often in patterns, and that little slip stitch at the end of the round can really throw you off because when you turn, it looks like a stitch… but it’s not, and needs to be ignored. This is where using a stitch marker will really come in handy. Just before you SL ST to the first SC in Round 10, mark your final stitch of the round with a stitch marker (1st photo). Then do your join (2nd photo). When you move on to Round 11, CH1 and turn as per the instructions (3rd photo). When instructed to SK the first ST, you’ll know to skip right over the stitch marker and do your first SC+HDC in the stitch immediately following it (4th photo).

    Marion Slouch Hat Crochet Pattern | Free Crochet Pattern by Little Monkeys Crochet

    Rounds 11-13: CH1, turn. SK first ST, SC+HDC in next ST. (SK next ST, SC+HDC in next ST) around. Join to the top of the first SC with a SL ST. (100)

    Round 14: CH1, turn. HDC in each ST around. Join to the top of the first HDC with a SL ST. (100)

    Round 15: CH1, do not turn. In 3rd loops, HDC around. Join to the top of the first HDC with a SL ST. (100)

    Round 16: CH1. HDC in each ST around. Join to the top of the first HDC with a SL ST. (100)

    Round 17: CH1. In 3rd loops, HDC around. Join to the top of the first HDC with a SL ST. (100)

    Round 18: CH1. SK first ST, SC+HDC in next ST. (SK next ST, SC+HDC in next ST) around. Join to the top of the first SC with a SL ST. (100)

    Rounds 19-21: CH1, turn. SK first ST, SC+HDC in next ST. (SK next ST, SC+HDC in next ST) around. Join to the top of the first SC with a SL ST. (100)

    Round 22: CH1, turn. HDC in each ST around. Join to the top of the first HDC with a SL ST. (100)

    Round 23: CH1, do not turn. In 3rd loops, HDC around. Join to the top of the first HDC with a SL ST. (100)

    Round 24: CH1. HDC in each ST around. Join to the top of the first HDC with a SL ST. (100)

    Round 25: CH1. In 3rd loops, HDC around. Join to the top of the first HDC with a SL ST. (100)

    Round 26: CH1. HDC in each ST around. Join to the top of the first HDC with a SL ST. (100)

    Round 27: CH1. (SC2TOG, SC in each of the next 8 STS) around. Join to the top of the first SC with a SL ST. (90)

    Round 28: CH1. SC in each ST around. Join to the top of the first SC with a SL ST. (90)

    Switch to G hook.

    Rounds 29-38: SC around.

    Note: At some point around Round 33, you may want to check the band of the hat to see if it’s measuring about 10 inches. If it’s measuring much bigger than that, you may want to grab a smaller hook to finish things off.

    Smooth out the round by slip stitching into the first 3 STS of the next round. Fasten off and weave in ends.

  • Rustic Slouch

    Rustic Slouch

    © Photography by Kindred Photo & Design

    Thank you to Lion Brand Yarn for providing the yarn for this sample!

    I recently had a chance to sample some Lion’s Pride Woolspun (by Lion Brand Yarn), and boy, was I impressed!

    This #5 bulky weight yarn is awesome. Sold exclusively at Michael’s stores, it’s a sturdy yarn that doesn’t split and shows stitch definition very clearly. I had been looking around for a nice bulky yarn that I could use to make a chunky version of the popular Yenni Slouch, and when I saw this yarn, I knew it would be perfect.

    Rustic Slouch Crochet Hat Pattern | Free Slouchy Hat Crochet Pattern by Little Monkeys Crochet

    Just look at that stitch definition!

    Rustic Slouch Crochet Hat Pattern | Free Slouchy Hat Crochet Pattern by Little Monkeys Crochet

    I went a little crazy and designed a matching scarf. It’s big, it’s chunky, and it’s adorable.

    Rustic Fringe Infinity Scarf Crochet Pattern | Free Infinity Scarf Crochet Pattern by Little Monkeys Crochet

    Isn’t my model adorable, too? She rocked this photo shoot.

    Rustic Slouch Crochet Hat Pattern | Free Slouchy Hat Crochet Pattern by Little Monkeys Crochet

    Rustic Slouch Crochet Hat Pattern | Free Slouchy Hat Crochet Pattern by Little Monkeys Crochet

    So grab your bigger hooks and join me for a quick, trendy project that will keep your head warm all winter long!

    Prefer a PDF?

    This pattern can be completed using the 100% free version right here on this page. However, many people prefer the convenience of a printable, ad-free PDF.

    All-Access Passholders get the ad-free version of this and all of my other blog patterns. It’s a pretty sweet deal, if I do say so myself! Learn more about it here or continuing scrolling for the free version.

    RUSTIC SLOUCH

    add-to-ravelry-favorites

    Level: Easy

    Size:
    One Size Fist Most (Preteen – Adult Woman).
    Hat measures 10.5” across at band, and is 10” tall.

    Materials:

    • N hook (9.00mm) and I hook (5.50mm)
    • Yarn needle
    • Lion’s Pride Woolspun (from Lion Brand), 190-200 yards. The color in the photos is Taupe.
      *About Lion’s Pride Woolspun:
        Weight: #5 Bulky
                    Fiber: 80% acrylic, 20% wool
      Yardage: 100 g (3.5 oz) / 127 yd (116 m)
    • Button embellishment (mine is 1″)

    Gauge: With N hook, a row of 7HDC = 3″ in length.

    Abbreviations Used:
    CH (chain)
    SK (skip)
    SL ST (slip stitch)
    SC (single crochet)
    HDC (half double crochet)
    DC (double crochet)
    SC+DC (this just means to put a single crochet and a double crochet in the same stitch)

    Special Terminology:
    3rd Loop – Some rows call for the stitches to be completed in the “3rd loop”. When working in turned rows, and after completing a row of HDC, these loops will be visible just below the front loop. So instead of inserting your hook into the top loops, you’ll only insert it into that 3rd loop. This will force the top loops to go to the front of your work, which is how we get the “ribbing” effect. View a tutorial here.

    Notes:
    (1) This pattern is written in American Standard terms.
    (2) The button is just a decorative embellishment (non-functional).

    – – – – – – – – – – – – – – – –

    To begin:
    Using N Hook, and leaving an 18″ tail, CH21.

    Row 1:  SC+DC in 3rd CH from hook. (Sk next ST, SC+DC in next ST) across. (20)

    Row 2: CH1, turn. Skip 1st ST, SC+DC in next ST. (Sk next ST, SC+DC in next ST) across. (20)

    Row 3: CH1, turn. Skip 1st ST, SC+DC in next ST. (Sk next ST, SC+DC in next ST) across. (20)

    Row 4: CH1, turn. SK 1st ST. HDC in each of the next 18 STS. 2HDC in last ST. (20)

    Row 5: CH1, turn. Working in 3rd loops, (SK next ST, SC+DC in next ST) across. (20)

    Rows 6-44: Repeat Rows 2-5, in order, until you have 44 total rows (you will end with a repeat of Row 4).

    Switch to I hook.

    Row 45: CH1, DO NOT turn. Begin to SC down the LONG edge of the project, putting 5SC in each section between ribbing rows (see photo below for a visual). You should end up with 55SC. Then, CH8 to create the base of your button flap.

    Yenni Chunky Slouch Hat Crochet Pattern | Little Monkeys Crochet

    Row 46: Turn your work. SC in 2nd CH from hook and in each remaining CH. Continue to SC across. (62)

    Rows 47-50: CH1, turn. SC across. (62)

    Row 51 (edging): CH1, turn. SC across (62). Putting (SC, CH1, SC) in both corners, continue to SC around the edge of the button flap. Stop when you get here:

    Yenni Chunky Slouch Hat Crochet Pattern | Little Monkeys Crochet

    Sewing the hat together
    Fasten off your yarn, leaving a long tail. Using a yarn needle, sew the ends of the hat together. Utilize the 3rd loop of the edge with the HDCs in order to blend the seam in so it is hardly noticeable. (A note: several of you have mentioned that it looks as though I’m seaming with a bit of an overlap according to the photo below. The photo is an unintentional optical illusion; I actually did seam the edges together with no overlap, and the “overlap” you’re seeing is actually the opposite side of the hat. So sorry for the confusion!)

    Yenni Chunky Slouch Hat Crochet Pattern | Little Monkeys Crochet

    Once you get to the top of the hat, make a knot and weave in the end.

    Cinching the top
    Turn your hat inside out. Use your starting tail to cinch the top of the hat by threading it through a yarn needle and weaving the needle in and out along the top edge of the hat at even intervals. Once you’ve gone all the way around, pull the tail tight and insert your yarn needle across the cinched area a few times to really keep it closed, then make a knot and weave in the end. Turn your hat right-side out again.

    Yenni Chunky Slouch Hat Crochet Pattern | Little Monkeys Crochet

    Finishing the Button Flap
    We still need to sew our button flap in place and attach our button. Using a needle and appropriately-colored thread, position the button flap in place and sew along its 3 edges to secure it. Use your needle and thread to attach your button as well.

  • Snow Capped Slouch Hat

    Snow Capped Slouch Hat

    © Photography by Kindred Photo & Design

    Special thanks to Lion Brand Yarn for providing the yarn for this sample!

    I have another new slouch pattern for you! This one is simple, but it has a eye-catching spiral design that adds a lot of visual interest.

    The Yarn

    I’ve been a fan of Lion Brand’s Heartland Yarn for a while. It’s a lighter worsted weight acrylic yarn that comes in a range of beautiful, natural colors, all of which have just the right amount of sheen. My stores don’t carry the full range of colors, so I was very excited when Lion Brand sent me some shades that I’d never seen before. For this hat, I used a color called “Katmai.” Click here to view all the colors available. It was the combination of the color of the yarn and the design of the hat that made me think of snow capped mountains, so that’s how I got the name for the pattern!

    yarnpic

    Prefer a PDF?

    This pattern can be completed using the 100% free version right here on this page. However, many people prefer the convenience of a printable, ad-free PDF.

    All-Access Passholders get the ad-free version of this and all of my other blog patterns. It’s a pretty sweet deal, if I do say so myself! Learn more about it here or continuing scrolling for the free version.

    The Snowcapped Slouch Hat
    add-to-ravelry-favorites

    Size:
    One Size Fist Most (Preteen – Adult Woman).
    Hat measures about 9.5” across at band, and 9.5” tall.

    Materials:

    • Hook sizes K (6.5mm), H(5.0mm)
    • Yarn needle
    • 150-160 yards of worsted weight yarn (I used Lion Brand Heartland in “Katmai”)
    • Stitch marker (a bobby pin works great)

    Gauge:
    With H hook, 6 HDC x 4 rows = 1.5” square

    Abbreviations Used:
    ST (stitch)
    MC (magic circle – view tutorial here)
    SK (skip)
    CH (chain)
    SS (slip stitch)
    SC (single crochet)
    HDC (half double crochet)
    SC2TOG (single crochet 2 together)

    Notes:
    (1) This pattern is written in American Standard Terms.
    (2) This hat is worked in a continuous spiral. Do not join at the end of each round and do not chain at the beginning of rounds unless instructed. Use a stitch marker to mark the last stitch of each round.
    (3) The CH2s that create the holes in the hat still count as stitches. Keep this in mind when checking your stitch count, and when you reach Round 24 where it tells you to SC in the next 6 stitches (the CH2 counts as the first 2 of the 6).

    – – – – – – – – – – – – – – – –

    Using K Hook, begin with magic circle.

    Round 1:  10 HDC in magic circle (10)

    Round 2: 2 HDC in each ST around (20)

    Round 3: 2 HDC in each ST around (40)

    Round 4: (2 HDC in next ST, 1 HDC in next ST) around (60)

    Round 5: (2 HDC in next ST, 1 HDC in each of the next 2 STS) around (80)

    Switch to H hook.

    Round 6: (CH2, SK 2 STS, HDC in each of the next 8 STS) around. (80)

    Rounds 7-23: Repeat Round 6.

    Round 24: (SC in each of the next 6 STS; SC2TOG) around. (72)

    Rounds 25-33: SC around.

    Slip Stitch into the next 3 STS to smooth down the round, then fasten off and weave in ends.

  • Snowdrift Slouch Hat

    Snowdrift Slouch Hat

    © Photography by Kindred Photo & Design

    Winter is coming! Even though I can still see bright red leaves on the tree in my front yard, I just know (especially living in Michigan) that any day now, I could wake up to a few inches of snow and single-digit temperatures. Snowdrifts are a common occurrence in my part of the country, and this hat reminds me of them.

    Snowdrift Slouch Crochet Hat | Free Slouchy Hat Crochet Pattern by Little Monkeys Crochet

    This is a pretty simple slouchy hat pattern that’s worked in rows and cinched at the end. You might even learn a new stitch – the Double Crochet Cluster Stitch! (See pattern notes.)–

    The Yarn

    I used Lion Brand Vanna’s Choice in “White” for my sample. Vanna’s Choice is one of those yarns that I’ve been using since I first learned to crochet. Most craft stores stock it well, and the color choices are really nice. Click here to view the color options.

    Prefer a PDF?

    This pattern can be completed using the 100% free version right here on this page. However, many people prefer the convenience of a printable, ad-free PDF.

    All-Access Passholders get the ad-free version of this and all of my other blog patterns. It’s a pretty sweet deal, if I do say so myself! Learn more about it here or continuing scrolling for the free version.

    THE SNOWDRIFT SLOUCH HAT

    add-to-ravelry-favorites

    Level: Easy

    Size:
    One Size Fist Most (Preteen – Adult Woman).
    Hat measures 10” across at band, and is 9.5” tall.

    Materials:

    • I hook (5.50mm)
    • About 200 yards (<2 skeins) of Lion Brand Vanna’s Choice* (Sample color: White)
      *About Vanna’s Choice:
       Fiber Content: 100% Premium Acrylic
      Weight/Yardage: 100 g / 170 yds
      Crochet Gauge: 12 sc + 15 rows = 4″ (10 cm) on size J-10 (6 mm) hook
    • Yarn Needle

    Gauge:
    With I hook, 7 HDC = 2″ square

    Abbreviations Used:
    CH (chain)
    ST/STS (stitch/stitches)
    SL ST (slip stitch)
    SK (skip)
    SC (single crochet)
    2DCCL (2 Double Crochet Cluster Stitch – see Special Stitch, below)
    SC+2DCCL (this just means to put 1 SC and 1 2DCCL in the same stitch)

    Special Stitch
    2DCCL – 
    2 Double Crochet Cluster Stitch. To complete:
    (YO, insert hook, draw up a loop, YO, pull through 2 loops) twice; YO, pull through remaining 3 loops.

    Notes:
    (1) This hat is worked in rows and cinched at the end.
    (2) This pattern is written in American Standard terms.
    (3) Starting chains do not count as stitches.
    (4) The band of the hat is worked in seamless rounds. Do not join or turn at the end of rounds. Use a stitch marker if needed.

    – – – – – – – – – – – – – – – –

    To begin:
    Using I Hook, and leaving a 12″ tail, CH23. Don’t weave in the tail until instructed (we’ll use it later to cinch the hat).

    Row 1:  In 3rd CH from hook, SC+2DCCL. (SK next ST, SC+2DCCL in next ST) across. (22)

    Row 2: CH1, turn. SK first ST, SC+2DCCL in next ST. (SK next ST, SC+2DCCL in next ST) across. (22)
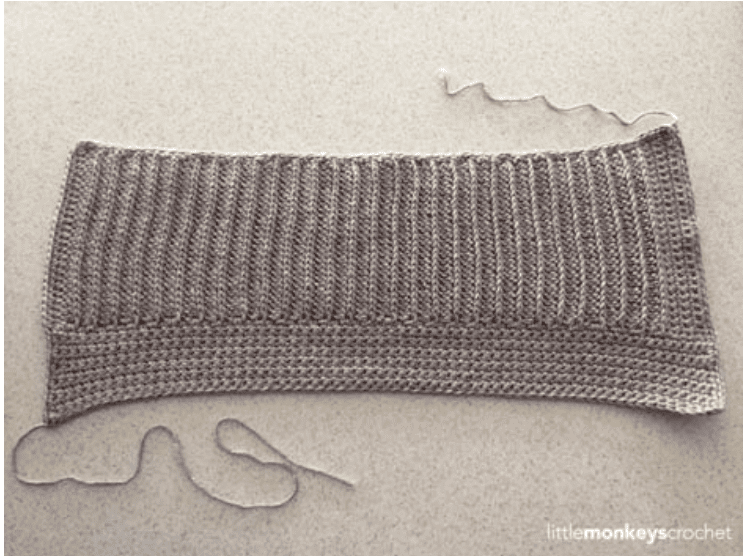
    Rows 3-48: Repeat Row 2.

    Next we’re going to seam the hat. Fasten off, leaving a 12″ tail. Lay the piece out flat, then fold the short sides in toward each other. Use the tail and a yarn needle to whip stitch the two short ends together, as shown.

    snowdriftslouch-seaming

    Fasten off the tail you just used, and weave in its end.

    Next, we’re going to cinch the top of the hat. Turn it inside out (whichever side has the most obvious seam should be exposed). Thread your starting tail through your yarn needle and weave it in and out around the very top of the hat. (The smaller your weave, the nicer finish the top of the hat will have.)

    snowdriftslouch-cinching

    After cinching, it should look like this:

    snowdriftslouch-aftercinching

    Pull the tail tight to draw the cinch closed, tie a couple of knots, and fasten off and weave in the end.

    Band of the Hat

    Now, we’re going to add a nice thick band to our slouch hat. Turn your hat right-side out and reattach your yarn at the base of the hat, at the seam. We’re doing this with the seamless method, which means we aren’t joining at the end of rounds. If you need to, you can use a stitch marker or bobby pin to mark the last SC of each round so you don’t get lost.

    Round 1: CH1. SC evenly around, 3SC per ridge*. (Approx. 72, give or take a couple)
    *We’re going to SC evenly around the hat, so let’s take a look at what we have to work with. The ridges on the hat will be how we keep track of our stitches. We want to put 3SC in each ridge. I chose to put the first SC in the “valley”, and the next 2 SC evenly spaced on the “hilltop”. Take a look at this photo for guidance on where your SCs should go:

    snowdriftslouch-band

    Rounds 2-8: SC evenly around.

    To finish, SL ST into the next 3 SCs to smooth out the round. Fasten off and weave in ends.

  • Maribel Slouch

    Maribel Slouch

    © Photography by Kindred Photo & Design

    Thank you to Lion Brand for providing the yarn for this pattern sample.

    Last winter, I released a pattern set – the Maribel Cowl and Boot Cuffs. They are still some of my favorite patterns from that season!

    So this year, I decided to do what I always meant to do, but never got around to… designing a matching hat.

    This slouch is worked differently from my other slouch hats, in that it’s worked flat and then cinched (as opposed to being worked in the round). This enables us to get vertical stitch work that you can’t get when you work a hat in the round. Cinching it up at the end is easy, and I’ve provided photos for you in the pattern.
    –

    The Yarn

    I used Lion Brand Heartland in “Grand Canyon” for my sample. Heartland is one of my go-to worsted weight yarns. It has a beautiful sheen to it, it’s lightweight, and the color choices are gorgeous. You might recognize it in some of my other patterns, like the Sandy Slouch & Cowl Set.

    Prefer a PDF?

    This pattern can be completed using the 100% free version right here on this page. However, many people prefer the convenience of a printable, ad-free PDF.

    All-Access Passholders get the ad-free version of this and all of my other blog patterns. It’s a pretty sweet deal, if I do say so myself! Learn more about it here or continuing scrolling for the free version.

    THE MARIBEL SLOUCH HAT

    Level: Easy

    Size:
    One Size Fist Most (Preteen – Adult Woman).
    Hat measures 9.5” across at band (when laid flat), and is 9.5” tall.

    Materials:

    • I hook (5.50mm)
    • Yarn needle
    • About 210 yards of Lion Brand Heartland* (Sample color: Grand Canyon)
      *About Heartland:
        Weight: #4 worsted
                    Fiber: 100% Acrylic
      Yardage: 5oz/142g (251yd/230m)
      Gauge: 12 sc + 15 rows = 4 inches on size J-10 [6 mm] hook
    • 7 small buttons (I used 1/2″)

    Gauge:
    With I hook, 10 rows of 7 SC = 2″ square

    Stitches Used:
    CH (chain)
    SS (slip stitch)
    SC (single crochet)
    HDC (half double crochet)
    RibHDC (also known as Camel Stitch or 3rd Loop HDC; see Special Stitch, below)

    Special Stitch:
    RibHDC – instead of putting your HDC in the top loops, find the 3rd loop. Because we’re working in turned rows, the third loop will be located just underneath the front loop. Insert your hook there and create your HDC. This forces both of the top loops to rest on the front of your project, creating a ribbing effect. It is also referred to as a Camel Stitch or 3rd Loop HDC. (Confused? You can view a photo tutorial here.)

    Notes:
    (1) This hat is worked in rows and cinched at the end.
    (2) This pattern is written in American Standard terms.
    (3) Starting chains do not count as stitches.

    – – – – – – – – – – – – – – – –

    To begin:
    Using I Hook, and leaving a 12″ tail, CH27. Don’t weave in the tail until instructed (we’ll use it later to cinch the hat).

    Row 1:  SC in 2nd CH from hook and in each ST across. (26)

    Rows 2-6: CH1, turn. SC in each ST across. (26)

    Row 7: CH1, turn. HDC in each ST across. (26)

    Rows 8-64: CH1, turn. RibHDC in each ST across. (26)

    We are now going to begin working along the long edge of our project to create the band of the hat.

    Row 65: CH1. Working along the long edge, SC across. Put 1SC in each row, for a total of 64SC. (64)

    Rows 66-76: CH1, turn. SC in each ST across.

    Edging: CH1, turn. SC evenly around the entire project, putting (SC, CH1, SC) in each corner. Fasten off, leaving a 12″ tail.

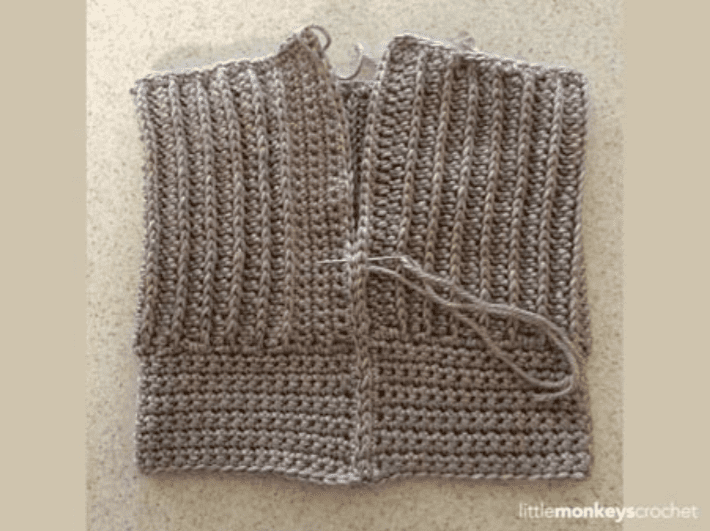
    At this point, your project should look like this:

    Seaming the Hat

    Use your finishing tail to whip stitch the two short ends together, then fasten off and weave it in.

    Cinching the Hat

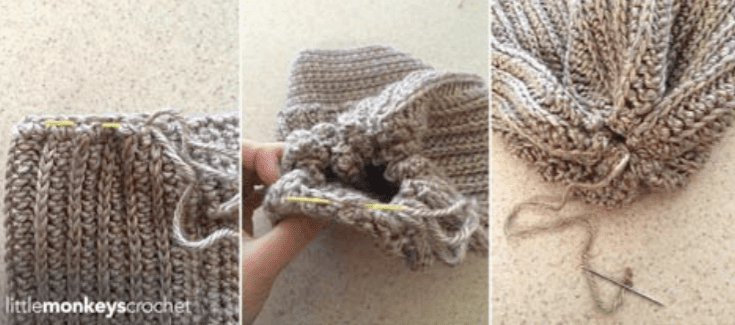
    Turn your hat inside out. Thread your starting tail through the yarn needle and weave it in and out of every other SC along the top edging of the hat. (I’ve highlighted my yarn needle in yellow in the photos below.) When you’re done, pull it tight to cinch the hat (but carefully… you don’t want to break the yarn!). Use the yarn needle to reach across the cinch a few times to make sure it’s closed up nice and tight, then make a knot and weave in the tail. Turn your hat right side out.

    Sew your buttons along that very first section of SC rows, extending them down across the band of the hat, too.

  • Half-‘n-Half Slouch Hat

    Half-‘n-Half Slouch Hat

    © Photography by Kindred Photo & Design

    Thank you to Lion Brand for providing the yarn for this pattern sample.

    Today’s pattern is extra special, because I partnered with a fellow crochet blogger to bring you a set!

    Krista of Rescued Paw Designs has designed matching boot cuffs for the Half & Half Slouch, and I love them. Both patterns are simple and trendy, and they’ll be great together for those chilly days. My pattern is at the bottom of this post, as always. Click here to view the Half & Half Boot Cuffs pattern on Krista’s blog, and don’t forget to go Like her on Facebook!

    Half & Half Slouch Crochet Hat | Free Slouchy Hat Crochet Pattern by Little Monkeys Crochet

    This hat utilizes the crochet-flat-then-cinch-together method. To change it up, I crocheted half of it in one stitch pattern and half of it in another. It’s a fun hat with a nice fit and just the right amount of slouch.

    The Yarn

    I used Lion Brand Heartland in “Mammoth Cave” for my sample. Heartland is one of my go-to worsted weight yarns. It has a beautiful sheen to it, it’s lightweight, and the color choices are gorgeous. You might recognize it in some of my other patterns, like the Sandy Slouch & Cowl Set.

    yarnpic
    Click the photo to view this yarn on Craftsy.

    Prefer a PDF?

    This pattern can be completed using the 100% free version right here on this page. However, many people prefer the convenience of a printable, ad-free PDF.

    All-Access Passholders get the ad-free version of this and all of my other blog patterns. It’s a pretty sweet deal, if I do say so myself! Learn more about it here or continuing scrolling for the free version.

    THE HALF-‘N-HALF SLOUCH

    add-to-ravelry-favorites

    Level: Easy

    Size:
    One Size Fist Most (Preteen – Adult Woman).
    Hat measures 10” across at band, and is 9.5” tall.

    Materials:

    • I hook (5.50mm)
    • About 190 yards of Lion Brand Heartland* (Sample color: Mammoth Cave)
      *About Heartland:
        Weight: #4 worsted
                    Fiber: 100% Acrylic
      Yardage: 5oz/142g (251yd/230m)
      Gauge: 12 sc + 15 rows = 4 inches on size J-10 [6 mm] hook
    • Yarn Needle

    Gauge:
    With I hook, 7 HDC = 2″ square

    Abbreviations Used:
    CH (chain)
    ST/STS (stitch/stitches)
    SL ST (slip stitch)
    SK (skip)
    SC (single crochet)
    HDC (half double crochet)
    SC+DC (this just means to put 1SC and 1DC in the same stitch)

    Notes:
    (1) This hat is worked in rows and cinched at the end.
    (2) This pattern is written in American Standard terms.
    (3) Starting chains do not count as stitches.
    (4) As you work, you might begin to notice that your piece isn’t a perfect rectangle, and the bottom half lays at a slight angle – this is ok.

    – – – – – – – – – – – – – – – –

    To begin:
    Using I Hook, and leaving a 12″ tail, CH35. Don’t weave in the tail until instructed (we’ll use it later to cinch the hat).

    Row 1:  In 3rd CH from hook, SC+DC. (SK next ST, SC+DC in next ST) 9 times. HDC in each of the next 14 STS. (34)

    Row 2: CH1, turn. SC in each of the first 14 STS. (SK next ST, SC+DC in next ST) 10 times. (34)

    Row 3: CH1, turn. SK first ST, SC+DC in next ST. (SK next ST, SC+DC in next ST) 9 times. HDC in each of the next 14 STS. (34)

    Row 4: CH1, turn. SC in each of the first 14 STS. (SK next ST, SC+DC in next ST) 10 times. (34)

    Rows 5-62: Repeat Rows 3 & 4 until you have 62 rows. (34)

    Row 63: Repeat Row 3.  (34)

    We are now going to work along the long edge of our project to put a nice edging on the band of the hat.

    Row 64: CH1, do not turn. Working along the long edge, SC across, putting 1SC in each row, for a total of 63SC. When you’re done, your starting and ending tails should be in the same corner. (63)

    Lay your project flat, with the starting and ending tails at the bottom left corner. At this point, your project should look like this:

    Half & Half Slouch Crochet Hat  |  Free Slouchy Hat Crochet Pattern by Little Monkeys Crochet

    Fasten off your finishing tail and weave it in.

    Seaming the Hat

    Turn your hat inside out. Use a yarn needle and your starting tail, whip stitch the two short ends together (see photo below). Now, we’re going to keep using this tail to cinch the top of the hat too, and we don’t want the seam to pull when we pull the cinch tight — so tie a knot or two at the top of the hat.

    Cinching the Hat

    Keeping your hat inside out, weave your starting tail in and out along the top edge of the hat. When you’re done, pull it tight to cinch the hat (but carefully… you don’t want to break the yarn!). Use the yarn needle to reach across the cinch a few times to make sure it’s closed up nice and tight, then make a knot and weave in the tail. Turn your hat right side out.

    halfnhalf-seamingcinching

    Done!

    Half & Half Slouch Crochet Hat  |  Free Slouchy Hat Crochet Pattern by Little Monkeys Crochet