Category: Home Decor

  • Zinnia 12″ Square

    Zinnia 12″ Square

    (Pour la traduction française, cliquez ici. Traduit par Véronique Malanda Mavouala de Chez Horaive.)

    After a lot of back-and-forth between the seasons here in Michigan, I think (I said think) it’s safe to say that Spring has officially sprung. So I’m excited to reveal this year’s contribution to the Moogly 2016 Afghan CAL: the Zinnia 12″ Crochet Square!

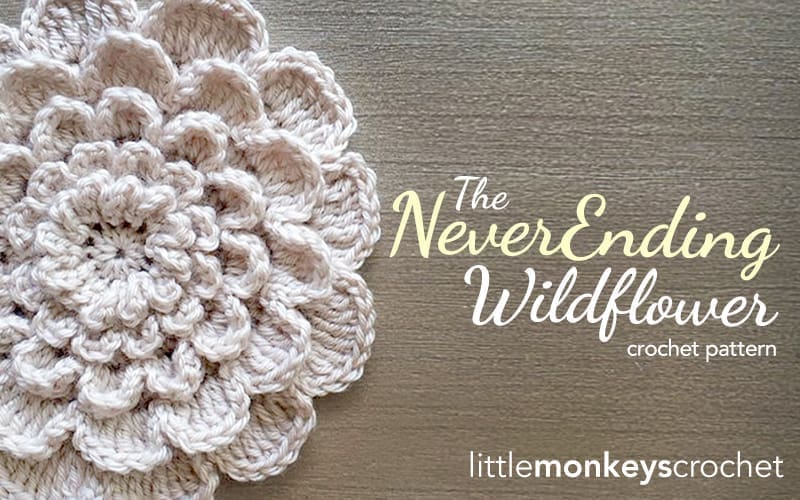
    If you followed along with the CAL last year, you might think this square looks very familiar. And you’re right! I took my inspiration from my 2015 submission, the Neverending Wildflower 12″ Square.

    The Never Ending Wildflower Granny Square Crochet Pattern | Free Crochet Pattern by Little Monkeys Crochet (www.littlemonkeyscrochet.com)

    This flower is built similarly, but has a significant difference: instead of petals that increase in width, as in last year’s square, this one has petals that stay the same size and only increase in quantity, resulting in a mass of tiny petals — much like a Zinnia flower. It’s a great match to the 2015 square, and the two together might make a stunning blanket of their own!

    Prefer a PDF?

    This pattern can be completed using the 100% free version right here on this page. However, many people prefer the convenience of a printable, ad-free PDF.

    All-Access Passholders get the ad-free version of this and all of my other blog patterns. It’s a pretty sweet deal, if I do say so myself! Learn more about it here or continuing scrolling for the free version.

    ZINNIA 12″ SQUARE

    (Pour la traduction française, cliquez ici.)

    Difficulty: Easyish
    Final Size: 12″x12″
    Hook: 
    I (5.50mm)
    Yarn: Vanna’s Choice, or your favorite #4 aran weight yarn. I used about 130 yards (total) of Vanna’s Choice, in colors Linen, Dusty Purple, Purple, and Taupe.
    You’ll also need: Yarn needle, small button and tools to attach it (optional)
    Gauge: Circle after Round 3 should measure 3.75” in diameter.

    Notes:


    • This pattern is written in American Standard Terms.
    • The flower, including its petals, are worked as a part of the granny square as a whole. Rounds will alternate between increase rounds and petals. Increase rounds will be called “round 1, 2, 3” etc, and petal rounds will be referred to as “1st round of petals, 2nd round of petals,” etc. Because each petal round shares its space with the increase round below it, they are not counted as part of the pattern’s total rounds.
    • CH1 on the increase rounds does not count as a stitch.
    • Be mindful that the pattern alternates in calling for FLO (Front Loops Only) and BLO (Back Loops Only).
    • If doing a multi-colored flower, the best place to change colors is on the increase rounds (not the petal rounds).

    PART 1: THE FLOWER

    Begin with a Magic Circle; CH1.

    Round 1: 12 DC in MC. Join with a SL ST to first DC. (12)

    1st Round of Petals (FLO – don’t miss this!): CH2. In same St, 2DC, CH2, SL ST. This is your first petal. (SL ST to next St. In same St, CH2, 2DC, CH2, SL ST to same St) around. SL ST to base of 1st CH2. (12 petals)
    The Never Ending Wildflower  |  Free Crochet Pattern by Little Monkeys Crochet

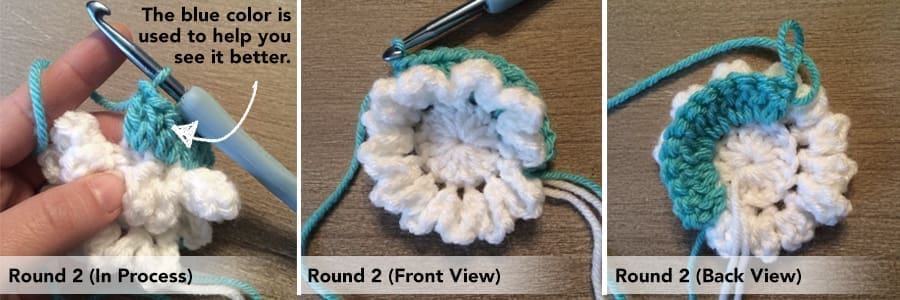
    Round 2 (BLO – You’re now going to work around Round 1 again, this time working in the loop that you ignored during the first round of petals): SL ST to 1st back loop of Round 1. CH1. 2DC in same ST. 2 DC in each ST around. Join with a SL ST to first DC. (24)
    The Never Ending Wildflower  |  Free Crochet Pattern by Little Monkeys Crochet

    2nd Round of Petals (FLO): CH2. DC in same ST. In next ST, DC, CH2, SL ST. (SL ST to next St, CH2, DC in same ST. In next ST, DC, CH2, SL ST) around. SL ST to base of 1st CH2. (12 petals)

    Round 3 (BLO): SL ST to 1st back loop of Round 2. CH1. 2DC in same ST, DC in next ST. (2DC in next ST, DC in next ST) around. Join with a SL ST to first DC. (36)

    3rd Round of Petals (FLO): CH2. DC in same ST. In next ST, DC, CH2, SL ST. (SL ST to next St, CH2, DC in same ST. In next ST, DC, CH2, SL ST) around.  SL ST to base of 1st CH2. (18 petals)

    Round 4 (BLO): SL ST to 1st back loop of Round 3. CH1. 2DC in same ST, DC in each of the next 2 STS. (2DC in next ST, DC in each of the next 2 STS) around. Join with a SL ST to first DC. (48)

    4th Round of Petals (FLO): CH2. DC in same ST. In next ST, DC, CH2, SL ST. (SL ST to next St, CH2, DC in same ST. In next ST, DC, CH2, SL ST) around.  SL ST to base of 1st CH2. To complete flower, SL ST to 1st BLO of Round 4. (24 petals)

    PART 2: THE SQUARE

    Round 5 (BLO): CH2 (does not count as a stitch, here and throughout the rest of the pattern). In same ST, 2DC, CH2, 2DC. DC in next. HDC in each of the next 3 STS. SC in each of the next 3 STS. HDC in each of the next 3 STS. DC in next ST. (In next ST, 2DC, CH2, 2DC. DC in next. HDC in each of the next 3 STS. SC in each of the next 3 STS. HDC in each of the next 3 STS. DC in next ST) 3 times. Join to 1st DC of the round with a SL ST. (Total STS per side, not including the corner CH2s, is 15.)

    Round 6: CH2. DC around, putting (2DC, CH2, 2DC) in each corner chain space. Join to 1st DC of the round with a SL ST. (Total STS per side, not including the corner CH2s, is 19.)

    Round 7: CH2. DC around, putting (2DC, CH2, 2DC) in each corner chain space. Join to 1st DC of the round with a SL ST. (Total STS per side, not including the corner CH2s, is 23.)

    Round 8: CH2. DC around, putting (2DC, CH2, 2DC) in each corner chain space. Join to 1st DC of the round with a SL ST. (Total STS per side, not including the corner CH2s, is 27.)

    Round 9: CH2. DC around, putting (2DC, CH2, 2DC) in each corner chain space. Join to 1st DC of the round with a SL ST. (Total STS per side, not including the corner CH2s, is 31.)

    Round 10: CH2. DC around, putting (2DC, CH2, 2DC) in each corner chain space. Join to 1st DC of the round with a SL ST. (Total STS per side, not including the corner CH2s, is 35.)

    Round 11: CH2. DC around, putting (2DC, CH2, 2DC) in each corner chain space. Join to 1st DC of the round with a SL ST. (Total STS per side, not including the corner CH2s, is 39.)

    Fasten off and weave in all ends.

  • Wildflower Dish Scrubby

    Wildflower Dish Scrubby

    Thank you to Red Heart for providing the yarn for this sample! 

    Not long ago, a really fun box of yarn from Red Heart landed on my doorstep. Included inside were two skeins of “Scrubby“, a yarn I’d seen online, but never in person. I couldn’t wait to get started playing with it! I came up with this cute little dish scrubby pattern in the shape of the wildflower that’s been so popular on the blog.

    About the Yarn

    Red Heart Scrubby is a #4 worsted weight, extremely textured polyester yarn. Thanks to that texture, it gets the gunk off your dishes with ease, and the polyester dries quicker than cotton. If you aren’t a fan of cotton crocheted dishcloths, this might be the perfect alternative!

    Wildflower Dish Scrubby Crochet Pattern with Red Heart Scrubby Yarn | Free Crochet Scrubby Pattern by Little Monkeys Crochet

    Because of the texture, Scrubby isn’t as easy to crochet with as a typical worsted weight yarn. I was a little intimidated at first, but once I got going with it, I was fine. It takes a little concentration (and a lot of bright light!), but as long as you understand the different parts of a stitch and what to look for, you’ll get the hang of crocheting with Scrubby!

    If you need a little extra help, check out this awesome help video from Marly Bird:

    Prefer a PDF?

    This pattern can be completed using the 100% free version right here on this page. However, many people prefer the convenience of a printable, ad-free PDF.

    All-Access Passholders get the ad-free version of this and all of my other blog patterns. It’s a pretty sweet deal, if I do say so myself! Learn more about it here or continuing scrolling for the free version.

    WILDFLOWER SCRUBBY

    add-to-ravelry-favorites

    Hook: I (5.50mm)
    Yarn: Red Heart Scrubby in two colors (< one ball of each). I used Grape (Color “A”) and Jelly (Color “B”).
    Difficulty: Easyish (the yarn is a bit tricky at first!)
    Gauge: Unimportant
    Finished Size: Sample is 5.5″ wide

    Notes:


    • This pattern is written in American Standard Terms.
    • Rounds will alternate between increase rounds and petals. Increase rounds will be called “round 1, 2, 3” etc, and petal rounds will be referred to as “1st round of petals, 2nd round of petals,” etc. Because ch petal round shares its space with the increase round below it, they are not counted as part of the pattern’s total rounds.
    • CH1 on the increase rounds does not count as a stitch.
    • Be mindful that the pattern alternates in calling for FLO (Front Loops Only) and BLO (Back Loops Only).
    • This pattern is based off of my Neverending Wildflower. If you haven’t done this pattern before, it might be a good idea to try the pattern below with regular yarn before attempting it with Scrubby. If you need a little extra help, give this pattern a try (it has photo tutorials).

    THE PATTERN

    With Color A, begin with a Magic Circle; CH1.

    Round 1: 12 DC in MC. Join with a SL ST to first DC. (12)

    Switch to Color B.

    1st Round of Petals (FLO): CH2. DC in same ST. In next ST, DC, CH2, SL ST. (SL ST to next St, CH2, DC in same ST. In next ST, DC, CH2, SL ST) around. SL ST to base of 1st CH2. (6 petals)

    Switch to Color A.

    Round 2 (BLO – You’re now going to work around Round 1 again, this time working in the loop that you ignored during the first round of petals): SL ST to 1st back loop of Round 1. CH1. 2DC in same ST. 2 DC in each ST around. Join with a SL ST to first DC. (24)

    2nd Round of Petals (FLO): CH2. DC in same ST. In next ST, DC, CH2, SL ST. (SL ST to next St, CH2, DC in same ST. In next ST, DC, CH2, SL ST) around. SL ST to base of 1st CH2. (12 petals)

    Switch to Color B.

    Round 3 (BLO): SL ST to 1st back loop of Round 2. CH1. 2DC in same ST, DC in next ST. (2DC in next ST, DC in next ST) around. Join with a SL ST to first DC. (36)

    3rd Round of Petals (FLO): CH2. DC in same ST. 2DC in next ST. In next ST, DC, CH2, SL ST. (SL ST to next ST, CH2, DC in same ST. 2DC in next ST. In next ST, DC, CH2, SL ST) around. SL ST to base of 1st CH2. (12 petals)

    Fasten off and weave in all ends.

  • Color Block Placemat

    Color Block Placemat

    Thank you to Lion Brand Yarn for supplying the yarn for this sample!

    Before we talk about this fabulous yarn, can we talk about this fabulous table!? My dad made it for me! Isn’t it gorgeous? I’ve wanted a farmhouse-style dining table for years and I can’t believe it’s mine! And the fact that my dad made it makes it infinitely more special than anything I could’ve found in a store. (He’s in the process of making some benches for it, but until then, try to look past the totally-not-matching-chairs from my previous table.)

    Color Block Placemat Crochet Pattern with Lion Brand 24/7 Cotton Yarn | Crochet Placemat Pattern by Little Monkeys Crochet

    I decided to make some placemats for it; you know, for when guests come over and we pretend that we’re classier than we really are. I’ve been wanting to try Lion Brand Yarn’s 24/7 Cotton, and I had a hunch that placemats might be just the right project. Have you seen the color choices for this yarn? Beautiful!

    Color Block Placemat Crochet Pattern with Lion Brand 24/7 Cotton Yarn | Crochet Placemat Pattern by Little Monkeys Crochet

    About the Yarn

    24/7 Cotton is a #4 medium weight yarn, although I’d definitely put it on the lighter side of the #4 family. It’s 100% mercerized cotton, which means it’s been treated with a process that brings out its brightness and sheen and helps it withstand multiple washings without losing that sheen. It comes in 186-yard skeins in a range of 24 gorgeous colors, from striking brights to natural-looking neutrals. It produces a stiffish (that’s probably not a real word) fabric, has a great balance of sheen and stitch definition, and doesn’t split at all during use. I’ve been seriously impressed with Lion Brand’s recently released yarns, and 24/7 Cotton is really no exception.

    Color Block Placemat Crochet Pattern with Lion Brand 24/7 Cotton Yarn | Crochet Placemat Pattern by Little Monkeys Crochet

    Prefer a PDF?

    This pattern can be completed using the 100% free version right here on this page. However, many people prefer the convenience of a printable, ad-free PDF.

    All-Access Passholders get the ad-free version of this and all of my other blog patterns. It’s a pretty sweet deal, if I do say so myself! Learn more about it here or continuing scrolling for the free version.

    COLOR BLOCK PLACEMAT

    add-to-ravelry-favorites

    Level: Easy

    Size: 13″x18″ (standard placemat size)

    Hook: G (4.25mm)

    Yarn: About 75-80 yards per color block of #4 medium weight 100% mercerized cotton yarn. I used 24/7 Cotton (by Lion Brand) in color blocks of Lilac, White, Café Au Lait, and Ecru. (Helpful tip: 1 skein of each color will produce 2 placemats, but 2 skeins of each color will produce 5 placemats.)

    You’ll also need: Yarn needle

    Gauge: 10 rows of 10 SC = a 2.25″ square

    Abbreviations Used:
       ST (stitch)
    SL ST (slip stitch)
    SK (skip)
    CH (chain)
    SC (single crochet)
    HDC (half double crochet)
       SC+HDC (this just means to put a single crochet and a half double crochet in the same stitch)

    Notes:
    (1) This pattern is written in American Standard Terms.
    (2) Starting CHs do not count as stitches.

    – – – – – – – – – – – – – – – –

    To begin:
    With first color, CH 55.

    Row 1: SC in 2nd CH from hook and in each remaining CH. (54)

    Rows 2-17: CH1, turn. HDC in 1st ST. (SK next ST, SC+HDC in next ST) across until 1 ST remains. SC in remaining ST. (54)

    Row 18: CH1, turn. SC in first ST and in each ST across. (54)

    Helpful tip: The SCs in Rows 18 & 19 help us to create a nice straight line where color blocks come together. If we didn’t add it, the color changes would have a more jagged edge.

    Switch to a new color; fasten off previous color.

    Row 19: CH1, turn. SC in first ST and in each ST across. (54)

    Rows 20-35: CH1, turn. HDC in 1st ST. (SK next ST, SC+HDC in next ST) across until 1 ST remains. SC in remaining ST. (54)

    Row 36: CH1, turn. SC in first ST and in each ST across. (54)

    For the two remaining color blocks: Switch to a new color and fasten off the previous color, then repeat Rows 19-36. (You will end with 4 color blocks totaling 72 rows.)

    Fasten off and weave in all ends.

    Color Block Placemat Crochet Pattern with Lion Brand 24/7 Cotton Yarn  |  Crochet Placemat Pattern by Little Monkeys Crochet

  • Throw Pillow with Removable Flower Accents

    Throw Pillow with Removable Flower Accents

    Thank you to Cascade Yarns for providing the yarn for this sample!

    I love throw pillows! They’re so simple to make, and they add so much character to a couch or bed.

    For this pillow, I used 220 Superwash from Cascade Yarns (in “Ridge Rock”). This is a popular yarn from Cascade, and it’s my first experience with it. I absolutely love it! It’s soft, but sturdy. It was perfect for the pillow, but would also be great for a hat or scarf. I love that the yarn is not dull-looking, but is still matte enough that it shows off stitch work wonderfully. Click here to see all of the beautiful colors available!

    Throw Pillow with Removable Accent Flowers Crochet Pattern | Free Flower Throw Pillow Crochet Pattern by Little Monkeys Crochet

    I decided to accent this pillow with a pop of color using three fabric flowers from Hobby Lobby:

    flowers

    The great thing about these flowers is that they’re actually hair clips; so they’re super easy to attach to the pillow, and are completely rearrangeable/removable. If my decor changes, I can simply find different fabric flower clips. So simple!

    flowers-back

    Enjoy this easy pattern!

    Prefer a PDF?

    This pattern can be completed using the 100% free version right here on this page. However, many people prefer the convenience of a printable, ad-free PDF.

    All-Access Passholders get the ad-free version of this and all of my other blog patterns. It’s a pretty sweet deal, if I do say so myself! Learn more about it here or continuing scrolling for the free version.

    12″ THROW PILLOW (WITH REMOVABLE FLOWER ACCENTS)

    add-to-ravelry-favorites

    Level: Easy

    Size: Pattern will fit a standard 12″ throw pillow insert. (Instructions for adjusting the size are including in the Notes section.)

    Hook: H (5.00mm)

    Yarn: 310-320 yards of 220 Superwash from Cascade Yarns (sample shown in “Ridge Rock”). 220 Superwash is a #4 worsted weight yarn.

    You’ll also need: 12″ throw pillow insert, yarn needle, fabric flower hair clips (optional)

    Gauge: 8 rows of 12 SC = 3″ square

    Abbreviations Used:
       ST/STS (stitch/stitches)
    SL ST (slip stitch)
    SK (skip)
    CH (chain)
    SC (single crochet)
    HDC (half double crochet)
       SC+HDC (this just means to put a single crochet and a half double crochet in the same stitch)

    Notes:
    (1) This pattern is worked in American Standard Terms.
    (2) CH1 at the beginning of rows does not count as a stitch.
    (3) To make the pattern for a larger or smaller pillow, just make sure to begin with an odd number of chains. Your starting chain and first row, when gently stretched, should come just short of the seams of your insert pillow (keeping in mind that you’ll be adding a couple small rows of border at the end).

    PATTERN (MAKE 2):

    To begin: CH 45.

    Row 1: SC in 2nd CH from hook and in each CH across. (44)
    Row 2: CH1, turn. SC in each ST across. (44)
    Row 3: CH1, turn. SK 1st ST, SC+HDC in next ST. (SK next ST, SC+HDC in next ST) across. (44)
    Row 4: CH1, turn. SK 1st ST, SC+HDC in next ST. (SK next ST, SC+HDC in next ST) across. (44)
    Row 5: CH1, turn. SC in each ST across. (44)
    Row 6: CH1, turn. SC in each ST across. (44)
    Row 7: CH1, turn. SK 1st ST, SC+HDC in next ST. (SK next ST, SC+HDC in next ST) across. (44)
    Row 8: CH1, turn. SK 1st ST, SC+HDC in next ST. (SK next ST, SC+HDC in next ST) across. (44)
    Rows 9-44: Repeat Rows 5-8. (44)

    Edging: CH1. SC evenly around all 4 sides of pillow, putting (SC, Ch1, SC) in each corner. Join with Sl St to 1st SC. You should have 44 SC on each side.

    Edging

    Sewing Sides Together:
    Hold both sides together as you want them to be placed on the pillow. Join your yarn through both pieces, somewhere on the edge (I started in a corner). Ch1, then SC through the lined-up stitches from both pieces, seaming them together:

    Seaming

    Continue around 3 sides of the pillow, putting (SC, Ch1, SC) in each corner. Insert pillow. Continue to SC along the remaining side, enclosing the pillow completely. Join with a Sl St to the first SC of the round, fasten off and weave in ends.

    Attach your flowers (optional). Done!

    Throw Pillow with Removable Accent Flowers Crochet Pattern  |  Free Flower Throw Pillow Crochet Pattern by Little Monkeys Crochet

  • Comfy Squares Textured Blanket

    Comfy Squares Textured Blanket

    When I find a stitch I love, I get really fixated on it. I make a bunch of different patterns with it until I finally get bored and move on to another stitch.

    My fixation right now?

    The SC+HDC combo!

    The first pattern I made with this stitch was the Comfy Squares Textured Cowl. It was a bit of an accident how it all came together, and interestingly enough, that cowl has become my go-to cowl this winter. I love the way it drapes, and I just love the look of the stitches.

    Our family draws names for Christmas, and this year, I drew my Grandma. I was so excited! I knew right away that I wanted to make her something special. So I decided this would be the perfect opportunity to try out this stitch in blanket form.

    I am thrilled with how it turned out!

    Comfy Squares Textured Blanket Crochet Pattern | Free Lap Blanket Crochet Pattern by Little Monkeys Crochet

    Let’s talk colors. I need to give a shoutout to my friend Krista at Rescued Paw Designs — I’ve admired her great sense of color schemes since I first discovered her blog. The colors I chose for my blanket were inspired by some of her blanket patterns.

    Comfy Squares Textured Blanket Crochet Pattern | Free Lap Blanket Crochet Pattern by Little Monkeys Crochet

    I used a collection of Vanna’s Choice (which has some of the most gorgeous neutral colors available in the big craft stores): Purple, Linen, Taupe, and Gray Marble. The great thing about Vanna’s Choice is that their entire line coordinates. So you can pretty much go in and choose any colors you want, and you’re almost guaranteed to come out with a beautiful color scheme.

    My advice? Choose three neutrals and one accent color. Make sure at least one of your choices is a heather yarn (meaning it has little flecks of other colors in it) to give your blanket a rustic modern look. (Love me some rustic modern!)

    I took the advice of my Little Monkeys followers and softened the finished blanket up by running it through the dryer with a dryer sheet. I was surprised at how soft it came out, and it didn’t mess with the blanket at all. (I’m paranoid about stuff like that.)

    Here it is, all ready for Christmas! (Find my free printable “handmade with special care” gift tags here.)

    Comfy Squares Textured Blanket Crochet Pattern | Free Lap Blanket Crochet Pattern by Little Monkeys Crochet

    Prefer a PDF?

    This pattern can be completed using the 100% free version right here on this page. However, many people prefer the convenience of a printable, ad-free PDF.

    All-Access Passholders get the ad-free version of this and all of my other blog patterns. It’s a pretty sweet deal, if I do say so myself! Learn more about it here or continuing scrolling for the free version.

    COMFY SQUARES TEXTURED BLANKET

    add-to-ravelry-favorites

    Level: Easy

    Size: Blanket measures 30″x40″ (stroller blanket or small lap blanket size). Pattern is easily adjustable for both length and width.

    Hook: K (6.50mm)

    Yarn: About 180 yards of #4 worsted/aran weight yarn per color block. I used Vanna’s Choice (by Lion Brand) in color blocks of Purple (x2), Linen, Taupe and Gray Marble. Please see Notes section for a helpful note about yarn amounts.

    You’ll also need: Yarn needle

    Gauge:
    Not crucial, but a row of 10SC = about 3″ in length.

    Abbreviations Used:
       ST (stitch)
    SL ST (slip stitch)
    SK (skip)
    CH (chain)
    SC (single crochet)
    HDC (half double crochet)
       SC+HDC (this just means to put a single crochet and a half double crochet in the same stitch)

    Notes:
    (1) This pattern is written in American Standard Terms.
    (2) Starting CHs do not count as stitches.
    (3) A note about yarn amounts: I used yarn in my stash to complete most of this project, so I wasn’t concerned about trying to use full skeins… which resulted in a pattern that, if done as written, uses about 30 yards of a second skein per color block. If that drives you absolutely nuts, you might want to make your blanket smaller or larger to avoid having a lot of leftover yarn.  🙂
    (4) To adjust the width of your blanket, add or subtract from your starting CH (just begin with an odd number of CHs). To adjust the length of your blanket, add or subtract an even number of rows to/from each color block.

    – – – – – – – – – – – – – – – –

    To begin:
    With first color, CH101.

    Row 1: HDC in 2nd CH from hook. (SK next ST, SC+HDC in next ST) across until 1 CH remains. SC in remaining CH. (100)

    Rows 2-22: CH1, turn. HDC in 1st ST. (SK next ST, SC+HDC in next ST) across until 1 ST remains. SC in remaining ST. (100)

    Row 23: CH1, turn. SC in first ST and in each ST across. (100)

    Helpful tip: The SCs in Rows 23 & 24 help us to create a nice straight line where color blocks come together. If we didn’t add it, the color changes would have a more jagged edge.

    Switch to a new color; fasten off previous color.

    Row 24: CH1, turn. SC in first ST and in each ST across. (100)

    Rows 25-46: CH1, turn. HDC in 1st ST. (SK next ST, SC+HDC in next ST) across until 1 ST remains. SC in remaining ST. (100)

    Row 47: CH1, turn. SC in first ST and in each ST across. (100)

    For each remaining color block: Switch to a new color and fasten off the previous color, then repeat Rows 24-47.

    Fasten off and weave in all ends.

  • Basketweave Throw Pillow

    Basketweave Throw Pillow

    Ever since I made my first throw pillow, the 12″ Buttoned Throw Pillow, I’ve been on a bit of a pillow kick. Once I made one, about a dozen ideas for different ones started flooding into my head. The thing I love about crocheted throw pillows is that you can make them whatever color you want to match your decor, and between all the crochet stitches and color schemes out there, the design possibilities are endless. They’re a nice break from all the hats and scarves I’ve been making all winter, too!

    This new throw pillow pattern is super cute, if I do say so myself. It utilizes the basketweave stitch, which looks so much more complicated than it really is. Even if you’re a beginner, give it a try. You might surprise yourself, and you’ll certainly impress your family and friends!

    One thing I’ve learned in the process of making throw pillows is that they fit over the inserts the best when they’re just slightly smaller in length than the insert itself. So for this 12″ pillow, I edged both sides in SC until they were about 11.75″ (that’s width, not corner-to-corner). Any larger than that, and I’ve found that the edges get wavy and floppy and just don’t lay as nicely. So for this pattern, although I SC’d around the 3 times, you should measure your piece before edging and only add as many rounds of edging as you need to get to about 11.75″. You might need more or less than I did.

    Prefer a PDF?

    This pattern can be completed using the 100% free version right here on this page. However, many people prefer the convenience of a printable, ad-free PDF.

    All-Access Passholders get the ad-free version of this and all of my other blog patterns. It’s a pretty sweet deal, if I do say so myself! Learn more about it here or continuing scrolling for the free version.

    BASKETWEAVE THROW PILLOW

    Hook: H (5.00mm)
    Yarn: About 340 yards (170 yards for each side) of your favorite medium worsted weight yarn
    Difficulty: Easy
    Gauge: 7DC per 2″. If yours is slightly tighter, it’s not going to matter because I’ve given instructions on the “edging” section that will help you adapt the pattern to get to the right measurements. If your tension is looser than mine, however, you’ll want to adjust your hook size down.
    You’ll also need: 12″ throw pillow insert (I got mine at Hobby Lobby), tape measure, yarn needle and scissors.

    Notes:
    (1) This pattern is worked in American Standard Terms.
    (2) Starting Ch2 DOES count as 1st stitch of each row.

    PATTERN (MAKE 2):

    Ch 37.

    Row 1: DC in 3rd Ch from hook. Dc across. (36, including starting Ch)

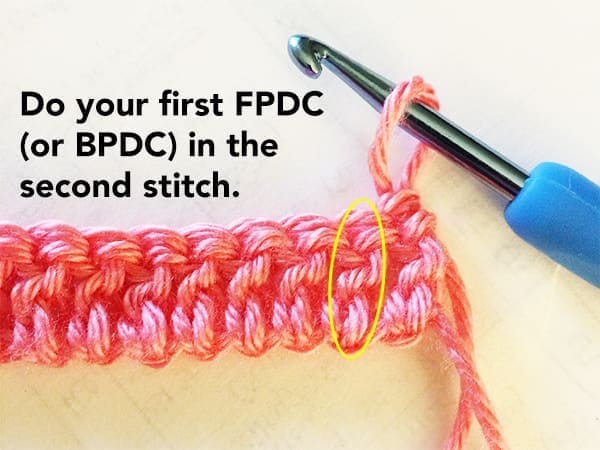
    Row 2: Ch 2; turn. Skipping 1st DC from previous row (see photo), FPDC in next 3 Sts. (BPDC in next 4 Sts, FPDC in next 4 Sts) across. (36)

    Your Ch2 will serve as the 1st stitch of the row, so do your first FPDC (or BPDC) in the 2nd stitch.

    Row 3: Ch 2; turn. Skipping 1st DC from previous row, BPDC in next 3 Sts. (FPDC in next 4 Sts, BPDC in next 4 Sts) across. (36)

    Row 4: Ch 2; turn. Skipping 1st DC from previous row, BPDC in next 3 Sts. (FPDC in next 4 Sts, BPDC in next 4 Sts) across. (36)

    Row 5: Ch 2; turn. Skipping 1st DC from previous row, FPDC in next 3 Sts. (BPDC in next 4 Sts, FPDC in next 4 Sts) across. (36)

    Rows 6-?: Repeat rows 2-5 until the length is approximately the same as the width. (Mine took 26 rows. Since you’re making two of these, be sure to crochet the same number of rows for both pillow pieces.)

    Edging:

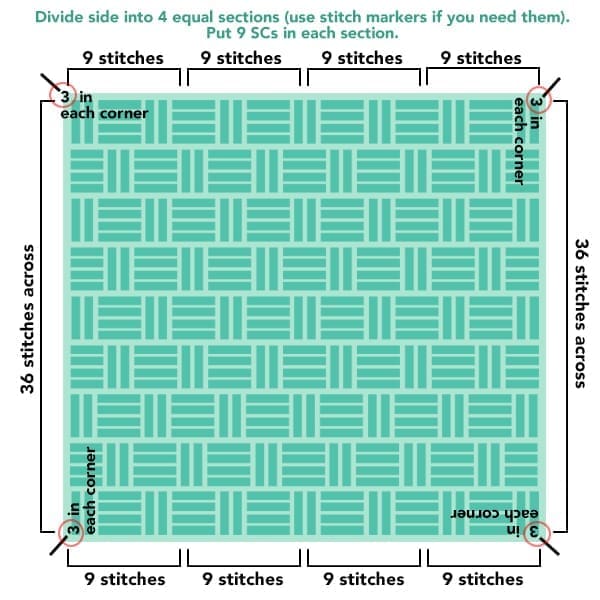
    Round 1: Ch 1. SC evenly around all 4 sides of pillow, putting 3SC in each corner. Join with Sl St to 1st SC.  (NOTE: Two of your sides will have exactly 36 stitches, and your goal is to get as close to that as you can on the other two sides, so that you’ll end up with a perfect or close-to-perfect square. You may have to do a little visual math here. I did it by dividing the side into fourths – you can place a bobbie pin in the center, and then again in the center of each half, to help you visualize this. Then, because

    36 (stitches) ÷ 4 (sections) = 9

    …I put 9 SCs in each section. I know, I’m such a nerd, but I made you a diagram.)

    Basketweave Throw Pillow Crochet Pattern  |  free crochet pattern by Little Monkeys Crochet

    Round 2: Ch 1. SC evenly around all 4 sides of pillow, putting 3SC in each corner (which would be the middle SC from the previous round’s 3 corner SCs). Join with Sl St to 1st SC.

    Measure your width. If it’s not 11.75″ yet, repeat Round 2 until it is.

    For Pillow Side 1, fasten off and weave in ends. For Pillow Side 2, do not fasten off; weave in only your starting end, and continue to sewing instructions.

    Sewing the Pillow Together:

    Hold both pillow pieces together with the unfinished one closest to you, wrong sides facing each other, right sides facing out. (If you’re a perfectionist, you may want to make sure that the stitches from both pieces are going in the same direction, although it won’t affect assembly either way.) Insert your hook into the loop of the unfinished side, then slip stitch through the top loops of both pillow pieces. Ch1. Working through both pillow pieces throughout, SC in same St and evenly around 3 sides, putting 3SC in each corner. When you finish the 3rd side, insert your pillow. Continue to SC around the final side, sewing the pillow shut. Fasten off and weave in ends.

  • Never Ending Wildflower 12″ Granny Square

    Never Ending Wildflower 12″ Granny Square

    Welcome, Moogly Afghan CAL visitors!

    If you’ve spent much time around my blog (and welcome, to those of you who haven’t), you know that I like to create modern, clean-looking patterns.  I like simple color schemes, clean lines, and contemporary styles!

    That’s why I decided to use my Never Ending Wildflower to create this square. The interest of this pattern doesn’t come from the square itself, but from the beauty of its focal centerpiece, the large, multi-petal wildflower. Of course, you can incorporate as many different colors into this pattern as you want; for me, I prefer just using two, and I love how the contrast makes the flower leap right off the square.

    If you’d like to see the original pattern for the Never Ending Wildflower, and learn how to make it even bigger for different uses, you can view that pattern here.
    The Never Ending Wildflower Crochet Pattern | Free Crochet Pattern by Little Monkeys Crochet (www.littlemonkeyscrochet.com)


    And for our Dutch friends joining in on the Moogly CAL:
    Dit patroon is (door HET HAAKBEEST) in het Nederlands vertaald. Je vindt een versie met foto’s voor rechtshandigen, eentje met foto’s speciaal voor linkshandigen, en een printerversie zonder foto’s.


    THE NEVER ENDING WILDFLOWER 12″ GRANNY SQUARE

    Hook: I (5.50mm)
    Yarn: Vanna’s Choice, or your favorite worsted weight yarn. I used less than 100 yards (each) of Vanna’s Choice in White and Dusty Blue for my sample.
    Difficulty: Easy
    Gauge: Circle after Round 3 should measure 3.75” in diameter.
    Final Size: 12″x12″

    Notes:


    • This pattern is written in American Standard Terms. The flower portion is taken from my original pattern, The Never Ending Wildflower.
    • The flower, including its petals, are worked as a part of the granny square as a whole. Rounds will alternate between increase rounds and petals. Increase rounds will be called “round 1, 2, 3” etc, and petal rounds will be referred to as “1st round of petals, 2nd round of petals,” etc. Because each petal round shares its space with the increase round below it, they are not counted as part of the pattern’s total rounds.
    • CH1 on the increase rounds does not count as a stitch.
    • Be mindful that the pattern alternates in calling for FLO (Front Loops Only) and BLO (Back Loops Only).
    • Each round of petals has 12 total petals. The first round of petals will cover 1 ST (of the previous round) per petal. The 2nd round of petals will cover 2 STS per petal, the 3rd round 3 STS, and so on.


    PART 1: THE FLOWER

    Begin with a Magic Circle; CH1.

    Round 1: 12 DC in MC. Join with a SL ST to first DC. (12)

    1st Round of Petals (FLO – don’t miss this!): CH2. In same St, 2DC, CH2, SL ST. This is your first petal. (SL ST to next St. In same St, CH2, 2DC, CH2, SL ST to same St) around. SL ST to base of 1st CH2. (12 petals)
    The Never Ending Wildflower  |  Free Crochet Pattern by Little Monkeys Crochet

    Round 2 (BLO – You’re now going to work around Round 1 again, this time working in the loop that you ignored during the first round of petals): SL ST to 1st back loop of Round 1. CH1. 2DC in same ST. 2 DC in each ST around. Join with a SL ST to first DC. (24)
    The Never Ending Wildflower  |  Free Crochet Pattern by Little Monkeys Crochet

    2nd Round of Petals (FLO): CH2. DC in same ST. In next ST, DC, CH2, SL ST. (SL ST to next St, CH2, DC in same ST. In next ST, DC, CH2, SL ST) around. SL ST to base of 1st CH2. (12 petals)

    Round 3 (BLO): SL ST to 1st back loop of Round 2. CH1. 2DC in same ST, DC in next ST. (2DC in next ST, DC in next ST) around. Join with a SL ST to first DC. (36)

    3rd Round of Petals (FLO): CH2. DC in same ST. 2TR in next ST. In next ST, DC, CH2, SL ST. (SL ST to next ST, CH2, DC in same ST. 2TR in next ST. In next ST, DC, CH2, SL ST) around. SL ST to base of 1st CH2. (12 petals)

    Round 4 (BLO): SL ST to 1st back loop of Round 3. CH1. 2DC in same ST, DC in each of the next 2 STS. (2DC in next ST, DC in each of the next 2 STS) around. Join with a SL ST to first DC. (48)

    4th Round of Petals (FLO): CH2. DC in same ST. 2TR in next ST. 2 TR in next ST. In next ST, DC, CH2, SL ST. (SL ST to next ST, CH2, DC in same ST. 2TR in next ST. 2 TR in next ST. In next ST, DC, CH2, SL ST) around. SL ST to base of 1st CH2. To complete flower, SL ST to 1st BLO of Round 4. (12 petals)

    Change colors if desired.


    PART 2: THE GRANNY SQUARE

    Round 5: CH2 (does not count as a stitch, here and throughout the rest of the pattern). In same ST, 2DC, CH2, 2DC. DC in next. HDC in each of the next 3 STS. SC in each of the next 3 STS. HDC in each of the next 3 STS. DC in next ST. (In next ST, 2DC, CH2, 2DC. DC in next. HDC in each of the next 3 STS. SC in each of the next 3 STS. HDC in each of the next 3 STS. DC in next ST) 3 times. Join to 1st DC of the round with a SL ST. (Total STS per side, not including the corner CH2s, is 15.)

    Round 6: CH2. DC around, putting (2DC, CH2, 2DC) in each corner chain space. Join to 1st DC of the round with a SL ST. (Total STS per side, not including the corner CH2s, is 19.)

    Round 7: CH2. DC around, putting (2DC, CH2, 2DC) in each corner chain space. Join to 1st DC of the round with a SL ST. (Total STS per side, not including the corner CH2s, is 23.)

    Round 8: CH2. DC around, putting (2DC, CH2, 2DC) in each corner chain space. Join to 1st DC of the round with a SL ST. (Total STS per side, not including the corner CH2s, is 27.)

    Round 9: CH2. DC around, putting (2DC, CH2, 2DC) in each corner chain space. Join to 1st DC of the round with a SL ST. (Total STS per side, not including the corner CH2s, is 31.)

    Round 10: CH2. DC around, putting (2DC, CH2, 2DC) in each corner chain space. Join to 1st DC of the round with a SL ST. (Total STS per side, not including the corner CH2s, is 35.)

    Fasten off and weave in all ends.

  • Buttoned Throw Pillow

    Buttoned Throw Pillow

    I’ve been watching a lot of HGTV lately. We purchased our first house this past fall, and for the first time in my life, I have the final say (well, with the husband of course) on what my home looks like! We’ve already tackled our dining room, painting it the most beautiful shade of blue. Next on the list? The living room! While it’ll take us a little while to save the money for this next makeover, that doesn’t stop me from imagining the possibilities.  So, when I see the big reveals on shows like Fixer Upper (my favorite!) and Love It Or List It (also a great one), I can’t help but analyze all of their design choices and make mental notes of which ones would fit nicely into my own dream living room.

    One thing I know for sure about my living room makeover is that I want it to incorporate a few of my own handmade items. I can definitely see my Mason Jar Cozy up on the fireplace mantel, and a larger version of my Sweet Ocean Breeze blanket draped over the couch. This newest project, the Buttoned Throw Pillow, is just one more way to incorporate my yarn obsession into the space!

    This pattern is for a 12″ throw pillow, but it’s not difficult to make bigger (or smaller). I’ve included those directions in the notes section of the pattern.

    Prefer a PDF?

    This pattern can be completed using the 100% free version right here on this page. However, many people prefer the convenience of a printable, ad-free PDF.

    All-Access Passholders get the ad-free version of this and all of my other blog patterns. It’s a pretty sweet deal, if I do say so myself! Learn more about it here or continuing scrolling for the free version.

    12″ BUTTONED THROW PILLOW

    Hook: H (5.00mm)
    Yarn: About 260 yards (130 per side) of your favorite medium worsted weight yarn
    Difficulty: Easy
    Gauge: 4 rows of 4 SC = 1 square inch
    You’ll also need: 12″ uncovered throw pillow (I got mine at Hobby Lobby), yarn needle, decorative buttons of your choice, and tools to attach buttons.

    Notes:
    (1) This pattern is worked in American Standard Terms.
    (2) The buttons are decorative only, so I didn’t worry about adding button holes. If you wanted to make this a removable pillowcase, you could probably figure it out pretty easily. I really wanted the raised seam look all the way around the pillow so I opted not to overlap the fabric.
    (3) To make the pattern for a larger or smaller pillow, just make sure to begin with an odd number of chains. Your starting chain and first row, when stretched, should barely touch both seams of your insert pillow (keeping in mind that you’ll be adding a couple small rows of border at the end).

    PATTERN FOR FRONT SIDE:

    Ch 37.
    Row 1: SC in 2nd Ch from hook and in each Ch across. (36)
    Row 2: Ch 1, turn. SC in each St across. (36)
    Rows 3-6: Repeat Row 2.
    Row 7: Ch 1, turn. Sk 1st St. SC+DC in next St. (Sk next St, SC+DC in next St) across. (36)
    Rows 8-36: Repeat Row 7.

    Edging:
    Round 1: Ch 1. SC evenly around all 4 sides of pillow, putting (SC, Ch1, SC) in each corner. Join with Sl St to 1st SC. You should have 36 SC on each side.
    Round 2: Ch 1. SC evenly around all 4 sides of pillow, putting (SC, Ch1, SC) in each corner. Join with Sl St to 1st SC. You should have 38 SC on each side. Fasten off and weave in ends.
    Finishing:
    Attach buttons evenly spaced down the 1st 6 rows of the pillow (where you did the SCs only).

    PATTERN FOR BACK SIDE:

    Ch 37.
    Row 1: SC+DC in 3rd Ch from hook. (Sk next St, SC+DC in next St) across. (36)
    Row 2: Ch 1. Sk 1st St. SC+DC in next St. (Sk next St, SC+DC in next St) across. (36)
    Rows 3-36: Repeat Row 2.

    Edging:
    Round 1: Ch 1. SC evenly around all 4 sides of pillow, putting (SC, Ch1, SC) in each corner. Join with Sl St to 1st SC. You should have 36 SC on each side.
    Round 2: Ch 1. SC evenly around all 4 sides of pillow, putting (SC, Ch1, SC) in each corner. Join with Sl St to 1st SC. You should have 38 SC on each side. Fasten off and weave in ends.
    Sewing Sides Together:
    Hold both sides together as you want them to be placed on the pillow. Join your yarn through both pieces, somewhere on the edge (I started in a corner). Ch1, then SC through the lined-up stitches from both pieces, seaming them together. Continue around 3 sides of the pillow, putting (SC, Ch1, SC) in each corner. Insert pillow. Continue to SC along the remaining side, enclosing the pillow completely. Join with a Sl St to the first SC of the round, fasten off and weave in ends.

  • Mason Jar Cover

    Mason Jar Cover

    This past fall, our family moved from Indiana to Michigan. We purchased a cute little house (our first!) and settled in just in time to see the huge tree in the front yard shed its fire-red leaves, and before we’d even unpacked everything, the winter chill was moving in. So you’ll understand what I’m saying when I tell you that I’ve waited rather impatiently for spring to come. We’ve never had a nice backyard, but we do now; and it even comes with a cute porch that’s just begging for some DIY decor!

    My first project? Mason jar cozies. I wanted to make something that would look cute during the day and, with the addition of a tea light, would cast a beautiful patterned shadow around it at night for those summer campfire evenings. I think a line of these would look stunning in the dark.

    Mason Jar Cozy | Free Crochet Pattern by Little Monkeys Crochet (lwww.littlemonkeyscrochet.com)

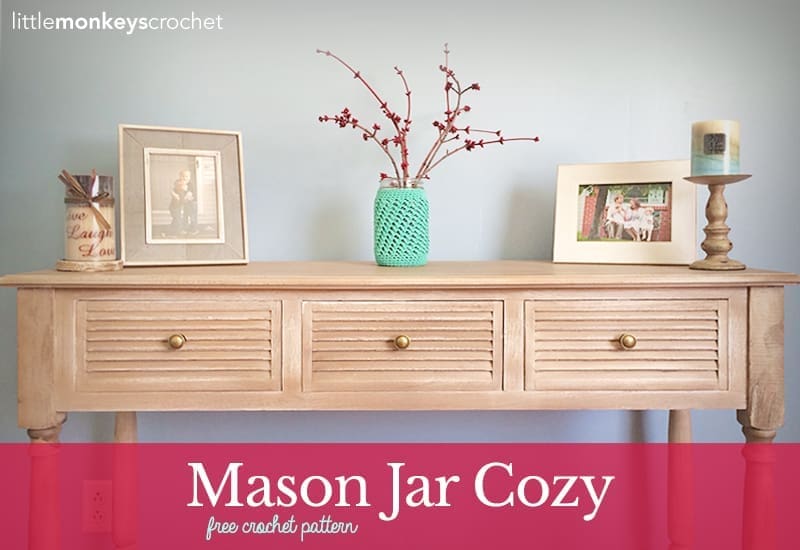
    Of course, once I started to crochet, more ideas came into my mind for these cute mason jar cozies. They will look adorable as a vase for fresh flowers, or as part of a front porch “welcome” display. As you can see in my photos, I even got my husband to cut me some small budding limbs off of the big tree in our front yard, and now one of my cozies is on display in our dining room!

    Mason Jar Cozy | Free Crochet Pattern by Little Monkeys Crochet (lwww.littlemonkeyscrochet.com)

    There are about as many uses for mason jars as there are stars in the sky, so why not make them look extra pretty too? I used wide-mouthed Ball Mason Jars in two different sizes (32oz and 16oz). Scroll down for the pattern in both sizes!

    Mason Jar Cozy | Free Crochet Pattern by Little Monkeys Crochet (lwww.littlemonkeyscrochet.com)

    Prefer a PDF?

    This pattern can be completed using the 100% free version right here on this page. However, many people prefer the convenience of a printable, ad-free PDF.

    All-Access Passholders get the ad-free version of this and all of my other blog patterns. It’s a pretty sweet deal, if I do say so myself! Learn more about it here or continuing scrolling for the free version.

    MASON JAR COZY (FOR A BALL® 32OZ WIDE MOUTH QUART JAR)

    Hook: H (5.00mm)
    Yarn: Less than 1.5 oz of light (3) cotton yarn (I used Sinfonia in “Verde”)
    Difficulty: Easy
    Gauge: After you complete round 4, the diameter of your circle should measure about 3″.

    Notes:
    (1) This pattern is worked in American Standard Terms.
    (2) This pattern is worked in a seamless round. Do not join at the end of rounds or chain unless instructed. Use a stitch marker to keep track of the beginning of your rounds.

    THE PATTERN:

    Begin with a Magic Circle.

    Round 1: 10 HDC in magic circle (10)
    Round 2: 2 HDC in each St around (20)
    Round 3: (2 HDC in next, 1 HDC in next) around (30)
    Round 4: (2 HDC in next, 1 HDC in each of the next 2 Sts) around (40)
    Rounds 5-9: SC in each St around (40)
    Round 10: (SC+DC in next St, SK next St) around (40)
    Rounds 11-24 (or until just before the cozy comes to the point on the mason jar where the jar begins to narrow again): Repeat Round 10 (40)
    Rounds 25-28: SC tightly in each St around (40)

    Finish by slip stitching into the next 3 stitches to smooth out the final row. Fasten off and weave in ends.


    MASON JAR COZY (FOR A BALL® 16OZ WIDE MOUTH PINT JAR)

    Hook: H (5.00mm)
    Yarn: Less than 1 oz of light (3) cotton yarn (I used Sinfonia in “Verde”)
    Difficulty: Easy
    Gauge: After you complete round 3, the diameter of your circle should measure about 2.25″.

    Notes:
    (1) This pattern is worked in American Standard Terms.
    (2) This pattern is worked in a seamless round. Do not join at the end of rounds or chain unless instructed. Use a stitch marker to keep track of the beginning of your rounds.

    THE PATTERN:

    Begin with a Magic Circle.

    Round 1: 10 HDC in magic circle (10)
    Round 2: 2 HDC in each St around (20)
    Round 3: (2 HDC in next, 1 HDC in next) around (30)
    Round 4: 2 HDC in next St, 1 HDC in each of the next 6 Sts, 2 HDC in next St, 1 HDC in each of the next 7 Sts. Repeat. (34)
    Rounds 5-9: SC in each St around (34)
    Round 10: (SC+DC in next St, SK next St) around (34)
    Rounds 11-19 (or until just before the cozy comes to the point on the mason jar where the jar begins to narrow again): Repeat Round 10 (34)
    Rounds 20-23: SC tightly in each St around (34)

    Finish by slip stitching into the next 3 stitches to smooth out the final row. Fasten off and weave in ends.

  • Wildflower Granny Square No. 2

    Wildflower Granny Square No. 2

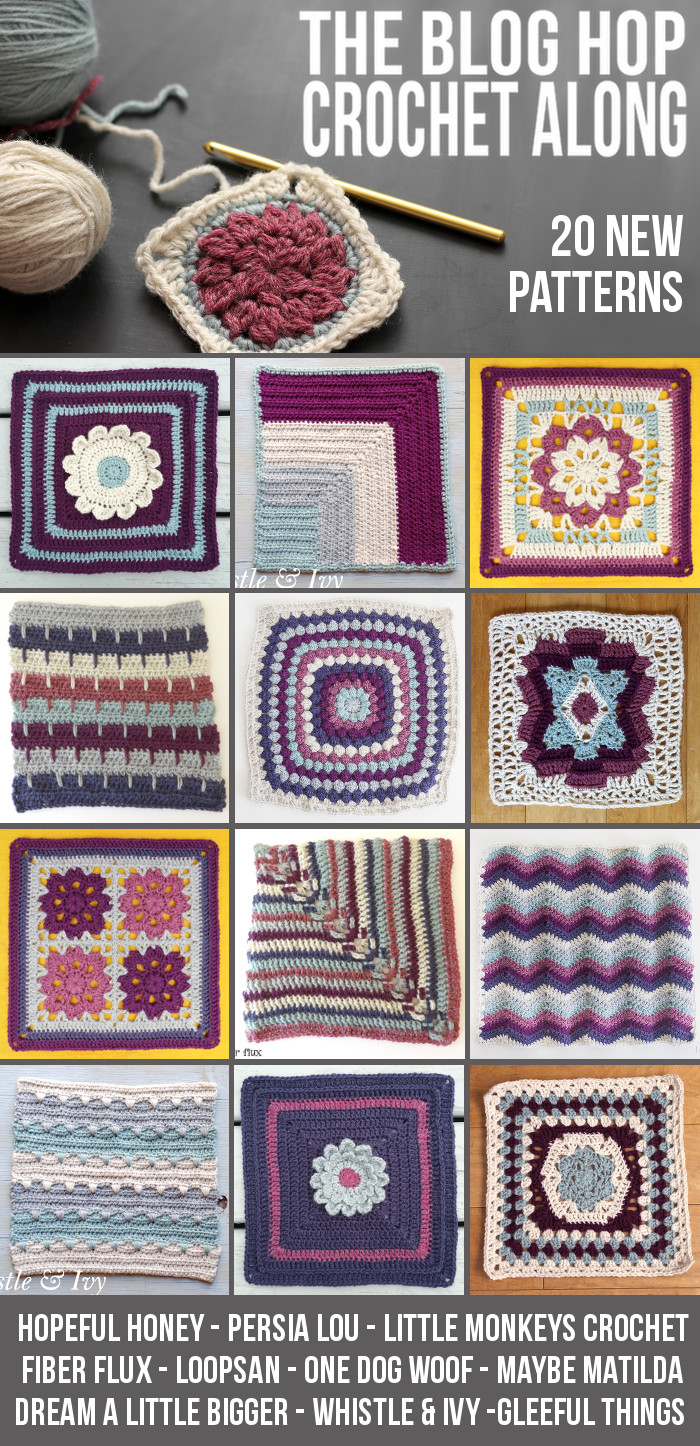
    Today I am excited to be joining The Blog Hop Crochet Along! Nine other bloggers and I are teaming up to release a new afghan square pattern every day for a month. Crochet along with us and you will have a gorgeous new afghan just in time for the holiday season!

    Here’s how it is going to work:

    • Every day (M-F) a new square pattern will be posted on one of our ten blogs.
    • You can join in the fun by crocheting each day’s square on that day whenever you have time.
    • Share your progress and post photos of your squares in our facebook group.
    • By the end of the Crochet Along you will have twenty 12″ squares all ready to be pieced together into a beautiful afghan just in time for the holiday season.
    • Finally, we will be hosting some fabulous giveaways! You could win Lion Brand yarn to make your own afghan, $100 CASH money, OR our COMPLETED AFGHAN! That’s right, we are going to be piecing all of our squares together and shipping an afghan out to one very lucky winner.


    Hopeful Honey – Persia Lou – Little Monkeys Crochet
    Fiber Flux – Loopsan One Dog Woof – Maybe Matilda
    Dream a Little Bigger – Whistle & Ivy  – Gleeful Things

    —
    —

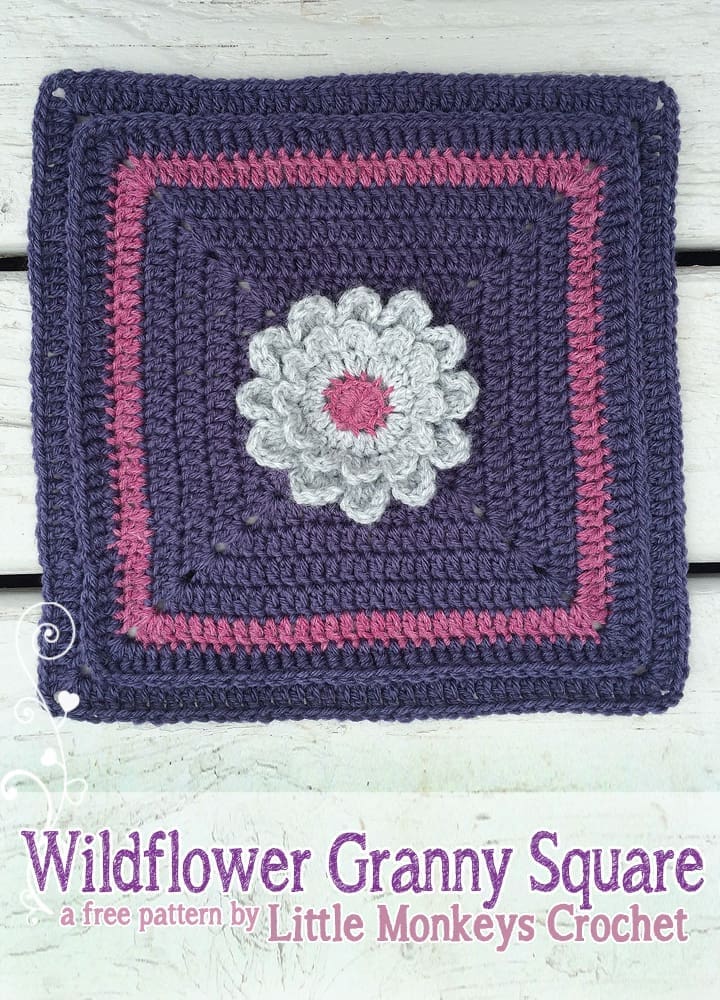
    Today I am sharing the 12″ Wildflower Granny Square [No. 2]. This, like my last Square-A-Day contribution, is a modified version of my much smaller Wildflower Granny Square. You can find links to all the other participating patterns at the end of this post. The links will be updated daily!

    – – – – – – – – – – – – – – – – – – – – – – – – – – – – – – – – – –

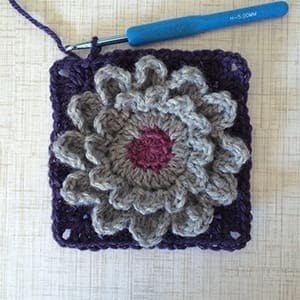
    12" Wildflower Granny Square from Square-A-Day CrochetAlong | Free Crochet Pattern by Little Monkeys Crochet


    12″ WILDFLOWER GRANNY SQUARE [NO. 2]

    Finished Size: About 12″ square
    Abbreviations Used: 

    • Ch – Chain
    • Sl St – Slip Stitch
    • SC – Single Crochet
    • HDC – Half Double Crochet
    • DC – Double Crochet
    • TR- Treble (or Triple) Crochet
    • FLO – Front Loops Only
    • BLO- Back Loops Only
    • BPDC – Back Post Double Crochet

    Yarn: Medium worsted (I used Wool-Ease from Lion Brand)
    Hook: Size H (5.00mm)
    Notes:
    (1) Pattern is written in American standard terms.
    (2) The square is built around the flower (so the flower will not need to be attached at the end).
    (3) Beginning chains do NOT count as the first stitch in the final row count. When joining, you’ll slip stitch to the top of the first stitch (not the chain).
    (4) I’ve included [New Color] in the pattern whenever I chose to change colors. I think it looks cleaner to attach a new color before joining at the end of a row, but you do what’s familiar to you. The Lion Brand Wool-Ease colors I used in the photo above, in order of introduction, are Dark Rose Heather, Grey Heather, and Violet.
    (5) Don’t overlook the switch to Back Post Double Crochet (BPDC) for round 11! Lots of people missed that part of my first Blog Hop contribution square, but I think it adds so much to the finished product. 🙂

    – – – – – – – – – – – – – – – – – – – – – – – – – – – – – – – – – –

    THE FLOWER:

    Begin with a Magic Circle.

    Round 1: Ch1. 12 HDC in Magic Circle. [New Color] Join to the top of the first HDC with a Sl St. (12)

    Round 2 (work this round in BLO): Ch2; 2 HDC in same. 2 HDC in next and in each St around. Join to the top of the first HDC with a Sl St. Take a moment to weave in the tails from the first color, and the starting tail of the current color. It will help to get them out of the way. (24)

    The next round is worked in 2 parts: the petals, and then the base behind it. Just follow the instructions and you’ll be fine. 🙂

    Round 3, part 1 (work this round in FLO): Ch2. DC in same. DC in next; Ch2 and Sl St to same St. This is your first petal. (Sl St to next st. Ch 2. DC in same. DC in next. Ch2 and Sl St to same St) around, for a total of 12 petals.

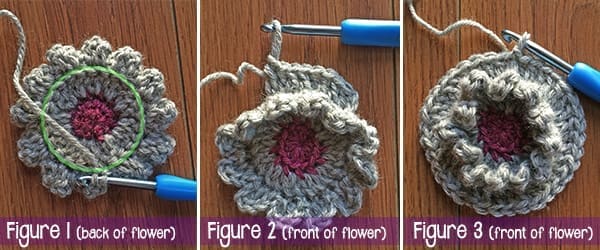
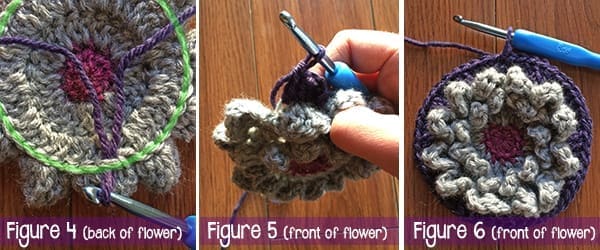
    Round 3, part 2: Turn flower over. You will see a circle that is made up of the back loops that we didn’t use in Round 3.1 (I’ve highlighted this circle in green in the photo below). These are the loops we will use now. Ch1; Sl St into the nearest loop [See Figure 1]. Ch2; 2 DC in same, DC in next. (2 DC in next, DC in next) around [Figure 2]. Join to the top of the first DC with a Sl St [Figure 3]. (36)

    12" Wildflower Granny Square from Square-A-Day CrochetAlong | Free Crochet Pattern by Little Monkeys Crochet

    Round 4, part 1 (work this round in FLO):  Ch2. DC in same St. 2 TR in next. DC in next. Ch2 and Sl St to same St. This is your first petal. (Sl St to next St. Ch2. DC in same. 2 TR in next. DC in next. Ch2 and Sl St to same St) around, for a total of 12 petals.

    THE SQUARE:

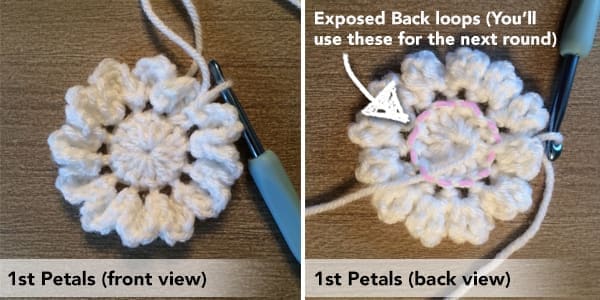
    Fasten off and weave in the tail. Turn flower over to view a new circle of back loops, just like the ones from Round 3. Attach [New Color] yarn via one of the loops [Figure 4].

    12" Wildflower Granny Square from Square-A-Day CrochetAlong | Free Crochet Pattern by Little Monkeys Crochet

    Round 4, part 2:  Ch2. 2DC in same St, DC in each of the next 2 Sts. (2DC in next, DC in each of the next 2 Sts) around. Join to the top of the first DC with a Sl St. (48)

    Round 5:  Ch2. In same St: 2 DC, Ch2, 2 DC (first corner). DC in next St. HDC in each of the next 3 Sts. SC in each of the next 3 Sts. HDC in each of the next 3 Sts. DC in next St. (In next St: 2 DC, Ch2, 2 DC. DC in next St. HDC in each of the next 3 Sts. SC in each of the next 3 Sts. HDC in each of the next 3 Sts. DC in next St.) Repeat ( ) 2 more times. Join to the top of the first DC with a Sl St.

    12" Wildflower Granny Square from Square-A-Day CrochetAlong | Free Crochet Pattern by Little Monkeys Crochet

    Round 6:  Ch2. DC in same St and in each St around, putting (2 DC + CH2 + 2 DC) in each CH2 corner space from previous round. Join to the top of the first DC with a Sl St. (When you complete this round, there should be 19 DCs on each side.)

    Round 7:  Ch2. DC in same St and in each St around, putting (2 DC + CH2 + 2 DC) in each CH2 corner space from previous round. Join to the top of the first DC with a Sl St. (When you complete this round, there should be 23 DCs on each side.)

    Round 8:  Ch2. DC in same St and in each St around, putting (2 DC + CH2 + 2 DC) in each CH2 corner space from previous round. [New Color] Join to the top of the first DC with a Sl St. (When you complete this round, there should be 27 DCs on each side.)

    Round 9:  Ch2. DC in same St and in each St around, putting (2 DC + CH2 + 2 DC) in each CH2 corner space from previous round. [New Color] Join to the top of the first DC with a Sl St. (When you complete this round, there should be 31 DCs on each side.)

    Round 10:  Ch2. DC in same St and in each St around, putting (2 DC + CH2 + 2 DC) in each CH2 corner space from previous round. Join to the top of the first DC with a Sl St. (When you complete this round, there should be 35 DCs on each side.)

    Round 11 (note the change to BPDC): Ch2. BPDC in same St and in each St around, but when you come to corner spaces, simply CH2; then begin with your BPDCs across the next side. Join to the top of the first BPDC with a Sl St.(When you complete this round, there should be 35 BPDCs on each side.)

    Round 12:  Ch2. DC in same St and in each St around, putting (2 DC + CH2 + 2 DC) in each CH2 corner space from previous round. Join to the top of the first DC with a Sl St. (When you complete this round, there should be 39 DCs on each side.)

    Fasten off and weave in ends.