Category: Home Decor

  • Mosaic Basket

    Mosaic Basket

    I am so excited about this pattern! I am totally in love with the effect on the outside of these baskets. I just feel like the finished product is so unique and I love how the two different yarn colors come together to form what reminds me of a piece of mosaic art. And the best part is, it’s so easy to do!

    Choosing Your Yarn

    The first thing you need to do is decide what yarns to use. I highly recommend starting with a neutral-colored bulky yarn, such as white, ivory, or gray. I used Bernat Maker Home Dec in “Cream” as the base for my baskets in the sample photos. Next, you need to choose a worsted weight yarn that will work well with your base color… and this is where you get to go a little crazy, because there are so many options! In the main photo above, I used one of my favorite colorways, Urban Chic in “Juneberry Breeze”. In the baskets pictured below, I used Hobby Lobby’s I Love This Yarn in Aqua Blue Gradient:

    And here it is in the medium size with Hobby Lobby’s I Love This Cotton in “Pink/Teal/Orange” (that’s one colorway):

    If you go with a color-changing yarn like I did, make sure the color changes aren’t toooooooo long. I love a nice gradual change, but as you can see on the main photos (with the Aqua Blue Gradient yarn), the yarn didn’t really change throughout the entire large-sized basket. I actually had to pull out quite a bit of yarn to get to a significant color change so that the smaller matching baskets wouldn’t be exactly the same.

    About Those Cute Leather Tags

    Those adorable tags on my baskets aren’t actually leather at all – they’re cork! I had mine printed by All This Wood (affiliate link). They always do a great job for me. If you purchase tags of your own through this link, you won’t pay any extra, but I’ll get a small percentage of the sale. My affiliate links are just one of the ways I am able to keep releasing free patterns, so I am always incredibly appreciative of anyone who uses them!

    Video Tutorial

    As simple as this pattern really is, I knew as I was typing it up that it wasn’t going to sound as simple on the page. Sometimes it’s easier to just watch someone else make it, so I’ve put together a video tutorial to assist you throughout. And like all Yarn + Chai tutorials, the pattern is written in full right on the screen so that you can follow along. I get tons of compliments about this tutorial feature, so it’s definitely worth the extra effort it takes to include it!

    Prefer a PDF?

    This pattern can be completed using the 100% free version right here on this page. However, many people prefer the convenience of a printable, ad-free PDF.

    All-Access Passholders get the ad-free version of this and all of my other blog patterns. It’s a pretty sweet deal, if I do say so myself! Learn more about it here or continuing scrolling for the free version.

    MOSAIC BASKET

    View on Ravelry

    Difficulty: Easy

    Yarn: I used Bernat Maker Home Dec (a #5 bulky weight cotton/nylon blend) in “Cream”, and Hobby Lobby I Love This Yarn (a #4 worsted weight acrylic) in “Aqua Blue”. Yarn amounts are listed with individual pattern sizes.

    Hooks: H (5.0mm) and G (4.25mm)

    Gauge: Your first 5 rounds should measure 2.5″ across.

    You’ll also need: Yarn needle, stitch marker, plastic canvas

    Terms and Abbreviations:
    MC (magic circle – view tutorial here)
    ST/STS
     (stitch/stitches)
    SL ST (slip stitch)
    SK (skip)
    CH (chain)
    SC (single crochet)
    HDC (half double crochet)
    SC Spike Stitch (see Special Stitches, below)
    3rd Loop (see Special Stitches, below)

    Special Stitches:

    SC Spike Stitch: Instead of inserting your hook into the top loops of the stitch, insert them into its base, then complete an SC. This will wrap your SCs over the top of the SCs from the previous round.

    SL ST Spike Stitch: Follow instructions for SC Spike Stitch, but instead of completing an SC, complete a SL ST.

    3rd Loop: Half double crochet stitches have a 3rd loop that we utilize in this pattern. For this pattern the 3rd loop can be found just below the front loop on the side of the work that is facing away from you. When instructed to work in “3rd loop only”, reach over the two top loops and insert your hook into this special loop. This creates a delicate braided look on the right side of the pattern. Also called Camel Stitch or RibHDC.

    Notes:
    (1) This pattern is written in American Standard Terms.
    (2) IMPORTANT: Most of this pattern is worked seamlessly, but a small portion is worked in joined rounds. Pay attention, and only join, chain and/or turn when specifically instructed. Use a stitch marker to mark the beginning of your rounds when working seamlessly.
    (3) The finished size of each basket is listed on its individual pattern.
    (4) Because we utilize the SC Spike Stitch for entire rounds throughout the pattern, we will be referring to those rounds as an extension of the SC rounds they are being worked into. For example, if Round 15 is a round of SC, then the very next round which places spike stitches on top of those SCs will be referred to as Round 15B. This just makes for easier counting.

    – – – – – – – – – – – – – – –

    SMALL BASKET

    Yardage: 50 yards bulky, 20 yards worsted or DK
    Finished Size: 3.5″ wide x 2.25″ tall

    To Begin: With larger hook and bulky yarn, make a magic circle; CH1 (does not count as a stitch).

    Round 1: 6SC in MC. (6)

    Round 2: 2SC in each ST around. (12)

    Round 3: (2SC in next ST, SC in next ST) around. (18)

    Round 4: (SC in next ST, 2SC in next ST, SC in next ST) around. (24)

    Round 5: (2SC in next ST, SC in each of the next 3 STS) around. (30)

    Round 6: (SC in each of the next 2 STS, 2SC in next ST, SC in each of the next 2 STS) around. (36)

    Round 7: SC in each ST around. Pull the loop on your hook up a couple inches so it doesn’t unravel, then remove your hook. (36)

    Round 7B: Insert hook into top loops of next ST; attach worsted weight yarn and CH1; SC in same ST. SC Spike Stitch into next ST and each remaining ST. Pull the loop on your hook up a couple inches so it doesn’t unravel, then remove your hook. (36)

    Round 8: Reinsert hook into loop from bulky yarn. SC in each ST around (you’re working in the top loops of the SC Spike Stitches from the previous round). Remove hook. (36)

    Round 8B: Reinsert hook into loop from worsted yarn. SC Spike Stitch in each ST around. Remove hook. (36)

    Rounds 9-11B: Repeat Rounds 8-8B. (36)

    Round 12: Reinsert hook into loop from bulky yarn. SC in each of the next 34 STS (2 STS remain). SL ST in each of the remaining 2 STS. Remove hook. (36)

    Round 12B: Reinsert hook into loop from worsted yarn. SC Spike Stitch into each of the next 34 STS (2 STS remain). SL ST Spike Stitch into each of the remaining 2 STS. Remove hook. (36)

    Fasten off thinner yarn – you won’t need it anymore.

    Round 13: Reinsert hook into loop from bulky yarn. Join with a SL ST to the next ST (the first ST of the previous round). CH1. HDC in each ST around. Join with a SL ST to the top of the first HDC. (36)

    Switch to smaller hook.

    Round 14: CH1. SC in 3rd loop of each ST around. Do not join. (36)

    Rounds 15-21: SC in each ST around. (36)

    Round 22: SC in each of the next 34 STS (2 STS remain). SL ST in each of the remaining 2 STS. (36)

    Fasten off and weave in ends. Proceed to “Adding Plastic Canvas” (after instructions for large basket).

    – – – – – – – – – – – – – – –

    MEDIUM BASKET

    Yardage: 95 yards bulky, 40 yards worsted or DK
    Finished Size: 5″ wide x 2.75″ tall

    To Begin: With larger hook and bulky yarn, make a magic circle; CH1 (does not count as a stitch).

    Round 1: 6SC in MC. (6)

    Round 2: 2SC in each ST around. (12)

    Round 3: (2SC in next ST, SC in next ST) around. (18)

    Round 4: (SC in next ST, 2SC in next ST, SC in next ST) around. (24)

    Round 5: (2SC in next ST, SC in each of the next 3 STS) around. (30)

    Round 6: (SC in each of the next 2 STS, 2SC in next ST, SC in each of the next 2 STS) around. (36)

    Round 7: (2SC in next ST, SC in each of the next 5 STS) around. (42)

    Round 8: (SC in each of the next 3 STS, 2SC in next ST, SC in each of the next 3 STS) around. (48)

    Round 9: (2SC in next ST, SC in each of the next 7 STS) around. (54)

    Round 10: SC in each ST around. Pull the loop on your hook up a couple inches so it doesn’t unravel, then remove your hook. (54)

    Round 10B: Insert hook into top loops of next ST; attach worsted weight yarn and CH1; SC in same ST. SC Spike Stitch into next ST and each remaining ST. Pull the loop on your hook up a couple inches so it doesn’t unravel, then remove your hook. (54)

    Round 11: Reinsert hook into loop from bulky yarn. SC in each ST around (you’re working in the top loops of the SC Spike Stitches from the previous round). Remove hook. (54)

    Round 11B: Reinsert hook into loop from worsted yarn. SC Spike Stitch in each ST around. Remove hook. (54)

    Rounds 12-16B: Repeat Rounds 11-11B. (54)

    Round 17: Reinsert hook into loop from bulky yarn. SC in each of the next 52 STS (2 STS remain). SL ST in each of the remaining 2 STS. Remove hook. (54)

    Round 17B: Reinsert hook into loop from worsted yarn. SC Spike Stitch into each of the next 52 STS (2 STS remain). SL ST Spike Stitch into each of the remaining 2 STS. Remove hook. (54)

    Fasten off worsted yarn – you won’t need it anymore.

    Round 18: Reinsert hook into loop from bulky yarn. Join with a SL ST to the next ST (the first ST of the previous round). CH1. HDC in each ST around. Join with a SL ST to the top of the first HDC. (54)

    Switch to smaller hook.

    Round 19: CH1. SC in 3rd loop of each ST around. Do not join. (54)

    Rounds 20-29: SC in each ST around. (54)

    Round 30: SC in each of the next 52 STS (2 STS remain). SL ST in each of the remaining 2 STS. (54)

    Fasten off and weave in ends. Proceed to “Adding Plastic Canvas” (after instructions for large basket).

    – – – – – – – – – – – – – – –

    LARGE BASKET

    Yardage: 145 yards bulky, 60 yards worsted or DK
    Finished Size: 6.5″ wide x 3″ tall

    To Begin: With larger hook and bulky yarn, make a magic circle; CH1 (does not count as a stitch).

    Round 1: 6SC in MC. (6)

    Round 2: 2SC in each ST around. (12)

    Round 3: (2SC in next ST, SC in next ST) around. (18)

    Round 4: (SC in next ST, 2SC in next ST, SC in next ST) around. (24)

    Round 5: (2SC in next ST, SC in each of the next 3 STS) around. (30)

    Round 6: (SC in each of the next 2 STS, 2SC in next ST, SC in each of the next 2 STS) around. (36)

    Round 7: (2SC in next ST, SC in each of the next 5 STS) around. (42)

    Round 8: (SC in each of the next 3 STS, 2SC in next ST, SC in each of the next 3 STS) around. (48)

    Round 9: (2SC in next ST, SC in each of the next 7 STS) around. (54)

    Round 10: (SC in each of the next 4 STS, 2SC in next ST, SC in each of the next 4 STS) around. (60)

    Round 11: (2SC in next ST, SC in each of the next 9 STS) around. (66)

    Round 12: (SC in each of the next 5 STS, 2SC in next ST, SC in each of the next 5 STS) around. (72)

    Round 13: SC in each ST around. Pull the loop on your hook up a couple inches so it doesn’t unravel, then remove your hook. (72)

    Round 13B: Insert hook into top loops of next ST; attach worsted weight yarn and CH1; SC in same ST. SC Spike Stitch into next ST and each remaining ST. Pull the loop on your hook up a couple inches so it doesn’t unravel, then remove your hook. (72)

    Round 14: Reinsert hook into loop from bulky yarn. SC in each ST around (you’re working in the top loops of the SC Spike Stitches from the previous round). Remove hook. (72)

    Round 14B: Reinsert hook into loop from worsted yarn. SC Spike Stitch in each ST around. Remove hook. (72)

    Rounds 15-21B: Repeat Rounds 14-14B. (72)

    Round 22: Reinsert hook into loop from bulky yarn. SC in each of the next 70 STS (2 STS remain). SL ST in each of the remaining 2 STS. Remove hook. (72)

    Round 22-B: Reinsert hook into loop from worsted yarn. SC Spike Stitch into each of the next 70 STS (2 STS remain). SL ST Spike Stitch into each of the remaining 2 STS. Remove hook. (72)

    Fasten off worsted yarn – you won’t need it anymore.

    Round 23: Reinsert hook into loop from bulky yarn. Join with a SL ST to the next ST (the first ST of the previous round). CH1. HDC in each ST around. Join with a SL ST to the top of the first HDC. (72)

    Switch to smaller hook.

    Round 24: CH1. SC in 3rd loop of each ST around. Do not join. (72)

    Rounds 25-36: SC in each ST around. (72)

    Round 37: SC in each of the next 70 STS (2 STS remain). SL ST in each of the remaining 2 STS. (72)

    Fasten off and weave in ends. Proceed to “Adding Plastic Canvas”.

    – – – – – – – – – – – – – – –

    Adding Plastic Canvas

    Cut across your plastic canvas to make strips that are the same height as the inner layer of the basket. Set your basket so that it is completely unfolded. Roll up a strip of canvas and insert it into the bottom of the basket, allowing it to expand up against the walls of the basket. Continue adding as many layers as you want to make it as stiff as you want. Fold the inside layer down over the canvas. Work the fabric until it all lays neat and flat.

    You’re done!

    I hope you enjoyed this tutorial. If you’re sharing your baskets on social media, be sure to use hashtag #ycmosaicbasket and tag me @yarnandchai.design!

  • Nautical Basket

    Nautical Basket

    I love nautical decor. (Sidenote – the word “nautical” always makes me giggle because my boys love the movie “Boss Baby” and there’s a part where the older brother is trying to get the baby into this obnoxious blue and white striped outfit and the baby screams “I DON’T DO NAUTICAL! IT’S NOT EVEN FRIDAY!” My boys ran around the house for like a week yelling that line before they finally asked me one day, “Mommy, what does nautical mean?” But I digress.)

    If you love the feel of the ocean breeze as much as I do, you’ll love making these super easy baskets that look like something out of a catalog. If you haven’t done grommets or eyelets on a crochet project before, don’t run away. I promise it’s easy-peasy. And you can’t beat the professional finishing touch they give to these baskets!

    How It’s Constructed

    I make my baskets a little different than the traditional way. I’ve made baskets before and never found them enjoyable because they required such tiny hooks to get the thick yarn nice and stiff, and even then, they weren’t that stiff. And my hands always ached. So, for my baskets, I use a double-layer method that relies on plastic canvas to get them really stiff and sturdy. It requires a little extra time, but a whole lot less wrist pain!

    Choosing Your Yarn

    For the Nautical Baskets, you’ll want to look for a #5 weight (chunky/bulky) yarn. I used Bernat Maker Outdoor, which is an acrylic/nylon mix, but there are many chunky yarns out there that will work. Just find something that you like the look of and has the colors you want to use, and avoid anything that’s super soft.

    Choosing Your Colors

    With a nautical theme in mind, I chose navy and white for my basket. But of course, you can use any color(s) you want! I think a deep red and white would be a beautiful compliment to the navy and white.

    Additional Features

    I add extra little features to my patterns whenever I can, because I think a little fabric or metal can add such a professional touch to handmade items. Here’s what I used in these baskets:

    Rope Handles

    You can find rope at pretty much any craft store, often in several different departments, sold in packages or by-the-yard; just look for the 3/8″ size. For this project, I chose a natural rope that I had leftover from another project. For the large basket, you’ll need two 20″ lengths. For the small basket, you’ll need two 16″ lengths.

    Eyelets (optional)

    If you’re wondering what those metallic circles are where the rope attaches to my basket – they’re eyelets! They give the basket such a professional finished look, and they are not hard to install – you just need a hammer and a little confidence. And if you really don’t want to put eyelets on your basket, that’s ok. You can simply feed the rope through the holes we create and they should stay put just fine.

    If you have a Hobby Lobby nearby, you’ll find an eyelet kit in the sewing notions section. Make sure you grab the one with the setting tool included if you don’t already have one! You can also buy the setting tool separate and then choose your eyelet color (I picked silver). Either way, you’re looking for 15/32″ (12mm) eyelets and you need 4 per basket. Watch for the sale, and you’ll score it all for 50% off.

    Metallic Embellishment

    These are becoming more and more popular at the big box craft stores, and you’ll usually find them in the scrapbooking section. I found both the Emerson quote and the anchor at Michael’s. (The anchor actually came in a set of two.)

    Prefer a PDF?

    This pattern can be completed using the 100% free version right here on this page. However, many people prefer the convenience of a printable, ad-free PDF.

    All-Access Passholders get the ad-free version of this and all of my other blog patterns. It’s a pretty sweet deal, if I do say so myself! Learn more about it here or continuing scrolling for the free version.

    Nautical Basket

    View on Ravelry

    Difficulty: Easy / Beginner

    Finished Size: 9″ wide x 8″ tall (large basket) and 6″ wide x 5.5″ tall (small basket)

    Hook:  H (5.0mm) and G (4.25mm). Because we’re using a small hook for a chunky yarn, make sure to protect your hands by using hooks with padded grips. I absolutely love my Clover Amour hooks!

    Yarn: I used Bernat Maker Outdoor for my baskets, but most #5 weight chunky/bulky yarns will work; just avoid anything that’s super soft. For the large basket, you will need about 330 yards of COLOR A (I used “Navy Ink”) and 165 yards of COLOR B (I used “Fresh White”). For the small basket, you will need about 170 yards of COLOR A and 75 yards of COLOR B.

    Gauge: With your larger hook, your first 8 rounds should measure 3.75″ wide.

    You’ll also need:

    • Yarn needle
    • Scissors
    • Two 20″ (large basket) or 16″ (small basket) lengths of 3/8″ twisted rope for handles (available at craft stores)
    • Optional but recommended: Size 15/32″ (12mm) eyelet kit. Each basket needs 4 eyelets. You don’t have to add these but they will give your basket a beautiful, professional finished look.
    • Hammer (if using eyelets)
    • Plastic Canvas – look for the large sheets of ultra stiff, and get a couple per basket. If you can’t find the large sheets, that’s ok; just grab a couple extra of the smaller ones.

    Abbreviations Used:

    ST/STS (stitch/stitches)
    SL ST (slip stitch)
    SK (skip)
    CH (chain)
    SC (single crochet)

    Special Stitch: Magic Circle (view my tutorial here)

    Notes:
    (1) This pattern is written in American Standard Terms.
    (2) This pattern is worked in joined rounds. Some rounds are turned and some are not, so pay attention. CH1 at the beginning of rounds does not count as a stitch.
    (3) The increases for this pattern are done in what I call a “Smooth Circle Base.” Normally when doing standard SC increase rounds, the more rounds you do, the more your circle will start to look like a hexagon (due to the height of the SC increases stacking up on each other). Because we do 16 increase rounds on the large basket, the effect is rather severe. So instead of a standard increase pattern, we are using a modified increase pattern that will result in a much nicer, rounded circle.
    (4) When switching colors, you do not need to fasten off the previous color unless the instructions say to; you can simply carry it up the inside of basket. It won’t show in the end.
    (5) The instructions for adding the eyelets are included after the written patterns, but the eyelets need to be installed in the middle of the pattern. This is noted in the patterns at the proper time. So when you get to that part, skip down to the eyelet instructions, then return to the pattern to complete it.
    (6) The chunky yarn is too thick for the eyelets to attach through both layers, so they will only show on the outside of the basket.

    – – – – – – – – – – – – – – – – – – – – – – – –

    INSTRUCTIONS (Large Basket)

    To begin: With COLOR A and H (5.0mm) hook, make a magic circle; CH1.

    Round 1: 6SC in MC; join with a SL ST to the top of the first SC. (6)

    Round 2: CH1. 2SC in each ST around; join with a SL ST to the top of the first SC. (12)

    Round 3: CH1. 2SC in first ST, SC in next ST. (2SC in next ST, SC in next ST) around; join with a SL ST to the top of the first SC. (18)

    Round 4: CH1. SC in first ST, 2SC in next ST, SC in next ST. (SC in next ST, 2SC in next ST, SC in next ST) around; join with a SL ST to the top of the first SC. (24)

    Round 5: CH1. 2SC in first ST, SC in each of the next 3 STS. (2SC in next ST, SC in each of the next 3 STS) around; join with a SL ST to the top of the first SC. (30)

    Round 6: CH1. SC in each of the first 2 STS, 2SC in next ST, SC in each of the next 2 STS. (SC in each of the next 2 STS, 2SC in next ST, SC in each of the next 2 STS) around; join with a SL ST to the top of the first SC. (36)

    Round 7: CH1. 2SC in first ST, SC in each of the next 5 STS. (2SC in next ST, SC in each of the next 5 STS) around; join with a SL ST to the top of the first SC. (42)

    Round 8: CH1. SC in each of the first 3 STS, 2SC in next ST, SC in each of the next 3 STS. (SC in each of the next 3 STS, 2SC in next ST, SC in each of the next 3 STS) around; join with a SL ST to the top of the first SC. (48)

    Round 9: CH1. 2SC in first ST, SC in each of the next 7 STS. (2SC in next ST, SC in each of the next 7 STS) around; join with a SL ST to the top of the first SC. (54)

    Round 10: CH1. SC in each of the first 4 STS, 2SC in next ST, SC in each of the next 4 STS. (SC in each of the next 4 STS, 2SC in next ST, SC in each of the next 4 STS) around; join with a SL ST to the top of the first SC. (60)

    Round 11: CH1. 2SC in first ST, SC in each of the next 9 STS. (2SC in next ST, SC in each of the next 9 STS) around; join with a SL ST to the top of the first SC. (66)

    Round 12: CH1. SC in each of the first 5 STS, 2SC in next ST, SC in each of the next 5 STS. (SC in each of the next 5 STS, 2SC in next ST, SC in each of the next 5 STS) around; join with a SL ST to the top of the first SC. (72)

    Round 13: CH1. 2SC in first ST, SC in each of the next 11 STS. (2SC in next ST, SC in each of the next 11 STS) around; join with a SL ST to the top of the first SC. (78)

    Round 14: CH1. SC in each of the first 6 STS, 2SC in next ST, SC in each of the next 6 STS. (SC in each of the next 6 STS, 2SC in next ST, SC in each of the next 6 STS) around; join with a SL ST to the top of the first SC. (84)

    Round 15: CH1. 2SC in first ST, SC in each of the next 13 STS. (2SC in next ST, SC in each of the next 13 STS) around; join with a SL ST to the top of the first SC. (90)

    Round 16: CH1. SC in each of the first 7 STS, 2SC in next ST, SC in each of the next 7 STS. (SC in each of the next 7 STS, 2SC in next ST, SC in each of the next 7 STS) around; join with a SL ST to the top of the first SC. (96)

    Rounds 17-19: CH1. SC in each ST around; join with a SL ST to the top of the first SC. (96)

    Switch to COLOR B.

    Rounds 20-22: CH1. SC in each ST around; join with a SL ST to the top of the first SC. (96)

    Switch to COLOR A.

    Rounds 23-25: CH1. SC in each ST around; join with a SL ST to the top of the first SC. (96)

    Switch to COLOR B.

    Rounds 26-28: CH1. SC in each ST around; join with a SL ST to the top of the first SC. (96)

    Switch to COLOR A.

    Rounds 29-31: CH1. SC in each ST around; join with a SL ST to the top of the first SC. (96)

    Switch to COLOR B.

    Rounds 32-34: CH1. SC in each ST around; join with a SL ST to the top of the first SC. (96)

    Switch to COLOR A.

    Rounds 35-37: CH1. SC in each ST around; join with a SL ST to the top of the first SC. (96)

    Switch to COLOR B.

    Rounds 38-40: CH1. SC in each ST around; join with a SL ST to the top of the first SC. (96)

    Switch to COLOR A.

    Rounds 41-43: CH1. SC in each ST around; join with a SL ST to the top of the first SC. (96)

    Switch to COLOR B.

    Rounds 44-46: CH1. SC in each ST around; join with a SL ST to the top of the first SC. (96)

    Switch to COLOR A; fasten off COLOR B.

    Round 47: CH1. SC in each ST around; join with a SL ST to the top of the first SC. (96)

    Rounds 48-50: CH1, TURN. SC in each ST around; join with a SL ST to the top of the first SC. (96)

    Round 51: CH1, TURN. SC in each of the first 12 STS. CH2, SK 2 STS. SC in each of the next 20 STS. CH2, SK 2 STS. SC in each of the next 24 STS. CH2, SK 2 STS. SC in each of the next 20 STS. CH2, SK 2 STS. SC in each of the next 12 STS. Join with a SL ST to the top of the first SC. (88 + 4 CH2 spaces)

    Round 52: CH1, TURN. SC in each ST around, putting 2SC in each CH2 space from the previous round. Join with a SL ST to the top of the first SC. (96)

    Rounds 53-55: CH1, TURN. SC in each ST around. Join with a SL ST to the top of the first SC. (96)

    If you’re adding eyelets, STOP HERE and attach them now in each of the 4 holes we created in Round 51, then return to the pattern to complete it. (It will be much harder to do later.) See instructions following pattern for Small Basket.

    Switch to G (4.25mm) hook.

    Rounds 56-58: CH1, TURN. SC in each ST around. Join with a SL ST to the top of the first SC. (96)

    Round 59: CH1, TURN. SC in each of the first 12 STS. CH2, SK 2 STS. SC in each of the next 20 STS. CH2, SK 2 STS. SC in each of the next 24 STS. CH2, SK 2 STS. SC in each of the next 20 STS. CH2, SK 2 STS. SC in each of the next 12 STS. Join with a SL ST to the top of the first SC. (88 + 4 CH2 spaces) (Note: The holes you just created should be directly above the holes you created in Round 51.)

    Round 60: CH1, TURN. SC in each ST around, putting 2SC in each CH2 space from the previous round. Join with a SL ST to the top of the first SC. (96)

    Rounds 61-63: CH1, TURN. SC in each ST around. Join with a SL ST to the top of the first SC. (96)

    Switch to COLOR B (you fastened it off earlier but you can reattach it now).

    Round 64: CH1, TURN. SC in each ST around; join with a SL ST to the top of the first SC. (96)

    Rounds 65-66: CH1, DO NOT turn. SC in each ST around; join with a SL ST to the top of the first SC. (96)

    Switch to COLOR A.

    Rounds 67-69: CH1. SC in each ST around; join with a SL ST to the top of the first SC. (96)

    Switch to COLOR B.

    Rounds 70-72: CH1. SC in each ST around; join with a SL ST to the top of the first SC. (96)

    Switch to COLOR A.

    Rounds 73-75: CH1. SC in each ST around; join with a SL ST to the top of the first SC. (96)

    Switch to COLOR B.

    Rounds 76-78: CH1. SC in each ST around; join with a SL ST to the top of the first SC. (96)

    Switch to COLOR A.

    Rounds 79-81: CH1. SC in each ST around; join with a SL ST to the top of the first SC. (96)

    Switch to COLOR B.

    Rounds 82-84: CH1. SC in each ST around; join with a SL ST to the top of the first SC. (96)

    Switch to COLOR A.

    Rounds 85-87: CH1. SC in each ST around; join with a SL ST to the top of the first SC. (96)

    Switch to COLOR B.

    Rounds 88-90: CH1. SC in each ST around; join with a SL ST to the top of the first SC. (96)

    Switch to COLOR A.

    Rounds 91-93: CH1. SC in each ST around; join with a SL ST to the top of the first SC. (96)

    Fasten off and weave in all ends. See sections on “Adding Plastic Canvas” and “Adding Rope Handles” to complete project.

    INSTRUCTIONS (Small Basket)

    To begin: With COLOR A and H (5.0mm) hook, make a magic circle; CH1.

    Round 1: 6SC in MC; join with a SL ST to the top of the first SC. (6)

    Round 2: CH1. 2SC in each ST around; join with a SL ST to the top of the first SC. (12)

    Round 3: CH1. 2SC in first ST, SC in next ST. (2SC in next ST, SC in next ST) around; join with a SL ST to the top of the first SC. (18)

    Round 4: CH1. SC in first ST, 2SC in next ST, SC in next ST. (SC in next ST, 2SC in next ST, SC in next ST) around; join with a SL ST to the top of the first SC. (24)

    Round 5: CH1. 2SC in first ST, SC in each of the next 3 STS. (2SC in next ST, SC in each of the next 3 STS) around; join with a SL ST to the top of the first SC. (30)

    Round 6: CH1. SC in each of the first 2 STS, 2SC in next ST, SC in each of the next 2 STS. (SC in each of the next 2 STS, 2SC in next ST, SC in each of the next 2 STS) around; join with a SL ST to the top of the first SC. (36)

    Round 7: CH1. 2SC in first ST, SC in each of the next 5 STS. (2SC in next ST, SC in each of the next 5 STS) around; join with a SL ST to the top of the first SC. (42)

    Round 8: CH1. SC in each of the first 3 STS, 2SC in next ST, SC in each of the next 3 STS. (SC in each of the next 3 STS, 2SC in next ST, SC in each of the next 3 STS) around; join with a SL ST to the top of the first SC. (48)

    Round 9: CH1. 2SC in first ST, SC in each of the next 7 STS. (2SC in next ST, SC in each of the next 7 STS) around; join with a SL ST to the top of the first SC. (54)

    Round 10: CH1. SC in each of the first 4 STS, 2SC in next ST, SC in each of the next 4 STS. (SC in each of the next 4 STS, 2SC in next ST, SC in each of the next 4 STS) around; join with a SL ST to the top of the first SC. (60)

    Round 11: CH1. 2SC in first ST, SC in each of the next 9 STS. (2SC in next ST, SC in each of the next 9 STS) around; join with a SL ST to the top of the first SC. (66)

    Rounds 12-14: CH1. SC in each ST around; join with a SL ST to the top of the first SC. (66)

    Switch to COLOR B.

    Rounds 15-17: CH1. SC in each ST around; join with a SL ST to the top of the first SC. (66)

    Switch to COLOR A.

    Rounds 18-20: CH1. SC in each ST around; join with a SL ST to the top of the first SC. (66)

    Switch to COLOR B.

    Rounds 21-23: CH1. SC in each ST around; join with a SL ST to the top of the first SC. (66)

    Switch to COLOR A.

    Rounds 24-26: CH1. SC in each ST around; join with a SL ST to the top of the first SC. (66)

    Switch to COLOR B.

    Rounds 27-29: CH1. SC in each ST around; join with a SL ST to the top of the first SC. (66)

    Switch to COLOR A; fasten off COLOR B.

    Round 30: CH1. SC in each ST around; join with a SL ST to the top of the first SC. (66)

    Rounds 31-33: CH1, TURN. SC in each ST around; join with a SL ST to the top of the first SC. (66)

    Round 34: CH1, TURN. SC in each of the first 8 STS. CH2, SK 2 STS. SC in each of the next 13 STS. CH2, SK 2 STS. SC in each of the next 16 STS. CH2, SK 2 STS. SC in each of the next 13 STS. CH2, SK 2 STS. SC in each of the next 8 STS. Join with a SL ST to the top of the first SC. (58 + 4 CH2 spaces)

    Round 35: CH1, TURN. SC in each ST around, putting 2SC in each CH2 space from the previous round. Join with a SL ST to the top of the first SC. (66)

    Rounds 36-38: CH1, TURN. SC in each ST around. Join with a SL ST to the top of the first SC. (66)

    If you’re adding eyelets, STOP HERE and attach them now in each of the 4 holes we created in Round 34, then return to the pattern to complete it. (It will be much harder to do later.) See instructions following this pattern.

    Switch to G (4.25mm) hook.

    Rounds 39-41: CH1, TURN. SC in each ST around. Join with a SL ST to the top of the first SC. (66)

    Round 42: CH1, TURN. SC in each of the first 8 STS. CH2, SK 2 STS. SC in each of the next 13 STS. CH2, SK 2 STS. SC in each of the next 16 STS. CH2, SK 2 STS. SC in each of the next 13 STS. CH2, SK 2 STS. SC in each of the next 8 STS. Join with a SL ST to the top of the first SC. (58 + 4 CH2 spaces) (Note: The holes you just created should be directly above the holes you created in Round 34.)

    Round 43: CH1, TURN. SC in each ST around, putting 2SC in each CH2 space from the previous round. Join with a SL ST to the top of the first SC. (66)

    Rounds 44-46: CH1, TURN. SC in each ST around. Join with a SL ST to the top of the first SC. (66)

    Switch to COLOR B (you fastened it off earlier but you can reattach it now).

    Round 47: CH1, TURN. SC in each ST around; join with a SL ST to the top of the first SC. (66)

    Rounds 48-49: CH1, DO NOT turn. SC in each ST around; join with a SL ST to the top of the first SC. (66)

    Switch to COLOR A.

    Rounds 50-52: CH1. SC in each ST around; join with a SL ST to the top of the first SC. (66)

    Switch to COLOR B.

    Rounds 53-55: CH1. SC in each ST around; join with a SL ST to the top of the first SC. (66)

    Switch to COLOR A.

    Rounds 56-58: CH1. SC in each ST around; join with a SL ST to the top of the first SC. (66)

    Switch to COLOR B.

    Rounds 59-61: CH1. SC in each ST around; join with a SL ST to the top of the first SC. (66)

    Switch to COLOR A.

    Rounds 62-64: CH1. SC in each ST around; join with a SL ST to the top of the first SC. (66)

    Fasten off and weave in all ends. See sections on “Adding Plastic Canvas” and “Adding Rope Handles” to complete project.

    – – – – – – – – – – –

    ATTACHING EYELETS OR GROMMETS

    Open your eyelet or grommet kit and retrieve the following items:

    Follow the instructions on your eyelet/grommet kit to add eyelets/grommets to each of the four holes of the basket. (Please note that if your instructions include anything about punching a hole in the fabric, you do not need to do this step because we crocheted holes right into our fabric.) You can watch my tutorial video for the Malia Shoulder Bag to see exactly how eyelets are installed; I demonstrate it at the 19:11 mark (the video below is cued to that moment). A few tips to keep in mind:

    • Do this on a solid, sturdy surface. Your hard floor is ok; a concrete garage floor is best.
    • Make sure you are inserting the eyelet from the outside of the basket, through to the inside (not the other way around).
    • Don’t go too crazy with the hammering or you’ll split and break the eyelet.

    – – – – – – – – – – –

    ADDING PLASTIC CANVAS

    Cut across your plastic canvas to make strips that will fit inside the basket and come up to just below the eyelets. Set your basket so that it is completely unfolded (image 1). Insert plastic canvas into the bottom of the basket, using as many layers as you want to make it as stiff as you want (image 2). Fold the inside layer down over the canvas (image 3). Work the fabric until it all lays neat and flat (image 4).

    You can watch my Plastic Canvas tutorial video if you need help with what plastic canvas is, where to buy it, or how to use it; the only difference is that in the video, I’m not using a basket with eyelets so the canvas in the demo comes all the way to the top of the basket. But you’ll get the idea.

    – – – – – – – – – – –

    ADDING ROPE HANDLES

    Locate the seam of your basket, then locate the nearest eyelet to the right of the seam. Take your first rope handle and tie a piece of scotch tape around the end, and insert it through the eyelets as well as the corresponding hole on the inside layer of the basket. Tie a knot near the bottom of the rope on the inside of the basket and pull it tight (you can use your eyelet to help by gently but firmly pulling the rope from the outside of the basket, which will pull the knot against the eyelet and tighten it up). Then, use good scissors to cut the excess rope close to the knot. Moving farther away from your basket’s seam to the next available eyelet, insert the other end of the rope through it and repeat the process. That’s your first handle. For your second handle, start at the seam again and locate the nearest eyelet to the left of the seam. Repeat the entire process for the 2nd handle. (Neither handle should cross over the seam.)

    Note that you’ll want both handles to be the same length, so be sure to compare them when you’re about to tie your final knot to ensure that the handle sizes match.

    – – – – – – – – – – –

    That’s it – you’re done! If you’re showing off your work, be sure to hashtag #ycnauticalbasket and tag me @yarnandchai.design!

  • Summer Boardwalk Baby Blanket

    Summer Boardwalk Baby Blanket

    I’m all about challenging myself in crochet, but sometimes I just need a simple pattern to relax with at the end of a long day. This blanket pattern, made completely of single crochet stitches, has been wonderful for that purpose!

    I’ve been wanting to design an all-single-crochet blanket because I think the effect is so modern and sleek. Sometimes we get so caught up in thinking we need fancy stitches that we forget how modern a simple, clean design can look. Remember, if you’re gifting a blanket to a new mom with modern taste, she’s not going to care so much about fancy stitchwork – in fact, the fancier the stitchwork, the more “old-fashioned” the project can look. I can almost guarantee that she just wants a cute, soft blanket to wrap her baby in!

    I chose the name “Summer Boardwalk Baby Blanket” because the colors remind me so much of the beach, and the multicolored sections remind me of the run-down wooden planks that often line a beach boardwalk.

    About the Yarn

    I chose Hobby Lobby’s Sweet Delight yarn (from their Baby Bee line) for this project, which is an acrylic baby yarn that is pleasantly soft. Sweet Delight is a really interesting line of DK (that’s #3 weight) yarn, because it boasts a mixture of coordinating solids as well as self-striping, marled, speckled, and variegated colorways, all working together to give you awesome options for colorwork. When I chose the colors for this blanket, I stood in the yarn aisle and searched for a self-striping skein that I loved, then chose three solids that matched the colors contained within it. I also grabbed a white for what has become sort of my signature blanket look – the ribbing on both edges. (So much more modern-looking than a full border!)

    Beware, if you choose a different multi-colored yarn than I did to start with (for instance if you wanted to make a girly blanket), some of the multi-colored yarns in the line have long color changes, and some are more of a variegated… and it’s not easy to tell the difference at first glance! I learned this the hard way when I grabbed a skein of this beautiful white, lavender and green mixture. When I got home and started working with it, I discovered it was variegated (meaning, the color changes happened every couple of inches). You might like variegated yarns, but I’m not a huge fan of them, so I didn’t end up using it. If you want to avoid variegated, very carefully inspect the skein before you purchase it and make sure the color changes are more than a couple inches long. (Don’t destroy the skein and put it back on the shelf; that’s not cool.)

    Lately, Hobby Lobby has been having this awesome 30% off all yarn sale every other week. I grabbed my yarn on sale week and at $5.29 retail price for 6 skeins, I was able to make this entire blanket for $23. Not bad!

    One last thing. I don’t think of myself as a yarn snob, but I am sensitive to scratchy yarns. And when it comes to baby blankets, my standards are especially high. If you’re the same and are wondering how soft this yarn really is, I promise you, it’s soft! For an acrylic yarn, I was thrilled. You know how some yarns feel squishy soft in the skein but then when you start working them up, they just don’t feel that soft anymore? This one maintains its softness. Some of the colors felt softer than others, but I was not a bit disappointed in any of them. This baby blanket is actually a gift for my sister, who is giving birth to my newest nephew this week, if that tells you anything!

    Prefer a PDF?

    This pattern can be completed using the 100% free version right here on this page. However, many people prefer the convenience of a printable, ad-free PDF.

    All-Access Passholders get the ad-free version of this and all of my other blog patterns. It’s a pretty sweet deal, if I do say so myself! Learn more about it here or continuing scrolling for the free version.

    SUMMER BOARDWALK BABY BLANKET

    View on Ravelry

    Difficulty: Easy / Beginner

    Finished Size: 29″ wide x 37″ long

    Hook: 4.5mm (US-7) hook

    Yarn: Approx. 1,200 yards of #3 DK weight in 5 colors. To achieve the effect in the sample blanket, you’ll need to choose a self-striping yarn and a contrast color (for the ribbing) then choose 3 solid colors that coordinate with the self-striping yarn. Yarn used in sample photos is Yarn Bee Sweet Delight (from Hobby Lobby) in the following colors and amounts:

    COLOR A (“Angel”) – 145 yards (this is the ribbing)
    COLOR B (“Tricycle Time”) – 510* yards (this is the self-striping yarn) *This is a correction from the previously-published 340 yards
    COLOR C (“Surf Baby”) – 170 yards (this is the aqua)
    COLOR D (“Cloudy”) – 170 yards (this is the light tan)
    COLOR E (“Toy Elephant”) – 170 yards (this is the dark tan-gray)

    Gauge: 19 SC x 25 rows = 4″ square

    You’ll also need: Yarn needle

    Terms and Abbreviations:
    ST/STS (stitch/stitches)
    SL ST (slip stitch)
    CH (chain)
    SC (single crochet)
    BLO (back loop only)

    Notes:
    (1) This pattern is written in American Standard Terms.
    (2) CH1s at the beginning of rows do not count as a stitch in the final stitch count.
    (3) Whenever the instructions tell you to switch to a new color, you can fasten off the previous color.
    (4) There is no stitch multiple for this pattern. If you want to make it wider, add rows to the first ribbing section. If you want to make it longer, simply repeat the color blocks, or make them thicker.

    INSTRUCTIONS

    TOP RIBBING

    With COLOR A, CH11.

    Row 1: SC in 2nd CH from hook and in each remaining CH. (10)

    Rows 2-134 (or until ribbing measures about 29-30″ long): CH1, turn. SC in first ST. SC in BLO of each of the next 8 STS. SC in final ST. (10)

    – – – – – – – – – –

    BODY (Row count restarts back to 1)

    Body, Row 1: CH1, do not turn. SC in each row end along the long edge of the ribbing. (134, or however many ribbing rows you completed)

    Rows 2-4 (3 rows): CH1, turn. SC in each ST across. (134)

    – – – – – – – – – –

    Switch to COLOR B.

    Rows 5-34 (30 rows): CH1, turn. SC in each ST across. (134)

    – – – – – – – – – –

    Switch to COLOR A.

    Rows 35-38 (4 rows): CH1, turn. SC in each ST across. (134)

    – – – – – – – – – –

    Switch to COLOR C.

    Rows 39-68 (30 rows): CH1, turn. SC in each ST across. (134)

    – – – – – – – – – –

    Switch to COLOR A.

    Rows 69-72 (4 rows): CH1, turn. SC in each ST across. (134)

    – – – – – – – – – –

    Switch to COLOR B.

    Rows 73-102 (30 rows): CH1, turn. SC in each ST across. (134)

    – – – – – – – – – –

    Switch to COLOR A.

    Rows 103-106 (4 rows): CH1, turn. SC in each ST across. (134)

    – – – – – – – – – –

    Switch to COLOR D.

    Rows 107-136 (30 rows): CH1, turn. SC in each ST across. (134)

    – – – – – – – – – –

    Switch to COLOR A.

    Rows 137-140 (4 rows): CH1, turn. SC in each ST across. (134)

    – – – – – – – – – –

    Switch to COLOR B.

    Rows 141-170 (30 rows): CH1, turn. SC in each ST across. (134)

    – – – – – – – – – –

    Switch to COLOR A.

    Rows 171-174 (4 rows): CH1, turn. SC in each ST across. (134)

    – – – – – – – – – –

    Switch to COLOR E.

    Rows 175-204 (30 rows): CH1, turn. SC in each ST across. (134)

    – – – – – – – – – –

    Switch to COLOR A.

    Rows 205-208 (4 rows): CH1, turn. SC in each ST across. (134)

    – – – – – – – – – – – – – –

    BOTTOM RIBBING

    In this section, we will be creating the bottom ribbing by making vertical ribs and attaching them with slip stitches to the last row of the body as we go. We’ll be referring to “Row 208” quite a bit; that’s the last row of the body of the blanket we completed, and that’s what the ribbing will be attaching to. If you need a little extra help, check out my tutorial on how to add ribbing at the end of a crochet project.

    CH11.
    Row 1:
    Turn. SC in 2nd chain from hook and in each of the remaining 9 chains. SL ST into the first SC from Row 208, the stitch on which your CH11 was built. SL ST into the next SC from Row 208. (10, plus the two slip stitches along Row 208)

    The section we just created, built on the CH11, will hereafter be referred to as the “ribbing.”

    Row 2: CH1, turn. Skipping over the 2 SL STS you put in Row 208, SC in BLO of each of the first 9 STS of the ribbing. SC in both loops of the last ST. (10)

    Row 3: CH1, turn. SC in 1st ST. SC in BLO of each of the remaining 9 STS of the ribbing. SL ST in each of the next 2 STS of Row 208. (10, plus the 2 SL STS along Row 208)

    Row 4: CH1, turn. Skipping over the 2 SL STS you put in Row 208, SC in BLO of each of the first 9 STS of the ribbing. SC in both loops of the last ST. (10)

    Rows 5-134: Repeat Rows 3-4 all the way across Row 208. (10)

    Fasten off and weave in ends.

    – – – – – – – – – –

    Done! If you’re sharing on social media, be sure to hashtag #summerboardwalkbabyblanket and tag me @yarnandchai.design!

    Hope you enjoyed it!

  • Malia Christmas Stocking

    Malia Christmas Stocking

    Every year around this time, when we dig out the boxes full of Christmas decorations, I say to myself “this year we are all going to have matching stockings!”

    I think in the younger years of a family, Christmas stockings tend to be random and mismatched because each new addition to the family comes on a different year. I brought my stocking with me when I moved from my family’s house into the one I shared with my new husband, and I think we bought him one that year. When Sam was born, we bought one for him, and two years later, one for Isaiah, too. Of course, none of them matched!

    There’s nothing wrong with that, and each one holds special memories. But. The older I get, the more I love the idea of looking at the mantle and seeing 5 coordinating stockings. What can I say? Life is chaos, and a little order makes my anxious heart happy. (Can you tell I’m a mom of all boys!?)

    If I’m being honest, this year probably won’t be the year we achieve my dream of matching stockings, because it’s already December 5th (what!?) and I’ve only made one. But I am SO going be ready for next year thanks to this new pattern – the Malia Christmas Stocking!

    VIDEO TUTORIAL

    If you’ve been following along with the Malia pattern collection, this pattern won’t give you much trouble, if any. But if you need a little extra help with any of the stitches in the pattern, I created a video tutorial for previous Malia patterns in which I crocheted up a swatch of the stitch pattern. You might find it useful to scan through the tutorial if you find yourself stuck at any point!

    `

    Prefer a PDF?

    This pattern can be completed using the 100% free version right here on this page. However, many people prefer the convenience of a printable, ad-free PDF.

    All-Access Passholders get the ad-free version of this and all of my other blog patterns. It’s a pretty sweet deal, if I do say so myself! Learn more about it here or continuing scrolling for the free version.

    MALIA CHRISTMAS STOCKING

    Difficulty: Easyish

    Finished Sizes: 16.5″ tall (folded) or 20.5″ tall (unfolded) x 9″ wide

    Hook: I (5.0 mm) or whichever hook is needed to obtain correct gauge

    Yarn: 275 yards of COLOR A (yarn used in sample photos is Yarn Bee’s Rustic Romantic in “Red Roads”) and 95 yards of COLOR B (yarn used in sample photos is Bernat Baby Blanket Tiny in “Snow Cap”). Both yarns are #4 medium weight.

    Gauge: To ensure the best results, the gauge check is a swatch taken straight from the pattern. Upon completion, you should have a 4” square. If yours is larger, consider using a smaller hook or a thinner #4 yarn. If yours is smaller, consider using a larger hook. Please note that I have a tight tension, so it is entirely possible that you will need a smaller hook.

    Pattern for Gauge:
    CH17.
    Row 1: SC in 2nd CH from hook and in each remaining CH. (16)
    Row 2: CH1, turn. SC in first ST. (SK next ST, LBS in next ST) 7 times. SC in final ST. (16)
    Row 3: CH1, turn. HDC in each ST across. (16)
    Row 4: CH1, turn. SC in first ST. SC in 3rd loop of each of the next 14 STS. SC in final ST. (16)
    Row 5: CH1, turn. SC in each ST across. (16)
    Row 6: CH1, turn. SC in first ST. (LBS in next ST, SK next ST) 7 times. SC in final ST. (16)
    Row 7: CH1, turn. HDC in each ST across. (16)
    Row 8: CH1, turn. SC in first ST. SC in 3rd loop of each of the next 14 STS. SC in final ST. (16)
    Row 9: CH1, turn. SC in each ST across. (16)
    Rows 10-16: Repeat Rows 2-8. (16)

    You’ll also need: Yarn needle, 3 decorative buttons, needle & thread, 11″ long coordinating ribbon (I used 1.5″ thick burlap)

    Terms and Abbreviations:
    ST/STS
     (stitch/stitches)
    SL ST (slip stitch)
    SK (skip)
    CH (chain)
    SC (single crochet)
    HDC (half double crochet)
    LBS (large bean stitch – see “Special Stitches”)
    BLO (back loop only)
    SC2TOG (single crochet two together)
    HDC2TOG (half double crochet two together)
    3rd LOOP (work stitch into 3rd loop only – see “Special Stitches”)

    Special Stitches:

    Large Bean Stitch (LBS)
    Insert hook into stitch, yarn over and pull through (2 loops on hook). Yarn over, insert hook into same stitch, yarn over and pull through (4 loops on hook). Yarn over, insert hook into same stitch, yarn over and pull through (6 loops on hook). Yarn over, insert hook into same stitch, yarn over and pull through (8 loops on hook). Yarn over and pull through all 8 loops. Chain 1 to close the stitch. (Because this stitch creates two sets of loops – one when creating the bean, and one when closing the stitch – each completed Large Bean Stitch will count for two stitches in the row or round’s final stitch count.)

    3rd Loop Only
    Half double crochet stitches have a 3rd loop that we utilize in this pattern. When working in turned rows, as in this pattern, the 3rd loop can be found just below the front loop on the side of the work that is facing you. When instructed to work in “3rd loop only”, insert your hook into this special loop. This creates a delicate braided look on the opposite side of the pattern.

    Notes:
    (1) This pattern is written in American Standard Terms.
    (2) CH1s at the beginning of rows do not count as a stitch in the final stitch count.
    (3) A video tutorial for a swatch of the stitch pattern is available up in the post, or by clicking here.

    INSTRUCTIONS – SIDE 1

    To begin: CH39.

    Row 1: SC in 2nd CH from hook and in each remaining CH. (38)

    Row 2: CH1, turn. SC in first ST. (SK next ST, LBS in next ST) 18 times. 2SC in final ST. (39)

    Row 3: CH1, turn. HDC in each ST across. (39)

    Row 4: CH1, turn. SC in 3rd loop of each of the first 38 STS. 2SC in 3rd loop of final ST. (40)

    Row 5: CH1, turn. SC in each ST across. (40)

    Row 6: CH1, turn. SC in first ST. (LBS in next ST, SK next ST) 19 times. 2SC in final ST. (41)

    Row 7: CH1, turn. HDC in each ST across. (41)

    Row 8: Ch1, turn. SC in 3rd loop of each of the first 40 STS. 2SC in 3rd loop of final ST. (42)

    Row 9: CH1, turn. SC in each ST across. (42)

    Row 10: CH1, turn. SC in first ST. (SK next ST, LBS in next ST) 20 times. 2SC in final ST. (43)

    Row 11: CH1, turn. HDC in each ST across. (43)

    Row 12: Ch1, turn. SC in 3rd loop of each of the first 42 STS. 2SC in 3rd loop of final ST. (44)

    Row 13: CH1, turn. SC in each ST across. (44)

    Row 14: CH1, turn. SC in first ST. (LBS in next ST, SK next ST) 21 times. 2SC in final ST. (45)

    Row 15: CH1, turn. HDC in each ST across. (45)

    Row 16: Ch1, turn. SC in 3rd loop of each of the first 44 STS. 2SC in 3rd loop of final ST. (46)

    Row 17: Ch1, turn. SC in each ST across. (46)

    Row 18: Ch1, turn. SC in first ST. (SK next ST, LBS in next ST) 22 times. 2SC in final ST. (47)

    Row 19: Ch1, turn. HDC in each ST across. (47)

    Row 20: Ch1, turn.  SC in 3rd loop of each of the first 46 STS. 2SC in 3rd loop of final ST. (48)

    Row 21: Ch1, turn.  SC in each ST across. (48)

    Row 22: Ch1, turn. SC in first ST. (LBS in next ST, SK next ST) 23 times. 2SC in final ST. (49)

    Row 23: Ch1, turn. HDC in each ST across. (49)

    Row 24: Ch1, turn. SC in 3rd loop of each of the first 48 STS. 2SC in 3rd loop of final ST. (50)

    Row 25: Ch1, turn. SC in each of the first 22 STS. SC2TOG. Leave the rest unworked. (23)

    Row 26: Ch1, turn. SC2TOG. (SK next ST, LBS in next ST) 10 times. SC in final ST. (22)

    Row 27: Ch1, turn. HDC in each ST across. (22)

    Row 28: Ch1, turn. In 3rd loops of first 2 STS, SC2TOG. SC in 3rd loops of each remaining ST across. (21)

    Row 29: Ch1, turn. SC in each of the first 19 STS. SC2TOG. (20)

    Row 30: Ch1, turn. SC2TOG. (LBS in next ST, SK next ST) 8 times. SC2TOG. (18)

    Row 31: Ch1, turn. HDC2TOG. HDC in each of the next 14 STS. HDC2TOG. (16)

    Row 32: Ch1, turn. In 3rd loops of first 2 STS, SC2TOG. SC in 3rd loops of each of the next 12 STS. In 3rd loops of final 2 STS, SC2TOG. (14)

    Row 33: Ch1, turn. SC2TOG. SC in next ST. HDC in each of the next 2 STS. DC in each of the next 4 STS. HDC in each of the next 2 STS. SC in next ST. SC2TOG. (12)

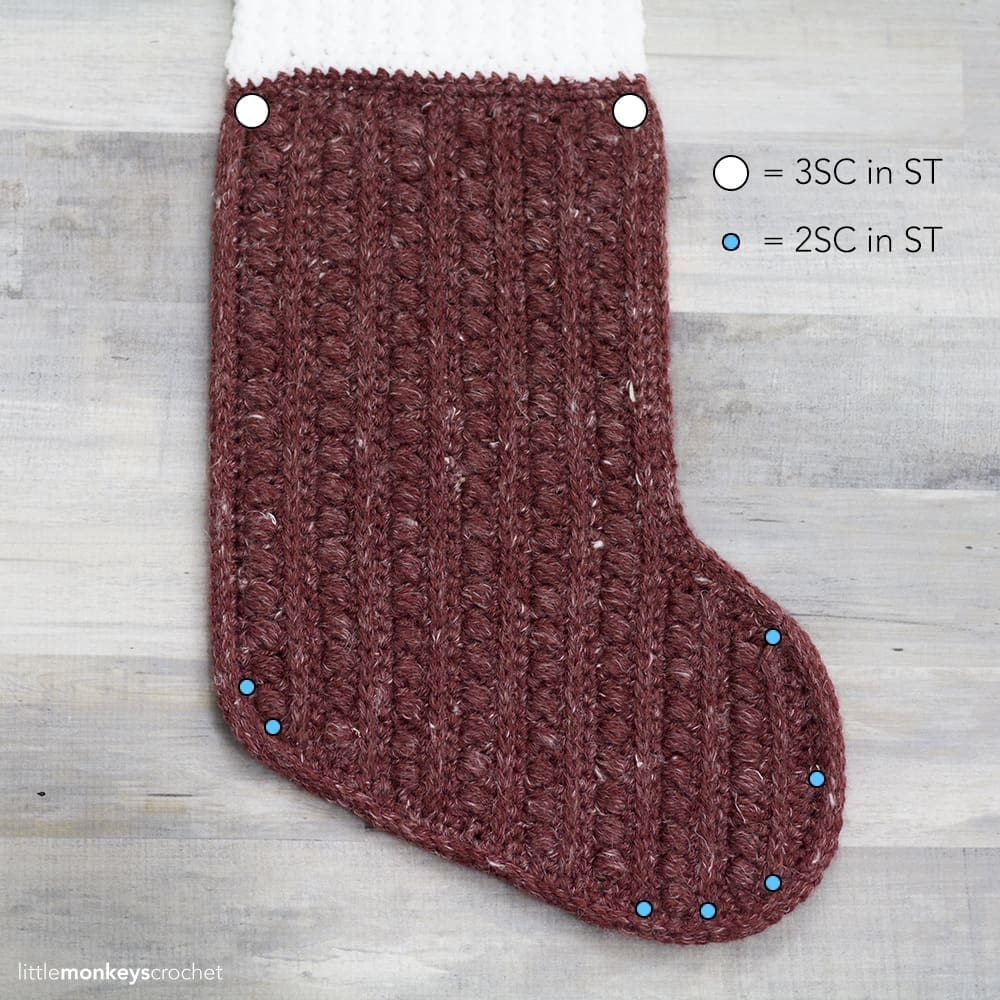
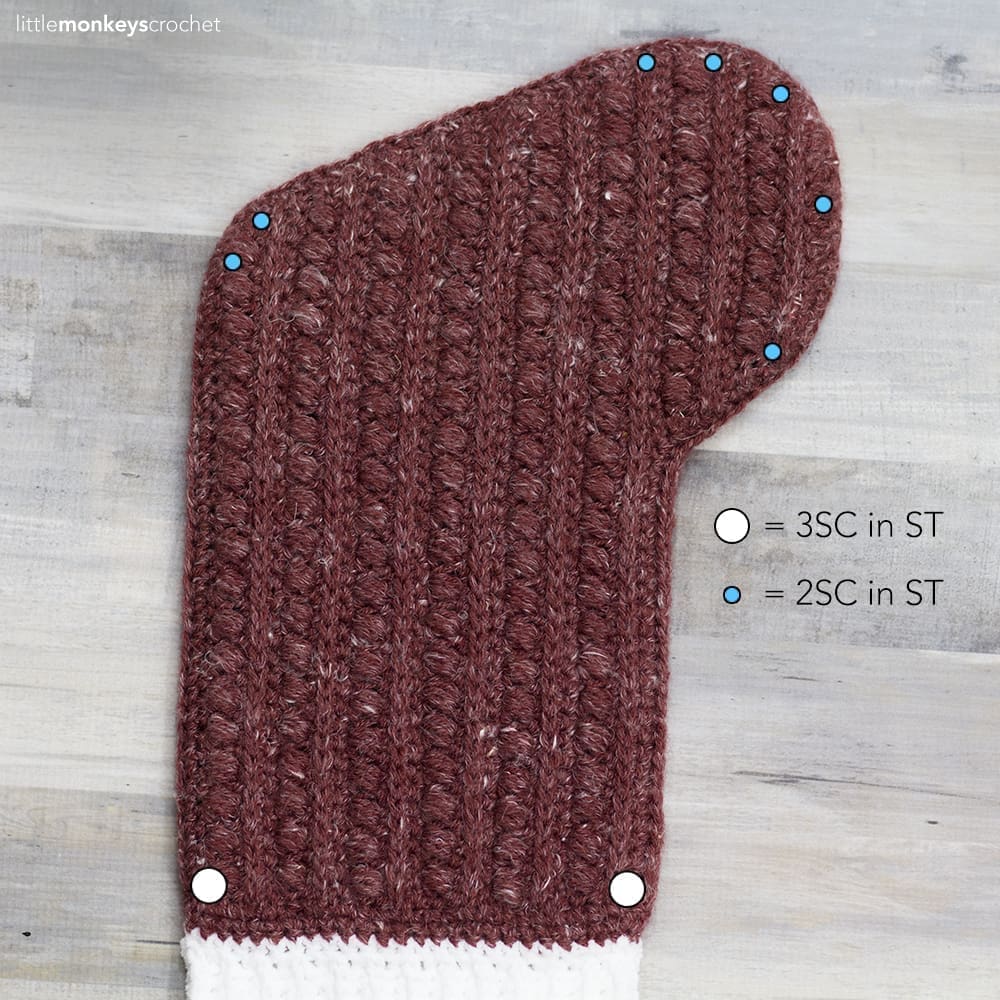
    Edging: CH1; SC evenly around the entire piece, putting one SC in each ST or row end as applicable, and using the image below to place 2SC or 3SC where indicated (this will help keep your stocking from curling). Fasten off and weave in ends.

    INSTRUCTIONS – SIDE 2

    To begin: CH39.

    Row 1: SC in 2nd CH from hook and in each remaining CH. (38)

    Row 2: CH1, turn. 2SC in first ST. (SK next ST, LBS in next ST) 18 times. SC in final ST. (39)

    Row 3: CH1, turn. HDC in each ST across. (39)

    Row 4: CH1, turn. 2SC in 3rd loop of first ST. SC in 3rd loop of each of the remaining 38 STS. (40)

    Row 5: CH1, turn. SC in each ST across. (40)

    Row 6: CH1, turn. 2SC in first ST. (LBS in next ST, SK next ST) 19 times. SC in final ST. (41)

    Row 7: CH1, turn. HDC in each ST across. (41)

    Row 8: Ch1, turn. 2SC in 3rd loop of first ST. SC in 3rd loop of each of the remaining 40 STS. (42)

    Row 9: CH1, turn. SC in each ST across. (42)

    Row 10: CH1, turn. 2SC in first ST. (SK next ST, LBS in next ST) 20 times. SC in final ST. (43)

    Row 11: CH1, turn. HDC in each ST across. (43)

    Row 12: Ch1, turn. 2SC in 3rd loop of first ST. SC in 3rd loop of each of the remaining 42 STS. (44)

    Row 13: CH1, turn. SC in each ST across. (44)

    Row 14: CH1, turn. 2SC in first ST. (LBS in next ST, SK next ST) 21 times. SC in final ST. (45)

    Row 15: CH1, turn. HDC in each ST across. (45)

    Row 16: Ch1, turn. 2SC in 3rd loop of first ST. SC in 3rd loop of each of the remaining 44 STS. (46)

    Row 17: Ch1, turn. SC in each ST across. (46)

    Row 18: Ch1, turn. 2SC in first ST. (SK next ST, LBS in next ST) 22 times. SC in final ST. (47)

    Row 19: Ch1, turn. HDC in each ST across. (47)

    Row 20: Ch1, turn. 2SC in 3rd loop of first ST. SC in 3rd loop of each of the remaining 46 STS. (48)

    Row 21: Ch1, turn.  SC in each ST across. (48)

    Row 22: Ch1, turn. 2SC in first ST. (LBS in next ST, SK next ST) 23 times. SC in final ST. (49)

    Row 23: Ch1, turn. HDC in each ST across. (49)

    Row 24: Ch1, turn. 2SC in 3rd loop of first ST. SC in 3rd loop of each of the remaining 48 STS. (50)

    Fasten off.

    Row 25: Turn the work like you normally would to start a new row. Skip the first 26 STS, and reattach yarn in the next (27th) ST, then CH1. Beginning in same ST, SC2TOG. SC in each of the remaining 22 STS. (23)

    Row 26: Ch1, turn. SC in first ST. (SK next ST, LBS in next ST) 10 times. SC2TOG. (22)

    Row 27: Ch1, turn. HDC in each ST across. (22)

    Row 28: Ch1, turn. SC in 3rd loops of the first 20 STS. In 3rd loops of final 2 STS, SC2TOG. (21)

    Row 29: Ch1, turn. SC2TOG. SC in each of the remaining 19 STS. (20)

    Row 30: Ch1, turn. SC2TOG. (LBS in next ST, SK next ST) 8 times. SC2TOG. (18)

    Row 31: Ch1, turn. HDC2TOG. HDC in each of the next 14 STS. HDC2TOG. (16)

    Row 32: Ch1, turn. In 3rd loops of first 2 STS, SC2TOG. SC in 3rd loops of each of the next 12 STS. In 3rd loops of final 2 STS, SC2TOG. (14)

    Row 33: Ch1, turn. SC2TOG. SC in next ST. HDC in each of the next 2 STS. DC in each of the next 4 STS. HDC in each of the next 2 STS. SC in next ST. SC2TOG. (12)

    Edging: CH1; SC evenly around the entire piece, putting one SC in each ST or row end as applicable, and using the image below to place 2SC or 3SC where indicated (this will help keep your stocking from curling). Fasten off and weave in ends.

    SEAMING

    Put stocking sides together, right sides facing out, and attach yarn in the top left corner through both layers; CH1. SL ST evenly around the left, bottom, and right edges of the stocking, going through all 4 loops (both layers) of each stitch, putting one SL ST in each ST or row end as applicable, and 2 SL STS wherever needed to keep stocking from curling. (You can use Side 1’s placement as a guide.) I find it difficult to SL ST twice in one stitch, so for the 2nd SL ST, I skip over the loop closest to me and work it through the remaining 3 loops. Once you reach the top right corner, CH1 and SC evenly (1 SC in each row end) around the top of the stocking, one layer at a time (don’t crochet it closed, or Santa won’t be able to fill it!), going all the way around the top until you come back to where you started; SL ST to the top of the first SC. (You should have 48 SC.)

    TOP RIBBING SECTION
    If you need some extra guidance, a video tutorial for how to add ribbing to crochet projects can be found here.)

    Attach new color (if you are switching); fasten off previous color.

    Base Round: CH1, SC in same ST and in each ST around. Join with a SL ST to the top of the first SC. (48)

    Row 1: CH33. SC in 2nd chain from hook and in each of the remaining 31 chains. SL ST into the first SC from the Base Round, the stitch on which your CH33 was built. SL ST into the next SC from the Base Round. (32, plus the two slip stitches along the Base Round)

    The section we just created, built on the CH33, will hereafter be referred to as the “ribbing.”

    Row 2: CH1, turn. Skipping over the 2 SL STS you put in the Base Round, SC in BLO of each of the first 31 STS of the ribbing. SC in both loops of the last ST. (32)

    Row 3: CH1, turn. SC in 1st ST. SC in BLO of each of the remaining 31 STS of the ribbing. SL ST in each of the next 2 STS of the Base Round. (32, plus the two slip stitches along the Base Round)

    Row 4: CH1, turn. Skipping over the 2 SL STS you put in the Base Round, SC in BLO of each of the first 31 STS of the ribbing. SC in both loops of the last ST. (32)

    Rows 5-48: Repeat Rows 3-4 all the way around the Base Round.

    Row 49: CH1, do not turn. SC along the top of the ribbing, putting 1SC in each row end (48). Fasten off, leaving a long tail, and use it to sew the first and last ribbing rows together. Weave in all ends.

    BUTTONS

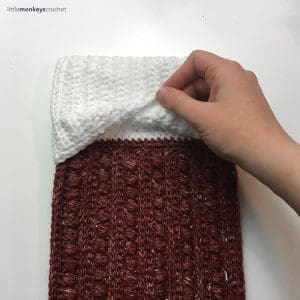
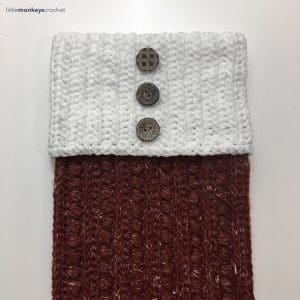
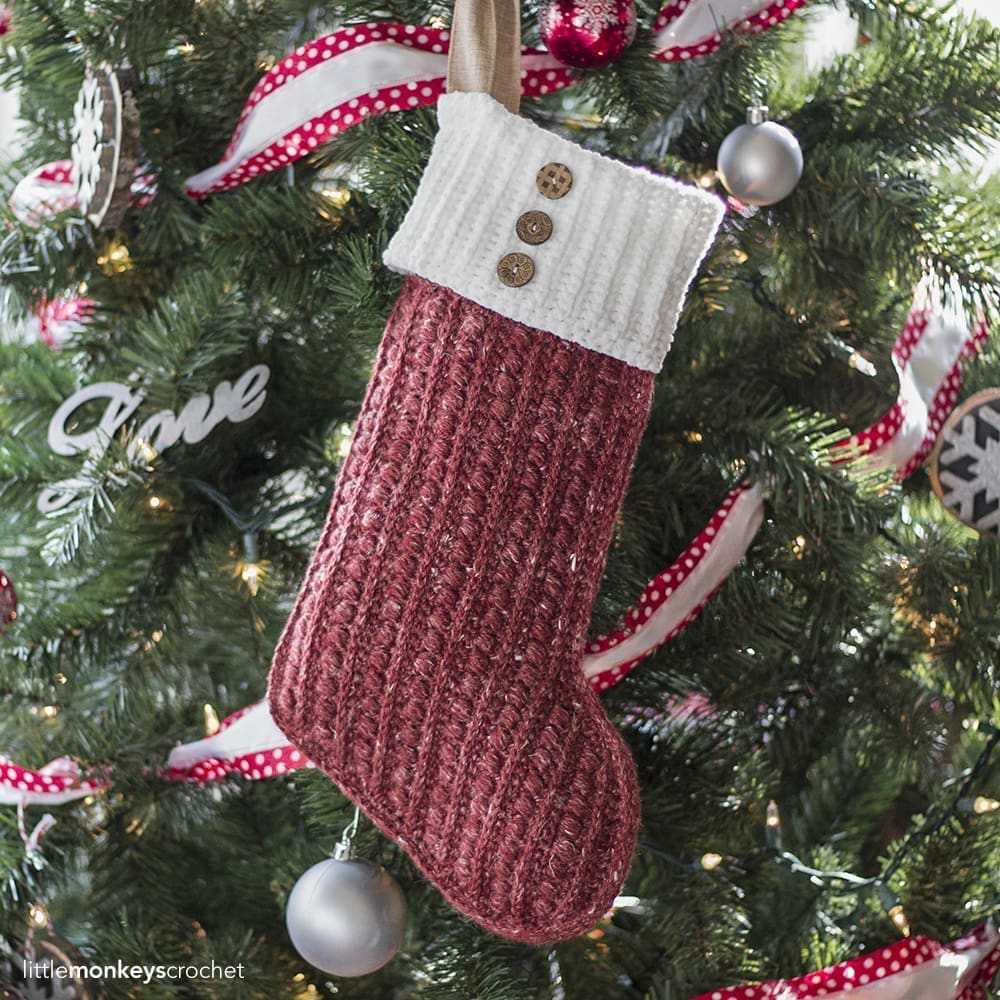
    Fold ribbing down over itself until it extends about an inch lower than its bottom edge. Place buttons where indicated and sew them on, working through the front double layers of ribbing to help hold everything in the correct place.

    RIBBON

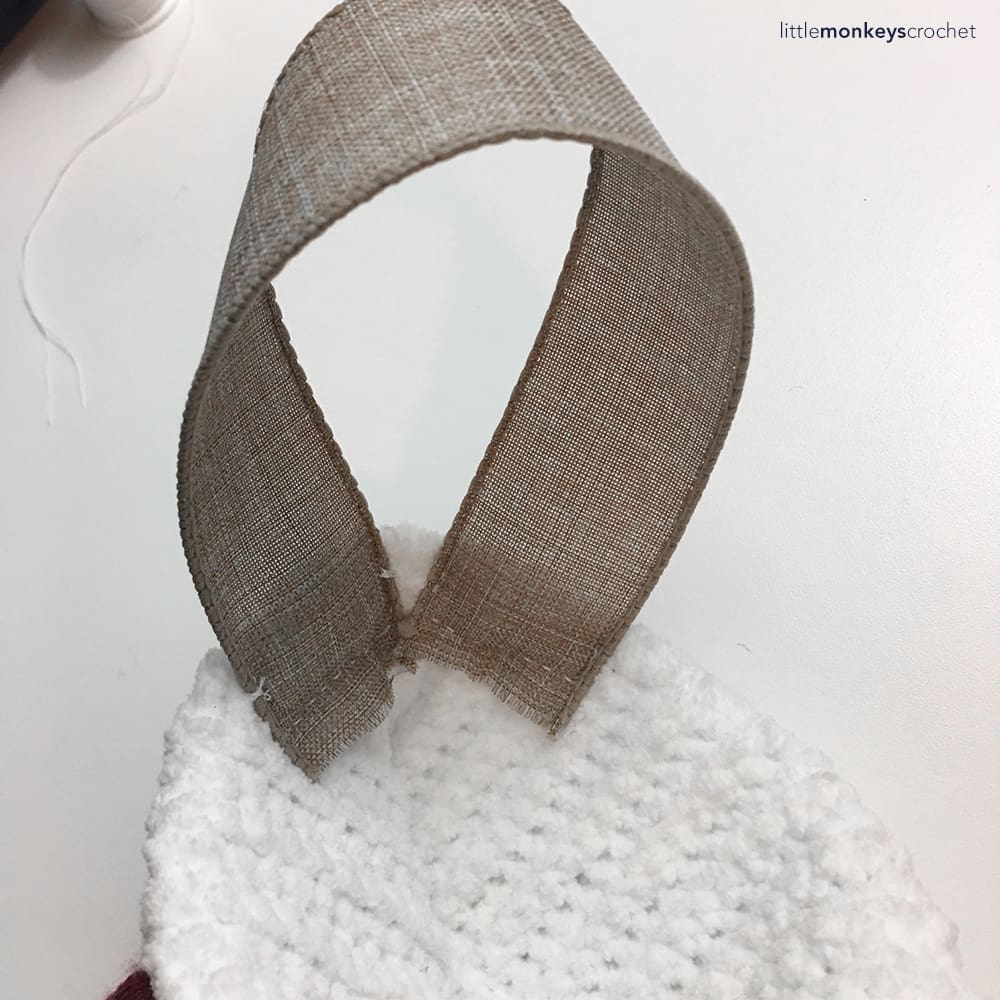
    Tuck ribbon ends into the stocking on the left side, about an inch below the top edge, and sew them to the inside, 1 against each side of the stocking. (I should note here that I am not a seamstress by any stretch of the imagination, and those of you who are may be cringing at what I did to attach the ribbon… so, if you have any kind words of wisdom, please feel free to put them in the comments below!)

    Done! If you’re sharing on social media, be sure to hashtag #maliachristmasstocking and tag me @yarnandchai.design. Hope you enjoyed it!

  • Bean Stitch Accent Pillow

    Bean Stitch Accent Pillow

    Two things I’m loving this spring: the Bean Stitch, and accent pillows!

    So, to make this free pattern I combined the Bean Stitch with a classic ribbing to create this beautiful pillow. Vanna’s Choice in “Linen” and “Graphite” come together to give it that rustic-modern look that is always a winner to me.

    Once you get the hang of the Bean Stitch, this pillow works up quick. I made it in two days while watching Nashville reruns during my son’s naps… and he’s a catnapper (UGH), so I think that’s pretty impressive! (Any of you other mamas who’ve had catnappers, I know you’re feeling my pain right now. Seriously, my laundry piles are sky high and we’ve had pizza for dinner one too many times this month. Good thing he’s cute!)

    Scroll down for the free pattern, or Klik hier voor de Nederlandse vertaling (Dutch translation). (Nederlandse vertaling gemaakt door Rita van Someren voor Haken voor Iedereen en Summerday’s Creations. Dit patroon mag niet in andere groepen, websites, blogs etc. gedeeld worden.)

    Prefer a PDF?

    This pattern can be completed using the 100% free version right here on this page. However, many people prefer the convenience of a printable, ad-free PDF.

    All-Access Passholders get the ad-free version of this and all of my other blog patterns. It’s a pretty sweet deal, if I do say so myself! Learn more about it here or continuing scrolling for the free version.

    BEAN STITCH ACCENT PILLOW

    add-to-ravelry-favorites

    Level: Easyish

    Size: 11.5″ x 11.5″ (stretches to fit a 12″ square pillow insert)

    Hooks: I (5.5mm) and H (5.0mm)

    Yarn: I used about 275 yards of Vanna’s Choice (from Lion Brand), a #4 aran weight yarn. The breakdown is as follows:

    COLOR A (ribbing): Vanna’s Choice “Linen” (about 75 yards)
    COLOR B (main section): Vanna’s Choice “Graphite” (about 200 yards)

    You’ll also need: Yarn needle for weaving in ends, 12″ pillow insert

    Gauge: Your 15 rows of ribbing (as instructed in the “first ribbing” section of the pattern) should measure about 4″ unstretched.

    Abbreviations Used:
       ST/STS (stitch/stitches)
    SL ST (slip stitch)
    SK (skip)
    CH (chain)
    SC (single crochet)
    BLO (back loops only)

    Special Stitch:

    Bean Stitch – Insert hook into stitch, yarn over and pull through (2 loops on hook). Yarn over, insert hook into same stitch, yarn over and pull through (4 loops on hook). Yarn over, insert hook into same stitch, yarn over and pull through (6 loops on hook). Yarn over and pull through all 6 loops. Chain 1 to close the stitch.

    Notes:
    (1) This pattern is written in American Standard Terms.
    (2) Starting CHs do not count as stitches.
    (3) Make 2.
    (4) Each side of the pillow is worked in one piece (with color changes). In other words, the second ribbing section is not created and sewn on separately. Once both sides of the pillow are complete, you will follow the instructions to sew them together with your pillow insert inside.
    (5) A Dutch translation is available here. Nederlandse vertaling gemaakt door Rita van Someren voor Haken voor Iedereen en Summerday’s Creations. Dit patroon mag niet in andere groepen, websites, blogs etc. gedeeld worden.

    – – – – – – – – – – – – – – – –

    SECTION 1: FIRST RIBBING

    To begin: With larger hook and COLOR A, CH9.

    Row 1: SC in 2nd CH from hook and in each remaining CH. (8)

    Rows 2-40:  CH1, turn. SC in 1st ST. SC in BLO of each of the next 6 STS. SC in last ST. (8)

    – – – – – – – – –

    SECTION 2: BODY OF PILLOW

    Body, Row 1: CH1, do not turn. SC evenly down the long edge of the ribbing, putting 1SC in each ribbing row (each peak and each valley). (40)

    Switch to COLOR B, fasten off previous color.

    Row 2: CH1, turn. SC in each ST across. (40)

    Note: At this point we will begin using the Bean Stitch. The bulkiness of this stitch might cause you to unintentionally loosen your tension significantly. To rectify this, you can switch to a smaller hook size. The ribbing will stretch around the pillow so it is not imperative that your bean stitch rows be exactly the same length as your strip of ribbing, but you will want to measure a bean stitch row every so often to make sure you aren’t crocheting the beans so loosely that the length is more than 11.5″. If it is, you’ll want to lower your hook size even more.

    Rows 3-22: CH1, turn. SK 1st ST, BEAN STITCH in next ST. (SK next ST, BEAN STITCH in next ST) across. (40, or 20 bean stitches)

    Note: If you switched to a lower hook size for rows 3-22, you can switch back to your first hook size now.

    Row 23: CH1, turn. SC in each ST across. (40)

    Switch to COLOR A, fasten off previous color.

    Row 24: CH1, turn. SC in each ST across. (40)

    – – – – – – – – –

    SECTION 3: LAST RIBBING

    In this section, we will be creating the second ribbing by making vertical ribs and attaching them with slip stitches to the last row of the body as we go. We’ll be referring to “Row 24” quite a bit; that’s the last row of the body of the pillow we completed, and that’s what the ribbing will be attaching to. 

    With hook still in your last stitch from Row 24, CH9.

    Last Ribbing, Row 1: Turn work and SC in 2nd CH from hook and in each remaining CH (Fig. A). SL ST in the first SC of Row 24, then SL ST in the next SC of Row 24 as well (Fig. B). (8, plus the 2 SL STS along Row 24)

    Row 2: CH1, turn. Skipping over the 2 SL STS you put in Row 24 (Fig. C), SC in BLO of each of the first 7 STS of the ribbing. SC in final ST (Fig. D). (8)

    Row 3: CH1, turn. SC in first ST of ribbing. SC in BLO of each of the next 7 STS of ribbing. SL ST in each of the next 2 STS of Row 24 (Fig. E). (8, plus the 2 SL STS along Row 24)

    Row 4: CH1, turn. Skipping over the 2 SL STS you put in Row 24, SC in BLO of each of the first 7 STS of the ribbing. SC in final ST. (8)

    Repeat Rows 3-4 all the way along Row 24 (See Fig. F for a progress photo). You should end up with 40 rows of ribbing, which is the number of stitches in Row 2

    Do not fasten off, but do take a moment to weave in your other ends, then proceed to Edging.

    – – – – – – – – –

    EDGING

    We need to put 40 STS along each edge of our square, and to keep it looking really nice, we’re going to edge each section in its own color. Continuing with COLOR A, CH1. SC evenly down the long edge of the ribbing, putting 1SC in each ribbing row (each peak and each valley) for 40 SC. CH1 to round the corner, then proceed to next edge. SC in each of the first 9 STS (8 ribbing stitches + Row 1 of the body). Attach COLOR B (Fig. G). (Note: You can decide if you want to carry the color you aren’t using behind the current color, or fasten it off and reattach it at the next appropriate section. I carried mine.) SC along the BEAN STITCH section of the pillow, putting 1SC in each BEAN STITCH row for a total of 20 SC. SC in the final row of COLOR B (Row 23, the row of single crochet). Switch to COLOR A. Complete 9 more SC to finish the edge, then CH1 to round the corner. Repeat the process for edges 3 & 4, then join with a SL ST to the top of the first SC.

    Fasten off and weave in all ends.

    – – – – – – – – –

    SEWING THEM TOGETHER

    Keeping your pillow insert handy, hold the two piece together exactly how you want them to be arranged on the pillow. Pick a spot on the edging that is the beginning of a COLOR A section, and attach COLOR A through the same stitch on both pieces (Fig. H). CH1, then SL ST evenly through both layers around the entire COLOR A section (Fig. I), putting (SC, CH1, SC) in each corner. When you come to the COLOR B section, attach COLOR B and fasten off COLOR A (or carry it along if you prefer) and continue. Once you’ve completed about 3/4 of the perimeter of the pillow, stuff your pillow insert inside (Fig. J). Continue to SC the rest of the way around. Join with a SL ST to the first SC.  Fasten off and weave in ends.

  • Henry’s Accent Pillow

    Henry’s Accent Pillow

    When I was choosing the theme for my newest little monkey’s nursery, I fell in love with this gorgeous navy, gray and green bedding set. In the spirit of keeping things simple and inexpensive, I bought the bed skirt and some off-brand coordinating sheets and changing pad covers. I wanted to add an accent pillow for the rocker to help tie everything together, but the pillow that came with the set was $52.

    FIFTY-TWO DOLLARS.

    It was really cute, but who has that much money to spend on a decorative pillow? So instead, after making Henry’s Baby Blanket in his nursery colors, I decided to just make a coordinating pillow. I’m giving you the pattern for it today!

    As you can see, the pillow only includes 2 color blocks (as opposed to Henry’s Baby Blanket, which uses 3 different colors of blocks). There just wasn’t room for 3 of them on a 12″ pillow without them being reeeaaally skinny. I opted to leave out the green color simply because I figure that when Henry grows out of his nursery, the pillow will be easier to coordinate with a different decor later if it doesn’t have the green in it.

    So, if you’re making the baby blanket for someone in their chosen nursery colors, now you can blow them away with a coordinating accent pillow!

    Prefer a PDF?

    This pattern can be completed using the 100% free version right here on this page. However, many people prefer the convenience of a printable, ad-free PDF.

    All-Access Passholders get the ad-free version of this and all of my other blog patterns. It’s a pretty sweet deal, if I do say so myself! Learn more about it here or continuing scrolling for the free version.

    HENRY’S ACCENT PILLOW

    add-to-ravelry-favorites

    Level: Easyish

    Size: 11″ x 11″ (stretches to fit a 12″ square pillow insert)

    Hook: H (5.0mm)

    Yarn: I used about 325 yards of Cascade Longwood (from Jimmy Beans Wool), a lighter #4 worsted weight yarn. Here’s my breakdown, and the colors as assigned in the pattern:

    COLOR A (White): Cascade Longwood – 01 White (about 135 yards)
    COLOR B (Gray): Cascade Longwood – 02 Frost Gray (about 95 yards)
    COLOR C (Navy): Cascade Longwood – 40 Midnight (about 95 yards)

    You’ll also need: Yarn needle for weaving in ends, 12″ pillow insert

    Gauge: 11 rows of ribbing (as instructed in the “first ribbing” section of the pattern) should measure 2.5″.

    Abbreviations Used:
       ST/STS (stitch/stitches)
    SL ST (slip stitch)
    SK (skip)
    CH (chain)
    SC (single crochet)
    HDC (half double crochet)
       SC+HDC (this just means to put a single crochet and a half double crochet in the same stitch)
    HHDC (herringbone half double crochet; see “special stitch” below)
    BLO (back loops only)

    Special Stitch:
    HHDC – Herringbone Half Double Crochet. Here’s how you do it:

    HHDC: Yarn over, insert hook into stitch. Yarn over, pull loop through stitch AND through first loop on hook (this is similar to a slip stitch motion). Two loops remain on hook. Yarn over and pull through both loops.

    (If you need additional help, Moogly has an excellent video tutorial here. Please note that while her video considers the CH2 at the beginning of rows as a stitch, the pattern below does not.)

    Notes:
    (1) This pattern is written in American Standard Terms.
    (2) Starting CHs do not count as stitches.
    (3) Pillow is worked in one piece (with color changes). In other words, the ribbing at the bottom is not created and sewn on separately.
    (4) You need to make 2. I switched the colors for the color block sections on the second side so that the sides of the pillow would be slightly different (on one side, the herringbone section is gray and the SC+HDC combo section is navy, and vice versa on the other side).

    – – – – – – – – – – – – – – – –

    SECTION 1: FIRST RIBBING

    To begin: With COLOR A (white), CH9.

    Row 1: SC in 2nd CH from hook and in each remaining CH. (8)

    Rows 2-48:  CH1, turn. SC in BLO of each ST across. (8)

    – – – – – – – – –

    SECTION 2: BODY OF PILLOW

    Body, Row 1: CH1, do not turn. SC evenly down the long edge of the ribbing, putting 1SC in each ribbing row (each peak and each valley). (48)

    Switch to COLOR B (gray), fasten off previous color.

    Row 2: CH1, turn. SC in each ST across. (48)

    Rows 3-12: CH1, turn. HDC in 1st ST. (SK next ST, SC+HDC in next ST) across until 1 ST remains. SC in remaining ST. (48)

    Row 13: CH1, turn. SC in each ST across. (48)

    Switch to COLOR A (white), fasten off previous color.

    Rows 14-15: CH1, turn. SC in each ST across. (48)

    Switch to COLOR C (navy), fasten off previous color.

    Row 16: CH1, turn. SC in each ST across. (48)

    Rows 17-26: CH1, turn. HHDC in each ST across. (48)

    Row 27: CH1, turn. SC in each ST across. (48)

    Switch to COLOR A (white), fasten off previous color.

    Row 28: CH1, turn. SC in each ST across. (48)

    – – – – – – – – –

    SECTION 3: LAST RIBBING

    In this section, we will be creating the second ribbing by making vertical ribs and attaching them with slip stitches to the last row of the body as we go. We’ll be referring to “Row 28” quite a bit; that’s the last row of the body of the pillow we completed, and that’s what the ribbing will be attaching to. 

    With hook still in your last stitch from Row 28, CH9.

    Last Ribbing, Row 1: Turn work and SC in 2nd CH from hook and in each remaining CH. SL ST in the first SC of Row 28, then SL ST in the next SC of Row 28 as well. (8, plus the 2 SL STS along Row 28)

    Row 2: CH1, turn. Skipping over the 2 SL STS you put in Row 28, SC in BLO of each of the 8 STS of the ribbing to create another row of ribbing. (8)

    Row 3: CH1, turn. SC in BLO of each of the 8 STS of the ribbing to create another row of ribbing. SL ST in each of the next 2 STS of Row 28. (8, plus the 2 SL STS along Row 28)

    Row 4: CH1, turn. Skipping over the 2 SL STS you put in Row 28, SC in BLO of each of the 8 STS of the ribbing to create another row of ribbing. (8)

    Repeat Rows 3-4 all the way along Row 28. (You should end up with 48 rows of ribbing, which is the number of stitches in Row 28).

    – – – – – – – – –

    EDGING

    Explanation: We need to put a SC edging around the entire pillow. Ideally, we want this to be a perfect square, so we need to make sure that we are putting 48 stitches along each side. The sides with the ribbing are easy; there are 48 rows of ribbing, so we’ll just put 1 stitch in each ribbing row (each peak and each valley). The other two sides are comprised of 44 rows (28 rows in the body + 8 stitches in each ribbing section), so we need to make sure we’re adding 4 stitches to get to 48. To do that, we’ll put 1 SC in each row of the pattern (including one in each of the 8 ribbing stitches) except for the color blocks. The color blocks are each 12 rows tall, so we’re going to put 14 stitches along each color block (just eyeball it the best you can). To get around corners, we’ll simply chain 1.

    Here’s a visual:

    So, to do this, keep your hook in the final stitch you completed in the second ribbing section. CH1, and SC evenly around the entire piece according to the directions above. When you get back to the beginning, join with a SL ST to the first SC you made.

    Fasten off and weave in all ends.

    – – – – – – – – –

    SEWING THEM TOGETHER

    Keeping your pillow insert handy, hold the two piece together exactly how you want them to be arranged on the pillow. Pick a spot on the edging and join COLOR A through the same stitch on both pieces. CH1, then SC evenly through both layers around the entire pillow, putting (SC, CH1, SC) in each corner. Once you’ve completed about 3/4 of the perimeter, stuff your pillow insert inside. Continue to SC the rest of the way around. Join with a SL ST to the first SC.  Fasten off and weave in ends.

  • Henry’s Baby Blanket

    Henry’s Baby Blanket

    I am so excited to finally show you my newest little monkey’s baby blanket!

    At the time I’m writing up this blog post, I’m 38 weeks along (although when it gets published, Baby Henry will already be born). I can feel him kicking around inside and I get the feeling he’s just as anxious to be born as I am to hold him in my arms.

    Henry's Baby Blanket Crochet Pattern | Free modern baby blanket crochet pattern by Little Monkeys Crochet

    For Henry’s blanket, I chose one of my favorite yarns, Cascade Longwood. It has a beautiful stitch definition that I knew would be important in a textured blanket like this. This definitely turned out to be a heavy, warm blanket, perfect for draping over the carseat of a winter baby.

    Henry's Baby Blanket Crochet Pattern | Free modern baby blanket crochet pattern by Little Monkeys Crochet

    When I started the blanket, I knew that I wanted to use ribbing for the ends to give it a nice finished, modern look. I started out intending to do the entire body of the blanket in herringbone half double crochet, but once I got through the first color block, I couldn’t let go of the nagging feeling that it needed a little more interest. So on a whim, I switched to one of my other favorite stitches, the SC+HDC combo for the 2nd color block. I loved the contrast between the blocks (and how it allowed me to change stitches just when I started getting bored), so I went with it! You can see the different textures – ribbing, herringbone, and SC+HDC – in the photo below.

    Henry's Baby Blanket Crochet Pattern | Free modern baby blanket crochet pattern by Little Monkeys Crochet

    I think this blanket would make a gorgeous, modern statement for a boy or a girl, depending on the colors you pick.

    – – – – – – – – – – – – – – – –
    UPDATE: He’s here!

    henry-blog

    – – – – – – – – – – – – – – – –

    Prefer a PDF?

    This pattern can be completed using the 100% free version right here on this page. However, many people prefer the convenience of a printable, ad-free PDF.

    All-Access Passholders get the ad-free version of this and all of my other blog patterns. It’s a pretty sweet deal, if I do say so myself! Learn more about it here or continuing scrolling for the free version.

    HENRY’S BABY BLANKET

    add-to-ravelry-favorites

    Level: Easyish

    Size: Blanket measures 30″x38″. Adjustment instructions are given in Notes section.

    Hook: H (5.0mm)

    Yarn: I used about 1,330 yards of Cascade Longwood (from Jimmy Beans Wool), but any #4 worsted weight yarn will work. Here’s my breakdown, and the colors as assigned in the pattern:

    COLOR A (White): Cascade Longwood – 01 White (about 220 yards, or <2 skeins)
    COLOR B (Navy): Cascade Longwood – 40 Midnight (about 370 yards, or almost 2 full skeins)
    COLOR C (Gray): Cascade Longwood – 02 Frost Gray (about 370 yards, or almost 2 full skeins)
    COLOR D (Green): Cascade Longwood – 18 Green Spruce – discontinued (about 370 yards, or almost 2 full skeins)

    You’ll also need: Yarn needle for weaving in ends

    Gauge: Not super important, but 14 rows of 16 HHDC = 4″.

    Abbreviations Used:
       ST/STS (stitch/stitches)
    SL ST (slip stitch)
    SK (skip)
    CH (chain)
    SC (single crochet)
    HDC (half double crochet)
       SC+HDC (this just means to put a single crochet and a half double crochet in the same stitch)
    HHDC (herringbone half double crochet; see “special stitch” below)
    BLO (back loops only)

    Special Stitch:
    HHDC – Herringbone Half Double Crochet. Here’s how you do it:

    HHDC: Yarn over, insert hook into stitch. Yarn over, pull loop through stitch AND through first loop on hook (this is similar to a slip stitch motion). Two loops remain on hook. Yarn over and pull through both loops.

    (If you need additional help, Moogly has an excellent video tutorial here. Please note that while her video considers the CH2 at the beginning of rows as a stitch, the pattern below does not.)

    Notes:
    (1) This pattern is written in American Standard Terms.
    (2) Starting CHs do not count as stitches.
    (3) To adjust the width of your blanket, add or subtract rows from the first ribbing section of the pattern (just be sure to end up with an even number of ribs). To adjust the length of your blanket, you can add/subtract more blocks of color, or make each block taller/shorter.
    (4) Blanket is worked in one piece (except for color changes). In other words, the ribbing at the bottom is not created and sewn on separately.

    – – – – – – – – – – – – – – – –

    SECTION 1: TOP RIBBING

    To begin: With COLOR A (white), CH9.

    Row 1: SC in 2nd CH from hook and in each remaining CH. (8)

    Row 2: CH1, turn. SC in BLO of each ST across. (8)

    Rows 3-120 (or until ribbing measures about 30″ long, but keep it an even number):  CH1, turn. SC in BLO of each ST across. (8)

    – – – – – – – – –

    SECTION 2: BODY OF BLANKET

    The body of the blanket is divided into 6 color blocks which alternate between blocks of Herringbone HDC and blocks of SC+HDC combos. Each color block is separated by a thin, 2-row block of white.

    Body, Row 1: CH1, do not turn. SC evenly down the long edge of the ribbing, putting 1SC in each ribbing row (each peak and each valley). It is important to end with an even number of stitches in this row. (120)

    Switch to COLOR B (navy), fasten off previous color.

    Row 2: CH1, turn. SC in each ST across. (120)

    Rows 3-18: CH1, turn. HHDC in each ST across. (120)

    Row 19: CH1, turn. SC in each ST across. (120)

    Switch to COLOR A (white), fasten off previous color.

    Rows 20-21: CH1, turn. SC in each ST across. (120)

    Switch to COLOR C (gray), fasten off previous color.

    Row 22: CH1, turn. SC in each ST across. (120)

    Rows 23-40: CH1, turn. HDC in 1st ST. (SK next ST, SC+HDC in next ST) across until 1 ST remains. SC in remaining ST. (120)

    Row 41: CH1, turn. SC in each ST across. (120)

    Switch to COLOR A (white), fasten off previous color.

    Rows 42-43: CH1, turn. SC in each ST across. (120)

    Switch to COLOR D (green), fasten off previous color.

    Row 44: CH1, turn. SC in each ST across. (120)

    Rows 45-60: CH1, turn. HHDC in each ST across. (120)

    Row 61: CH1, turn. SC in each ST across. (120)

    Switch to COLOR A (white), fasten off previous color.

    Rows 62-63: CH1, turn. SC in each ST across. (120)

    Switch to COLOR B (navy), fasten off previous color.

    Row 64: CH1, turn. SC in each ST across. (120)

    Rows 65-82: CH1, turn. HDC in 1st ST. (SK next ST, SC+HDC in next ST) across until 1 ST remains. SC in remaining ST. (120)

    Row 83: CH1, turn. SC in each ST across. (120)

    Switch to COLOR A (white), fasten off previous color.

    Rows 84-85: CH1, turn. SC in each ST across. (120)

    Switch to COLOR C (gray), fasten off previous color.

    Row 86: CH1, turn. SC in each ST across. (120)

    Rows 87-102: CH1, turn. HHDC in each ST across. (120)

    Row 103: CH1, turn. SC in each ST across. (120)

    Switch to COLOR A (white), fasten off previous color.

    Rows 104-105: CH1, turn. SC in each ST across. (120)

    Switch to COLOR D (green), fasten off previous color.

    Row 106: CH1, turn. SC in each ST across. (120)

    Rows 107-124: CH1, turn. HDC in 1st ST. (SK next ST, SC+HDC in next ST) across until 1 ST remains. SC in remaining ST. (120)

    Row 125: CH1, turn. SC in each ST across. (120)

    Switch to COLOR A (white), fasten off previous color.

    Row 126: CH1, turn. SC in each ST across. (120)

    – – – – – – – – –

    SECTION 3: BOTTOM RIBBING

    In this section, we will be creating the bottom ribbing by making vertical ribs and attaching them with slip stitches to the last row of the body as we go. We’ll be referring to “Row 126” quite a bit; that’s the last row of the body of the blanket we completed, and that’s what the ribbing will be attaching to. 

    CH9.

    Bottom Ribbing, Row 1: Turn work and SC in 2nd CH from hook and in each remaining CH. SL ST in the first SC of Row 126, then SL ST in the next SC of Row 126 as well. (8, plus the 2 SL STS along Row 126)

    Row 2: CH1, turn. Skipping over the 2 SL STS you put in Row 126, SC in BLO of each of the 8 STS of the ribbing to create another row of ribbing. (8)

    Row 3: CH1, turn. SC in BLO of each of the 8 STS of the ribbing to create another row of ribbing. SL ST in each of the next 2 STS of Row 126. (8, plus the 2 SL STS along Row 126)

    Row 4: CH1, turn. Skipping over the 2 SL STS you put in Row 126, SC in BLO of each of the 8 STS of the ribbing to create another row of ribbing. (8)

    Repeat Rows 3-4 all the way along Row 126. (You should end up with 120 rows of ribbing, which is the number of stitches in Row 126).

    Fasten off and weave in ends.

  • Newborn Photography Prop Blanket

    Newborn Photography Prop Blanket

    Today’s pattern release is a little out-of-the-norm for me. If you’re expecting a bundle of joy soon, or if you work with (or sell to) photographers, you might love it!

    With the arrival of Baby Boy #3 less than 2 months away, I’m starting to think about what I want to do for his newborn photo session. I didn’t even know how to crochet when my two older (now 4 & 6) boys were born, so this is exciting!

    I’m a big fan of the rustic-modern style, so I’ll definitely be incorporating that into the photos. I saw this pin on Pinterest not long ago and decided that a chalkboard crate was the way to go. I figured I’d have to DIY it, so I was really happy when I came across a baby-sized crate at Walmart that already had the chalkboard section built in. It doesn’t get much easier than that!

    Newborn Photography Prop Blanket Crochet Pattern | Free baby photo prop blanket crochet pattern by Little Monkeys Crochet

    I decided to crochet a few fluffy blankets for the crate, and have been keeping my eyes open for the perfect yarns to achieve the cozy rustic look I want. I ended up choosing three different yarns, and whipped up some of the coziest looking prop blankets ever! These yarns are all different brands, but their colors and textures will work beautifully together or separately.

    As you’ll see below, this pattern isn’t written out as a pattern so much as it is a formula, because it can work for any yarn and any hook size you choose. So instead of giving you detailed chain and stitch counts, I’ll teach you how to determine the right number of stitches for the yarn you choose, to get a beautiful 20″ x 20″ prop-sized blanket.

    Since I know you’re probably wondering, here are the yarns that I used, and their accompanying hook sizes:

    – – – – – –

    Lion Brand Homespun (bulky)

    Color: Shaker
    Hook Size: K

    Newborn Photography Prop Blanket Crochet Pattern | Free baby photo prop blanket crochet pattern by Little Monkeys Crochet

    This is not a beginner yarn, but I will say that this pattern is ideal for it. The crinkly texture of the yarn makes seeing your stitches tough, but the stitch combination we’re using makes it easy to feel where the hook gets inserted, thanks to the little holes that are created when we skip a stitch and put two stitches together in the next. The resulting blanket is really rustic looking.

    – – – – – –

    Bernat Home Bundle (super bulky)

    Color: Not Sure (It was a mix of cream and white, and I can’t find it online anywhere)
    Hook Size: N

    Newborn Photography Prop Blanket Crochet Pattern | Free baby photo prop blanket crochet pattern by Little Monkeys Crochet

    I’d never noticed this yarn at the store before, but when I saw it at Joann Fabrics, I knew it was absolutely perfect for the look I wanted to achieve. Home Bundle is a supersized skein of 4 different textures of yarn: a faux-fur, Bernat Blanket, a regular super bulky yarn, and a yarn that feels really similar to Lion Brand Homespun. These textures show up in a self-striping pattern, and I did see a few colorways that featured different colors for each texture, but I opted for the all-cream skein because I didn’t want the jagged edges that come with abrupt color changes (which would be especially noticeable in this thick of a yarn). The resulting blanket is incredibly soft and looks just like something you’d want to snuggle around your newborn.

    – – – – – –

    Charisma Big! by Loops & Threads (bulky)

    Color: Taupe
    Hook Size: L

    Newborn Photography Prop Blanket Crochet Pattern | Free baby photo prop blanket crochet pattern by Little Monkeys Crochet

    The color of this yarn is gorgeous! I’m always a sucker for really natural-looking neutral yarns, and this is a good one. This is the yarn that shows off the actual pattern the best of the three that I chose. I also opted to put a simple, boy-friendly (i.e. not frilly) border on this one, and included the instructions for it in the pattern below.

    Prefer a PDF?

    This pattern can be completed using the 100% free version right here on this page. However, many people prefer the convenience of a printable, ad-free PDF.

    All-Access Passholders get the ad-free version of this and all of my other blog patterns. It’s a pretty sweet deal, if I do say so myself! Learn more about it here or continuing scrolling for the free version.

    NEWBORN PHOTOGRAPHY PROP BLANKET

    add-to-ravelry-favorites

    Level: Easy

    Size: 20″ x 20″

    Yarn: Your choice

    Hook: Whatever will work well with the yarn you chose

    You’ll also need: Yarn needle, measuring tape

    Gauge:
    Not important

    Abbreviations Used:
       ST (stitch)
    SL ST (slip stitch)
    SK (skip)
    CH (chain)
    SC (single crochet)
    HDC (half double crochet)
       SC+HDC (this just means to put a single crochet and a half double crochet in the same stitch)

    Notes:
    (1) This pattern is written in American Standard Terms.
    (2) Starting CHs do not count as stitches.
    (3) This pattern will work for any size blanket and you can chain any number to start as long as it’s an odd number.

    – – – – – – – – – – – – – – – –

    To begin:
    Being sure to chain an odd number of chains, chain until your starting chain is about 19-20″ in length.

    Row 1: SC+HDC in 3rd CH from hook. (SK next ST, SC+HDC in next ST) across.

    Row 2: CH1, turn. SK first ST, SC+HDC in next ST. (SK next ST, SC+HDC in next ST) across.

    Repeat Row 2 until your blanket measures about 20″ in length. Fasten off and weave in ends, or continue on to Optional Edging, below.

    – – – – – –

    Optional Edging
    If you want to give your blanket a nice finished edge without drawing a lot of attention to it (remember, we’re going for the rustic look, not the fancy look), follow these instructions:

    Round 1: CH1, turn. SC evenly around the entire blanket, putting 3SC in each corner. (On the sides of the blanket where there aren’t already defined stitches, you can put 1SC in each row.) Join to the first SC with a SL ST.

    Round 2: CH1. SL ST in each SC around the entire blanket, putting (SL ST, CH1, SL ST) in each corner stitch. Join to the first SL ST with a SL ST.

    Newborn Photography Prop Blanket Crochet Pattern  |  Free baby photo prop blanket crochet pattern by Little Monkeys Crochet

    Fasten off and weave in all ends.

  • Americana Pillow (12″)

    Americana Pillow (12″)

    Thank you to Lion Brand Yarn for providing the yarn for this sample!

    Happy Independence Day Weekend to all my American friends! Between the fireworks and campfires, beach trips and barbecues, we definitely know how to celebrate freedom in style.

    In honor of this special holiday, I’ve created this fun American flag throw pillow pattern. The front is a combination of 4 smaller squares sewn into the design of an American Flag, with assorted buttons in place of the stars. The back side has its own design:

    Americana Pillow Patriotic Crochet Pattern | Free American Flag Crochet Pattern by Little Monkeys Crochet

    Don’t worry if you don’t have time to get yours done for the 4th; Americana is in style all year round!

    The Yarn

    Before we get into the pattern, though, let me talk about this yarn. I used the brand new Vanna’s Style (from Lion Brand), which is a DK (that’s a #3 weight) yarn. When I first heard that Lion Brand was debuting a DK version of Vanna’s Choice, I couldn’t contain my excitement. And when my first skeins came in the mail, I was completely blown away. Seriously, guys — I have never, ever been this excited about a new yarn. It is so soft! And you get 254 yards in a skein, which for a DK weight especially is a great amount. The stitch definition is gorgeous and crocheting with it is easy peasy. All I can say is, get ready for fall and winter, because you’ll definitely be seeing lots of new Little Monkeys patterns with my new favorite yarn.

    I haven’t found Vanna’s Style in any of my local stores yet (it really is brand new), but you can always purchase it direct from Lion Brand!

    Prefer a PDF?

    This pattern can be completed using the 100% free version right here on this page. However, many people prefer the convenience of a printable, ad-free PDF.

    All-Access Passholders get the ad-free version of this and all of my other blog patterns. It’s a pretty sweet deal, if I do say so myself! Learn more about it here or continuing scrolling for the free version.

    AMERICANA PILLOW

    add-to-ravelry-favorites

    Level: Easy but involved

    Size: Fits a standard 12″ square pillow insert

    Hook: E (3.50mm); use whatever hook you need to match gauge.

    Gauge: 6 rows of 8 HRDC = 2″ square

    Yarn: About 600 yards of Vanna’s Style yarn from Lion Brand. (Vanna’s Style is a #3 DK weight yarn.) I used Red, Ecru, and Navy (less than 1 skein of each).

    You’ll also need: Yarn needle for weaving in ends, assorted small buttons in shades of cream/ivory, needle and thread for sewing on buttons, 12″ square throw pillow insert

    Abbreviations Used:
       ST/STS (stitch/stitches)
    SL ST (slip stitch)
    SK (skip)
    CH (chain)
    SC (single crochet)
    HbDC (herringbone double crochet; see “Special Stitch” below)

    Special Stitch:
      HbDC – Herringbone Double Crochet. (If the instructions below are unclear, Moogly has an excellent video tutorial here.)

    HbDC: Yarn over, insert hook into stitch. Yarn over, pull loop through stitch AND through first loop on hook (this is similar to a slip stitch motion). Two loops remain on hook. Yarn over and pull through first loop on hook. Two loops remain on hook. Yarn over again and pull the loop through both loops on the hook.

    Additional Notes:
    (1) This pattern is written in American Standard Terms.
    (2) CH1/CH2 at the beginning of rows do not count as stitches.
    (3) Gauge is important in this pattern. It is not important to use the same hook size as I did; it is very important to choose a hook that allows you to match the gauge listed.
    (4) Regarding the front side of the pillow, the red and white striped squares: instead of edging them in all red or all ecru (ivory), I chose to edge mine in both colors, alternating my yarn all the way around the square according to what color stripe I was edging. This may seem like overkill, but the difference in the finished look of the pillow was striking. When I first edged them in the ivory color all the way around, it looked significantly more sloppy. I highly recommend you alternate the colors, as I think you’ll be happier with the professionalism of the finished product.

    PATTERN

    FRONT SIDE, RED AND WHITE STRIPED SQUARES (MAKE 3)

    Finished squares should measure 5.75″ across including edging.

    To begin:
    With RED, CH24.

    Row 1: HbDC in 3rd CH from hook and in each CH across. (22)
    Row 2: CH2, turn. HbDC in each ST across. (22)
    Row 3: CH2, turn. HbDC in each ST across. (22)
    Row 4: CH2, turn. HbDC in each ST across. (22)

    Switch to ECRU.

    Row 5-8: CH2, turn. HbDC in each ST across. (22)

    Switch to RED.

    Rows 9-12: CH2, turn. HbDC in each ST across. (22)

    Switch to ECRU.

    Rows 13-16: CH2, turn. HbDC in each ST across. (22)

    Fasten off. To weave in ends, let’s determine which side of the square will be the front. If you look at both sides of a square, you’ll notice they are slightly different at their color changes; one side will have a nice definitive color change (albeit slightly jagged), and the other side will show slight overlap at the color changes, where the Ecru may show through the Red stitches a bit or vice versa. Use the side with the nice clear color change as the front of your square, and weave your ends into the backside.

    FrontSideOfStripedSquares

    Edging

    There are 2 important things to understand about edging these squares. This may sound a little confusing, but hang with me here and use the photo below to clarify what I’m saying. (1) We need to edge these squares nice and evenly, with 22SC around each side of the square. This is easy to do with the top and bottom of the square, but takes a little planning with the left and right edges since there are no evenly-placed stitches to work into. To get 22SC along those left and right edges, we’re going to put 6SC in each Red section, and 5SC in each Ecru section (6+5+6+5=22). (2) As mentioned in the Notes section above, we are edging these squares with alternating Red and Ecru, because the finished look will be much nicer. Yes, it means a few more ends to weave in, but trust me; it will look better. If you need help with switching colors in the middle of a row, Moogly has a great video tutorial here.

    So, keeping in mind the explanations above, we’re going to put a nice edging on these squares. We’ve already determined which side of the squares will be the front, so lay a square in front of you with the front side facing you. Attach RED to the rightmost corner of the top Red stripe; CH1. Put 6SC along the short side of that stripe. CH2 (to turn the corner), and SC in each ST along the long side of the Red stripe (22SC). CH2 again, and put 6SC evenly along the remaining edge of that stripe. Switch to ECRU and put 5SC along the short edge of that stripe. Switch back to RED and put 6SC along the short edge of the next red stripe. Continue around the square, then join to the first SC with a SL ST.

    EdgingTheStripedSquares

    Fasten off and weave in all ends.

    FRONT SIDE, BLUE SQUARE (MAKE 1)

    Finished square should measure 5.75″ across including edging.

    To begin:
    With NAVY, CH24.

    Row 1: HbDC in 3rd CH from hook and in each CH across. (22)
    Rows 2-16: CH2, turn. HbDC in each ST across. (22)

    Edging:
    CH1, turn.

    1st side: SC evenly along the first edge (22SC); CH2 to round the corner.
    2nd side: Notice the horizontal “lines” that were created naturally by the stitch we used; these lines divide the square up into 9 “strips”. To evenly crochet 22SC down this side of the square, place 2SC in the first strip, 3SC in the next, 2 in the next, 3 in the next, alternating all the way down the side for a total of 22SC (2+3+2+3+2+3+2+3+2=22). Use the photo below to guide you. CH2 to round the next corner.

    Americana Pillow Patriotic Crochet Pattern | Free American Flag Crochet Pattern by Little Monkeys Crochet

    3rd side:
     SC evenly along the first edge (22SC); CH2 to round the corner.
    4th side: Follow instructions for 2nd side (22SC), and CH2 to round the final corner. Join with a SL ST to the first SC.

    Fasten off and weave in ends.

    Buttons

    Arrange your buttons on the front side of the blue square and sew them on with yarn and thread. I used a tiny dab of hot glue to affix each one to the square before I sewed any of them, so that they would stay in place during the sewing process. If you don’t have a glue gun handy, you could also snap a photo of the buttons in the layout you want so that you can refer to it as you sew.

    Americana Pillow Patriotic Crochet Pattern | Free American Flag Crochet Pattern by Little Monkeys Crochet

    BACK SIDE (MAKE 1)

    Finished square should measure 11.75″ across including edging.

    To begin:
    With RED, CH48.

    Row 1: HbDC in 3rd CH from hook and in each CH across. (46)
    Row 2: CH2, turn. HbDC in each ST across. (46)

    Switch to ECRU.

    Rows 3-4: CH2, turn. HbDC in each ST across. (46)

    Switch to NAVY.

    Rows 5-6: CH2, turn. HbDC in each ST across. (46)

    Switch to RED.

    Rows 7-32: Continue this pattern, switching colors every 2 rows in a RED, ECRU, and NAVY repetition. (You will end on RED.)

    Switch to ECRU.

    Row 33: CH2, turn. HbDC in each ST across. Note that this is only a single row of HbDC. (46)

    Fasten off RED and NAVY. Leaving ECRU attached, weave all loose ends into the backside of the square, then continue on to Edging (next).

    Edging:
    CH1, do not turn.

    1st side: This pillow is divided into 17 stripes or color blocks (yes, we’re including that last row of HbDC in that final count, even though it’s smaller than the rest). We need to crochet 46SC evenly down this side, and we’ll do so by following a pattern of 2-3-3-3 (meaning 2SC in the first stripe, 3SC in the next, 3SC in the next, 3SC in the next, then repeat, all the way down the side). After repeating this sequence a total of 4 times, there will be 1 stripe remaining; we’ll put 2SC in that one. Use the photo below as a visual.

    Americana Pillow Patriotic Crochet Pattern | Free American Flag Crochet Pattern by Little Monkeys Crochet

    CH2 to round the corner.

    2nd side: SC in each ST across (46). CH2 to round the corner.
    3rd side: Follow the instructions for the 1st side (46). CH2 to round the corner.
    4th side: SC in each ST across (46). CH2 to round the corner. Join to the first SC of Side 1 with a SL ST. Fasten off and weave in.

    ASSEMBLING THE FRONT OF THE PILLOW

    You should now have 5 squares:

    Americana Pillow Patriotic Crochet Pattern | Free American Flag Crochet Pattern by Little Monkeys Crochet

    It’s time to make them into a pillow cover!

    We’ll start by assembling the front side of the pillow. Lay your squares out in front of you in the layout in which they’ll be sewn together:

    Americana Pillow Patriotic Crochet Pattern | Free American Flag Crochet Pattern by Little Monkeys Crochet

    We’ll begin with the top two squares. Line up the right edge of the blue square with the left edge of the striped square, and put the squares together, wrong sides touching, right sides facing outward. Attach Ecru in the top corner CH2 spaces (going through both squares) and CH1. SC in same space. SC in only the two inner loops (the ones that are touching each other) of the next ST, leaving the outer loop of each square unworked (see photo below). SC in only the two inner loops of each ST all the way across the edge of the squares. SC in last CH2 space. Do not remove your hook.

    Americana Pillow Patriotic Crochet Pattern | Free American Flag Crochet Pattern by Little Monkeys Crochet

    We’re going to muster up a little extra hand coordination now in order to attach the bottom two squares. Take the bottom two squares and line them up with each other in the same way you did for the top two squares. Holding the top two squares in your right hand and the bottom two in your left, SC in the top CH2 spaces of both bottom squares, essentially attaching the top two with the bottom two (see photo below).

    Americana Pillow Patriotic Crochet Pattern | Free American Flag Crochet Pattern by Little Monkeys Crochet

    Continue to SC in only the two inner loops along the edge of the bottom two squares. SC in last CH2 space. All four of your squares should be attached now by a vertical seam, and they should look a little like a butterfly when laid out flat:

    Americana Pillow Patriotic Crochet Pattern | Free American Flag Crochet Pattern by Little Monkeys Crochet

    CH1, turn. Going back over the seam you just created, SC in the samestitches you did before. Note that you are not adding a new row; you are thickening the row you already did by going over it with a 2nd layer (see photo below).

    Americana Pillow Patriotic Crochet Pattern | Free American Flag Crochet Pattern by Little Monkeys Crochet

    Fasten off your yarn and weave in the ends.

    Next, fold the piece in half at the unseamed center, wrong sides touching, right sides facing out. Reattach Ecru in the CH2 spaces on the right edge, and follow the same instructions to seam the edges together (making sure to SC in each CH2 space, and also to SC in only the two inner loops of the rest of the stitches). Don’t forget to CH1, turn, and SC in the same stitches you did before to give the seam a 2nd layer.

    Americana Pillow Patriotic Crochet Pattern | Free American Flag Crochet Pattern by Little Monkeys Crochet

    Fasten off and weave in ends.


    Final Assembly 

    Hold the front and back sides of the pillow cover together, wrong sides facing each other, right sides facing outward. Attach Ecru in the CH2 space of one of the corners, CH1, and SC in same space. SC around 3 sides of the squares, putting (SC, CH1, SC) in each CH2 corner space. Place pillow insert inside cover and continue to SC along the 4th side, closing the pillow inside. When you get to the corner in which you started, SC and CH1, then SL ST to the very first SC you completed. Fasten off and weave in ends.

    PATTERN FAQS

    I am already anticipating some of the questions I’ll get about this pattern, so I’m going to answer them here. I’ll add other questions and answers as they come.

    Q. Did you carry your yarn on the striped sections, or fasten off and reattach each time?
    A. I started out fastening off, but did switch to carrying. It really depends on what you’re most comfortable with. As long as you’re careful to not let the carried yarn pull on the edges, and you know how to hide it when you edge your squares and keep it concealed with you sew the pillow together, you’ll be fine if you carry it.

    Q. Do I have to edge the red & white striped squares in both colors, or can I just edge them all in ecru (ivory)?
    A. You don’t have to do what I did; I just highly recommend it for a nicer finished look. If it’s too overwhelming for you, then yes, feel free to just do a simple ivory edging.

    Q. How can I make this for a larger pillow?
    A. Unfortunately, due to the involved nature of the pattern, it’s quite a bit more complicated than simply starting with a longer chain. If you want to make the pattern for a larger pillow insert, you’ll need to figure out the changes on your own.

    Q. Is there a video tutorial for this pattern?
    A. No, sorry! 🙂

  • Bubble Gum Accent Rug

    Thank you to Lion Brand Yarn for providing the yarn for this sample!

    I have a fun new home decor pattern for you today! I experimented with Lion Brand’s cheerfully-colored Kitchen Cotton line to come up with this bright accent rug. I’m a big fan of color-blocking (colors striped in big chunks at a time), so I used that method when choosing this project’s color scheme. Smaller stripes of an off-white separate each of the color blocks to really make them pop. This accent rug would be perfect in a bathroom or a nursery.

    Bubble Gum Accent Rug Crochet Pattern made with Kitchen Cotton yarn from Lion Brand | Free crochet pattern by Little Monkeys Crochet

    I double-stranded (held two strands together) my yarn for this pattern in order to get a nice sturdy rug. If you’re newer to crochet, this might sound intimidating, but you’ll get the hang of it quick! You may also find that it’s a little harder on your hands, because the hook has to work a little harder, but you can always set it aside for a day and come back to it with fresh fingers.

    You can find this fun, sturdy yarn at lionbrand.com, or on Craftsy. At the time this blog post was published, Kitchen Cotton was on sale on Craftsy.com for just $2.03 a skein (regular $3.69). That’s a steal!

    Bubble Gum Accent Rug Crochet Pattern made with Kitchen Cotton yarn from Lion Brand | Free crochet pattern by Little Monkeys Crochet

    Prefer a PDF?

    This pattern can be completed using the 100% free version right here on this page. However, many people prefer the convenience of a printable, ad-free PDF.

    All-Access Passholders get the ad-free version of this and all of my other blog patterns. It’s a pretty sweet deal, if I do say so myself! Learn more about it here or continuing scrolling for the free version.

    BUBBLE GUM ACCENT RUG

    add-to-ravelry-favorites

    Level: Easy

    Size: 20″ (height) x 30″ (width)

    Hook: H (5.00mm)

    Yarn: About 1,100 yards of Kitchen Cotton yarn from Lion Brand. (Kitchen Cotton is a #4 medium weight yarn.) I used the following colors and amounts:

    Grape (about 280 yards, or less than 3 skeins)
    Bubblegum (about 280 yards, or less than 3 skeins)
    Tropic Breeze (about 280 yards, or less than 3 skeins)
    Vanilla (about 260 yards, or less than 3 skeins)

    You’ll also need: Yarn needle for weaving in ends

    Gauge: 6 rows of 10 SC = 3″ square (getting this exact is not super important unless you’re wanting your rug to turn out the exact same size as mine)

    Abbreviations Used:
       ST/STS (stitch/stitches)
    SL ST (slip stitch)
    SK (skip)
    CH (chain)
    SC (single crochet)
    HDC (half double crochet)
       SC+HDC (this just means to put a single crochet and a half double crochet in the same stitch)

    Notes:
    (1) This pattern is worked in American Standard Terms.
    (2) CH1 at the beginning of rows does not count as a stitch.
    (3) You will be double-stranding the entire pattern. (That means holding two strands of yarn together. This will give the rug stiffness.)
    (4) You can easily change the size of this rug; just make sure to begin with any odd number of chains (to make it taller or shorter), and add or subtract rows as needed for a different width.
    (5) The pattern below is written out according to my color changes, but the stitch pattern is actually just Rows 1-8, with  a continuous repeat of Rows 5-8. This is good information to have if you want to make a solid-colored rug, or if you want your color changes to be different than mine.

    Here are the colors I used, and how they’ll be referenced in the pattern:
        COLOR A: Grape (purple)
    COLOR B: Vanilla (ivory)
    COLOR C: Bubblegum (pink)
    COLOR D: Tropic Breeze (aqua)


    PATTERN

    Remember, you’re holding two strands together throughout!

    To begin: With COLOR A, CH 61.

    Row 1: SC in 2nd CH from hook and in each CH across. (60)
    Row 2: CH1, turn. SK 1st ST, SC+HDC in next ST. (SK next ST, SC+HDC in next ST) across. (60)
    Row 3: CH1, turn. SK 1st ST, SC+HDC in next ST. (SK next ST, SC+HDC in next ST) across. (60)
    Row 4: CH1, turn. SC in each ST across. (60)
    Row 5: CH1, turn. SC in each ST across. (60)
    Row 6: CH1, turn. SK 1st ST, SC+HDC in next ST. (SK next ST, SC+HDC in next ST) across. (60)
    Row 7: 
    CH1, turn. SK 1st ST, SC+HDC in next ST. (SK next ST, SC+HDC in next ST) across. (60)
    Row 8: 
    CH1, turn. SC in each ST across. (60)
    Row 9: 
    CH1, turn. SC in each ST across. (60)
    Row 10: 
    CH1, turn. SK 1st ST, SC+HDC in next ST. (SK next ST, SC+HDC in next ST) across. (60)
    Row 11: 
    CH1, turn. SK 1st ST, SC+HDC in next ST. (SK next ST, SC+HDC in next ST) across. (60)
    Row 12: 
    CH1, turn. SC in each ST across. (60)

    Change to COLOR B.

    Row 13: CH1, turn. SC in each ST across. (60)
    Row 14: 
    CH1, turn. SK 1st ST, SC+HDC in next ST. (SK next ST, SC+HDC in next ST) across. (60)
    Row 15: 
    CH1, turn. SK 1st ST, SC+HDC in next ST. (SK next ST, SC+HDC in next ST) across. (60)
    Row 16: 
    CH1, turn. SC in each ST across. (60)

    Change to COLOR C.

    Row 17: CH1, turn. SC in each ST across. (60)
    Rows 18-28: Repeat Rows 2-12. (60)

    Change to COLOR B.

    Rows 29-32: Repeat Rows 13-16. (60)

    Change to COLOR D.

    Row 33: CH1, turn. SC in each ST across. (60)
    Rows 34-44: Repeat Rows 2-12. (60)

    Change to COLOR B.

    Rows 45-48: Repeat Rows 13-16. (60)

    Change to COLOR A.

    Row 49: CH1, turn. SC in each ST across. (60)
    Rows 50-60: Repeat Rows 2-12. (60)

    Change to COLOR B.

    Rows 61-64: Repeat Rows 13-16. (60)

    Change to COLOR C.

    Row 65: CH1, turn. SC in each ST across. (60)
    Rows 66-76: Repeat Rows 2-12. (60)

    Change to COLOR B.

    Rows 77-80: Repeat Rows 13-16. (60)

    Change to COLOR D.

    Row 81: CH1, turn. SC in each ST across. (60)
    Rows 82-92: Repeat Rows 2-12. (60)

    Fasten off and weave in all ends.