Category: Neckwear

  • Malia Wrist Warmers

    Malia Wrist Warmers

     This pattern is part of the Fall 2017 Malia CAL (Crochet-Along). To view the other patterns in this collection, please visit the Malia CAL Homepage.

    Wrist warmers (or wristers, or fingerless gloves, or fingerless mitts) are a great way to keep your hands warm without taking away your ability to function (a.k.a. check your smartphone)! They’re also a great accessory to keep in your car, ready for those cold mornings on the road. I made my samples two-toned, but of course, you can crochet yours up in one solid color. Add a couple of decorative buttons to complete the look.

    –

    VIDEO TUTORIAL

    If you need a little extra help with any of the stitches in the pattern, I created a video tutorial for previous Malia patterns in which I crocheted up a swatch of the pattern. You might find it useful to scan through the tutorial if you find yourself stuck at any point!

    Free Printable Tags

    I made some cute printable labels for this pattern that you are welcome to use! If you’re selling or gifting these wrist warmers, a label just ups the professionalism, in my opinion. Print on cardstock for best results!
    Prefer a PDF?

    This pattern can be completed using the 100% free version right here on this page. However, many people prefer the convenience of a printable, ad-free PDF.

    All-Access Passholders get the ad-free version of this and all of my other blog patterns. It’s a pretty sweet deal, if I do say so myself! Learn more about it here or continuing scrolling for the free version.

    MALIA WRIST WARMERS

    Difficulty: Easyish

    Finished Sizes: 3.5″ wide x 7″ tall

    Hook: I (5.50 mm) or whichever hook is needed to obtain correct gauge, as well as one size smaller (in my case, an H (5mm))

    Yarn: 120 yards (total for a pair of wrist warmers) of #4 aran weight. If you choose to do your wrist warmers two-toned like I did, you’ll need about 80 yards of COLOR A for the main part of the design, and 40 yards of COLOR B for the ribbing. Yarn used in sample photos is Yarn Bee’s Rustic Romantic in “Red Roads” and “Sugared Oats”.

    Gauge: The gauge for all Malia patterns is a 16 stitch x 16 row swatch, but because this particular pattern is also based on 16 stitches, it makes more sense to simply start following the pattern. So, to make sure your gauge is on the right track, after you’ve finished the first 8 rows, measure them; they should measure 2″. (The height should be about 4″.) Adjust your hook accordingly and begin again if necessary.

    You’ll also need: Yarn needle, 4 small buttons

    Terms and Abbreviations:
    ST/STS
     (stitch/stitches)
    SL ST (slip stitch)
    SK (skip)
    CH (chain)
    SC (single crochet)
    HDC (half double crochet)
    LBS (large bean stitch – see “Special Stitches”)
    BLO (back loop only)
    3rd LOOP (work stitch into 3rd loop only – see “Special Stitches”)

    Special Stitches:

    Large Bean Stitch (LBS)
    Insert hook into stitch, yarn over and pull through (2 loops on hook). Yarn over, insert hook into same stitch, yarn over and pull through (4 loops on hook). Yarn over, insert hook into same stitch, yarn over and pull through (6 loops on hook). Yarn over, insert hook into same stitch, yarn over and pull through (8 loops on hook). Yarn over and pull through all 8 loops. Chain 1 to close the stitch. (Because this stitch creates two sets of loops – one when creating the bean, and one when closing the stitch – each completed Large Bean Stitch will count for two stitches in the row or round’s final stitch count.)

    3rd Loop Only
    Half double crochet stitches have a 3rd loop that we utilize in this pattern. When working in turned rows, as in this pattern, the 3rd loop can be found just below the front loop on the side of the work that is facing you. When instructed to work in “3rd loop only”, insert your hook into this special loop. This creates a delicate braided look on the opposite side of the pattern.

    Notes:
    (1) This pattern is written in American Standard Terms.
    (2) CH1s at the beginning of rows do not count as a stitch in the final stitch count.
    (3) A video tutorial for the stitch pattern is available up in the post, or by clicking here.

    INSTRUCTIONS (MAKE 2)

    To begin: With COLOR A and larger hook, CH17.

    Row 1: SC in 2nd CH from hook and in each remaining CH. (16)

    Row 2: Ch1, turn. SC in each ST across. (16)

    Row 3: CH1, turn. SC in first ST. (SK next ST, LBS in next ST) 7 times. SC in final ST. (16)

    Row 4: Ch1, turn. HDC in each ST across. (16)

    Row 5 (thumb hole): CH1, turn. SC in first ST. SC in 3rd loop of each of the next 3 STS. Ch7; SK 7 STS. SC in 3rd loop of each of the next 4 STS. SC in final ST. (7 + CH7)

    Row 6: CH1, turn. SC in each of the first 5 STS. SC in each of the 7 CHs. SC in each of the remaining 4 STS. (16)

    Row 7: Ch1, turn. SC in first ST. (LBS in next ST, SK next ST) 7 times. SC in final ST. (16)

    Row 8: CH1, turn. HDC in each ST across. (16)

    Row 9: CH1, turn. SC in first ST. SC in 3rd loop of each of the next 14 STS. SC in final ST. (16)

    Row 10: CH1, turn. SC in each ST across. (16)

    Row 11: CH1, turn. SC in first ST. (SK next ST, LBS in next ST) 7 times. SC in final ST. (16)

    Row 12: CH1, turn. HDC in each ST across. (16)

    Row 13: CH1, turn. SC in first ST. SC in 3rd loop of each of the next 14 STS. SC in final ST. (16)

    Row 14: CH1, turn. SC in each ST across. (16)

    Row 15: CH1, turn. SC in first ST. (LBS in next ST, SK next ST) 7 times. SC in final ST. (16)

    Row 16: CH1, turn. HDC in each ST across. (16)

    Rows 17-24: Repeat Rows 9-16.

    At this point, you should put your thumb in the thumb hole and make sure that the fabric can stretch around your palm. It should be snug. If it is too small, repeat Rows 9-12 to add another inch of width.

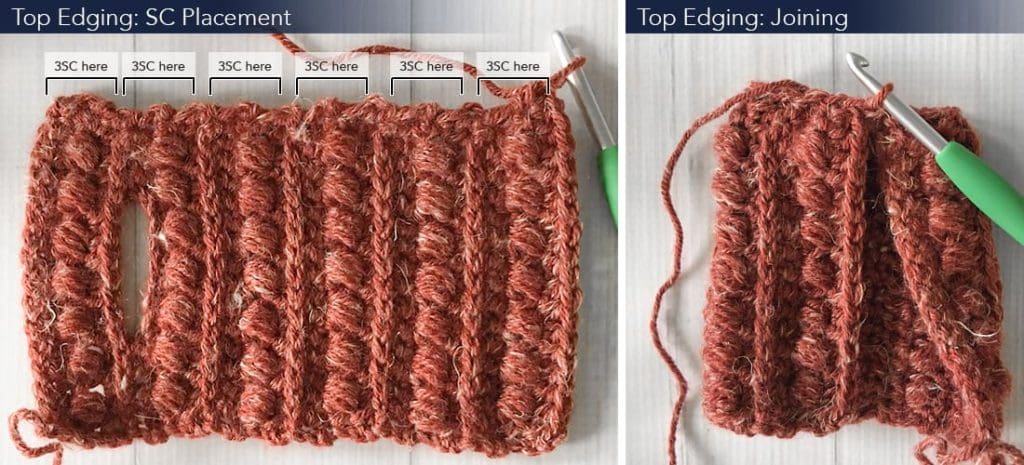
    Row 25: CH1, do NOT turn. SC in same ST again to round corner. Continue to SC across the top edge of the wrist warmer, putting 3SC in each 4-row section. (I visualize each “section” as being the area between each 3rd loop row, so I put an SC directly to the left of the 3rd loop row, one on the bean stitch row, and one directly to the right of the next 3rd loop row, then repeat that sequence all the way across.) Bring the sides together (right side out) and join to the top of the 1st SC with a SL ST. Fasten off, leaving a long tail for seaming.
    Seaming the Main Section
    Turn inside out. Seam the edges together, using your yarn needle to go under the 3rd loop of the HDC row and across to the corresponding stitch on the other side. This will create a row of raised top loops along your seam, ensuring that it will blend in with the rest of the similar rows. (This technique is demonstrated on the video tutorial for the Malia Beanie + Slouch at the 42:00 mark.)  Fasten off and weave in both ends.

    Main Section, Bottom Edging
    Turn right-side out. Turn upside down and reattach COLOR A at the bottom, lined up with the thumb hole, and CH1. SC in each row around. (Notice we aren’t doing 3SC in each 4-row section like we did before; this time, each row gets its own SC.) You should end up with 24SC (4 per section), but one more or less won’t make much of a difference. Join with a SL ST to the top of the first SC.

    Change to COLOR B; fasten off COLOR A.

    CH1. SC in each ST around. Join with a SL ST to the top of the first SC. In the following instructions, this round will be referred to as the “Base Round”.

    Ribbing Section
    (Note: If you need extra help on this part, please watch this video tutorial on how to add ribbing to the bottom of a crochet project.)

    Switch to smaller hook. CH11.

    Row 1: SC in 2nd chain from hook and in each of the remaining 9 chains. SL ST into the first SC from the Base Round, the stitch on which your CH11 was built. SL ST into the next SC from the Base Round. (10, plus the two slip stitches along the Base Round)

    The section we just created, built on the CH11, will hereafter be referred to as the “ribbing.”

    Row 2: CH1, turn. Skipping over the 2 SL STS you put in the Base Round, SC in BLO of each of the first 9 STS of the ribbing. SC in both loops of the last ST. (10)

    Row 3: CH1, turn. SC in 1st ST. SC in BLO of each of the remaining 9 STS of the ribbing. SL ST in each of the next 2 empty STS of the Base Round. (10, plus the 2 SL STS along the Base Round)

    Row 4: CH1, turn. Skipping over the 2 SL STS you put in the Base Round, SC in BLO of each of the first 9 STS of the ribbing. SC in both loops of the last ST. (10)

    Rows 5-24: Repeat Rows 3-4 all the way along the Base Round.

    Fasten off and use your tail to sew together the first and last rows of the ribbing, then weave in your ends.

    Thumb Edging
    Reattach COLOR A somewhere on the edge of the thumb hole; CH1. SC evenly around the opening. Join with a SL ST to the top of the first SC. Fasten off and weave in ends.

    Buttons
    Using your yarn needle and COLOR B, or a needle and thread, attach two small buttons to the ribbing toward the outer edge of each wrist warmer.

    Done! If you’re sharing on social media, be sure to hashtag #maliacaland #maliawristwarmers and tag me @littlemonkeyscrochet. Hope you enjoyed it!

  • Elena Scarf

    Elena Scarf

    So I was looking back through all of my patterns the other day and realizing that, for whatever reason, I’ve never designed a regular, classic scarf. I’ve always done infinity scarves! It’s probably because I love to wear them; they are just so easy.

    When I got the idea for this scarf, I originally intended it to be an infinity scarf, too. I was going to seam it up at the end, add some buttons, and maybe even add some fringe all the way around. But the longer I worked on it, the more I started to think, this should be a classic scarf. It has this amazing texture, and when I would double-wrap it around my neck, all that gorgeous texture just sort of got lost in the folds. But when I draped it once around my neck and let it hang, it just looked right.

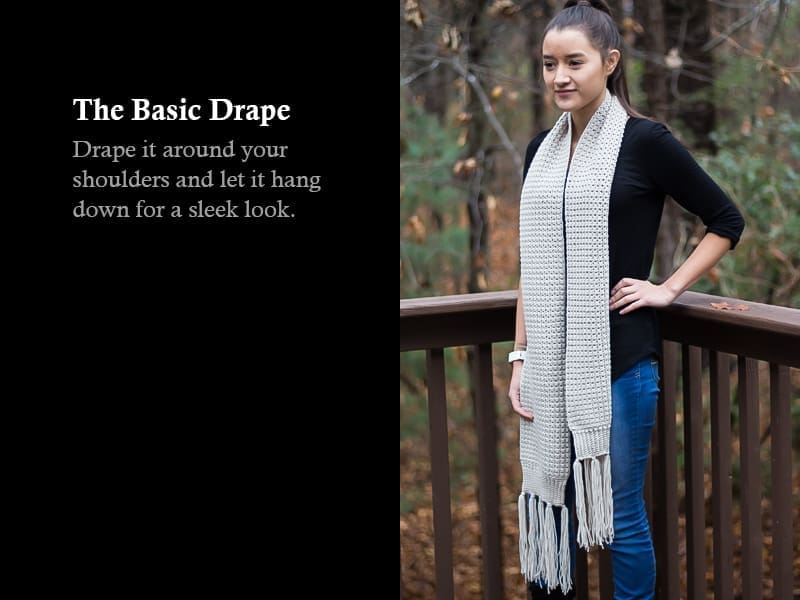
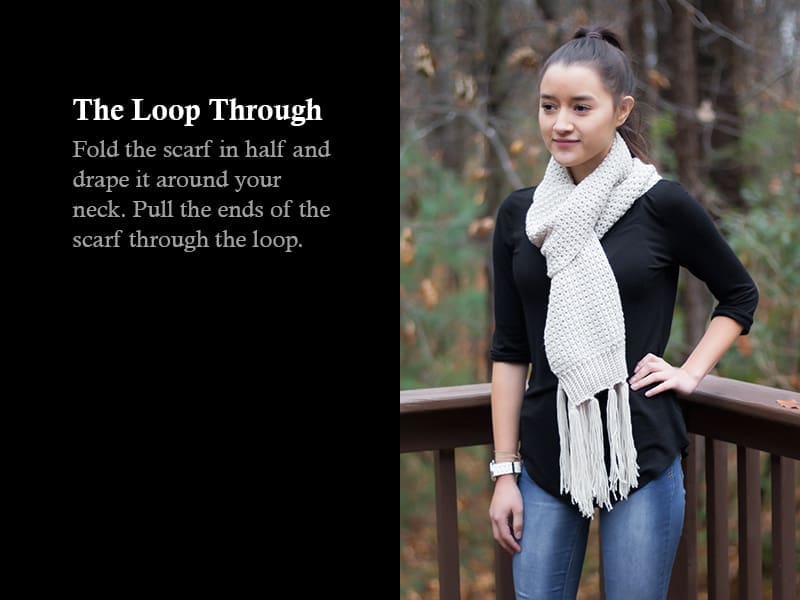
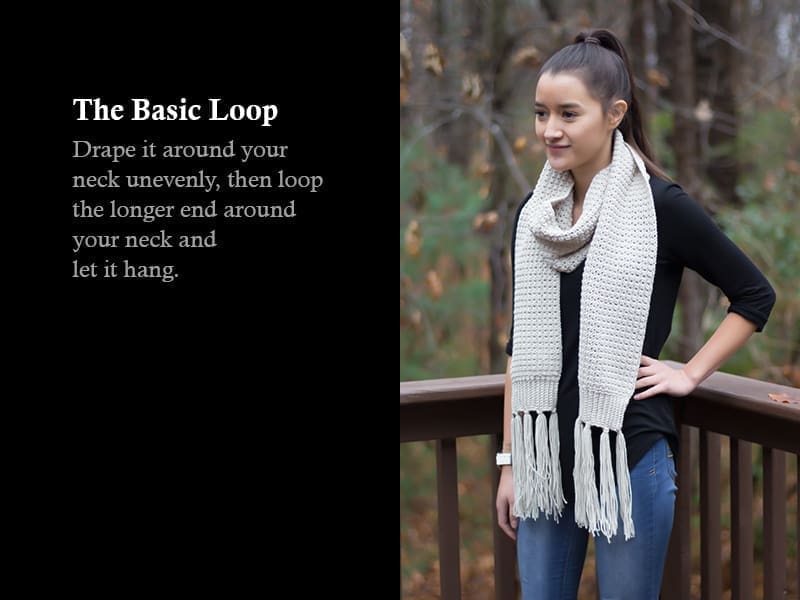
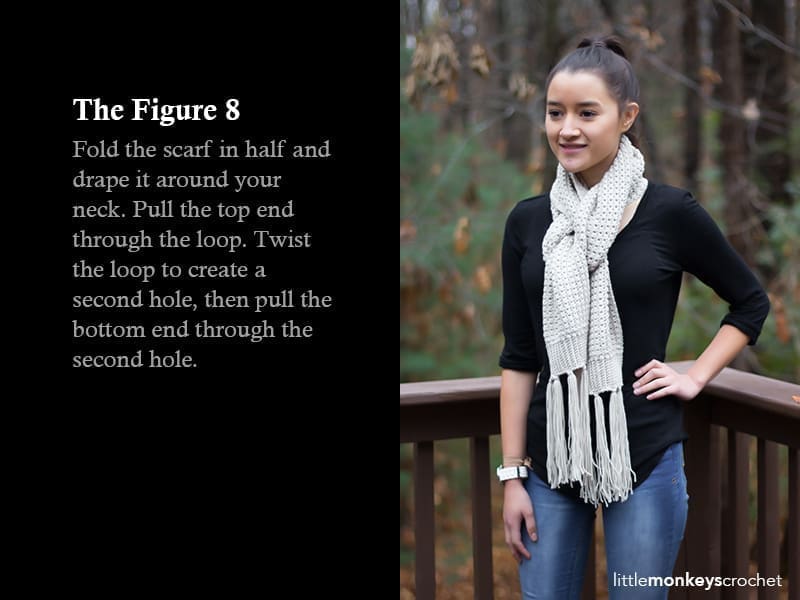
    So, here is yet another instance this season when I’m branching out of my “norm” and doing something different than what I’ve always done. I hope you love the finished product as much as I do! This scarf has so many ways it can be worn, and here are a few (my favorite is the Figure 8):


    On Using A Different Yarn Weight

    Every time I design a pattern with #3 light yarn, someone inevitably asks how to adapt the pattern for #4 worsted. I totally get it; I crocheted for at least a year or two before I ventured into anything less than #4. While I think the lighter yarn really contributes to the texture of this pattern (and, shoutout to the newbies: #3 yarn is not as scary as you think it is), it really wouldn’t be that difficult to adapt it for #4 yarn, or even bulky or super bulky yarn. You just need to make the body of the scarf about 65″ long and repeat the rows until it is 7″ wide. Then, when you add your ribbing, chain enough to add a 2.5″ ribbing section to each end. I can’t give you exact stitch / row counts, nor can I tell you how much the yardage would be, but feel free to adapt it as you see fit. (That’s my nice way of saying that if you deviate from the pattern, you’re on your own.)  🙂

    And since I loved the finished look of this scarf so much, I knew it needed to be a set. Click here to view the pattern for the matching slouch!

    Prefer a PDF?

    This pattern can be completed using the 100% free version right here on this page. However, many people prefer the convenience of a printable, ad-free PDF.

    All-Access Passholders get the ad-free version of this and all of my other blog patterns. It’s a pretty sweet deal, if I do say so myself! Learn more about it here or continuing scrolling for the free version.

    Elena Scarf

    Difficulty: Easy

    Finished Size: 70″ long (not including the fringe) x 7″ wide. It’s not “super-scarf” dimensions, but it’s big enough to give you lots of stylish, wearable options.

    Hook: H (5.00mm)

    Yarn: Approximately 725 yards (this does include the fringe) of Cascade Yarns’ Longwood Sport. Longwood Sport is a #3 light yarn, and the color shown on the sample is “Oatmeal.”

    Gauge: 9 rows of 5 (SC+HDC) combos = 2″ square

    You’ll also need: Yarn needle

    Abbreviations Used:
    ST/STS 
    (stitch/stitches)
    SL ST
     (slip stitch)
    SK
     (skip)
    CH
     (chain)
    SC 
    (single crochet)
    HDC 
    (half double crochet)
    SC+HDC 
    (this just means to put 1 SC and 1 HDC in the same ST)
    BLO
     (back loop only)

    Notes:
    (1) This pattern is written in American Standard Terms.
    (2) Pattern is worked in rows, and the ribbing sections on the ends are worked after the main part of the scarf is finished.

    – – – – – – – – – – – – – – – – – – – – – – – –

    THE PATTERN

    To begin: CH 309.

    Row 1: In 3rd CH from hook, SC+HDC. (SK next ST, SC+HDC in next ST) across. (308)

    Row 2: CH1, turn. SK 1st ST, SC+HDC in next ST. (SK next ST, SC+HDC in next ST) across. (308)

    Rows 3-32: Repeat Row 2. (308)

    Fasten off and weave in all ends.

    Ribbing
    Next we’ll crochet the small ribbing sections to each end of the scarf. We will crochet one row of SC along the short edge to provide a base for our ribbing, and then we will be working the ribbing in vertical rows, attaching it to the base row with SL STS as we go. 

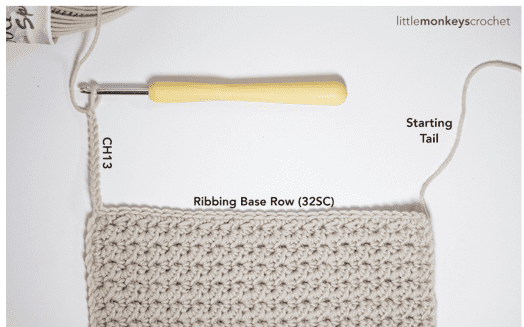
    Ribbing Base Row: Attach yarn to one of the corners of the scarf. SC evenly down the short edge, putting 1SC in each row, for a total of 32SC. CH13.

    Ribbing Row 1: Turn your work and SC in 2nd CH from hook, and in each remaining CH. SL ST in the first SC of the Base Row, then SL ST in the next SC of the base row. (12, plus the 2 SL STS on the base row)

    Ribbing Row 2: CH1, turn. Skipping over the 2 SL STS, SC in BLO of each of the first 11 STS of the ribbing. SC in both loops of the last ST. (12)

    Ribbing Row 3: CH1, turn. SC in first ST. SC in BLO of each of the next 11 STS. SL ST in next 2 STS of the Base Row. (12, plus the 2 SL STS on the base row)

    Ribbing Row 4: CH1, turn. Skipping over the 2 SL STS, SC in BLO of each of the first 11 STS of the ribbing. SC in both loops of the last ST. (12)

    Repeat Rows 3-4 all the way down the Base Row (for 32 rows). Fasten off and weave in ends.

    Repeat “Ribbing” instructions for the opposite end of the scarf.

    Tassels
    Last, we’ll attach tassels to both ends of the scarf.

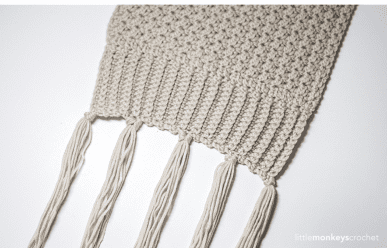
    Cut at least 80 (a few more to be safe) 18″ strands of yarn. In groups of 8 strands, attach yarn to first edge of scarf; 5 groups total, spaced evenly across the edge of the ribbing. Repeat on opposite end of scarf.

  • Providence Scarf

    Providence Scarf

    Thank you to Lion Brand Yarn for providing the yarn for this sample!

    Have you seen Lion Brand’s new yarn, Shawl In A Ball?

    Boasting the potential to create an entire stunning shawl with just one skein, it might be just now starting to show up at your local craft stores. (Or, you can purchase it direct from Lion Brand, or from Joann Fabrics in limited colors.) I had a chance to try it, and can I just say, wow.

    Sonoma Scarf Crochet Pattern | Free Fringe Infinity Scarf Crochet Pattern by Little Monkeys Crochet

    I realize this is not a shawl, but I’ll get to that.

    When I first held the yarn in my hands, I was really surprised that it was a category 4 (worsted) yarn. It really feels so much lighter.

    The first thing I thought when I started working with it was, “wow, this is like a really thin version of Homespun.” Which freaked me out a little, because (honesty time) I’ve never successfully completed a pattern with Homespun. I love what people are able to make with it, but it’s just too difficult for me to see the stitches. Shawl In A Ball has that similar crinkly feel to it, so I decided to use a stitch combo that I was very familiar with to ensure I would be able to recognize the loops. Once I got past the first row, I really got the hang of it. It’s like anything new; you just have to give it a chance! And you will be soooo glad you did.

    Ok, so I know it’s called Shawl In A Ball, but I’m not a shawl-wearer. So, I decided to take it in a little bit different direction, and used it to make this gorgeous infinity scarf. Aren’t you just drooling over those gradual color changes? I had so much fun making this and was so motivated to keep going because I was enjoying the color changes so much. And the finished look of the stitches creates this beautiful fabric that is light and drapes perfectly. I honestly think Lion Brand hit it out of the park with this yarn!

    Sonoma Scarf Crochet Pattern | Free Fringe Infinity Scarf Crochet Pattern by Little Monkeys Crochet

    The scarf is wide, so it could be worn over the shoulders in more of a shawl or wrap fashion. My model here is very petite, so it was too large to hang secure on her shoulders, but I bunched it up in the back a bit to at least be able to show you what it would look like. You could simply measure the shoulder width of the intended recipient, and crochet enough rows to match that needed length. Or, you could secure it with a cute pin.

    Sonoma Scarf Crochet Pattern | Free Fringe Infinity Scarf Crochet Pattern by Little Monkeys Crochet

    Of course, there are lots of beautiful colorways to choose from, and you’re bound to find one that suits your personality. The name of the color used in my sample is “Mindful Mauve.” If you can’t find it in stores yet, you can buy it from Joann Fabrics Online in limited colors (or, as always, you can get it direct from Lion Brand).

    Prefer a PDF?

    This pattern can be completed using the 100% free version right here on this page. However, many people prefer the convenience of a printable, ad-free PDF.

    All-Access Passholders get the ad-free version of this and all of my other blog patterns. It’s a pretty sweet deal, if I do say so myself! Learn more about it here or continuing scrolling for the free version.

    PROVIDENCE SCARF
    add-to-ravelry-favorites

    Size:
 Scarf measures 40″ around and is 10″ tall (not including fringe).
    Gauge:
 Not crucial, because you can simply chain until you reach 10″. But, in my scarf, a row of 22 stitches is about 5″ in length (and 10 rows of the pattern are about 3″).
    Hook: I (5.50mm)
    Yarn: 1 skein of Lion Brand Shawl In A Ball (sample shown in “Mindful Mauve”)
    You’ll also need: Yarn needle

    Abbreviations Used:
    CH (chain)
    ST/STS (stitch/stitches)
    SL ST (slip stitch)
    SK (skip)
    SC (single crochet)
    HDC (half double crochet)
    SC+HDC (this just means to put a single crochet and a half double crochet in the same stitch)

    Notes:
    (1) This pattern is written in American Standard terms.
    (2) It is crocheted as a flat piece, then seamed at the end.
    (3) CH1 at the beginning of rounds does not count as a stitch.
    (4) Note that the yarn needed for the fringe is cut from the skein first, so that we can be sure to have enough. You’ll notice on my sample scarf that I alternated between two colors of fringe; this was accomplished because the first few yards of my skein were purple, but they were attached with a manufacturer’s knot to the rest of the skin, which started cream-colored (that was the only knot I found). So, I cut off the purple and set it aside, then cut off enough of the cream for the rest of the fringe, then proceeded to make the scarf. (In other words, I got lucky, and made lemonade out of lemons. Every skein will be different.)

    FRINGE

    Before we even pick up our hook, we first need to set aside some yarn. We’ll be using the whole skein for this pattern, so we want to make sure we have enough yarn left for fringe! Grab a cutting board or something sturdy that’s somewhere between 8-10″ wide, and follow the instructions below.

    1. Wrap the yarn all the way around the cutting board about 40 times. Wrap it snug, but don’t wrap it crazy-tight. Try to be consistent.
    2. Take a good pair of scissors and carefully cut the yarn right down the center of the pile.
    3. You now have a pile of yarn strands approximately 18″ long. Very carefully, fold it in half and cut at the halfway point again. You should now have about 80 strands of yarn, about 9″ long apiece. Set it aside for when you’ve completed the pattern.

    Providence Scarf Crochet Pattern  |  Free Fringe Infinity Scarf Crochet Pattern by Little Monkeys Crochet


    PATTERN

    To begin:
    CH45. (This should measure about 10″ when lightly stretched; add or subtract chains as necessary, just be sure to begin with an odd number of chains.)

    Row 1: SC+HDC in 3rd CH from hook. (SK next ST, SC+HDC in next ST) across. (44)

    Rows 2-132 (or until you get to the end of your skein, or until the scarf is the length you want it to be): CH1, turn. SK 1st ST, SC+HDC in next ST. (SK next ST, SC+HDC in next ST) across. (44)

    seamingFasten off, leaving a tail long enough to seam the scarf. Use your yarn needle and finishing tail to whip stitch both ends together.

    Fasten off and weave in all ends.

    Attaching the Fringe

    Attach fringe to every other row along the entire length of one side of the scarf.

  • Chunky Ribbed Infinity Scarf

    Chunky Ribbed Infinity Scarf

    The Chunky Ribbed Infinity Scarf is great practice for your Half Double Crochet stitch, but working in the back loops only (BLO) gives it a more interesting surface and adds visual depth.

    Prefer a PDF?

    This pattern can be completed using the 100% free version right here on this page. However, many people prefer the convenience of a printable, ad-free PDF.

    All-Access Passholders get the ad-free version of this and all of my other blog patterns. It’s a pretty sweet deal, if I do say so myself! Learn more about it here or continuing scrolling for the free version.

    CHUNKY RIBBED INFINITY SCARF

    Hook: P (11.50mm)
    Yarn: Super Bulky (I used 3 skeins of Lion Brand’s “Hometown USA”)
    Difficulty: Easy
    Gauge: Not crucial, but a row of 8 HDC = about 5″
    Finished Size: Approximately 52″ around, 8″ wide

    Notes:
    (1) This pattern is worked in American Standard Terms.
    (2) This pattern is a great candidate for the Chainless Foundation method, if you’re comfortable with it. If you haven’t learned it, there is a helpful tutorial here.

    – – – – – – – – – – – – – – – – – – – – – – – –

    THE PATTERN

    To begin: Ch 83.

    Round 1: HDC in 2nd chain from hook. HDC across. Bring ends together, being careful not to twist the chain. Join with a slip stitch to the top of the first HDC.
    (You can also do a chainless foundation stitch (FHDC) for the first row of 82 HDC. If you don’t know how to do this, check out this tutorial. It will change your life. Be sure to join the FHDC, and don’t twist it in the meantime.)

    Round 2: Ch1, turn. In BLO (Back Loops Only), HDC around. Join with a slip stitch to the top of the first HDC.

    Rounds 3-10 (or until scarf is about 8″ wide): Ch1, turn. In BLO, HDC around. Join with a slip stitch to the top of the first HDC.

    Fasten off and weave in ends.