Category: Home Decor

  • St. Patrick’s Day Treat Bag

    St. Patrick’s Day Treat Bag

    Top o’ the morning’ to ya!

    With St. Patrick’s Day around the corner, I wanted to come up with a festive pattern to share with you that could double as a fun surprise for my boys. While I was making the pattern for the Potpourri Pouch, I thought of how cute it would be as a treat bag, too!
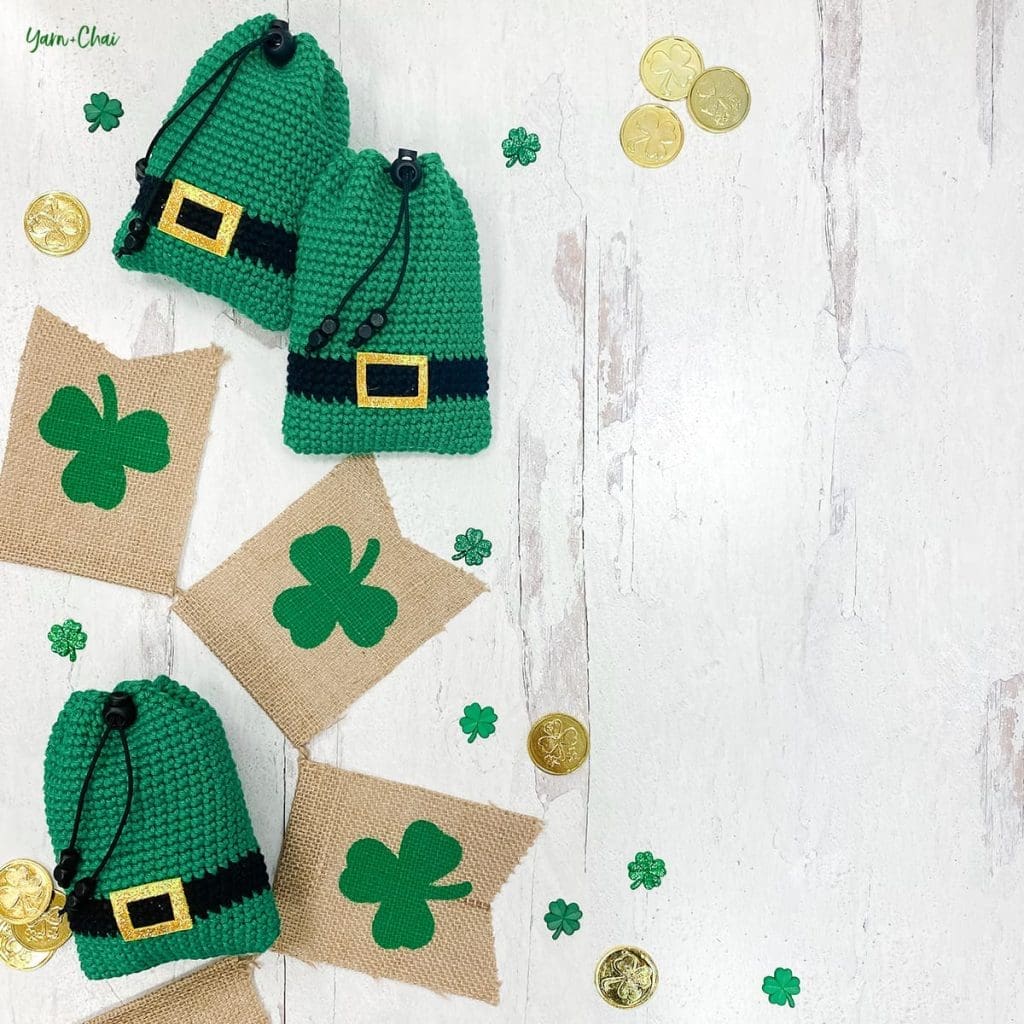
    I used cotton yarn to work up these leprechaun-inspired bags, and finished them off with a drawstring closure and a gold-colored buckle made of 99 cent craft foam that I found at Hobby Lobby. They were so quick and inexpensive to create that I’m tempted to make a dozen more and send them in to my youngest’s preschool class for their St. Patrick’s Day party!

    I found lots of options for the “treasure” inside. There are several chocolates that come in gold-colored wrappers (Hershey’s Nuggets with Almonds and Rolos are my favorites). Looking for more of a rainbow theme? Use Skittles or Airhead Extremes. Not keen on a pouch full of sugar? There was a day when my kids were young enough that a pouch full of plastic golden coins would have thrilled them! (The coins in the photo above are from Hobby Lobby’s St. Patrick’s Day supplies.)

    Do you have a different idea? Leave it in the comments!

    Prefer a PDF?

    This pattern can be completed using the 100% free version right here on this page. However, many people prefer the convenience of a printable, ad-free PDF.

    All-Access Passholders get the ad-free version of this and all of my other blog patterns. It’s a pretty sweet deal, if I do say so myself! Learn more about it here or continuing scrolling for the free version.

    – – – – – – – – – – – – – –

    St. Patrick’s Day Treat Bag

    View on Ravelry

    Difficulty: Easy

    Crochet Language: American Standard

    Finished Size: 4″ wide x 5.5″ tall

    Yarn: You’ll need a #4 weight yarn in 2 colors:

    • COLOR A: 60 yards (I used I Love This Cotton in “Bright Green”)
    • COLOR B: 12 yards (I used I Love This Cotton in “Black”)

    Hook: 4.5mm

    Gauge: 20CSC x 22 rows = 4″ square

    You’ll also need: Black string or cord, small cord stop, sheet of gold-colored foam or felt, fabric glue (or glue gun), beads

    Terms and Abbreviations:
    ST/STS (stitch/stitches)
    SL ST (slip stitch)
    CH (chain)

    CSC (crossed single crochet: Insert hook into stitch. Yarn UNDER, pull through; 2 loops on hook. Yarn over, pull through both loops.)

    Notes:
    (1) Pattern is worked in a seamless spiral. Do not join, chain or turn unless instructed.
    (2) To change the width, add or subtract any number from the starting chain. To change the height, add or subtract any number of rounds.

    – – – – – – – – – – – – – – –

    INSTRUCTIONS

    To begin: With COLOR A, CH21.

    Round 1: CSC in 2nd CH from hook and in each remaining CH. Working around to the opposite side of the starting chain, CSC in each CH across. (You have now worked in both sides of each chain.)
    Stitch count: 40

    Rounds 2-6: CSC in each ST around.
    Stitch count: 40

    Switch to COLOR B. (Drop COLOR A, but do not fasten off.)

    Rounds 7-10: CSC in each ST around.
    Stitch count: 40

    Switch back to COLOR A. (You can drop and fasten off COLOR B.)

    Rounds 11-29: CSC in each ST around.
    Stitch count: 40

    Round 30: SL ST in each ST around.
    Stitch count: 40

    Fasten off and weave in all ends.

    Finishing it up

    Using a yarn needle, locate the top center of the bag and count 2 STS to the right; run cord through from the outside going in, just underneath the final round. Weave in and out every 4 STS all around the top of the bag; cord should finish on the outside, 4 STS away from where it first went in.
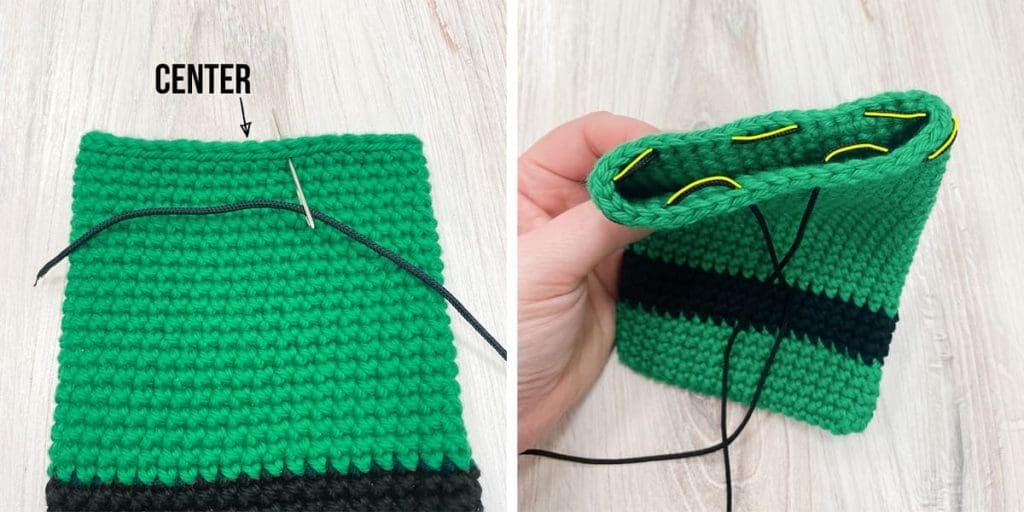
    Thread both ends through a cord stop, then add a couple of small beads to each end and secure with a knot. Trim as needed.

    For the buckle, cut a small rectangle (slightly taller than the black stripe on the bag) from a sheet of gold-colored foam or felt. Cut a smaller rectangle out of the center and glue the larger piece to your bag with fabric glue (or a glue gun).
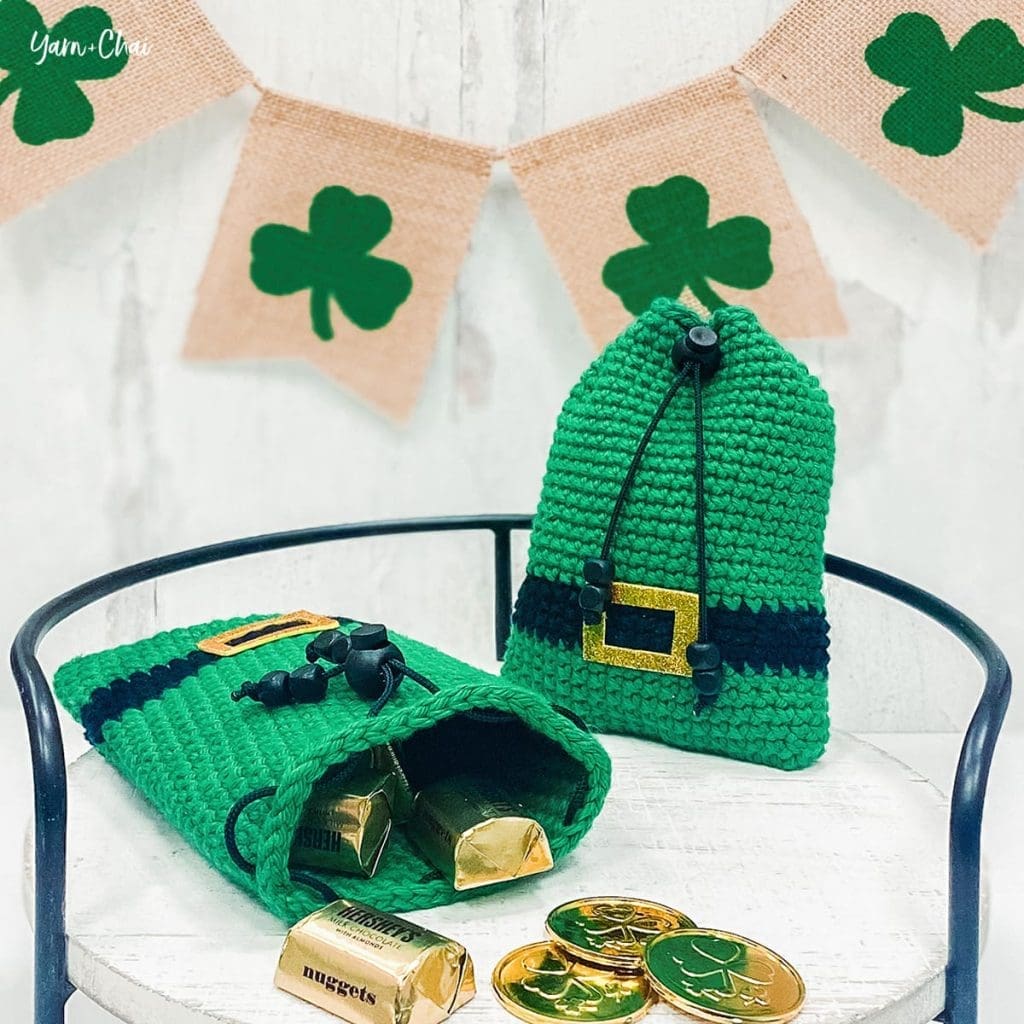
    Image of green, black and gold treat bags; one is open with candy spilling out.

    That’s it!

    I hope you enjoyed this tutorial. If you’re sharing your project on social media, be sure to tag me @yarnandchai.design!
  • Potpourri Pouch

    Potpourri Pouch

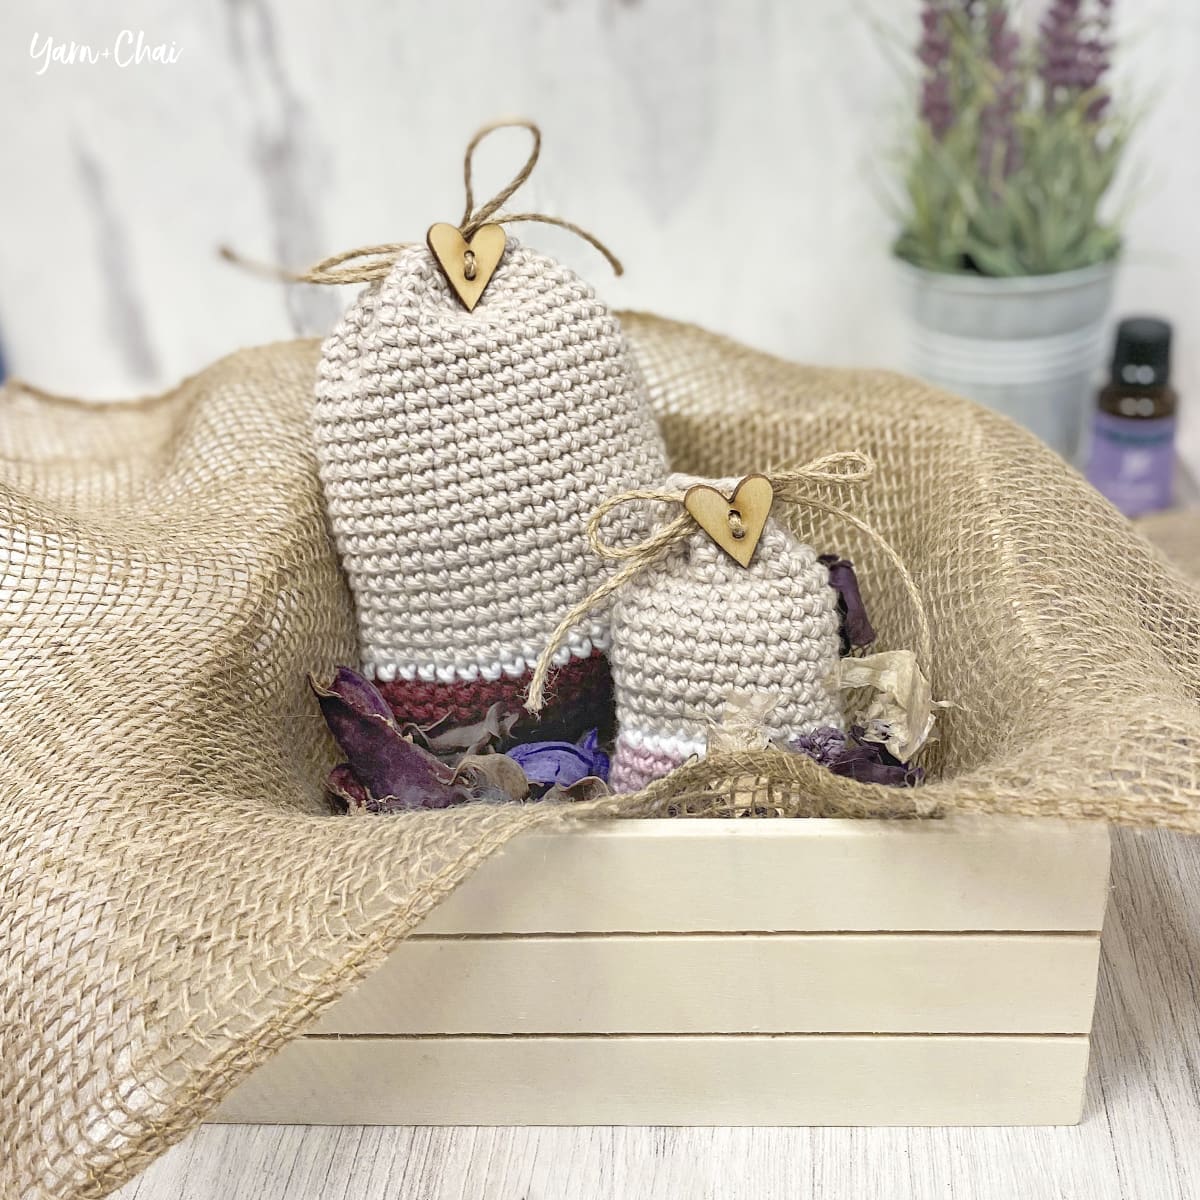
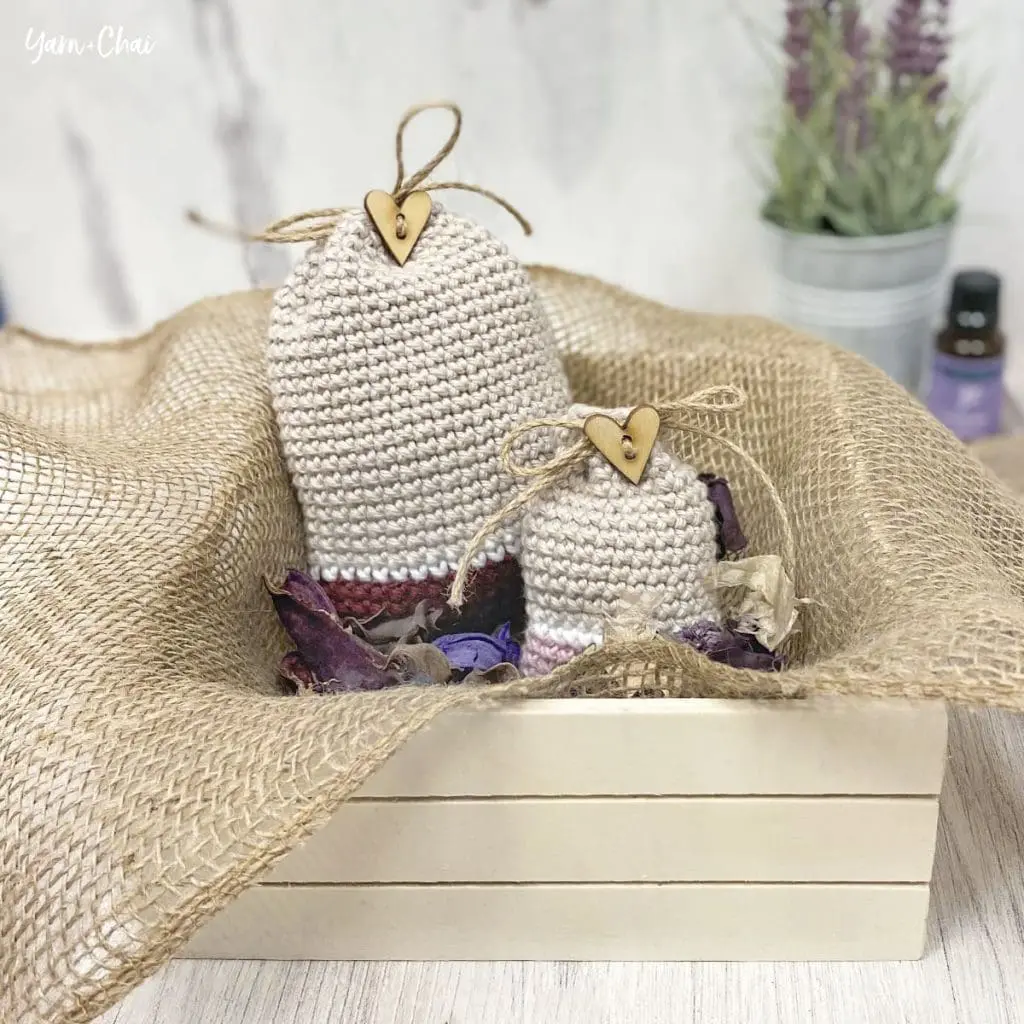
    Potpourri pouches or sachets are a simple, natural way to freshen up small spaces, such as drawers of sweaters, linens, or socks. Filled with dried potpourri mixed with a few drops of fragrant oil, these hand-crocheted pouches release fragrance slowly over time to keep things smelling nice. They work up quickly and would make a cute, thoughtful gift for teachers, co-workers, family or friends. I’ve included a mini size as well which would make an adorable wedding favor for a country- or rustic-themed reception!

    I wasn’t sure whether a tightly stitched pouch would release enough fragrance, so I tested mine out by putting it in one of the sections of the cube shelf that holds my yarn. The next day I checked, and sure enough, the nearby yarn had a pleasant, subtle aroma. Perfect!

    And did you know that you can make scented pouches without the potpourri? A less expensive alternative is dried rice mixed with essential oil… which would be perfect for the mini sized pouch, as even small potpourri may be hard to stuff much inside.

    Prefer a PDF?

    This pattern can be completed using the 100% free version right here on this page. However, many people prefer the convenience of a printable, ad-free PDF.

    All-Access Passholders get the ad-free version of this and all of my other blog patterns. It’s a pretty sweet deal, if I do say so myself! Learn more about it here or continuing scrolling for the free version.

    – – – – – – – – – – – – – –

    Potpourri Pouch

    View on Ravelry

    Difficulty: Easy

    Crochet Language: American Standard

    Finished Sizes: 4″ wide x 5.5″ tall (regular) and 2″ wide x 3.25″ tall (mini)

    Yarn: You’ll need a #4 weight cotton yarn in 3 colors. For COLOR A and COLOR B, I used Hobby Lobby’s I Love This Cotton, and for COLOR C, I used Yarn Bee Pima Suprema (also an HL brand). Both yarns are 100% cotton.

    For the regular size:

    • COLOR A: 15 yards (I used I Love This Cotton in “Burnt Sienna”)
    • COLOR B: 3 yards (I used I Love This Cotton in “White”)
    • COLOR C: 55 yards (I used Yarn Bee Pima Suprema in “Bone”)

    For the mini size:

    • COLOR A: 8 yards (I used I Love This Cotton in “Rosy”)
    • COLOR B: 2 yards (I used I Love This Cotton in “White”)
    • COLOR C: 20 yards (I used Yarn Bee Pima Suprema in “Bone”)

    Hook: 4.5mm

    Gauge: 20CSC x 22 rows = 4″ square

    You’ll also need: Jute twine, button, filler (either potpourri or uncooked rice), fragrant or essential oil

    Terms and Abbreviations:
    ST/STS (stitch/stitches)
    SL ST (slip stitch)
    CH (chain)

    CSC (crossed single crochet: Insert hook into stitch. Yarn UNDER, pull through; 2 loops on hook. Yarn over, pull through both loops.)

    Notes:
    (1) Pattern is worked in a seamless spiral. Do not join, chain or turn unless instructed.
    (2) Pattern is written for the regular pouch size, with instructions for the mini version in parentheses. When there is only one instruction, it applies to both sizes.

    – – – – – – – – – – – – – – –

    INSTRUCTIONS

    To begin: With COLOR A, CH21 (CH11).

    Round 1: CSC in 2nd CH from hook and in each remaining CH. Working around to the opposite side of the starting chain, CSC in each CH across. (You have now worked in both sides of each chain.)
    Stitch count: 40 (20)

    Rounds 2-6 (Rounds 2-4): CSC in each ST around.
    Stitch count: 40 (20)

    Switch to COLOR B.

    Round 7 (Round 5): CSC in each ST around.
    Stitch count: 40 (20)

    Switch to COLOR C.

    Rounds 8-29 (Rounds 6-17): CSC in each ST around.
    Stitch count: 40 (20)

    Round 30 (Round 18): SL ST in each ST around.
    Stitch count: 40 (20)

    Fasten off and weave in all ends.

    Finishing it up

    1. Fill a small bowl with potpourri or uncooked rice and add a few drops of essential oil; mix. Add to pouch.
    2. Using a yarn needle, locate the top center of the sachet and count 2 STS to the right; run twine through from the outside going in. Weave in and out every 4 STS all around the top of the bag; twine should finish on the outside, 4 STS away from where it first went in.
    3. Tie the two strands together, cinching the bag closed.
    4. Thread one strand through the button and finish it with a bow.

    That’s it!

    I hope you enjoyed this tutorial. If you’re sharing your project on social media, be sure to tag me @yarnandchai.design!
  • Classic Sherpa Pillow

    Classic Sherpa Pillow


    In my almost decade of crocheting, I’ve never had a very successful relationship with furry yarn.

    There are so many times I’ve wanted to use it, and I’ve bought more variations of it than I can count over the years, but the skeins have never amounted to much of anything because I always end up deciding that whatever I was going to make just wasn’t worth the trouble.

    Can you relate?

    I’d love to tell you that I have a magic solution for you, but I don’t.

    That said… I think I’ve found a yarn that is easier to work with than anything I’ve tried before.

    The proof?

    I made a pillow with it!

    And then I made another, bigger pillow!

    That’s right; I finished the first one and still had enough patience in me to make another. And trust me, when you make this pillow… you’re going to want to make another, too. And another. They are sooooo soft and plushy. And with the #6 super bulky yarn, they work up so darn quick once you get the hang of that yarn!

    About the Yarn

    The yarn I used is Big Twist Sherpa. If you didn’t know, Big Twist is one of Joann Fabrics’ store brands. The Sherpa line showed up in my local store this fall in a big, hard-to-miss center aisle display and the big, fluffy skeins drew me in.

    As I mentioned, I’ve never been great with fur yarn. You really have to feel for your next stitch, because the soft faux fur just blends everything together and there is literally zero stitch definition. Big Twist Sherpa made it a little bit easier, though, by using a dark color for the actual thread, and then blending that same dark color out to white. So the darker it is, the closer you are to your stitch… which really helps.

    One neat thing about the way the yarn is constructed is that when it’s worked in unturned rounds (as we will with this pillow), the “right” side of the resulting fabric is significantly more color-saturated than the “wrong” side, which brings in a lot more of the white. You’ll see this as you work the pattern, but you won’t have to decide which side you like more until the very end. (I ended up choosing the “wrong” side because I liked the brightness of it.)

    One word of caution: be sure to grab enough skeins of the same dye lot for your project. I didn’t pay attention (oops) and let me tell you, the difference in the two skeins when I started to add on the second one was jarring. It’s not so much that the color was different, but the second skein had a much bigger concentration of white. I went back to my store and was very lucky to find a skein that matched my first one!

    Prefer a PDF?

    This pattern can be completed using the 100% free version right here on this page. However, many people prefer the convenience of a printable, ad-free PDF.

    All-Access Passholders get the ad-free version of this and all of my other blog patterns. It’s a pretty sweet deal, if I do say so myself! Learn more about it here or continuing scrolling for the free version.

    – – – – – – – – – – – – – –

    Classic Sherpa Pillow

    View on Ravelry

    Difficulty: Easyish (The pattern is easy… the yarn takes some focus!)

    Crochet Language: American Standard

    Finished Sizes: For 12″ and 18″ pillow inserts
    (The opening should measure about .5″-1″ smaller than your pillow insert; it will stretch.)

    Yarn: Big Twist Sherpa, a very thick, #6 super bulky yarn. You’ll need 2 skeins for the 12″ pillow, or 3 skeins for the 18″. I used โ€œSeaโ€ and โ€œWine.โ€ 

    Hook: 9.0mm (M or N depending on brand; go by mm measurement)

    Gauge: 9 CSC x 9 rows = 4″ square
    (Note that there is no stitch multiple for this pattern, so it would probably be easier to adjust your initial chain to the correct width than to try to match gauge exactly.)

    You’ll also need: 12″ or 18″ pillow insert, yarn needle for weaving in super bulky yarn

    Terms and Abbreviations:
    ST/STS (stitch/stitches)
    SL ST (slip stitch)
    CH (chain)

    CSC (crossed single crochet: Insert hook into stitch. Yarn UNDER, pull through; 2 loops on hook. Yarn over, pull through both loops.)

    Notes:
    (1) Fur yarn is challenging, but you’ll get better with practice. Big Twist Sherpa has been one of the easier fur yarns I’ve used, because the fur gets darker the closer to the actual thread you get, and you can use that dark thread and a sharp eye to locate your top loops. However, I find that most of the time I’m using my fingers to feel for where to insert my hook.
    (2) This pattern is worked in a seamless round. Do not join, chain or turn unless instructed.
    (3) Pattern is written for a 12″ pillow insert, with instructions for an 18″ insert written in parentheses.

    – – – – – – – – – – – – – – –

    INSTRUCTIONS

    To begin: CH27 (CH41), or to 11.5โ€-12โ€ (17.5โ€-18โ€)

    For Round 1, we’re going to CSC across the length of a chain, and then CSC back down the other side of it until we are back where we started.

    Round 1: CSC in 2nd CH from hook (mark this first ST with a stitch marker) and in each remaining CH. Working down the other side of the chain, CSC across. You have now worked in both sides of each chain. DO NOT join.
    Stitch count: 52 (80)

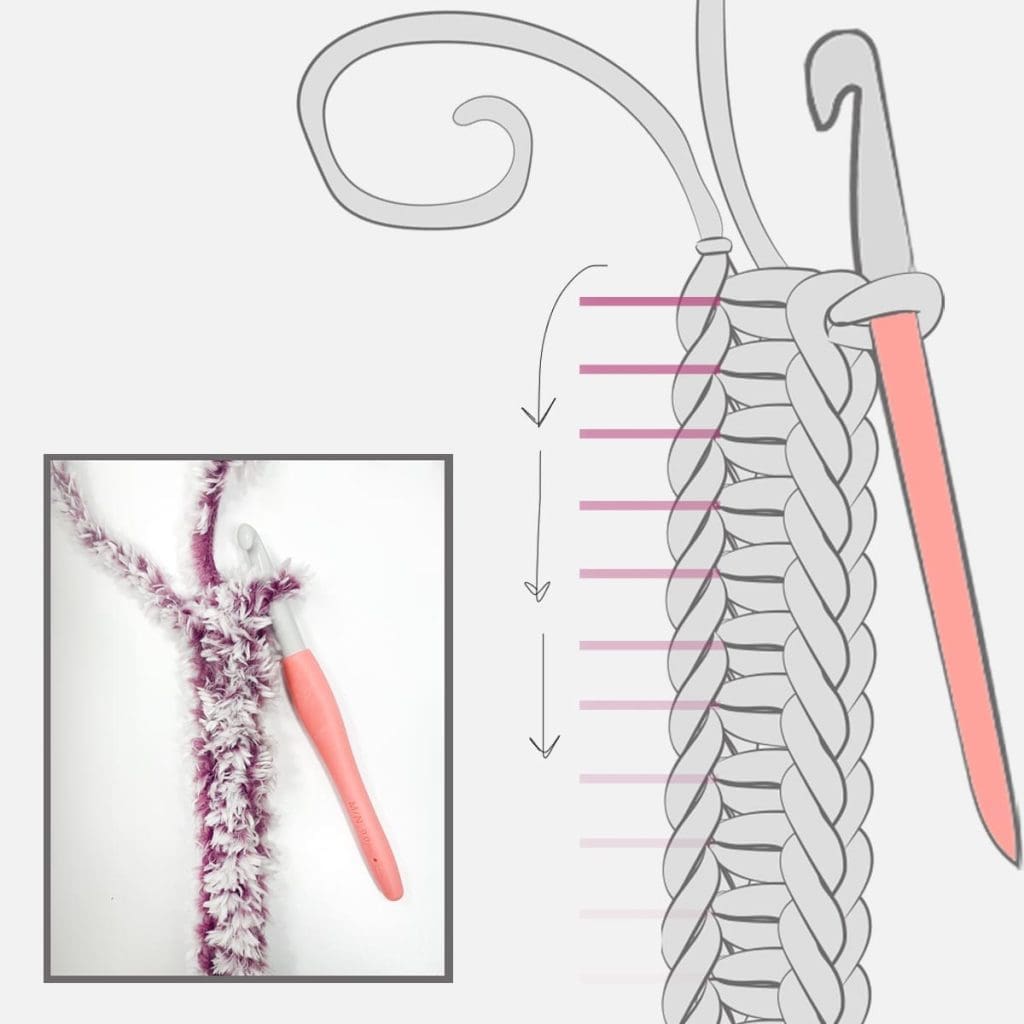
    In the inset image, you can see that I’ve crocheted along the entire chain, completing the first half of Round 1. The illustration shows you what the stitches look like underneath all that fur.

    To begin working down the other side of the chain, insert your hook where the pink line at the top is pointing. (If you’re thinking “that’s the same place I made the last CSC”, you’d be right!) Continue to place a CSC in each chain until you are back where you first started.

    Rounds 2-27 (2-41), or until pillow measures 12โ€ (18โ€) tall: CSC in each ST around.
    Stitch count: 52 (80)

    Fasten off, leaving a long tail for weaving top of pillow closed. Choose which side you like best, and weave all other tails on whichever side of the pillow you have determined to be the “wrong” side.

    Turn pillow right side out. Add pillow insert, then hold open edges of pillow together and seam closed with your preferred method. Here’s how I seamed mine:

    Weave in tail and hide excess yarn inside pillow.

    That’s it! Enjoy your soft, cozy new pillow!

    I hope you enjoyed this tutorial. If you’re sharing your project on social media, be sure to tag me @yarnandchai.design!

  • Buffalo Check Potholders

    Buffalo Check Potholders

    As soon as Fall decor started showing up at the craft stores this year, it was clear that buffalo check was going to be a staple of the season. And I’m not complaining… because I love it.

    So I was especially pumped to see that the theme is carrying on into Christmas decor, too!

    Buffalo check, buffalo plaid… whatever you call it, there’s something downright cozy about this familiar fabric. It takes me back to a little cabin in the Tennessee mountains where our family vacationed a few years back, and I can almost smell the pine trees!

    But as “American” as buffalo check feels to, well, Americans, we’re only responsible for the name. The original fabric has much earlier origins in Scotland. Cool, right?

    There are a lot of color variations these days, too. You can go with the classic red and black, opt for a modern black and white, or get creative with a different choice altogether. Do whatever suits your personality!

    About the Yarn

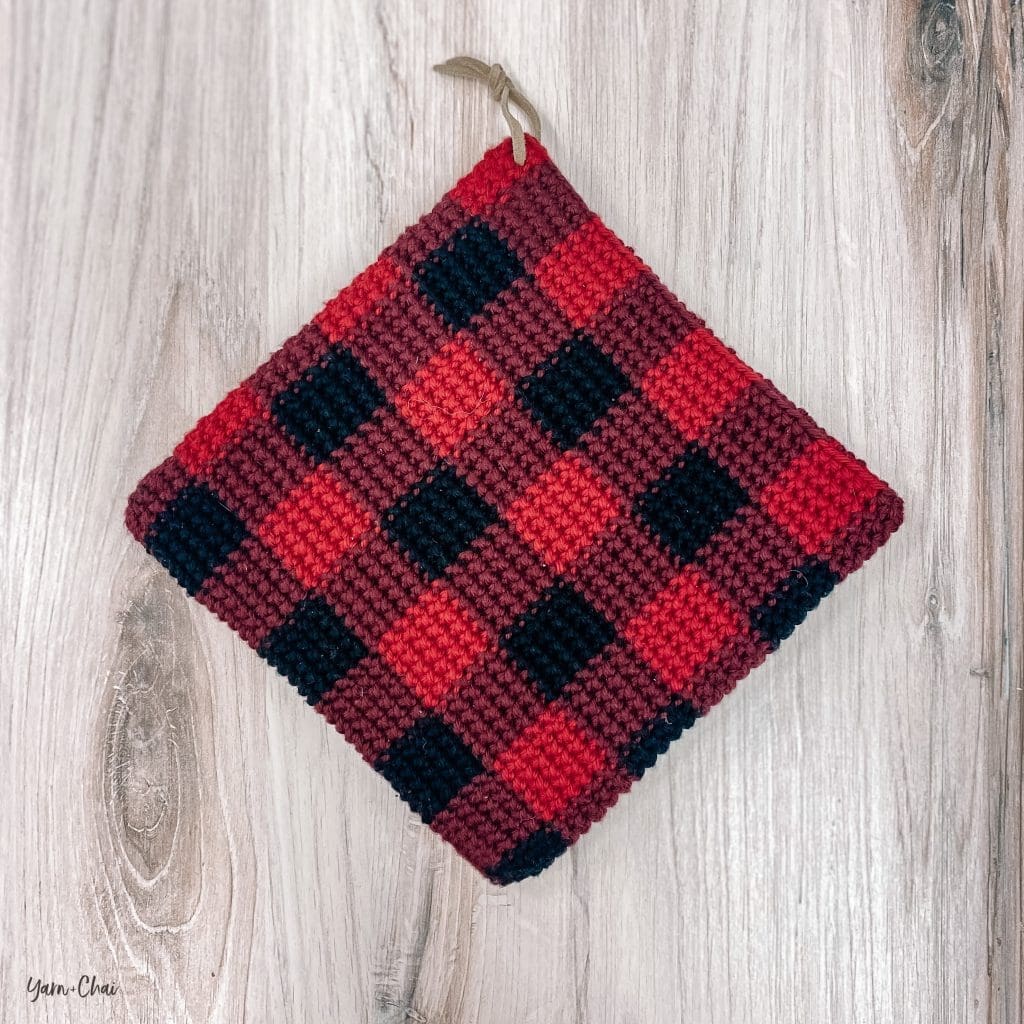
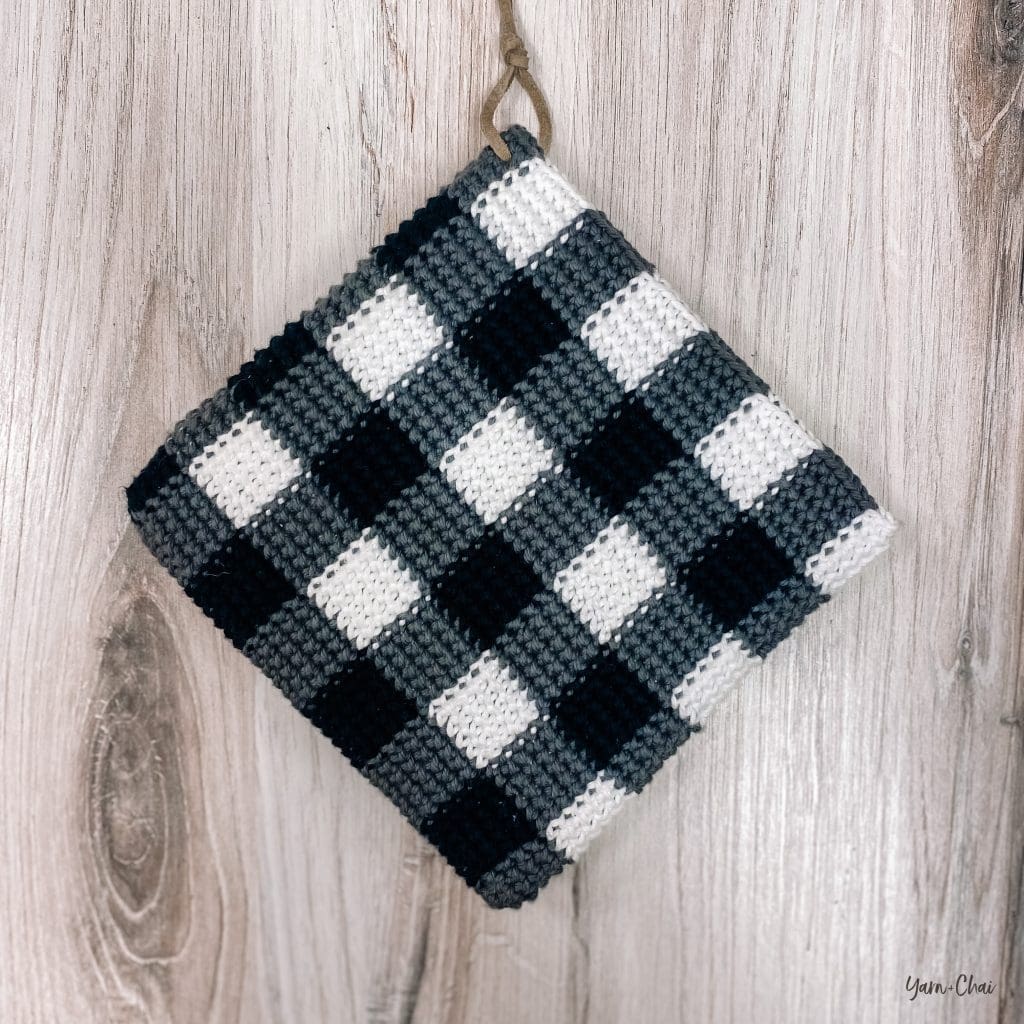
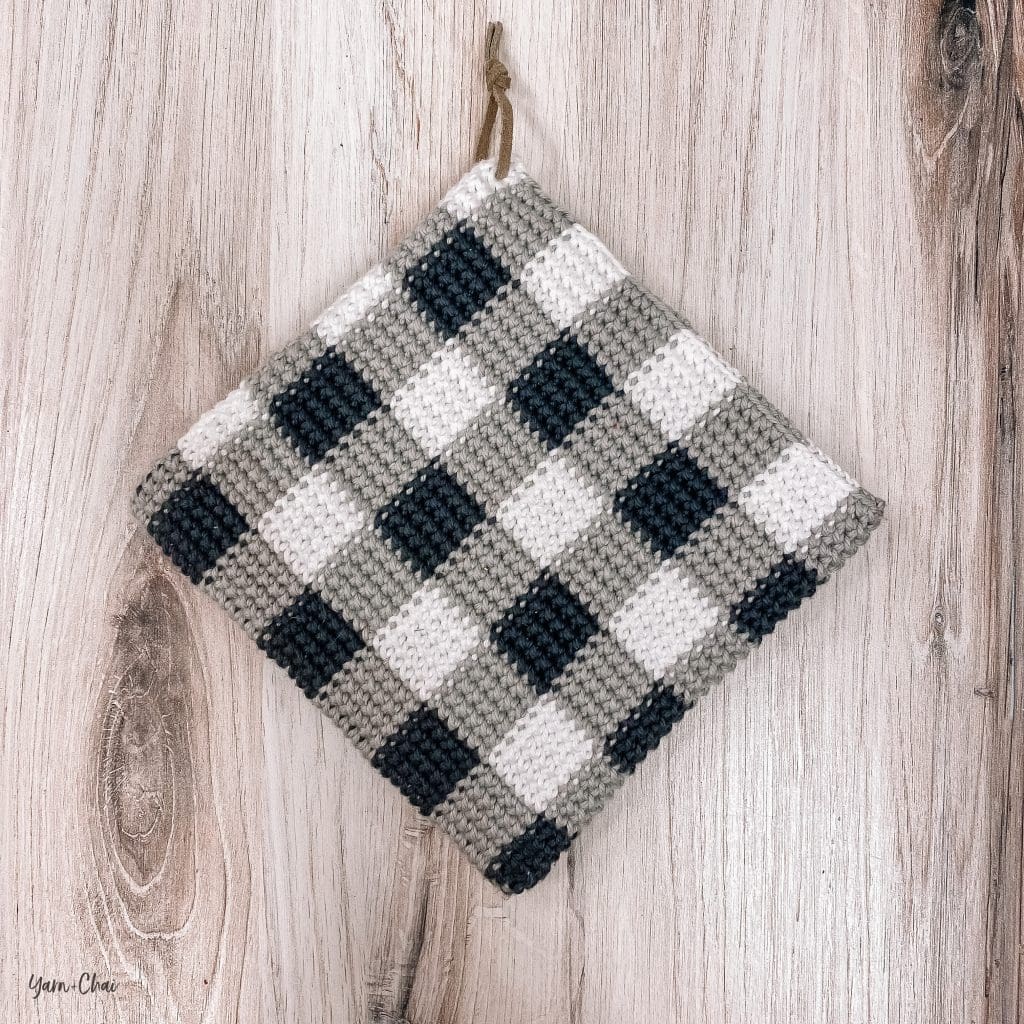
    I used Hobby Lobby’s I Love This Cotton for all three of my potholders. It’s important to use 100% cotton yarn for potholders, and ILTC has an awesome selection of colors. Here are the three color schemes I crocheted, and their colorways:

    COLOR A: Aubergine
    COLOR B: Black
    COLOR C: Burnt Sienna

    COLOR A: Pewter
    COLOR B: Black
    COLOR C: White

    COLOR A: Dove
    COLOR B: Pewter
    COLOR C: White

    I’ve seen some other pretty combos in the craft stores, like green and white, and red and white. If you do decide to stray from the colors I crocheted with, you’ll get best results by starting with white, adding a dark color, and finally choosing a lighter version of the dark color. (True buffalo check fabric is woven and actually only uses 2 colors; the medium color is the result of the dark and light threads crossing paths.)

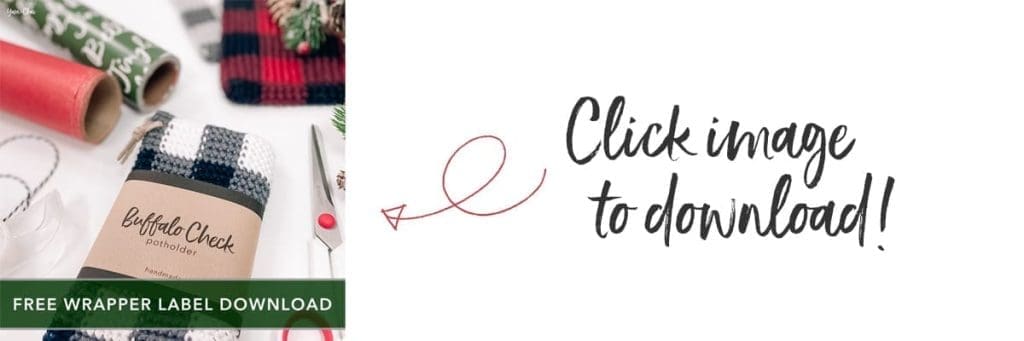
    Free Downloadable Label

    Since Buffalo Check Potholders would make a great holiday gift, I’ve included a free downloadable PDF for a wraparound-style label! These wrappers will take your gift presentation up a notch, and would also be great for displaying your potholders as a part of your craft show inventory. Whatever your needs, just click the image to download. (I printed mine on lightly textured, cardboard-colored cardstock to achieve this rustic look.)

    Prefer a PDF?

    This pattern can be completed using the 100% free version right here on this page. However, many people prefer the convenience of a printable, ad-free PDF.

    All-Access Passholders get the ad-free version of this and all of my other blog patterns. It’s a pretty sweet deal, if I do say so myself! Learn more about it here or continuing scrolling for the free version.

    BUFFALO CHECK POTHOLDERS

    View on Ravelry

    Language: American Standard

    Difficulty: Intermediate

    Finished Size: 7.5″ x 7.5″

    Hook: 4.0mm or whichever hook is needed to obtain correct gauge

    Gauge: 22 CSC x 17 rows = 4″ square

    Yarn: #4 medium weight cotton yarn in three colors:

    • COLOR A (midtone): 80 yards
    • COLOR B (darkest): 45 yards
    • COLOR C (lightest): 45 yards

    I used Hobby Lobby’s I Love This Cotton for all three of my Buffalo Check Potholders. Check up in the blog post for the colorways used in each one!

    You’ll Also Need: Yarn needle, 10″ length of 3mm leather or suede cord for handle

    Terms and Abbreviations:
    ST/STS
     (stitch/stitches)
    SL ST (slip stitch)
    CH (chain)
    CSC 
    (crossed single crochet: Insert hook into stitch. Yarn UNDER, pull through; 2 loops on hook. Yarn over, pull through both loops.)
    FLO (front loop only)
    JOIN (join with a SL ST to the top of the first ST of the round)

    Notes:
    (1) CH1s at the beginning of rounds do not count as a stitch in the final stitch count.
    (2) This is an intermediate level pattern because it involves a lot of color changes and carrying yarn. I go through the first round very thoroughly with lots of photos, and then basically set you free with a color chart after that. If you can crochet the first round and it’s all making sense to you, you’ll be just fine to complete the pattern!
    (3) Pattern is worked in joined, unturned rounds around a base chain and seamed closed at the end, resulting in a sturdy, double-thickness potholder.

    INSTRUCTIONS

    To begin: With COLOR A, CH43.

    Round 1: CSC in 2nd CH from hook. CSC in next CH. CSC in next CH, but complete the ST with COLOR B (see photo).

    With COLOR B, and carrying COLOR A along behind your stitches, CSC in each of the next 5 CHS. CSC in next ST, but complete the ST with COLOR A (see photo).

    Carrying whichever color you are not actively using, continue across the chain, following a color pattern of 6 STS per color (excluding the very first set of 3 STS) until you have three empty chains remaining. Complete the final 3 STS with COLOR B (photo).

    Next, you’re going to complete the other half of this set of six COLOR B stitches on the other side of the chain. Place your next 3 STS where indicated in the first image (shown completed in the second image), and don’t forget to complete the final ST with COLOR A to prepare for the color change:

    Continue to CSC into the remaining chains, following the 6-stitches-per-color pattern, until only 3 STS remain; complete those STS in COLOR A. (Notice how the first 3 STS and the last 3 STS of the round make a full set of 6 for COLOR A.)

    JOIN to the top of the very first ST of the round (indicated in the first photo and shown completed in the second photo). (42)

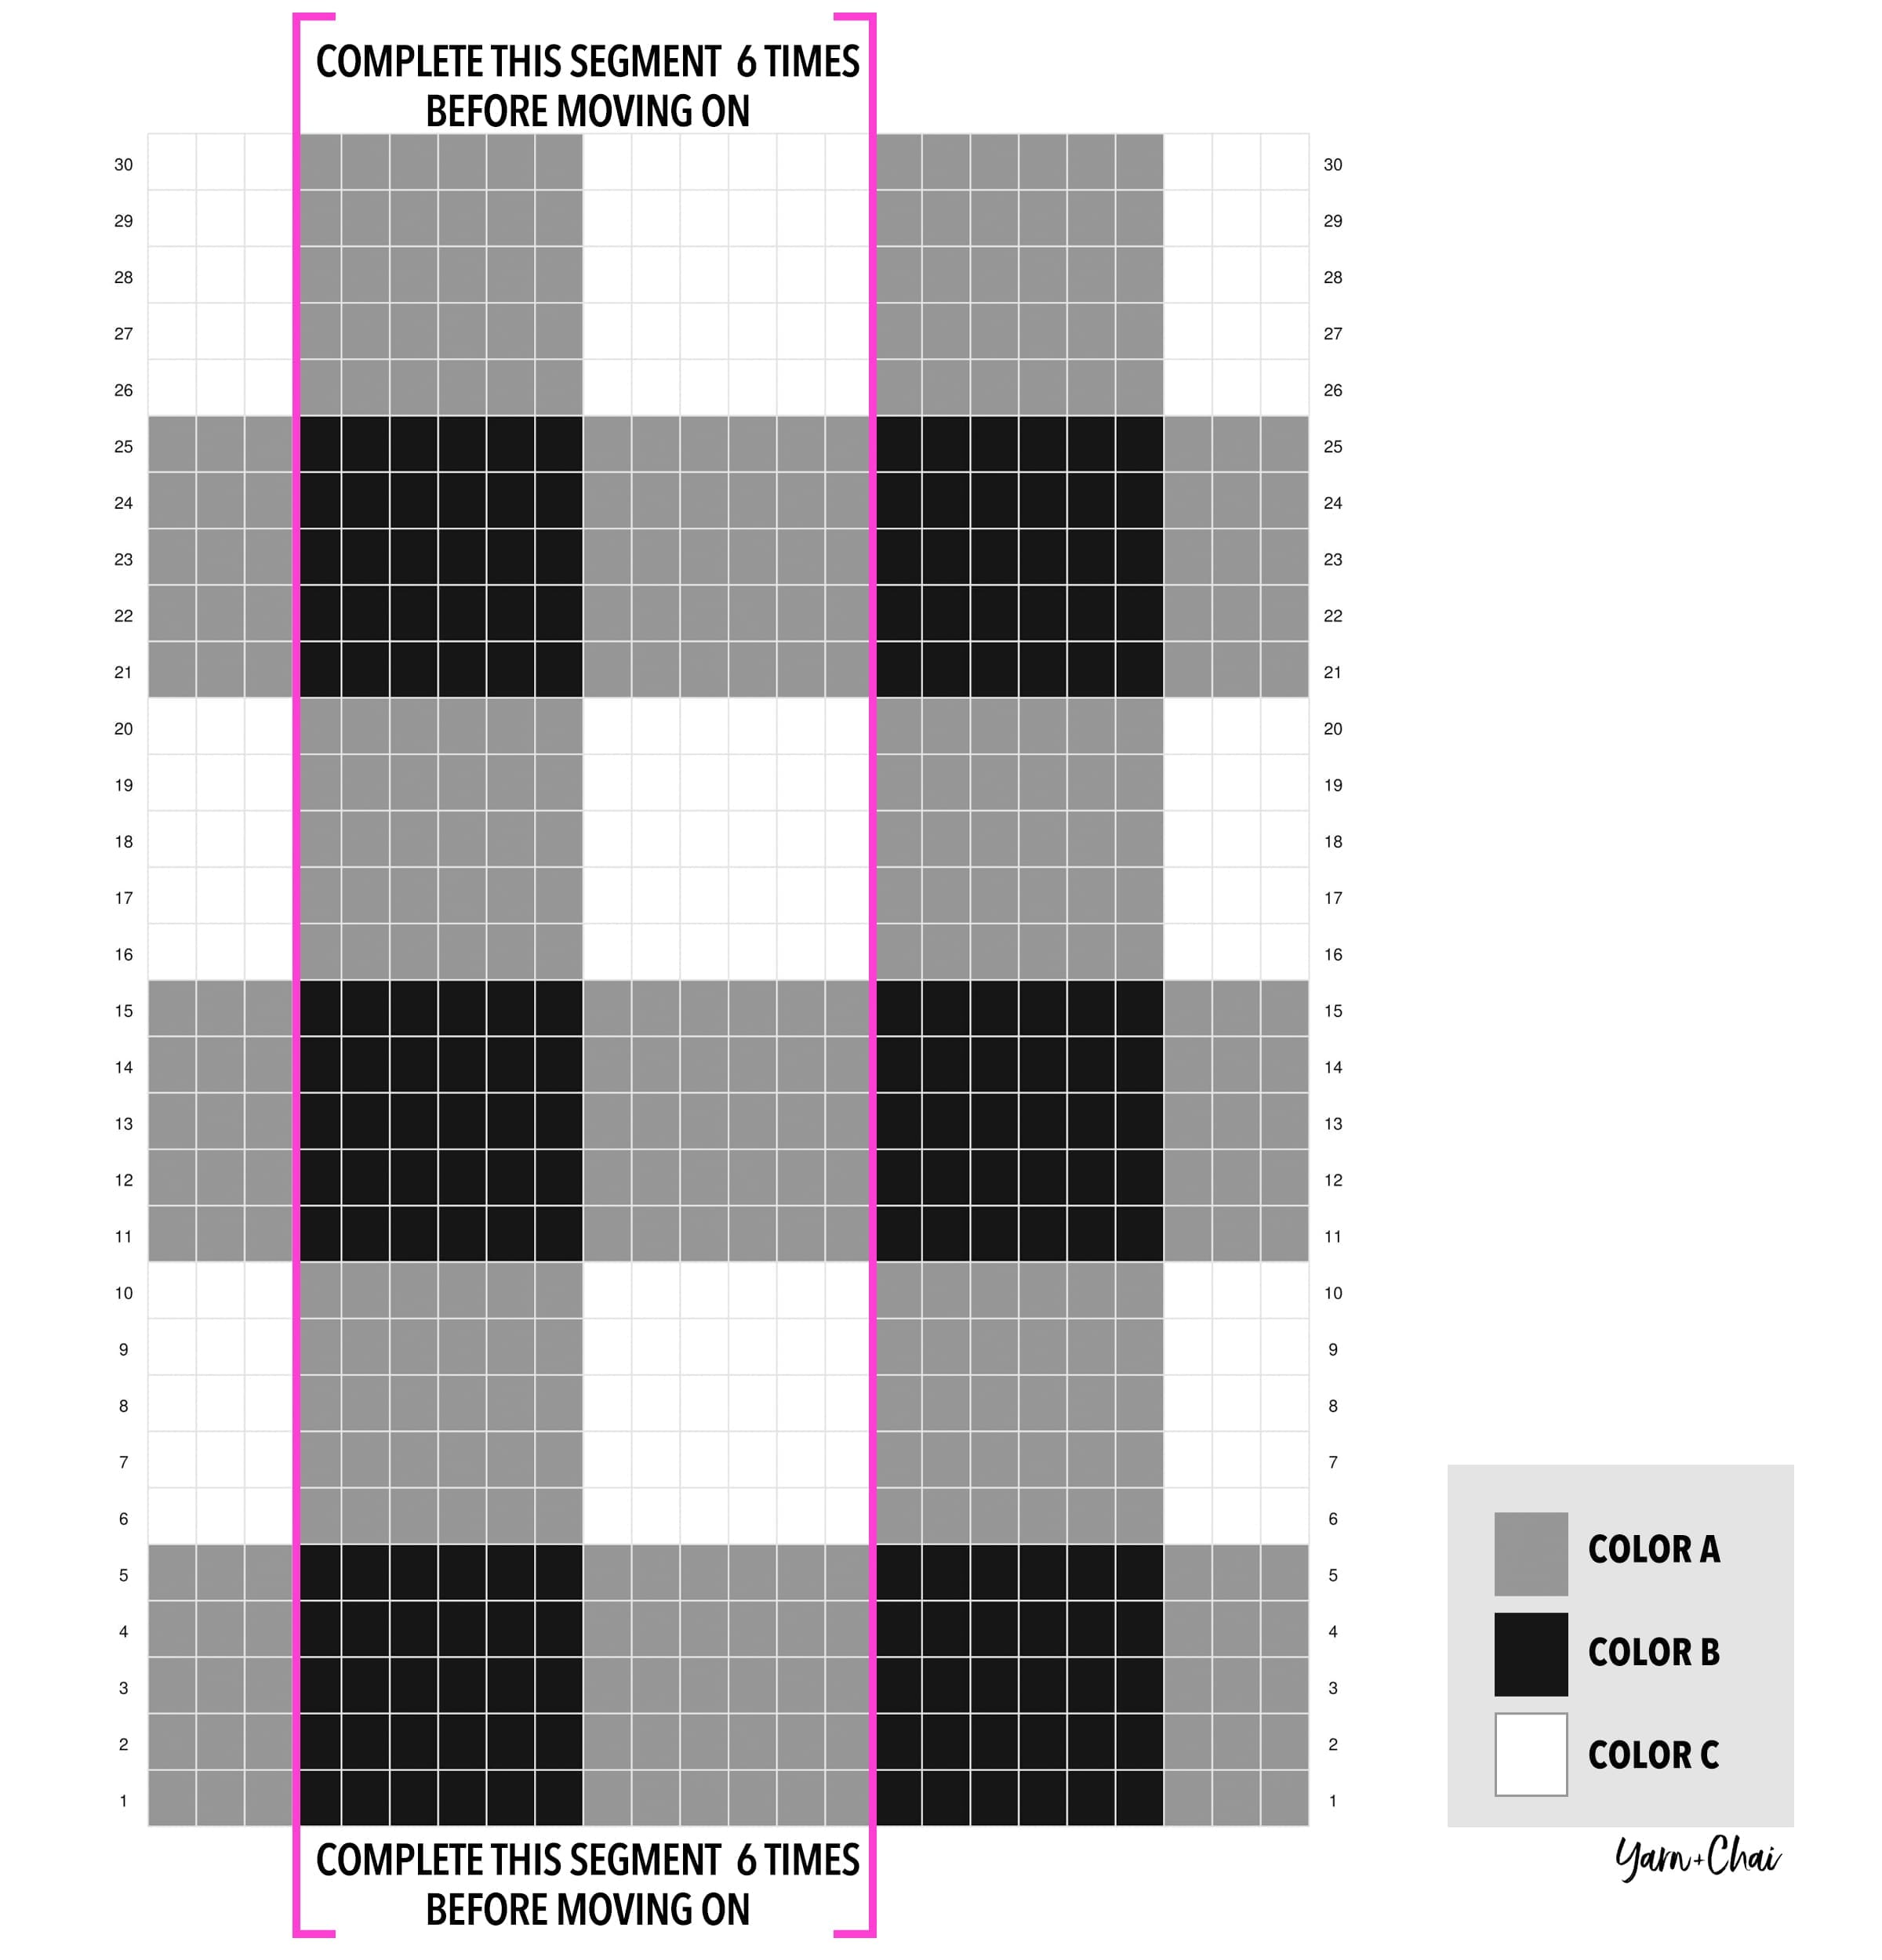
    Rounds 2-30: CH1, do not turn. In FLO, CSC in each ST around, following the color chart below. Join. (42)

    A few tips for following the color chart:

    • To save space, the chart has been condensed using a repeated section, just like a written pattern would. Read it from right-to-left (or left-to-right, if you’re a leftie), and be sure to complete the repeated section the indicated number of times before finishing with your final 3 stitches (or final 9 if you’re a leftie).
    • The pattern is worked from the bottom up, so start at the bottom of the chart.
    • Don’t forget, you’ve already completed Round 1.
    • Remember, when changing colors, always complete the last ST of the previous color by drawing the new color through the two loops on the hook.
    • When you get to Round 6 and add COLOR C, you can drop COLOR B until you need it again (you don’t need to carry it along). This applies to whenever you get to a round where the blocks of color are different from the previous round.

    Fasten off, leaving a long tail for seaming. Weave in all other ends.


    Seaming

    Hold top edges of potholder together so that the color blocks line up with each other, and seam the edges together in your preferred method. Here’s how I seamed mine:

    Fasten off and weave in your final end.


    Handle

    Cut a 10″ length of leather or suede cord (mine was 3mm thick) and use a yarn needle to run it through the potholder near the corner. Tie a knot at the top and trim as necessary.

    Done! If you’re sharing on social media, be sure to tag me @yarnandchai.design so I can see your beautiful work!

    (And don’t forget to download these FREE wrapper labels!)

  • Halloween Pumpkin

    Halloween Pumpkin

    Iโ€™ve always been more of a fall person than a Halloween person, but when October 31 rolls around, I donโ€™t mind a bit of spooky decor. 

    And you know whatโ€™s great about a jack-o-lantern made of yarn?

    It doesnโ€™t rot! Score.

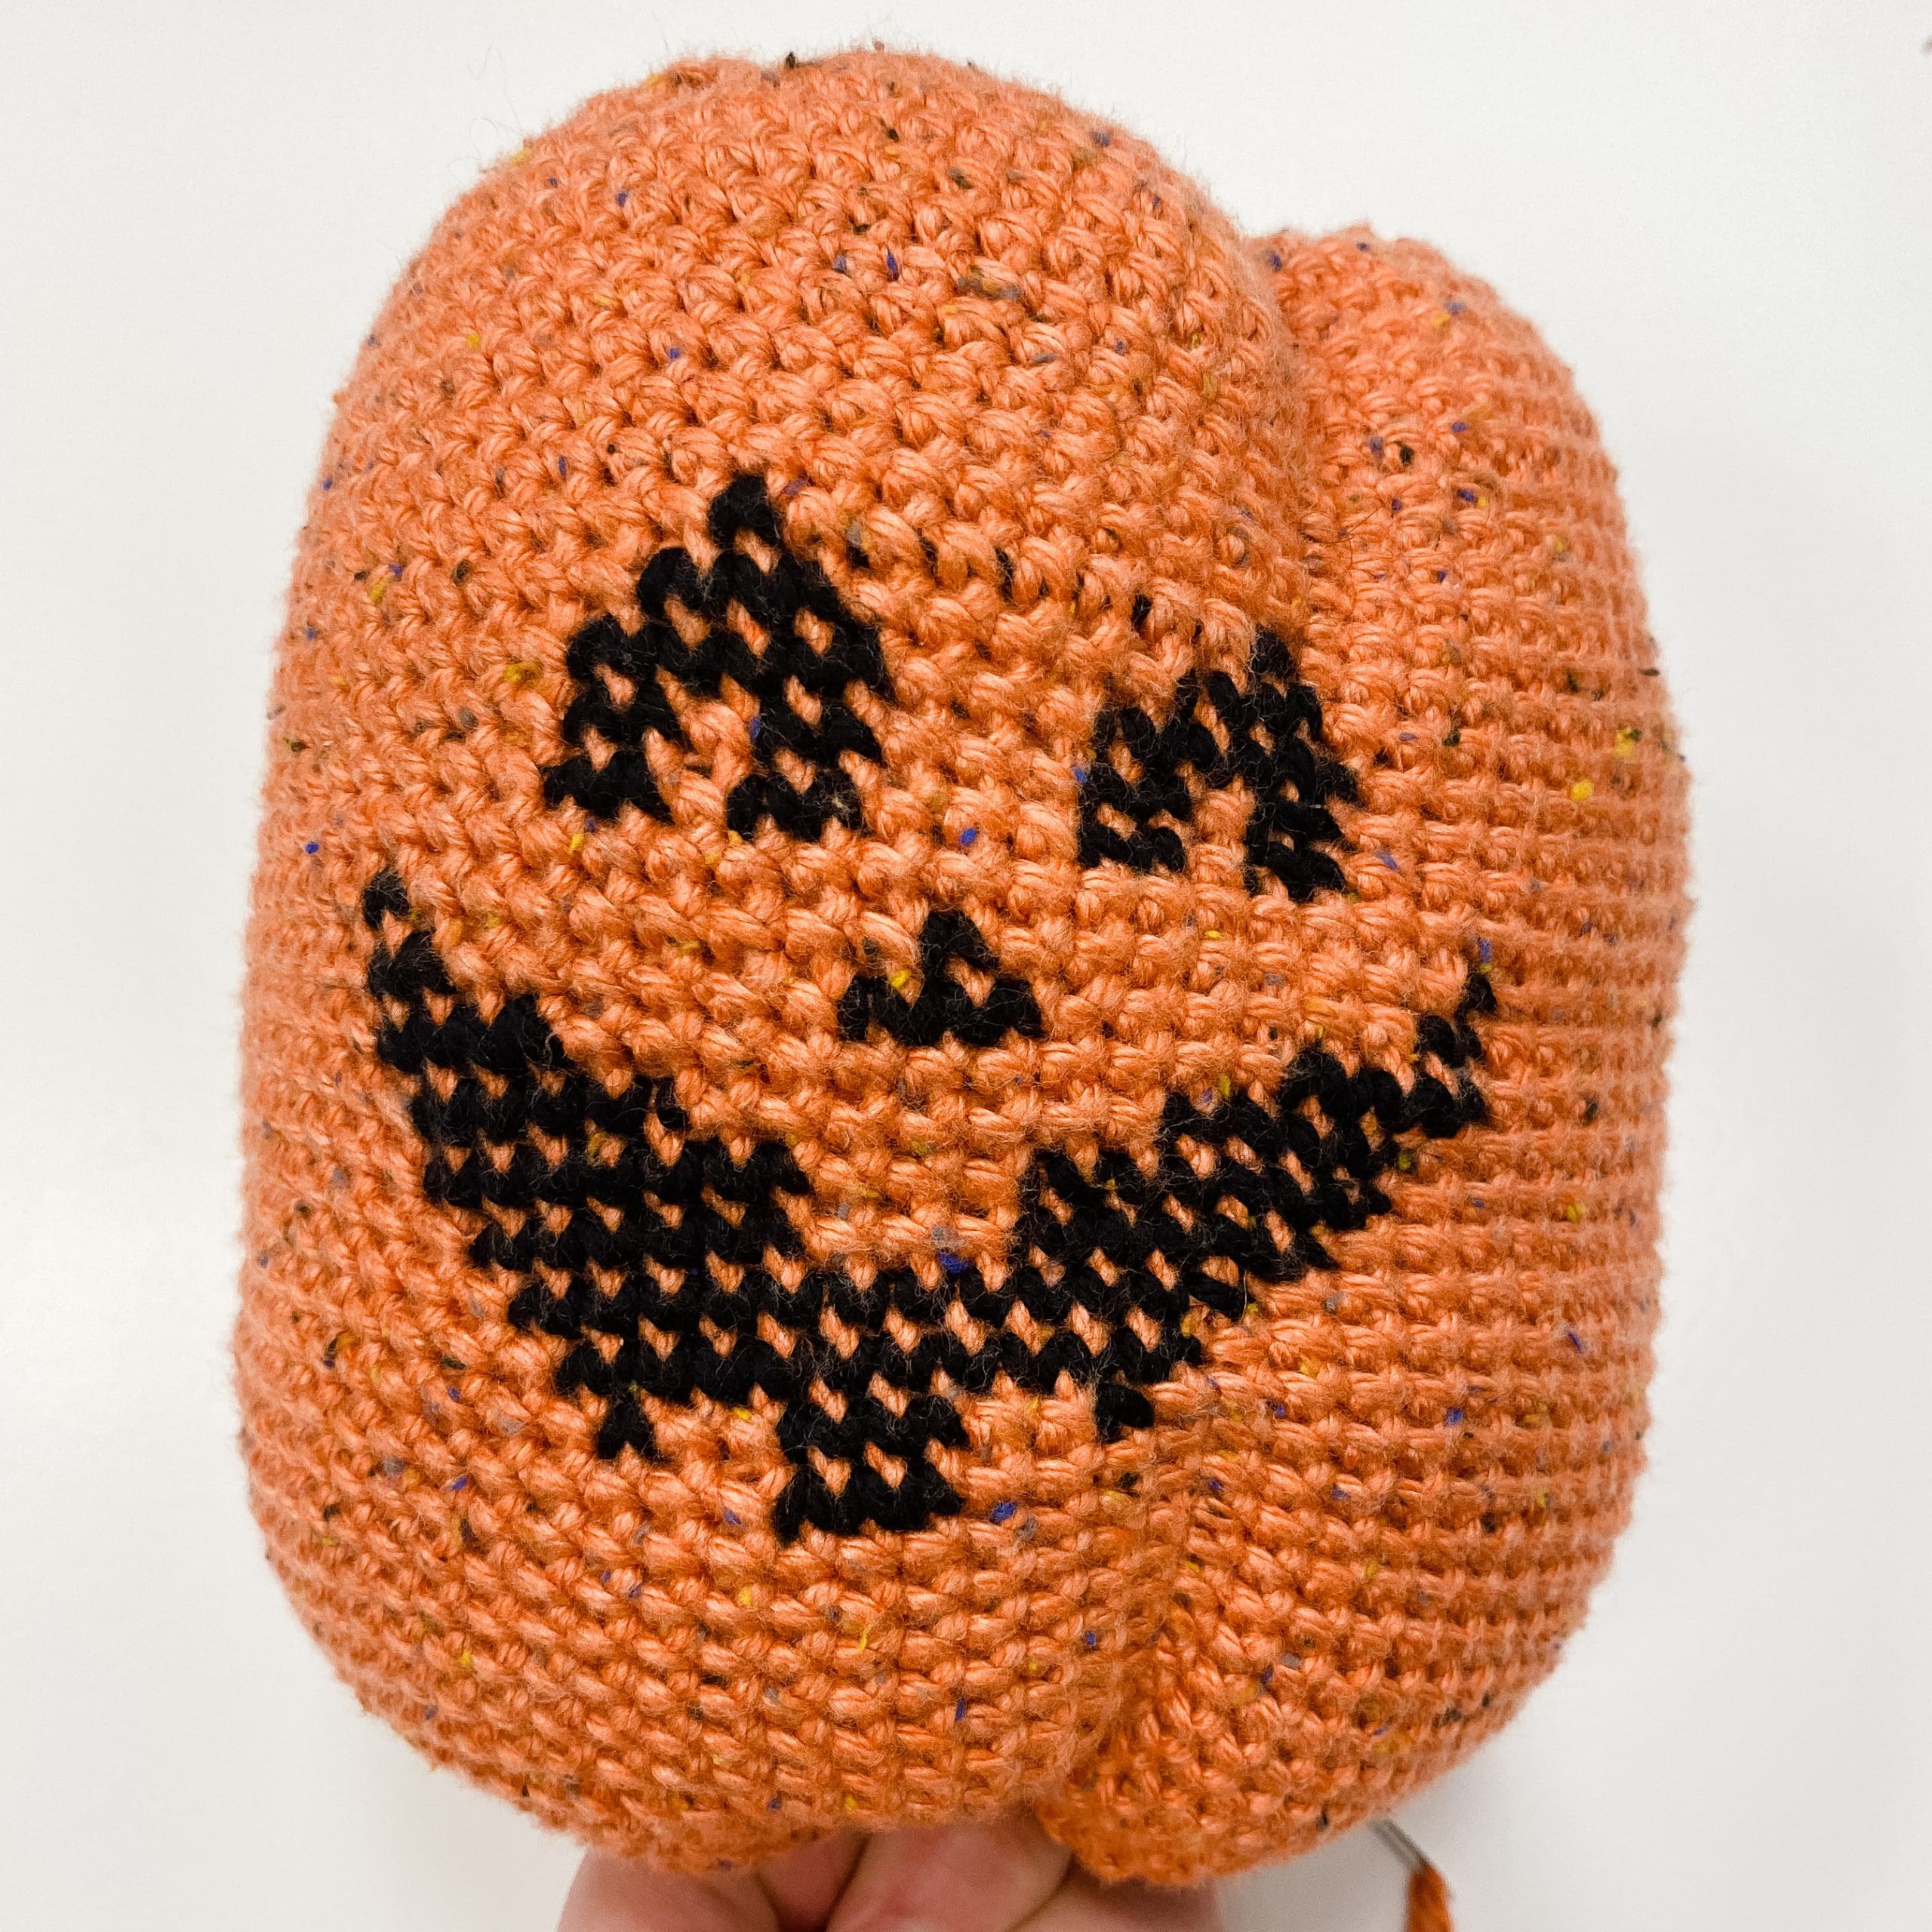
    While I was designing my Petite Autumn Pumpkin, I started brainstorming how I might adapt it into a silly-faced holiday version.

    I think he came out pretty cute!

    (Full disclosure, I think the kid is even cuter.)

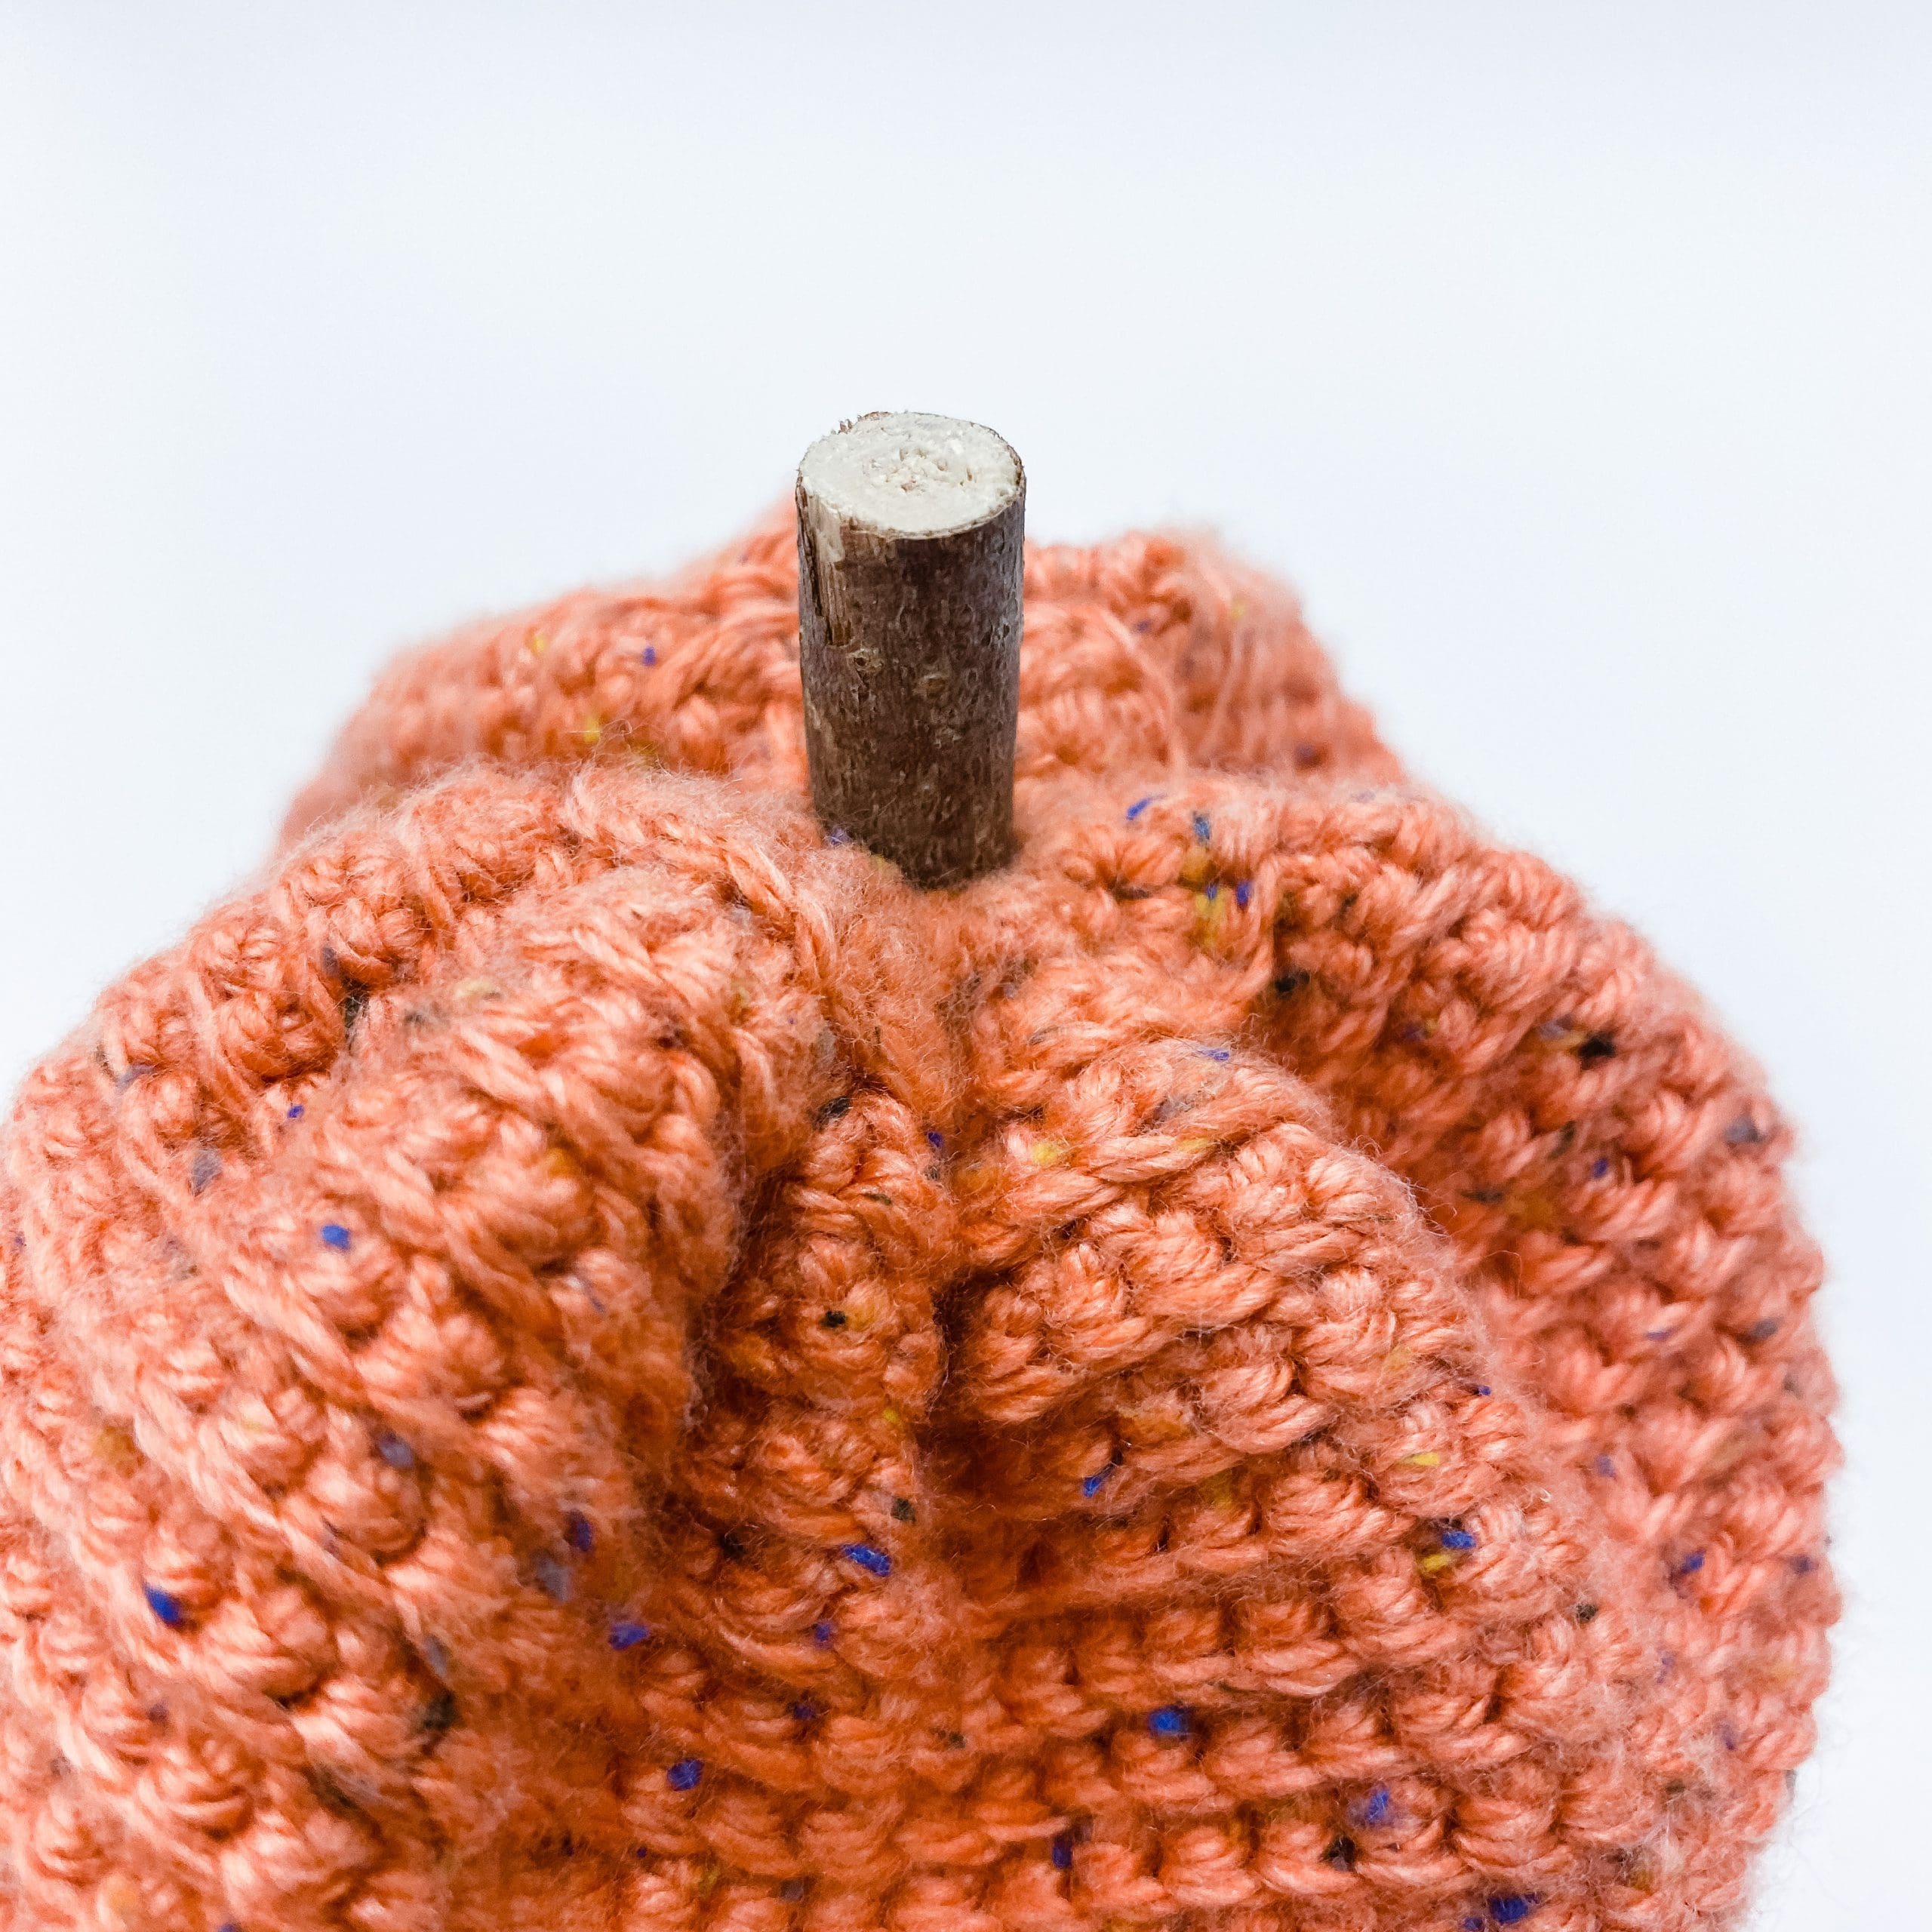
    You could also leave the face off completely and just use this as a classic pumpkin pattern. I mean, look at that realistic shaping:

    About the Yarn

    The yarn I chose for my little jack-o-lantern was chosen based on color, not fiber. (There aren’t a lot of really good pumpkin oranges to choose from!) But Yarn Bee Tweed Indeed in “Pumpkin Tweed” fit my rustic vibe perfectly. It’s the same #4 weight yarn that I used for my Harvest Cardigan pattern, and I love it, but you could easily substitute it with a #4 of your choice.

    For the face, I used I Love This Cotton in “Black”; but, again, this #4 weight cotton is easy to substitute!

    Prefer a PDF?

    This pattern can be completed using the 100% free version right here on this page. However, many people prefer the convenience of a printable, ad-free PDF.

    All-Access Passholders get the ad-free version of this and all of my other blog patterns. It’s a pretty sweet deal, if I do say so myself! Learn more about it here or continuing scrolling for the free version.

    – – – – – – – – – – – – – –

    Halloween Pumpkin

    View on Ravelry

    Difficulty: Intermediate

    Crochet Language: American Standard

    Finished Size: Finished pumpkin will be approximately 6โ€ wide x 5.25โ€ tall, but these measurements may vary slightly based on how you stuff and shape it.

    Yarn: Approximately 160 yards of #4 worsted weight yarn for COLOR A (I used Yarn Bee Tweed Indeed in โ€œPumpkin Tweedโ€) and 20 yards of #4 worsted weight yarn for COLOR B (I used I Love This Cotton in โ€œBlackโ€)

    Hook: 4.5mm (G) hook

    Gauge: Not super important, but 12 CSC x 11.5 rows = 2โ€ square.

    You’ll also need: Regular and extra long yarn needles, stitch marker, poly-fill (stuffing), small stick (or cinnamon stick) for stem, fast drying glue

    Terms and Abbreviations:
    MC (magic circle – view tutorial here)
    ST/STS (stitch/stitches)
    SL ST (slip stitch)
    CH (chain)
    FLO (front loop only)

    CSC (crossed single crochet: Insert hook into stitch. Yarn UNDER, pull through; 2 loops on hook. Yarn over, pull through both loops.)
    CSC2TOG (CSC 2 stitches together: Insert hook into FLO of stitch, then immediately insert hook into FLO of the next ST. Yarn UNDER, pull through front loop of each ST; 2 loops on hook. Yarn over, pull through both loops.)

    Notes:
    (1) Pattern is worked in a seamless round. Do not join, chain and/or turn unless instructed. Use a stitch marker to mark the beginning of your rounds.
    (2) Crocheting the bulk of the pattern in FLO helps keep the stitches stacked neatly, as opposed to the natural slant they usually have when working in a seamless round. This helps keep the pumpkin’s face from slanting, too!
    (3) I did not carry COLOR B behind any stitches made with COLOR A; instead, I picked up COLOR B whenever it was needed and dropped it immediately after.
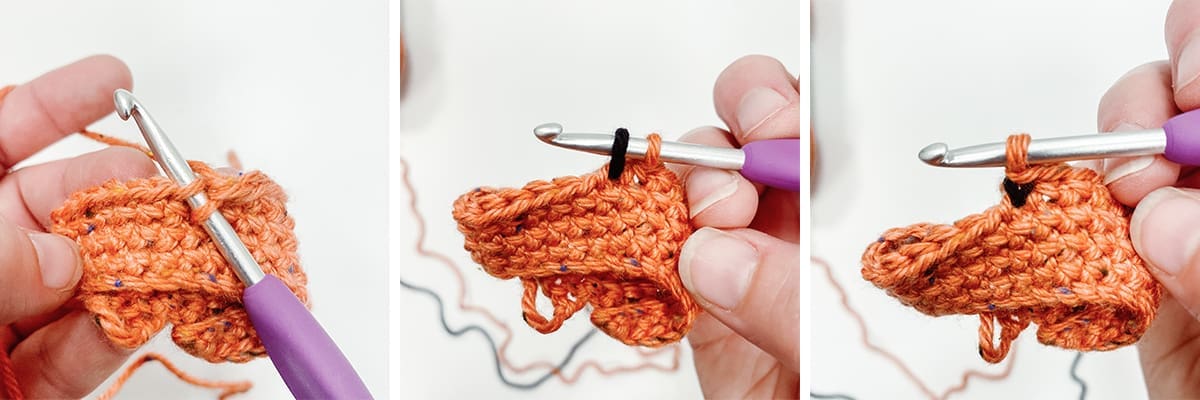
    (4) When you come to CSC stitches marked as COLOR B, complete them as follows: Insert hook into stitch, drop COLOR A, grab COLOR B and pull through (2 loops on hook); drop COLOR B, yarn over with COLOR A, pull through both loops.

    – – – – – – – – – – – – – – –

    INSTRUCTIONS

    To begin: With COLOR A, make a magic circle; CH1.

    Round 1: 20 CSC in MC. (20)

    Round 2: 2 CSC in each ST around. (40)

    Round 3: 2 CSC in each ST around. (80)

    Note: Your circle will be very wavy because of all of the stitches you’ve crowded into a small area. Don’t worry!

    Rounds 4-15: CSC in FLO of each ST around. (80)

    Rounds 16-31: CSC in FLO of each ST around, following the color chart below. (80)

    HOW TO READ THIS CHART: The pumpkin’s face is 19 STS across. Start in the bottom right square and work left. When you’ve completed the 19 charted STS, finish the rest of the round in COLOR A. Then move up a row and start again in the rightmost square. Each time you complete the 19 STS of the charted part of the round, finish the rest of the round with COLOR A.

    Refer to pattern notes for more tips.

    Lefties: The chart is symmetrical from side to side, so if it helps, you can start in the lower left corner instead.

    (Note: The chart is upside down because we are crocheting this pumpkin from the top down.)


    Rounds 32-44: With COLOR A, CSC in FLO of each ST around. (80)

    Pull up a large loop so your work doesnโ€™t start to unravel, then remove your hook. Weโ€™re going to pause here to do two things: 

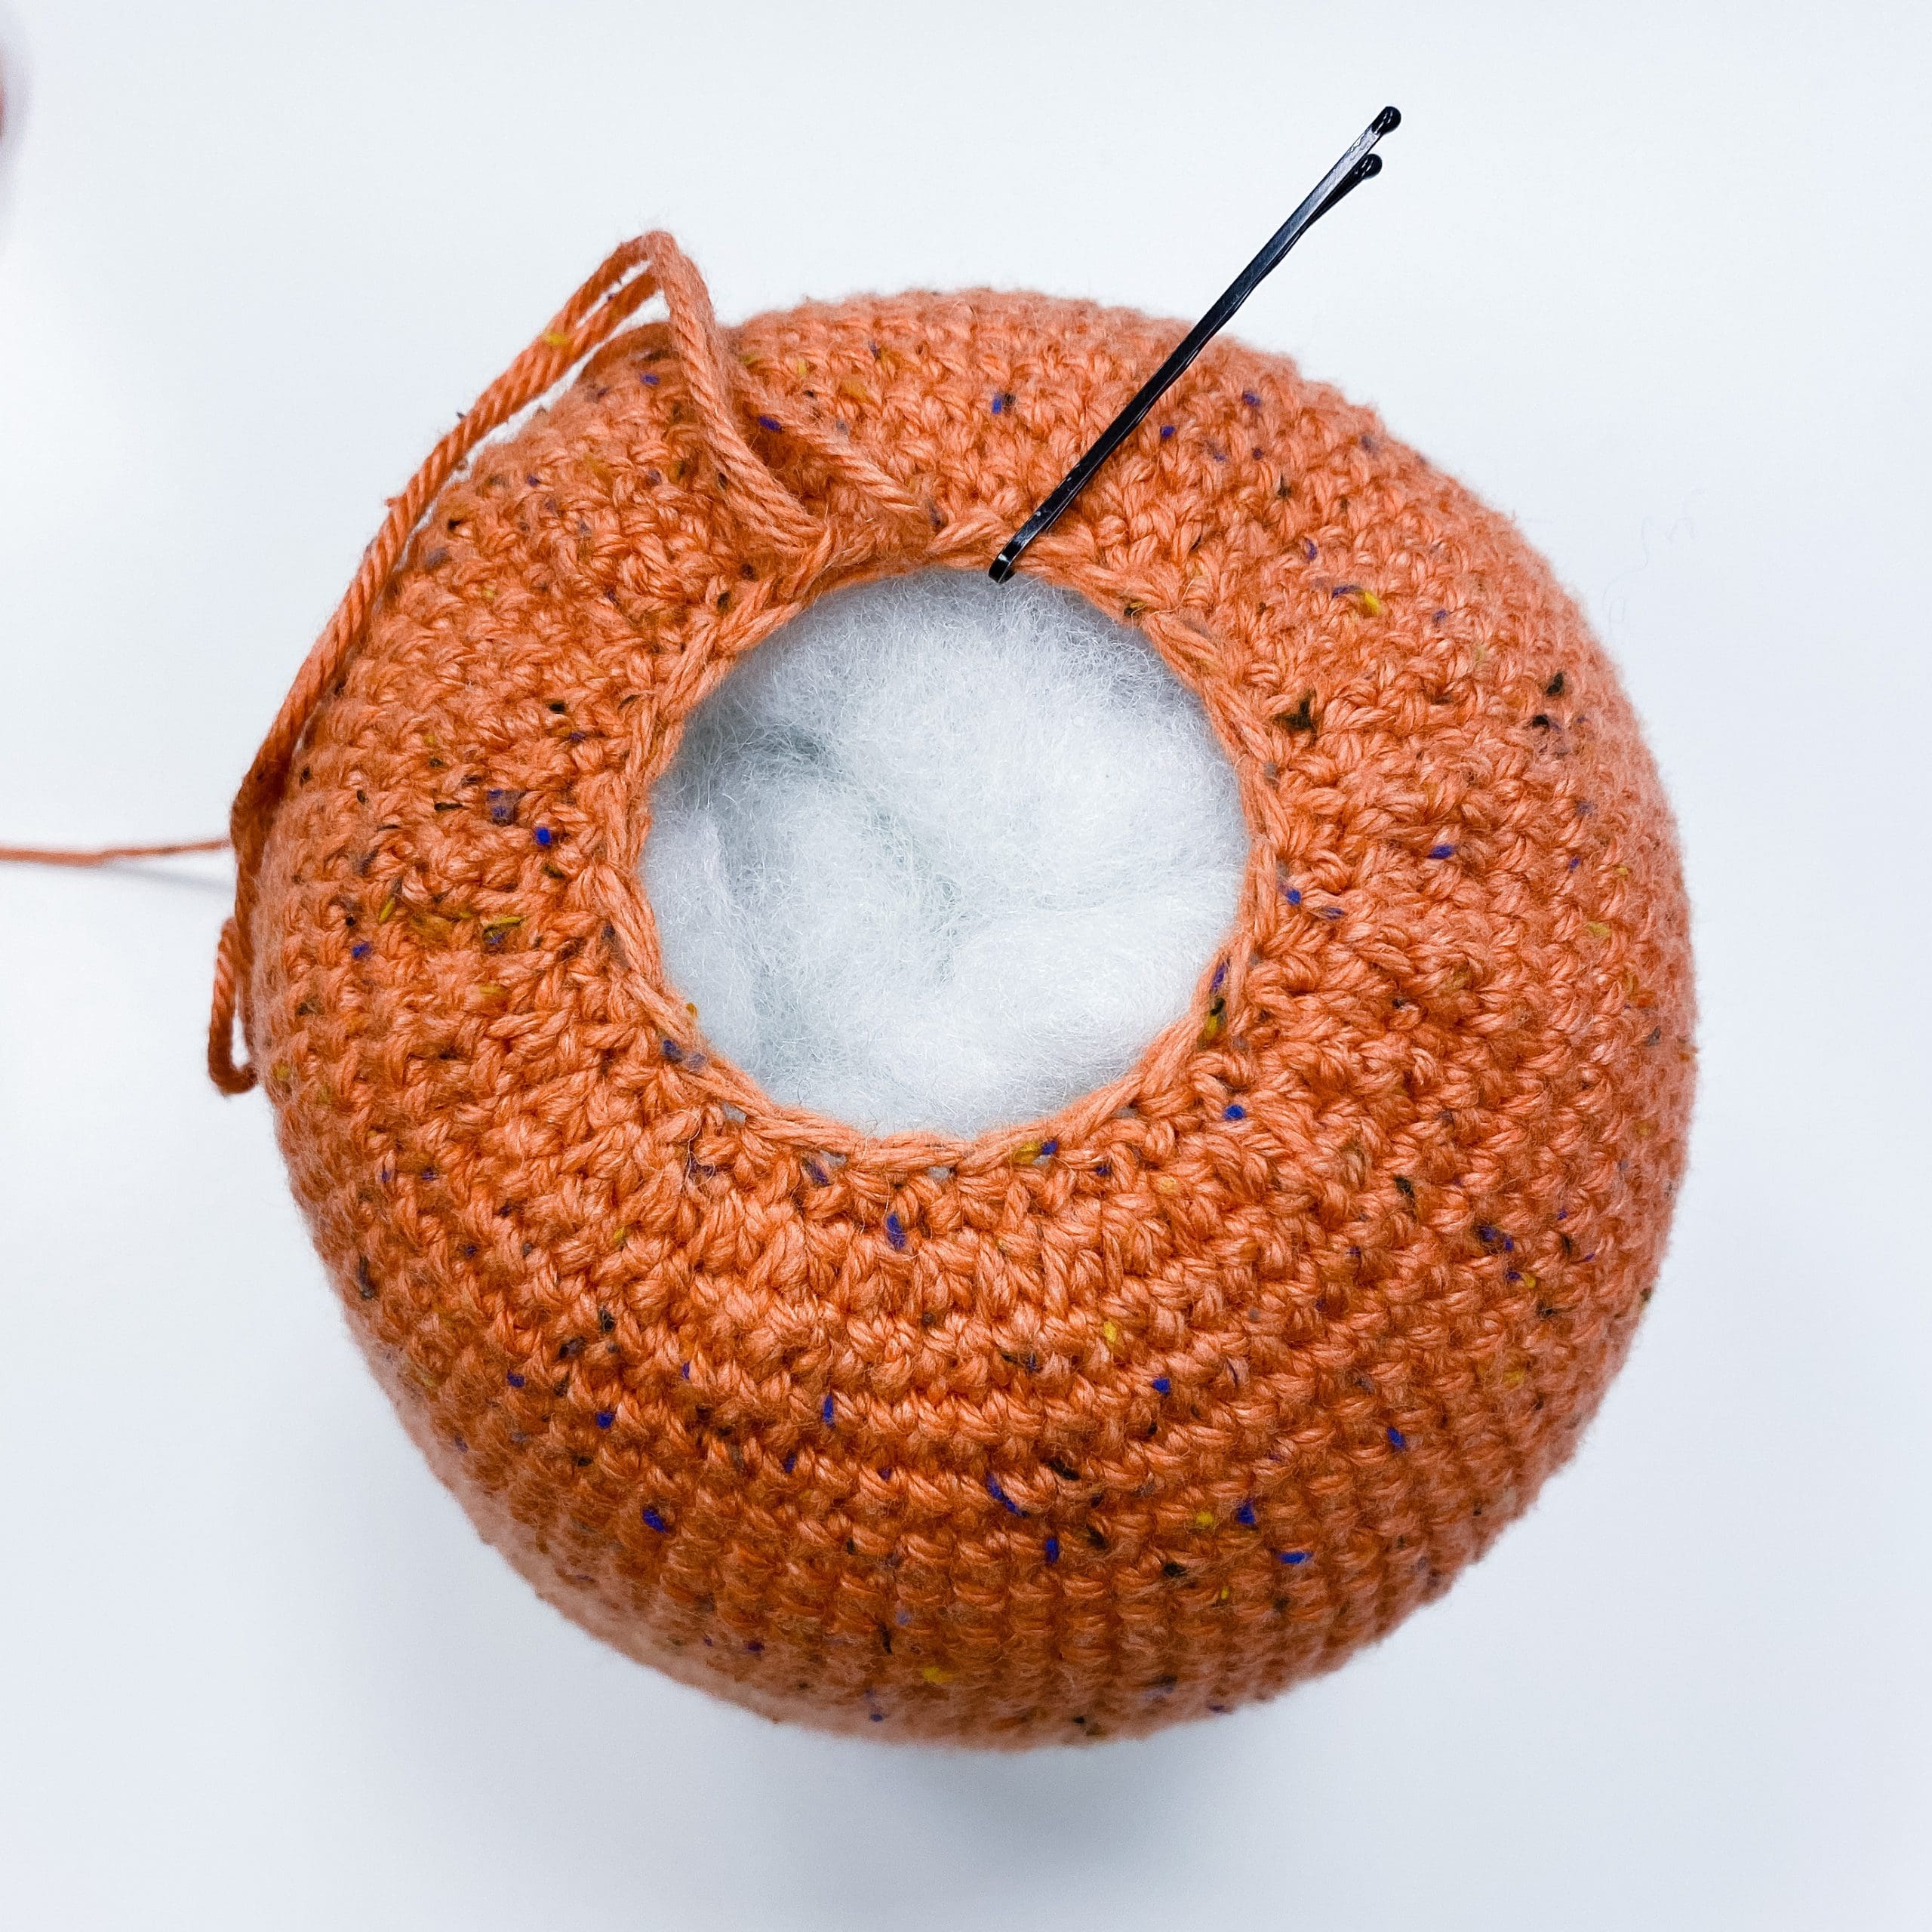
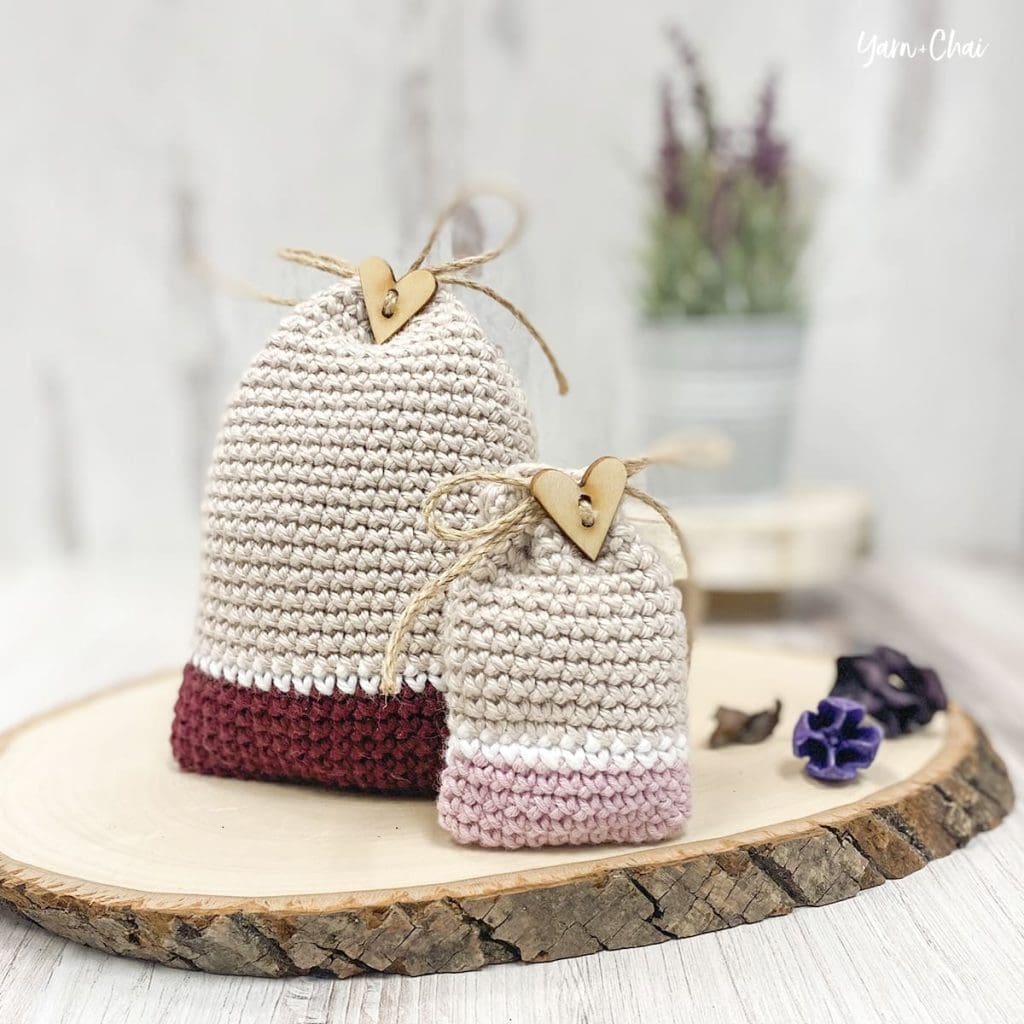
    Weave in the starting tail: Turn your pumpkin inside out (so the ridges created by the FLO are visible), then insert your pumpkin stem into the opening created by the magic circle (see photo). Weave in the starting tail, then remove the stem (youโ€™ll glue it in place later).

    Turn pumpkin right side out.

    Add stuffing: Use the polyfill to stuff the pumpkin. Donโ€™t be skimpy; the better you stuff it, the better pumpkin shape youโ€™ll have in the end.

    Reinsert your hook and continue on to Round 45.

    Round 45: CSC2TOG around. (40)

    Round 46: CSC2TOG around. (20)

    To finish: SL ST in each of the next 2 STS to smooth down the round, then fasten off, leaving a tail about 2 yards long. 

    If your pumpkin needs a little more stuffing after crocheting the last two rounds, add it now.


    SHAPING + FINISHING

    Cinching and Closing:
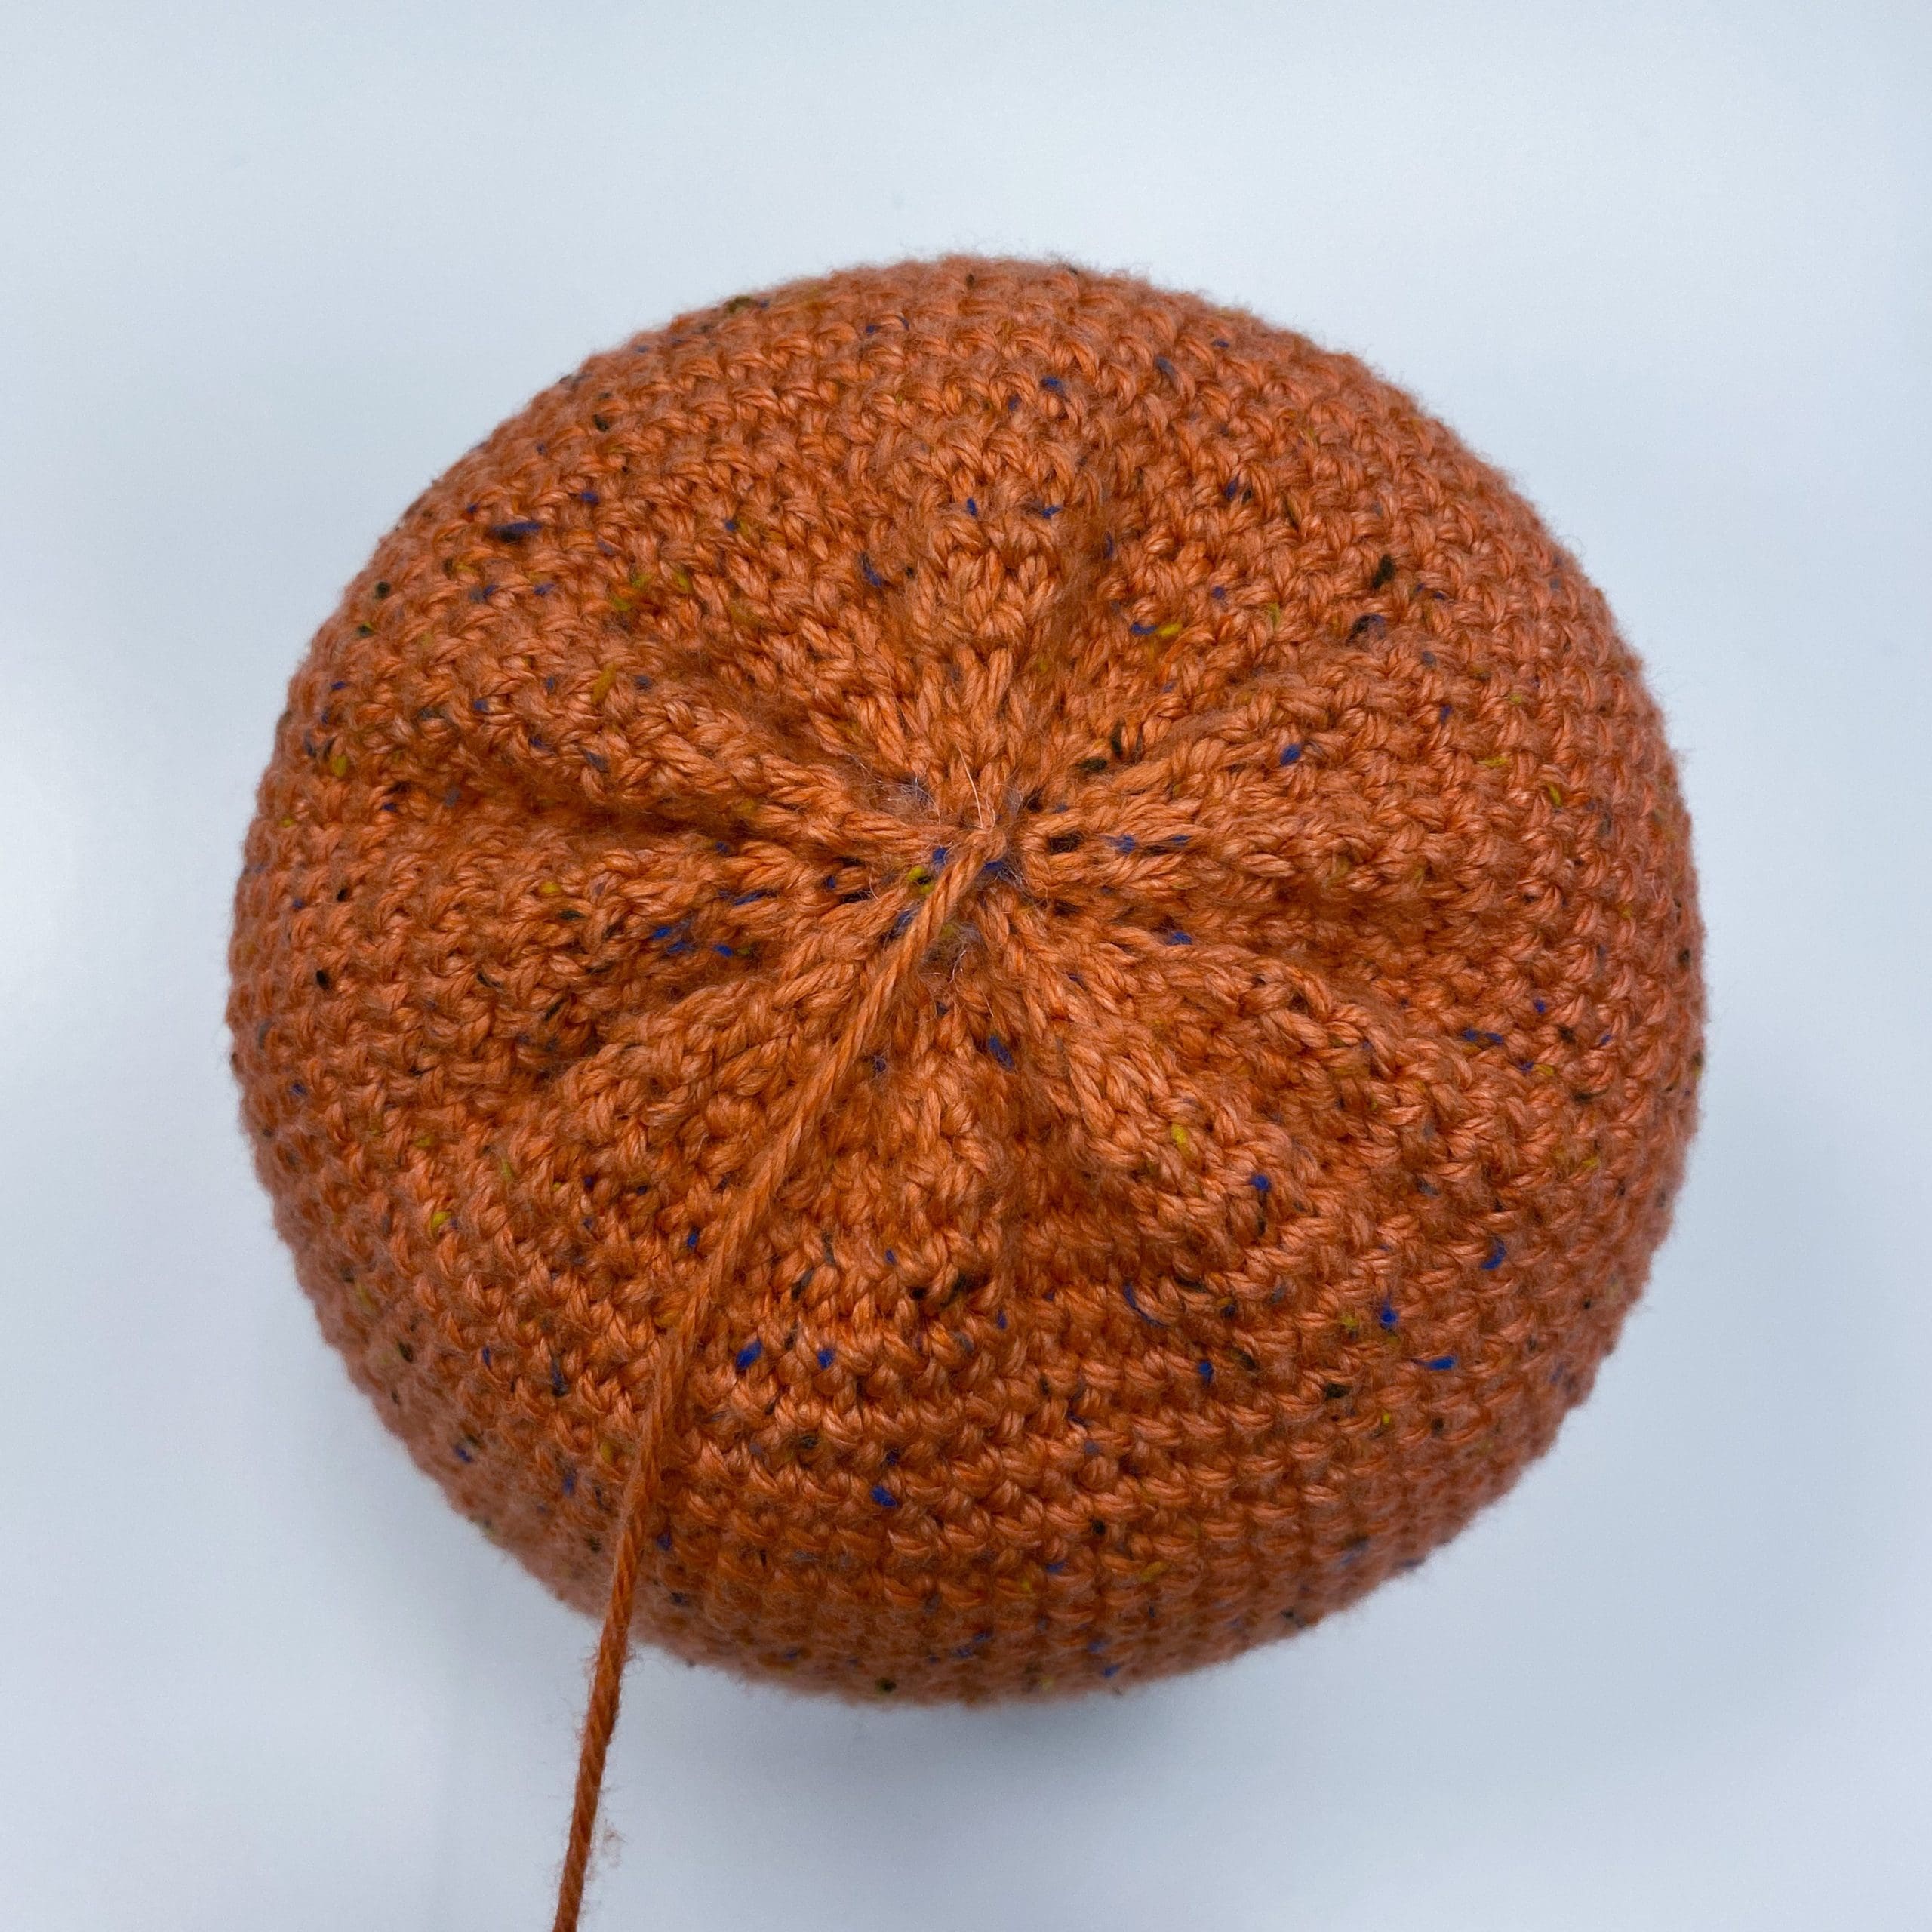
    Use yarn needle and finishing tail to weave along the bottom edge of the pumpkin, weaving in one stitch, out the next until youโ€™re back where you started. Pull yarn tail to cinch closed. Weave yarn needle across the cinch in a couple different directions to reinforce closure; tie a knot, but do not fasten off.

    Shaping:
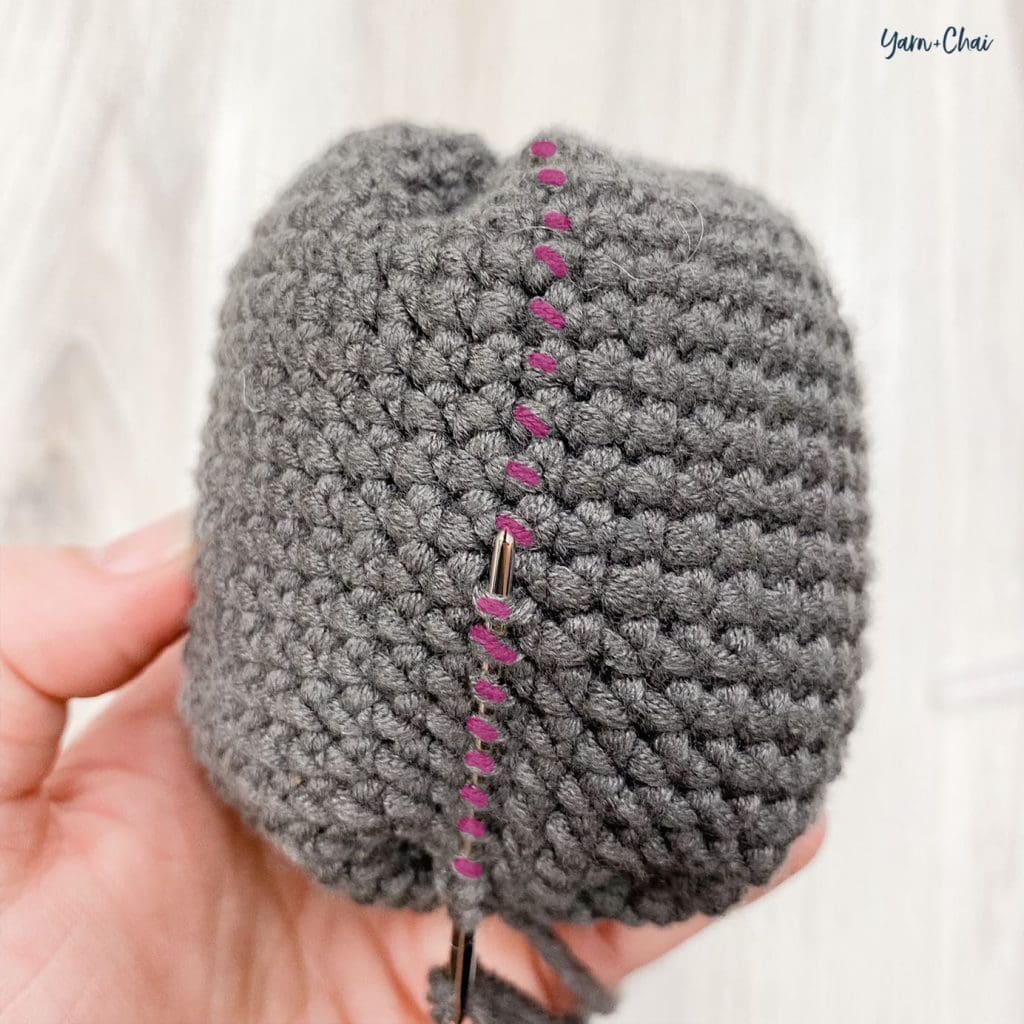
    Use extra-long yarn needle to run the finishing tail under the diagonal bar of each CSC in a vertical line as shown in the photo below:

    Continue all the way to the top, then insert yarn needle down between the 1st and 2nd round and push it down through the pumpkin, pulling it out through the center of the bottom of the pumpkin.

    Pull tight, creating an indent in the pumpkin.

    Count over 10 stitches to the right from your first indent, and repeat the process. 

    Continue the process, counting over 10 stitches each time. You should end with 8 evenly spaced indents. Tie a knot and weave in the tail.

    Stem:
    Add a few dots of fast-drying glue to the magic circle area of the pumpkin, then quickly insert stem and push down; hold to set.

    All done! Seriously, how CUTE is he!?

    I hope you enjoyed this tutorial. If you’re sharing your pumpkins on social media, be sure to tag me @yarnandchai.design!
  • Petite Autumn Pumpkin

    Petite Autumn Pumpkin

    I love fall. It gives me all the feels.

    Petite Autumn Pumpkin

    When the heat of a Michigan summer finally breaks and the leaves start to turn shades of orange and red and yellow and I can snuggle up in a cardigan and fuzzy socks, I feel an overwhelming sense of calmness. 

    If I could bottle up the feeling that autumn gives me and access it year-round, I would be one peaceful, contented girl.

    But alas, fall is fleeting. So letโ€™s make the most of it, starting with a brand new pumpkin pattern, shall we?

    Prefer a PDF?

    This pattern can be completed using the 100% free version right here on this page. However, many people prefer the convenience of a printable, ad-free PDF.

    All-Access Passholders get the ad-free version of this and all of my other blog patterns. It’s a pretty sweet deal, if I do say so myself! Learn more about it here or continuing scrolling for the free version.

    – – – – – – – – – – – – – –

    Petite Autumn Pumpkin

    View on Ravelry

    Difficulty: Easy

    Crochet Language: American Standard

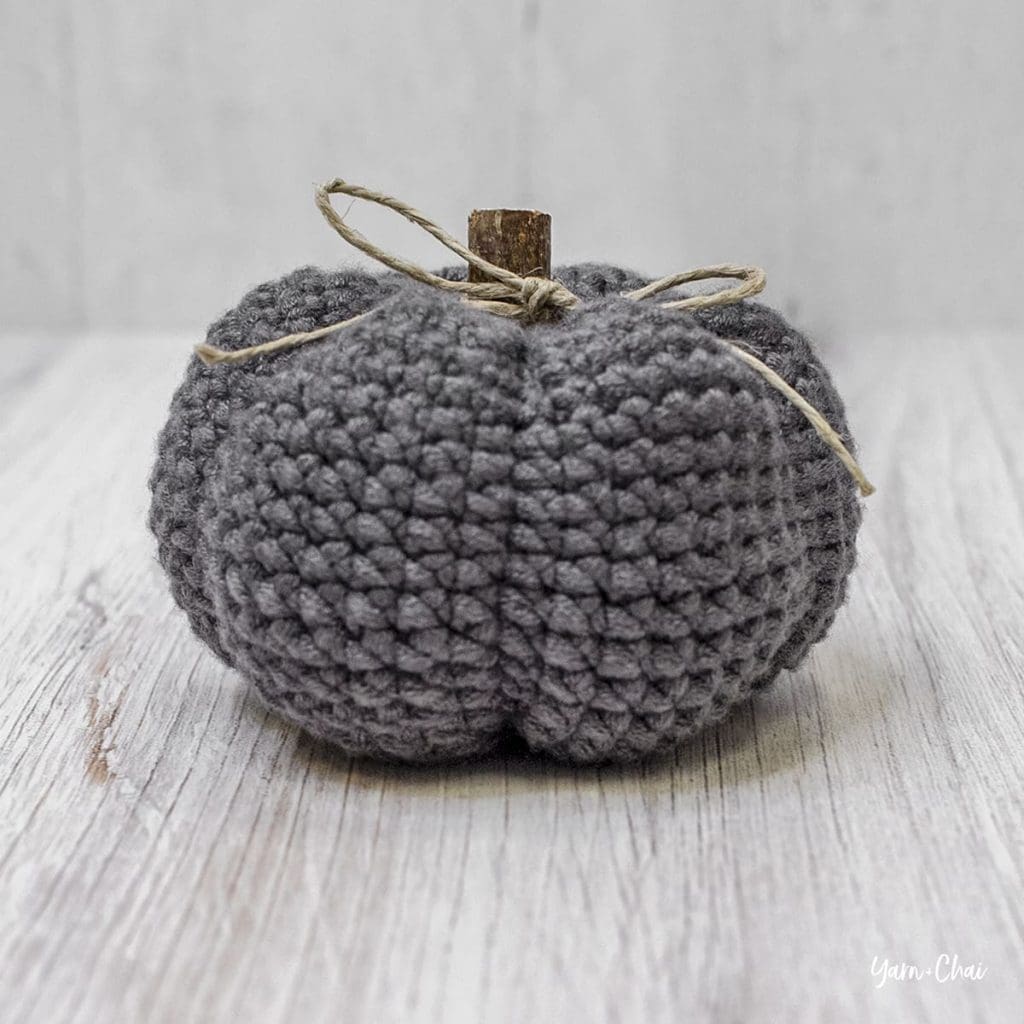
    Finished Size: 4.25โ€ wide x 4.25โ€ tall (laid flat, before stuffing). Finished pumpkin will be approximately 3.5โ€ wide x 2.25โ€ tall, but these measurements may vary slightly based on how you stuff and shape it.

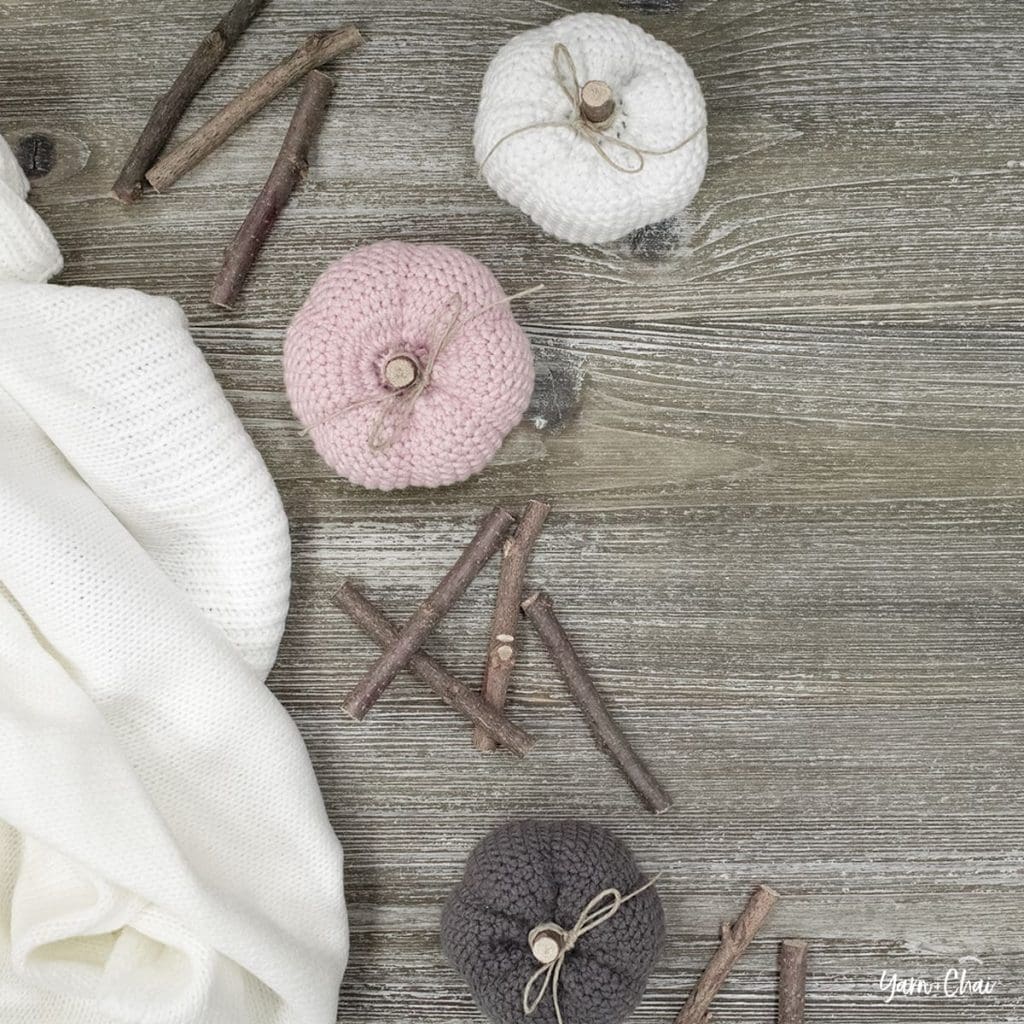
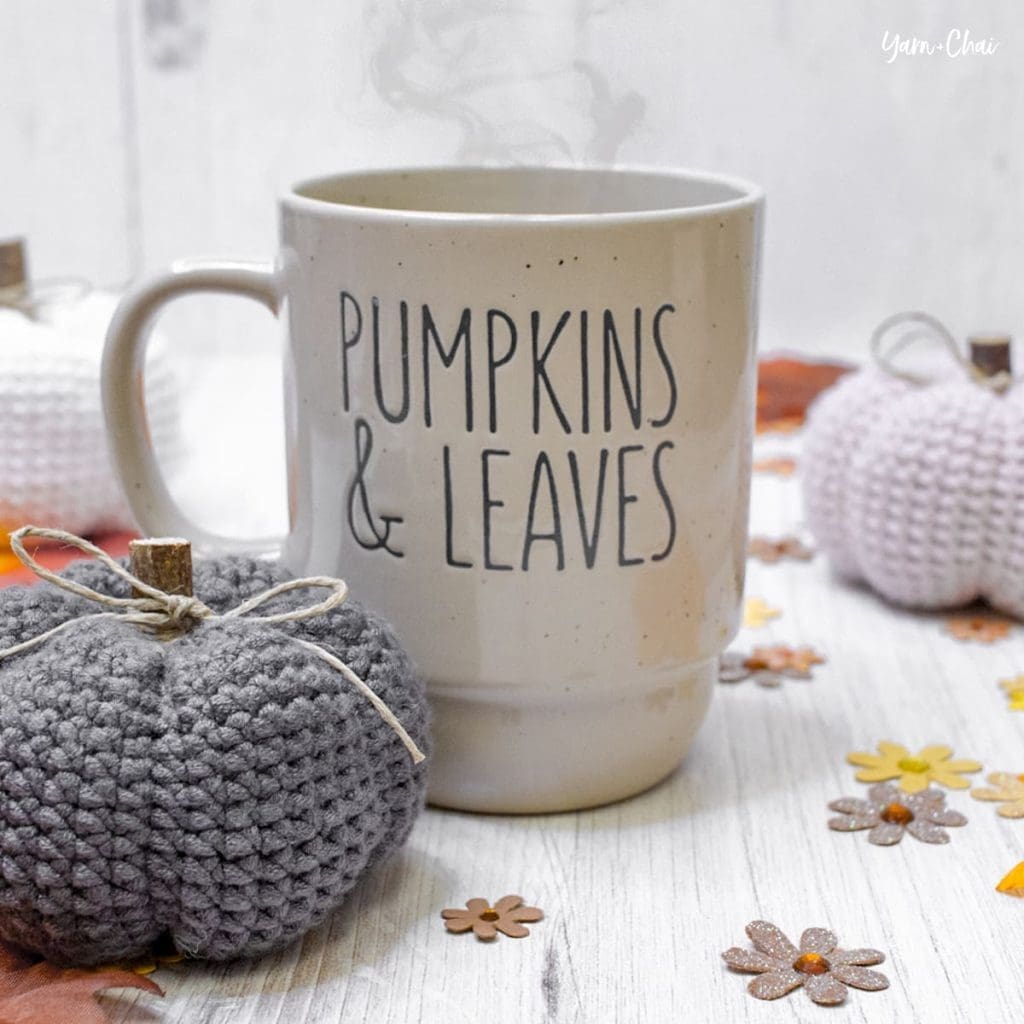
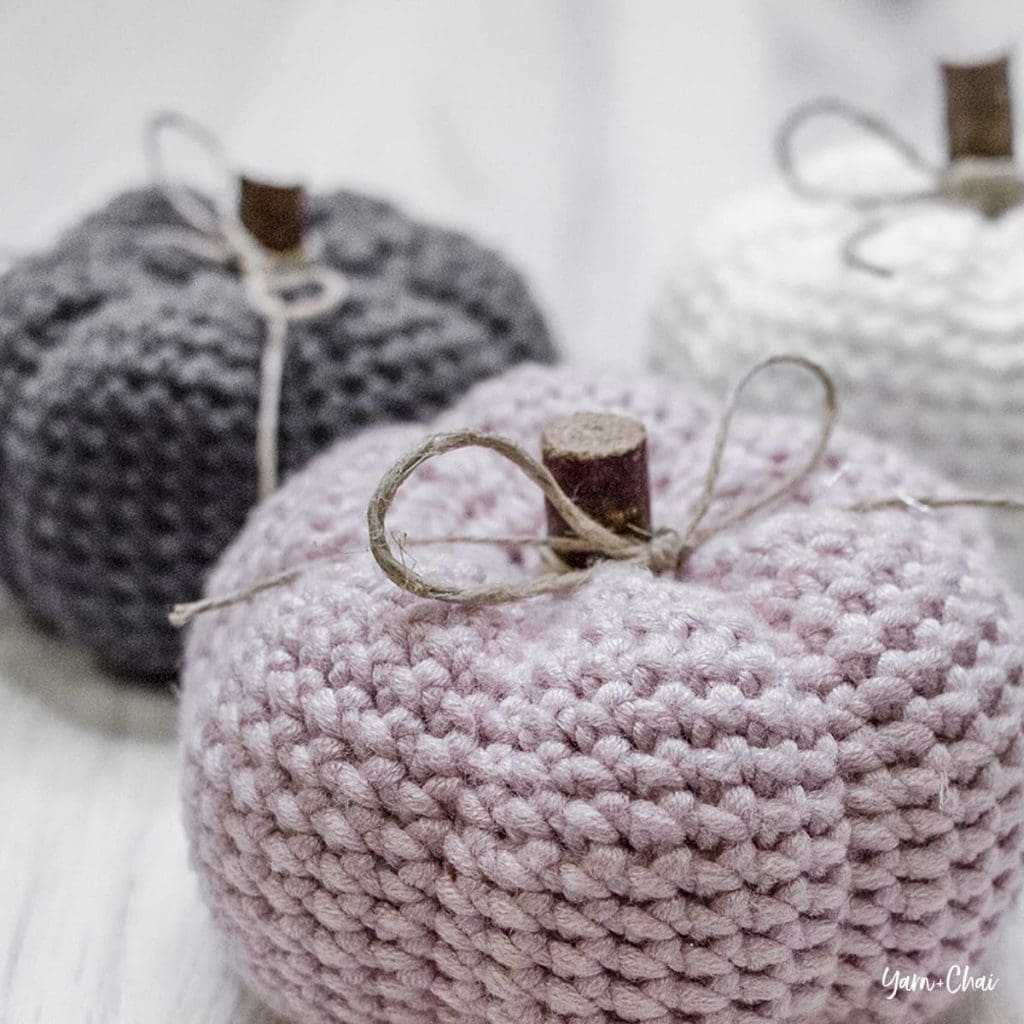
    Yarn: Approximately 50 yards of a #4 weight yarn. I used Yarn Bee Comfy Classic (samples shown in White, Granite, and Blush). Comfy Classic is a blend of viscose, polyester and nylon. You can substitute another #4 weight yarn to achieve a similar size, or play around with different yarn weights to create pumpkins in different sizes. (Of course, yardage will vary.)

    Hook: 4.5mm (G) hook

    Gauge: Not super important, but 12 CSC x 11.5 rows = 2โ€ square.

    You’ll also need: Yarn needle, stitch marker, poly-fill (stuffing), small stick (or cinnamon stick) for stem, fast drying glue, twine or other pumpkin embellishments

    Terms and Abbreviations:
    MC (magic circle – view tutorial here)
    ST/STS (stitch/stitches)
    SL ST (slip stitch)
    CH (chain)
    FLO (front loop only)

    CSC (crossed single crochet: Insert hook into stitch, yarn UNDER, pull through — 2 loops on hook; yarn over, pull through both loops.)

    Notes:
    (1) Pattern is worked in a seamless round. Do not join, chain and/or turn unless instructed. Use a stitch marker to mark the beginning of your rounds.

    – – – – – – – – – – – – – – –

    INSTRUCTIONS

    To begin: Make a magic circle; CH1.

    Round 1: 16 CSC in MC. (16)

    Round 2: 3 CSC in each ST around. (48)

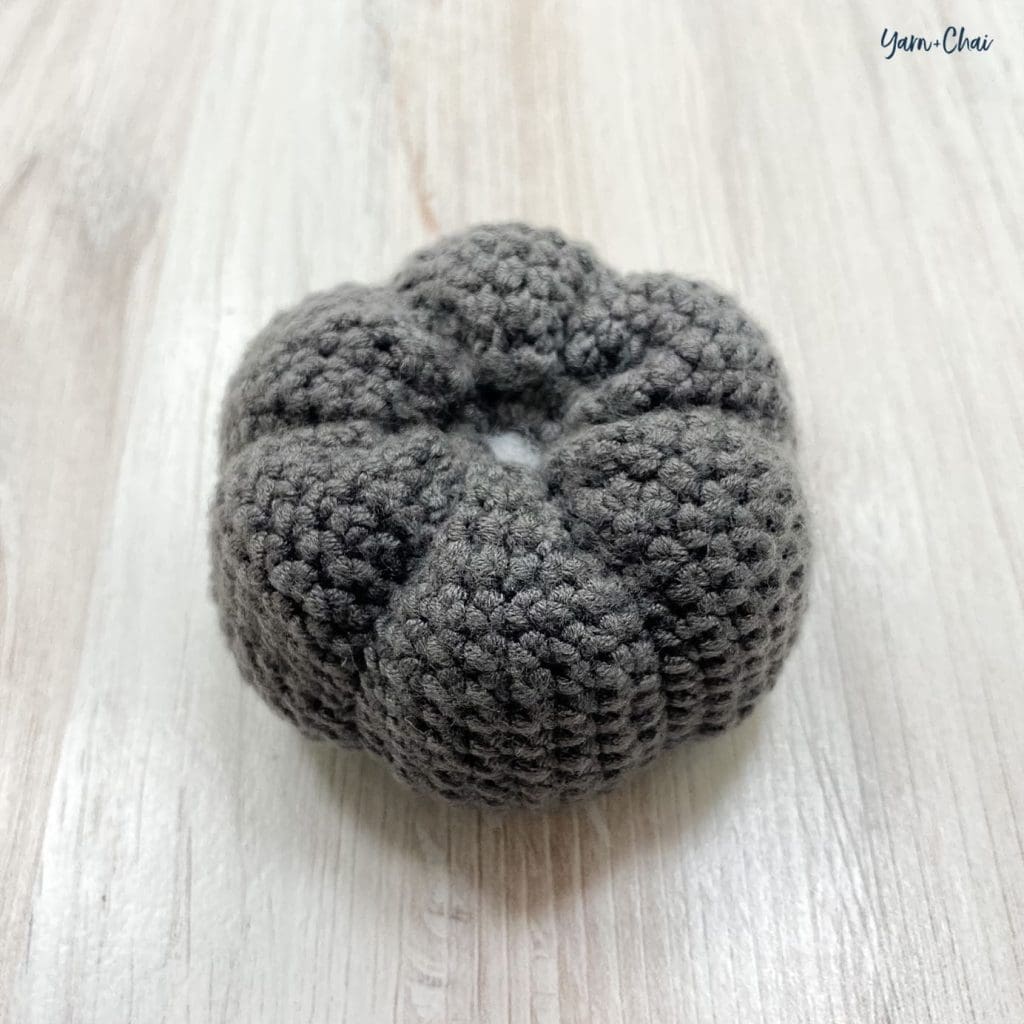
    Rounds 3-22: CSC in FLO of each ST around. (48)

    To finish: SL ST in FLO of each of the next 2 STS to smooth down the round, then fasten off, leaving a tail about 2 yards long.


    SHAPING + FINISHING

    Follow these steps to shape and finish your pumpkin. Remember, the โ€œtopโ€ of the pumpkin is where your magic circle is. 

    Stem:
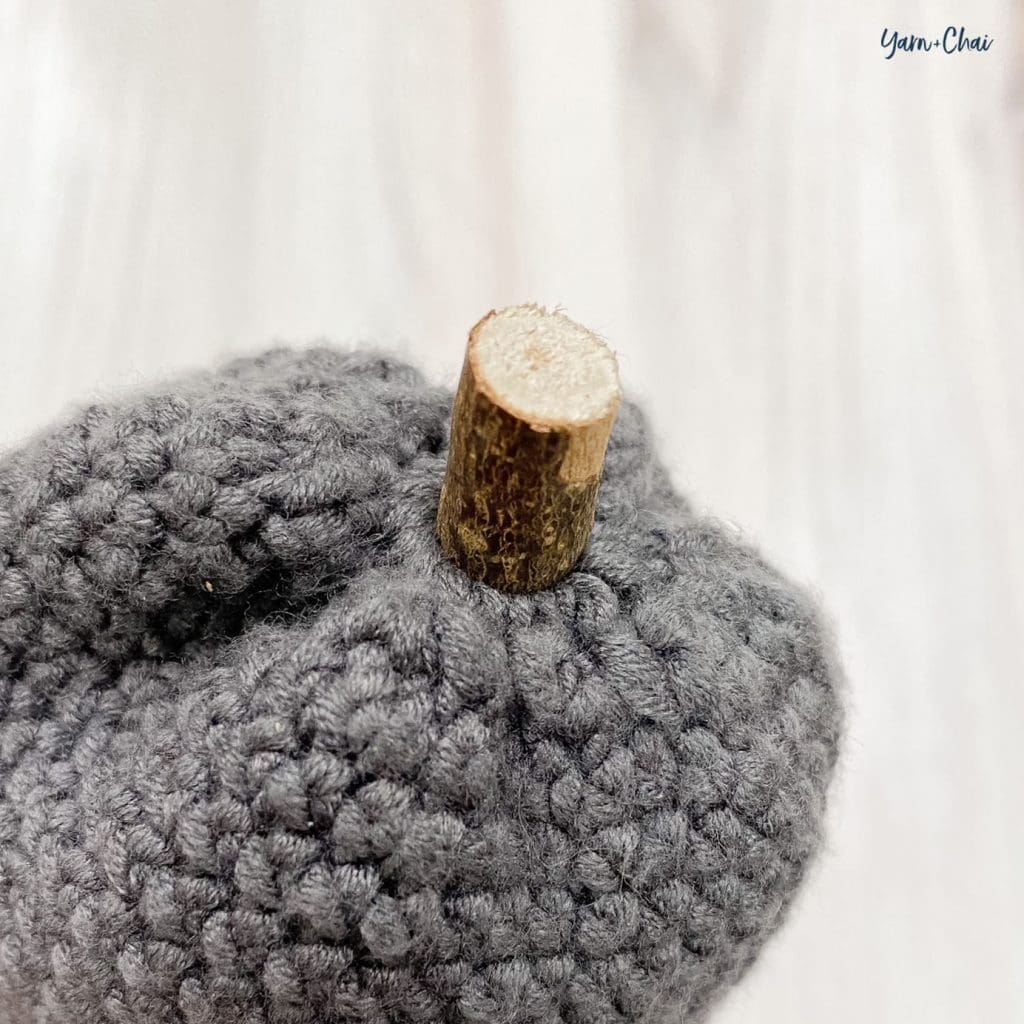
    Turn pumpkin inside out. Cut a 1โ€ length of your chosen material to serve as the pumpkin stem. Insert into the hole created by the magic circle, then pull the starting tail so that it tightens up around the stem. Weave in starting tail; remove stem. (Youโ€™ll glue it in place at the end.) 

    Cinching, Stuffing and Closing:
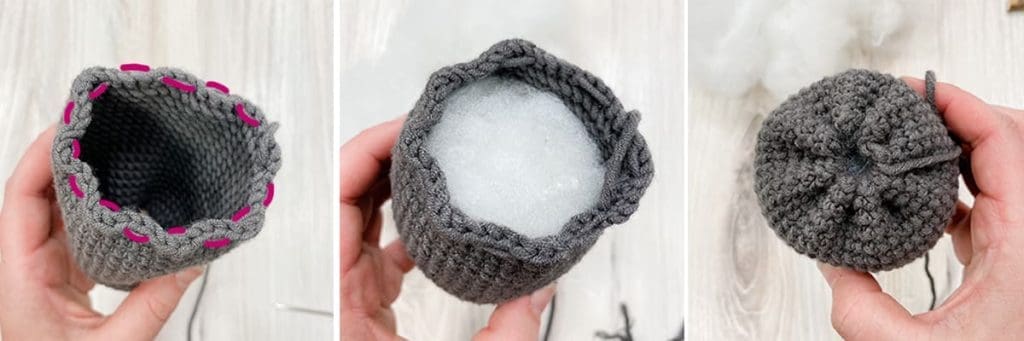
    Turn pumpkin right-side out. Use yarn needle and finishing tail to weave along the bottom edge of the pumpkin, weaving every 3 stitches until youโ€™re back where you started (1st image). Set yarn needle down and stuff pumpkin (2nd image), then pull yarn tail to cinch closed (3rd image). Weave yarn needle across the cinch in a couple different directions to reinforce closure; tie a knot, but do not fasten off.

    Shaping:
    Use yarn needle to run the finishing tail under the diagonal bar of each CSC in a vertical line as shown in the photo below:

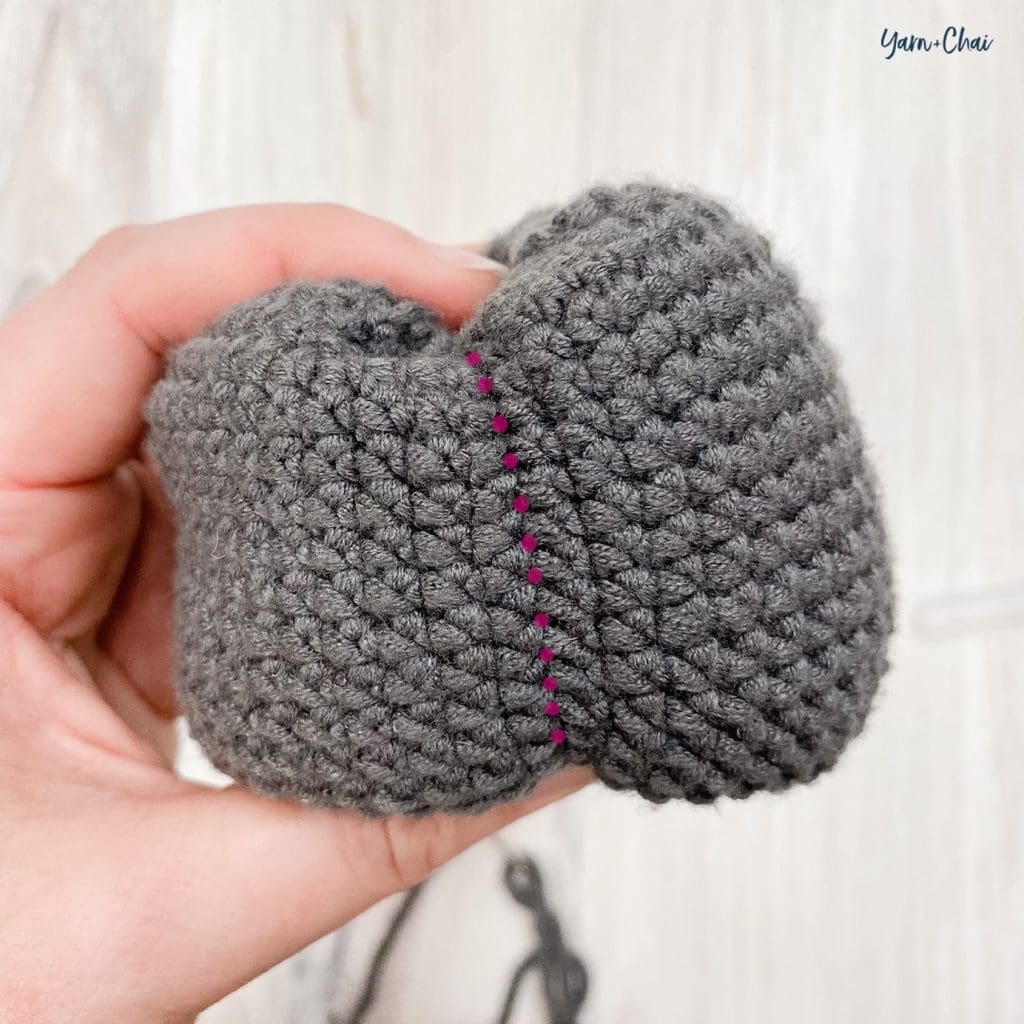
    Continue all the way to the top, then insert yarn needle down between the 1st and 2nd round and push it down through the pumpkin, pulling it out through the center of the bottom of the pumpkin. Pull tight, creating an indent in the pumpkin.

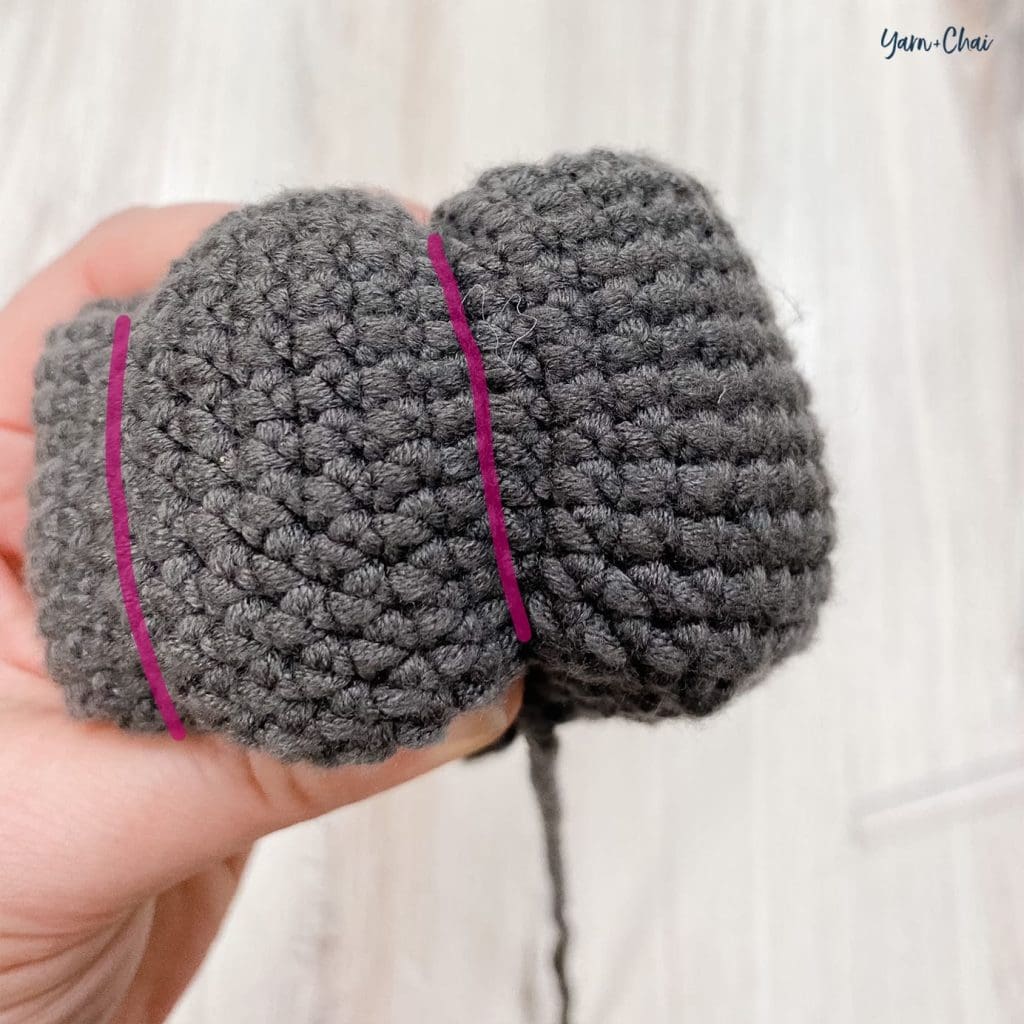
    Count over 8 stitches to the right from your first indent, and repeat the process. 

    Continue the process, counting over 8 stitches each time. You should end with 6 evenly spaced indents. Tie a knot and weave in the tail.

    Stem:
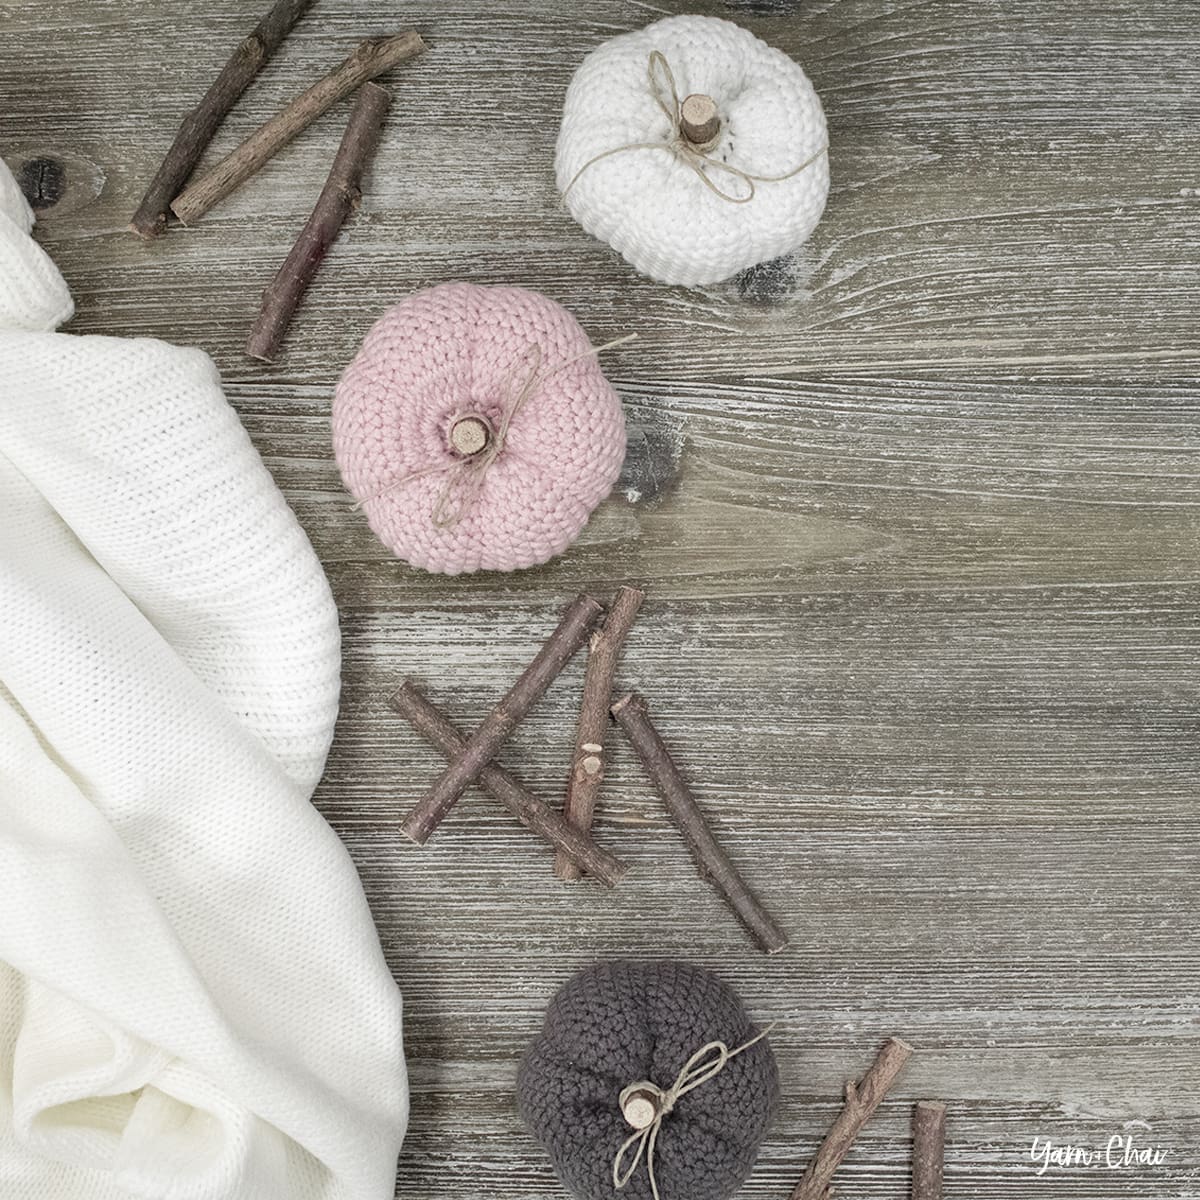
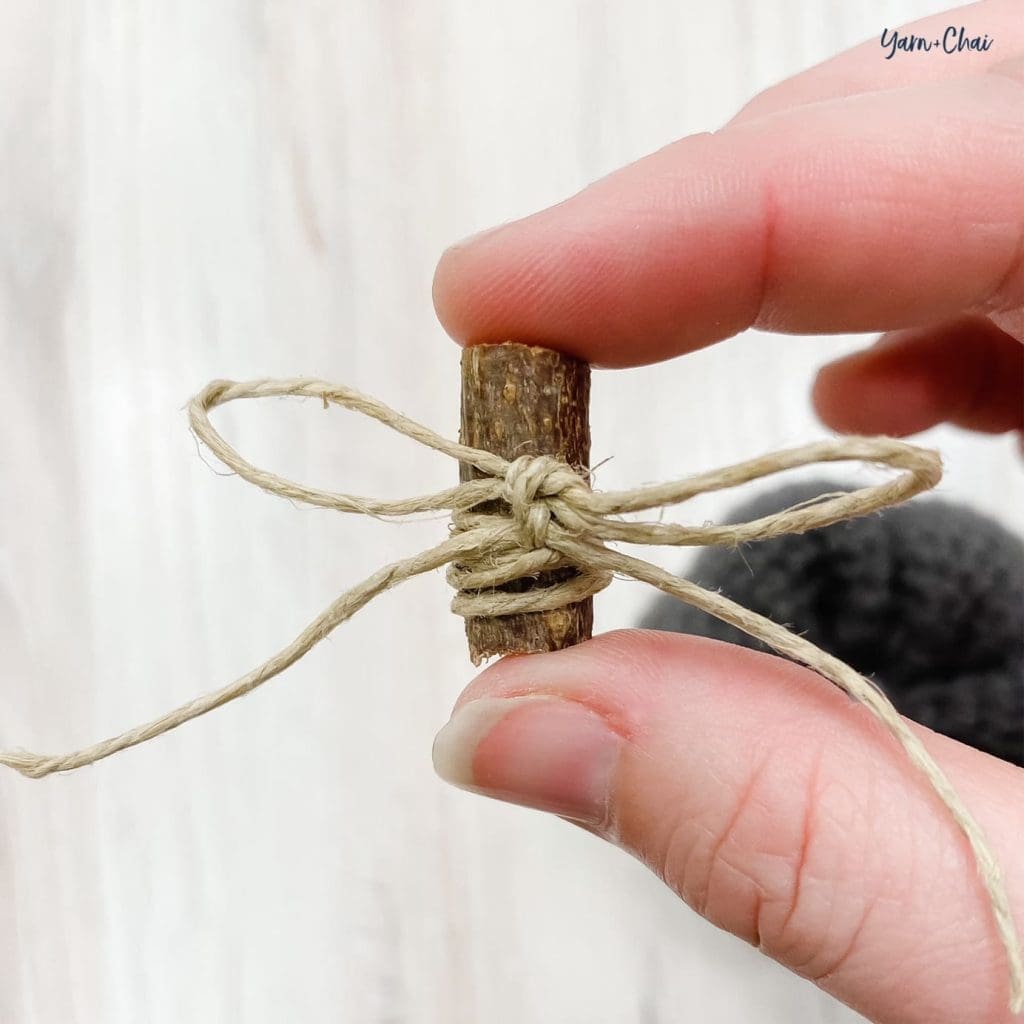
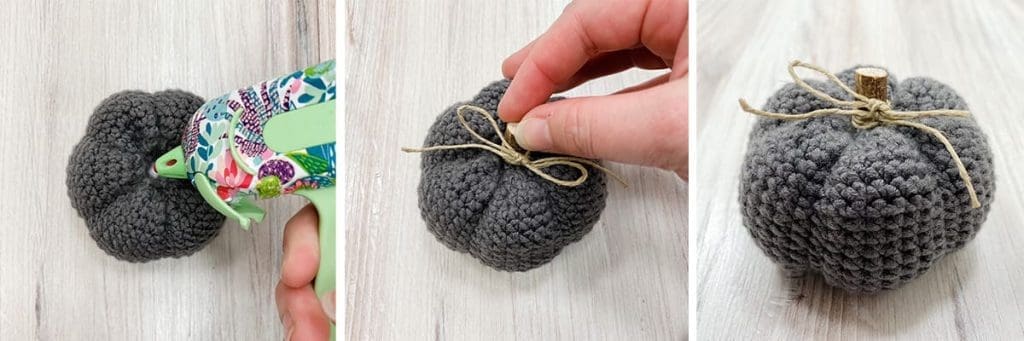
    Embellish stem as desired. I wrapped twine around mine 4 or 5 times, then tied it in a small double-knotted bow:

    Add a few dots of fast-drying glue to the magic circle area of the pumpkin, then quickly insert cinnamon stick and push down; hold to set.

    You’re done!

    I hope you enjoyed this tutorial. If you’re sharing your pumpkins on social media, be sure to tag me @yarnandchai.design!

  • Fair Isle Basket

    Fair Isle Basket

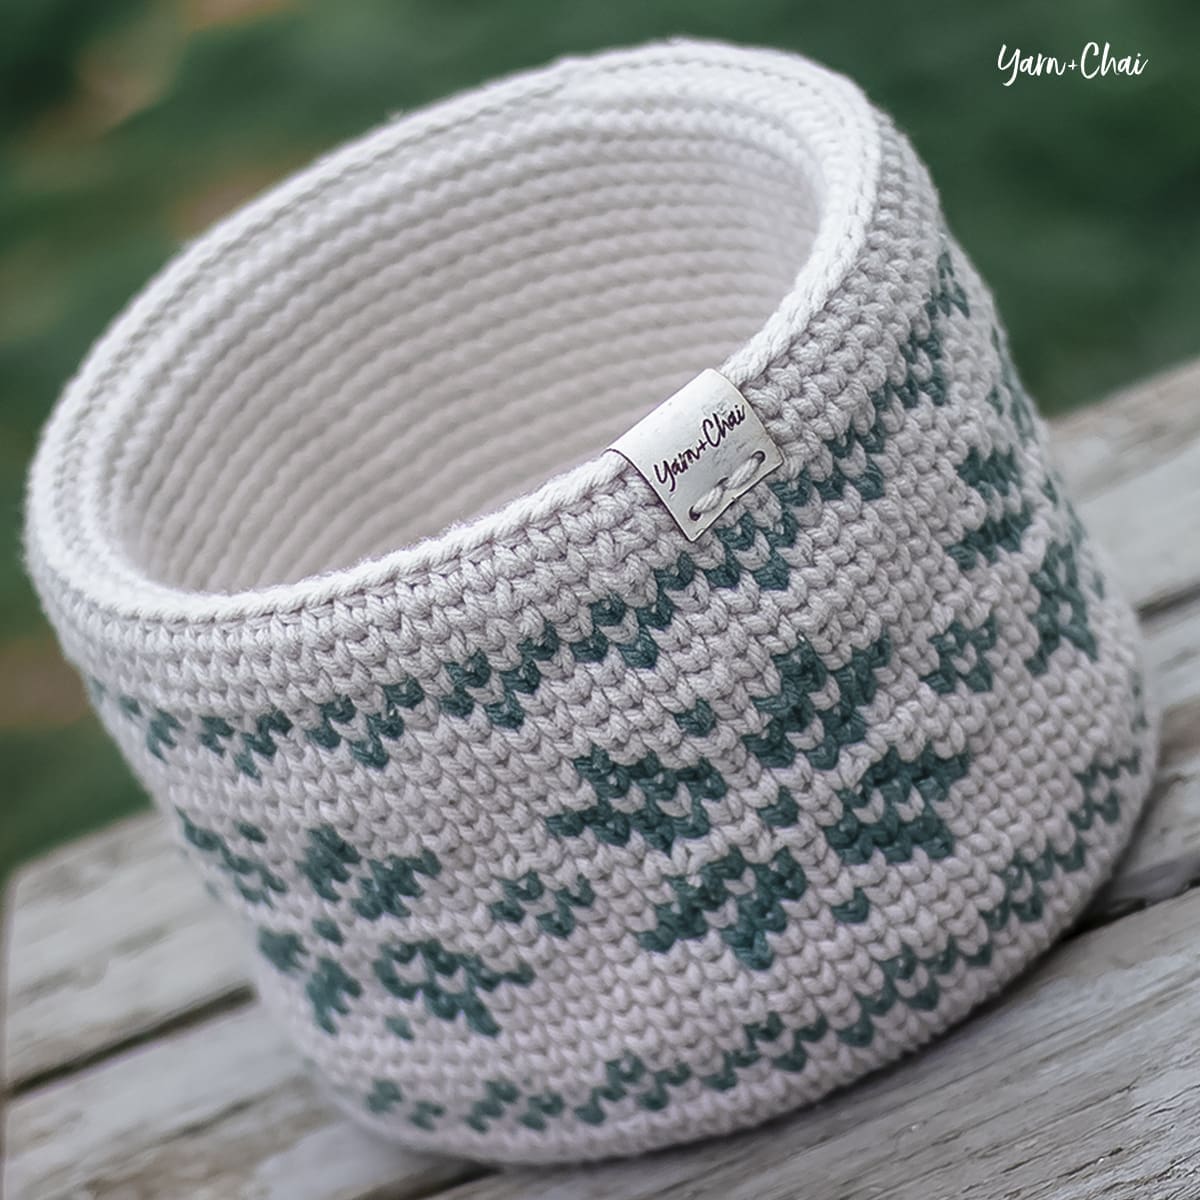
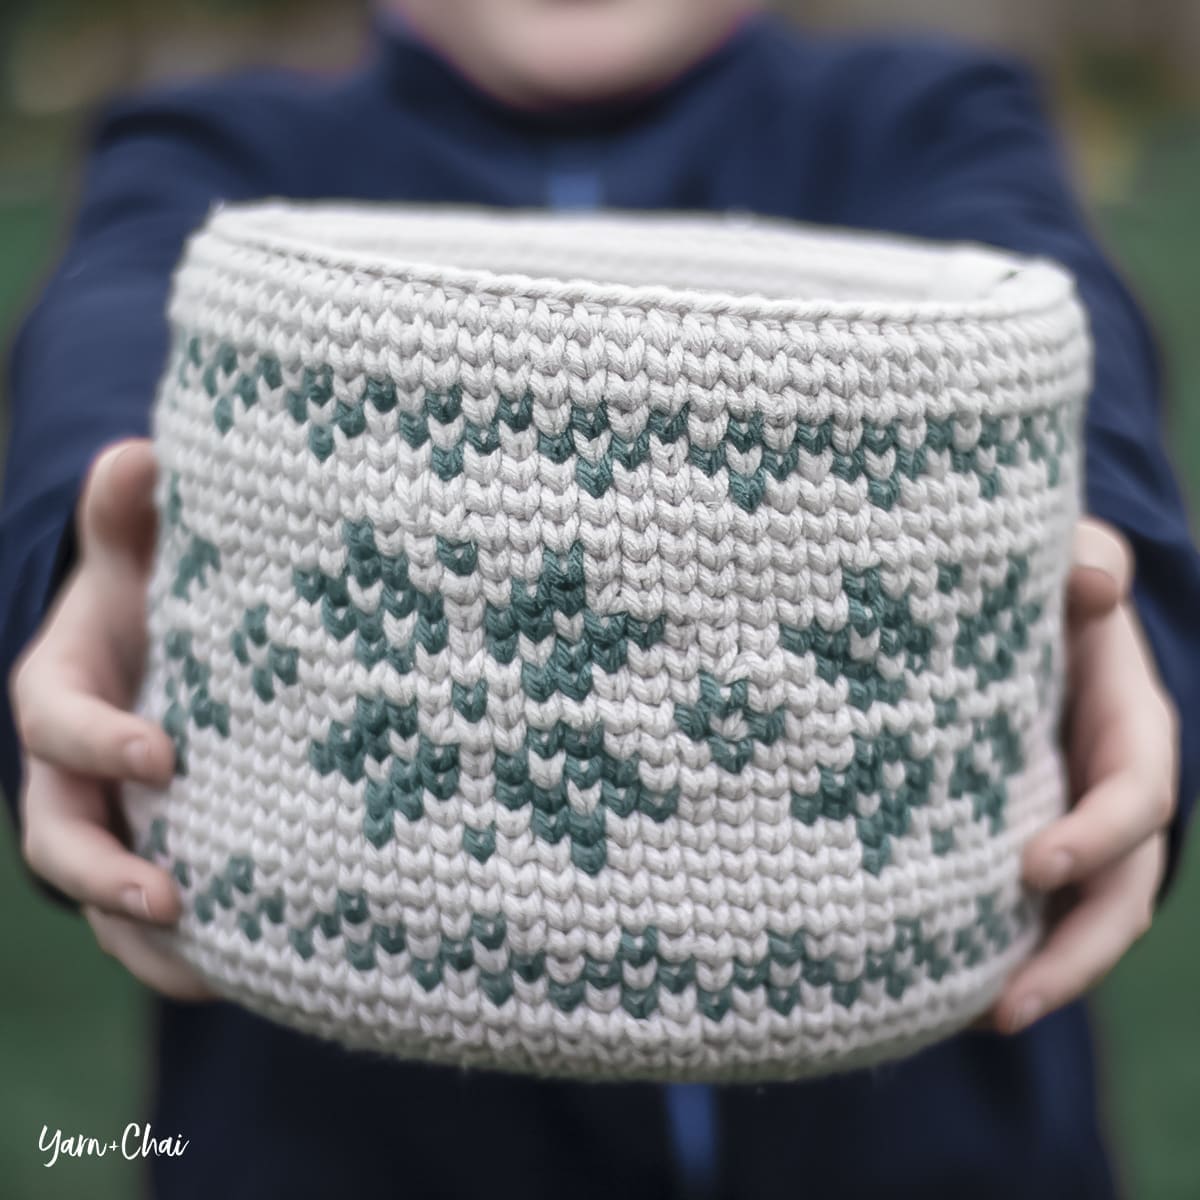
    Fun fact about this pattern: I never intended for it to be a pattern! When I crocheted this basket, I was making it up as I went along, trying my hand at the Fair Isle technique for the first time to see if I could do it. In the end, I loved it so much that it seemed a waste to not share it with you all!

    Fair Isle Basket Crochet Pattern by Rebecca Langford Yarn + Chai

    Here’s a disclaimer, though. I’m no expert on Fair Isle, as this is my first project that uses it, and I have some work to do as far as consistency of stitches and tension. (If you look close, you’ll see some of that inconsistency, particularly around the middle of the basket.) So this won’t really be one of my more “teaching” patterns where I thoroughly explain everything and give tips and all that. I’m just putting the pattern out there so that anyone who (1) already knows how to do Fair Isle or (2) is confident enough to try can have a go at it. I promise that this won’t be my last Fair Isle pattern, though, and maybe when I’ve gotten a little more experience with it, I’ll come back and make a video for this cute basket!

    Fair Isle Basket Crochet Pattern by Rebecca Langford Yarn + Chai

    About Those Leather Tags

    Those adorable tags on my baskets aren’t actually leather at all – they’re cork! I had mine printed by All This Wood (affiliate link). They always do a great job for me. If you purchase tags of your own through this link, you won’t pay any extra, but I’ll get a small percentage of the sale. My affiliate links are just one of the ways I am able to keep releasing free patterns, so I am always incredibly appreciative of anyone who uses them!

    Quick note — I attached my tag with yarn going through my layers of plastic canvas, so the plastic canvas is pretty much locked in place. Don’t do this if you want your bag to be washable!

    Prefer a PDF?

    This pattern can be completed using the 100% free version right here on this page. However, many people prefer the convenience of a printable, ad-free PDF.

    All-Access Passholders get the ad-free version of this and all of my other blog patterns. It’s a pretty sweet deal, if I do say so myself! Learn more about it here or continuing scrolling for the free version.

    – – – – – – – – – – – – – –

    Fair Isle Basket

    View on Ravelry

    Crochet Language:ย American Standard

    Difficulty:ย Intermediate

    Finished Size: 7″ wide x 6″ tall

    Yarn:ย I used Yarn Bee Studio 72, a sturdy #4 weight acrylic blend available at Hobby Lobby, in the following amounts:
    COLOR A (I used “Ivory”): 350 yards
    COLOR B (I used “Teal”): 40 yards

    Hooks: H (5.0mm) and G (4.25mm)

    Gauge: With larger hook,ย your first 7 rounds should measure 4″ across. (This is only important if you want your basket to match my measurements exactly.)

    You’ll also need:ย Yarn needle, stitch marker, heavy duty plastic canvas

    Terms and Abbreviations:
    MCย (magic circle – view tutorial here)
    ST/STS
    ย (stitch/stitches)
    SL STย (slip stitch)
    SKย (skip)
    CHย (chain)
    SCย (single crochet)
    WC (waistcoat stitch; there are lots of tutorials for this on YouTube!)
    HDCย (half double crochet)
    3rd Loopย (see Special Stitch, below)

    Special Stitch: HDC stitches have a 3rd loop that we utilize in this pattern. For this pattern the 3rd loop can be found just below the front loop on the side of the work that is facing away from you. When instructed to work in โ€œ3rd loop onlyโ€, reach over the two top loops and insert your hook down into this special loop. This creates a delicate braided look on the right side of the pattern.

    Notes:
    (1) IMPORTANT: Most of this pattern is worked seamlessly, but a small portion is worked in joined rounds. Pay attention, and only join, chain and/or turn when specifically instructed. Use a stitch marker to mark the beginning of your rounds when working seamlessly.
    (2) To maintain consistency in thickness, you will be carrying yarn along the bottom and outside sections of the basket (indicated in the pattern).
    (3) Many designers who use Fair Isle crochet instruct you to complete the entire waistcoat stitch in the secondary color… but I’m not a fan of this technique as I believe it muddies up the design. So for this pattern, whenever you get to COLOR B on the chart, I want you to insert your hook into the stitch and draw up a loop with COLOR B, then yarn over and complete the stitch with COLOR A. When you do it this way, the only part of COLOR B that shows through on the design is the “V”. Nice and clean!

    – – – – – – – – – – – – – – –

    To Begin:ย With larger hook and COLOR A, make a magic circle; CH1 (does not count as a stitch).

    Round 1:ย 7SC in MC. (6)

    Starting here, carry a 2nd strand of COLOR A along your stitches until instructed otherwise.

    Round 2:ย 2WC in each ST around. (14)

    Round 3:ย (2WC in next ST, WC in next ST) around. (21)

    Round 4:ย (WC in next ST, 2WC in next ST, WC in next ST) around. (28)

    Round 5:ย (2WC in next ST, WC in each of the next 3 STS) around. (35)

    Round 6:ย (WC in each of the next 2 STS, 2WC in next ST, WC in each of the next 2 STS) around. (42)

    Round 7:ย (2WC in next ST, WC in each of the next 5 STS) around. (49)

    Round 8: (WC in each of the next 3 STS, 2WC in next ST, WC in each of the next 3 STS) around. (56)

    Round 9:ย (2WC in next ST, WC in each of the next 7 STS) around. (63)

    Round 10: (WC in each of the next 4 STS, 2WC in next ST, WC in each of the next 4 STS) around.ย (70)

    Round 11: (2WC in next ST, WC in each of the next 9 STS) around. (77)

    Round 12: (WC in each of the next 5 STS, 2WC in next ST, WC in each of the next 5 STS) around.ย (84)

    Rounds 13-16: WC in each ST around. (84)

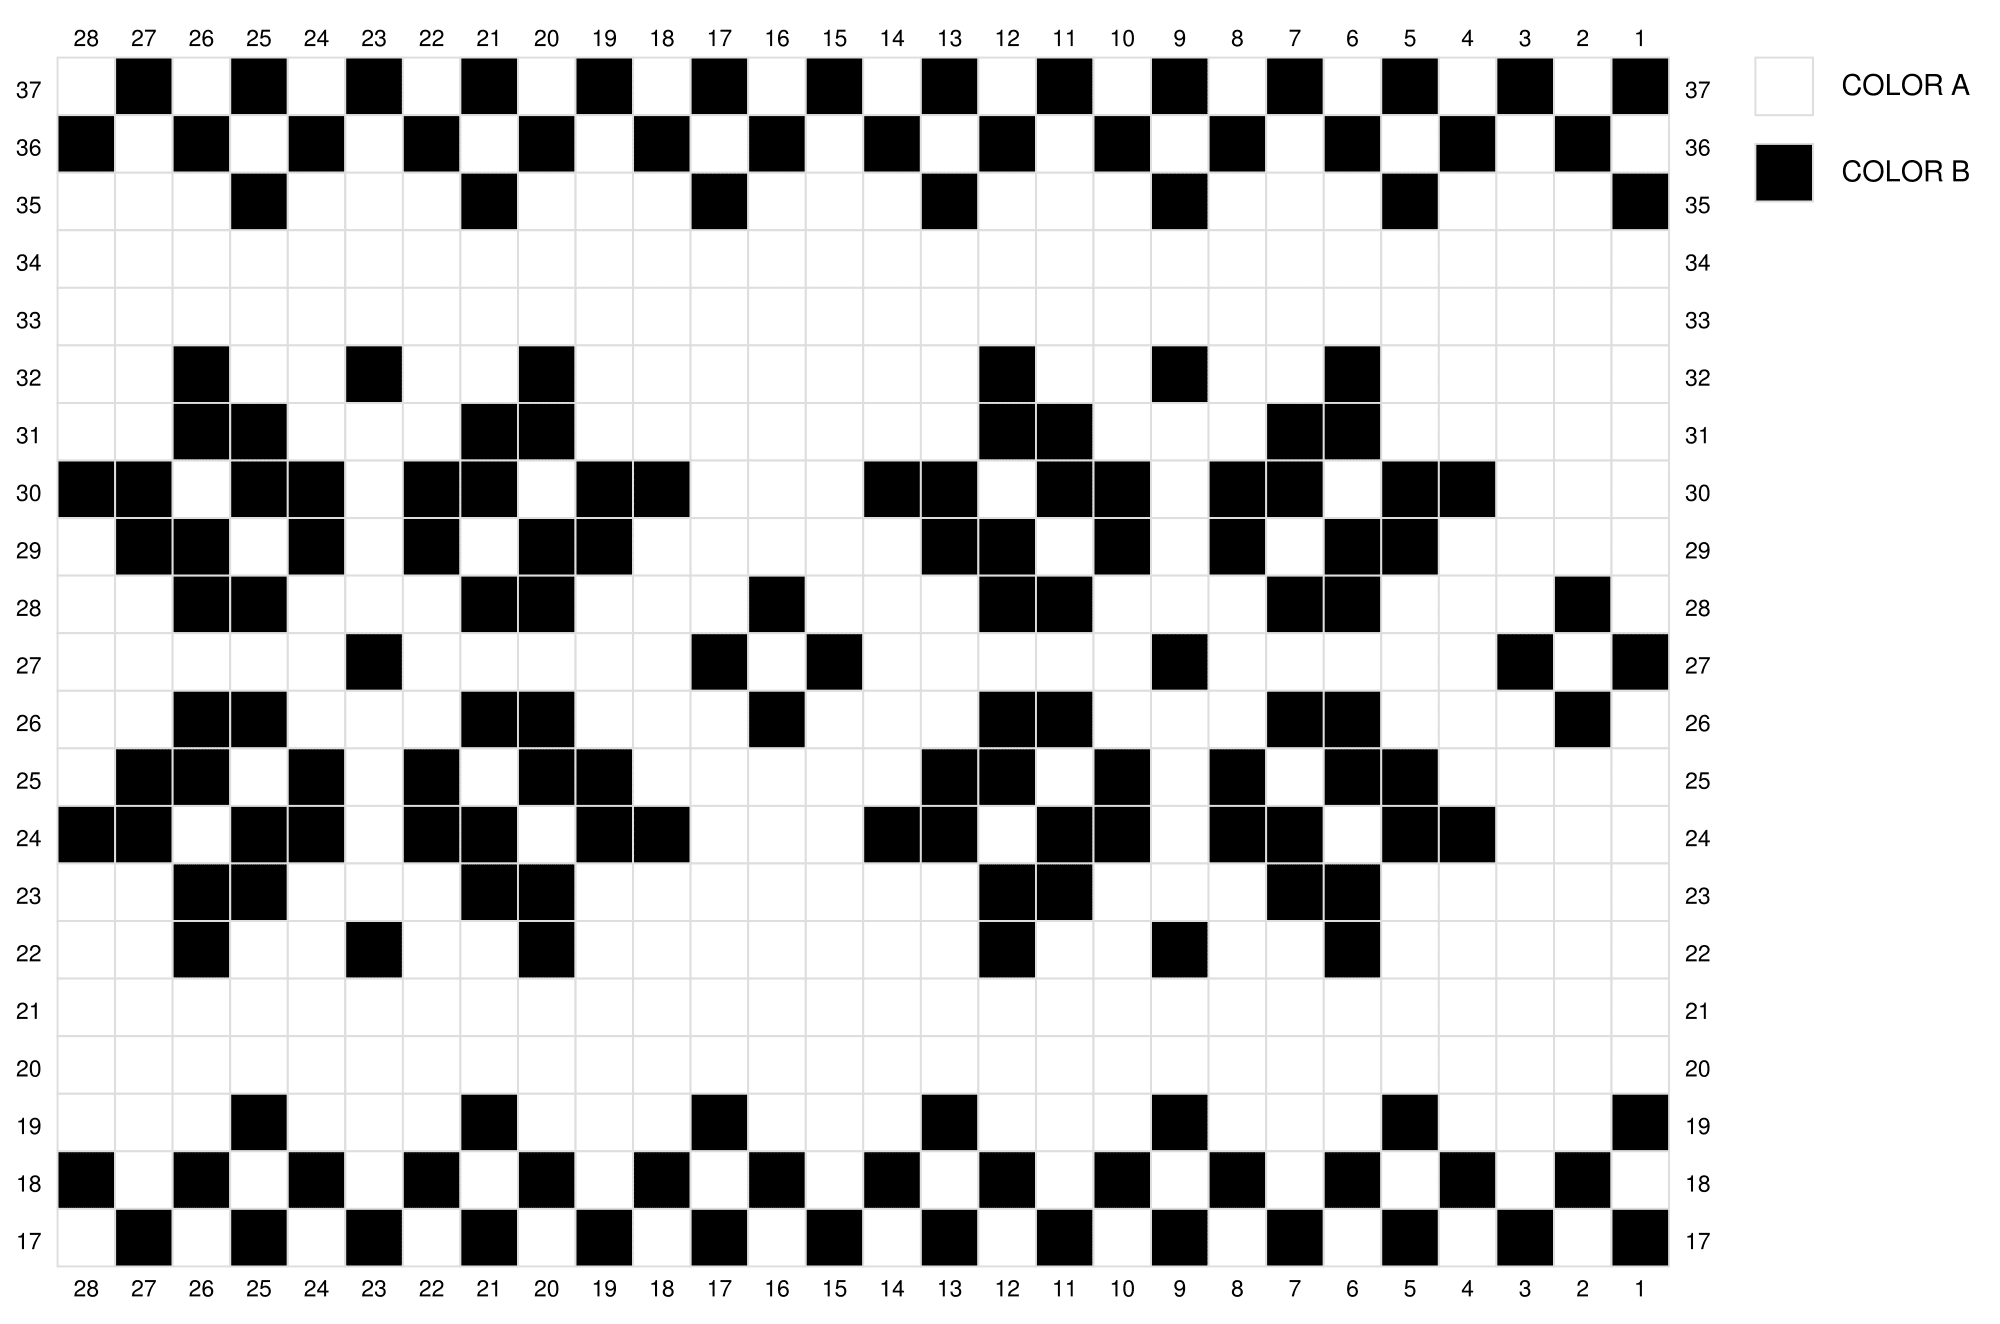
    Rounds 17-37: Drop 2nd strand of COLOR A and begin to carry a strand of COLOR B. WC in each ST around, using the chart to guide your color changes. (Lefties, you can follow the chart from L-R. It won’t make a difference in the finished basket.)

    Fair Isle Basket Chart

    Round 38: Drop strand of COLOR B and begin to carry a 2nd strand of COLOR A. WC in each ST around. (84)

    Round 39:ย WC in each ST around. Join with a SL ST into the “V” of the first ST of the round (the same place you insert for a WC stitch).ย (84)

    Round 40: CH1. HDC in each ST around. Join with a SL ST to the top of the first HDC. (84)

    Drop 2nd strand of COLOR A; you will no longer carry yarn.

    Switch to smaller hook.

    Round 41: CH1. SC in 3rd loop of each ST around. Do not join. (84)

    Rounds 42-65:ย SC in each ST around. (84)

    To finish:ย SL ST into the next ST to smooth down the round. Fasten off and weave in ends, then proceed to โ€œAdding Plastic Canvas.โ€

    – – – – – – – – – – – – – – –

    Adding Plastic Canvas

    Cut across your plastic canvas to make strips that are the same height as the inner layer of the basket. Set your basket so that it is completely unfolded. Roll up a strip of canvas and insert it into the bottom of the basket, allowing it to expand up against the walls of the basket. Continue adding as many layers as you want to make it as stiff as you want. Fold the inside layer down over the canvas. Work the fabric until it all lays neat and flat.

    If you want, you can sew the inner edge of the fabric to the bottom of the basket to keep everything in place. (Avoid doing this if you want your basket to be machine washable.)

    You’re done!

    I hope you enjoyed this tutorial. If you’re sharing your baskets on social media, be sure toย tag me @yarnandchai.design!

  • Herringbone Round Basket Set

    Herringbone Round Basket Set

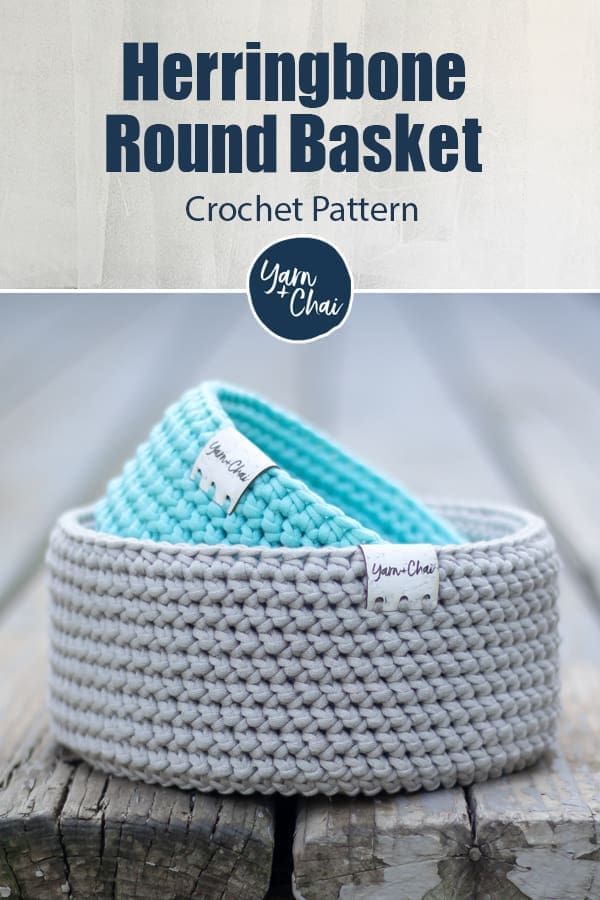
    I love crocheted baskets. I love making them, I love displaying them, and I love using them. Ever since I came up with my plastic canvas method for stability, I just can’t get enough of these easy projects!

    I wanted my next basket pattern to be chic, simple and modern looking. So I returned to one of my favorite stitches – the herringbone half double crochet worked in the round. Such pretty texture!

    (My tribe has been begging for a square basket pattern, too, and that’s right here.)

    About Those Cute Leather Tags

    Those adorable tags on my baskets aren’t actually leather at all – they’re cork! I had mine printed by All This Wood (affiliate link). They always do a great job for me. If you purchase tags of your own through this link, you won’t pay any extra, but I’ll get a small percentage of the sale. My affiliate links are just one of the ways I am able to keep releasing free patterns, so I am always incredibly appreciative of anyone who uses them!

    Video Help

    While this is a very simple pattern, I know that many of you are visual learners. I don’t have a video tutorialย specifically for this pattern, but I have three tutorials that you can use together to basically make the entire basket! Here they are:

    Prefer a PDF?

    This pattern can be completed using the 100% free version right here on this page. However, many people prefer the convenience of a printable, ad-free PDF.

    All-Access Passholders get the ad-free version of this and all of my other blog patterns. It’s a pretty sweet deal, if I do say so myself! Learn more about it here or continuing scrolling for the free version.

    Herringbone Round Basket Set

    Difficulty:ย Easy

    Yarn:ย I used Bernat Maker Home Dec (a #5 bulky weight cotton/nylon blend) in “Clay”. Yarn amounts are listed with individual pattern sizes.

    Hooks: H (5.0mm) and G (4.25mm)

    Gauge:ย Your first 5 rounds should measure 2.5″ across.

    You’ll also need:ย Yarn needle, stitch marker, heavy duty plastic canvas

    Terms and Abbreviations:
    MCย (magic circle – view tutorial here)
    ST/STS
    ย (stitch/stitches)
    SL STย (slip stitch)
    SKย (skip)
    CHย (chain)
    SCย (single crochet)
    HDCย (half double crochet)
    HHDC (herringbone half double crochet; see Special Stitches, below)
    3rd Loop
    ย (see Special Stitches, below)

    Special Stitches:

    HHDC:ย Yarn over, insert hook into stitch. Yarn over, pull loop through stitch AND through first loop on hook (this is similar to a slip stitch motion). Two loops remain on hook. Yarn over and pull through both loops.

    3rd Loop:ย Half double crochet stitches have a 3rd loop that we utilize in this pattern. For this pattern the 3rd loop can be found just below the front loop on the side of the work that is facing away from you. When instructed to work in โ€œ3rd loop onlyโ€, reach over the two top loops and insert your hook into this special loop. This creates a delicate braided look on the right side of the pattern. Also called Camel Stitch or RibHDC.

    Notes:
    (1) This pattern is writtenย in American Standard Terms.
    (2) IMPORTANT: Most of this pattern is worked seamlessly, but a small portion is worked in joined rounds. Pay attention, and only join, chain and/or turn when specifically instructed. Use a stitch marker to mark the beginning of your rounds when working seamlessly.
    (3) The finished size of each basket is listed on its individual pattern.
    (4) This basket uses the Smooth-Circle Base method of increasing, which is different than a standard circle increase pattern. Please see the video tutorial listed under “Video Help” up in the blog post for a thorough walk-through of this method.

    – – – – – – – – – – – – – – –

    SMALLER BASKET

    Yards Used: 120
    Finished Size:ย 5.5″ wide x 2.75″ tall

    To Begin:ย With larger hook and bulky yarn, make a magic circle; CH1 (does not count as a stitch).

    Round 1:ย 6SC in MC. (6)

    Round 2:ย 2SC in each ST around. (12)

    Round 3:ย (2SC in next ST, SC in next ST) around. (18)

    Round 4:ย (SC in next ST, 2SC in next ST, SC in next ST) around. (24)

    Round 5:ย (2SC in next ST, SC in each of the next 3 STS) around. (30)

    Round 6:ย (SC in each of the next 2 STS, 2SC in next ST, SC in each of the next 2 STS) around. (36)

    Round 7:ย (2SC in next ST, SC in each of the next 5 STS) around. (42)

    Round 8: (SC in each of the next 3 STS, 2SC in next ST, SC in each of the next 3 STS) around. (48)

    Round 9:ย (2SC in next ST, SC in each of the next 7 STS) around. (54)

    Rounds 10-15:ย HHDC in each ST around. (54)

    Round 16: HHDC in each of the first 52 STS. SC in each of the remaining 2 STS. Join with a ย SL ST to the top of the first ST of the round. (54)

    Round 17:ย CH1. HDC in each ST around. Join with a SL ST to the top of the first HDC. (54)

    Switch to smaller hook.

    Round 18:ย CH1. SC in 3rd loop of each ST around. Do not join. (54)

    Rounds 19-27: SC in each ST around. (54)

    SL ST into the next ST to smooth down the round. Fasten off and weave in ends, then proceed to โ€œAdding Plastic Canvas.โ€

    – – – – – – – – – – – – – – –

    LARGER BASKET

    Yards Used: 190
    Finished Size:ย 
    7″ wide x 3.25″ tall

    To Begin:ย With larger hook and bulky yarn, make a magic circle; CH1 (does not count as a stitch).

    Round 1:ย 6SC in MC. (6)

    Round 2:ย 2SC in each ST around. (12)

    Round 3:ย (2SC in next ST, SC in next ST) around. (18)

    Round 4:ย (SC in next ST, 2SC in next ST, SC in next ST) around. (24)

    Round 5:ย (2SC in next ST, SC in each of the next 3 STS) around. (30)

    Round 6:ย (SC in each of the next 2 STS, 2SC in next ST, SC in each of the next 2 STS) around. (36)

    Round 7:ย (2SC in next ST, SC in each of the next 5 STS) around. (42)

    Round 8: (SC in each of the next 3 STS, 2SC in next ST, SC in each of the next 3 STS) around. (48)

    Round 9:ย (2SC in next ST, SC in each of the next 7 STS) around. (54)

    Round 10:ย (SC in each of the next 4 STS, 2SC in next ST, SC in each of the next 4 STS) around. (60)

    Round 11:ย (2SC in next ST, SC in each of the next 9 STS) around. (66)

    Round 12:ย (SC in each of the next 5 STS, 2SC in next ST, SC in each of the next 5 STS) around. (72)

    Rounds 13-20:ย HHDC in each ST around. (72)

    Round 21: HHDC in each of the first 70 STS. SC in each of the remaining 2 STS. Join with a ย SL ST to the top of the first ST of the round. (72)

    Round 22:ย CH1. HDC in each ST around. Join with a SL ST to the top of the first HDC. (72)

    Switch to smaller hook.

    Round 23:ย CH1. SC in 3rd loop of each ST around. Do not join. (72)

    Rounds 24-34: SC in each ST around. (72)

    SL ST into the next ST to smooth down the round. Fasten off and weave in ends, then proceed to โ€œAdding Plastic Canvas.โ€

    – – – – – – – – – – – – – – –

    Adding Plastic Canvas

    Cut across your plastic canvas to make strips that are the same height as the inner layer of the basket. Set your basket so that it is completely unfolded. Roll up a strip of canvas and insert it into the bottom of the basket, allowing it to expand up against the walls of the basket. Continue adding as many layers as you want to make it as stiff as you want. Fold the inside layer down over the canvas. Work the fabric until it all lays neat and flat.

    If you want, you can sew the inner edge of the fabric to the bottom of the basket to keep everything in place. (Avoid doing this if you want your basket to be machine washable.)

    You’re done!

    I hope you enjoyed this tutorial. If you’re sharing your baskets on social media, be sure to use hashtag #herringbonebasket and tag me @yarnandchai.design!

  • Cross-stitched Lamb Cinched Backpack

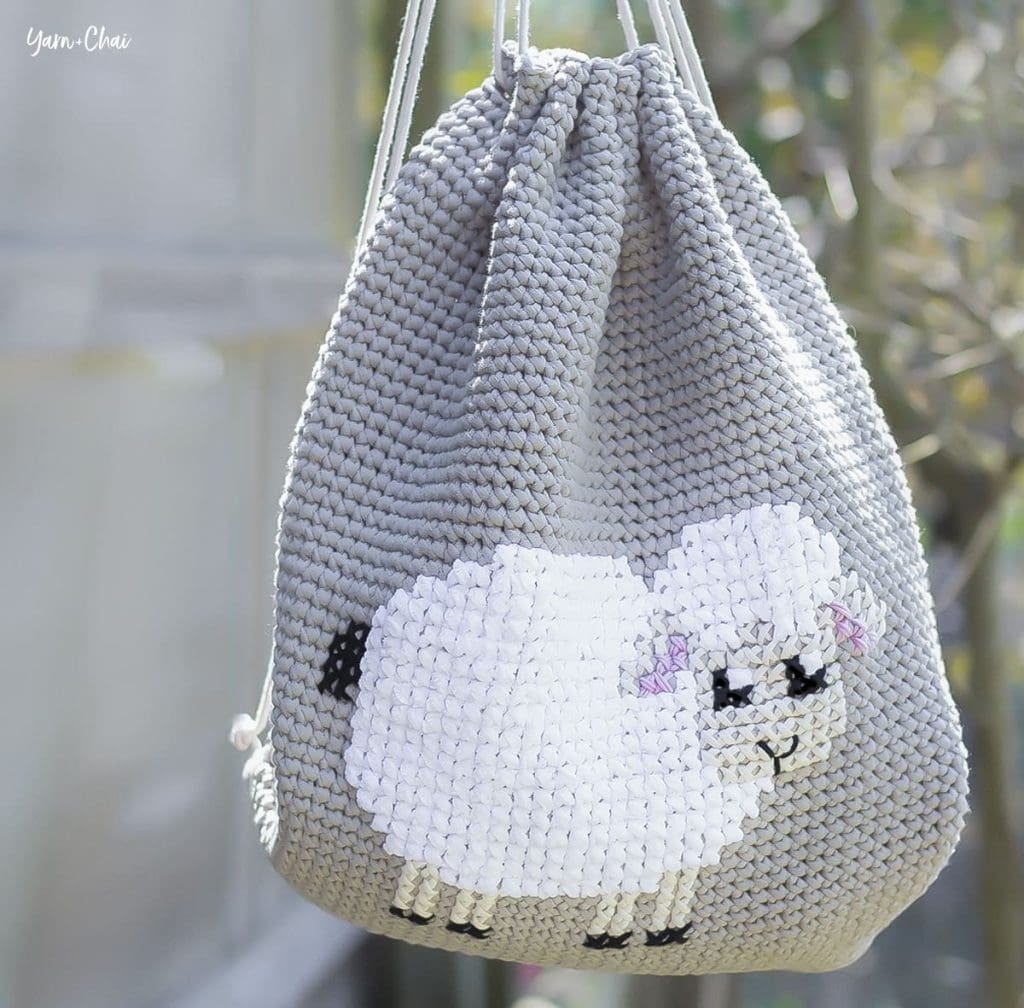
    Cross-stitched Lamb Cinched Backpack


    This pattern is dedicated to my mom and the example she set as a successful business-owning, work-at-home-mama!

    I should start off by saying that I’m not an expert cross-stitcher. But I do have a neat connection to the world of cross-stitching, because when I was teeny tiny, my mom had a cross-stitching business through a company called Creative Circle. (Creative Circle doesn’t exist anymore, but if you remember it, I’d love to know in the comments!) So it probably goes without saying that she was pretty awesome at it.ย 

    Then there’s me. I’ve attempted a couple cross-stitch projects in my lifetime, but I couldn’t tell you all the techniques and tips that a more complicated project would involve. I knew just enough to pull off this project, so I’m passing on my very basic knowledge to you in case you’ve never done it, either!

    For this project, we’ll first crochet the bag itself, and then we’ll add the cross-stitched lamb at the end. The bag uses a crochet stitch called Crossed Single Crochet (CSC),ย not to be confused with cross-stitching… they are unrelated. (Not confusing at all, right!?) But the CSC stitch really is a great stitch for our purposes. If you’re already familiar with it, feel free to scroll down to the pattern; otherwise, I’ve got some tips for you!

    – – – – – – – – – – – – – – –

    The Crossed Single Crochet Stitch: Tips + Tricks

    With its almost perfectly square stitches, the Crossed Single Crochet (CSC) stitch makes for an ideal surface for cross-stitching. Here are the steps:

    CROSSED SINGLE CROCHET STITCH:
    Insert your hook, yarn under,
    draw yarn through stitch (2 loops on hook), yarn over,
    draw through both loops.ย 

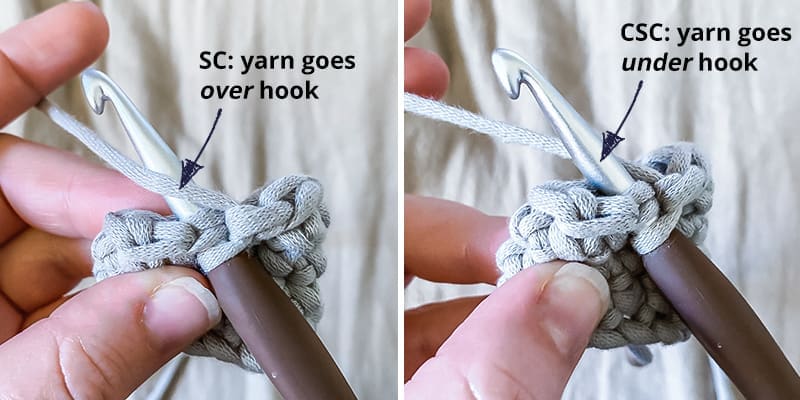
    It’s created almost the same way as a standard Single Crochet (SC), but with one tiny difference (bolded in the instructions above): you’ll grab your yarn under your hook instead of over it. Here’s the difference between an SC and a CSC at that step:

    Sidenote: You might be looking at this and thinking “um… I’ve always grabbed my yarn under the hook for a regular single crochet! Have I been doing it wrong all this time!?” Short answer – Yes! But you aren’t alone. I’ve even seen patterns online that call for single crochet stitches, but the designer is clearly doing crossed single crochets stitches. Chances are, you’re a self-taught crocheter and no one ever corrected you. It usually won’t make much difference in a pattern, but it’s always good to learn and improve.ย 

    Even if you know the steps for CSC, it takes some practice — and some helpful tips — to get those stitches to line up almost vertically. Here’s what I’ve learned:ย 

    • Keep your tension loose. If you are already a loose crocheter, this will come naturally; but for me, a tight crocheter, I really had to concentrate to keep a relaxed tension.
    • Be a “lifter”. You may have heard the terms rider, yanker and lifter in reference to something called the golden loop. (And if not, I got ya covered.) The golden loop is the loop that is on your hook after you’ve pulled your yarn through the stitch in the first part of a crochet stitch. We all fall into three categories as far as how tall we pull that loop before moving on to the next step in the stitch; a yanker barely pulls the loop up at all, aย lifter pulls it up quite tall, and aย rider falls somewhere in the middle. Your CSC stitches are more likely to line up vertically if you become aย lifter. (Again, this does not come naturally for me. I really had to focus!)
    • Don’t pull your yarn directly from the skein. Unless you’re working from a center-pull skein and the yarn is flowing out freely, you’re going to want to pull out a few yards of it at a time and then complete the stitches. Any friction on the yarn is going to mess with your tension and make your stitches less consistent.
    • Work your bag right-side out.ย When I make hats, bags, or any 3D round shape, I tend to hold my bag inside out while crocheting. It’s just the way I have always done it, and it doesn’t feel as natural to work on it right side out. But I can look at my finished bag and tell you exactly where I started holding it right side out, because it’s the point in the bag where my stitchesย really started to line up well vertically. I couldn’t tell you why this is the case, but it definitely made a big difference.ย 

    So that’s the Crossed Single Crochet!ย 

    – – – – – – – – – – – – – – –

    Prefer a PDF?

    This pattern can be completed using the 100% free version right here on this page. However, many people prefer the convenience of a printable, ad-free PDF.

    All-Access Passholders get the ad-free version of this and all of my other blog patterns. It’s a pretty sweet deal, if I do say so myself! Learn more about it here or continuing scrolling for the free version.

    – – – – – – – – – – – – – – –

    Cross-stitched Lamb Cinched Backpack

    View on Ravelry

    Difficulty: Easy

    Finished Size: 14.25″ wide x 15.75″ tall

    Hook: I (5.5mm)

    Gauge: 13.5 CSC x 15 rows = 4″ square

    Yarn: For the bag, you’ll need 450 yards of Bernat Maker Home Dec or other #5 weight yarn. For the cross-stitched lamb, you’ll need about 30 yards of Baby Bee Adore-A-Ball or other #4 or #5 fluffy white yarn, as well as less than 10 yards each of black, cream, and pink yarns in #4 or #5 weights.

    You’ll also need: A large-eyed yarn needle and 3 yards of 3mm macrame cord, or other chosen material for drawstring backpack strap.

    Terms and Abbreviations:
    ST/STS (stitch/stitches)
    SK (skip)
    CH (chain)
    SL ST (slip stitch)
    BLO (back loop only)
    CSC (crossed single crochet – see Special Stitches)

    Special Stitches:

    Crossed Single Crochet (CSC): Insert your hook, yarn under*, draw yarn through stitch (2 loops on hook), yarn over, draw through both loops. (*This is the only difference between a crossed single crochet and a standard single crochet, for which you would yarn over after inserting your hook.)

    Notes:
    (1) This pattern is written in American Standard Terms.
    (2) Pattern is worked in a seamless spiral. Do not join, chain or turn unless instructed. Use a stitch marker to keep track of the first stitch of your rounds.
    (3) Pattern can be created with standard Single Crochet stitches, but you’ll want to join and turn each round rather than working in a spiral so that your stitches line up vertically.

    – – – – – – – – – – – – – – –

    The Pattern

    – – – – – – – – – – – – – – –
    MAKING THE BAG
    – – – – – – – – – – – – – – –

    To Begin: CH49.

    Round 1: Working into the back bumps, CSC in 2nd CH from hook and in each remaining CH. Working in BLO down the opposite side of the chain, CSC across. (You have now worked in both sides of each chain.) Do not join. (96)

    Rounds 2-56: CSC in each ST around. (96)

    Now we need to “reset” our starting point for the next round so that our drawstring holes go in the correct place. So no matter where on the bag you completed the last stitch of the previous round, continue to CSC until you reach the nearest edge. (I had to crochet 3 additional stitches to get to the edge; you may require more or less.) Consider the last stitch you make to be the final stitch of the previous round, and get ready to mark the first stitch of the next round with your stitch marker.

    Round 57 (drawstring holes): CSC in next ST. CH2, SK 2 STS. (CSC in each of the next 2 STS, CH2, SK 2 STS) around until 1 ST remains. CSC in final ST. (24 drawstring holes)

    Round 58: CSC in each ST around, putting 2CSC in each CH2 space. (96)

    Round 59: CSC in each of the first 94 STS. SL ST in each of the remaining 2 STS. (96)

    Fasten off and weave in all ends.

    – – – – – – – – – – – – – – –
    CROSS-STITCHING ON YOUR BAG
    – – – – – – – – – – – – – – –

    Use a yarn needle and basic cross-stitching technique to add the lamb to your bag. Never cross-stitched before? No problem! At least for this purpose, it’s easy. Here is the diagram:

    The graph on the diagram represents the first 34 rounds of the bag, and is 48 units wide to represent the front side of the bag. The dark brown units represent the bag itself, and you will not cross-stitch into them.

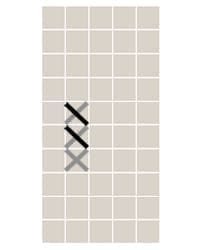
    Let’s start with the tail. Lay your bag flat and count up to the 25th round, 8th stitch from the left (marked on the graph by a pink border). This is your starting point.

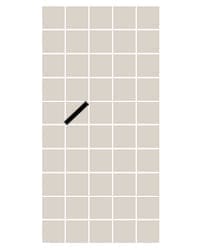
    Thread your yarn needle with a couple yards of the black yarn, and coming out from the inside of the bag, make a diagonal line from the top right corner of the stitch to the bottom left corner of the same stitch.

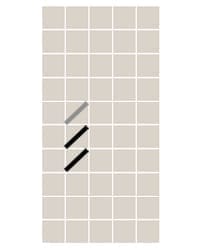
    Before crossing the stitch, look back at the diagram: there are 3 black stitches in this column. To keep things looking as streamlined as possible, we’re going to make that first diagonal line for all three of the stitches.

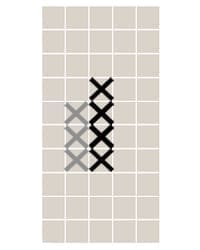
    Now, starting with the last stitch you made and moving back up toward your starting stitch, cross each stitch with a diagonal line starting at the bottom right corner and ending in the top left corner. You now have 3 completed stitches!

    Move to the next column and follow the same process.

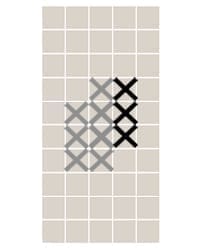
    Follow the process for the third column as well.

    Your lamb’s tail should be done! Fasten off the yarn and secure as desired. I tied a bunch of knots because I don’t care what the inside looks like, but if you do, you’ll want to weave in your ends or line your bag with fabric.

    Move on to another section of color; I did the white next, but it’s really up to you how you want to tackle it. (Just save the thin lines on the lamb’s face for Don’t worry if you run out of yarn before you finish a color; just fasten off and start with a new strand wherever you left off.

    When you’ve finished every section, it’s time to add the three lines that make up the mouth/nose area. Simply use your yarn needle and black yarn to “draw” the lines over the face stitches. Simple!

    – – – – – – – – – – – – – – –
    DRAWSTRING
    – – – – – – – – – – – – – – –

    Cut two 1.5 yard lengths of macrame cord. Lay bag flat and locate the furthermost hole to the right; starting from the outside, thread the first length of cord through the hole and then, working leftward, proceed to weave it in and out of each hole around the entire bag (photo 1). You should end up with the cord exiting the bag through the hole next to your starting hole.

    Make sure the two cord ends are equal in length when bag is uncinched, then take the end that is coming out of the first hole you used and thread it into the bag along the edge, starting at about 5 rounds from the bottom, and out through the bottom corner (photo 2). Line the unused cord end up with it, and tie together in a knot. Don’t cut off the excess yet.

    Do the same thing with the other 1.5 yard length of cord, starting in the leftmost hole and working rightward, continuing around the entire bag. (Both cords will be entering and exiting the same drawstring holes, in opposite directions.) Follow the rest of the steps to secure the second cord.


    Cinch the backpack and wear it to test the length, then readjust knot placement as needed. Trim off excess cord.

    Done!

    – – – – – – – – – – – – – – –

    Don’t forget to share your finished project!

    Share it on FB, in our FB group, in other groups, on Instagram… wherever you want to spread creativity! Be sure to tag me @yarnandchai.design so I can see it, too!

  • Mug Rug

    Mug Rug

    – – – – – – – – – – – – – – – –

    This project is part of the Yarn Stash Challenge. For more great ideas, or to join the fun, visit theย Yarn Stash Challengeย blog post!

    – – – – – – – – – – – – – – – –

    A set of coasters is a quick, easy project, and it’s a great stashbuster, too! One of my favorite styles of coaster is known as a “mug rug” because it looks just like a tiny rug. How cute is that?

    The Process

    All you need for this pattern are several skeins of the same yarn weight. I used 5 skeins of #3 yarn and chose shades of blue, tan and ivory, with some white furry yarn thrown in there too.

    After I choose my yarn, I simply crocheted rows of SC, fastening off and changing colors every row. I added fringe to the sides, pulling the row ends through with the added fringe to keep everything secure. Then I trimmed the fringe. Done!

    I’ll write out the actual pattern below, but feel free to adjust it to make it your own!

    – – – – – – – – – – – – – – –

    Prefer a PDF?

    This pattern can be completed using the 100% free version right here on this page. However, many people prefer the convenience of a printable, ad-free PDF.

    All-Access Passholders get the ad-free version of this and all of my other blog patterns. It’s a pretty sweet deal, if I do say so myself! Learn more about it here or continuing scrolling for the free version.
    – – – – – – – – – – – – – – –

    Mug Rug

    View on Ravelry

    Difficulty:ย Easy

    Finished Size: 5.5″ wide x 4.25″ tall (excludes fringe)

    Yarn:ย #3 weight yarn in 5 different colors. Feel free to mix textures, brands, and fibers. You’ll only need about 30 yards combined. (See Notes for my specific yarn choices.)

    Hooks: F (4.0mm)

    Gauge:ย 4 SC x 5.5 rows = 1″

    You’ll also need:ย Scotch tape

    Terms and Abbreviations:
    ST/STS
    ย (stitch/stitches)
    CHย (chain)
    SCย (single crochet)

    Notes:
    (1) This pattern is writtenย in American Standard Terms.
    (2)ย The specific yarns I used in my samples are:

    • COLOR A: Loops & Threads Coastal Cotton (in “Indigo”)
    • COLOR B: Yarn Bee Warm & Cozy (in “Oat”)
    • COLOR C: Yarn Bee Cloud 9 (in “Cream”)
    • COLOR D: Lion Brand Jeans (in “Brand New”)
    • COLOR E: Baby Bee Sweet Delight (in “Toy Elephant Marled”)

    – – – – – – – – – – – – – – –

    The Pattern

    The first thing you’ll want to do (if you’re following my color sequence) is label your yarns A, B, C, D, E so you know which goes where in the pattern. Follow this pattern:

    CH + Row 1:ย A
    Row 2:ย B
    Row 3:ย C
    Row 4:ย D
    Row 5:ย A
    Row 6:ย E
    Row 7:ย A
    Row 8:ย D
    Row 9:ย A
    Row 10:ย B
    Row 11:ย A
    Row 12:ย D
    Row 13:ย A
    Row 14:ย E
    Row 15:ย A
    Row 16:ย D
    Row 17:ย A
    Row 18:ย B
    Row 19:ย A
    Row 20: D
    Row 21:ย C
    Row 22:ย E
    Row 23:ย A

    – – –

    To Begin:ย With COLOR A, CH23.

    Row 1:ย SC in 2nd CH from hook and in each remaining CH. Switch to next color; fasten off. (22)

    Rows 2-22: CH1, turn. SC in each ST across. Switch to next color; fasten off. (22)

    Row 23: CH1, turn. SC in each ST across. Fasten off. (22)

    Here’s what we have so far:

    – – – – – – – – – – – – – – –

    Fringe
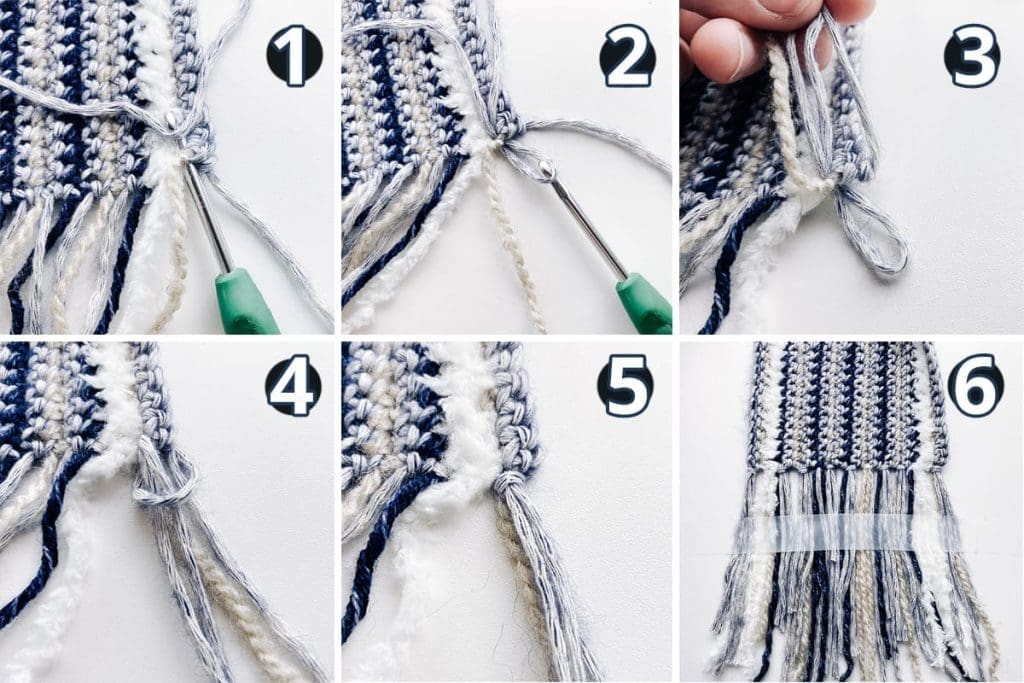
    Attach fringe using these instructions and the photo below:

    1. Insert hook in between the first two yarn tails. Cut a small strand of yarn that matches one of them and wrap it around the hook.
    2. Pull new yarn through to create a small loop.
    3. Take the 2 tails of the new yarnย and the yarn ends on either side of your loop in your hand. You should have 4 strands.
    4. Pull all four strands down through the loop.
    5. Tighten the knot using the two tails of the new yarn.Repeat instructions 1-5, moving down both sides of the mug rug until all ends have been combined into fringe, then move on to #6.
    6. Lay mug rug flat and smooth out the fringe so that it isn’t tangled. Tape ย it down with a piece of scotch tape wherever you want to cut it, then cut along the tape to get rid of the excess yarn.

    Done!

    – – – – – – – – – – – – – – –

    Don’t forget to share your finished project!

    Share it on FB, in our FB group, in other groups, on Instagram… wherever you want to spread joy! Be sure to hashtag #yarnstashchallenge and tag me @yarnandchai.design so I can see it, too!